Understand how to deploy a site-to-site (S2S) VPN tunnel from Amazon Web Services (AWS) to Cisco Secure Access.
Deploy a site-to-site (S2S) VPN tunnel from Amazon Web Services (AWS) to Cisco Secure Access. An AWS S2S VPN in Secure Access will support the following:
-
Tunnel redundancy with high availability for branch site connections to your Amazon Virtual Private Cloud (Amazon VPC). For more information, refer to Tunnel throughput, capacity, and scaling and Failover for Branch Connections in Secure Access Data Centers.
-
Connection over IPsec (Internet Protocol Security) with authentication negotiated and traffic encrypted by IKEv2 (Internet Key Exchange, version 2). For more information, refer to Supported IPsec Parameters.
-
Dynamic (BGP) routing. For more information, refer to Routing Options and Guidelines.
The S2S VPN topology depends on components configured in the following order. Components in the diagram are numbered by order of configuration.

For more detailed instructions, refer to Amazon Virtual Private Cloud Documentation. Please note that AWS may update their documentation without notice.
Limitations
-
Number of Primary Tunnels: Secure Access supports a maximum of two primary tunnels within an AWS Site-to-Site (S2S) VPN tunnel group. Cisco has not validated configurations involving more than two S2S tunnels from a single AWS transit gateway. Additionally, the Secure Access dashboard does not provide the capability to add IP addresses for more than two tunnels in an AWS network tunnel group.
-
Bandwidth per Tunnel: Each IPsec tunnel is limited to a maximum bandwidth of 1 Gbps. Given the two-tunnel limit, the total supported throughput for Secure Access in an AWS S2S VPN deployment is 2 Gbps.
Before you begin
Prerequisites include the following.
-
A valid Cisco Secure Access account.
-
An AWS account with an active subscription and an Amazon VPC.
Procedure
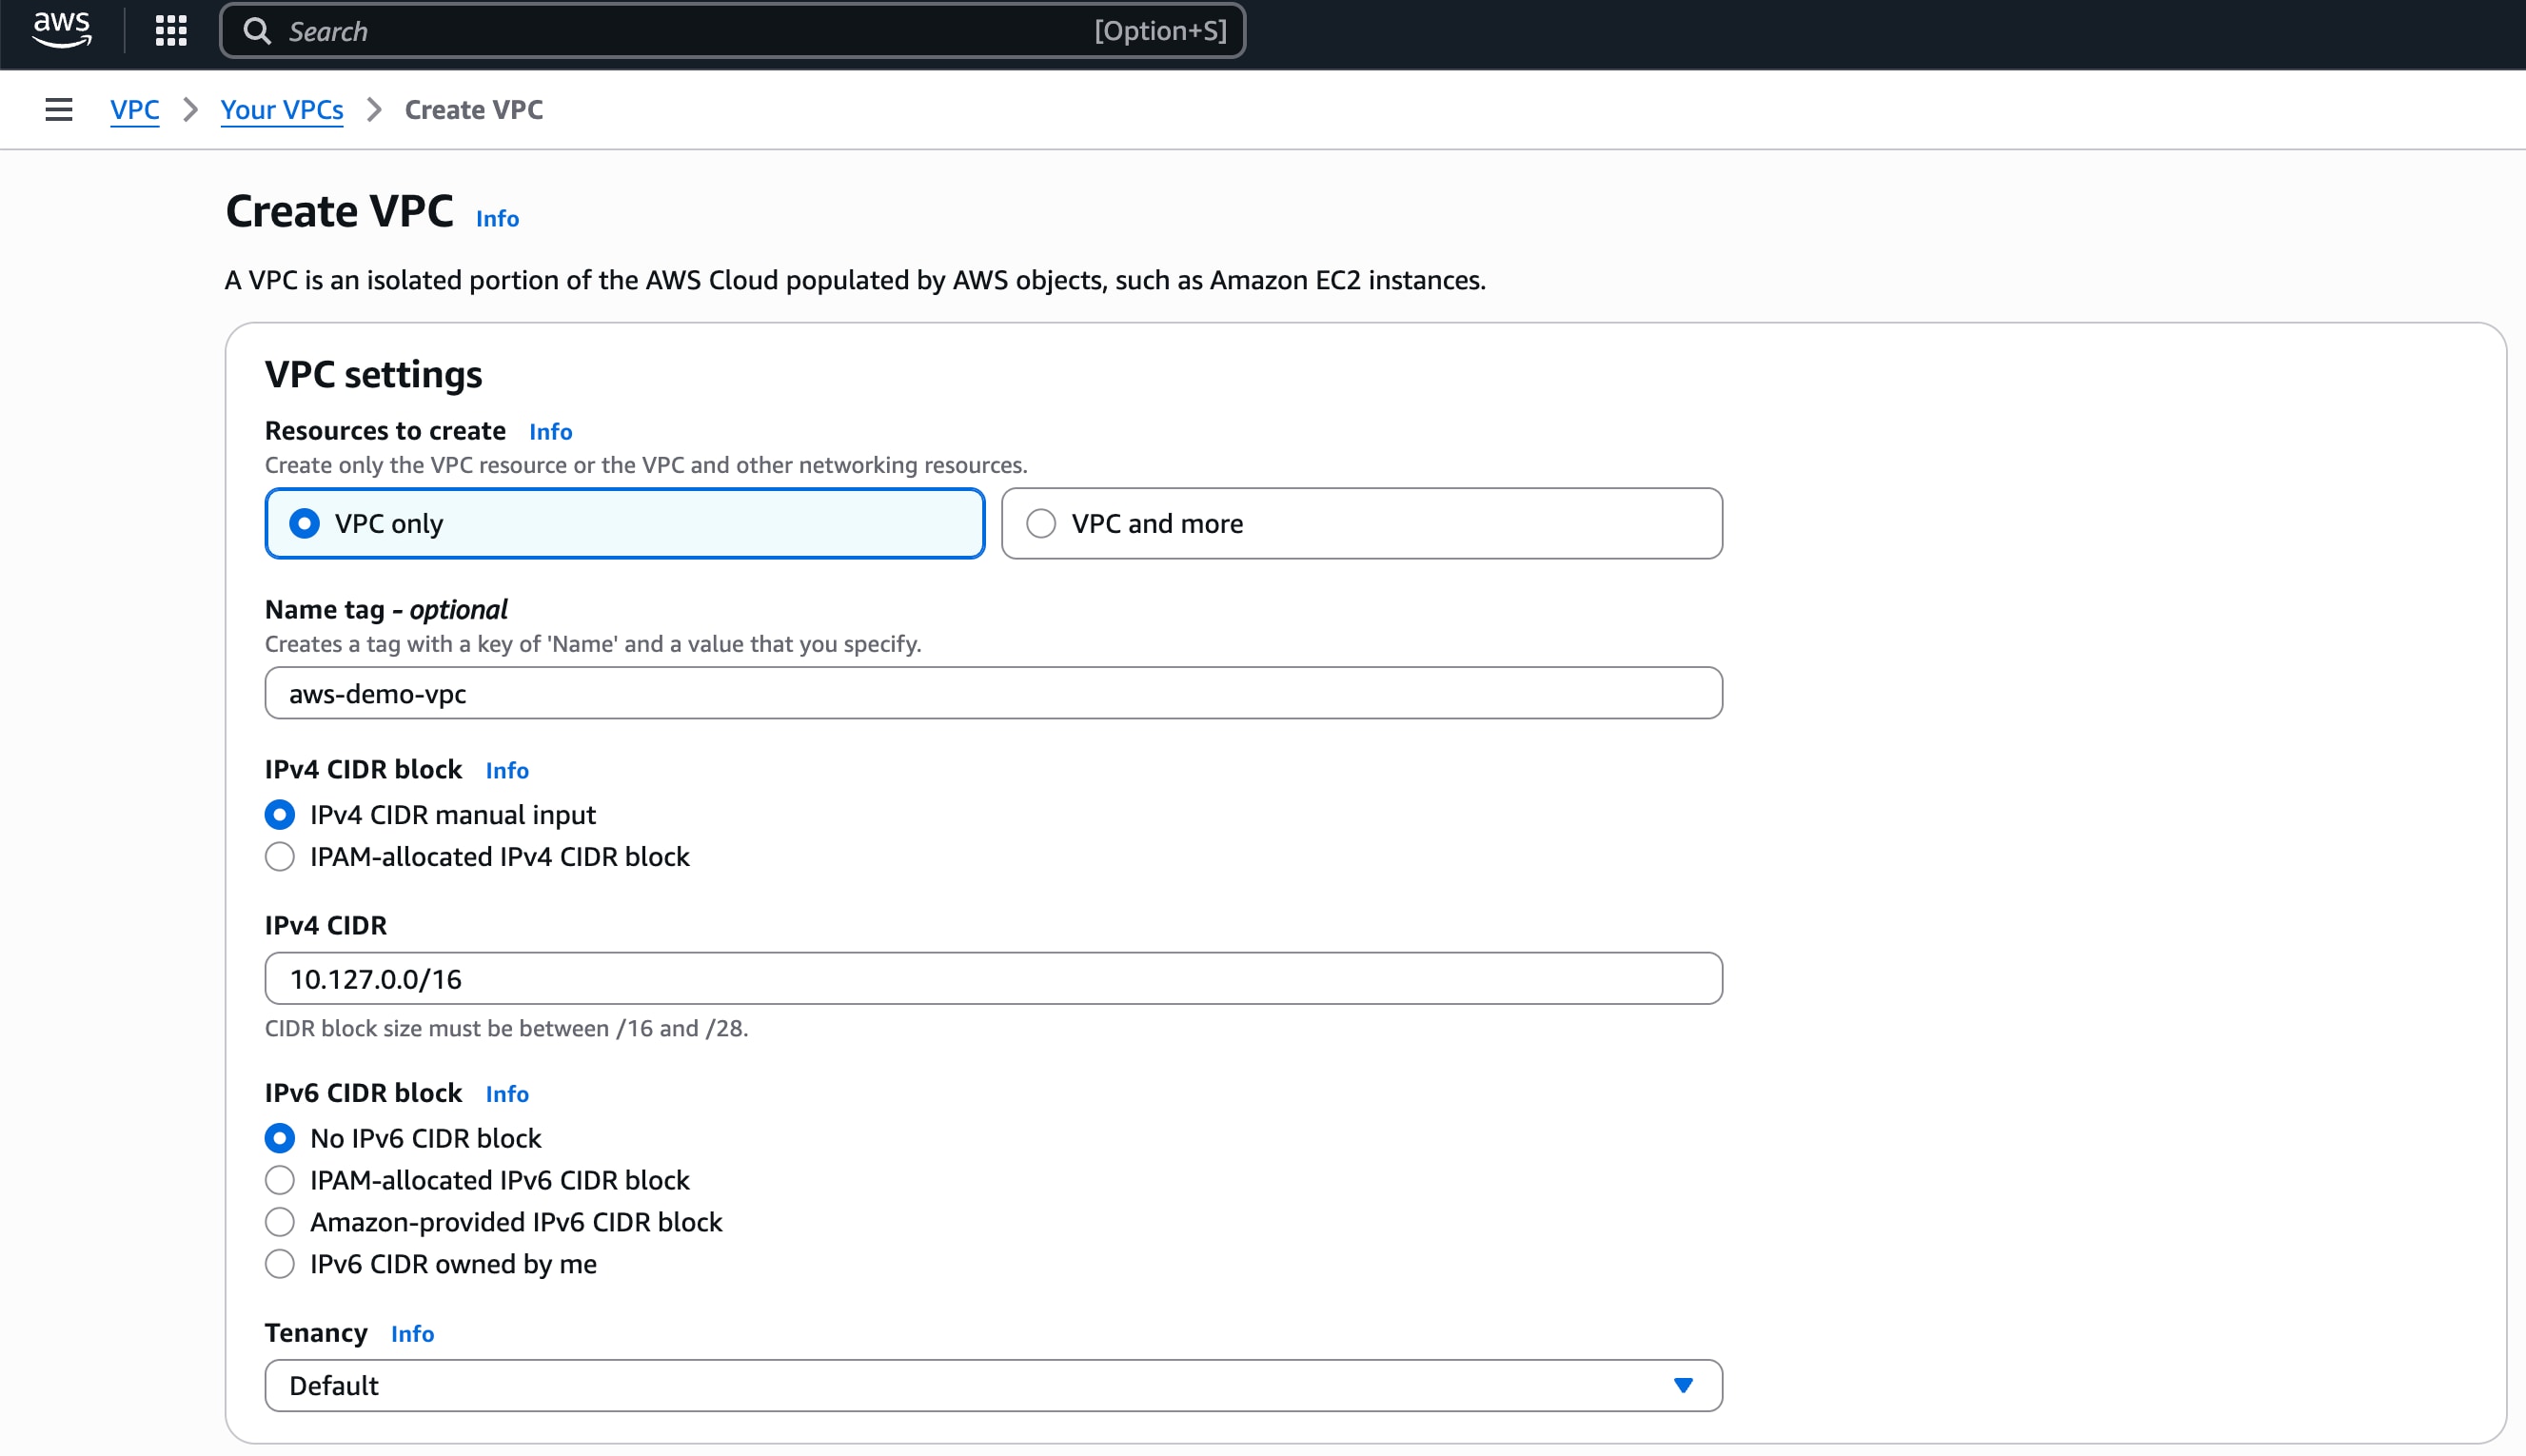
Component 1: Create a VPC with two subnets in AWS—In your AWS dashboard, create a VPC with two subnets. Skip this step if you already have a VPC. For more information, refer to Create a VPC
-
Click Create VPC.
The AWS dashboard shows the new VPC details.

-
Choose your VPC ID or IP address.
The AWS dashboard shows the Create subnet menu.

-
Click Create subnet.
The AWS dashboard shows the new subnets.

-
Click Transit gateways in the left navigation menu of the AWS VPC dashboard.
The AWS dashboard shows the transit gateway configuration menu.

-
Click Create transit gateway.
Once the gateway Status is Available, create a transit gateway attachment between the transit gateway and the VPC.

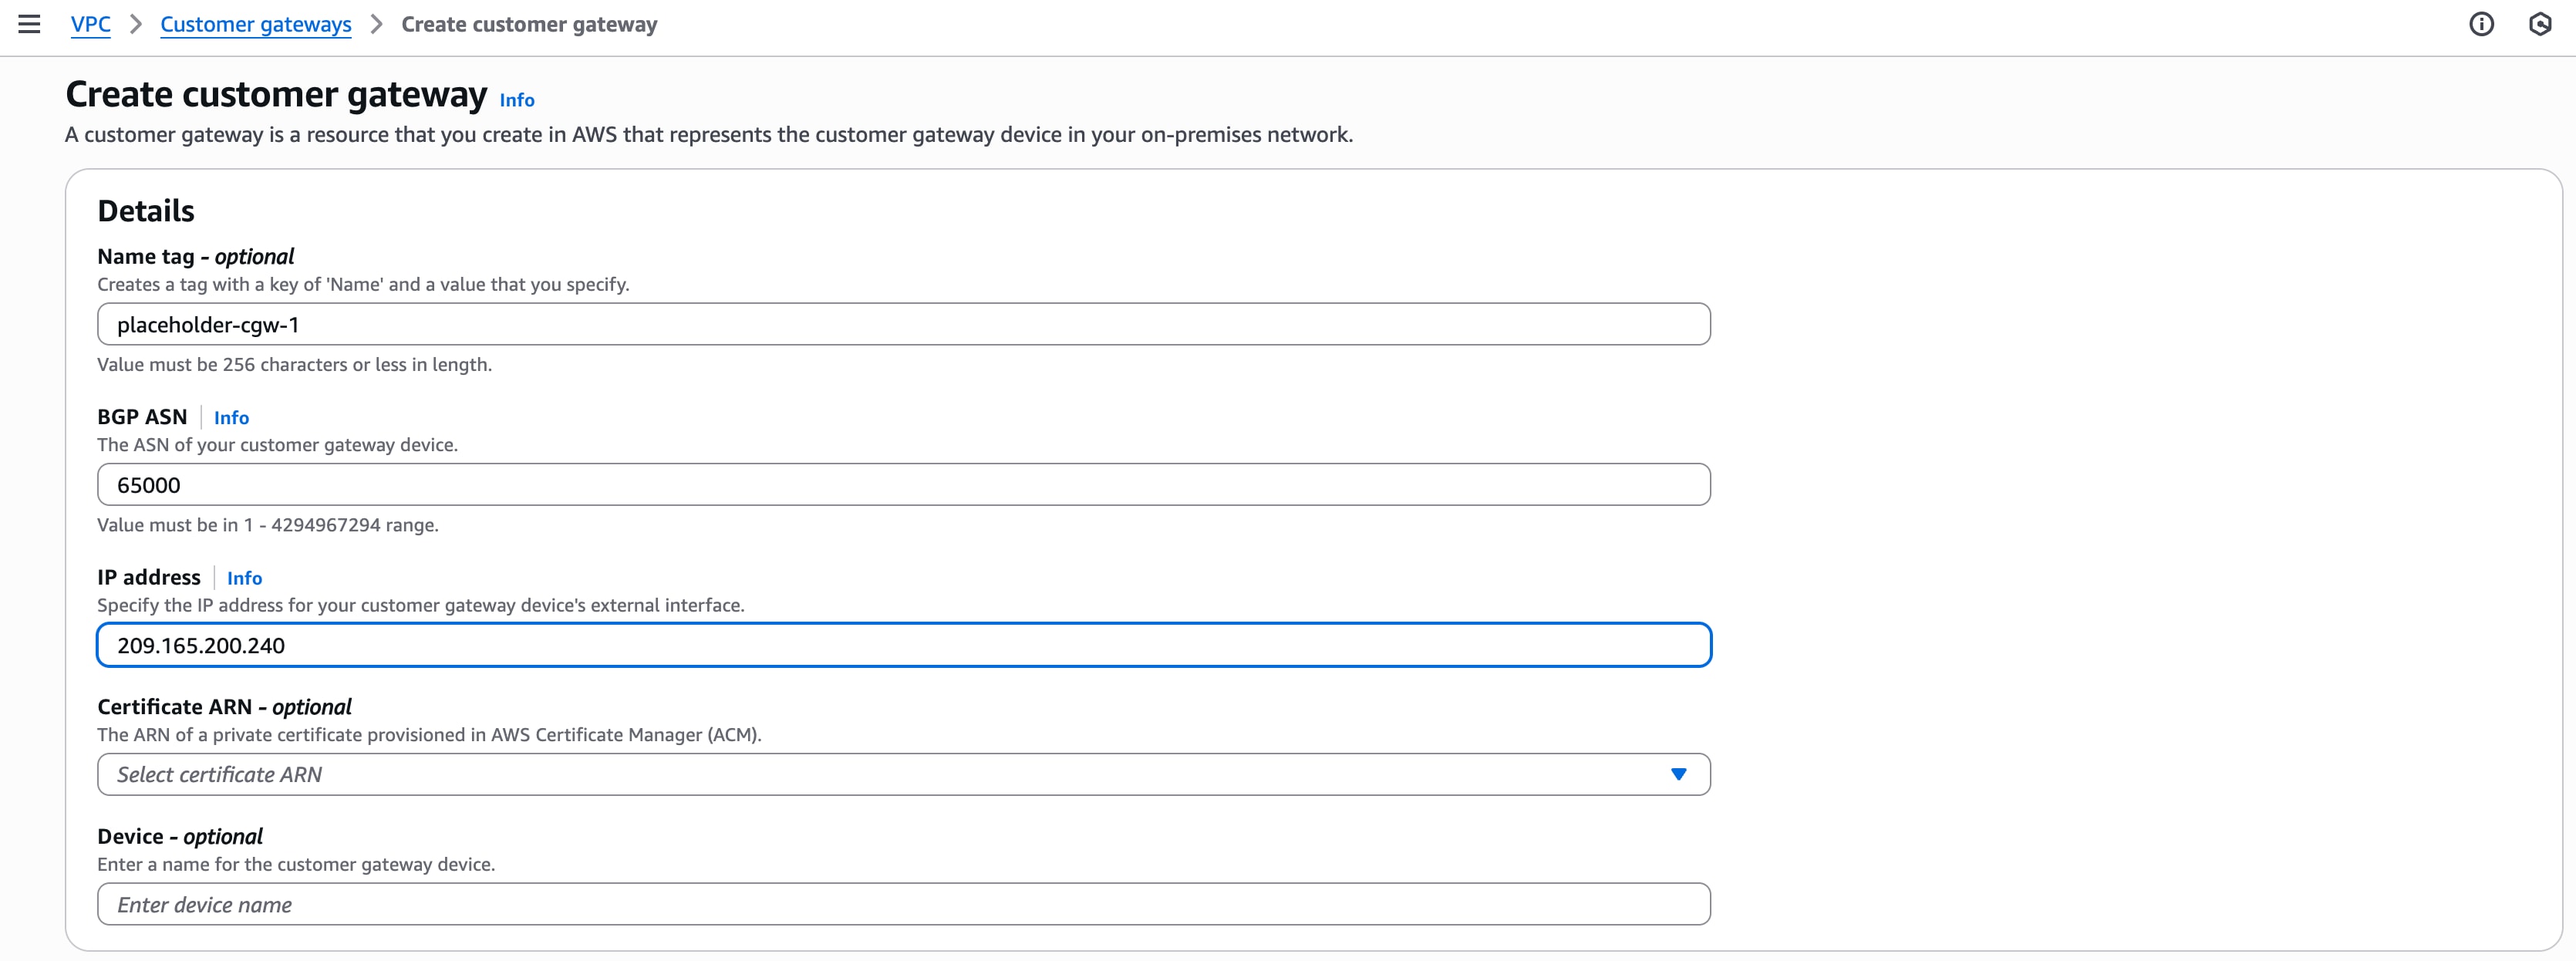
Component 3: Create two placeholder Customer Gateways in AWS—Create two customer gateways with S2S connections. For more information, refer to Get started with AWS Site-to-Site VPN, Step 1: Create a customer gateway and Step 5: Create a VPN connection.
These gateways will act as temporary placeholders that provide outside IP addresses required by the Secure Access network tunnel group configuration in the next step. The network tunnel group will provide the Secure Access BGP ASN and public IP addresses for the Secure Access Peer IP address DCs that you will use to create two new customer gateways in AWS.
-
Repeat these steps to create a second customer gateway with a different placeholder IP address. This example uses 209.165.200.241.

-
Repeat these steps to create a second VPN connection.
- Select the second customer gateway that you created earlier.
- Inside IPv4 CIDR for tunnels 1 and 2 should match the inside IP addresses you entered for tunnels 1 and 2 in the first S2S connection.
Confirm that both S2S VPN connections have an available State.

-
: Each AWS customer gateway that you created in the previous step will have two tunnels, and each tunnel will have an outside IP address.

-
: Enter the Amazon-side Autonomous System Number (ASN) configured for the Transit Gateway in AWS.

Component 6: Replace the placeholder customer gateways in AWS—Configure two more customer gateways in AWS to connect to the Secure Access DC IPs. These will replace the placeholder customer gateways that you created for Component 3.
It is not possible to update the placeholder customer gateways. You must create new customer gateways with the DC IPs from Secure Access, then modify the VPN connection in AWS to target the new customer gateways.
Before you begin, you will need this information from Secure Access:
-
The DC IP addresses for the primary and secondary tunnel from Component 4. You can also find this information in Secure Access by navigating to and clicking the network tunnel group name for details.
-
The Peer (Secure Access) BGP AS number for the network tunnel group. Find this information in Secure Access by navigating to and clicking the network tunnel group name for details.
-
Modify the VPN connection in AWS. For more information, refer to Modify AWS Site-to-Site VPN connection options.
- In the left navigation menu of the AWS VPC dashboard, navigate to and click Site-to-Site VPN connections.
- Click the VPN ID of the first connection. Navigate to .
- Change Target customer gateway to the primary tunnel customer gateway created to replace the placeholder gateway.
- Click Save changes.
- Repeat these steps for the second VPN connection and the secondary tunnel customer gateway.
- Delete the placeholder customer gateway.

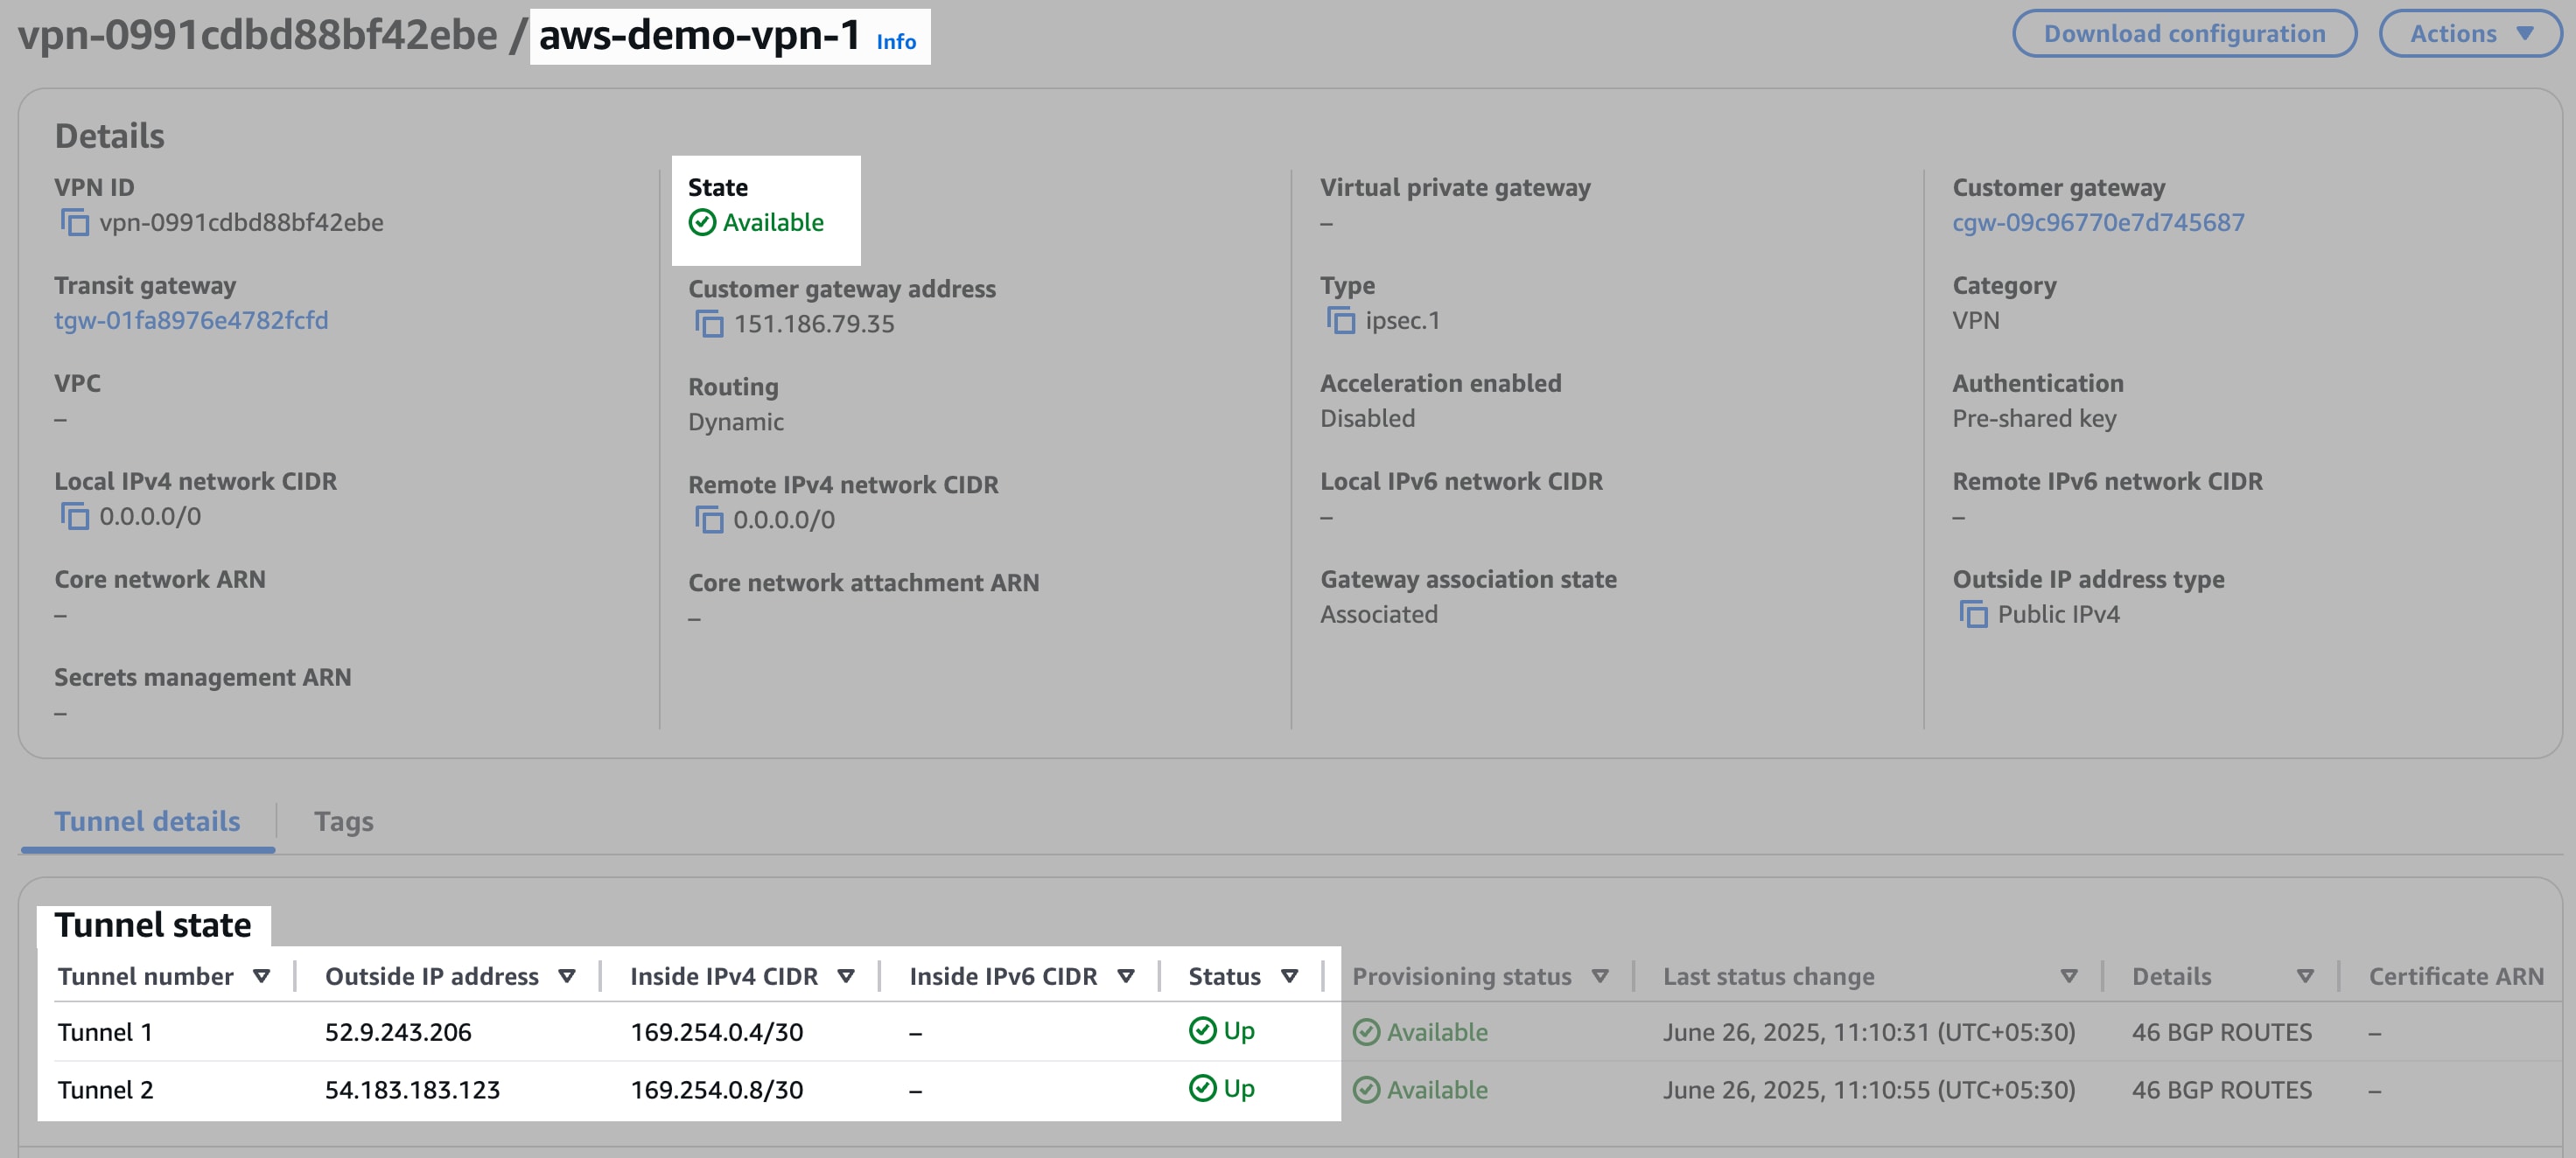
Component 7: Verify tunnel status in AWS and Secure Access—In the left navigation menu of the AWS VPC dashboard, navigate to and click Site-to-Site VPN connections. Click the VPN ID of each VPN connection to confirm that the State is Available and that the Status of both tunnels is Up.
This example shows VPN connection 1 is Available and both tunnels are Up:
VPN connection 2 is also Available and both tunnels are Up.
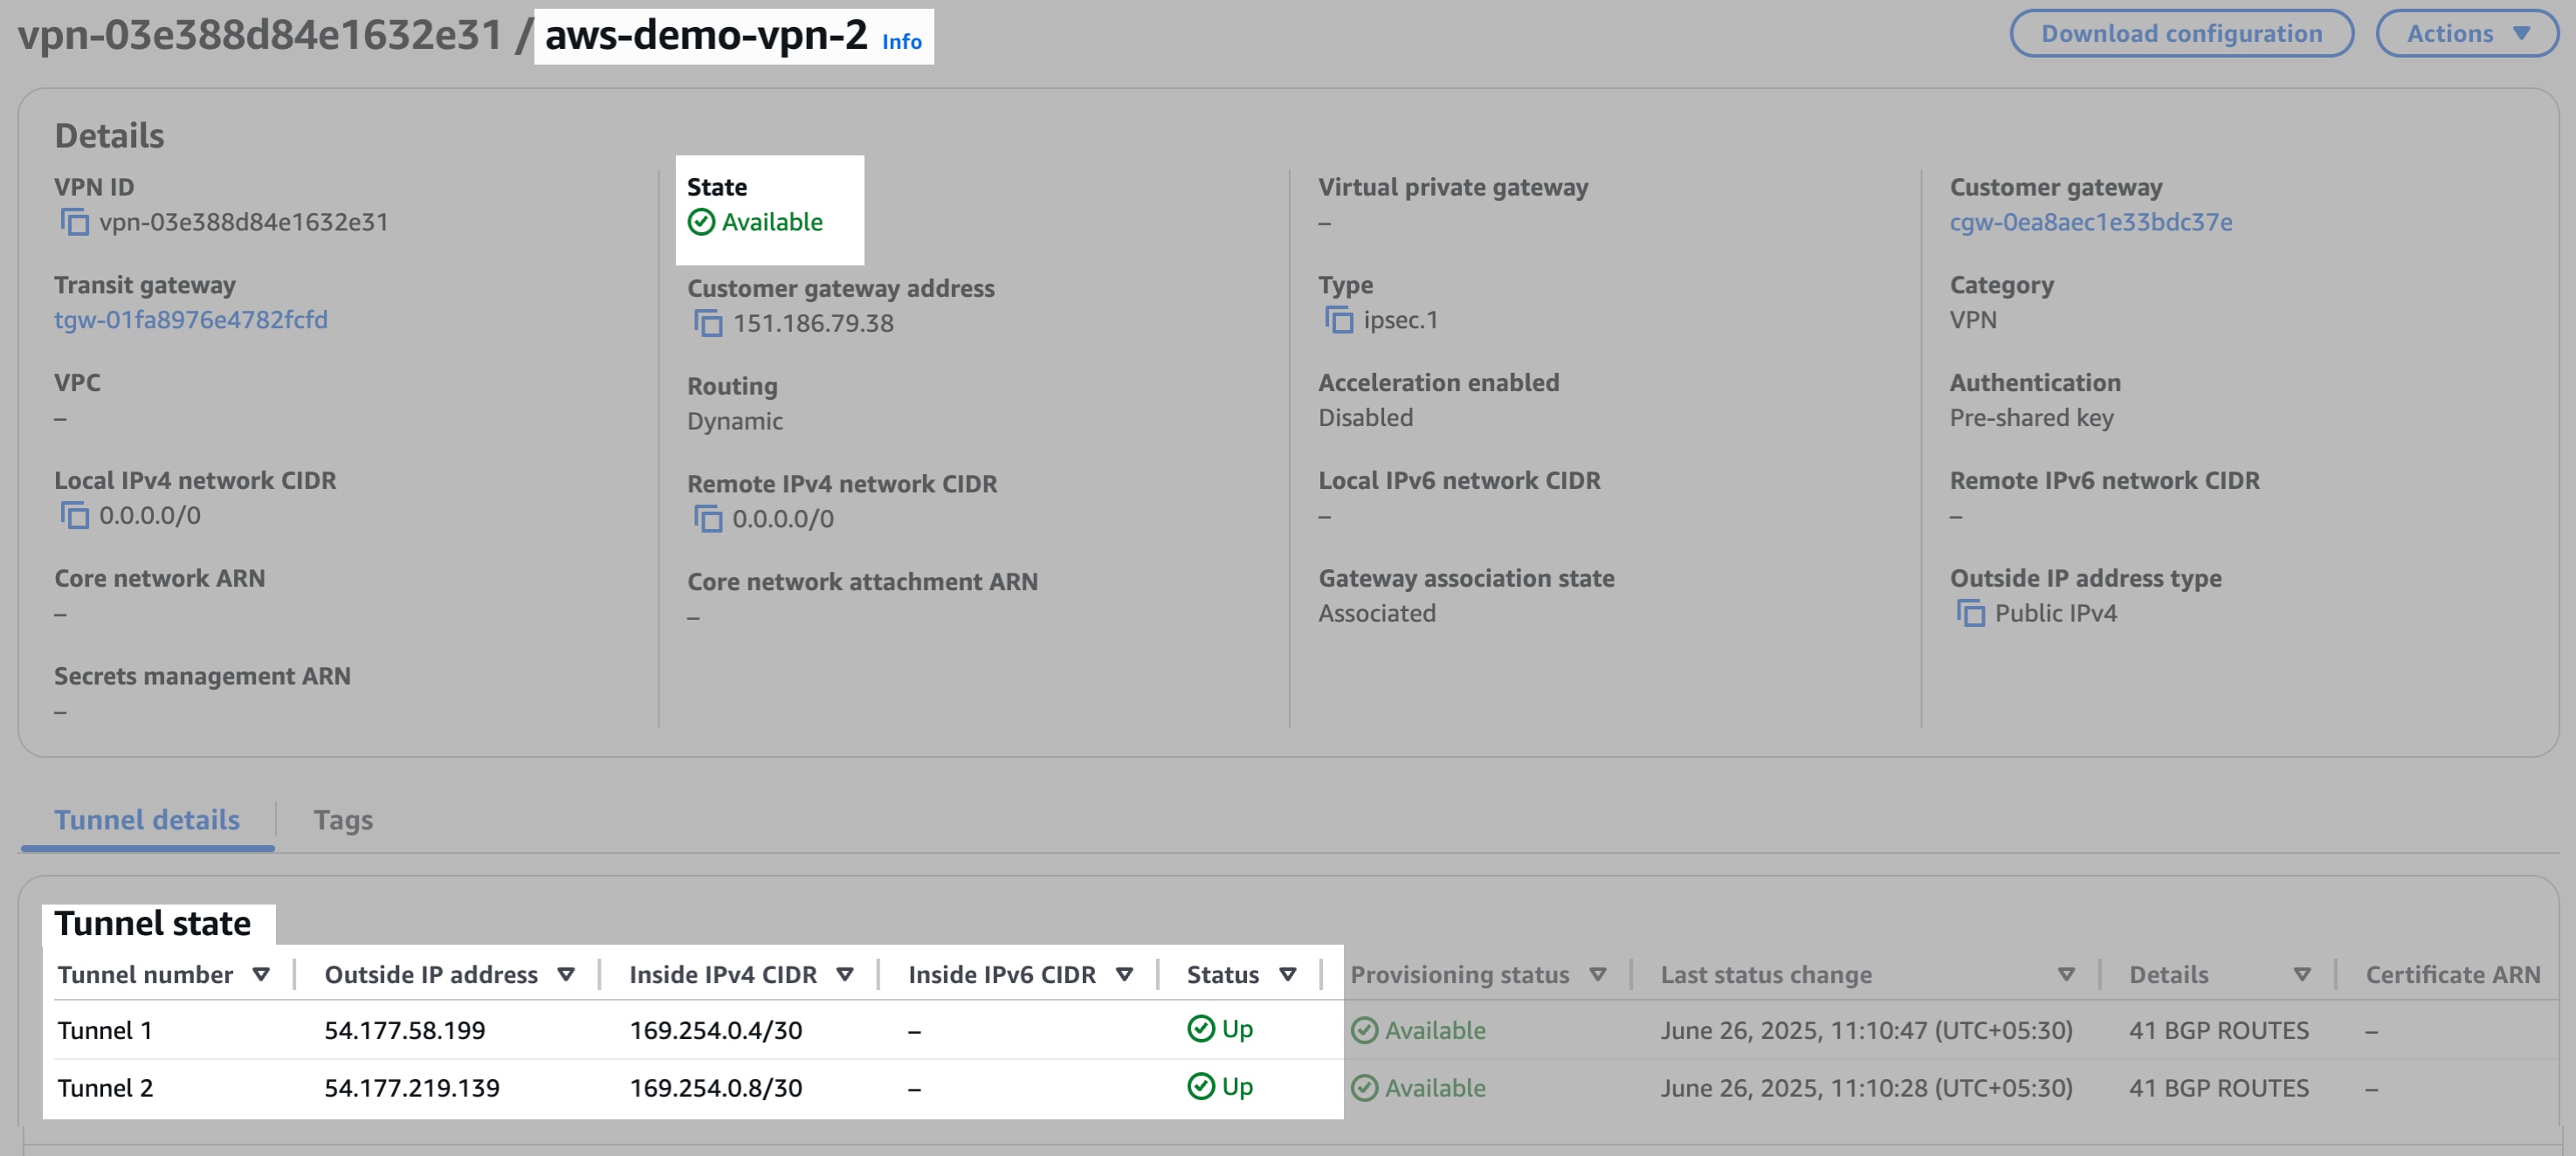
Note that each tunnel has a unique Outside IP Address. Tunnel 1 has the same Inside IPv4 CIDR range for each VPN connection, and Tunnel 2 has the same Inside IPv4 CIDR range for each VPN connection.
-
In Secure Access, navigate to and click the name of the network tunnel group to review the connection status with AWS.

-
Verify the IP address values under in Secure Access. The ID of Tunnel Group 1 should match the Outside IP Address of VPN connection 1, Tunnel 1 in AWS. The ID of Tunnel Group 2 in Secure Access should match VPN connection 1, Tunnel 2 in AWS.

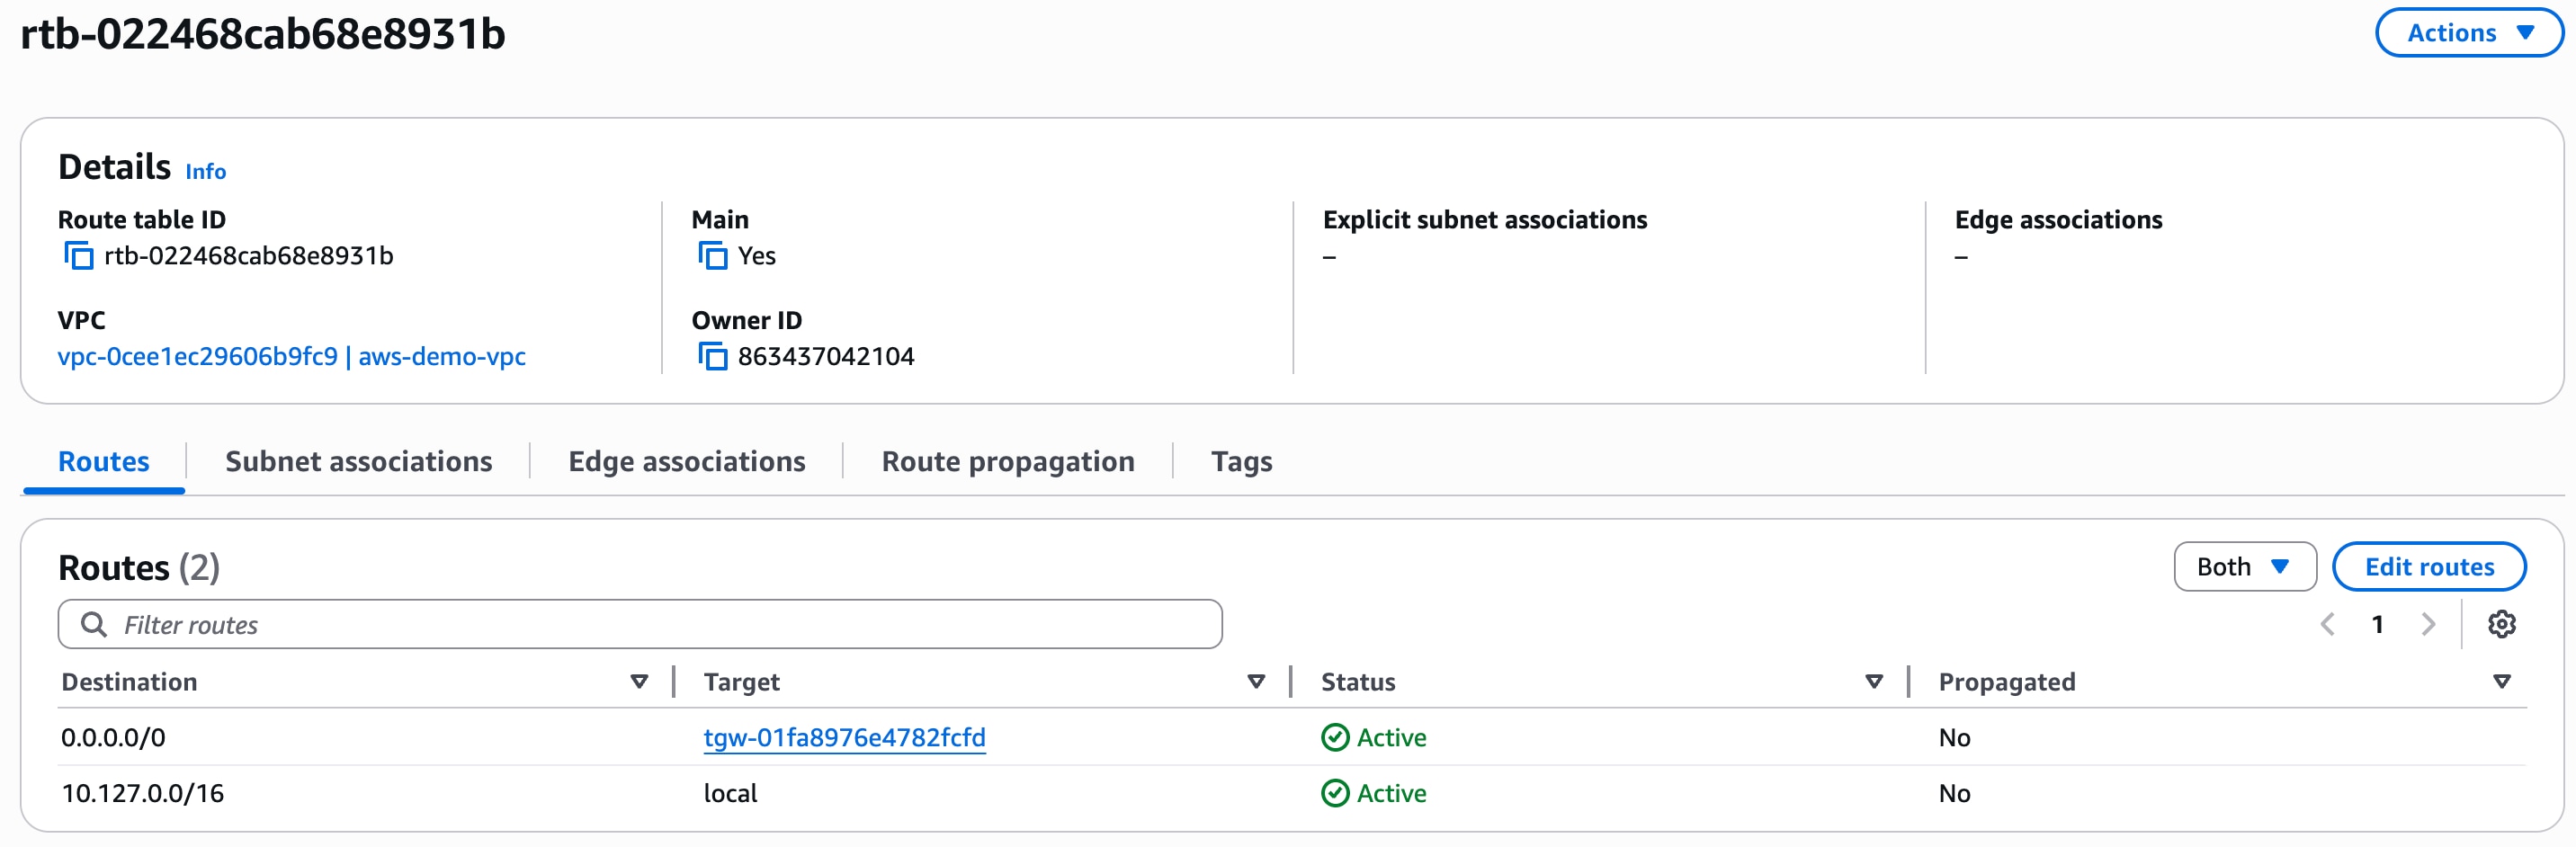
Component 8: Modify subnet routing tables to send traffic to the AWS Transit Gateway—To send traffic from the AWS VPC to the AWS transit gateway, modify the routing table of each subnet to target the Transit gateway ID. For more information, refer to Change a subnet route table.
What to do next
For information about managing and monitoring your network tunnel group, refer to Manage Network Tunnel Groups.