Explains how optimizing LSP setup bandwidth improves network scalability, load balancing, and resilience during failures.
As a network operator, you may need to periodically update LSPs as traffic changes in your network. You may have some fixed rules around the maximum setup bandwidth for LSPs. Restrictions on the setup bandwidth per LSP affect the number of LSPs in the network. As the setup bandwidth increases, the number of LSPs that you have to manage in your network is reduced. However, the risk that certain LSPs cannot be routed also increases. As the setup bandwidth decreases, more alternative paths can be found, allowing for better load balancing. This holds true both in the fail-free and under failure cases.
To address these LSP setup bandwidth requirements, Cisco Crosswork Planning includes an LSP setup BW optimization tool (Actions > Tools > RSVP LSP Optimization > LSP setup BW optimization).
Run LSP setup bandwidth optimization
Use this task to optimize the number and configuration of LSPs in your network to match set bandwidth goals.
The LSP setup BW optimization tool lets you add or remove LSPs based on set bandwidth requirements that you specify. You can select the LSPs that you want the optimizer to consider. The optimizer then separates these LSPs into different groups. The optimizer defines an LSP group based on the fact that the LSPs within the group share common source and destination nodes. You can also specify additional custom groupings to get a finer granularity on the setup bandwidth.
The optimizer lets you create LSPs by specifying:
The number of LSPs to create for each LSP group.
The maximum setup bandwidth per LSP. In this case, the minimum number of LSPs is created for each group in order to meet this requirement.
Additionally, the optimizer lets you remove LSPs by specifying:
The number of LSPs to remove for each group.
The minimum setup bandwidth per LSP. In this case, the minimum number of LSPs is removed from each group in order to meet this requirement.
You can then perform different operations on each group to test different design scenarios.
NoteThe sum of the setup bandwidth of the LSPs per group is not modified by adding or removing LSPs. The setup bandwidth is evenly redistributed among the LSPs within each LSP group.
Procedure
Open the plan file (refer to Open plan files). It opens in the Network Design page.
From the toolbar, choose any of the these options:
From the toolbar, choose Actions > Tools > RSVP LSP optimization > LSP setup BW optimization.
Alternatively, you can also choose Preset workflows > Perform optimization, select RSVP LSP Optimization as the optimization type, select LSP setup BW optimization from the drop-down list, and click Launch.
Choose the LSPs you want the optimizer to consider. By default, none of the LSPs are selected.
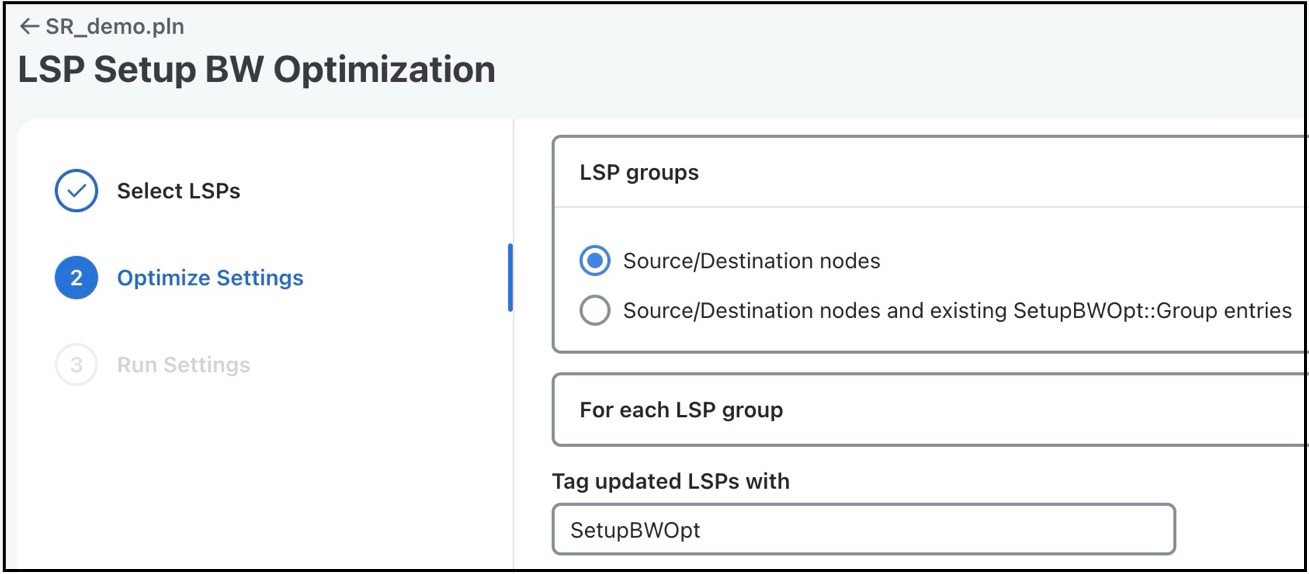
In the LSP groups section, choose the manner in which LSPs are separated into LSP groups:
Figure 1. LSP setup bw optimization options
Source/Destination nodes: LSPs with a common source and destination belong in the same group.
Source/Destination nodes and existing SetupBWOpt::Group entries: LSPs with a common source and destination and common SetupBWOpt::Group entries belong in the same group. This option is useful when you want to group LSPs based on different service classes.
In the For each LSP group section, provide your setup bandwidth requirements for each LSP group:
Create x LSPs: Enter a positive integer. The optimizer creates a certain number of LSPs per group; for example, 1.
Create the minimum number of LSPs so that setup BW <= x Mbps: Specify the minimum number of LSPs to meet your setup bandwidth rule. For example, the bandwidth rule could be 10000 Mbps.
Remove x LSPs: Enter a positive integer. The optimizer removes a certain number of LSPs per group; for example, 1.
Remove the minimum number of LSPs so that setup BW >= x Mbps: Specify the removal of the minimum number of LSPs to meet your setup bandwidth rule; for example, 10000 Mbps.
(Optional) In the Tag updated LSPs with field, override the defaults for how LSPs are tagged ( SetupBWOpt).
On the Run Settings page, choose whether to execute the task now or schedule it for a later time. Choose one of these Execute options:
Now: Choose this option to execute the job immediately. The tool runs and changes are applied to the network model immediately. A summary report appears. You can access the report any time later using Actions > Reports > Generated reports option.
As a scheduled job: Choose this option to execute the task as an asynchronous job. Set these options:
Priority: Select the priority of the task.
Engine profiles: Select the engine profile as needed. This section lists all the available asynchronous engine profiles.
Schedule: Set the time at which you want to run the tool.
The tool runs at the scheduled time using the selected engine profile. You can track the status of the job at any time using the Job Manager page (from the main menu, choose Job Manager). Once the job completes, import the output plan file into user space to visualize it. For more information, refer to Access output plan files from job manager.
NoteEnsure that you save the plan file before you schedule the job. Any unsaved changes in the plan file are not considered when you run the tool as a scheduled job.
(Optional) If you want to display the result in a new plan file, specify a name for the new plan file in the Display results section.
In the previous step:
If you have selected to run the task immediately, by default, the changes are applied on the current plan file. If you want to display the results in a new file, select the Display results in a new plan file check box and enter the name of the new plan file.
If you have scheduled the task to run at a later time, by default, the results are displayed in the Plan-file-1. Update the name, if required.
The LSP Setup BW Optimization tool automatically generates a report every time it is run. You can access this information at any time by choosing Actions > Reports > Generated reports and then clicking the LSP Setup BW Optimization link in the right panel.
The report contains these two tabs:
Summary
The Summary tab summarizes the total number of
LSPs you selected
LSP groups identified
LSPs created
LSPs removed
LSP groups
The LSP groups tab provides the details on how the optimizer operated on LSPs:
Group: Name of the LSP group as specified by SetupBWOpt::Group. If this group is not specified, the Group column is empty
LSP Source: Source node of the LSP group
LSP Destination: Destination node of the LSP group
Total Setup BW: Sum of the setup bandwidth values of the LSPs within the LSP group
LSP Number Before: Number of LSPs within the LSP group before running the optimization
LSP Number After: Number of LSPs within the LSP group after the optimization
LSP Setup BW Before: Average setup bandwidth within the LSP group before the optimization
LSP Setup BW After: Setup bandwidth within the LSP group after the optimization