Outlines procedures for creating and configuring SIDs, including node SIDs, SRv6 node SIDs, interface SIDs, SRv6 interface SIDs, and flex algorithms to enable segment routing and optimize network path selection.
Use these procedures to create new SIDs.
Create a node SID
Use this task to assign node SIDs to routers within a network to uniquely identify routers, enabling packets to follow the shortest or engineered path through the network.
Procedure
Open the plan file (refer to Open plan files). It opens in the Network Design page.
From the toolbar, choose Actions > Insert > SIDs > Node SID.
Alternatively, in the Network Summary panel on the right side, click in the Node SIDs table.
The Node SIDs tab is available under the More tab. If it is not visible, then click the Show/hide tables icon () and check the Node SIDs check box.
Select the values for Site, Node, and Type fields.
Enter values for SID and SR algorithm.
Use the check box to select Protected or IPv6, as necessary.
Save your changes.
Create an SRv6 node SID
Use this task to define an SRv6 node SID within a network plan and associate it with a chosen site and node.
Procedure
Open the plan file (refer to Open plan files). It opens in the Network Design page.
From the toolbar, choose Actions > Insert > SIDs > SRv6 node SID.
Alternatively, in the Network Summary panel on the right side, click in the SRv6 node SIDs table.
The SRv6 node SIDs tab is available under the More tab. If it is not visible, then click the Show/hide tables icon ( ) and check the SRv6 node SIDs check box.
Select values for Site and Node from the drop-down list.
Enter values for SID and SR algorithm.
Use the check box to select Protected as necessary.
Save your changes.
Create an interface SID
Use this task to associate a SID with a network interface to enable segment routing features in your network design.
Procedure
Open the plan file (refer to Open plan files). It opens in the Network Design page.
From the toolbar, choose Actions > Insert > SIDs > Interface SID.
Alternatively, in the Network Summary panel on the right side, click in the Interface SIDs table.
The Interface SIDs tab is available under the More tab. If it is not visible, then click the Show/hide tables icon () and check the Interface SIDs check box.
Select values for Site, Node, Interface, and Type fields.
Enter the value for SID.
Use the check box to select Protected or IPv6, as necessary.
Save your changes.
Create a SRv6 interface SID
Use this task to set up SRv6 interface SIDs for segment routing in your network.
Procedure
From the toolbar, choose Actions > Insert > SIDs > SRv6 interface SID.
Alternatively, in the Network Summary panel on the right side, click in the SRv6 interface SIDs table.
The SRv6 interface SIDs tab is available under the More tab. If it is not visible, then click the Show/hide tables icon () and check the SRv6 interface SIDs check box.
Select values for Site, Node, and Interface fields.
Enter values for SID and SR algorithm.
Use the check box to select Protected, as necessary.
Save your changes.
Create flex algorithm
Use this task to add and configure flex algorithm to apply custom routing behaviors and improve traffic distribution in your network.
Procedure
Open the plan file (refer to Open plan files). It opens in the Network Design page.
From the toolbar, choose Actions > Insert > SIDs > Flex algorithm.
Alternatively, in the Network Summary panel on the right side, click in the Flex algorithms table.
The Flex algorithms tab is available under the More tab. If it is not visible, then click the Show/hide tables icon () and check the Flex algorithms check box.
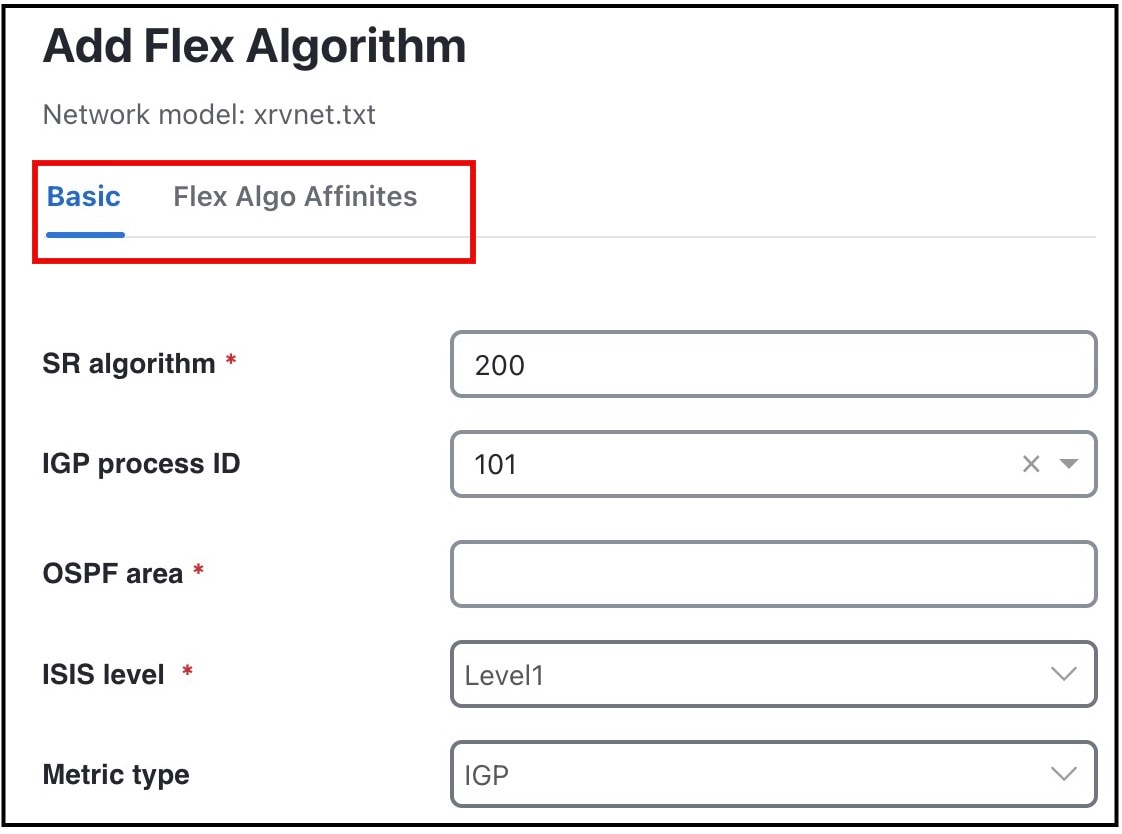
Figure 1. Add flex algorithm page
In the Basic tab, enter the value for SR algorithm.
Select values for IGP process ID, OSPF area, ISIS level, and Metric type.
Click the Flex Algo Affinities tab and choose the inclusion or exclusion rule for each affinity.
 in the
  ) and check the