Cisco Crosswork Planning Design 7.2.x User Guide

PDF

Cisco Crosswork Planning Design 7.2.x User Guide

Design engines

Want to summarize with AI?

Log in

Outlines how design engine instances in Cisco Crosswork Planning manage simulations and optimizations, describe resource configurations, and explain options to support multiple concurrent users and efficient resource utilization.


A design engine is a core component that

  • manages simulations and optimizations

  • is assigned to user sessions depending on engine availability, and

  • allows you to perform tasks interactively as synchronous or asynchronous jobs.

For an overview of design engines, refer to Core concepts in Cisco Crosswork Planning.

Design engine instances

Post installation, two design engine instances are created in the system.

  • cp-sync-engine-default: This engine is allocated for handling synchronous tasks.

  • cp-async-engine-default: This engine is allocated for running asynchronous jobs.

By default, these engine instances are configured with 4 vCPU (4000m vCPU) and 16 Gi of memory for large profiles. For extra large (XLarge) profiles, they are configured with 8 vCPU (8000m vCPU) and 24 Gi of memory.

Cisco Crosswork Planning allows you to set up additional design engine instances, and allocate vCPU and memory based on your requirements. You can create up to 10 design engine instances in total, including both synchronous and asynchronous instances. By having multiple instances, you can run several tasks at the same time. For example, if there are eight asynchronous engine instances, it means that eight scheduled jobs can be run in parallel. Similarly, if the number of synchronous engine instances is five, it means that five users can run the synchronous jobs simultaneously.

If there are distinct concurrent users logged in to Cisco Crosswork Planning Design to perform simulations, then an equivalent number of synchronous design engine instances is required.

Note

Idle design engine instances do not consume compute resources until they are allocated.

Design engine instances resource management

When creating a design engine instance, you specify the maximum limit for CPU (vCPU) and memory (RAM) that it can use. The system enforces these limits, so the instance cannot go over the specified resource limit during runtime. These limits do not reserve or block resources for the instance; resources are shared, and their usage depends on what is available at runtime.

  • CPU: The design engine instance cannot use more CPU than its specified maximum limit. If it reaches the limit, the system slows down the instance’s CPU usage.

  • Memory: If the design engine instance exceeds its memory limit, the system may terminate and restart it, especially if the node is low on memory.

Resource allocation for design engine instances

In large scale deployments, you may need to complete simulation analysis faster, conduct capacity planning more quickly, or perform tasks on huge plan files. In such cases, allocate higher vCPU and memory. The maximum vCPU and memory you can allocate to an instance depend on the system's total resources.

For example, on a system with 4 vCPUs and 64 Gi memory, a single instance can be allocated up to 4000m vCPU and 64 Gi memory.

To find the system's resource information, go to the Administration > Crosswork Manager > Crosswork summary > System summary page. The Used section reflects the current resource consumption.

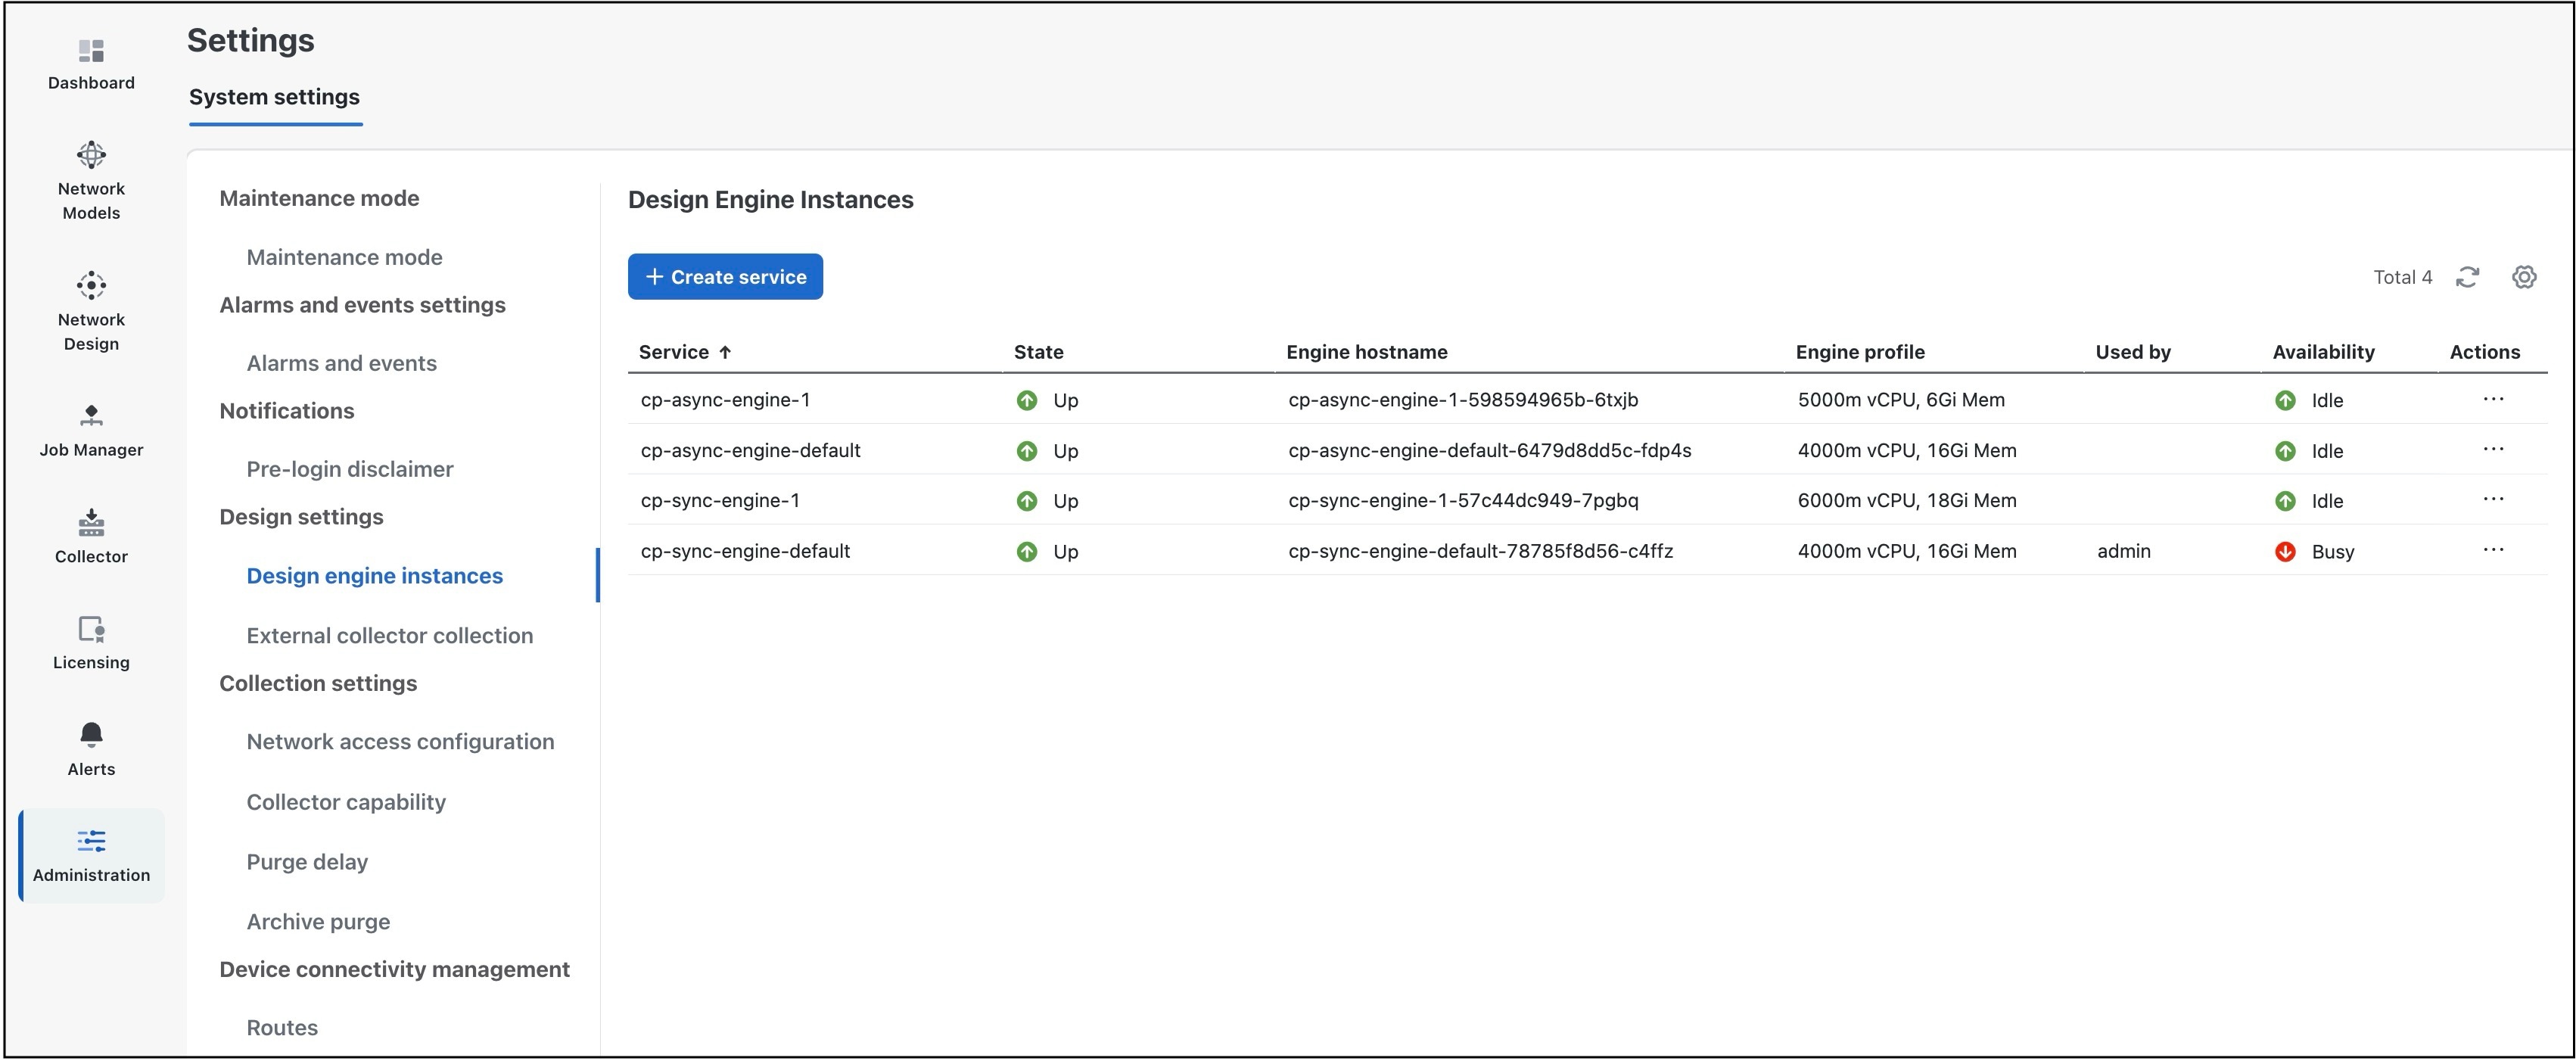
The resource limits for each instance appear in the Engine profile column of the Design Engine Instances page (Administration > Settings > Design settings > Design engine instances).

Best practices and key considerations

  • Resource limits are upper bounds, not reservations.

  • If the total amount of resources set for all engine instances is more than what the system has, the engines may have to compete for resources, which can make them run slower or work less efficiently.

  • The maximum number of concurrent users is determined by the number of synchronous engine instances.

  • Each engine operates independently. Performance of one is not directly affected by others. However, the overall system performance depends on how much total resources are being used by all engines together. If you run all engine instances at their highest CPU and memory settings at the same time, the total resource usage might exceed the system's capacity. This condition can cause the engines to slow down or fail.

  • For deployments with high concurrency or large network models, ensure sufficient CPU, memory, and disk resources for all configured engines.

  • When planning deployments, consider both the network model size and the expected number of concurrent users to select the appropriate hardware profile and VM count.

Example scenarios

Example 1:

If your system has 16 vCPUs and you create 4 engines with a 4 vCPU limit each, then if all engines run at their maximum at the same time, they will use all 16 vCPUs, which is the total capacity of your system.

Example 2:

If you set up 8 engines with a 4 vCPU limit each on a system that only has 16 vCPUs, and all engines try to use their full limit at the same time, the system will limit the total usage. As a result, some engines may be slowed down.


Create design engine instances

Complete these steps to create design engine services as per your requirement.

Before you begin

Ensure you have the "CW Planning Design Setting APIs" Role permission (Administration > Users and Roles > Users). For more information on managing user roles and permissions, refer to the "Manage Users" section of the Cisco Crosswork Planning 7.2.x Collection Setup and Administration document.

Note

You can allocate a maximum of 10 design engines for both synchronous and asynchronous jobs combined.

Procedure

1.

From the main menu, choose Administration > Settings > System settings > Design settings > Design engine instances.

The Design Engine Instances page opens.

Figure 1. Design engine instances page
Design engine instances page
2.

Click Create Service.

The Create Service page opens.

3.

Enter the Virtual CPU in milli vCPU as per your requirement. For example, to allocate 5 vCPUs, enter 5000. Ensure the value is greater than 100 and does not exceed the system's virtual CPU capacity. For example, if the system has 6 vCPUs, do not enter a value more than 6000.

4.

Enter the Memory in Gi (gibibyte) as per your requirement. Ensure that the entered value does not exceed the system's memory.

5.

Choose whether to create synchronous or asynchronous instances.

6.

Save the changes.

The creation process takes approximately 1 to 2 minutes. On successful creation, the Availability column of the newly created service displays the status as "Idle".

If this is the first service you are creating, a service named either cp-sync-engine-1 or cp-async-engine-1 is created based on your selection in Step 5. Subsequently, cp-sync-engine-2 or cp-async-engine-2 is created, and the pattern will continue.

Notice that:

  • The number of design engines increases in the Design Engines dashlet on the Dashboard page.

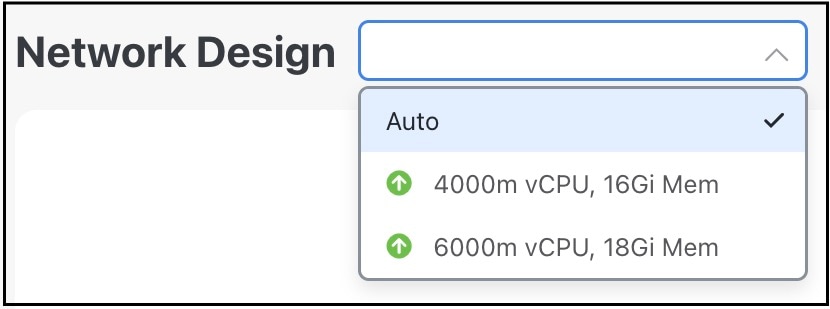
  • The newly created synchronous engine profile appears under the Auto drop-down list on the Network Design page. For details on using the dynamically created engine profiles, refer to Select design engine profiles.

  • The newly created asynchronous engine profile appears under the Engine Profile section on the Run Settings page while running the tools as scheduled jobs.


Select design engine profiles

At the top of the Network Design page, all available synchronous engine profiles are displayed. By default, a synchronous engine profile with the highest memory is selected (Auto). If you need to work on a large plan file that requires more vCPU and memory, you can select the engine profile with higher vCPU and memory allocations. For information on design engine profiles, refer to Design engines.

Available design engine profiles

Before you begin

Ensure that the required engine profiles are available. For more information on creating design engine instances, refer to Create design engine instances.

Complete these steps to change the engine profile as per your requirement.

Procedure

1.

From the main menu, choose Network Design.

2.

Close any open plan files.

3.

Select the required synchronous engine profile from the drop-down list located next to the page title.

Ensure that the engine profile's "State" is Up and "Availability" is Idle. If the does not meet this requirement, a red icon is displayed next to it in the drop-down. You can also check the status of the engine profile on the Design Engine Instances page.

4.

Open the required plan files and start working on them. They will now use the selected engine profile for all synchronous tasks.


Reset engine sessions

The Design Engine Instances page shows details about the design engine instance's availability and user status.

  • The Availability column indicates if the engine is "Busy" or "Idle" based on user activity. If a user is working on a plan file, the corresponding sync instance displays "Busy" in the Availability column. Similarly, when a scheduled job runs, the async instance shows "Busy". When the engine instance is not in use, the Availability column is marked as "Idle."

  • The Used by column specifies the user who is currently using the engine instance.

You can free up an engine instance from a user, allowing it to be reassigned to a different user. When a user session is ended, all open plans for the selected user are closed. Any operations triggered by the user are aborted, thereby freeing up the engine instance from the selected user. If the Cisco Crosswork Planning Design application becomes unresponsive or stuck due to certain operations, this feature helps to reset it.

Before you begin

Ensure you have the "CW Planning Design Setting APIs" Role permission (Administration > Users and Roles > Users). For more information on managing user roles and permissions, refer to the "Manage Users" section of the Cisco Crosswork Planning 7.2.x Collection Setup and Administration document.

Complete these steps to reset engine sessions.

Procedure

1.

From the main menu, choose Administration > Settings > System settings > Design settings > Design engine instances.

The Design Engine Instances page opens, displaying details of the available engine instances.

2.

Under the Actions column, click > Reset session for the engine instance whose session you want to reset.

3.

Click Reset in the confirmation dialog box.

After resetting the session, notice that:
  • The Availability column displays the status as "Idle".

  • For sync engine instances, the opened plan files are closed.

  • For async engine instances, the scheduled jobs are aborted.


Delete design engine instances

Note

You cannot delete the default design engine instances.

Complete these steps to delete the user-created design engine instances.

Before you begin

Ensure you have the "CW Planning Design Setting APIs" Role permission (Administration > Users and Roles > Users). For more information on managing user roles and permissions, refer to the "Manage Users" section of the Cisco Crosswork Planning 7.2.x Collection Setup and Administration document.

Procedure

1.

From the main menu, choose Administration > Settings > System settings > Design settings > Design engine instances.

The Design Engine Instances page opens, displaying the details of the available engine instances.

2.

Under the Actions column, click > Delete for the service you want to delete.

Ensure that the design engine service you selected is not the default one.

3.

Click Delete in the confirmation dialog box.

The deletion process takes approximately 1 to 2 minutes to complete.


Recreate design engine instances

The user-created design engine instances are deleted when

  • upgrading the Cisco Crosswork Planning Design application

  • restoring the Cisco Crosswork Planning configuration data after a natural or human-caused disaster, or

  • migrating data from an older version of Cisco Crosswork Planning to a newer version.

Complete these steps to recreate the design engine instances.

Procedure

1.

From the main menu, choose Administration > Settings > System settings > Design settings > Design engine instances.

The Design Engine Instances page opens, displaying the details of the available engine instances.

2.

Under the Actions column, click > Recreate for the service you want to recreate.

3.

Click Recreate in the confirmation dialog box.

The selected design engine instance is recreated.