Cisco Crosswork Planning Design 7.2.x User Guide

PDF

Cisco Crosswork Planning Design 7.2.x User Guide

P2MP LSPs

Want to summarize with AI?

Log in

Introduces P2MP LSP simulations and outlines bandwidth behavior, demand routing, creation requirements, sub-LSP workflows, demand creation, and deletion behavior rules.


Point-to-multipoint (P2MP) LSPs offer an MPLS alternative to IP multicast for setting up multiple paths to multiple locations from a single source. In live networks, the signal is sent once across the network and packets are replicated only at the relevant or designated branching MPLS nodes.

A P2MP LSP consists of two or more sub-LSPs that have the same source node. Most of Cisco Crosswork Planning refers to sub-LSPs as LSPs, and there is no distinction between the two.

To view the P2MP LSPs or their associated sub-LSPs, choose them from the P2MP LSPs and LSPs tables. To determine if an LSP belongs to a P2MP LSP, you can show the P2MP LSP column in the LSPs table.

Example

In P2MP LSPs and associated sub-LSPs, there are two P2MP LSPs, LSP_er12 and LSP_er13. LSP_er12 and LSP_er13 have "er12" and "er13" as their source nodes, respectively. In the LSPs table, the first three LSPs have er12 as the source node and are sub-LSPs of LSP_er12 P2MP LSP (as indicated by the P2MP LSP column). Similarly, the LSPs with er13 as the source node are the sub-LSPs of LSP_er13 P2MP LSP. The Sub LSP count in the P2MP LSPs table indicates the number of sub-LSPs of each P2MP LSP.
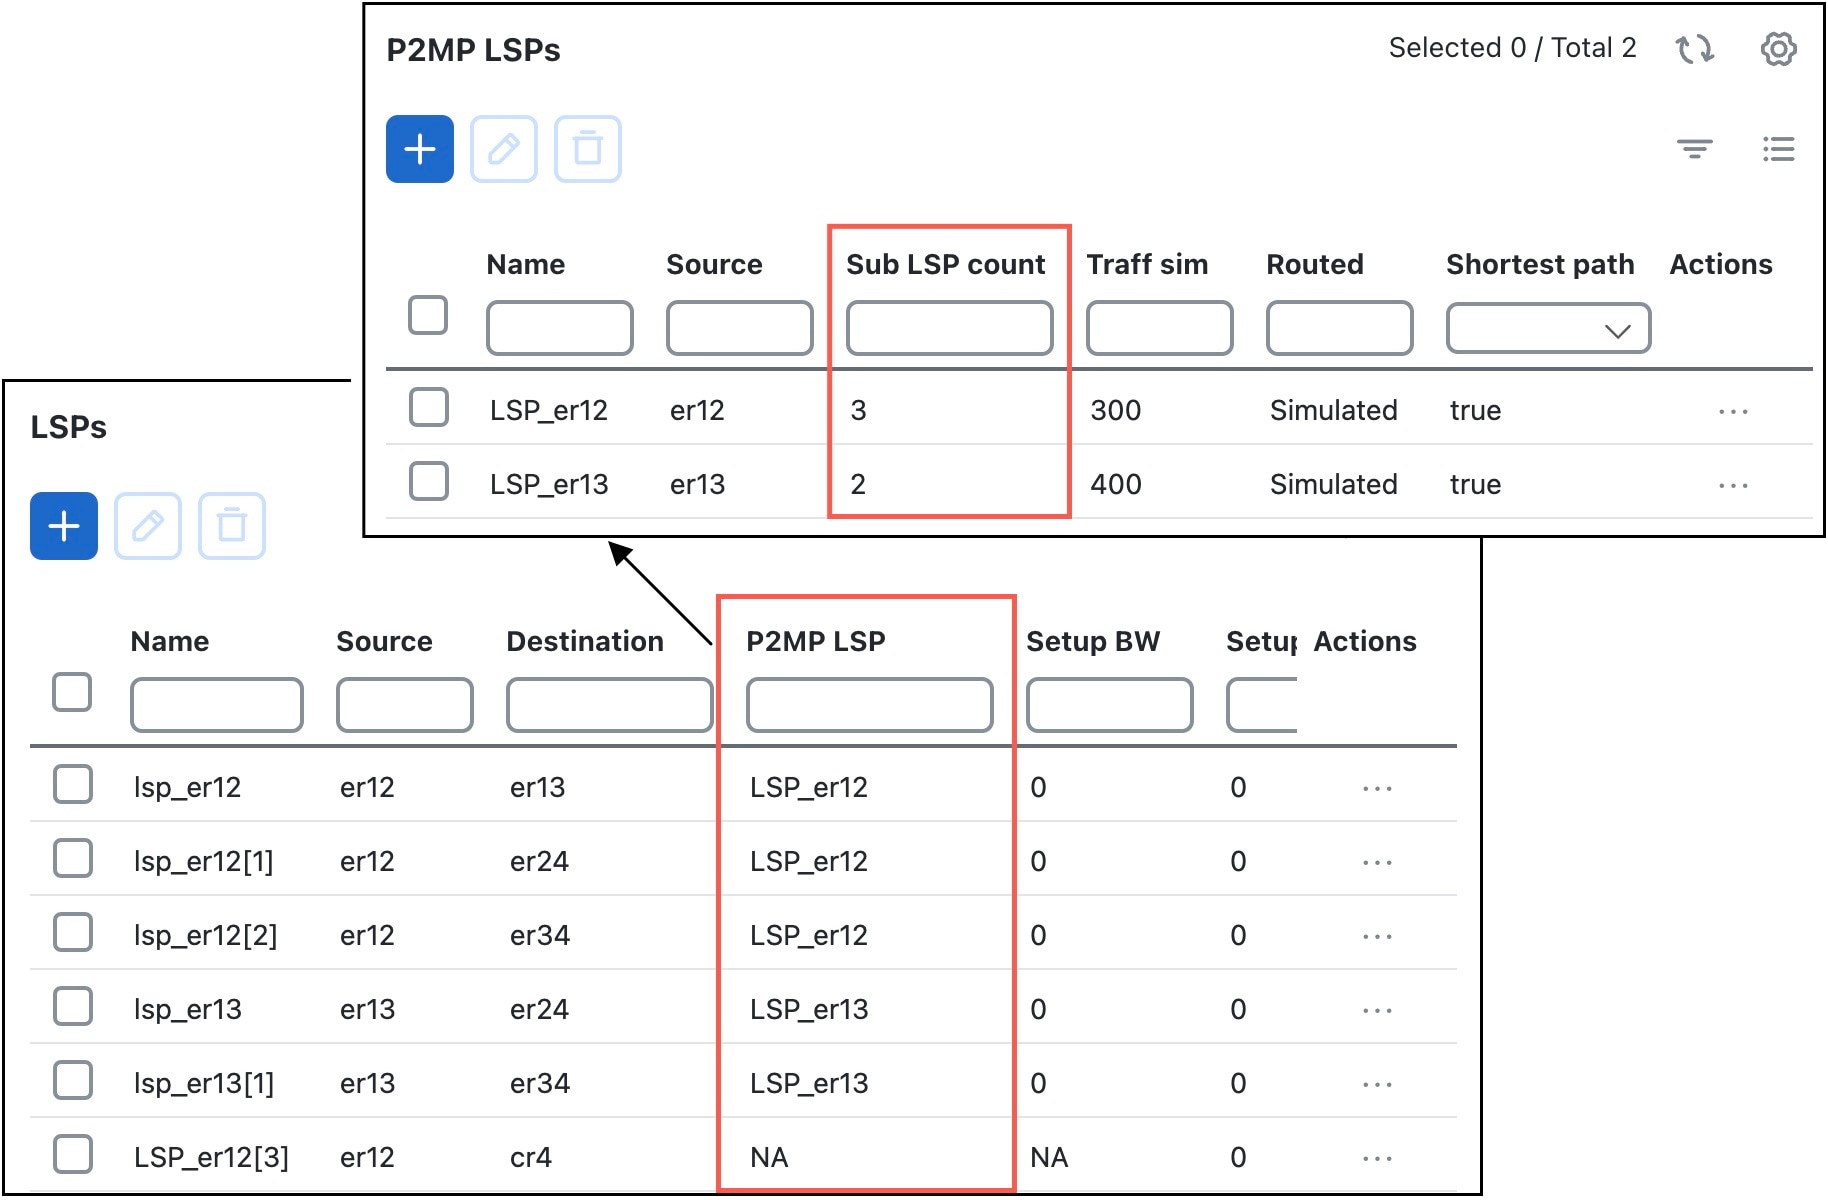
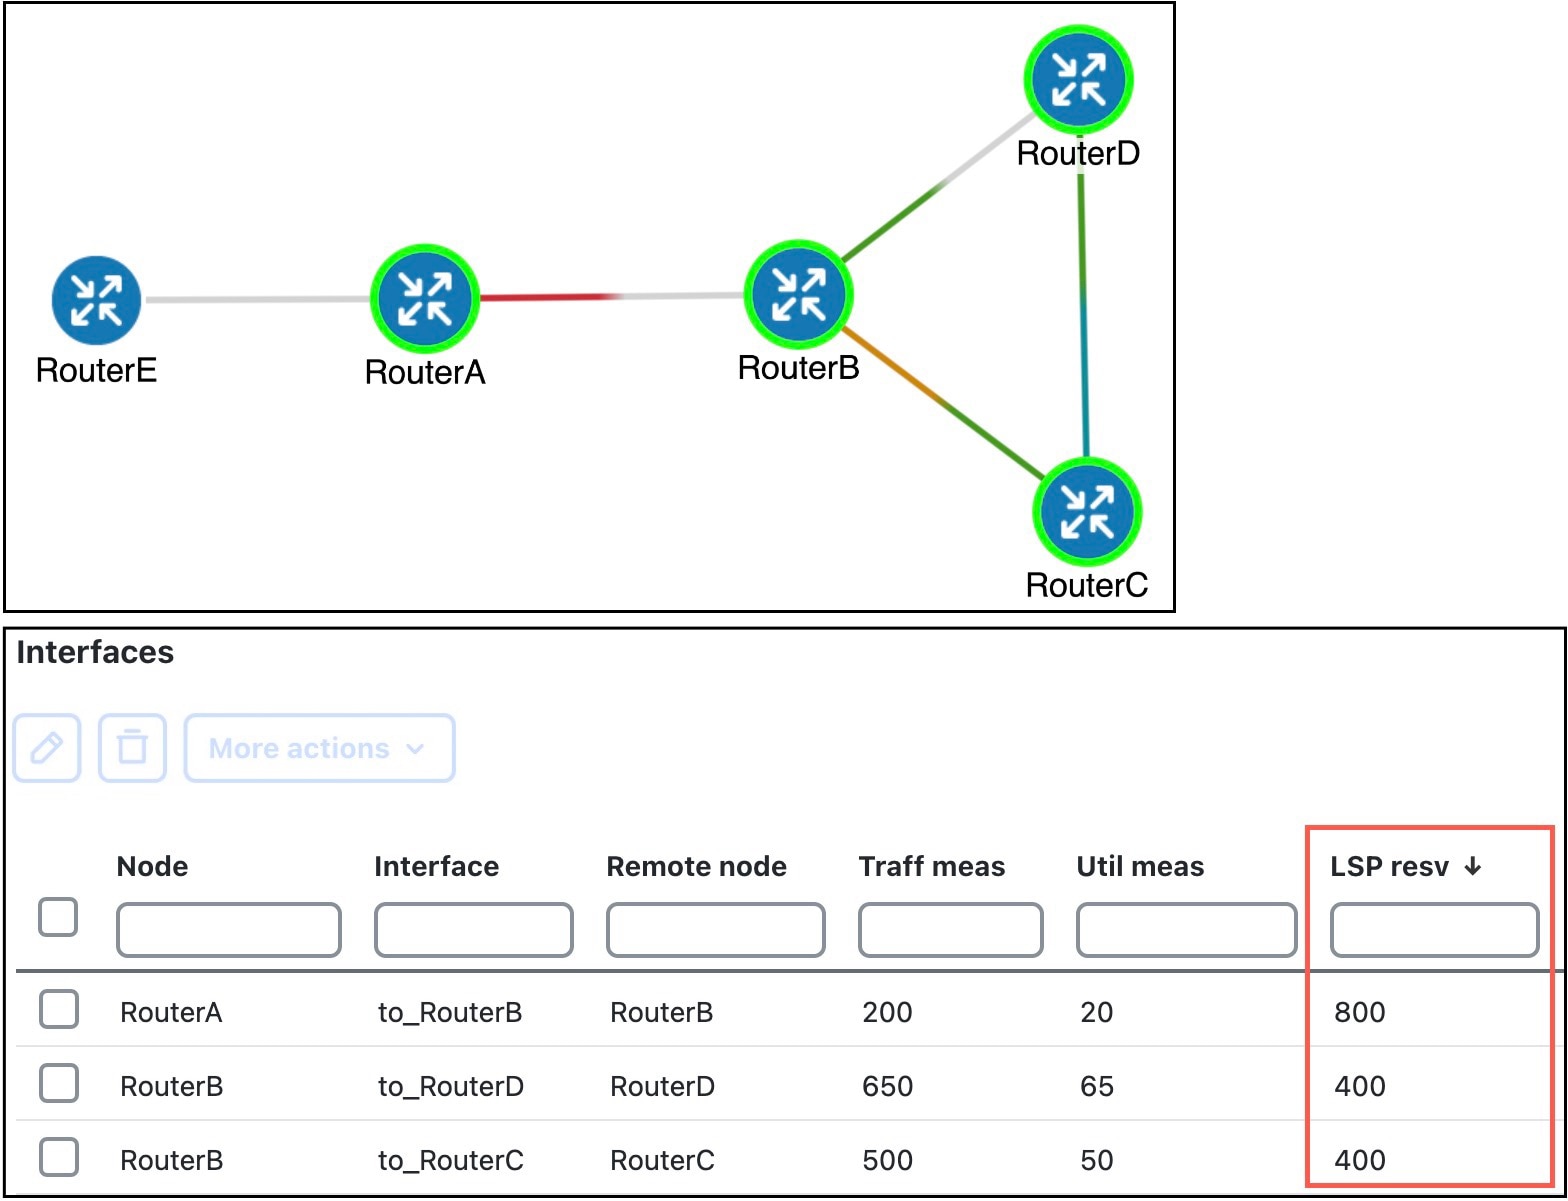
Figure 1. P2MP LSPs and associated sub-LSPs
P2MP LSPs and associated sub-LSPs

P2MP LSP bandwidth

All sub-LSPs within a given P2MP LSP share bandwidth and therefore, common circuits between these sub-LSPs have the same bandwidth, rather than an aggregate. Common practice is to set all sub-LSPs within a P2MP LSP to the same bandwidth. Otherwise, the bandwidth for the shared circuit is the highest bandwidth set.

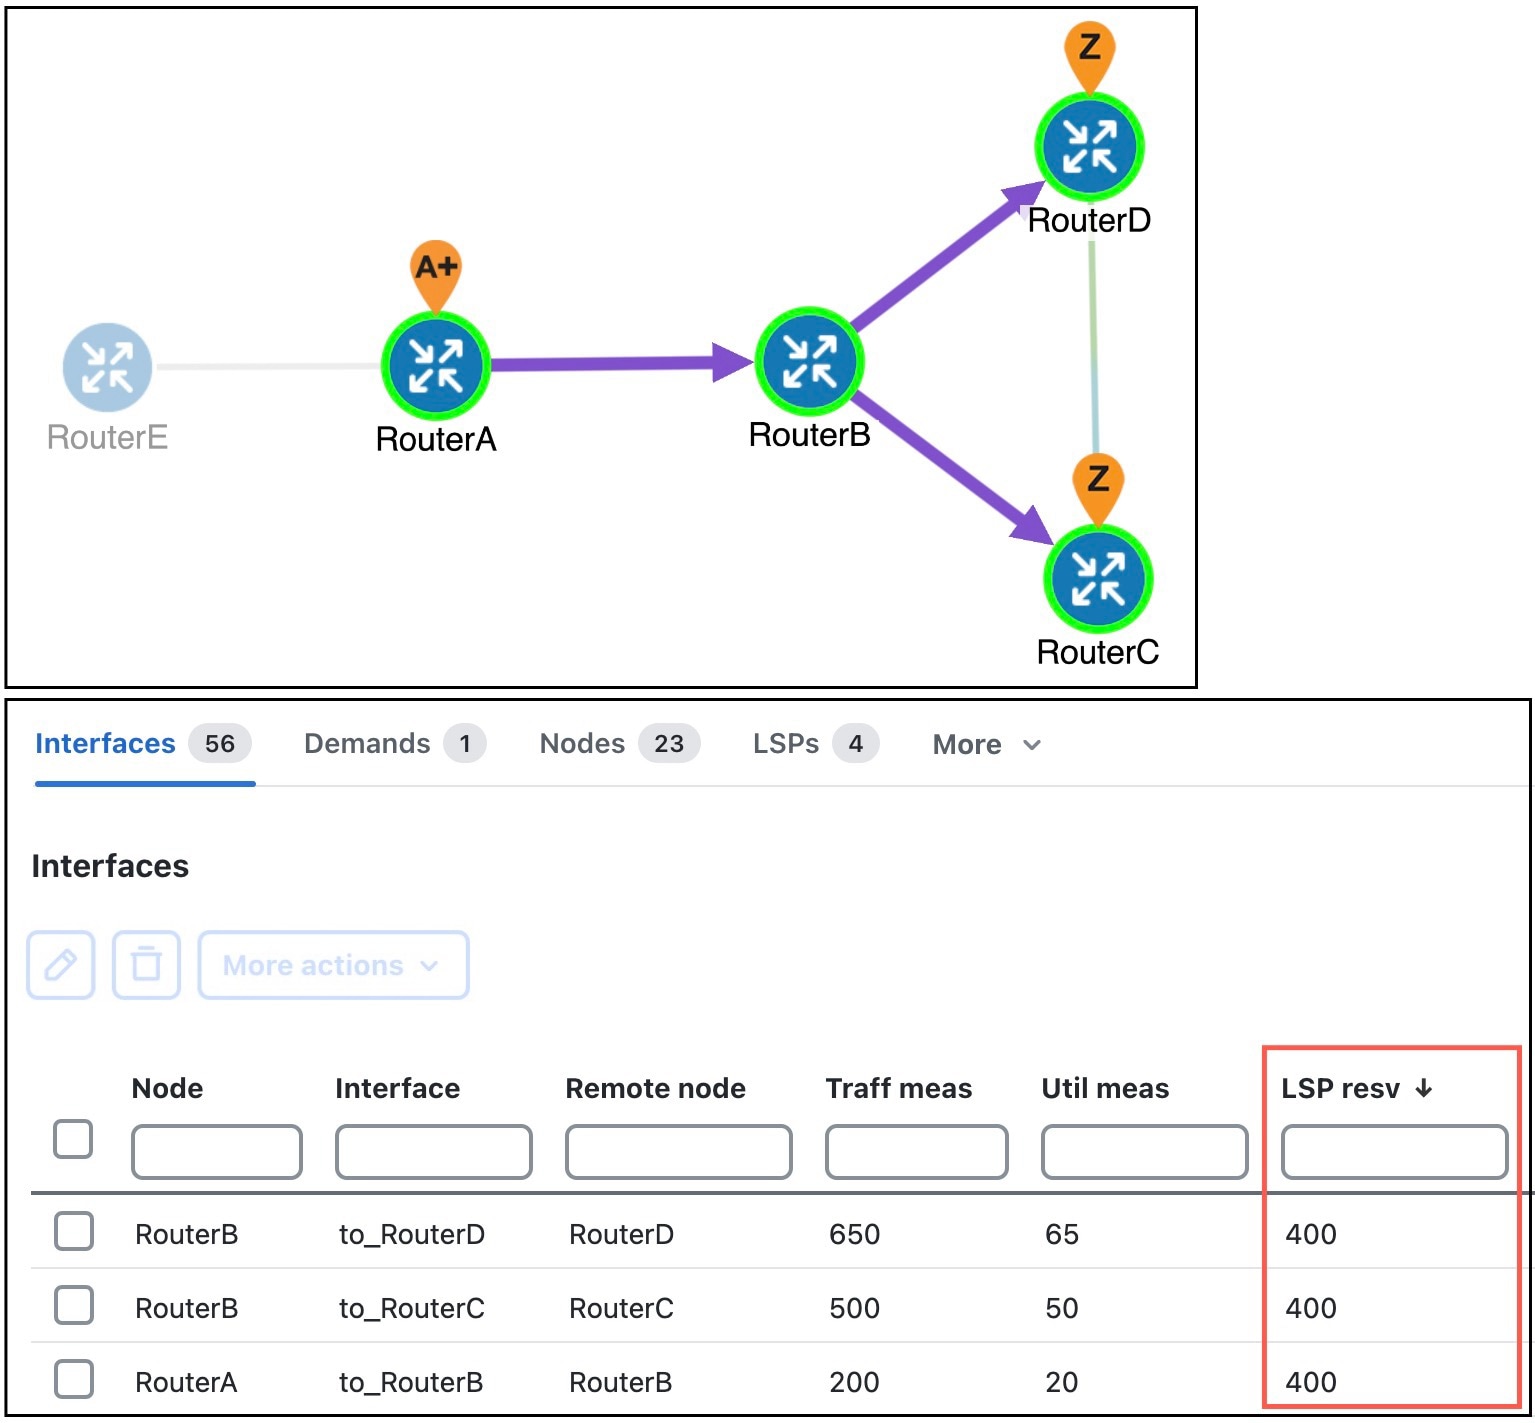
To refer to the reserved LSP bandwidth, show the LSP Resv column in the Interfaces table. You can also view the associated traffic by choosing LSP Reservations in the Network Plot menu in the Visualization toolbar. For more information, refer to View LSP reservations.

Example

Example: If A-C LSP and A-D LSP each have a bandwidth 400 Mbps, the A-B circuit has an aggregate bandwidth of 800 Mbps (Bandwidth behavior without a P2MP LSP). However, if A-C and A-D are sub-LSPs within a P2MP LSP, the A-B circuit has a bandwidth of 400 Mbps (Bandwidth behavior with a P2MP LSP).

Figure 2. Bandwidth behavior without a P2MP LSP
Bandwidth behavior without a P2MP LSP
Figure 3. Bandwidth behavior with a P2MP LSP
Bandwidth behavior with a P2MP LSP

P2MP LSP demands

Demands routed through P2MP LSPs must have the same source as the P2MP LSP; the demand then terminates at each of the P2MP LSP destinations. No other demands can go through the P2MP LSP except for the one created for it. If the P2MP LSP fails, its demand cannot be routed. For information on creating these demands, refer to Create demands for P2MP LSPs.

Demands must be private to the P2MP LSP. This privacy is automatically created when you insert a demand for a P2MP LSP.


Requirements for P2MP LSPs and sub-LSPs

Rules and guidelines:

  • All sub-LSPs within a given P2MP LSP must have the same source site and source node.

  • Because sub-LSPs within a P2MP LSP share setup bandwidth, typically bandwidth is set to the same value for each sub-LSP.


Create P2MP LSPs

Use this task to create P2MP LSPs by selecting sources, destinations, bandwidth settings, and routing properties.

Procedure

1.

Create an empty P2MP LSP.

  1. From the toolbar, choose Actions > Insert > LSPs > P2mp LSP, or click Add icon in the P2MP LSPs table.

  2. Enter a unique P2MP LSP name.

  3. Choose the source site and node. This selection is the root for all sub-LSPs contained in this P2MP LSP.

  4. (Optional) Enter or choose a disjoint group and disjoint priority.

2.

If you have not done so, create sub-LSPs for the P2MP LSP. For more information, refer to Create sub-LSPs.

3.

Associate the sub-LSPs to the P2MP LSP. You can use these steps individually or you can choose multiple LSPs and edit them collectively. If you are editing multiple sub-LSPs, verify that all of them have the same source site and node as the P2MP LSP.

  1. Select the sub-LSPs from the LSPs table and click Edit icon.

  2. In the Sub-LSP of P2MP LSP list under the Other section at the bottom, choose the P2MP LSP to which you want these LSPs to belong.

  3. Click Save.


Create sub-LSPs

Use this task to create sub-LSPs under a P2MP LSP and configure their destination and bandwidth settings.

Procedure

1.

From the toolbar, choose Actions > Insert > LSPs > LSP or click Add icon > LSPs in the LSPs table.

2.

Choose the site and node that will be the source of the P2MP LSP. All sub-LSPs in a P2MP LSP must have the same source site and source node.

3.

Choose the site and node that are the final destination for the sub-LSP.

4.

Complete the remaining optional fields and tabs, as needed. Because sub-LSPs share bandwidth, typically the CSPF Setup bandwidth field is set to the same value for each sub-LSP in the P2MP LSP.

5.

If you have already created the P2MP LSP to which this sub-LSP will belong, choose that P2MP LSP from the Sub-LSP of P2MP LSP list (at the bottom). For creating P2MP LSPs, refer to Create P2MP LSPs.

6.

Save your changes.


Create a mesh of sub-LSPs

Use this task to create a mesh of sub-LSPs from selected source and destination nodes for P2MP routing simulations.

Procedure

1.

In the Nodes table, choose the node you will be designating as the source for the P2MP LSP. All sub-LSPs in a P2MP LSP must have the same source node. A P2MP LSP cannot have multiple source nodes.

2.

From the toolbar, choose Actions > Insert > LSPs > LSP mesh or click Add icon > LSP mesh in the LSPs table.

3.

In the Destination nodes section, uncheck these check boxes and click Next.

  • Same destinations as sources

  • Create LSPs from destination to source

4.

Complete the remaining optional fields as needed and click Next.

5.

To set the bandwidth to be the same for all sub-LSPs in this mesh, choose Fixed Value in the Bandwidth drop-down list. Enter that value in the Fixed value field (in Mbps).

To use the auto bandwidth feature so that these LSPs have their Setup BW sim value automatically calculated and used in auto bandwidth simulations, choose Auto Bandwidth in the Bandwidth drop-down list.

6.

Complete the remaining optional fields as needed and click Submit.


Create demands for P2MP LSPs

To simulate traffic routing through a P2MP LSP, create a demand for it.

Procedure

1.

If you want to create demands for P2MP LSPs, choose one or more P2MP LSPs from the P2MP LSP table.

2.

From the toolbar, choose Actions > Insert > LSPs > Demands for P2MP LSPs or click Add icon > Demands for P2MP LSPs in the LSPs table.

3.

Choose the P2MP LSPs through which you are routing traffic.

4.

(Optional) Choose a service class for the newly created demand.

5.

Choose the desired bandwidth: Minimum sub-LSP Setup BW or Zero.

6.

Submit your changes.


Deletion behavior for P2MP LSPs and sub-LSPs

Deleting a P2MP LSP will invalidate the simulation and remove all demands that use the P2MP LSP as a private LSP. If you do not want all the sub-LSPs deleted, disassociate them first.


Disassociate sub-LSPs from their P2MP LSPs

Use this task to disassociate sub-LSPs from P2MP LSPs so selected sub-LSPs can be preserved during deletion.

Procedure

1.

In the LSPs table, choose one or more sub-LSPs.

2.

Click Edit icon.

Note

If you are editing a single sub-LSP, you can also use the > Edit option under the Actions column.

3.

In the Sub-LSP of P2MP LSP list, perform one of these actions:

  • Choose the empty row to disassociate the sub-LSP and change it to an LSP.

  • Choose a different P2MP LSP to associate the sub-LSP with a different P2MP LSP.

4.

Click OK.


Delete sub-LSPs or P2MP LSPs

Use this task to delete sub-LSPs or P2MP LSPs and choose the cleanup behavior for associated objects.

Procedure

1.

To delete sub-LSPs but keep the P2MP LSP:

  1. Select one or more sub-LSPs in the LSPs table.

  2. Click Delete icon. If you are deleting a single sub-LSP, you can also use the > Delete option under the Actions column.

  3. Click Delete in the confirmation dialog box to continue.

2.

To delete the P2MP LSP:

  1. Select one or more P2MP LSPs in the P2MP LSPs table.

  2. Click Delete icon. If you are deleting a single P2MP LSP, you can also use the > Delete option under the Actions column.

  3. Click Delete in the confirmation dialog box to continue.