ワークグループ ブリッジ

Cisco ワークグループ ブリッジ

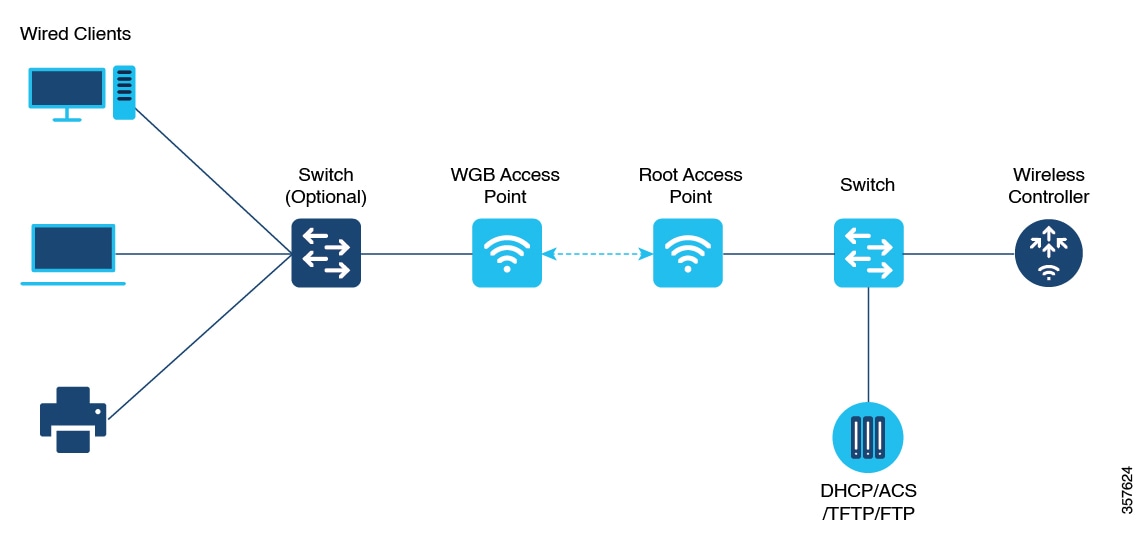
アクセスポイント(AP)モードのワークグループブリッジ(WGB)は、イーサネットポートで WGB AP に接続される有線クライアントへのワイヤレス接続を提供します。WGB はイーサネット インターフェイス上の有線クライアントの MAC アドレスを学習し、Internet Access Point Protocol(IAPP)メッセージングを使用してインフラストラクチャ AP 経由で WLC に報告することで、1 つのワイヤレスセグメントを介して有線ネットワークに接続します。WGB はルート AP への単一のワイヤレス接続を確立し、ルート AP は WGB をワイヤレスクライアントとして扱います。

図 1. WGB の例

Cisco IOS XE Cupertino 17.8.1 以降、WGB は次の Cisco Catalyst 9100 シリーズ アクセスポイントでサポートされます。

  • Cisco Catalyst 9105

  • Cisco Catalyst 9115

  • Cisco Catalyst 9120

Cisco IOS XE Dublin 17.10.1 以降、WGB は次の Cisco Catalyst 9100 シリーズのアクセスポイントでサポートされます。

  • Cisco Catalyst 9124

  • Cisco Catalyst 9130

Cisco IOS XE Cupertino 17.9.1 以降、WGB は、アップリンク(バックホール)接続用の 1 つの無線と、ワイヤレスクライアントにサービスを提供するための別の無線をサポートします。この機能は、Cisco Catalyst 9105 AP、Cisco Catalyst 9115 AP、Cisco Catalyst 9120 AP などの Cisco 11AX AP でサポートされています。

OPEN および PSK セキュリティ(WPA2 パーソナル)ベースのワイヤレスクライアントは、アップリンク接続に関係なく WGB に関連付けることができますが、WGB にアップリンク接続がないとトラフィックを転送できません。Radius サーバーが設定されている必要があり、WGB には、802.1x セキュリティ(WPA2 エンタープライズ)WLAN へのワイヤレスクライアントの認証用のアップリンク接続が必要です。ワイヤレスクライアントでは、IPv4 と IPv6 の両方のトラフィック転送がサポートされています。これらの WLAN では、静的 IP およびパッシブクライアントのサポートがデフォルトで有効になっています。

次の機能は WGB での使用をサポートされています。

表 1. WGB 機能マトリックス

機能

Cisco Wave 1 AP

Cisco Wave 2 および 11AX APs

802.11r

サポート対象

サポート対象

QOS

サポート対象

サポート対象

UWGB モード

サポート対象

Wave 2 AP ではサポート対象

11AX AP ではサポート対象外

IGMP スヌーピングまたはマルチキャスト

サポート対象

サポート対象

802.11W

サポート対象

サポート対象

PI サポート(SNMP なし)

サポート対象

サポート対象外

IPv6

サポート対象

サポート対象

VLAN

サポート対象

サポート対象

802.11i(WPAv2)

サポート対象

サポート対象

ブロードキャストのタグ付け/複製

サポート対象

サポート対象

ユニファイド VLAN クライアント

暗黙的にサポート(CLI は不要)

サポート対象

WGB クライアント

サポート対象

サポート対象

802.1x:PEAP、EAP-FAST、EAP-TLS

サポート対象

サポート対象

NTP

サポート対象

サポート対象

すべての LAN ポートで有線クライアントをサポート

Wired-0 および Wired-1 インターフェイスでサポート

すべての Wired-0、1 および LAN ポート 1、2、3 でサポート

2 番目の無線ワイヤレスクライアントのサポート

サポート対象

Cisco 11AX AP でのみサポート対象

次の表に、WGB に接続する場合の Cisco AP に対してサポートされている認証とサポートされていない認証、およびスイッチングモードを示します。


(注)  


ワークグループ ブリッジ モードは、Cisco IOS XE Bengaluru 17.6.1 の Wi-Fi 6 プラグ着脱可能モジュールでサポートされています。


表 2. サポートされるアクセスポイントと要件

アクセスポイント

要件

Cisco Aironet 2700、3700、1572 シリーズ

自律イメージが必要

Cisco Aironet 2800、3800、4800、1562、および Cisco Catalyst 9105、9115、9120、9124、9130、IW6300、ESW6300 シリーズ

Cisco AireOS 8.8 リリース以降の CAPWAP イメージ

  • MAC フィルタリングは、有線クライアントではサポートされていません。

  • アイドル タイムアウトは、WGB と有線のどちらのクライアントでもサポートされていません。

  • セッション タイムアウトは、有線クライアントには適用されません。

  • Web 認証はサポートされていません。

  • WGB(有線 + ワイヤレス)でサポートされるクライアントの総数は、20 クライアントに制限されています。

  • 証明書のチェーンを使用する場合は、すべての CA 証明書をファイルにコピーし、WGB のトラストポイントにインストールします。そうしないと、サーバー証明書の検証が失敗する可能性があります。

  • WGB に接続された有線クライアントは、WGB の QoS および AAA オーバーライド属性を継承します。

  • WGB がルート AP と通信できるようにするには、WLAN を作成し、[Advanced] 設定で Aironet IE が有効になっていることを確認します。

  • WPA2 エンタープライズ セキュリティは、アップリンク WLAN で FlexConnect ローカルスイッチングまたはファブリック対応 WLAN が有効になっている場合にのみ機能します。

  • Radius オーバーライドは、WGB WLAN に関連付けられているワイヤレスクライアントではサポートされていません。

  • WGB は、パワーインジェクタで使用する場合、dot1x 有線クライアント認証をサポートしません。

    パワーインジェクタは、有線クライアントから受信したすべての EAPOL パケットをドロップし、WGB の wired0 インターフェイスに転送しません。このような場合は、wired0 インターフェイスの背後にある PoE とハブを使用し、有線クライアントをハブに接続します。

  • WGB のリロード後、ハブの背後にある WGB dot1x 有線クライアントは、手動で行わない限り、認証を自動的にトリガーしません。

    WGB がリロードされた後、ハブの背後にある WGB dot1x 有線クライアントは、クライアント側で認証または接続されたままになり、WGB がリロードされたことが通知されません。クライアントは、WGB ブリッジテーブルにも表示されません。認証をトリガーするには、クライアント インターフェイスを手動で無効にしてから有効にする必要があります。

  • dot1x 有線クライアントのイーサネット インターフェイスを無効にしてから再度有効にすると、一部の dot1x 有線クライアントでクライアント認証が失敗することがあります。

WLAN でのワークグループ ブリッジの設定

WLAN で WGB を設定するには、次の手順に従います。

WGB をワイヤレスネットワークに参加させるために、WLAN および関連するポリシープロファイルに特定の設定があります。


(注)  


次に示す設定では、WLAN セキュリティがすでに設定されていることを前提としています。


手順

  コマンドまたはアクション 目的

ステップ 1

configure terminal

例:

Device# configure terminal 

グローバル コンフィギュレーション モードを開始します。

ステップ 2

wlan profile-name

例:

Device(config)# wlan WGB_Test

WLAN コンフィギュレーション サブモードを開始します。profile-name は設定されている WLAN のプロファイル名です。

ステップ 3

ccx aironet-iesupport

例:

Device(config-wlan)# ccx aironet-iesupport
Cisco Client Extensions オプションを設定し、WLAN での Aironet IE のサポートを設定します。

ステップ 4

exit

例:

Device(config-wlan)# exit
WLAN コンフィギュレーション サブモードを終了します。

ステップ 5

wireless profile policy profile-policy

例:

Device(config)# wireless profile policy test-wgb

WLAN ポリシー プロファイルを設定し、ワイヤレス ポリシー コンフィギュレーション モードを開始します。

ステップ 6

description 説明

例:

Device(config-wireless-policy)# description "test-wgb"

ポリシー プロファイルの説明を追加します。

ステップ 7

vlan vlan-no

例:

Device(config-wireless-policy)# vlan 48

プロファイル ポリシーを VLAN に割り当てます。

ステップ 8

wgb vlan

例:

Device(config-wireless-policy)# wgb vlan

WGB VLAN クライアントのサポートを設定します。

ステップ 9

wgb broadcast-tagging

例:

Device(config-wireless-policy)# wgb broadcast-tagging

WLAN で WGB ブロードキャスト タギングを設定します。

ステップ 10

no shutdown

例:

Device(config-wireless-policy)# no shutdown

ポリシープロファイルを再起動します。

ステップ 11

exit

例:

Device(config-wireless-policy)# exit

ワイヤレス ポリシー コンフィギュレーション モードを終了します。

ステップ 12

wireless tag policy policy-tag

例:

Device(config)# wireless tag policy WGB_Policy 

ポリシー タグを設定し、ポリシー タグ コンフィギュレーション モードを開始します。

ステップ 13

wlan profile-name policy profile-policy

例:

Device(config-policy-tag)# wlan WGB_Test policy test-wgb

ポリシー プロファイルを WLAN プロファイルにマッピングします。

ステップ 14

end

例:

Device(config-policy-tag)# end

ポリシー タグ コンフィギュレーション モードを終了し、特権 EXEC モードに戻ります。

コントローラでのワークグループブリッジのステータスの確認

WGB のステータスを確認するには、次のコマンドを使用します。

アクティブなクライアントのワイヤレス固有設定を表示するには、次のコマンドを使用します。

Device# show wireless client summary

ネットワーク上の WGB を表示するには、次のコマンドを使用します。

Device# show wireless wgb summary

特定の WGB に接続された有線クライアントの詳細を表示するには、次のコマンドを使用します。

Device# show wireless wgb mac-address 00:0d:ed:dd:25:82 detail

ワークグループブリッジとして機能するアクセスポイントの設定

Cisco Aironet 2700/3700/1572 シリーズ AP の自律モードへの切り替え

始める前に

特定のアクセスポイントの Autonomous イメージを software.cisco.com からダウンロードして TFTP サーバーに配置します。

手順

  コマンドまたはアクション 目的

ステップ 1

debug capwap console cli

例:

Device# debug capwap console cli

コンソール CLI を有効にします。

ステップ 2

archive download-sw force-reload overwrite tftp:ipaddress filepath filename

例:

Device(config)# archive download-sw force-reload overwrite tftp://10.10.10.1/tftp/c1800.tar

Autonomous イメージをアクセスポイントにダウンロードします。

ワークグループブリッジまたは CAPWAP AP モードでの Cisco Wave 2 AP または 11AX AP の設定(CLI)

手順

  コマンドまたはアクション 目的

ステップ 1

enable

例:

Device# enable

AP の特権モードを開始します。

ステップ 2

ap-type workgroup-bridge

例:

Device# ap-type workgroup-bridge

AP をワークグループ ブリッジ モードに移行します。

ステップ 3

configure ap address ipv4 dhcp または configure ap address ipv4 static ip-address netmask gateway-ipaddress

例:

DHCP IP Address

Device# configure ap address ipv4 dhcp

Static IP Address

Device# configure ap address ipv4 static 10.10.10.2 255.255.255.234 192.168.4.1

DHCP または静的 IP アドレスを設定します。

ステップ 4

configure ap management add username username password password secret secret

例:

Device# configure ap management add username xyz-user password ****** secret cisco

AP 管理用のユーザー名を設定します。

ステップ 5

configure ap hostnamehost-name

例:

Device# configure ap hostname xyz-host

AP のホスト名を設定します。

Cisco Wave 2 および 11AX AP の SSID プロファイルの設定(CLI)

この手順は AP の手順です。次の手順に示す CLI は、AP コンソールでのみ機能し、コントローラでは機能しません。

手順

  コマンドまたはアクション 目的

ステップ 1

configure ssid-profile ssid-profile-name ssid radio-serv-name authentication {open | psk preshared-key key-management {dot11r | wpa2 | dot11w |{optional | required }}| eap profile eap-profile-name key-management {dot11r | wpa2 | dot11w|{optional | required}}

例:

オープン認証を使用した SSID プロファイル。

Device# configure ssid-profile 
test WRT s1 authentication open 

PSK 認証を使用した SSID プロファイル。

Device# configure ssid-profile 
test WRT s1 authentication psk 1234 key-management dot11r optional

EAP 認証を使用した SSID プロファイル。

Device# configure ssid-profile 
test WRT s1 authentication eap profile test2 key-management dot11r optional

SSID プロファイルの認証プロトコル(Open、PSK、または EAP)を選択します。

ステップ 2

configure dot11radio radio-interface mode wgb ssid-profile profle-name

例:

Device# configure dot11radio r1 mode wgb ssid-profile doc-test

SSID プロファイルを無線インターフェイスにアタッチします。

ステップ 3

configure ssid-profile profile-name ssid ssid-name dtim-period value in beacon intervals

例:

Device# configure ssid-profile test ssid s1 dtim-period 50

DTIM 期間を設定します。

(注)  


このコマンドは、Cisco IOS XE Cupertino 17.9.1 以降のワイヤレスクライアントでサポートされています。

ステップ 4

configure qos profile qos-profile-name {bronze | gold | platinum | silver}

例:

Device# configure qos profile qos-profile gold

ゴールド QoS プロファイルを作成します。

ステップ 5

configure ssid-profile profile-name ssid ssid-name qos profile qos-profile-name

例:

Device# configure ssid-profile test ssid s1 qos profile qos-profile

QoS プロファイルを SSID プロファイルにマッピングします。

(注)  


このコマンドは、Cisco IOS XE Cupertino 17.9.1 以降のワイヤレスクライアントでサポートされています。

ステップ 6

configure ssid-profile profle-name delete

例:

Device# configure ssid-profile doc-test delete

(任意)SSID プロファイルを削除します。

ステップ 7

show wgb ssid

例:

Device# show wgb ssid

(任意)設定済みの接続された SSID の要約を表示します。

ステップ 8

show wgb packet statistics

例:

Device# show wgb packet statistics

(任意)管理、制御、およびデータパケットの統計を表示します。

認証サーバーの設定(CLI)

手順

コマンドまたはアクション 目的

configure radius authentication <primary | secondary> add <ipv4|ipv6> address radius-server-ip-address port radius-server-port-number secret radius-secret

例:

Device# configure radius authentication primary add ipv4 192.168.1.2 port 1812 secret Cisco123

IPv4 または IPv6 IP、ポート、およびシークレットを使用して、プライマリおよび(または)セカンダリ RADIUS サーバーを設定します。

Dot1X ログイン情報の設定(CLI)

手順

  コマンドまたはアクション 目的

ステップ 1

configure dot1x credential profile-name username name password password

例:

Device# configure dot1x credential 
test1 username XYZ password *****

dot1x ログイン情報を設定します。

ステップ 2

configure dot1x credential profile-namedelete

例:

Device# configure dot1x credential 
test1 delete 

dot1x プロファイルを削除します。

ステップ 3

clear wgb client{all | single mac-addr }

例:

Device# clear wgb client single xxxx.xxxx.xxxx.xxxx

WGB クライアントの認証を解除します。

EAP プロファイルの設定(CLI)

手順

  コマンドまたはアクション 目的

ステップ 1

configure eap-profile profile-name method {fast | leap | peap | tls}

例:

Device# configure eap-profile test-eap method fast

EAP プロファイルを設定します。

ステップ 2

configure eap-profile profile-name trustpoint default or configure eap-profile profile-name trustpoint name trustpoint-name

例:

MIC 証明書を使用するトラストポイントに対する EAP プロファイル。

Device# configure eap-profile test-eap trustpoint default

CA 証明書を使用するトラストポイントに対する EAP プロファイル。

Device# configure eap-profile 
test-eap trustpoint cisco 

トラストポイントを使用して EAP プロファイルを設定します。

ステップ 3

configure eap-profile profile-name trustpoint {default | name trustpoint-name}

例:

Device# configure eap-profile test-eap trustpoint default

CA トラストポイントをアタッチします。

(注)  


デフォルトプロファイルでは、WGB は認証に内部 MIC 証明書を使用します。

ステップ 4

configure eap-profile profile-name dot1x-credential profile-name

例:

Device# configure eap-profile test-eap dot1x-credential test-profile

802.1X ログイン情報プロファイルを設定します。

ステップ 5

configure eap-profile profile-namedelete

例:

Device# configure eap-profile test-eap delete

(任意)EAP プロファイルを削除します。

ステップ 6

show wgb eap dot1x credential profile

例:

Device# show wgb eap dot1x credential profile 

(任意)WGB EAP dot1x プロファイルの概要を表示します。

ステップ 7

show wgb eap profile

例:

Device# show wgb eap profile 

(任意)EAP プロファイルの概要を表示します。

ステップ 8

show wgb eap profile all

例:

Device# show wgb eap profile all

(任意)EAP および dot1x プロファイルを表示します。

ワークグループブリッジのトラストポイントの手動登録の設定(CLI)

手順

  コマンドまたはアクション 目的

ステップ 1

configure crypto pki trustpoint ca-server-name enrollment terminal

例:

Device# configure crypto pki trustpoint 
ca-server-US enrollment terminal

WGB にトラストポイントを設定します。

ステップ 2

configure crypto pki trustpoint ca-server-name authenticate

例:

Device# configure crypto pki trustpoint 
ca-server-US authenticate 

トラストポイントを手動で認証します。

Base 64 でエンコードされた CA 証明書を入力し、新しい行に quit と入力して証明書を終了します。

ステップ 3

configure crypto pki trustpoint ca-server-name key-size key-length

例:

Device# configure crypto pki trustpoint 
ca-server-Us key-size 60

秘密キーのサイズを設定します。

ステップ 4

configure crypto pki trustpoint ca-server-name subject-name name [2ltr-country-code |state-name |locality |org-name |org-unit |email]

例:

Device# configure crypto pki trustpoint 
ca-server-US subject-name test US CA abc cisco AP test@cisco.com

サブジェクト名を設定します。

ステップ 5

configure crypto pki trustpoint ca-server-name enrol

例:

Device# configure crypto pki trustpoint 
ca-server-US enroll

秘密キーと証明書署名要求(CSR)を生成します。

その後、CA サーバーの CSR 出力を使用して、デジタル署名付き証明書を作成します。

ステップ 6

configure crypto pki trustpoint ca-server-name import certificate

例:

Device# configure crypto pki trustpoint 
ca-server-US import certificate

WGB に署名済み証明書をインポートします。

Base 64 でエンコードされた CA 証明書を入力し、新しい行で quit コマンドを使用して証明書を終了します。

ステップ 7

configure crypto pki trustpoint ca-server-name delete

例:

Device# configure crypto pki trustpoint 
ca-server-US delete

(任意)トラストポイントを削除します。

ステップ 8

show crypto pki trustpoint

例:

Device# show crypto pki trustpoint

(任意)トラストポイントサマリーを表示します。

ステップ 9

show crypto pki trustpoint trustpoint-name certificate

例:

Device# show crypto pki trustpoint ca-server-US certificate

(任意)トラストポイント用に作成された証明書の格納ファイルを表示します。

ワークグループブリッジのトラストポイントの自動登録の設定(CLI)

手順

  コマンドまたはアクション 目的

ステップ 1

configure crypto pki trustpoint ca-server-name enrollment url ca-server-url

例:

Device# configure crypto pki trustpoint 
ca-server-US enrollment url https://cisco/certsrv

サーバー URL を使用して、WGB にトラストポイントを登録します。

ステップ 2

configure crypto pki trustpoint ca-server-name authenticate

例:

Device# configure crypto pki trustpoint 
ca-server-US authenticate 

CA サーバーから CA 証明書を自動的に取得してトラストポイントを認証します。

ステップ 3

configure crypto pki trustpoint ca-server-name key-size key-length

例:

Device# configure crypto pki trustpoint 
ca-server-Us key-size 60

秘密キーのサイズを設定します。

ステップ 4

configure crypto pki trustpoint ca-server-name subject-name name [2ltr-country-code |state-name |locality |org-name |org-unit |email ]

例:

Device# configure crypto pki trustpoint 
ca-server-US subject-name test US CA abc cisco AP test@cisco.com

サブジェクト名を設定します。

ステップ 5

configure crypto pki trustpoint ca-server-name enrol l

例:

Device# configure crypto pki trustpoint 
ca-server-US enroll

トラストポイントを登録します。

CA サーバーのデジタル署名付き証明書を要求します。

ステップ 6

configure crypto pki trustpoint ca-server-name auto-enroll enable renew-percentage

例:

Device# configure crypto pki trustpoint 
ca-server-US auto-enroll enable  10

トラストポイントの自動登録を有効にします。

コマンドで disable オプションを使用することで、自動登録を無効化できます。

ステップ 7

configure crypto pki trustpointtrustpoint-name delete

例:

Device# configure crypto pki trustpoint 
ca-server-US delete

(任意)トラストポイントを削除します。

ステップ 8

show crypto pki trustpoint

例:

Device# show crypto pki trustpoint

(任意)トラストポイントサマリーを表示します。

ステップ 9

show crypto pki trustpointtrustpoint-name certificate

例:

Device# show crypto pki trustpoint 
ca-server-US certificate

(任意)トラストポイント用に作成された証明書の格納ファイルを表示します。

ステップ 10

show crypto pki timers

例:

Device# show crypto pki timers

(任意)PKI タイマー情報を表示します。

TFTP サーバーを使用した手動での証明書登録の設定(CLI)

手順

  コマンドまたはアクション 目的

ステップ 1

configure crypto pki trustpoint ca-server-name enrollment tftp addr/file-name

例:

Device# configure crypto pki trustpoint 
ca-server-US enrollment tftp://10.8.0.6/all_cert.txt

WGB のトラストポイントの CA 証明書とクライアント証明書を取得するための登録方式を指定します。

ステップ 2

configure crypto pki trustpoint ca-server-name authenticate

例:

Device# configure crypto pki trustpoint 
ca-server-US authenticate 

指定された TFTP サーバから CA 証明書を取得して認証します。ファイル指定が含まれている場合は、WGB は指定されたファイル名に「.ca」という拡張子を付加します。

ステップ 3

configure crypto pki trustpoint ca-server-name key-size key-length

例:

Device# configure crypto pki trustpoint 
ca-server-Us key-size 60

秘密キーのサイズを設定します。

ステップ 4

configure crypto pki trustpoint ca-server-name subject-name name [2ltr-country-code |state-name |locality |org-name |org-unit |email ]

例:

Device# configure crypto pki trustpoint 
ca-server-US subject-name test US CA abc cisco AP test@cisco.com

サブジェクト名を設定します。

ステップ 5

configure crypto pki trustpoint ca-server-name enrol

例:

Device# configure crypto pki trustpoint 
ca-server-US enroll

秘密キーと証明書署名要求(CSR)を生成し、この要求を TFTP サーバーに書き込みます。書き込まれるファイル名には「.req」という拡張子が付加されます。

ステップ 6

configure crypto pki trustpoint ca-server-name import certificate

例:

Device# configure crypto pki trustpoint 
ca-server-US import certificate

許可された証明書を取得するコンソール端末で、TFTP を使用して WGB に署名済み証明書をインポートします。

WGB は、同じファイル名とファイル名に「.crt」拡張子を付けたものを使用して、TFTP を使用して付与された証明書の取得を試行します。

ステップ 7

show crypto pki trustpoint

例:

Device# show crypto pki trustpoint

(任意)トラストポイントサマリーを表示します。

ステップ 8

show crypto pki trustpoint trustpoint-name certificate

例:

Device# show crypto pki trustpoint ca-server-US certificate

(任意)トラストポイント用に作成された証明書の格納ファイルを表示します。

TFTP サーバーからの PKCS12 形式証明書のインポート(CLI)

手順

  コマンドまたはアクション 目的

ステップ 1

configure crypto pki trustpoint ca-server-name import pkcs12 tftp addr/file-name password pwd

例:

Device# configure crypto pki trustpoint 
ca-server-US enrollment tftp://10.8.0.6/all_cert.txt password ******

TFTP サーバーから PKCS12 形式証明書をインポートします。

ステップ 2

show crypto pki trustpoint

例:

Device# show crypto pki trustpoint

(任意)トラストポイントサマリーを表示します。

ステップ 3

show crypto pki trustpoint trustpoint-name certificate

例:

Device# show crypto pki trustpoint ca-server-US certificate

(任意)トラストポイント用に作成された証明書の格納ファイルを表示します。

ワークグループブリッジの無線インターフェイスの設定(CLI)

使用可能な 2 つの無線インターフェイスから、一方の無線インターフェイスで WGB または UWGB モードを設定する前に、もう一方の無線インターフェイスをルート AP モードに設定します。

手順

  コマンドまたはアクション 目的

ステップ 1

configure dot11radio radio-int mode root-ap

例:

Device# configure dot11Radio 0/3/0 mode root-ap

無線インターフェイスをルート AP としてマッピングします。

(注)  


アクティブな SSID または EAP プロファイルが変更された場合、更新されたプロファイルをアクティブにするには、プロファイルを無線インターフェイスに再度関連付ける必要があります。

ステップ 2

configure dot11Radio <0|1> wlan add ssid-profile-name ssid-number

例:

Device# configure dot11radio 1 wlan add ssid-profile-name ssid-number

ルート AP モード無線で WLAN を設定します。SSID プロファイル名と SSID 番号(1 ~ 16)を入力します。

ステップ 3

configure dot11Radio <0|1> wlan delete ssid-profile-name

例:

Device# configure dot11radio 1 wlan delete ssid-profile-name

無線設定から WLAN を削除します。SSID プロファイル名を入力します。

ステップ 4

configure dot11Radio <0|1> channel channel-number width

例:

Device# configure dot11radio 1 channel 36 80

SSID をブロードキャストする無線チャネルを設定します。チャネル番号の範囲は 1 ~ 173 です。チャネル幅の値は、20、40、80、および 160 です。

(注)  

 
  • 無線 0(2.4 GHz バンド)では、20MHz のチャネル幅のみがサポートされます。

  • 無線 1 の設定チャネルでレーダーが検出されると、チャネルは自動的にチャネル幅 20MHz の非 DFS チャネルに変更されます。管理者は無線をリセットして、設定されたチャネルに戻す必要があります。

ステップ 5

configure dot11Radio <0|1> beacon-period beacon-interval

例:

Device# configure dot11radio 1 beacon-period 120

定期ビーコン間隔をミリ秒単位で設定します。値の範囲は 2 ~ 2000 ミリ秒です。

ステップ 6

configure dot11Radio radio-int mode wgb ssid-profile ssid-profile-name

例:

Device# configure dot11Radio 0/3/0 mode wgb ssid-profile bgl18

無線インターフェイスを WGB SSID プロファイルにマッピングします。

ステップ 7

configure dot11Radio radio-int mode uwgb mac-addr ssid-profile ssid-profile-name

例:

Device# configure dot11Radio 0/3/0 mode uwgb 0042.5AB6.0EF0 ssid-profile bgl18

無線インターフェイスを WGB SSID プロファイルにマッピングします。

ステップ 8

configure dot11Radio radio-int {enable| disable}

例:

Device# configure dot11Radio 0/3/0 mode enable

無線インターフェイスを設定します。

(注)  


SSID プロファイルにアップリンクを設定した後、変更をアクティブにするために無線の無効化と有効化を行うことをお勧めします。

ステップ 9

configure dot11Radio radio-int antenna {a-antenna | ab-antenna | abc-antenna | abcd-antenna}

例:

Device# configure dot11Radio 0/3/0 antenna a-antenna

無線アンテナを設定します。

ステップ 10

configure dot11Radio radio-int encryption mode ciphers aes-ccm {

例:

Device# configure dot11Radio radio-int encryption mode ciphers aes-ccm

無線インターフェイスを設定します。

ステップ 11

configure wgb mobile rate {basic 6 9 18 24 36 48 54 | mcs mcs-rate}

例:

Device# configure wgb mobile rate basic 6 9 18 24 36 48 54 

デバイスチャネルレートを設定します。

ステップ 12

configure wgb mobile period secondsthres-signal

例:

Device# configure wgb mobile period 30 –50

スキャンをトリガーするしきい値の継続時間と信号強度を設定します。

ステップ 13

configure wgb mobile station interface dot11Radio radio-int scan channel-number add

例:

Device# configure wgb mobile station interface 
dot11Radio 0/3/0 scan 2 add

静的ローミングチャネルを設定します。

ステップ 14

configure wgb mobile station interface dot11Radio radio-int scan channel-number delete

例:

Device# configure wgb mobile station interface 
dot11Radio 0/3/0 scan 2 delete

(オプション)モバイルチャネルを削除します。

ステップ 15

configure wgb mobile station interface dot11Radio radio-int scan disable

例:

Device# configure wgb mobile station interface 
dot11Radio 0/3/0 scan disable

(オプション)モバイルチャネルを無効にします。

ステップ 16

configure wgb beacon miss-count value

例:

Device# configure wgb beacon miss-count 12

(オプション)ビーコンミスカウントを設定します。デフォルトでは、無効に設定されています。

(注)  


ビーコンミスカウント値を 10 以下に設定すると、ビーコンミスカウントは無効になります。この機能を有効にするには、値を 11 以上に設定します。

ステップ 17

show wgb wifi wifi-interface stats

例:

Device# show wgb wifi 0/3/0 stats

(オプション)Wi-Fi ステーション統計を表示します。

ステップ 18

show controllers dot11Radio radio-interface antenna

例:

Device# show controllers dot11Radio 0/3/0 antenna

(オプション)無線アンテナ統計を表示します。

ステップ 19

show wgb mobile scan channel

例:

Device# show wgb mobile scan channel

(オプション)モバイルステーションのチャネルスキャン設定を表示します。

ステップ 20

show configuration

例:

Device# show configuration

(オプション)NV メモリに保存されている設定を表示します。

ステップ 21

show running-config

例:

Device# show running-config

(オプション)デバイスの実行コンフィギュレーションを表示します。

ワークグループブリッジのタイムアウトの設定(CLI)

手順

  コマンドまたはアクション 目的

ステップ 1

configure wgb association response timeout response-millisecs

例:

Device# configure wgb association 
response timeout 4000

WGB アソシエーション応答のタイムアウトを設定します。デフォルト値は 5000 ミリ秒です。有効な範囲は 300 ~ 5000 ミリ秒です。

ステップ 2

configure wgb authentication response timeout response-millisecs

例:

Device# configure wgb authentication  
response timeout 4000

WGB 認証応答のタイムアウトを設定します。デフォルト値は 5000 ミリ秒です。有効な範囲は 300 ~ 5000 ミリ秒です。

ステップ 3

configure wgb uclient timeout timeout-secs

例:

Device# configure wgb uclient timeout 70

ユニバーサル WGB クライアント応答のタイムアウトを設定します。デフォルトのタイムアウト値は 60 秒です。有効な範囲は 1 ~ 65535 秒です。

ステップ 4

configure wgb eap timeout timeout-secs

例:

Device# configure wgb eap timeout 20

WGB EAP のタイムアウトを設定します。デフォルトのタイムアウト値は 3 秒です。有効な範囲は、2 ~ 60 秒です。

ステップ 5

configure wgb channel scan timeout {fast| medium | slow}

例:

Device# configure wgb channel scan timeout slow

WGB チャネルスキャンのタイムアウトを設定します。

ステップ 6

configure wgb dhcp response timeout timeout-secs

例:

Device# configure wgb dhcp response timeout 70

WGB DHCP 応答のタイムアウトを設定します。デフォルト値は 60 秒です。有効な範囲は 1000 ~ 60000 ミリ秒です。

ステップ 7

show wgb dot11 association

例:

Device# show wgb dot11 association

WGB アソシエーションの概要を表示します。

ワークグループブリッジのブリッジ転送の設定(CLI)

始める前に

ワークグループブリッジとしての Cisco Wave 2 および 11AX AP は、トラフィックにブリッジングタグがある場合にのみイーサネットクライアントを認識します。

次のような変更が予想される環境では、WGB ブリッジクライアントのタイムアウト値をデフォルト値の 300 秒以下に設定することを推奨します。

  • イーサネットケーブルが取り外され、再度接続される。

  • エンドポイントが変更される。

  • エンドポイント IP が変更される(静的から DHCP、またはその逆)。

より長い期間 WGB テーブルにクライアントエントリを保持する必要がある場合は、クライアント WGB ブリッジタイムアウト時間を増やすことを推奨します。

手順

  コマンドまたはアクション 目的

ステップ 1

configure wgb bridge client add mac-address

例:

Device# configure wgb bridge client add F866.F267.7DFB-

MAC アドレスを使用して WGB クライアントを追加します。

ステップ 2

configure wgb bridge client timeout timeout-secs

例:

Device# configure wgb bridge client timeout 400

WGB ブリッジクライアントのタイムアウトを設定します。デフォルトのタイムアウト値は 300 秒です。有効な範囲は 10 ~ 1000000 秒です。

ステップ 3

show wgb bridge

例:

Device# show wgb bridge

ブリッジを介した WGB 有線クライアントを表示します。

ステップ 4

show wgb bridge wired gigabitEthernet interface

例:

Device# show wgb bridge wired gigabitEthernet 0/1

ブリッジを介した WGB ギガビット有線クライアントを表示します。

ステップ 5

show wgb bridge dot11Radio interface-number

例:

Device# show wgb bridge dot11Radio 0/3/1

WGB ブリッジ無線インターフェイスの概要を表示します。

WGB 設定の簡素化について

Cisco IOS XE Cupertino 17.8.1 以降では、複数のシスコ アクセスポイント(AP)で WGB を同時に設定できます。実行コンフィギュレーションをインポートすることで、複数の WGB をネットワークに展開して、それらを迅速に動作させることができます。新しい Cisco AP がネットワークに追加された場合、既存の設定または動作中の設定を新しい Cisco AP に転送して、それらを動作させることができます。この機能拡張により、ログイン後に CLI を使用して複数の Cisco AP を設定する必要がなくなります。

ネットワーク管理者は、次のいずれかの方法を使用して Cisco AP を導入準備できます。

  • 既存の Cisco AP からサーバーに動作中の設定をアップロードし、新しく展開された Cisco AP にダウンロードします。

  • 展開内のすべての Cisco AP にサンプル設定を送信します。

この機能は次の Cisco AP のみでサポートされています。

  • Cisco Aironet 1562 アクセスポイント

  • Cisco Aironet 2800 アクセスポイント

  • Cisco Aironet 3800 アクセスポイント

  • Cisco Catalyst 9105 アクセスポイント

  • Cisco Catalyst 9115 アクセスポイント

  • Cisco Catalyst 9120 アクセスポイント

  • Cisco Catalyst IW6300 シリーズ Heavy Duty アクセスポイント

Cisco IOS XE リリースの Cisco Wave 2 および 802.11ax(Wi-Fi 6)アクセス ポイントのさまざまな機能に関する最新のサポート情報については、『Feature Matrix for Wave 2 and 802.11ax (Wi-Fi 6) Access Points』を参照してください。

複数の WGB の設定(CLI)

WGB モードの AP で次の手順を実行します。

手順

  コマンドまたはアクション 目的

ステップ 1

enable

例:

Device# enable

特権 EXEC モードを開始します。

ステップ 2

copy configuration upload{sftp:| tftp:} ip-address [directory] [file-name]

例:

Device# copy configuration upload sftp: 10.10.10.1 C:sample.txt

アップロード構成ファイルを作成し、指定されたパスを使用して SFTP または TFTP サーバーにアップロードします。

ステップ 3

copy configuration download{sftp:| tftp:} ip-address [directory] [file-name]

例:

Device# copy configuration download sftp: 10.10.10.1 C:sample.txt

構成ファイルをダウンロードし、AP の古い設定を置き換え、WGB を再起動します。デバイスを再起動すると、新しい設定が適用されます。

ステップ 4

show wgb dot11 association

例:

Device# show wgb dot11 association

WGB アップリンク情報を一覧表示します。

ステップ 5

show version

例:

Device# show version

AP ソフトウェア情報を表示します。

WGB 設定の確認

設定のダウンロードと AP の再起動が完了すると、WGB はネットワークに再参加します。デバッグログでキャプチャされたダウンロードイベントを一覧表示して確認するには、show logging コマンドを使用します。

Device# show logging

Jan 13 18:19:17 kernel: [*01/13/2022 18:19:17.4880] WGB - Applying download config...
Jan 13 18:19:18 download_config: configure clock timezone UTC
Jan 13 18:19:18 download_config: configure dot1x credential dot1x_profile username wifiuser password U2FsdGVkX1+8PWmAOnFO8BXyk5EAphMy2PmhPPhWV0w=
Jan 13 18:19:18 download_config: configure eap-profile eap_profile method PEAP
Jan 13 18:19:18 download_config: configure eap-profile eap_profile dot1x-credential dot1x_profile
Jan 13 18:19:18 chpasswd: password for user changed
Jan 13 18:19:18 kernel: [*01/13/2022 18:19:18.7260] chpasswd: password for user changed
Jan 13 18:19:18 kernel: [*01/13/2022 18:19:18.7610] 
Jan 13 18:19:18 kernel: [*01/13/2022 18:19:18.7610]  Management user configuration saved successfully
Jan 13 18:19:18 kernel: [*01/13/2022 18:19:18.7610] 
Jan 13 18:19:18 kernel: [*01/13/2022 18:19:18.7650] Warning!!! Attach SSID profile with the radio to use the new changes.
Jan 13 18:19:18 kernel: [*01/13/2022 18:19:18.7650] 
Jan 13 18:19:18 kernel: [*01/13/2022 18:19:18.7650]  Dot1x credential configuration has been saved successfully
Jan 13 18:19:18 kernel: [*01/13/2022 18:19:18.7650] 
Jan 13 18:19:18 kernel: [*01/13/2022 18:19:18.7740] Warning!!! Attach SSID profile with the radio to use the new changes.
Jan 13 18:19:18 kernel: [*01/13/2022 18:19:18.7740] 
Jan 13 18:19:18 kernel: [*01/13/2022 18:19:18.7740]  EAP profile configuration has been saved successfully
Jan 13 18:19:18 kernel: [*01/13/2022 18:19:18.7740] 
Jan 13 18:19:18 kernel: [*01/13/2022 18:19:18.7790] Warning!!! Attach SSID profile with the radio to use the new changes.
Jan 13 18:19:18 kernel: [*01/13/2022 18:19:18.7790] 
Jan 13 18:19:18 kernel: [*01/13/2022 18:19:18.7790]  EAP profile configuration has been saved successfully
Jan 13 18:19:18 kernel: [*01/13/2022 18:19:18.7790] 
Jan 13 18:19:18 kernel: [*01/13/2022 18:19:18.7830] Warning!!! Attach SSID profile with the radio to use the new changes.
Jan 13 18:19:18 kernel: [*01/13/2022 18:19:18.7830] 
Jan 13 18:19:18 download_config: configure ssid-profile psk ssid alpha_psk authentication psk U2FsdGVkX18meBfFFeiC4sgkEmbGPNH/ul1dne6h/m8= key-management wpa2
Jan 13 18:19:18 kernel: [*01/13/2022 18:19:18.7930] Warning!!! Attach SSID profile with the radio to use the new changes.
Jan 13 18:19:18 kernel: [*01/13/2022 18:19:18.7930] 
Jan 13 18:19:18 kernel: [*01/13/2022 18:19:18.7930]  EAP profile configuration has been saved successfully
Jan 13 18:19:18 kernel: [*01/13/2022 18:19:18.7930] 
Jan 13 18:19:18 download_config: configure ssid-profile open ssid alpha_open authentication open
Jan 13 18:19:18 download_config: configure ssid-profile openax ssid alpha_open_ax authentication open
Jan 13 18:19:18 kernel: [*01/13/2022 18:19:18.8650]  SSID-Profile dot1xpeap has been saved successfully 
Jan 13 18:19:18 kernel: [*01/13/2022 18:19:18.8650] 
Jan 13 18:19:18 kernel: [*01/13/2022 18:19:18.9270]  SSID-Profile psk has been saved successfully 
Jan 13 18:19:18 kernel: [*01/13/2022 18:19:18.9270] 
Jan 13 18:19:19 kernel: [*01/13/2022 18:19:19.0380]  SSID-Profile open has been saved successfully 
Jan 13 18:19:19 kernel: [*01/13/2022 18:19:19.0380] 
Jan 13 18:19:19 kernel: [*01/13/2022 18:19:19.0380]  SSID-Profile openax has been saved successfully 
Jan 13 18:19:19 kernel: [*01/13/2022 18:19:19.0380] 
Jan 13 18:19:22 download_config: configure wgb broadcast tagging disable
Jan 13 18:19:22 download_config: configure wgb packet retries 64 drop
Jan 13 18:19:22 kernel: [*01/13/2022 18:19:22.9710] Broadcast tagging 0 successfully
Jan 13 18:19:22 kernel: [*01/13/2022 18:19:22.9710] 
Jan 13 18:19:23 download_config: configure dot11Radio 1 mode wgb ssid-profile open
Jan 13 18:19:23 download_config: configure dot11Radio 1 enable
Jan 13 18:19:23 download_config: configure ap address ipv6 disable