Cisco APIC Layer 3 Networking Configuration Guide, Release 6.2(x)

PDF

Cisco APIC Layer 3 Networking Configuration Guide, Release 6.2(x)

Configure an SR-MPLS VRF L3Out using the GUI

Want to summarize with AI?

Log in

Configure an SR-MPLS VRF L3Out to forward traffic from the SR-MPLS infra L3Out and enable communication between tenant VRFs and external networks.


Configure an SR-MPLS VRF L3Out to enable traffic forwarding from SR-MPLS infra L3Outs and establish connectivity between tenant VRFs and external networks.
SR-MPLS VRF L3Outs forward traffic from SR-MPLS infra L3Outs and map user tenant VRFs to advertise tenant bridge domain subnets to DC-PE routers while importing MPLS VPN routes. You must specify routing and security policies for each VRF, with one SR-MPLS VRF L3Out supported per VRF.

Before you begin

Procedure

1.

Navigate to the Create SR-MPLS VRF L3Out window for the tenant.

Example:

Navigate to Tenants > tenant > Networking > SR-MPLS VRF L3Outs.

2.

Right-click on SR-MPLS VRF L3Outs and select Create SR-MPLS VRF L3Out.

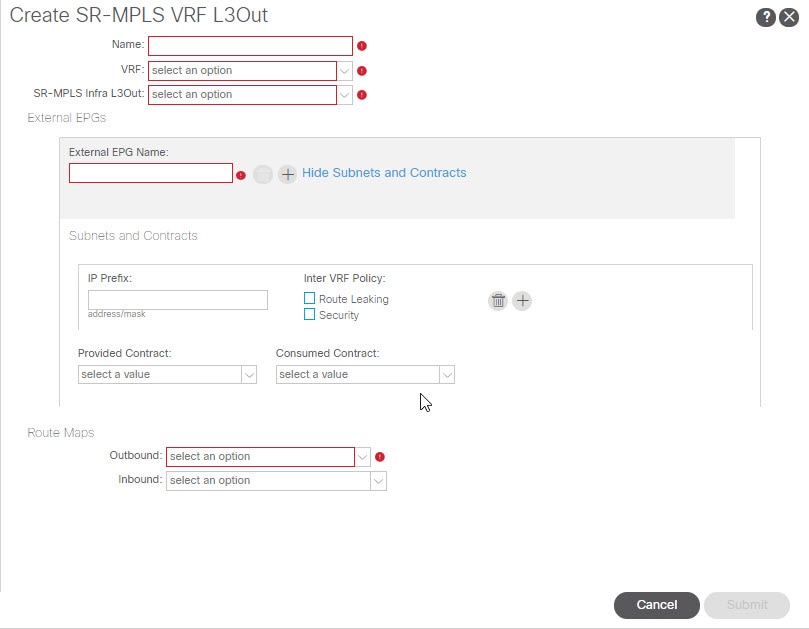
The Create SR-MPLS VRF L3Out window appears.

Figure 1. Create SR-MPLS VRF L3Out
3.

In the Name field, enter a name for the SR-MPLS VRF L3Out.

This will be the name for the policy controlling connectivity to the outside. The name can be up to 64 alphanumeric characters.

Note

You cannot change this name after the object has been saved.

4.

In the VRF field, select an existing VRF or click Create VRF to create a new VRF.

5.

In the SR-MPLS Infra L3Out field, select an existing SR-MPLS infra L3Out or click Create SR-MPLS Infra L3Out to create a new SR-MPLS infra L3Out.

For more information on creating an SR-MPLS infra L3Out, see Configure an SR-MPLS infra L3Out using the GUI.

6.

Navigate to the External EPGs area and, in the External EPG Name area, enter a unique name for the external EPG to be used for this SR-MPLS VRF L3Out.

7.

Navigate to the Subnets and Contracts area and configure individual subnets within this EPG.

Note

If you want to configure the subnet fields but you do not see the following fields, click Show Subnets and Contracts to display the following fields.

  1. In the IP Prefix field, enter an IP address and netmask for the subnet.

  2. In the Inter VRF Policy field, determine if you want configure inter-VRF policies.

    • If you do not want to configure inter-VRF policies, skip to 7.c.

    • If you want to configure inter-VRF policies, select the appropriate inter-VRF policy that you want to use.

      The options are:

      • Route Leaking.

        If you select Route Leaking, the Aggregate field appears. Click the box next to Aggregate if you also want to enable this option.

      • Security.

      Note that you can select one of the two options listed above or both options for the Inter VRF Policy field.

  3. In the Provided Contract field, select an existing provider contract or click Create Contract to create a provider contract.

  4. In the Consumed Contract field, select an existing consumer contract or click Create Contract to create a consumer contract.

  5. Determine if you want to configure additional subnets for this external EPG.

    • If you do not want to configure additional subnets for this external EPG, skip to StepĀ 8.

    • If you want to configure additional subnets for this external EPG, click + in the Subnet and Contracts area to bring up the same options for another subnet.

      Note

      If you want to delete the information that you entered for a subnet, or if you want to delete a subnet row that you added by accident, click the trash can icon for the subnet row that you want to delete.

8.

Determine if you want to create additional external EPGs to be used for this SR-MPLS VRF L3Out.

  • If you do not want to configure additional external EPGs to be used for this SR-MPLS VRF L3Out, skip to StepĀ 9.

  • If you want to configure additional external EPGs to be used for this SR-MPLS VRF L3Out, click + in the External EPG Name area to bring up the same options for another external EPG.

    Note

    If you want to delete the information that you entered for an external EPG, or if you want to delete an external EPG area that you added by accident, click the trash can icon for the external EPG area that you want to delete.

9.

In the Route Maps area, configure the outbound and inbound route maps.

Within each SR-MPLS VRF L3Out:

  • Defining the outbound route map (export routing policy) is mandatory. This is needed to be able to advertise prefixes toward the external DC-PE routers.

  • Defining the inbound route map (import routing policy) is optional, because, by default, all the prefixes received from the DC-PE routers are allowed into the fabric.

  1. In the Outbound field, select an existing export route map or click Create Route Maps for Route Control to create a new export route map.

  2. In the Inbound field, select an existing import route map or click Create Route Maps for Route Control to create a new import route map.

10.

When you have completed the configurations in the Create SR-MPLS VRF L3Out window, click Submit.

The SR-MPLS VRF L3Out is successfully configured and can now forward traffic between tenant VRFs and external networks through the associated SR-MPLS infra L3Out.