Configuration Guide for Cisco Optical Site Manager, IOS XR Release 26.x.x

PDF

Configuration Guide for Cisco Optical Site Manager, IOS XR Release 26.x.x

Add card mode for NCS 1000 cards

Want to summarize with AI?

Log in

This section explains adding card mode for NCS 1000 cards. Cisco Optical Site Manager allows you to configure NCS 1000 line cards in various modes, including Muxponder and Slice configurations.


Cisco Optical Site Manager allows you to configure NCS 1000 line cards in various modes, including Muxponder and Slice configurations. These modes determine how the line card processes data and manages traffic, facilitating efficient client-to-trunk mapping.

Additional information

Table 1. Features introduced in R26.3.1

Feature Name

Release Information

Description

Support for the NCS1K14-OXP2-K9 line card

Cisco Optical Site Manager Release 26.3.1

You can configure and manage the NCS1K14-OXP2-K9 line card from Cisco Optical Site Manager on Cisco NCS 1014-2 chassis. The Card Configuration Wizard supports the 800G trunk and client rate for all 16 slices, and the Optical Channel panel supports application code selection for the DP08SFP8-ZRB-A2 trunk optics.

Use this table to identify the application code values qualified for the DP08SFP8-ZRB-A2 trunk optic.

Table 2. Features introduced in R26.2.1

Feature Name

Release Information

Description

Enhanced support for NCS1K14-EDFA2 card

Cisco IOS XR Release 26.2.1

Cisco Optical Site Manager now provides enhanced support for the NCS1K14-EDFA2 card. This update includes support for DP04QSDD-E30-440 and DP04QSDD-E30-441 pluggables on the coherent probe. Additionally, you can now perform OSC configuration through the Provisioning > Ethernet Interfaces tab, view span loss data, and manage OTDR configuration directly. This update simplifies your workflow by centralizing all card configuration tasks for the NCS1K14-EDFA2 card within a single interface.

Additional Card Mode for the OTN-XP Card

Cisco IOS XR Release 26.1.1

The Card Configuration Wizard now lets you configure REGEN card mode for the NCS1K4-OTN-XP card.

You can explicitly set client-rate 100GE or 400GE with regen-slice, enabling ZR-based regeneration. Previously, regen-slice supported only trunk-rate without explicit client-rate settings.

Table 3. Features introduced in R26.1.1

Feature Name

Release Information

Description

Additional Client Rates for the NCS1K14-2.4T-X-K9 Card

Cisco IOS XR Release 26.1.1

The Card Configuration Wizard now supports configuring these client data rates in the Muxponder slice card mode (MXP-SLICES-1K) for the NCS1K14-2.4T-X-K9 card:

  • 100GE

  • 400GE

Additional Card Mode for the OTN-XP Card

Cisco IOS XR Release 26.1.1

The Card Configuration Wizard now lets you configure REGEN card mode for the NCS1K4-OTN-XP card.

You can explicitly set client-rate 100GE or 400GE with regen-slice, enabling ZR-based regeneration. Previously, regen-slice supported only trunk-rate without explicit client-rate settings.

Table 4. Features introduced in R25.4.1

Feature Name

Release Information

Description

Support for NCS1K14-EDFA2 card in Cisco Optical Site Manager

Cisco IOS XR Release 25.4.1

Cisco Optical Site Manager now supports the NCS1K14-EDFA2 card. To use the EDFA2 card, set the optical type to ROADM.

The EDFA2 card supports these pluggables and passive modules:

  • ONS-SC-PTP-1510: Optical Supervisory Channel (OSC) pluggable

  • ONS-QSFP-OTDR: Optical Time-Domain Reflectometer (OTDR) pluggable

  • DP01QSDD-ZT5-A1: Coherent probe pluggable

  • NCS1K-MD-32O-CE: 32-channel Odd Mux/Demux Patch Panel, C-band Enhanced

  • NCS1K-MD-32E-CE: 32-channel Even Mux/Demux Patch Panel, C-band Enhanced

This integration enables comprehensive Operations, Administration, and Maintenance (OAM) capabilities for the card within Cisco Optical Site Manager.

The Cisco Optical Site Manager supports only these capabilities:

  • Inventory

  • Alarms and alarm history

  • Provisioning (Amplifier, ZRPlus Interfaces, Interface, Ethernet Interfaces, and Optical Channel)

  • Performance monitoring and TCA (Threshold crossing alerts)

  • Maintenance (Live Data, Environmental Monitoring, and Power Monitoring)

  • Optical Degrees, Internal patchcord (IPCs), Network Function Virtualization (NFV)

Additional Trunk Rates for the NCS1K14-2.4T-X-K9 Card

Cisco IOS XR Release 25.4.1

The Select Card Mode page of the Card Configuration Wizard has been updated to configure these trunk rates in the muxponder mode for 2x100-GE client traffic:

  • 400G

  • 500G

  • 600G

Table 5. Features introduced in R25.4.1

Feature Name

Release Information

Description

Support for NCS1K14-EDFA2 card in Cisco Optical Site Manager

Cisco IOS XR Release 25.4.1

Cisco Optical Site Manager now supports the NCS1K14-EDFA2 card. To use the EDFA2 card, set the optical type to ROADM.

The EDFA2 card supports these pluggables and passive modules:

  • ONS-SC-PTP-1510: Optical Supervisory Channel (OSC) pluggable

  • ONS-QSFP-OTDR: Optical Time-Domain Reflectometer (OTDR) pluggable

  • DP01QSDD-ZT5-A1: Coherent probe pluggable

  • NCS1K-MD-32O-CE: 32-channel Odd Mux/Demux Patch Panel, C-band Enhanced

  • NCS1K-MD-32E-CE: 32-channel Even Mux/Demux Patch Panel, C-band Enhanced

This integration enables comprehensive Operations, Administration, and Maintenance (OAM) capabilities for the card within Cisco Optical Site Manager.

The Cisco Optical Site Manager supports only these capabilities:

  • Inventory

  • Alarms and alarm history

  • Provisioning (Amplifier, ZRPlus Interfaces, Interface, Ethernet Interfaces, and Optical Channel)

  • Performance monitoring and TCA (Threshold crossing alerts)

  • Maintenance (Live Data, Environmental Monitoring, and Power Monitoring)

  • Optical Degrees, Internal patchcord (IPCs), Network Function Virtualization (NFV)

Additional Trunk Rates for the NCS1K14-2.4T-X-K9 Card

Cisco IOS XR Release 25.4.1

The Select Card Mode page of the Card Configuration Wizard has been updated to configure these trunk rates in the muxponder mode for 2x100-GE client traffic:

  • 400G

  • 500G

  • 600G

Table 6. Features introduced in R25.3.1

Feature Name

Release Information

Description

Additional Card Modes for OTN-XP Card

Cisco IOS XR Release 25.3.1

The Card Configuration Wizard now supports configuring these card modes for NCS1K4-OTN-XP card:

  • 400G-TXP-DD

  • 4x100GE-MXP-DD

  • OTU-CN-REGEN

Table 7. Features introduced in R25.1.1

Feature Name

Release Information

Description

Additional Trunk Rates for the NCS1K14-2.4T-X-K9 Card

Cisco IOS XR Release 25.1.1

The Select Card Mode page of the Card Configuration Wizard has been updated to configure these trunk rates in the muxponder mode for 2x100-GE client traffic:

  • 800G

  • 900G

  • 1000G

  • 1100G

Additional Card Modes for OTN-XP Card

Cisco IOS XR Release 25.1.1

The Card Configuration Wizard now supports configuring these card modes for NCS1K4-OTN-XP card:

  • FC-MXP

  • MXP-4x100G-TXP-400G with 400GE and 100GE/OTU4 client rates

Additionally, you can configure the OC192 and STM64 client datarates for the MXP-40X10G-4X100G card mode in the 40x10G HM configuration.

Support for 1.2T Cards

Cisco IOS XR Release 25.1.1

The Card Configuration Wizard now supports configuration of card mode for these cards:

  • NCS1K4-1.2T-K9

  • NCS1K4-1.2TLCW-K9

Support for NCS 2000 Cards

Cisco NCS 2000 Release 25.1.1

The Card Configuration Wizard now supports these cards and their operating modes:

  • 10x10G-LC

    • TXP-10G

    • RGN-10G

  • 10x10G + 200G-CK-C

    • MXP-10x10G

  • 200G-CK-C

    • TXP-100G

    • RGN-100G

  • 400G-XP-LC

    • MXP

    • RGN-100G

    • RGN-200G

  • NCS2K-1.2T-MXP

    • TXPMXP

Table 8. Features introduced in R24.3.1

Feature Name

Release Information

Description

Additional Card Mode and Trunk Rates for the NCS1K4-OTN-XP Card

Cisco IOS XR Release 24.3.1

The Select Card Mode page of the Card Configuration Wizard is updated to include theĀ 1.2T Splitted configuration on the Trunk 0 port.

You can also use the wizard to configure these trunk rates in the muxponder mode:

  • 100-GE client traffic for 600-G and 1000-G

  • 500-G and 900-G

Support for NCS 1004 Card and Card Modes

Cisco IOS XR Release 24.3.1

The Card Configuration Wizard now supports configuring these card modes for NCS1K4-OTN-XP cards:

  • 10G-GREY-MXP

  • 40x10G-4x100G-MXP

You can also use the wizard to configure card mode for the NCS1K4-2-QDD-C-K9 card.

Table 9. Features introduced in R24.1.1

Feature Name

Release Information

Description

Card Configuration Wizard Enhancements

Cisco IOS XR Release 24.1.1

The Card Configuration Wizard is updated to select theĀ MXP-1K muxponder mode supported by the new NCS1K14-2.4T-X-K9 card.

You can use the add card mode feature in Cisco Optical Site Manager to configure NCS 1000 line cards. The configuration performed through the Card Configuration Wizard in Cisco Optical Site Manager allows you to:

  • Select the card mode for NCS 1000 line cards

  • Set trunk and client data rates tailored to your network requirements.

  • Add internal patch cords by specifying ports and chassis details to establish virtual links.

  • Configure trunk details including administrative state, frequency, baud rate, bits per symbol, and rate.

  • Configure application code for qualified NCS1K14-OXP2-K9 trunk optics.

  • Verify all configuration details in a recap window before applying the settings to ensure accuracy.
How to add a card mode


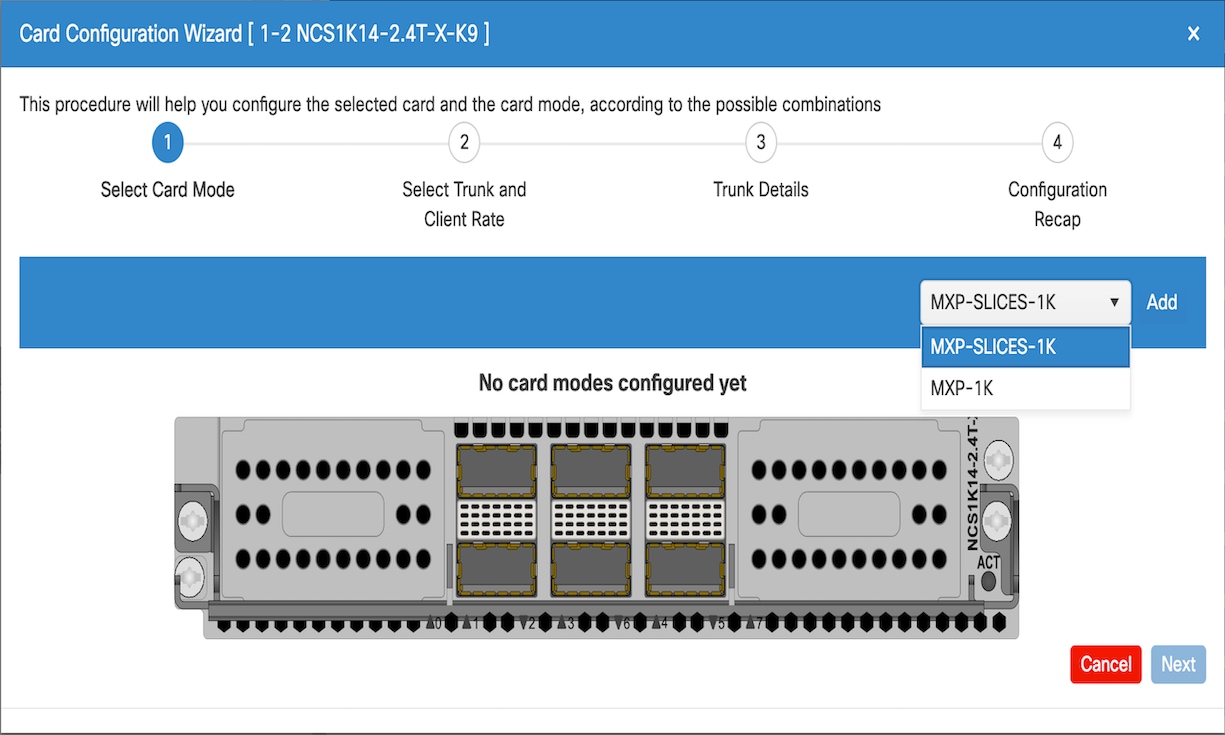
Select a card mode

Use Cisco Optical Site Manager to select a card mode.

The Select Card Mode in the Cisco Optical Site Manager Card Configuration Wizard allows you to choose from various card modes available for a line card.

Figure 1. Select card mode

Before you begin

Log into Cisco Optical Site Manager

Follow these steps to enter into the Card Configuration Wizard and select a card mode.

Procedure

  1. Open the Card Configuration Wizard in any of these ways.

    From rack or card view

    From the tabbed view

    1. Right-click a line card.

    2. Click Card Mode.

    3. Select Install.

    1. Click the Provisioning tab.

    2. Click the Card Modes section to expand it.

    3. Click the Add Card mode button.

  2. Select the card mode from the drop-down list and click Add.

    Table 10. Supported card modes

    For details on card modes for

    refer to

    NCS 1014

    Configuring the Card Mode on NCS 1014 Line Cards

    NCS 1004

    Configuring the Card Mode on NCS 1004 Line Cards
  3. Click Next.

The card mode is added

What to do next

Select the Trunk and Client Data Rates.


Select trunk and client data rate

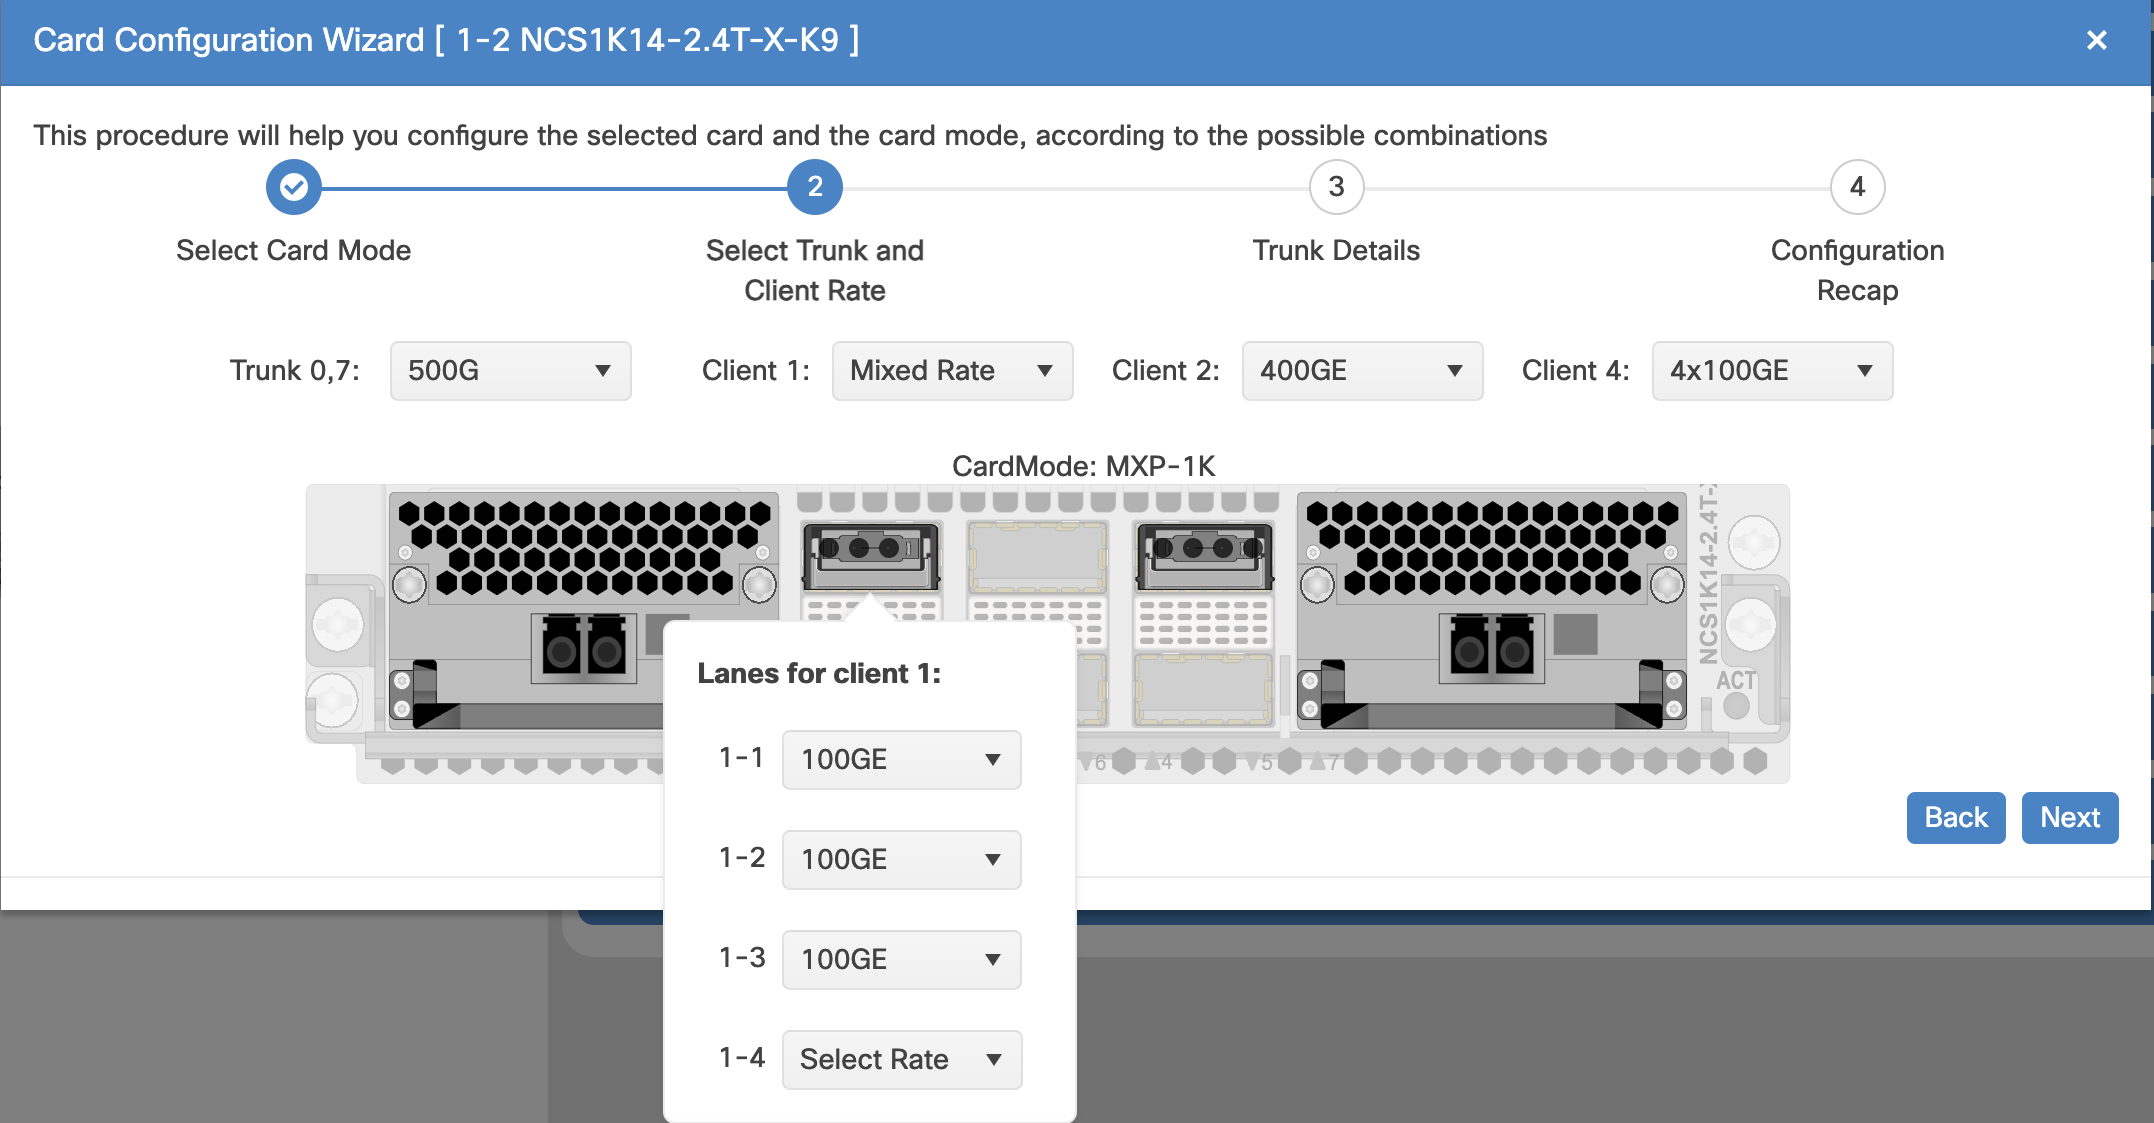
Use this task to select the trunk and client data rates for a card mode configured on an NCS 1000 line card. This step defines how the line card processes data and manages traffic efficiently.

This configuration helps you map client traffic to trunk ports and supports various card modes, including Muxponder and Slice configurations.

Figure 2. Select Trunk and Client Data Rate

Before you begin

Select a card mode

Follow these steps to select the trunk and client port data rates in the Card Configuration Wizard.

Procedure

  1. Select the trunk data rate from the Trunk drop-down list.

    For the NCS1K14-OXP2-K9 line card, select the MXP-SLICES-1K card mode and use 800G trunk and 800G client data rates on all 16 slices.

    The Client drop-down lists are displayed.
  2. Select the client data rates using one of these ways:

    Table 11. Client data rate options

    For mixed client data rate for client ports

    For same client data rate for all client ports

    From the Client drop-down lists, select the same data rate for each client port.

    1. From the Client drop-down lists, select Mixed Rate.

      Mixed rate configuration information message is displayed.

    2. Close the message box.

    3. Right-click the lane in the line card image and select the data rate from the available drop-down lists.

  3. Click Next.

The system configures the trunk and client data rates for the selected card mode and maps client traffic as specified.

What to do next

If optical type is

then

txp

Add trunk details

roadm

Add Internal Patch Cords


Add Internal Patch Cords

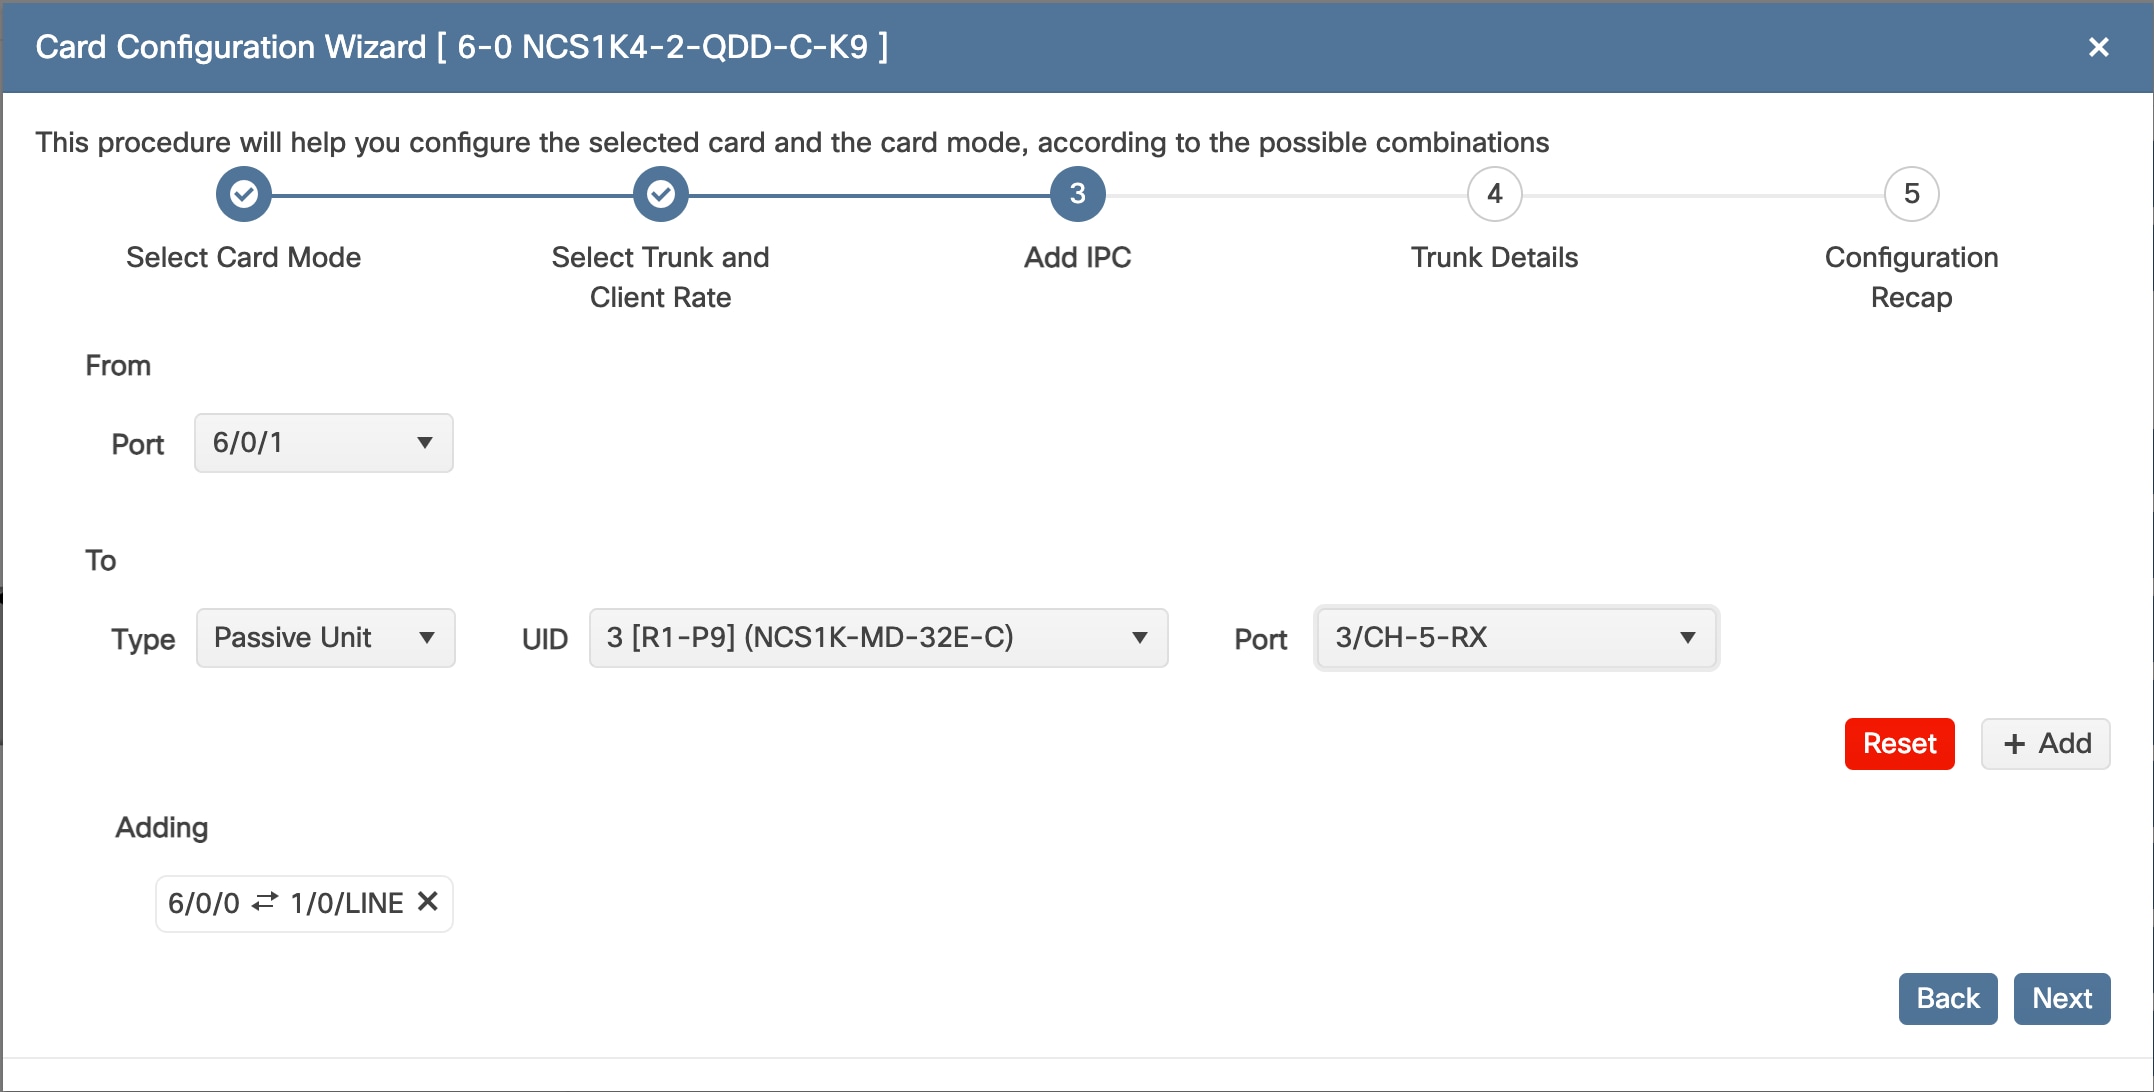
You add Internal Patch Cords to establish internal connections that optimize data flow to enable efficient client-to-trunk mapping. IPC links trunk and client ports across line cards. They are necessary when the optical type is set to ROADM.

This task involves creating IPC that are virtual links between network termination points, such as OSC ports, transponder or muxponder trunk ports, line ports, and passive device ports within the node.

Figure 3. Add IPC

Before you begin

Select trunk and client data rate

Note

Add IPC page is only available if optical type is configured as roadm.

Follow these steps to add IPC in the Card Configuration Wizard.

Procedure

  1. Select the port from the Port drop-down list in the From section.

  2. In the To section, perform these steps:

    Use this table to choose the correct option based on your need:

    Table 12. IPC drop-down lists displayed based on device type

    To create an IPC for a

    Select an option from these drop-down lists

    • Chassis

    • Passive Chassis

    • UID

    • Slot

    • Port

    Passive Unit

    • UID

    • Port

  3. Click the Add button.

  4. (Optional) Remove the internal patch cord using one of these methods:

    • To remove a single internal patch cord, click the cross (x) icon next to the internal patch cord under the Adding section.

    • To remove all added internal patch cords, click the Reset button.

  5. Click Next.

The IPC are added and displayed.

What to do next

Add the Trunk Details to configure the interfaces.


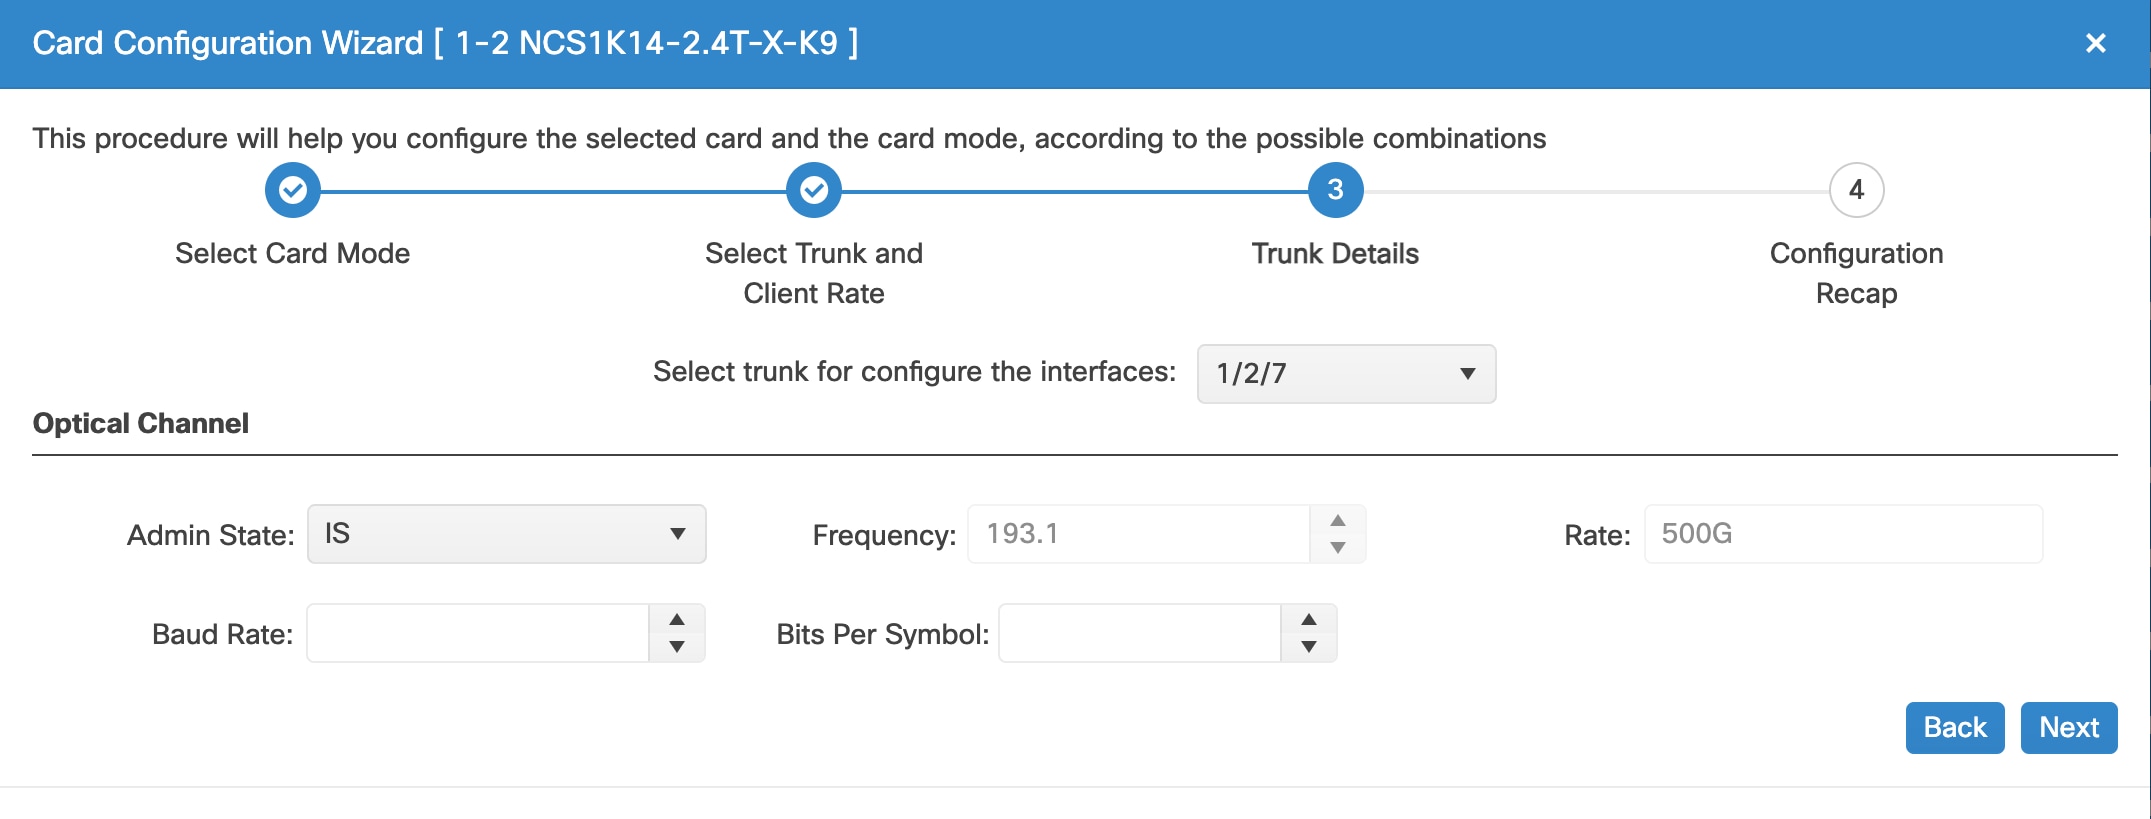
Add trunk details

Add trunk details to specify trunk interface parameters. These parameters help establish trunk connections, enabling efficient data transport and client-to-trunk mapping.

You can configure trunk port details using the Card Configuration Wizard for line cards by selecting parameters such as admin state, frequency, baud rate, bits per symbol, and rate.

Figure 4. Add Trunk Details

Before you begin

If optical type is configured as

then ensure

roadm

Add Internal Patch Cords

txp

Select trunk and client data rate

Follow these steps to add the trunk details in the Card Configuration Wizard to configure the interfaces.

Procedure

  1. Select the trunk port from the Select trunk for configure the interfaces drop-down list.

  2. Select these parameters from their corresponding drop-down lists in the Optical Channel section:

    • Admin State

    • Frequency

    • Baud Rate

      Note

      Cisco Optical Site Manager displays the Baud Rate value with seven digits after the decimal point.

    • Bits Per Symbol

    • Rate

    For the NCS1K14-OXP2-K9 line card with DP08SFP8-ZRB-A2 trunk optics, select one of these Application Code values:

    Table 13. Application code values for DP08SFP8-ZRB-A2

    Application code

    Description

    1

    OIF 800ZR-A 150 GHz media interface with ETH 800GAUI-8 S C2M or ETH 800GAUI-8 L C2M host interface.

    39

    OpenROADM FLEXO-8e-DPO-M media interface with ETH 800GAUI-8 S C2M host interface.

    40

    OpenROADM FLEXO-8e-DPO-M media interface with ETH 800GAUI-8 L C2M host interface.

    47

    FlexO 8e DPO 131 Gbd proprietary media interface with ETH 800GAUI-8 S C2M host interface.

    48

    FlexO 8e DPO 131 Gbd proprietary media interface with ETH 800GAUI-8 L C2M host interface.

  3. Click Next.

The trunk details are configured.

What to do next

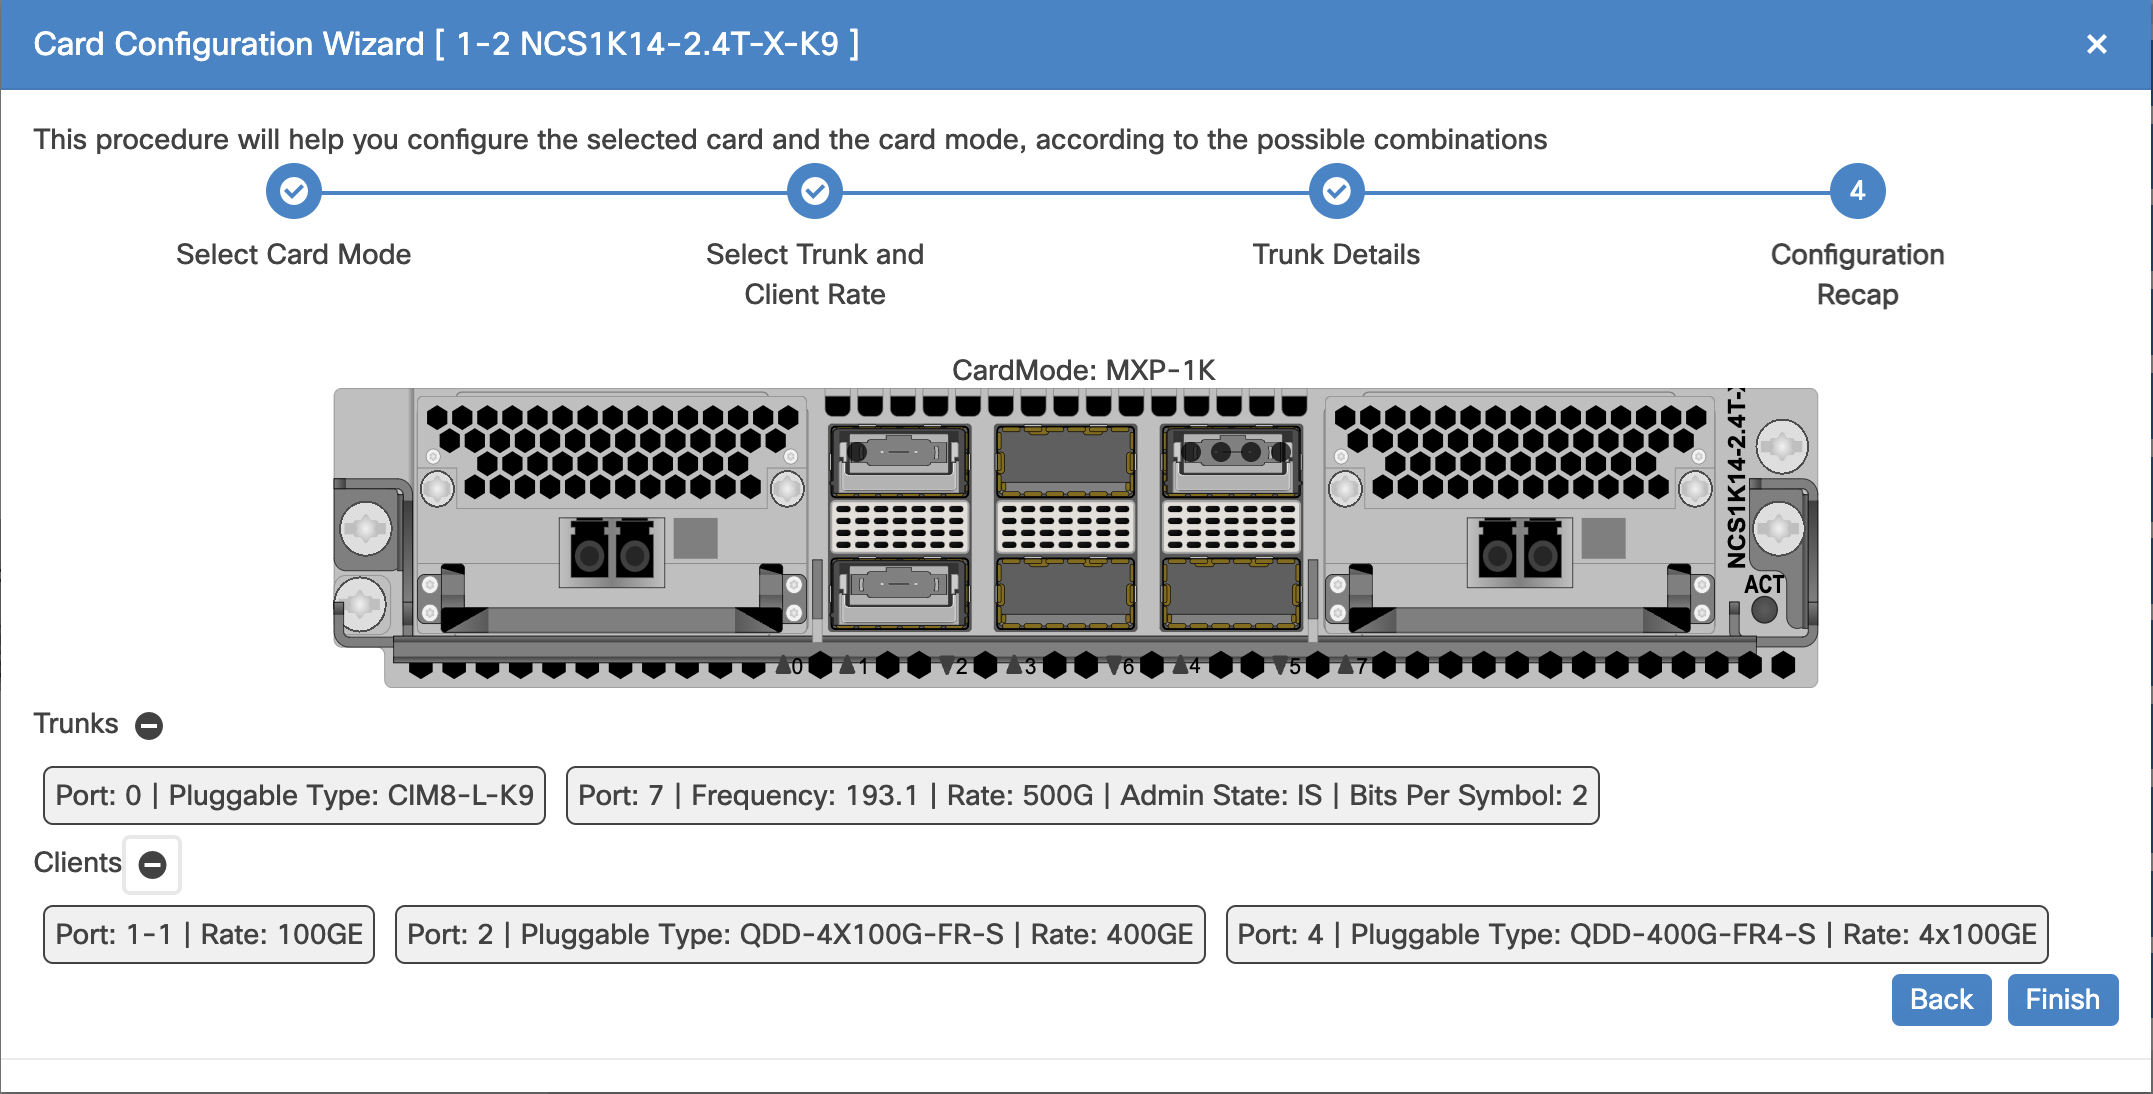
Verify configuration details


Verify configuration details

After you add a card mode, verify configuration details to ensure that all selected settings, such as trunk and client configurations, are correct and consistent before adding the card mode.

In the Card Configuration Wizard, verify the configuration in the Configuration Recap window for the Trunk and Client sections.

Figure 5. Verify Configuration Details

Before you begin

Add trunk details

Follow these steps to verify the card mode configuration details.

Procedure

  1. Click to expand the Trunk and Client sections to verify the configured details.

  2. Click Finish to add the card mode.

Verifying the configuration details ensures that the card mode is added with the correct parameters.


Edit card mode for NCS 2000 cards

Edit the card mode for NCS 2000 line cards to update the line card configuration to reflect the new trunk and client data rates.

Before you begin

Log into Cisco Optical Site Manager

Follow these steps to edit the trunk and client port data rates for a card mode configured on a for a NCS 2000 line card.

Procedure

  1. Open the Card Configuration Wizard in one of these ways.

    From rack or card view

    From the tabbed view

    1. Right-click a line card.

    2. Click Card Mode.

    3. Select Install.

    1. Click the Provisioning tab.

    2. Click the Card Modes section to expand it.

    3. Click the Add Card mode button.

  2. Select the trunk and client data rates.

    For more details about selecting trunk and client data rates, see Select trunk and client data rate.

The updated trunk and client details are displayed in the Card Modes section of the Provisioning tab.