Learn how to troubleshoot Secure Firewall ASA device issues including connectivity, configuration, synchronization, and deployment problems.
ASA Fails to Reconnect to Security Cloud Control After Reboot
If Security Cloud Control and your ASA do not connect after an ASA reboot, it may be because the ASA has fallen back to using an OpenSSL cipher suite that is not supported by Security Cloud Control's Secure Device Connector (SDC). This troubleshooting topic tests for that case and provides remediation steps.
Symptoms
-
ASA reboots and Security Cloud Control and the ASA fail to reconnect. Security Cloud Control displays the message, "Failed to reconnect."
-
When attempting to onboard an ASA, Security Cloud Control displays the message: Certificate could not be retrieved for <ASA_IP_Address>.
Cannot onboard ASA due to certificate error
Environment: ASA is configured with client-side certificate authentication.
Solution: Disable client-side certificate authentication.
Details: ASAs support credential-based authentication as well as client-side certificate authentication. Security Cloud Control cannot connect to ASAs that use client-side certificate authentication. Before onboarding your ASA to Security Cloud Control, make sure it does not have client-certificate authentication enabled by using this procedure:
Procedure
Determine the OpenSSL Cipher Suite Used by your ASA
Use this procedure to identify the OpenSSL cipher suite being used by your ASA. If the cipher suite named in the command output is not in the list of supported cipher suites, the SDC doesn't support that cipher suite and you will need to update the cipher suites on your ASA.
Procedure
Cipher Suites Supported by Security Cloud Control's Secure Device Connector
Security Cloud Control's Secure Device Connector uses node.js which only accepts the latest and most secure ciphers. As a result, Security Cloud Control's SDC only supports this list of ciphers:
-
ECDHE-RSA-AES128-GCM-SHA256
-
ECDHE-ECDSA-AES128-GCM-SHA256
-
ECDHE-RSA-AES256-GCM-SHA384
-
ECDHE-ECDSA-AES256-GCM-SHA384
-
DHE-RSA-AES128-GCM-SHA256
-
ECDHE-RSA-AES128-SHA256
-
DHE-RSA-AES128-SHA256
-
ECDHE-RSA-AES256-SHA384
-
DHE-RSA-AES256-SHA384
-
ECDHE-RSA-AES256-SHA256
-
DHE-RSA-AES256-SHA256
If the cipher suite you use on your ASA is not in this list, SDC does not support it and you will need to update the cipher suite on your ASA.
Updating your ASA's Cipher Suite
To update the TLS cipher suites on an ASA:
Procedure
Troubleshoot ASA using CLI commands
This section discusses some of the important commands you may want to use to troubleshoot the ASA and test basic connectivity. See CLI Book 1: Cisco ASA Series General Operations CLI Configuration Guide to learn about other troubleshooting scenarios and CLI commands. In the 'System Administration' section, navigate to the 'Testing and Troubleshooting' chapter.
You can use the Security Cloud Control CLI interface available for each ASA device to execute these commands.
See ASA command line interface to learn about how to use the CLI interface in Security Cloud Control.
NAT Policy Settings
Some of the important commands to determine the NAT settings are as follows:
-
To determine NAT policy statistics, use show nat.
-
To determine the NAT pools, including the addresses and ports allocated, and how many times they were allocated, use show nat pool.
For more commands related to NAT, see CLI Book 2: Cisco ASA Series Firewall CLI Configuration Guide, and navigate to the 'Network Address Translation (NAT)' chapter.
Test Basic Connectivity: Pinging Addresses
You can ping the ASA device using the ping <IP address> command using the ASA CLI interface. To learn about
Display the Routing Table
Use the show route command to view the entries in the routing table.
ciscoasa# show route
Example output for a routing table of an ASA:
Codes: L - local, C - connected, S - static, R - RIP, M - mobile, B - BGP
D - EIGRP, EX - EIGRP external, O - OSPF, IA - OSPF inter area
N1 - OSPF NSSA external type 1, N2 - OSPF NSSA external type 2
E1 - OSPF external type 1, E2 - OSPF external type 2, V - VPN
i - IS-IS, su - IS-IS summary, L1 - IS-IS level-1, L2 - IS-IS level-2
ia - IS-IS inter area, * - candidate default, U - per-user static route
o - ODR, P - periodic downloaded static route, + - replicated route
SI - Static InterVRF
Gateway of last resort is 192.168.0.254 to network 0.0.0.0
S* 0.0.0.0 0.0.0.0 [1/0] via 192.168.0.254, management
C 10.0.0.0 255.0.0.0 is directly connected, Outside
L 10.10.10.1 255.255.255.255 is directly connected, Outside
C 192.168.0.0 255.255.255.0 is directly connected, management
L 192.168.0.118 255.255.255.255 is directly connected, management
Monitor Switch Ports
-
show interface
Displays interface statistics.
-
show interface ip brief
Displays interface IP addresses and status.
-
show arp
Shows dynamic, static, and proxy ARP entries. Dynamic ARP entries include the age of the ARP entry in seconds.
Example output of ARP entries:
management 10.10.32.129 0050.568a.977b 0
management 10.10.32.136 0050.568a.5387 21
LANFAIL 20.20.21.1 0050.568a.4d70 96
outsi 10.10.16.6 0050.568a.e6d3 3881
outsi 10.10.16.1 0050.568a.977b 5551
Troubleshoot ASA Remote Access VPN
This section discusses some of the troubleshooting issues that may occur when configuring remote access VPN on an ASA device.
Missing Information on the RA VPN Monitoring Page
This issue may occur if the outside interface is not enabled for Webvpn.
Resolution:
-
In the left pane, click and then click the ASA tab.
-
Select the RA VPN headend ASA device that is having issues.
-
In the Management pane on the right, click Configuration.
-
Click Edit and search for ‘webvpn’.
-
Press Enter and add
enableinterface_name. Here, the interface_name is the name of the outside interface to which users connect when making the remote access VPN connection. Although this is normally the outside (internet-facing) interface, choose whichever interface is between the device and the end-users you are supporting with this connection profile.For example:
webvpnenable outside -
Click Save.
-
Preview and deploy the configuration to the device.
ASA Real-time Logging
Use real-time logging to display the last 20 seconds of logged data or the last 10 KB of logged data, whichever limit is reached first. When Security Cloud Control retrieves the real-time data, it reviews the existing logging configuration on your ASDM, changes it to request debugging-level data, and then returns the logging configuration to your configuration. The logging Security Cloud Control displays reflects any logging filters you may have set in ASDM.
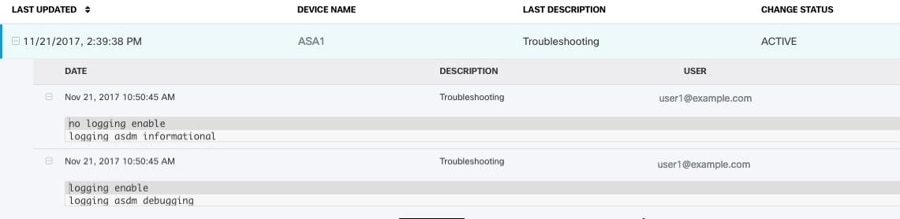
You can see the commands that Security Cloud Control sends to perform logging by reviewing the change log. Below is an example of a change log entry. The first entry (on the bottom) indicates that Security Cloud Control "turned on" logging with the logging enable command and changed the ASDM logging level to debugging. The second entry (on the top) shows that the logging configuration was returned to its previous state. Logging was "turned off" with the no logging enable command and the ASDM logging level was returned to informational.
View ASA Real-time Logs
Procedure
-
In the left pane, click .
-
Click the appropriate device type tab and select the device for which you want to view real-time data.
-
Click Troubleshoot
 .
. -
(Optional) Before clicking View Real-time Log, you can define a filter in the left pane to refine the results of your logging search.
-
Click View Real-time Log. Security Cloud Control retrieves the real-time logging data based on your filterin criteria and displays it.
-
To see an additional 20 seconds of logged data or the last 10 KB of logged data. click View Real-Time Log again.
ASA Packet Tracer
Packet tracer allows you to send a synthetic packet into the network and evaluate how the existing routing configuration, NAT rules, and policy configurations, affect that packet. Use this tool to troubleshoot these kinds of issues:
-
Users report that they cannot reach resources that they should be able to.
-
Users report that they can reach resources they should not be able to.
-
Test a policy to determine if it works as you expect.
Packet tracer can be used on a live, online, ASA device either physical or virtual. Packet Tracer does not work on ASA model devices. Packet tracer evaluates packets based on the saved configuration on the ASA. Staged changes on Security Cloud Control are not evaluated by packet tracer.
We consider it a best-practice to run packet tracer on an ASA that is in the synced state. Though packet tracer will run if the device is not synced, you could encounter some unexpected results. For example, if you deleted a rule in the staged configuration on Security Cloud Control, and this same rule was triggered on the ASA during packet tracing, Security Cloud Control won't be able to show you the result of the packet's interaction with that rule.
Troubleshooting with ASA Packet Tracer
As packet tracer sends the packet through the routing configuration, NAT rules, and security policies of your ASA, it displays the packet's status at each step. If the packet is allowed by the policy it receives a green checkmark  . If a packet is denied and dropped, Security Cloud Control displays a red X
  .
.
Packet tracer also displays a real time log of the result of the packet trace. In the example below, you can see where a rule denied a tcp packet.

Troubleshoot an ASA Device Security Policy
Procedure
Troubleshoot an Access Rule
Procedure
-
From the Security Cloud Control Home page, click Firewall.
-
In the left pane, click .
-
Select a policy that is associated with your ASA.
-
Select a rule in the network policy to troubleshoot and click Troubleshoot
in the details pane. Notice that in the values panel of the troubleshoot page, many of the fields are pre-populated with the attributes of the rule you chose. -
Enter information in the remaining required fields. Once you have completed all the required fields the Run Packet Tracer button becomes active.
-
Click Run Packet Tracer.
-
Continue with Analyze Packet Tracer Results.
Troubleshoot a NAT Rule
Procedure
-
In the left pane, click and then click the ASA tab.
-
Select your ASA, and click View NAT Rules
 in the Action pane.
 -
Select the rule from the NAT Rules table that you want to troubleshoot and click Troubleshoot
in the details pane. Notice that in the values panel of the Troubleshoot page, many of the fields are pre-populated with the attributes of the rule you chose. -
Enter information in the remaining required fields. Once you have completed all the required fields the Run Packet Tracer becomes active.
-
Click Run Packet Tracer.
-
Continue with Analyze Packet Tracer Results.
Troubleshoot a Twice NAT Rule
Procedure
-
In left pane, click .
-
Click the ASA tab, select your ASA, and click View NAT Rules
in the Action pane. -
Select the rule from the NAT Rules table that you want to troubleshoot and click Troubleshoot
in the details pane. For a bi-directional Twice NAT rule, this opens a dropdown where you choose to troubleshoot the source packet translation or the destination packet translation. -
Enter information in the remaining required fields. Once you have completed all the required fields the Run Packet Tracer becomes active.
-
Click Run Packet Tracer.
Analyze Packet Tracer Results
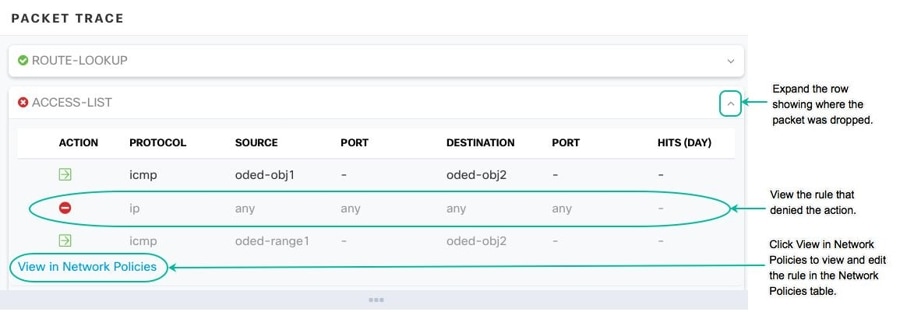
Whether the packet is dropped or allowed, you can learn why by expanding a row in the packet trace table and reading the rule or logging information related to that action. In the example below, packet tracer identified an access list policy that included a rule to deny an IP packet coming from any source and going to any destination. If this is not the action you want, you can click the View in Network Policies link and edit that rule immediately. After you edit the rule, be sure to deploy that configuration change to the ASA and then re-run packet tracer to ensure that you get the access results you expect.
Along with the packet tracer results, Security Cloud Control displays the real-time logs from the ASA.
Cisco ASA Advisory cisco-sa-20180129-asa1
The Cisco Product Security Incident Response Team (PSIRT) published the security advisory cisco-sa-20180129-asa1 which describes a critical-severity ASA and Firepower security vulnerability. Read the entire PSIRT team advisory for a full explanation of what ASA and Firepower hardware, software, and configurations are affected.
If you determine that your ASAs are impacted by the advisory, you can upgrade your ASAs to the patched version using Security Cloud Control. Use this process:
Procedure
Confirming ASA Running Configuration Size
To confirm the size of your running configuration file, follow this procedure:
Procedure
Container Privilege Escalation Vulnerability Affecting Secure Device Connector: cisco-sa-20190215-runc
The Cisco Product Security Incident Response Team (PSIRT) published the security advisory cisco-sa-20190215-runc which describes a high-severity vulnerability in Docker. Read the entire PSIRT team advisory for a full explanation of the vulnerability.
This vulnerability impacts all Security Cloud Control customers:
-
Customers using Security Cloud Control's cloud-deployed Secure Device Connector (SDC) do not need to do anything as the remediation steps have already been performed by the Security Cloud Control Operations Team.
-
Customers using an SDC deployed on-premise need to upgrade their SDC host to use the latest Docker version. They can do so by using the following instructions:
Updating a Security Cloud Control-Standard SDC Host
-
The Secure Device Connector (SDC) has been installed on CentOS 7 virtual machines up to now. However, as CentOS has reached its end-of-life and is no longer supported by Firewall in Security Cloud Control, we recommend migrating all SDCs from CentOS 7 to an Ubuntu virtual machine.
For more information, see Migrate an On-Premises Secure Device Connector and Secure Event Connector from a CentOS 7 Virtual Machine to an Ubuntu Virtual Machine.
This procedure applies if you are still using CentOS.
-
Use these instructions if you deployed an SDC using the Security Cloud Control image.
Procedure
Updating a Custom SDC Host
The Secure Device Connector (SDC) has been installed on CentOS 7 virtual machines up to now. However, as CentOS has reached its end-of-life and is no longer supported by Firewall in Security Cloud Control, we recommend migrating all SDCs from CentOS 7 to an Ubuntu virtual machine.
For more information, see Migrate an On-Premises Secure Device Connector and Secure Event Connector from a CentOS 7 Virtual Machine to an Ubuntu Virtual Machine.
This procedure applies if you are still using CentOS.
-
If you have created your own SDC host you will need to follow the instructions to update based on how you installed Docker. If you used CentOS, yum and Docker-ce (the community edition) the preceding procedure will work.
-
If you have installed Docker-ee (the enterprise edtion) or used an alternate method to install Docker, the fixed versions of Docker may be different. You can check the Docker page to determine the correct versions to install: Docker Security Update and Container Security Best Practices.
Bug Tracking
Cisco is continuing to evaluate this vulnerability and will update the advisory as additional information becomes available. After the advisory is marked Final, you can refer to the associated Cisco bug for further details:
Large ASA Running Configuration Files
Behavior in Security Cloud Control
You may see behavior such as the ASA failing to onboard, Security Cloud Control not displaying all of the configuration defined in the ASA's running configuration file, or Security Cloud Control failing to write to the change log.
Possible Cause
The running configuration file of your ASA may be "too large" for Security Cloud Control.
When you an onboard an ASA to Security Cloud Control, Security Cloud Control stores a copy of the ASA's running configuration file in its database. Generally, if that running configuration file is too large (4.5 MB or larger), or it contains too many lines (approximately 22,000 lines), or there are too many access-list entries for a single access group, Security Cloud Control will not be able to predictably manage that device.
To confirm the size of your running configuration file, see Confirming ASA Running Configuration Size.
Workaround or Solution
Contact your Cisco account team for help safely reducing the size of your configuration file without disrupting your security policies.