Cisco Security Cloud Control: Secure Firewall Management

PDF

Cisco Security Cloud Control: Secure Firewall Management

View a Firewall Threat Defense Migration Job

Want to summarize with AI?

Log in

Learn how to view Firewall Threat Defense migration job status in Security Cloud Control, review device progress, handle evaluation-period actions, download reports, commit or cancel changes, and address deployment or identity policy issues.


The migration dashboard provides the status of all migration jobs initiated from the Security Cloud Control. You can expand a specific job to see the status of individual devices associated with that tenant. This helps you keep track of the progress of your migration and identify issues, if any, that need to be addressed.

If you have set up alerts for device workflows, click the notifications icon to see the alerts that have been triggered during the migration process. Additionally, if you have opted to receive email notifications from Security Cloud Control, you will also receive an email notification regarding alerts, if any.

When a migration job is successful, you have 14 days to test and assess migration changes. If you are convinced about the migration changes, we recommend that you commit the devices manually, and not wait for Security Cloud Control to automatically commit the migration changes. See Commit Migration Changes Manually.

Note that for the on-premises Firewall Management Center 1000/2500/4500, you would have migrated devices from Version 7.4, which is unsupported for general operations. To return the on-premises Firewall Management Center to a supported version you must remove the re-migrated devices, reimage back to Version 7.2.x, restore from backup, and re-register the devices.

Note
  • You cannot revoke the actions that are specified in the migration commit window after committing the changes.

  • You can cancel the migration during the evaluation period and return the device to the on-premises Firewall Management Center.

  • You cannot delete a device from either the on-premises Firewall Management Center or Cloud-Delivered Firewall Management Center during the evaluation period.

Changes can be made and deployed to the device using Security Cloud Control during the evaluation period. If you switch device management back to the on-premises Firewall Management Center, Security Cloud Control-specific changes made during the evaluation period is not saved on the device once it is reverted to the source Security Cloud Control tenant. You must deploy the changes from the on-premises Firewall Management Center to the device after reverting the device's manager.

  • Name: Represents the job name that shows the on-premises Firewall Management Center name and the date and time when the job was initiated.

  • Number of FTDs: Shows the total number of devices that are being migrated to the cloud.

  • Status: Shows the status of the job. Expand the job to see the status of individual devices.

    When a job is completed successfully, the FTD Migration job is successful message appears in the Status column. You can click the tooltip to see the number of days remaining for evaluating the manager.

    You can click Commit Migration Changes to commit the changes manually before the 14 days evaluation period ends.

  • Last Update: Shows the date and time that are updated only when a change is made to the device.

  • Actions: Click to execute the following actions:

After a successful migration, Security Cloud Control deploys the configuration to the device. If the system identifies errors or warnings in the changes to be deployed, it displays them in the Validation Messages window. To view complete details, click the arrow icon before the warnings or errors. If the deployment fails, see the Best Practices for Deploying Configuration Changes section of Firepower Management Center Device Configuration Guide X.Y.

Configure Relam Sequence for Identity Policy

If the device contains an identity policy with a Realm or ISE configuration, configure your device as a proxy for Security Cloud Control to communicate with the identity source. The identity policies don't function if Security Cloud Control fails to connect to the Identity Realms.

A tooltip appears in the Status column for a device that requires additional configuration.

  1. Click the tooltip icon and then click Learn more.

  2. In the Configure Proxy window, click Configure my realms.

    To add a proxy sequence, see the Create a Proxy Sequence section in the Firepower Management Center Device Configuration Guide, 7.2.


Proceed Migration Process

If the Pause migration to review imported shared policies option was checked during the migration setup, the migration process will pause after the shared access policies were staged in the Cloud-Delivered Firewall Management Center. After you've reviewed the staged configurations, you must manually instruct Security Cloud Control to resume the migration, which will then import device-specific configurations such as routing and interfaces, as well as register the Firewall Threat Defense with the Cloud-Delivered Firewall Management Center. Completion of the migration triggers a 14-day evaluation period.

To proceed, go to the migration job page and click Proceed with migration for the relevant job.

Remember that deployment from the Cloud-Delivered Firewall Management Center must be done after a successful migration.


Commit Migration Changes Manually to Cloud-Delivered Firewall Management Center

We recommend that you commit migration changes manually if you are convinced with your changes and not waiting for Security Cloud Control to auto commit changes. The Commit Migration Changes window shows the remaining days to commit the migration to Cloud-Delivered Firewall Management Center or revert the device to on-premises Firewall Management Center. During the evaluation period, you can modify the actions for selected threat defense devices before committing the changes. Once the changes are committed, you can't revoke the actions.

Note

The commit manager changes actions are disabled in the following conditions:

  • The 14-day evaluation period has passed.

  • The Firewall Threat Defense devices have either been reverted to the on-premises Firewall Management Center or deleted from on-premises Firewall Management Center, in which case, no further actions can be taken.

Procedure

1.

In the migration jobs page, click the under the Actions column of a completed job.

2.

Click Commit Migration Changes. (This link is available only after a job is completed successfully.)

3.

Select a device and in the Commit Actions list, choose one of the following actions:

  • Retain on OnPrem FMC for Analytics: After committing the changes, analytics management for selected Firewall Threat Defense devices is retained on the management center.
  • Delete Firewall Threat Defense from OnPrem FMC: After committing the changes, the selected devices are removed from the on-premises Firewall Management Center and are available for Security Cloud Control to handle the analytics. You must configure the Firewall Threat Defense to send events to Security Cloud Control for managing analytics. After the Firewall Threat Defense devices are deleted from the on-premises Firewall Management Center, they cannot be revoked.
Note

If you want to revert the device management to on-premises Firewall Management Center, refer to Revert the Firewall Threat Defense Management to On-Premises Firewall Management Center.

4.

Click Commit executes your specified actions immediately without further confirmation.

On the migration jobs screen, you can expand the job to check the progress of the actions specified.

The migrated devices appear on Security Cloud Control's Security Devices page. These devices can be managed using the Cloud-Delivered Firewall Management Center portal that is linked to Security Cloud Control. Ensure you deploy the changes to the devices from Cloud-Delivered Firewall Management Center.


Revert the Firewall Threat Defense Management to On-Premises Firewall Management Center

You can revert the device management to the on-premises Firewall Management Center during the evaluation period. This means that the devices will no longer be managed through the Security Cloud Control platform. However, it is important to note that any changes made during the migration process in the Security Cloud Control will not be reflected in the on-premises Firewall Management Center after reverting Firewall Threat Defense management.

Note

When the Firewall Threat Defense management has been returned to the on-premises Firewall Management Center , you can begin the migration job again to switch the Firewall Threat Defense management to Security Cloud Control.

Procedure

1.

In the migration jobs page, click the under the Actions column of a completed job.

2.

Click Commit Migration Changes. (This link is available only after a job is completed successfully.)

3.

Select a device and in the Commit Actions list, choose Revert Manager to OnPrem FMC.

4.

Click Commit executes your specified actions immediately without further confirmation.

5.

Deploy the changes to the device from the on-premises Firewall Management Center.


View Migrated Devices

The migrated devices appear on the Security Devices page in Security Cloud Control. You can cross-launch and configure the required feature on the Cloud-Delivered Firewall Management Center.

Note

The devices on the Cloud-Delivered Firewall Management Center device listing page may show No-IP instead of the device's management IP address. Because the device registration uses the NAT ID, the device initiates the process, and therefore, the management IPs aren't discovered or used for the connection. Note that this applies to newly onboarded devices and devices migrated from the on-premises Firewall Management Center.

Analytics Only Firewall Threat Defense Device Example

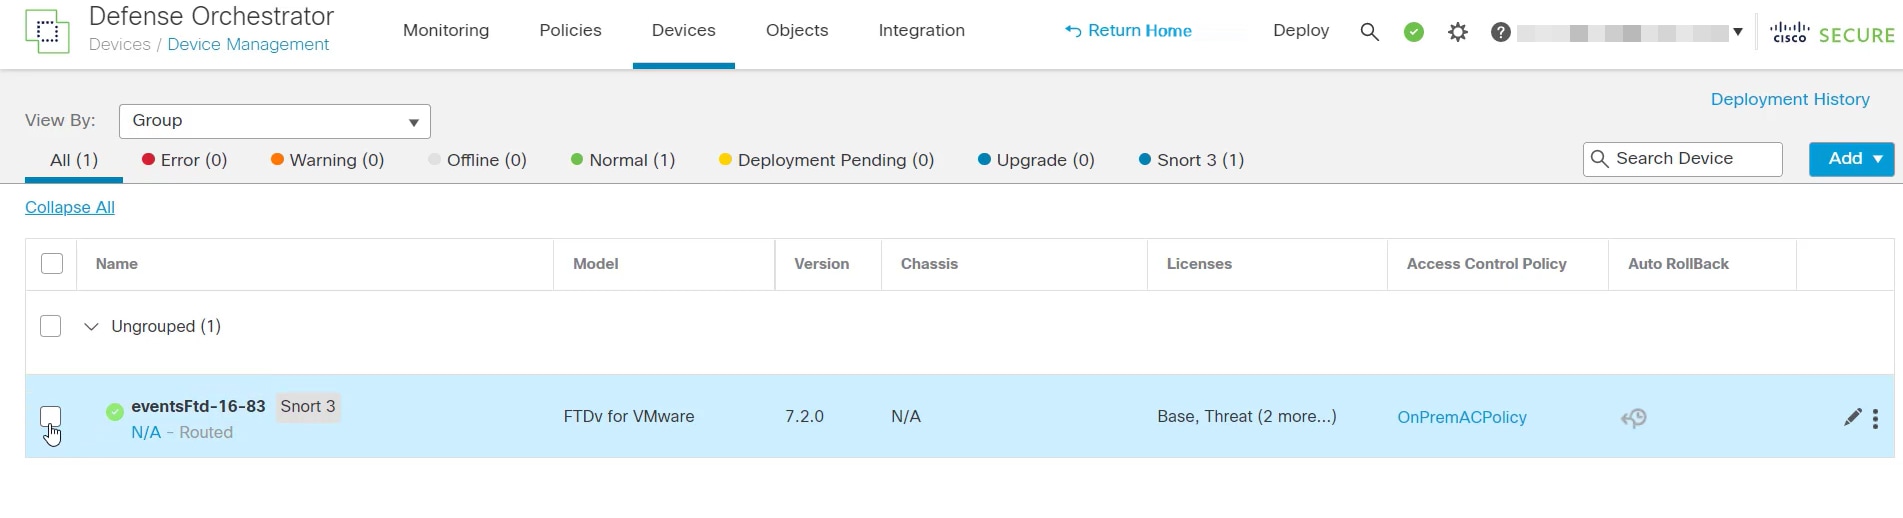
Security Cloud Control creates two instances of the same device that is configured to retain on the Firewall Management Center for analytics.

The device instance with FMC FTD and Analytics Only labels shows that the Firewall Management Center handles the analytics. The device instance with the FTD label indicates that Security Cloud Control manages its configuration.

You can manage the configuration of the device using Security Cloud Control. To see the device in the Cloud-Delivered Firewall Management Center, do the following:

Select the device having FTD label and in the Management pane on the right, click Device Summary.

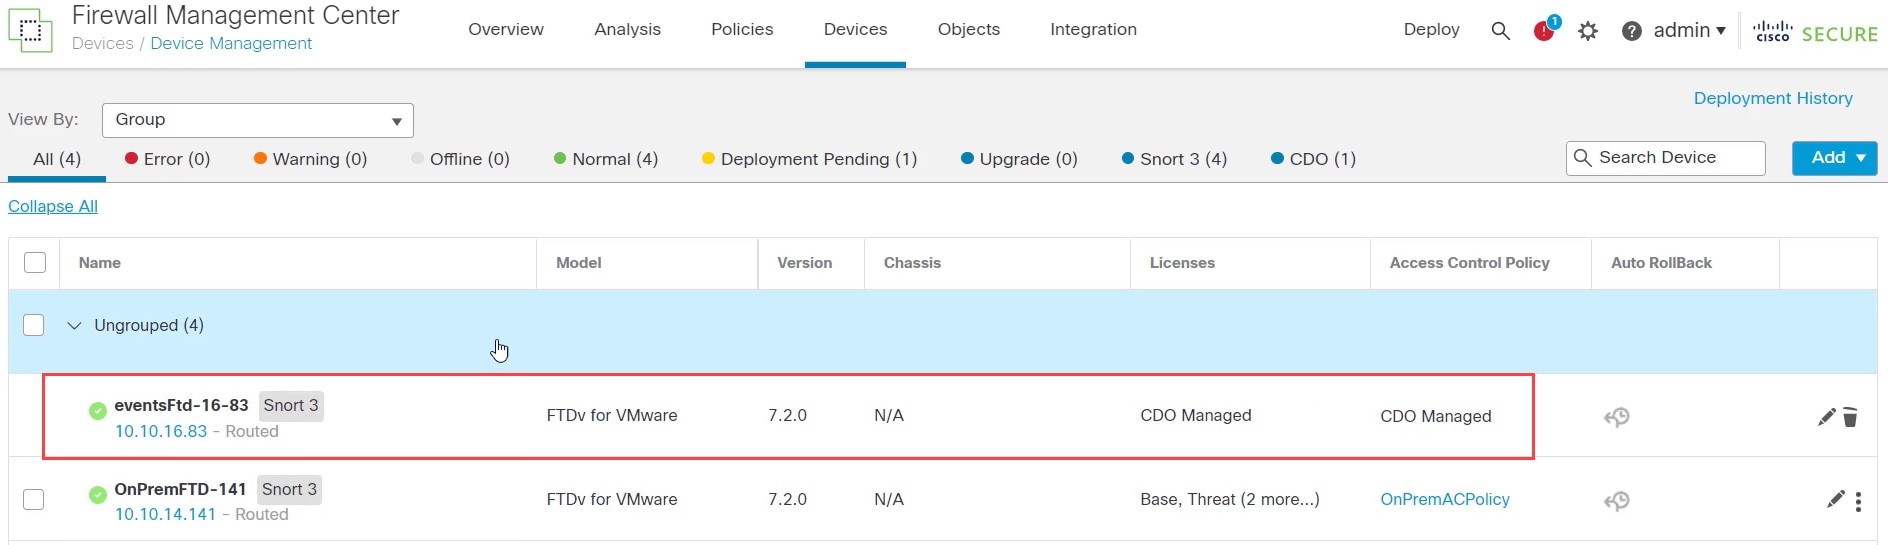
You can view the events from the device in the Firewall Management Center. To see the events, do the following:

  1. Select the device having FMC FTD and Analytics Only labels and on the right, click the Manage Devices link.

  2. Log on to the on premise Firewall Management Center.

  3. Choose Device > Device Management.

You can't select this device as Security Cloud Control manages the configuration. The Firewall Management Center shows the Security Cloud Control Managed label for this device.

To see the live events in the Firewall Management Center, click Analysis > Events.


Generate a Firewall Threat Defense Migration Report

When a migration job is successful, you can generate and download a report in PDF format to analyze every parameter imported from the on-premises Firewall Management Center to Cloud-Delivered Firewall Management Center. The report provides details of each device associated with the job. Details include information about devices, values of shared policies, objects, routing details, interfaces, network settings, and more.

On the migration jobs page, click the under the Actions column of a completed job and then click Download Report.. You must download a report within a year of the job being triggered.


Delete a Migration Job

If you have completed a migration job and no longer need it to be displayed on the migration page, you can easily remove it by deleting it. This cleans up the migration page and make it easier to navigate.

If you want to delete a migration job during the evaluation period, you must first commit the migration changes or revert the manager to the on-prem management center. Failing to do so may result in an inconsistent state of the on-prem management center, which could be unrecoverable. See Commit Migration Changes Manually.

If you don't have access to your on-premises Firewall Management Center or if it is no longer available and you are blocked from performing a commit or revert, you can delete the job.

Procedure

1.

From the Security Cloud Control Home page, click Firewall.

2.

Click Administration > Migration > Migrate FTD to cdFMC.

3.

Click the under the Actions column and then click Remove Migration Job.

4.

Click Delete to confirm your action.