Posture Administration Settings
You can globally configure the Admin portal for posture services. You can download updates automatically to the Cisco ISE server through the web from Cisco. You can also update Cisco ISE manually offline later. In addition, having an agent like AnyConnect, the NAC Agent, or the Web Agent installed on the clients provides posture assessment and remediation services to clients. The client agent periodically updates the compliance status of clients to Cisco ISE. After login and successful requirement assessment for posture, the client agent displays a dialog with a link that requires end users to comply with terms and conditions of network usage. You can use this link to define network usage information for your enterprise network that end users accept before they can gain access to your network.
Client Posture Requirements
To create a posture requirement:
-
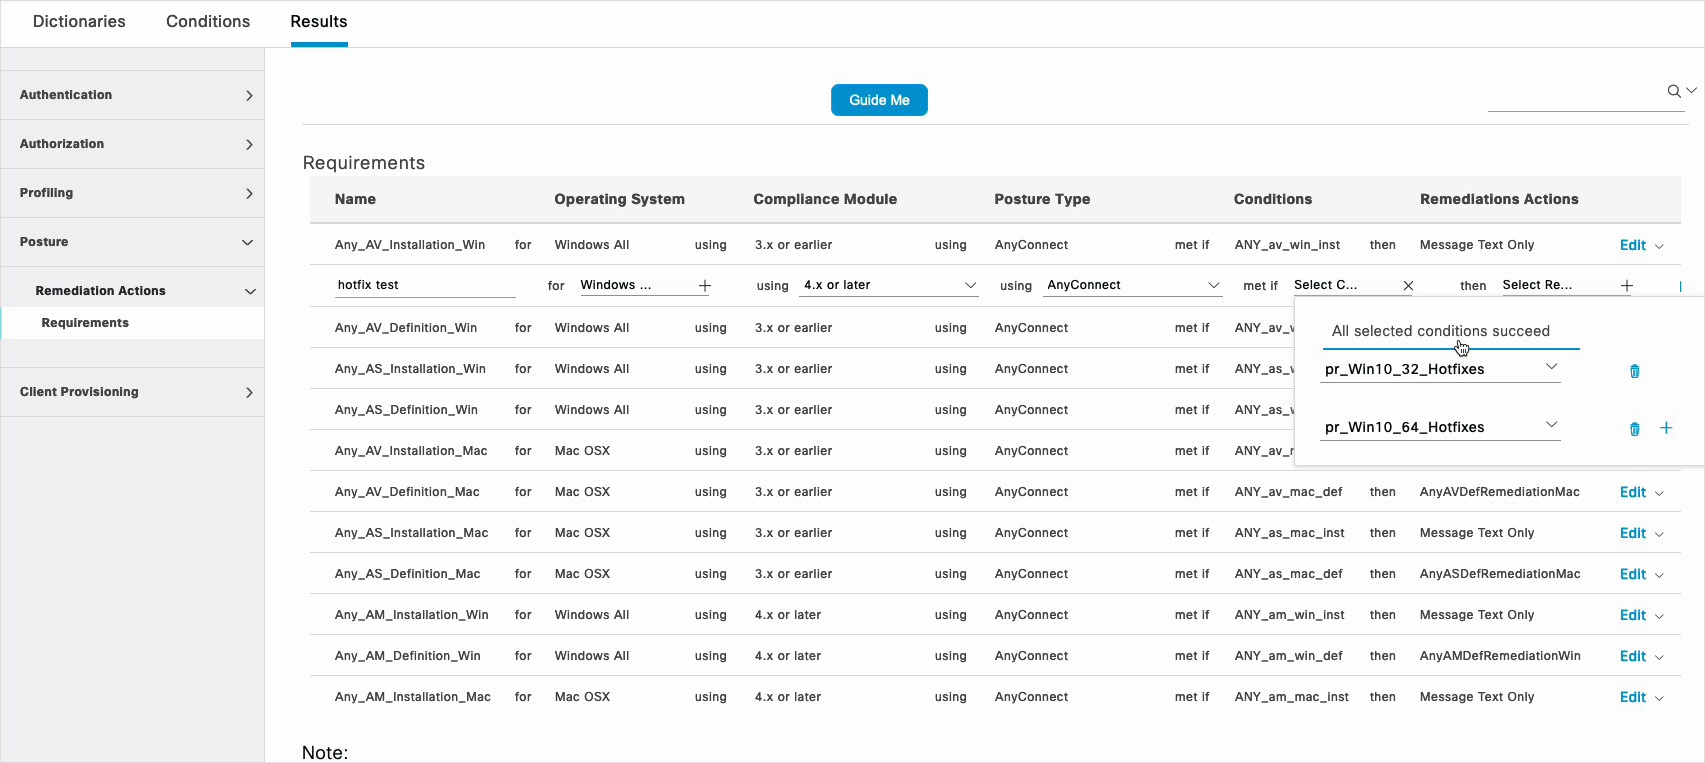
Choose Policy > Policy Elements > Results > Posture > Requirements.
-
From the Edit drop-down list at the end of any requirement row, choose Insert New Requirement.
-
Enter the required details and click Done.
The following table describes the fields in the Client Posture Requirements window.
|
Field Name |
Usage Guidelines |
|---|---|
|
Name |
Enter a name for the requirement. |
|
Operating Systems |
Choose an operating system. Click plus [+] to associate more than one operating system to the policy. Click minus [-] to remove the operating system from the policy. |
|
Compliance Module |
From the Compliance Module drop-down list, choose the required compliance module:
For more information about compliance module, see Compliance Module. |
|
Posture Type |
From the Posture Type drop-down list, choose the required posture type.
|
|
Conditions |
Choose a Condition from the list. You can also create any user defined condition by clicking the Action Icon and associate it with the requirement. You cannot edit the associated parent operating system while creating user defined conditions. The pr_WSUSRule is a dummy compound condition, which is used in a posture requirement with an associated Windows Server Update Services (WSUS) remediation. The associated WSUS remediation action must be configured to validate Windows updates by using the severity level option. When this requirement fails, the agent on the Windows client enforces the WSUS remediation action based on the severity level that you define in the WSUS remediation. The pr_WSUSRule cannot be viewed in the Compound conditions list page. You can only select the pr_WSUSRule from the Conditions widget. |
|
Remediation Actions |
Choose a Remediation from the list. You can also create a remediation action and associate it with the requirement. You have a text box for all the remediation types that can be used to communicate to the agent users. In addition to remediation actions, you can communicate to agent users about the non-compliance of clients with messages. The Message Text Only option informs agent users about the noncompliance. It also provides optional instructions to the user to contact the Help desk for more information, or to remediate the client manually. In this scenario, the agent does not trigger any remediation action. |
Timer Settings for Clients
You can set up timers for users to remediate, to transition from one state to another, and to control the login success screen.
However, when there are no agent profiles configured to match the client provisioning policies, you can use the settings in the General Settings configuration window ( ).
Set Remediation Timer for Clients to Remediate Within Specified Time
You can configure the timer for client remediation within a specified time. When clients fail to satisfy configured posture policies during an initial assessment, the agent waits for the clients to remediate within the time configured in the remediation timer. If the client fails to remediate within this specified time, then the client agent sends a report to the posture run-time services after which the clients are moved to the noncompliance state.
Procedure
|
Step 1 |
Choose . |
|
Step 2 |
In the Remediation Timer field, enter a time value in minutes. The default value is 4 minutes. The valid range is 1–300 minutes. |
|
Step 3 |
Click Save. |
Set Network Transition Delay Timer for Clients to Transition
You can configure the timer for clients to transition from one state to the other state within a specified time using the network transition delay timer, which is required for Change of Authorization (CoA) to complete. It may require a longer delay time when clients need time to get a new VLAN IP address during success and failure of posture. When successfully postured, Cisco ISE allows clients to transition from unknown to compliant mode within the time specified in the network transition delay timer. Upon failure of posture, Cisco ISE allows clients to transition from unknown to noncompliant mode within the time specified in the timer.
Procedure
|
Step 1 |
Choose . |
|
Step 2 |
Enter a time value in seconds, in the Network Transition Delay field. The default value is 3 seconds. The valid range is 2 to 30 seconds. |
|
Step 3 |
Click Save. |
Set Login Success Window to Close Automatically
After successful posture assessment, the client agent displays a temporary network access screen. The user needs to click the OK button in the login window to close it. You can set up a timer to close this login screen automatically after specified time.
Procedure
|
Step 1 |
Choose . |
|
Step 2 |
Check the Automatically Close Login Success Screen After check box. |
|
Step 3 |
Enter a time value in seconds, in the field next to Automatically Close Login Success Screen After check box. The valid range is 0 to 300 seconds. If the time is set to zero, then AnyConnect does not display the login success screen. |
|
Step 4 |
Click Save. |
Set Posture Status for Nonagent Devices
You can configure the posture status of endpoints that run on non-agent devices. When Android devices and Apple devices such as an iPod, iPhone, or iPad connect to a Cisco ISE enabled network, these devices assume the Default Posture Status settings.
These settings can also be applied to endpoints that run on Windows and MacOS operating systems when a matching client provisioning policy is not found during posture runtime while redirecting the endpoints to the client provisioning portal.
Before you begin
In order to enforce policy on an endpoint, you must configure a corresponding Client Provisioning policy (Agent installation package). Otherwise, the posture status of the endpoint automatically reflects the default setting.
Procedure
|
Step 1 |
Choose . |
|
Step 2 |
From the Default Posture Status drop-down list, choose the option as Compliant or Noncompliant. |
|
Step 3 |
Click Save. |
Posture Lease
You can configure Cisco ISE to perform posture assessment every time a user logs into your network or perform posture assessment in specified intervals. The valid range is from 1 to 365 days.
This configuration applies only for those who use AnyConnect agent for posture assessment.
When the posture lease is active, Cisco ISE will use the last known posture state and will not reach out to the endpoint to check for compliance. But when the posture lease expires, Cisco ISE does not automatically trigger a re-authentication or a posture reassessment for the endpoint. The endpoint will stay in the same compliance state since the same session is being used. When the endpoint re-authenticates, posture will be run and the posture lease time will be reset.
Example Use Case Scenario:
-
The user logs on to the endpoint and gets it posture compliant with the posture lease set to one day.
-
Four hours later the user logs off from the endpoint (the posture lease now has 20 hours left).
-
One hour later the user logs on again. Now the posture lease has 19 hours left. The last know posture state was compliant. Hence the user is provided access without posture being run on the endpoint.
-
Four hours later the user logs off (the posture lease now has 15 hours left).
-
14 hours later, the user logs on. The posture lease has one hour left. The last known posture state was compliant. The user is provided access without posture being run on the endpoint.
-
One hour later, the posture lease expires. The user is still connected to the network as the same user session is being used.
-
One hour later, user logs off (the session is tied to the user but not to the machine, so the machine can stay on the network).
-
One hour later the user logs on. Since the posture lease has expired and a new user session is launched, the machine performs a posture assessment, the results are sent to the Cisco ISE and the posture lease timer is reset to one day in case of this use case.
Periodic Reassessments
Periodic reassessment (PRA) can be done only for clients that are already successfully postured for compliance. PRA cannot occur if clients are not compliant on your network.
A PRA is valid and applicable only if the endpoints are in a compliant state. The policy service node checks the relevant policies, and compiles the requirements depending on the client role that is defined in the configuration to enforce a PRA. If a PRA configuration match is found, the policy service node responds to the client agent with the PRA attributes that are defined in the PRA configuration for the client before issuing a CoA request. The client agent periodically sends the PRA requests based on the interval specified in the configuration. The client remains in the compliant state if the PRA succeeds, or the action configured in the PRA configuration is to continue. If the client fails to meet PRA, then the client is moved from the compliant state to the noncompliant state.
The PostureStatus attribute shows the current posture status as compliant in a PRA request instead of unknown even though it is a posture reassessment request. The PostureStatus is updated in the Monitoring reports as well.
When the posture lease has not expired, an endpoint becomes compliant based on the Access Control List (ACL), and PRA is initiated. If PRA fails, the endpoint is deemed noncompliant and the posture lease is reset.
 Note |
PRA is not supported during PSN failover. After PSN failover, you must either enable rescan on the client or enable posture lease. |
Configure Periodic Reassessments
You can configure periodic reassessments only for clients that are already successfully postured for compliance. You can configure each PRA to a user identity group that is defined in the system.
Before you begin
-
Ensure that each Periodic reassessment (PRA) configuration has a unique group or a unique combination of user identity groups assigned to the configuration.
-
You can assign a role_test_1 and a role_test_2, which are the two unique roles to a PRA configuration. You can combine these two roles with a logical operator and assign the PRA configuration as a unique combination of two roles. For example, role_test_1 OR role_test_2.
-
Ensure that two PRA configurations do not have a user identity group in common.
-
If a PRA configuration already exists with a user identity group Any, you cannot create other PRA configurations unless you perform one of the following:
-
Update the existing PRA configuration with the Any user identity group to reflect a user identity group other than Any.
-
Delete the existing PRA configuration with a user identity group “Any”.
-
Procedure
|
Step 1 |
Choose . |
|
Step 2 |
Click Add. |
|
Step 3 |
Modify the values in the New Reassessment Configuration window to create a new PRA. |
|
Step 4 |
Click Submit to create a PRA configuration. |
Posture Troubleshooting Settings
The following table describes the fields on the Posture troubleshooting window, which you use to find and resolve posture problems on the network. The navigation path for this window is: .
|
Field Name |
Usage Guidelines |
|---|---|
|
Search and Select a Posture event for troubleshooting |
|
|
Username |
Enter the username to filter on. |
|
MAC Address |
Enter the MAC address to filter on, using format: xx-xx-xx-xx-xx-xx |
|
Posture Status |
Select the authentication status to filter on: |
|
Failure Reason |
Enter the failure reason or click Select to choose a failure reason from a list. Click Clear to clear the failure reason. |
|
Time Range |
Select a time range. The RADIUS authentication records that are created during this time range are used. |
|
Start Date-Time: |
(Available only when you choose Custom Time Range) Enter the start date and time, or click the calendar icon to select the start date and time. The date should be in the mm/dd/yyyy format and time in the hh:mm format. |
|
End Date-Time: |
(Available only when you choose Custom Time Range) Enter the end date and time, or click the calendar icon to select the start date and time. The date should be in the mm/dd/yyyy format and time in the hh:mm format. |
|
Fetch Number of Records |
Select the number of records to display: 10, 20, 50, 100, 200, 500 |
|
Search Result |
|
|
Time |
Time of the event |
|
Status |
Posture status |
|
Username |
User name associated with the event |
|
MAC Address |
MAC address of the system |
|
Failure Reason |
Failure reason for the event |


 Feedback