Configure Device Sensor for ISE Profiling
Available Languages
Download Options
Bias-Free Language
The documentation set for this product strives to use bias-free language. For the purposes of this documentation set, bias-free is defined as language that does not imply discrimination based on age, disability, gender, racial identity, ethnic identity, sexual orientation, socioeconomic status, and intersectionality. Exceptions may be present in the documentation due to language that is hardcoded in the user interfaces of the product software, language used based on RFP documentation, or language that is used by a referenced third-party product. Learn more about how Cisco is using Inclusive Language.
Contents
Introduction
This document describes how to configure the Device Sensor so that it can be used for profiling purposes on ISE.
Prerequisites
Requirements
Cisco recommends that you have knowledge of these topics:
- Radius protocol
- Cisco Discovery Protocol (CDP) and Link Layer Discovery Protocol (LLDP)
- Cisco Identity Service Engine (ISE)
- Cisco Catalyst Switch 9300
Components Used
The information in this document is based on these software and hardware versions:
- Cisco ISE version 3.4 patch 3
- Cisco Catalyst Switch 9300-48P version 17.12.4
- Cisco IP Phone 8811 version 12.8.1
The information in this document was created from the devices in a specific lab environment. All of the devices used in this document started with a cleared (default) configuration. If your network is live, ensure that you understand the potential impact of any command.
Background Information
Device Sensor is a feature of access devices that is used to gather raw endpoint data from network devices using protocols such as Cisco Discovery Protocol (CDP), Link Layer Discovery Protocol (LLDP) and Dynamic Host Configuration Protocol (DHCP). The endpoint data is helpful to complete the profiiling capability of the network access devices. Once the information is collected, it can be encapsulated in the radius accounting packets and sent to a profiling server, which, in this article, will be ISE.

Note: Device Sensor only profiles devices that are one hop away from the NAD (Network Access Device).
Once the information is collected, it can be encapsulated in radius accounting and sent to a profiling server. In this article, ISE is used as a profiling server.
Configure
Step 1. Standard AAA Configuration
In order to configure Authentication, Authorization, and Accounting (AAA), refer to these steps:
- Enable AAA using the aaa new-model command and enable 802.1X globally on the switch
- Configure the Radius server and enable dynamic authorization (Change of Authorization - CoA)
- Enable CDP and LLDP protocols. Add switchport authentication configuration
-
Add switchport authentication configuration
!
aaa new-model
!
!
aaa group server radius ISE-GROUP
 server name ise
!
aaa authentication dot1x default group radius
aaa authorization network default group radius
aaa accounting update newinfo
aaa accounting dot1x default start-stop group radius
!
!
aaa server radius dynamic-author
 client <ISE_PSN_IP> server-key Krakow123
!
dot1x system-auth-control
!
lldp run
cdp run
!
interface GigabitEthernet1/0/1
 description IP_Phone
 switchport mode access
 switchport voice vlan 101
 authentication event fail action next-method
 authentication host-mode multi-domain
 authentication order dot1x mab
 authentication priority dot1x mab
 authentication port-control auto
 mab
 dot1x pae authenticator
 dot1x timeout tx-period 2
 spanning-tree portfast
!
radius server ise
 address ipv4 <ISE_PSN_IP> auth-port 1812 acct-port 1813
 key <shared_key>
!
Note: It is necessary to configure the switch to send Cisco vendor-specific attributes (VSAs) to ISE.
These attributes can be sent inside the accounting packets by configuring the following command:
radius-server vsa send accountingStep 2. Configure Device Sensor
1. Determine which attributes from CDP/LLDP are needed in order to profile the device. In the case of Cisco IP Phone 8811 you can use these:
- LLDP SystemDescription attribute
- CDP CachePlatform attribute
You can validate which attributes are used to profile the device by checking the Profiler Policies. To do this, you can navigate to Work Centers > Profiler > Profiling Policies and select the profiling policy that you want to match.
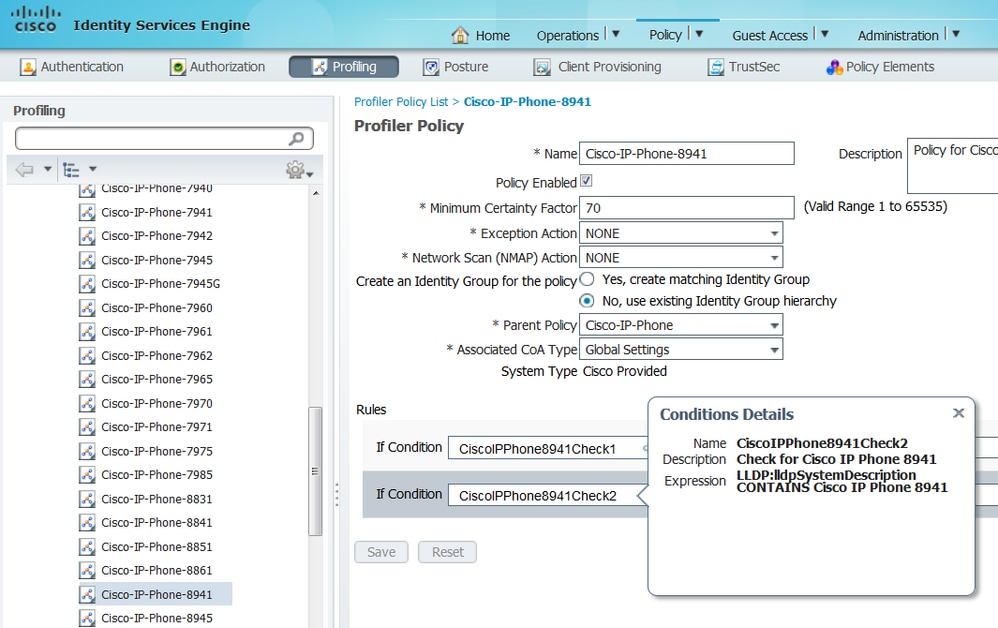
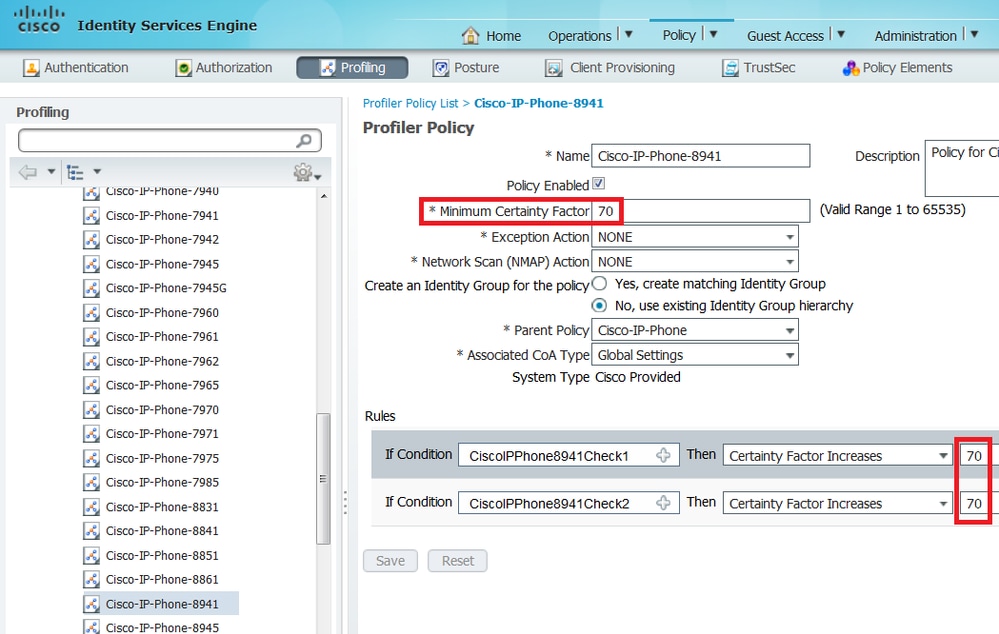
From the below screenshot, we can see that the Minimum Certainty Factory required for the endpoint to be profiled as Cisco-IP-Phone-8811 is 70. Therefore, since both attributes provide a Certainty Factory increase of 70 it is enough to obtain just one of them:
Note: In order to be profiled as a specific Cisco IP Phone, you must satisfy minimum conditions for all parent profiles. This means the profiler must match Cisco-Device (minimum Certainty Factor 10) and Cisco-IP-Phone (minimum Certainty Factor 20). Even though the profiler matches those two profiles, it must still be profiled as a specific Cisco IP Phone since each IP Phone model has a minimum Certainty Factor of 70. The device is assigned to the profile for which it has the highest Certainty Factor.
2.Configure two filter lists: one for CDP and another one for LLDP. Those indicate which attributes must be included in the Radius accounting messages. This step is optional.
3. Create two filter-specs for CDP and LLDP. In the filter-spec, you can indicate the list of attributes that must be included or excluded from accounting messages. In the example, these attributes are included:
-
device-name and platform-type from CDP
- system-description from LLDP
You can configure additional attributes to be transmitted via Radius to ISE if needed. This step is also optional.
4.Add the command device-sensor notify all-changes to trigger updates whenever TLVs are added, modified, or removed for the current session.
5.In order to actually send the information gathered via the Device Sensor functionality, you must explicitly tell the switch to accomplish this with the command device-sensor accounting.
!
device-sensor filter-list cdp list cdp-list
 tlv name device-name
 tlv name platform-type
!
device-sensor filter-list lldp list lldp-list
 tlv name system-description
!
device-sensor filter-spec lldp include list lldp-list
device-sensor filter-spec cdp include list cdp-list
!
device-sensor accounting
device-sensor notify all-changes
!
Step 3. Configure Profiling on ISE
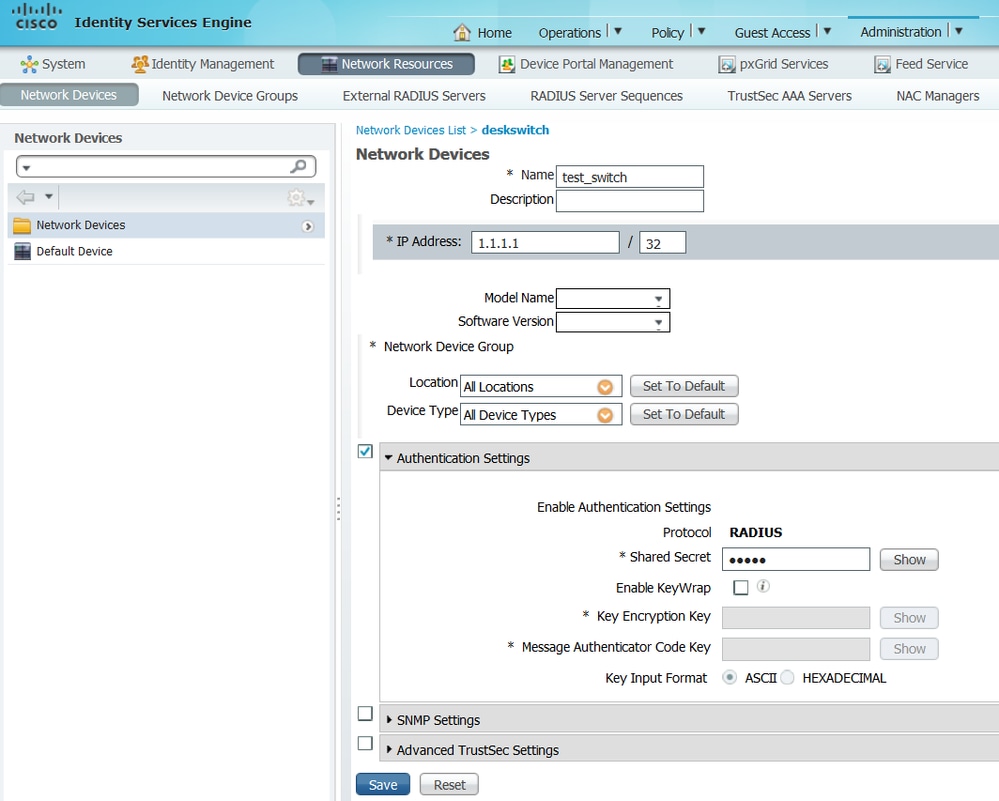
1. Add the switch as a network device in Administration > Network Resources > Network Devices. Use the radius server key from the switch as a shared secret in Authentication Settings:
2. Enable the Profiling Service on the ISE node. To do this, go to Administration > System > Deployment, choose the ISE node and, on the Policy Service tab, enable the Profiling Service option. If you need profiling on multiple PSNs, you can enable this service for each of one of them. However, keep in mind that the more probes you add and the more nodes you enable profiling service, the biggest the hit on performance, so enable them wisely.
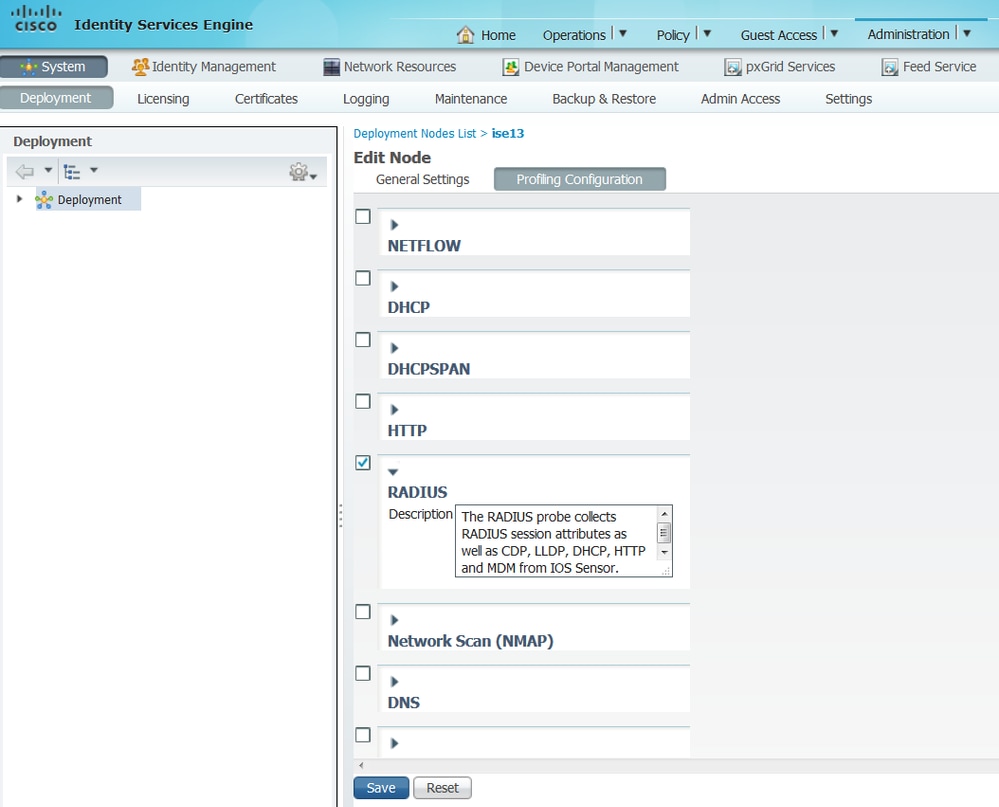
3. Enable the Radius probe on the profiling node. To do this, navigate to Administration > System > Deployment, choose the ISE node, and click on the Profiling Configuration tab.
4. Set the CoA (Change of Authorization) type to Reauth to enforce reauthentication of the endpoint when it is profiled. In addition, ensure that Endpoint Attribute Filter is checked. To do this, navigate to Administration > System > Settings > Profiling.
Note: It is a best practice to enable the Endpoint Attribute Filter in production deployments to avoid performance issues when too much unneeded profiler data is being gathered. To add an attribute to the allowlist that is currently not present, you can create a new Profiler Condition and Policy that uses the attribute. The attribute will automatically be added to the whitelist of stored and replicated attributes.
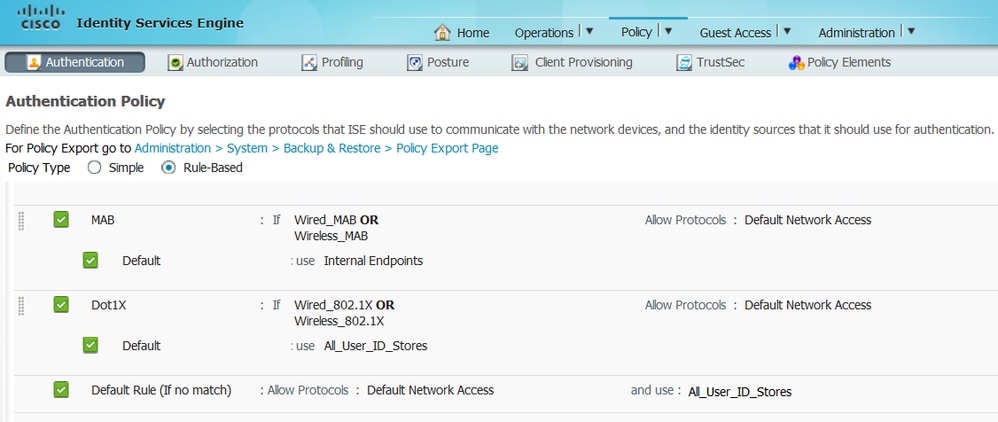
5. Configure ISE Authentication Rules:
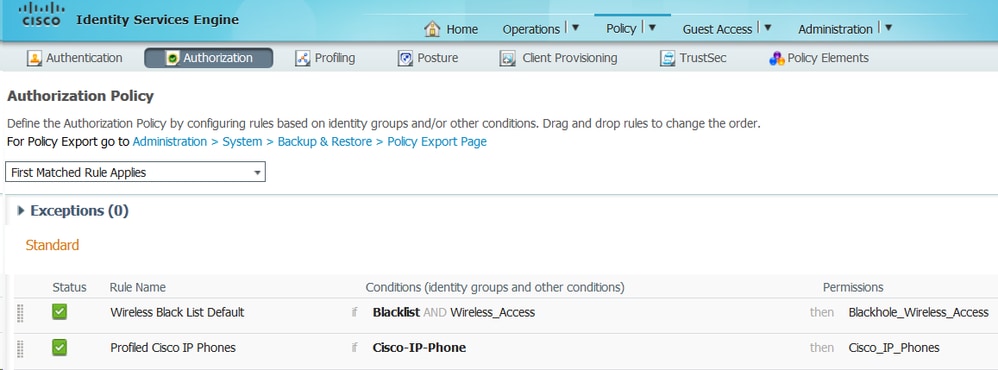
6. Configure ISE Authorization Rules. The Profiled Cisco-IP-Phone rule is used, which is preconfigured on ISE:
You can configure an Authorization Policy that will act as a catch policy, which will allow the endpoints to be authorized into the network (with limited access) to ensure that the attributes are sent in the accounting packets. In addition, create another policy that will be matched once the devices are profiled, ensuring that they can access the necessary resources in the network.
Verify
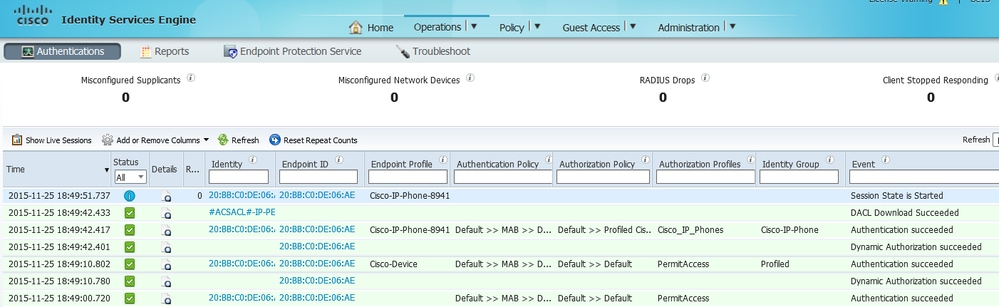
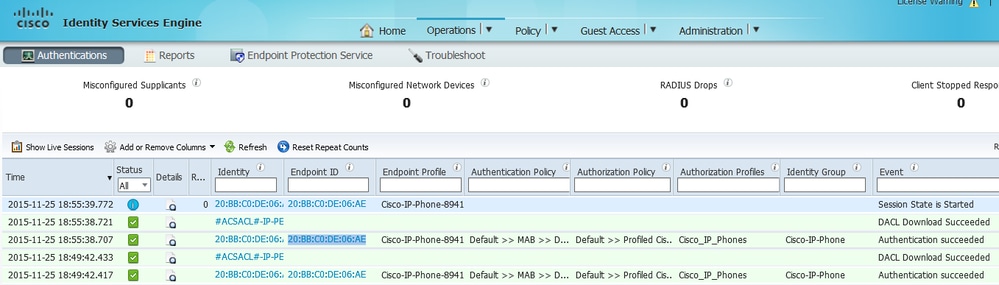
In order to verify if profiling is working correctly, refer to Operations > Radius > Live Logs on ISE:
First, authentication is expected to fail since we configured the authentication method order on the switch to be dot1x followed by MAB. Therefore, after dot1x authentication fails, the IP phone tries to authenticate using MAB and authentication is successful at 02:36:14 pm. In this live log, we can see that the device is profiled as a Cisco device since the OUI contains the word "Cisco", matching the pre-defined Cisco-Device profiling policy. Afterwards, since the device has access to the network, the CDP and LLDP attributes will be sent in the Radius Accounting packets. Therefore, at 02:36:15 pm, the device is profiled and ISE sends a CoA to force the endpoint to reauthenticate. Upon the successful CoA, we can see that the device authenticates into the network and hits the correct authorization policy, which is reserved only for Cisco IP Phones.
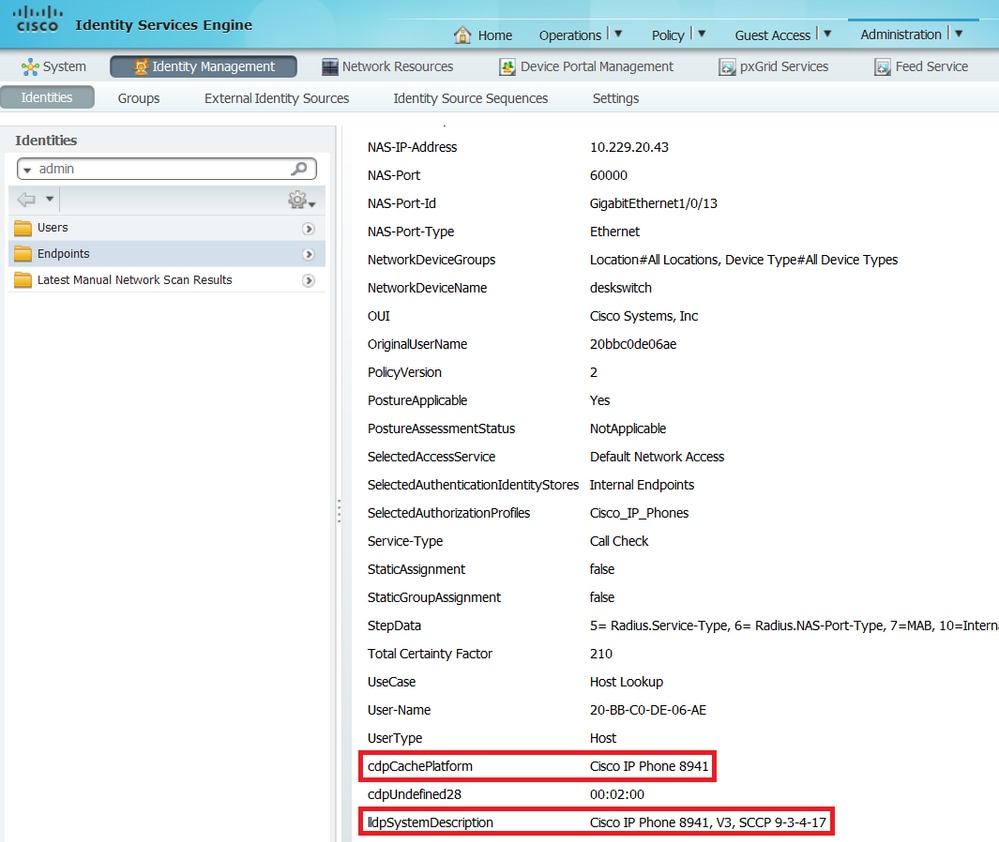
In Administration > Identity Management > Identities > Endpoints, you can filter by the tested endpoint MAC address and you can see what kind of attributes were collected by the Radius probe and what their values are:
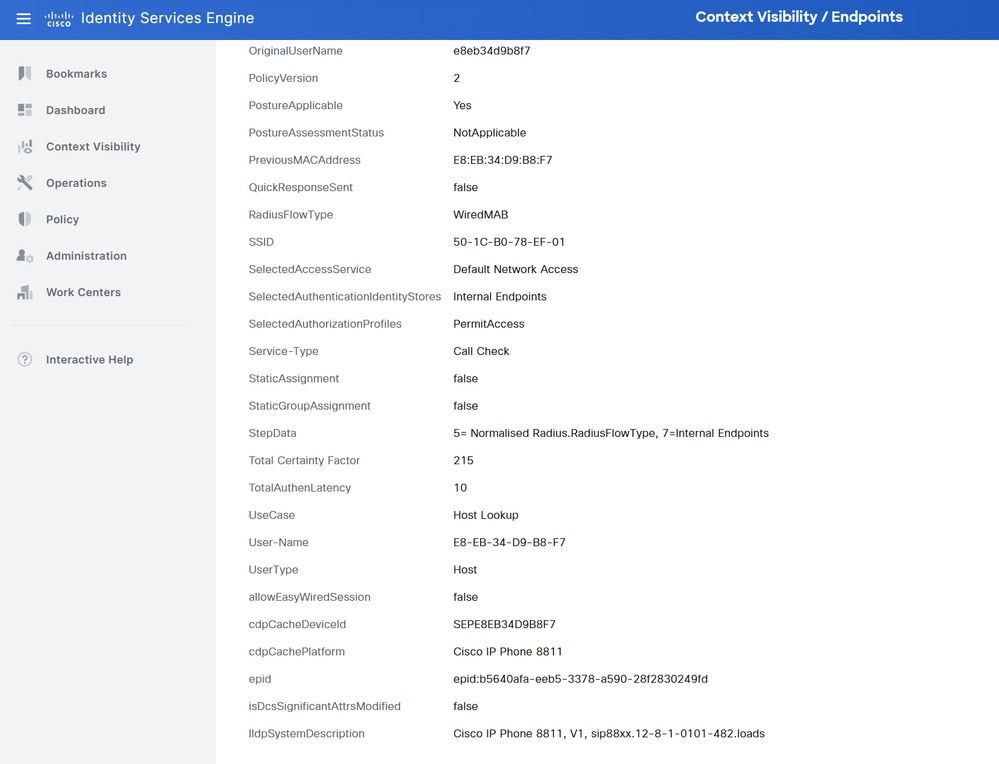
As you can observe, the total Certainty Factor computed is 215 in this scenario. It comes from the fact that the endpoint also matched the Cisco-Device profile (with a total certainty factor of 30) and the Cisco-IP-Phone profile (with a total certainty factor of 45). Moreover, the profiler also matched both conditions in profile Cisco-IP-Phone-8811, the certainty factor for this profile is 140 (70 for each attribute according to profiling policy). To sum up: 30+45+70+70=215.
Troubleshoot
Step 1. Verify Information Collected by CDP/LLDP
Switch#show cdp neighbors GigabitEthernet1/0/1 details
-------------------------
Device ID: SEPE8EB34D9B8F7
Entry address(es):
Platform: Cisco IP Phone 8811,  Capabilities: Host Phone Two-port Mac Relay
Interface: GigabitEthernet1/0/1,  Port ID (outgoing port): Port 1
Holdtime : 151 sec
Second Port Status: Down

Version :
sip88xx.12-8-1-0101-482.loads

advertisement version: 2
Peer Source MAC: e8eb.34d9.b8f7
Duplex: full
Power drawn: 6.086 Watts
Power request id: 63418, Power management id: 4
Power request levels are:6086 0 0 0 0


Switch#show lldp neighbors GigabitEthernet1/0/1 details
------------------------------------------------
Local Intf: Gi1/0/1
Local Intf service instance: -
Chassis id: 0.0.0.0
Port id: E8EB34D9B8F7:P1
Port Description: SW PORT
System Name: SEPE8EB34D9B8F7

System Description:
Cisco IP Phone 8811, V1, sip88xx.12-8-1-0101-482.loads

Time remaining: 175 seconds
System Capabilities: B,T
Enabled Capabilities: B,T
Management Addresses - not advertised
Auto Negotiation - supported, enabled
Physical media capabilities:
    1000baseT(FD)
    100base-TX(FD)
    100base-TX(HD)
    10base-T(FD)
    10base-T(HD)
Media Attachment Unit type: 30
Vlan ID: - not advertised
Peer Source MAC: e8eb.34d9.b8f7

MED Information:

    MED Codes:
          (NP) Network Policy, (LI) Location Identification
          (PS) Power Source Entity, (PD) Power Device
          (IN) Inventory

    H/W revision: 1
    F/W revision: sb2388xx.BE-01-027.sbn size=-1

    S/W revision: sip88xx.12-8-1-0101-482.loads
    Serial number: FCH25023CZN
    Manufacturer: Cisco Systems, Inc.
    Model: CP-8811
    Capabilities: NP, PD, IN
    Device type: Endpoint Class III
    Network Policy(Voice): VLAN 101, tagged, Layer-2 priority: 5, DSCP: 46
    Network Policy(Voice Signal): VLAN 101, tagged, Layer-2 priority: 4, DSCP: 32
    PD device, Power source: PSE, Power Priority: Unknown, Wattage: 5.9
    Location - not advertised


Total entries displayed: 1
If you cannot see any data collected, verify this:
- Check the state of the authentication session on the switch (it must be successful).
OCEAN#sh access-session int gig1/0/1 det
            Interface:  GigabitEthernet1/0/1
               IIF-ID:  0x172041DB
          MAC Address:  e8eb.34d9.b8f7
         IPv6 Address:  Unknown
         IPv4 Address:  Unknown
            User-Name:  E8-EB-34-D9-B8-F7
               Status:  Authorized
               Domain:  DATA
       Oper host mode:  multi-domain
     Oper control dir:  both
      Session timeout:  N/A
    Common Session ID:  F24D300A0000001B9A787BED
      Acct Session ID:  0x0000012b
               Handle:  0x79000011
       Current Policy:  POLICY_Gi1/0/1


Local Policies:
        Service Template: DEFAULT_LINKSEC_POLICY_SHOULD_SECURE (priority 150)
      Security Policy:  Should Secure
      Security Status:  Link Unsecured

Server Policies:


Method status list:
       Method           State
        dot1x           Stopped
mab Authc Success- Check if CDP and LLDP protocols are enabled. Check if there are any non-default commands regarding CDP/LLDP and how those can affect attribute retrieval from the endpoint.
Switch#show running-config all | include cdp run
cdp run
Switch#show running-config all | include lldp run
lldp run- Verify in the configuration guide for your endpoint if it supports CDP/LLDP and so on.
Step 2. Check the Device Sensor Cache
Switch#show device-sensor cache interface GigabitEthernet1/0/1
Device: e8eb.34d9.b8f7 on port GigabitEthernet1/0/1
----------------------------------------------------------------------------
Proto Type:Name                       Len Value                       Text
LLDP     6:system-description          56 0C 36 43 69 73 63 6F 20 49  .6Cisco I
                                          50 20 50 68 6F 6E 65 20 38  P Phone 8
                                          38 31 31 2C 20 56 31 2C 20  811, V1,
                                          73 69 70 38 38 78 78 2E 31  sip88xx.1
                                          32 2D 38 2D 31 2D 30 31 30  2-8-1-010
                                          31 2D 34 38 32 2E 6C 6F 61  1-482.loa
                                          64 73                       ds
CDP      6:platform-type               23 00 06 00 17 43 69 73 63 6F  ....Cisco
                                          20 49 50 20 50 68 6F 6E 65   IP Phone
                                          20 38 38 31 31               8811
CDP      1:device-name                 19 00 01 00 13 53 45 50 45 38  ....SEPE8
                                          45 42 33 34 44 39 42 38 46  EB34D9B8F
                                          37                          7
If you do not see any data in this field or information is not complete, verify device-sensor commands; in particular, filter-lists and filter-specs.
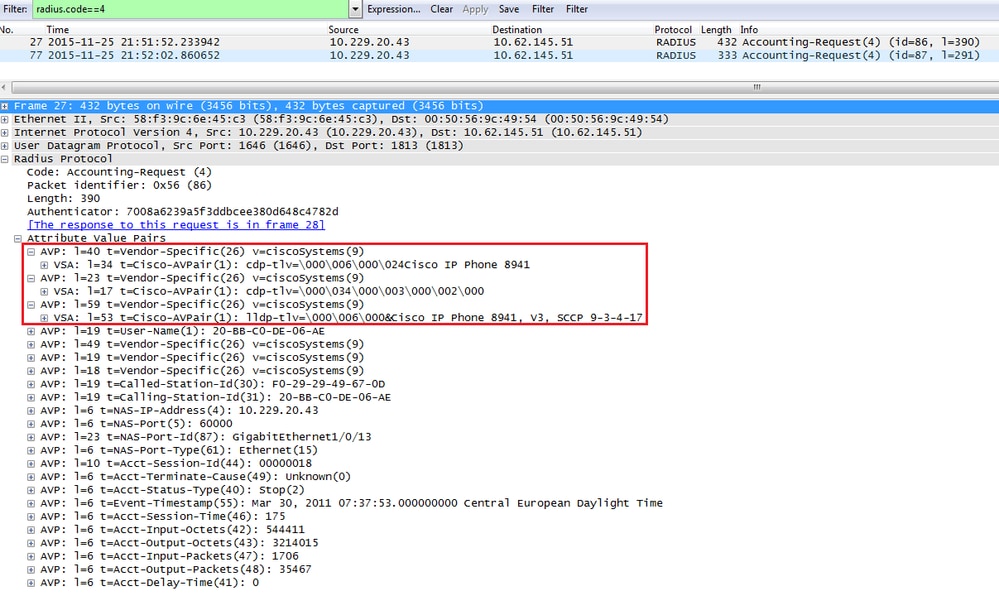
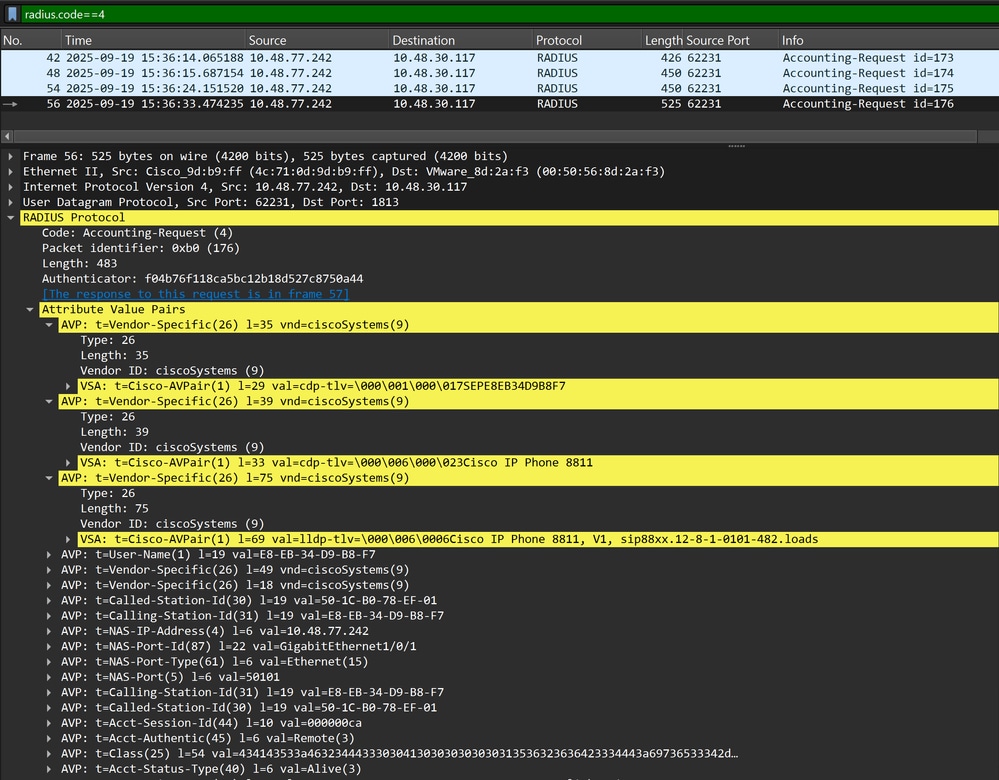
Step 3. Check if attributes are Present in Radius Accounting
You can verify that using the debug radius command on the switch or performing packet capture between the switch and ISE.
Radius Debug
Switch#debug radius
Switch#set platform software trace smd switch active R0 dot1x-all verbose
Switch#show platform software trace level smd switch active R0 | inc dot1x
dot1x Notice
dot1x-all Verbose
dot1x-redun Notice
To disable the debugs, you can execute the following command:
Switch#set platform software trace all noticeTo show the logs:
Switch#show logging process smd | include RADIUS

2025/09/19 14:36:25.431793040 {smd_R0-0}{1}: [radius] [23554]: (info): RADIUS: Send Accounting-Request to 10.48.30.117:1813 id 1813/180, len 459
2025/09/19 14:36:25.431800182 {smd_R0-0}{1}: [radius] [23554]: (info): RADIUS:  authenticator 37 19 72 c0 54 6b 63 a4 - e2 93 7b c1 c8 93 24 4c
2025/09/19 14:36:25.431804371 {smd_R0-0}{1}: [radius] [23554]: (info): RADIUS:  Vendor, Cisco       [26]    35
2025/09/19 14:36:25.431808600 {smd_R0-0}{1}: [radius] [23554]: (info): RADIUS:   Cisco AVpair       [1]     29  "cdp-tlv=                   "
2025/09/19 14:36:25.431811616 {smd_R0-0}{1}: [radius] [23554]: (info): RADIUS:  Vendor, Cisco       [26]    39
2025/09/19 14:36:25.431815180 {smd_R0-0}{1}: [radius] [23554]: (info): RADIUS:   Cisco AVpair       [1]     33  "cdp-tlv=                       "
2025/09/19 14:36:25.431817947 {smd_R0-0}{1}: [radius] [23554]: (info): RADIUS:  Vendor, Cisco       [26]    75
2025/09/19 14:36:25.431822305 {smd_R0-0}{1}: [radius] [23554]: (info): RADIUS:   Cisco AVpair       [1]     69  "lldp-tlv=                                                          "
2025/09/19 14:36:25.431826085 {smd_R0-0}{1}: [radius] [23554]: (info): RADIUS:  User-Name           [1]     19  "E8-EB-34-D9-B8-F7"
2025/09/19 14:36:25.431828885 {smd_R0-0}{1}: [radius] [23554]: (info): RADIUS:  Vendor, Cisco       [26]    49
2025/09/19 14:36:25.431832691 {smd_R0-0}{1}: [radius] [23554]: (info): RADIUS:   Cisco AVpair       [1]     43  "audit-session-id=F24D300A000000156266B34D"
2025/09/19 14:36:25.431835418 {smd_R0-0}{1}: [radius] [23554]: (info): RADIUS:  Vendor, Cisco       [26]    18
2025/09/19 14:36:25.431839009 {smd_R0-0}{1}: [radius] [23554]: (info): RADIUS:   Cisco AVpair       [1]     12  "method=mab"
2025/09/19 14:36:25.431842591 {smd_R0-0}{1}: [radius] [23554]: (info): RADIUS:  Called-Station-Id   [30]    19  "50-1C-B0-78-EF-01"
2025/09/19 14:36:25.431846145 {smd_R0-0}{1}: [radius] [23554]: (info): RADIUS:  Calling-Station-Id  [31]    19  "E8-EB-34-D9-B8-F7"
2025/09/19 14:36:25.431851298 {smd_R0-0}{1}: [radius] [23554]: (info): RADIUS:  NAS-IP-Address      [4]      6  10.48.77.242
2025/09/19 14:36:25.431854702 {smd_R0-0}{1}: [radius] [23554]: (info): RADIUS:  NAS-Port-Id         [87]    22  "GigabitEthernet1/0/1"
2025/09/19 14:36:25.431859269 {smd_R0-0}{1}: [radius] [23554]: (info): RADIUS:  NAS-Port-Type       [61]     6  Ethernet                  [15]
2025/09/19 14:36:25.431863238 {smd_R0-0}{1}: [radius] [23554]: (info): RADIUS:  NAS-Port            [5]      6  50101
2025/09/19 14:36:25.431866514 {smd_R0-0}{1}: [radius] [23554]: (info): RADIUS:  Calling-Station-Id  [31]    19  "E8-EB-34-D9-B8-F7"
2025/09/19 14:36:25.431870007 {smd_R0-0}{1}: [radius] [23554]: (info): RADIUS:  Called-Station-Id   [30]    19  "50-1C-B0-78-EF-01"
2025/09/19 14:36:25.431873587 {smd_R0-0}{1}: [radius] [23554]: (info): RADIUS:  Acct-Session-Id     [44]    10  "000000cc"
2025/09/19 14:36:25.431882560 {smd_R0-0}{1}: [radius] [23554]: (info): RADIUS:  Acct-Authentic      [45]     6  Remote                    [3]
2025/09/19 14:36:25.431885338 {smd_R0-0}{1}: [radius] [23554]: (info): RADIUS:  Class               [25]    54  ...
2025/09/19 14:36:25.431933331 {smd_R0-0}{1}: [radius] [23554]: (info): RADIUS:  Acct-Status-Type    [40]     6  Start                     [1]
2025/09/19 14:36:25.431937105 {smd_R0-0}{1}: [radius] [23554]: (info): RADIUS:  Event-Timestamp     [55]     6  1758292585
2025/09/19 14:36:25.431940547 {smd_R0-0}{1}: [radius] [23554]: (info): RADIUS:  Acct-Delay-Time     [41]     6  0
2025/09/19 14:36:25.431973200 {smd_R0-0}{1}: [radius] [23554]: (info): RADIUS: Started 5 sec timeout
Packet Capture
Step 4. Verify Profiler Debugs on ISE
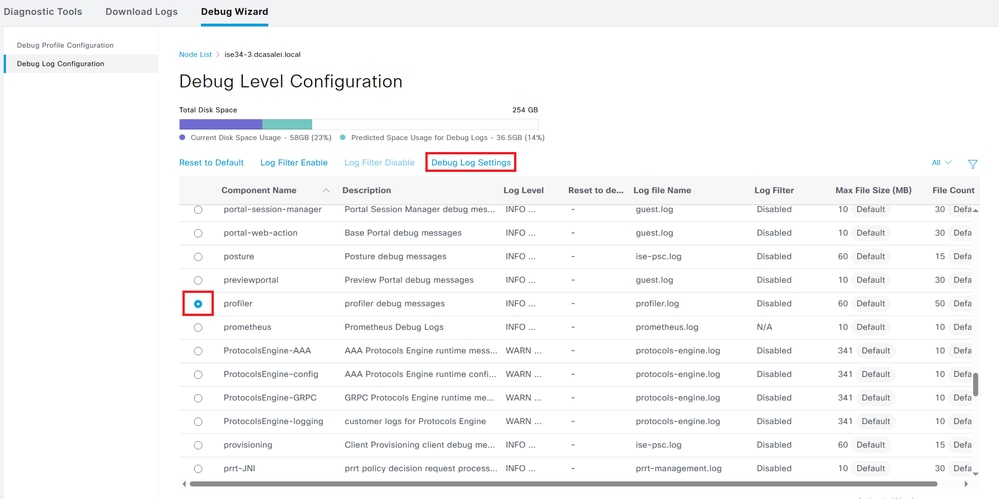
If the attributes were sent from the switch, it is possible to check if they were received on ISE. In order to check this, enable profiler debugs for the correct PSN node (Administration > System > Logging > Debug Log Configuration > PSN > profiler > debug) and perform authentication of the endpoint one more time.

Look for this information:
- Debug indicating that radius probe received attributes:
2025-09-21 07:14:07,574 INFO [RADIUSParser-1-thread-2][[]] cisco.profiler.probes.radius.RadiusParser -:F24D300A000000166B1DB387::::- MSG_CODE=[3000], VALID=[true], PRRT_TIMESTAMP=[2025-09-21 07:14:07.571 +00:00], MAC=[E8-EB-34-D9-B8-F7] 2025-09-21 07:14:07,574 DEBUG [RADIUSParser-1-thread-2][[]] cisco.profiler.probes.radius.RadiusParser -:F24D300A000000166B1DB387::::- ATTRS=[Device IP Address=10.48.77.242, UserName=CP-8811-SEPE8EB34D9B8F7, NetworkDeviceName=Test_Switch, User-Name=CP-8811-SEPE8EB34D9B8F7, NAS-IP-Address=10.48.77.242, NAS-Port=50101, Class=CACS:F24D300A000000166B1DB387:ise34-3/547062375/1383, Called-Station-ID=50-1C-B0-78-EF-01, Calling-Station-ID=E8-EB-34-D9-B8-F7, Acct-Status-Type=Start, Acct-Delay-Time=0, Acct-Session-Id=000000ce, Acct-Authentic=Remote, Event-Timestamp=1758438796, NAS-Port-Type=Ethernet, NAS-Port-Id=GigabitEthernet1/0/1, cisco-av-pair=cdp-tlv=cdpCacheDeviceId=SEPE8EB34D9B8F7, cisco-av-pair=cdp-tlv=cdpCachePlatform=Cisco IP Phone 8811, cisco-av-pair=lldp-tlv=lldpSystemDescription=Cisco IP Phone 8811\, V1\, sip88xx.12-8-1-0101-482.loads, cisco-av-pair=audit-session-id=F24D300A000000166B1DB387, cisco-av-pair=method=mab, QuickResponseSent=true, AcsSessionID=ise34-3/547062375/1389, SelectedAccessService=Default Network Access, RequestLatency=8, Step=11004, Step=11017, Step=15049, Step=15008, Step=22095, Step=11005, NetworkDeviceGroups=IPSEC#Is IPSEC Device#No, NetworkDeviceGroups=Location#All Locations, NetworkDeviceGroups=Device Type#All Device Types, CPMSessionID=F24D300A000000166B1DB387, StepLatency=1=0\;2=0\;3=0\;4=6\;5=0, TotalAuthenLatency=8, ClientLatency=0, Network Device Profile=Cisco, Location=Location#All Locations, Device Type=Device Type#All Device Types, IPSEC=IPSEC#Is IPSEC Device#No, ]
- Debug indicating that attributes were successfully parsed:
2025-09-21 07:14:07,574 DEBUG [RADIUSParser-1-thread-2][[]] cisco.profiler.probes.radius.RadiusParser -:F24D300A000000166B1DB387::::- Parsed IOS Sensor 1: cdpCacheDeviceId=[SEPE8EB34D9B8F7] 2025-09-21 07:14:07,574 DEBUG [RADIUSParser-1-thread-2][[]] cisco.profiler.probes.radius.RadiusParser -:F24D300A000000166B1DB387::::- Parsed IOS Sensor 2: cdpCachePlatform=[Cisco IP Phone 8811] 2025-09-21 07:14:07,574 DEBUG [RADIUSParser-1-thread-2][[]] cisco.profiler.probes.radius.RadiusParser -:F24D300A000000166B1DB387::::- Parsed IOS Sensor 3: lldpSystemDescription=[Cisco IP Phone 8811, V1, sip88xx.12-8-1-0101-482.loads]
- Debug indicating that attributes are processed by the forwarder:
2025-09-21 07:14:08,709 DEBUG [pool-55-thread-8][[]] cisco.profiler.infrastructure.probemgr.Forwarder -:F24D300A000000166B1DB387::90decf50-96ba-11f0-91c8-525ff9f6e55c:ProfilerCollection:- Endpoint Attributes:EndPoint[id=<null>,name=<null>] MAC: E8:EB:34:D9:B8:F7 Attribute:AAA-Server value:ise34-3 (... more attributes ...) Attribute:User-Name value:CP-8811-SEPE8EB34D9B8F7 Attribute:cdpCacheDeviceId value:SEPE8EB34D9B8F7 Attribute:cdpCachePlatform value:Cisco IP Phone 8811 Attribute:lldpSystemDescription value:Cisco IP Phone 8811, V1, sip88xx.12-8-1-0101-482.loads Attribute:SkipProfiling value:false
Note: A forwarder stores endpoints in the Cisco ISE database along with their attributes data, and then notifies the analyzer of new endpoints detected on your network. The analyzer classifies endpoints to the endpoint identity groups and stores endpoints with the matched profiles in the database.
Step 5. Profiling New Attributes and Device Assignment
Typically after new attributes are added to the existing collection for a specific device, this device or endpoint is added to the profiling queue in order to check if it has to be assigned a different profile based on new attributes:
2025-09-21 07:14:08,714 INFO   [pool-3352-thread-8][[]] cisco.profiler.infrastructure.profiling.ProfilerManager -:F24D300A000000166B1DB387::90decf50-96ba-11f0-91c8-525ff9f6e55c:Profiling:- Classify Mac E8:EB:34:D9:B8:F7 MessageCode 3000 epSource RADIUS Probe

2025-09-21 07:14:08,724 DEBUG  [pool-3352-thread-8][[]] cisco.profiler.infrastructure.profiling.ProfilerManager -:F24D300A000000166B1DB387::90decf50-96ba-11f0-91c8-525ff9f6e55c:Profiling:- Policy Cisco-Device matched E8:EB:34:D9:B8:F7 (certainty 30)

2025-09-21 07:14:08,727 DEBUG  [pool-3352-thread-8][[]] cisco.profiler.infrastructure.profiling.ProfilerManager -:F24D300A000000166B1DB387::90decf50-96ba-11f0-91c8-525ff9f6e55c:Profiling:- Policy Cisco-IP-Phone matched E8:EB:34:D9:B8:F7 (certainty 45)

2025-09-21 07:14:08,729 DEBUG  [pool-3352-thread-8][[]] cisco.profiler.infrastructure.profiling.ProfilerManager -:F24D300A000000166B1DB387::90decf50-96ba-11f0-91c8-525ff9f6e55c:Profiling:- Policy Cisco-IP-Phone-8811 matched E8:EB:34:D9:B8:F7 (certainty 140)

2025-09-21 07:14:08,729 DEBUG  [pool-3352-thread-8][[]] cisco.profiler.infrastructure.profiling.ProfilerManager -:F24D300A000000166B1DB387::90decf50-96ba-11f0-91c8-525ff9f6e55c:Profiling:- After analyzing policy hierarchy: Endpoint: E8:EB:34:D9:B8:F7 EndpointPolicy:Cisco-IP-Phone-8811 for:215 ExceptionRuleMatched:false
Related Information
Revision History
| Revision | Publish Date | Comments |
|---|---|---|
4.0 |
02-Oct-2025
|
Updated formatting, headers, biased laguage |
3.0 |
14-Aug-2024
|
Updated formatting, some grammar improvements. |
1.0 |
14-Dec-2015
|
Initial Release |
Contributed by Cisco Engineers
- Piotr BorowiecCustomer Delivery Leader
 Feedback
Contact Cisco
- Open a Support Case

- (Requires a Cisco Service Contract)