A Device Administration license allows you to use TACACS+ services on a Policy Service node. In a high availability (HA) standalone deployment, a Device Administration license permits you to use TACACS+ services on a single Policy Service node in the HA pair.
Configure TACACS+ over TLS 1.3 on a Nexus Device with ISE
Available Languages
Download Options
Updated:February 19, 2026
Document ID:224882
Bias-Free Language
The documentation set for this product strives to use bias-free language. For the purposes of this documentation set, bias-free is defined as language that does not imply discrimination based on age, disability, gender, racial identity, ethnic identity, sexual orientation, socioeconomic status, and intersectionality. Exceptions may be present in the documentation due to language that is hardcoded in the user interfaces of the product software, language used based on RFP documentation, or language that is used by a referenced third-party product. Learn more about how Cisco is using Inclusive Language.
Contents
Introduction
This document describes an example for TACACS+ over TLS with Cisco Identity Services Engine (ISE) as server and a Cisco NX-OS device as client.
Overview
The Terminal Access Controller Access-Control System Plus (TACACS+) Protocol [RFC8907] enables centralized device administration for routers, network access servers, and other networked devices through one or more TACACS+ servers. It provides authentication, authorization, and accounting (AAA) services, specifically tailored for device administration use cases.
TACACS+ over TLS 1.3 [RFC8446] enhances the protocol by introducing a secure transport layer, safeguarding highly sensitive data. This integration ensures confidentiality, integrity, and authentication for the connection and network traffic between TACACS+ clients and servers.
Using this Guide
This guide divides the activities into two parts to enable ISE to manage administrative access for Cisco NX-OS based network devices.
• Part 1 – Configure ISE for Device Admin
• Part 2 – Configure Cisco NX-OS for TACACS+ over TLS
Prerequisites
Requirements
Prerequisites to configure TACACS+ over TLS:
- A Certificate Authority (CA) to sign the certificate used by TACACS+ over TLS to sign the certificates of ISE and network devices.
- The root certificate from the Certificate Authority (CA).
-
Network devices and ISE have DNS reachability and can resolve hostnames.
Components Used
The information in this document is based on these software and hardware versions:
- ISE VMware virtual appliance, Release 3.4 patch 2.
- Nexus 9000 switch model C9364D-GX2A, Cisco NX-OS version 10.6(1)+.
The information in this document was created from the devices in a specific lab environment. All of the devices used in this document started with a cleared (default) configuration. If your network is live, ensure that you understand the potential impact of any command.
Licensing
Configure ISE for Device Admin
Generate Certificate Signing Request for TACACS+ Server Authentication
Step 1. Log in to the ISE admin web portal using one of the supported browsers.
By default, ISE uses a self-signed certificate for all services. The first step is to generate a Certificate Signing Request (CSR) to have it signed by our Certificate Authority (CA).
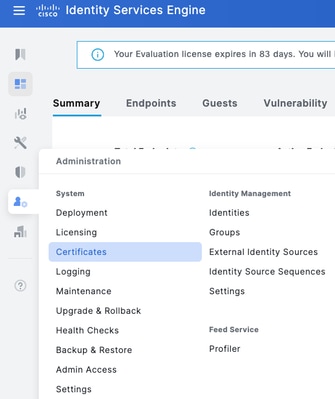
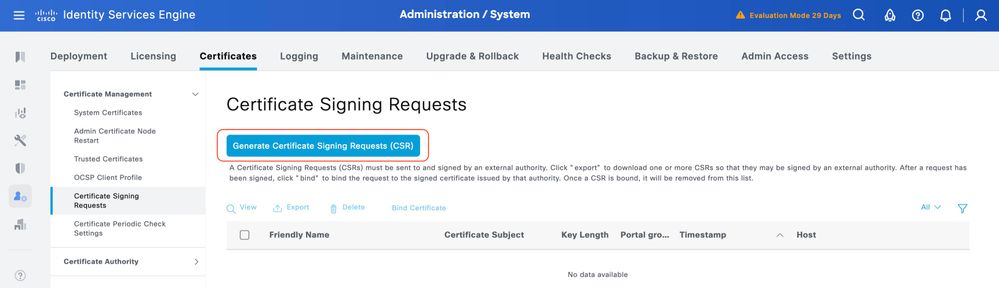
Step 2. Navigate to Administration > System > Certificates.
Step 3. Under Certificate Signing Requests, click Generate Certificate Signing Request.
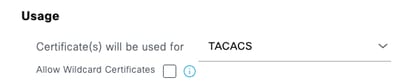
Step 4. Select TACACS in Usage.
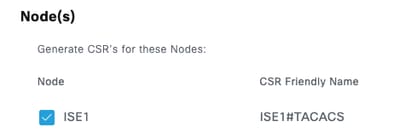
Step 5. Select the PSNs that has TACACS+ enabled.
Step 6. Fill the Subject fields with the appropiate information.

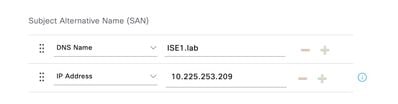
Step 7. Add the DNS Name and IP Address under Subject Alternative Name (SAN).
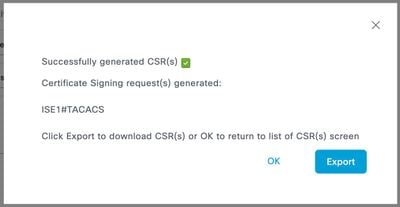
Step 8. Click Generate and then Export.
Now, you can have the certificate (CRT) signed by your Certificate Authority (CA).
Upload Root CA Certificate for TACACS+ Server Authentication
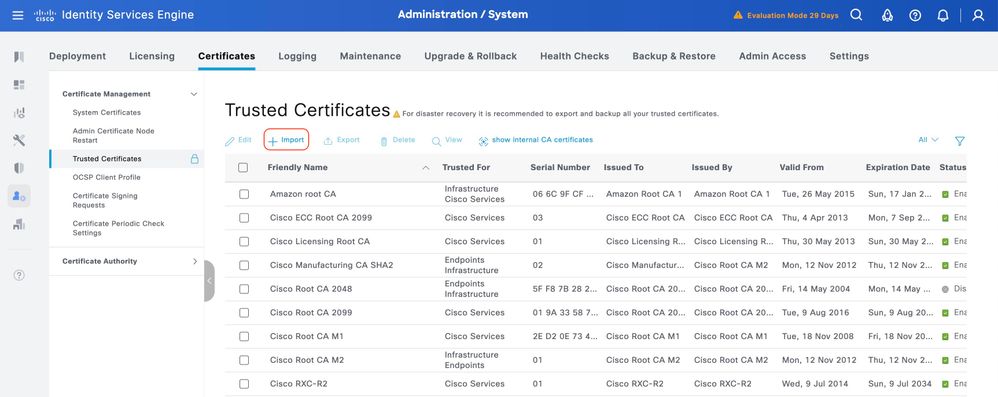
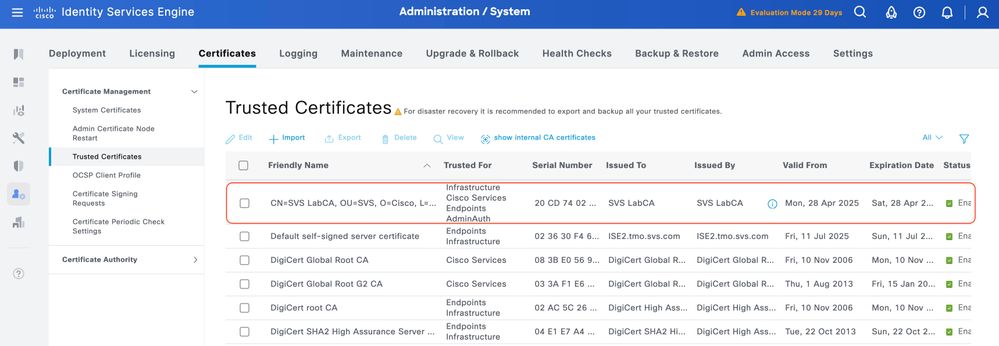
Step 1. Navigate to Administration > System > Certificates. Under Trusted Certificates, click Import.
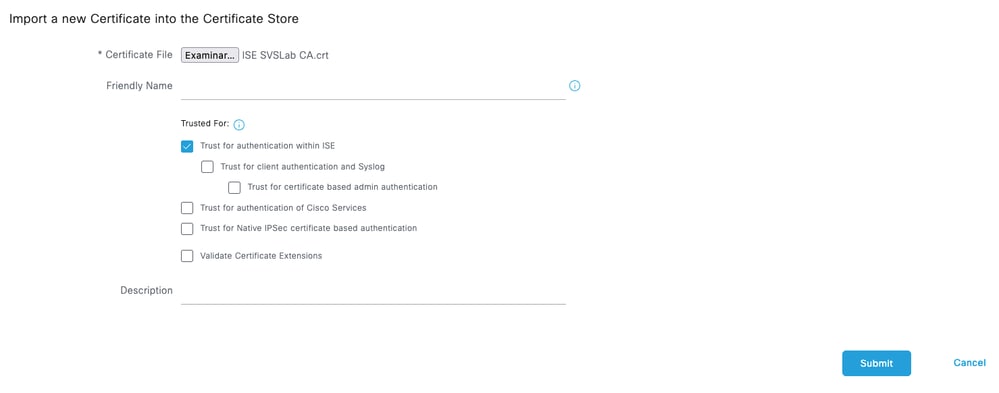
Step 2. Select the certificate issued by the Certificate Authority (CA) that signed your TACACS Certificate Signing Request (CSR). Make sure that the Trust for authentication within ISE option is enabled.
Click Submit. The certificate must now appear under Trusted Certificates.
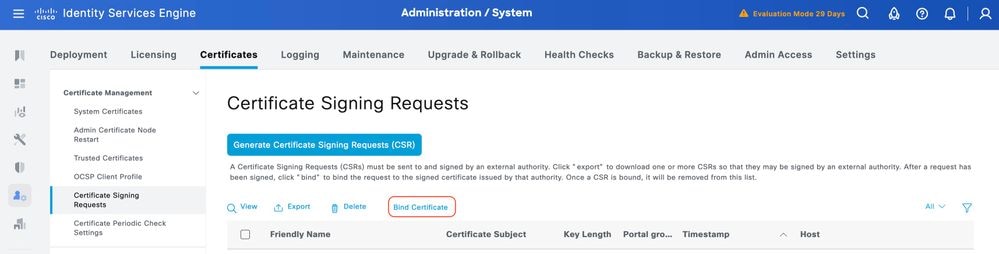
Bind the Signed Certificate Signing Request (CSR) to ISE
Once the Certificate Signing Request (CSR) is signed, you can install the signed certificate on ISE.
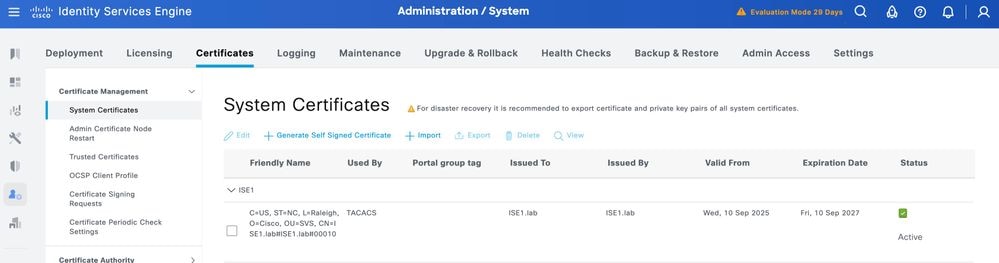
Step 1. Navigate to Administration > System > Certificates. Under Certificate Signing Requests, select the TACACS CSR generated in the previous step and click Bind Certificate.
Step 2. Select the signed certificate and ensure the TACACS checkbox under Usage remains selected.
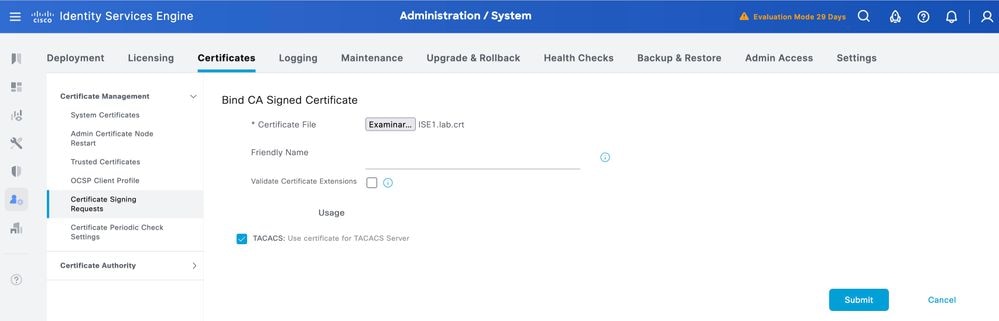
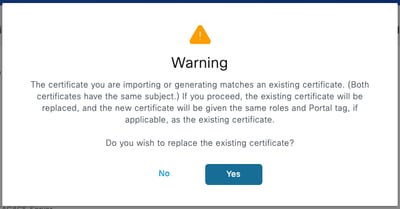
Step 3. Click Submit. If you receive a warning about replacing the existing certificate, click Yes to proceed.
The certificate must now be correctly installed. You can verify this under System Certificates.
Enable TLS 1.3
TLS 1.3 is not enabled by default in ISE 3.4.x. It must be manually enabled.
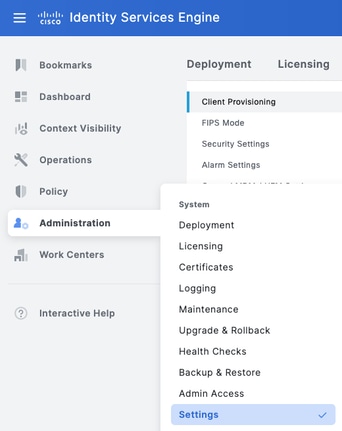
Step 1. Navigate to Administration > System > Settings.
Step 2. Click Security Settings, select the check box next to TLS1.3 under TLS Version Settings, then, click Save.
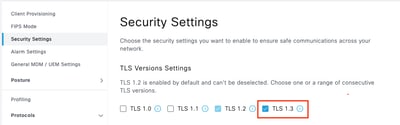

Warning: When you change the TLS version, the Cisco ISE application server restarts on all the Cisco ISE deployment machines.
Enable Device Administration on ISE
The Device Administration service (TACACS+) is not enabled by default on an ISE node. Enable TACACS+ on a PSN node.
Step 1. Navigate to Administration > System > Deployment. Select the check box next to the ISE node and click Edit.
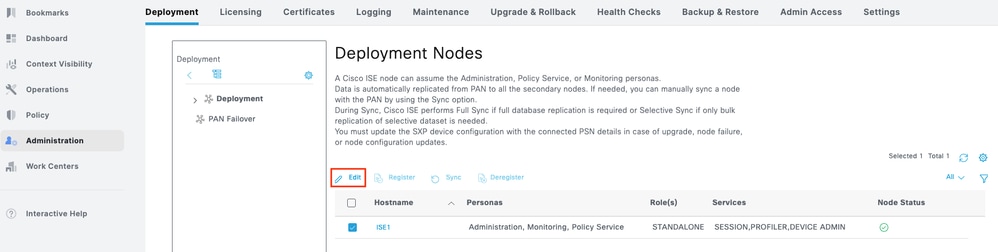
Step 2. Under General Settings, scroll down and select the check box next to Enable Device Admin Service.
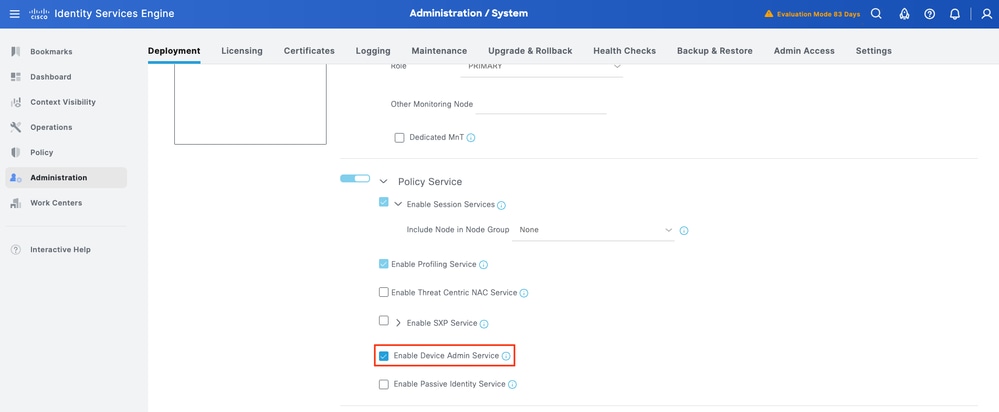
Step 3. Save the configuration. Device Admin Service is now enabled on ISE.
Enable TACACS Over TLS
Step 1. Navigate to Work Centers > Device Administration > Overview.

Step 2. Click Deployment. Select the PSN nodes where you want to enable TACACS over TLS.

Step 3. Keep the default port 6049 or specify a different TCP port for TACACS over TLS, then click Save.
ISE Prerequisites and Miscellaneous Tasks
Network Device and Network Device Groups
ISE provides powerful device grouping with multiple device group hierarchies. Each hierarchy represents a distinct and independent classification of network devices.
Step 1. Navigate to Work Centers > Device Administration > Network Resource. Click Network Device Groups.
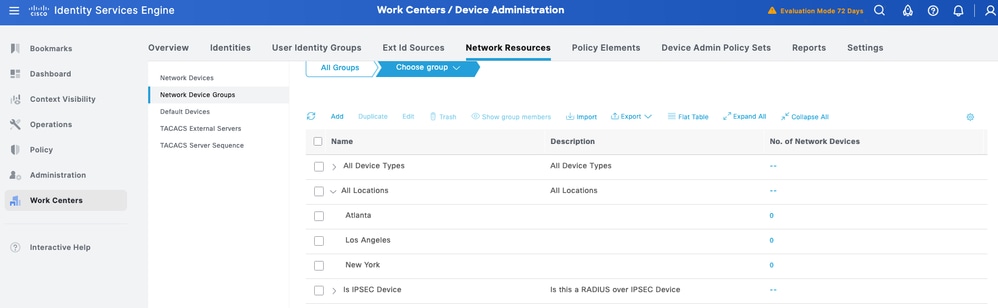
All Device Types and All Locations are default hierarchies provided by ISE. You add your own hierarchies and define the various components in identifying a Network Device which can be used later in the Policy Condition.
Step 2. Now, add a NS-OX device as a Network Device. Navigate to Work Centers > Device Administration > Network Resources. Click Add to add a new Network Device POD2IPN2.
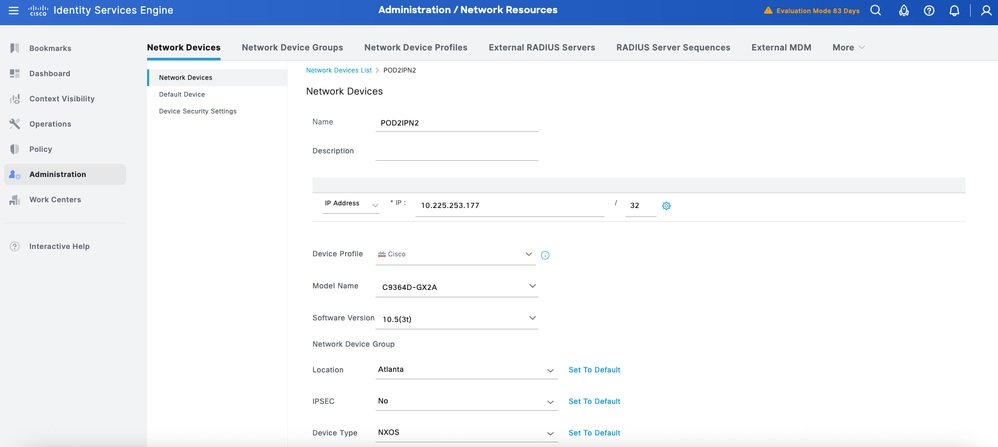
Step 3. Enter the IP address of the Device and make sure to map the Location and Device Type for the Device. Finally, enable the TACACS+ over TLS Authentication Settings.
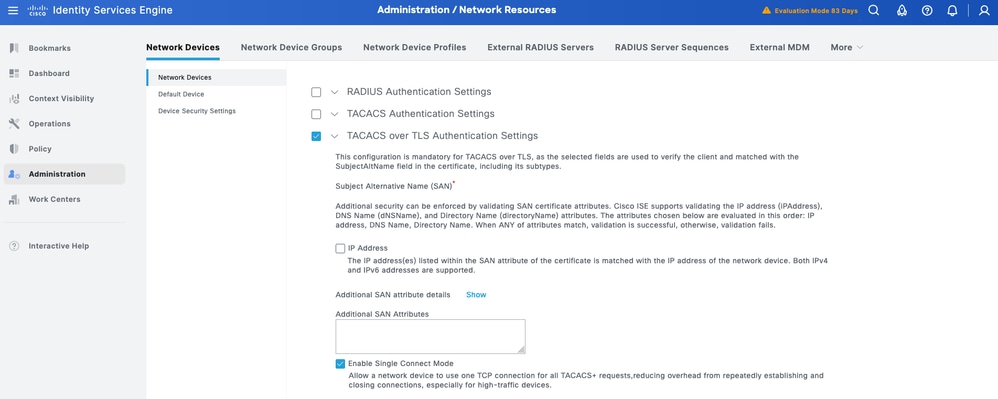

Tip: It is recommended to enable Single Connect Mode to avoid restarting the TCP session each time a command is sent to the device.
Configure Identity Stores
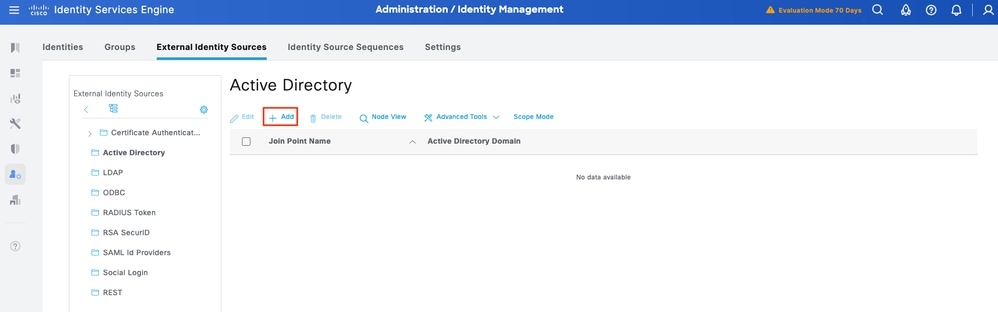
This section defines an Identity Store for the Device Administrators, which can be the ISE Internal Users and any supported External Identity Sources. Here uses Active Directory (AD), an External Identity Source.
Step1. Navigate to Administration > Identity Management > External Identity Stores > Active Directory. Click Add to define a new AD Joint Point.
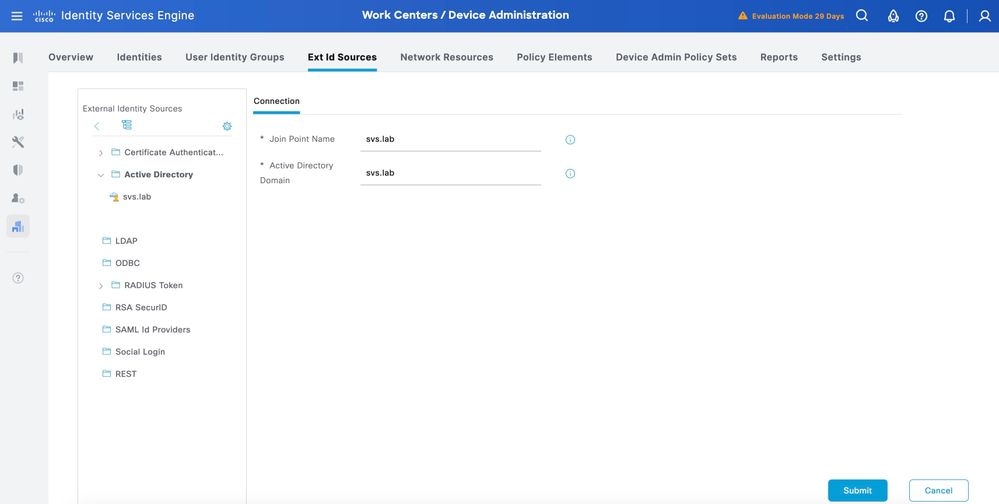
Step 2. Specify the Join Point name and the AD domain name and click Submit.
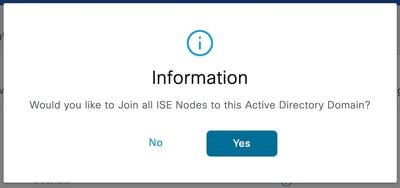
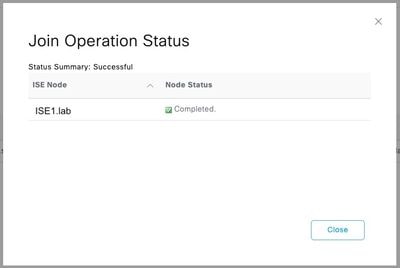
Step 3. Click Yes when prompted “Would you like to Join all ISE Nodes to this Active Directory Domain?”
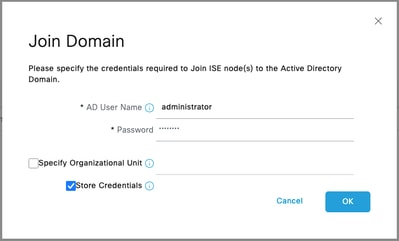
Step 4. Input the credentials with AD join privileges, and Join ISE to AD. Check the Status to verify it operational.
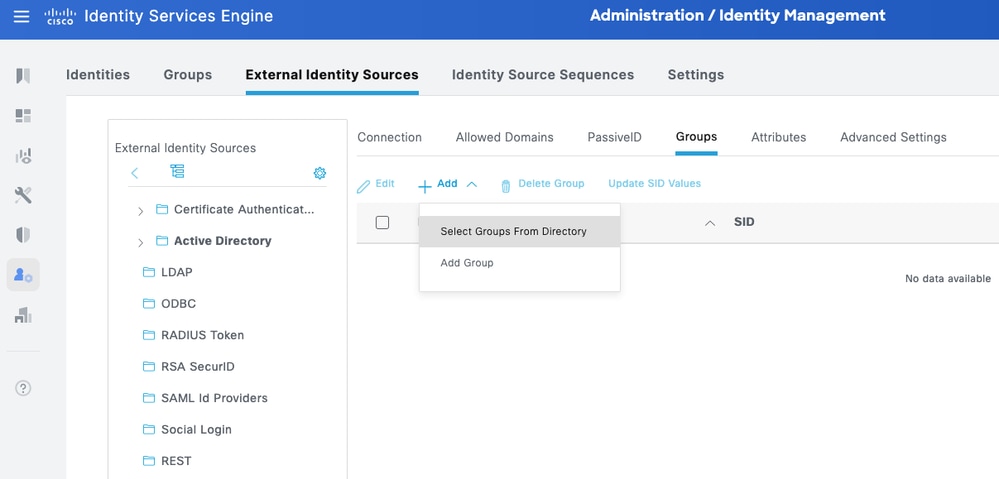
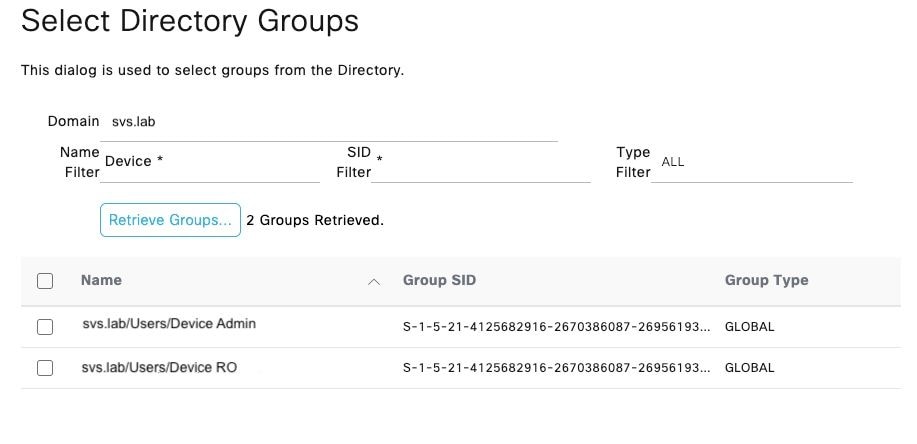
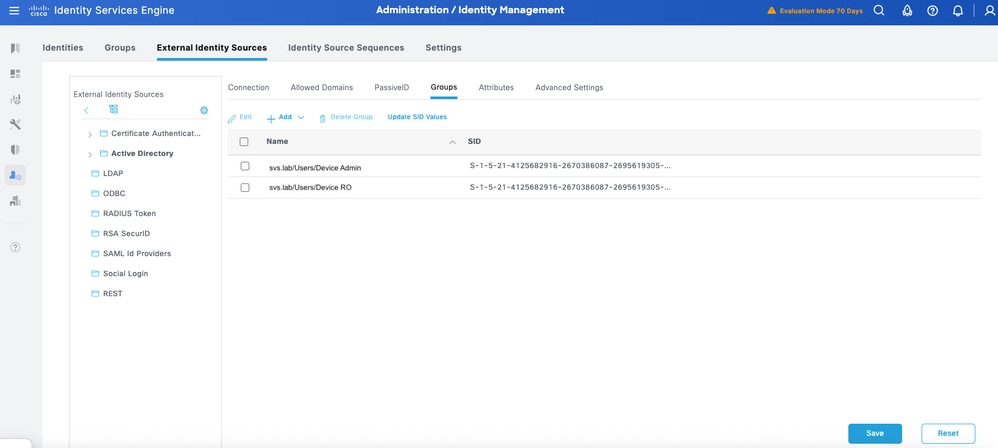
Step 5. Navigate to the Groups tab, and click Add to get all the groups needed based on which the users are authorized for the device access. This example shows the groups used in the Authorization Policy in this guide.
Configure TACACS+ Shell Profiles
Unlike Cisco IOS devices, which use privilege levels for authorization, Cisco NX-OS devices implement role-based access control (RBAC). In ISE, you can map TACACS+ profiles to user roles on Cisco NX-OS devices using Nexus-type Common Tasks.
The predefined roles on NX-OS devices differ among NX-OS platforms. Two common ones are:
- network-admin – predefined network admin role has complete read-and-write access to all commands on the switch; available in the default virtual device context (VDC) only if the devices (for example, Nexus 7000) have multiple VDCs. Use NX-OS CLI command show cli syntax roles network-admin to see the full command list available for this role.
- network-operator – predefined network admin role has complete read access to all commands on the switch; available in the default VDC only if the devices (for example, Nexus 7000) have multiple VDCs. Use NX-OS CLI command show cli syntax roles network-operator to see the full command list available for this role.
Next, it is defined two TACACS Profiles – NXOS Admin and NXOS HelpDesk.
NX-OS Admin
Step 1. Add another profile and name it NX-OS Admin.
Step 2. Select Mandatory from the Set attributes as drop down. Select Administrator from Network-role option under Common Tasks.
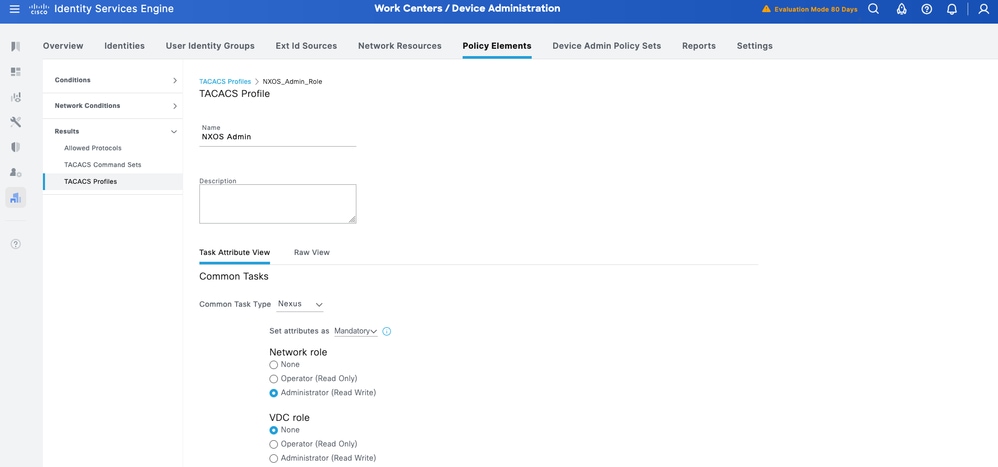
Step 3. Click Submit to save the profile.
NX-OS HelpDesk
Step 1. From ISE UI, navigate to Work Centers > Device Administration > Policy Elements > Results > TACACS Profiles. Add a new TACACS Profile and name it NXOS HelpDesk. Go to the Common Task Type drop down and choose Nexus.
You can see the template changes specific to user role. You can select these options corresponding to the user role you want to configure.
Step 2. Select Mandatory from the Set attributes as drop down. Select Operator from Network-role option under Common Tasks.
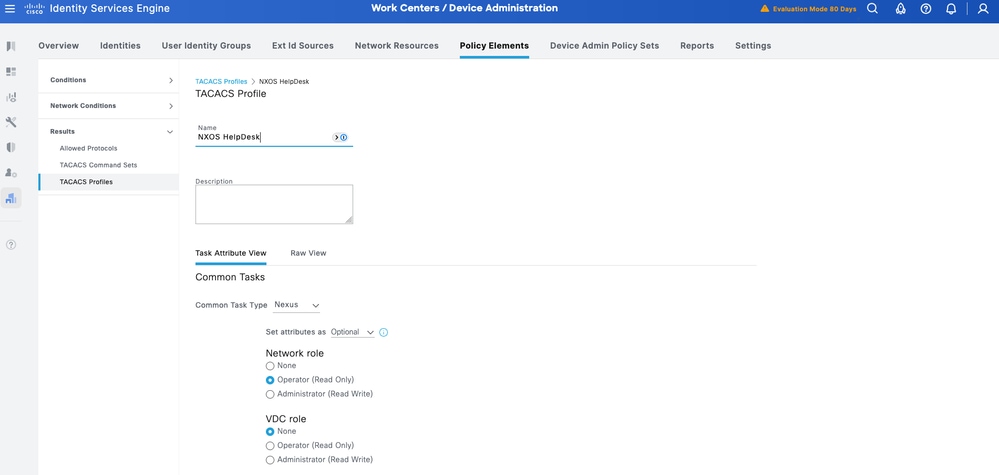
Step 3. Click Save to save the profile.
Configure Device Admin Policy Sets
Policy Sets are enabled by default for Device Administration. Policy Sets can divide polices based on the Device Types so to ease application of TACACS profiles. For example, Cisco IOS devices use Privilege Levels and/or Command Sets whereas Cisco NX-OS devices use Custom Attributes.
Step 1. Navigate to Work Centers > Device Administration > Device Admin Policy Sets. Add a new Policy Set NX-OS Devices. Under condition, specify DEVICE:Device Type EQUALS All Device Types#NXOS. Under Allowed Protocols, select Default Device Admin.
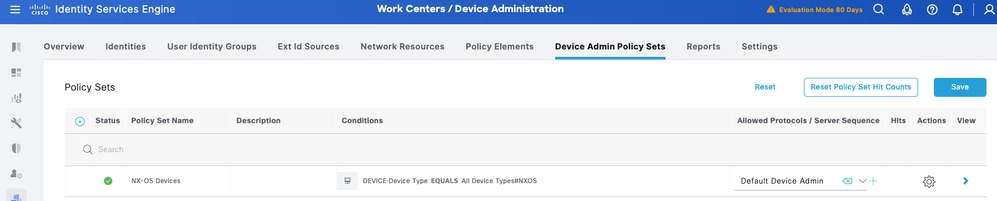
Step 2. Click Save and click the right arrow to configure this Policy Set.
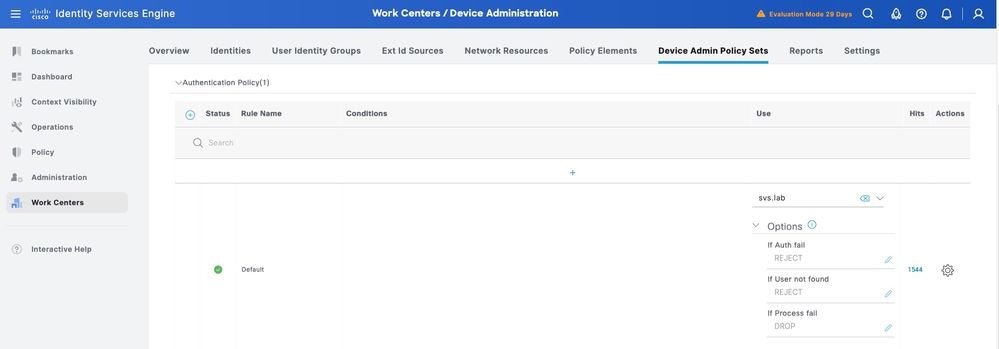
Step 3. Create the Authentication Policy. For Authentication, you use the AD as the ID Store. Leave the default options under If Auth fail, If User not found and If Process fail.
Step 4. Define the Authorization Policy.
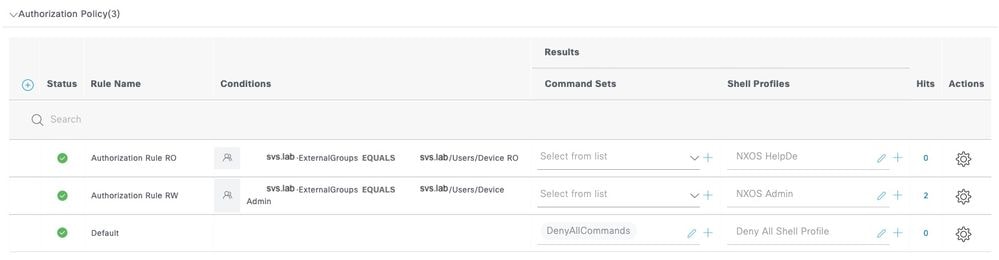
Create the authorization policy based on user groups in Active Directory (AD).
For example:
• Users in the AD group Device Admin are assigned the NXOS Admin TACACS Profile.
• Users in the AD group Device RO are assigned the NXOS HelpDesk TACACS Profile.
Configure Cisco NX-OS for TACACS+ over TLS

Note: For further details, please refer to NX-OS Security Configuration Guide - https://www.cisco.com/c/en/us/td/docs/dcn/nx-os/nexus9000/106x/configuration/security/cisco-nexus-9000-series-nx-os-security-configuration-guide-release-106x/m-configuring-tacacs.html
Verify Software Version and Base Configurations
On Nexus 9000 switches, TACACS+ over TLS 1.3 is supported from NX-OS release 10.6(1)F. Make sure that the current software version aligns with this.
Software
BIOS: version 01.18
NXOS: version 10.6(1) [Feature Release]
Host NXOS: version 10.6(1)
BIOS compile time: 04/25/2025
NXOS image file is: bootflash:///nxos64-cs.10.6.1.F.bin
NXOS compile time: 7/31/2025 12:00:00 [08/12/2025 21:18:15]
NXOS boot mode: LXC

Caution: Ensure that the console connection is reachable and functioning properly.
Tip: It is recommended to configure a temporary user and change the AAA authentication and authorization methods to use local credentials instead of TACACS while making configuration changes, to avoid being locked out of the device.
TACACS+ Server Configuration
Step 1. Initial configuration.
POD2IPN2# sho run tacacs

feature tacacs+

tacacs-server host 10.225.253.209 key 7 "F1whg.123"
aaa group server tacacs+ tacacs2
  server 10.225.253.209
  use-vrf management
Method 1 - Device Generated Key-pair
This method uses device generated key-pairs for certificate management. This involves generating a key on the device, generating CSR (certificate signing request) and once the CSR is signed, installing the signed certificate on the device, including installing the trusted CA certificate.
If you wish to use CA generated key-pair method (PFX install method), pelase refer Method 2.
Trustpoint Configuration
Step 1. Create a key label, in your case, use ecc key pair.
POD2IPN2(config)# crypto key generate ecc label ec521-label exportable modulus 521
Step 2. Associate this with a trustpoint.
POD2IPN2(config)# crypto ca trustpoint ec521-tp
POD2IPN2(config-trustpoint)# ecckeypair ec521-label
Step 3. Install the CA public key.
POD2IPN2(config)# crypto ca authenticate ec521-tp
input (cut & paste) CA certificate (chain) in PEM format;
end the input with a line containing only END OF INPUT :
-----BEGIN CERTIFICATE-----
MIIFlDCCA3ygAwIBAgIIIM10AsTaN/UwDQYJKoZIhvcNAQELBQAwajELMAkGA1UE
BhMCVVMxFzAVBgNVBAgTDk5vcnRoIENhcm9saW5hMRAwDgYDVQQHEwdSYWxlaWdo
MQ4wDAYDVQQKEwVDaXNjbzEMMAoGA1UECxMDU1ZTMRIwEAYDVQQDEwlTVlMgTGFi
Q0EwHhcNMjUwNDI4MTcwNTAwWhcNMzUwNDI4MTcwNTAwWjBqMQswCQYDVQQGEwJV
UzEXMBUGA1UECBMOTm9ydGggQ2Fyb2xpbmExEDAOBgNVBAcTB1JhbGVpZ2gxDjAM
BgNVBAoTBUNpc2NvMQwwCgYDVQQLEwNTVlMxEjAQBgNVBAMTCVNWUyBMYWJDQTCC
AiIwDQYJKoZIhvcNAQEBBQADggIPADCCAgoCggIBAJvZUOyn2vIn6gKbx3M7vaRq
2YjwZlzSH6EkEvxnJTy+kksiFD33GyHQepk7vfp4NFU5OtQ4HC7t/A0v9grDa3QW
VwvV4MBbJhFM3s0J/ejgDYcMZhIAaPy0Zo5WLboOkXEiKjPLatkXojB8FVrhLF3O
jMBSqwa4/Wlniy5S+7s4FFxsCf20COWfBAsnrs0tatIIhmcnx+VLJP7MRm8f0w4m
mutNo7IhbJSrgAFXmjlbBjMmgspObULo/wxMHdTbtPBf11HRHTkNIo3qy04UADL2
WpoGhgT/FaxxBo2UBcnYVaP+jjRE0NYT973MCbVAAxtNVU6bEBR0z+LWniACzupm
+qh23SL43uW5A3iSw/BuU1E9p7B0e8oDNKU6gXlojKyLP/gC7j8AeP03ir+KZui8
b8X4iYn/67SbzZFhwxn3chkW4JYhQ4AImW1An2Q1+DMoZL7zRtSqQ3g9ZqRIMzQN
gJ+kQXe7QtT/u6m1MrtjE3gAEVpL334rTIxy9hpKZIkB86t2ZA3JX8CLsbCa13sA
z1XCoONX+6a1ekmXuAOI+t3c1sNbN2AtFi4cJovTA01xh60I4QnK+MNQKpTjt/E4
ydHl0rrurXsZummj9QBnkX4pqY7cDLHhdMKpbjDwg7jVLl783nTc9wYptQEPi5sw
83g9EMgKV0ARIiVUa/qlAgMBAAGjPjA8MAwGA1UdEwQFMAMBAf8wEQYJYIZIAYb4
QgEBBAQDAgAHMBkGCWCGSAGG+EIBDQQMFgpTVlMgTGFiIENBMA0GCSqGSIb3DQEB
CwUAA4ICAQAIT308oL2L6j/7Kk9VdcouuaBsN9o2pNEk3KXeZ8ykarNoxa87sFYr
AwXIwfAtk8uEHfnWu1QcZ3LkEJM9rHVCZuKsYd3D6qojo54HTpxRLgo5oKOdGayi
iSEkSSX9qyfLfINHR2JSVqJU6jLsy86X7q7RmIPMS7XfHzuddFNI4YDoXRX67X+v
O+ja6zTQqjO6lqJhmrSkyFbYf/ZTpe4d1OzJsZjNsNOr8bF9nOA/7qNZLp3Z3cpU
PU0KdbiSvRqnPw3e8TfITVmAzcx8COI2SrYFMSUazolVBvDy+xRKxyAtMbneGz6n
YdykCimThCKoKwp/pWpYBEqIEOf5ay1PKURO/8aj/B7aluJapXkmnj5qPeGhN0pB
Q9r14reov4so2EspkXS7CrH9yGfpIyTprokz1UvZBZ8vloI7YZmjFmem+5rT6Gnk
eU/lX7nV61SYG5W5K+I8uaKuyBHOMn7Amy3DYL5c5GJBqxpSZERbLXV+Q1tIgRU8
8ggzlPOdsS/i6Lo7ypYX0eB9HgVDCkzQsLXQuHGj/2WsgPgdRcjkvnyURk4Jx+Ib
xDrmo7e0XPpSW4l72a6Kl8CR3U2Cr4wsuvndPEq/qd2NRSBWffF0XE/AJHQG7STT
HaXLU9r2Ko603oecu8ysGTwLlIt/9T1/FOb0xZRugWcpJrVoTgDGuA==
-----END CERTIFICATE-----
END OF INPUT
Fingerprint(s): SHA1
Fingerprint=0E:B1:81:E9:5A:3E:D7:80:3B:C5:A8:05:9A:85:4A:95:C8:3A:C7:37

Do you accept this certificate? [yes/no]:yes
POD2IPN2(config)#
POD2IPN2(config)# show crypto ca certificates ec521-tp
Trustpoint: ec521-tp
CA certificate 0:
subject=C = US, ST = North Carolina, L = Raleigh, O = Cisco, OU = SVS, CN = SVS LabCA
issuer=C = US, ST = North Carolina, L = Raleigh, O = Cisco, OU = SVS, CN = SVS LabCA
serial=20CD7402C4DA37F5
notBefore=Apr 28 17:05:00 2025 GMT
notAfter=Apr 28 17:05:00 2035 GMT
SHA1 Fingerprint=0E:B1:81:E9:5A:3E:D7:80:3B:C5:A8:05:9A:85:4A:95:C8:3A:C7:37
purposes: sslserver sslclient
POD2IPN2(config)#
Step 4. Generate switch identity certificate request (CSR).
POD2IPN2(config)# crypto ca enroll ec521-tp
 Create the certificate request ..
 Create a challenge password. You will need to verbally provide this
  password to the CA Administrator in order to revoke your certificate.
  For security reasons your password will not be saved in the configuration.
  Please make a note of it.
  Password:C1sco.123
 The subject name in the certificate will be the name of the switch.
 Include the switch serial number in the subject name? [yes/no]:yes
 The serial number in the certificate will be: FDO26490P4T
 Include an IP address in the subject name [yes/no]:yes
ip address:10.225.253.177
 Include the Alternate Subject Name ? [yes/no]:no
 The certificate request will be displayed...
-----BEGIN CERTIFICATE REQUEST-----
MIIBtjCCARcCAQAwKTERMA8GA1UEAwwIUE9EMklQTjIxFDASBgNVBAUTC0ZETzI2
NDkwUDRUMIGbMBAGByqGSM49AgEGBSuBBAAjA4GGAAQBGYT0iw7OvqIKQ/a22Lkg
Na9IhqWQvetjxKq485gqTSBEo6LzpkOhPAGE4jBveNHxYeIA7PfNWvJ7xTBWjDNX
/IYBm6E7Hd7q42OmCe8Mef+bqJBdJ9wzpyEjhI2lIIoXt4814nBxObkIWWyR5cZN
IiXTLk8P4IMZvPq8jRnELRxd8RGgSTAYBgkqhkiG9w0BCQcxCwwJQzFzY28uMTIz
MC0GCSqGSIb3DQEJDjEgMB4wHAYDVR0RAQH/BBIwEIIIUE9EMklQTjKHBArh/bEw
CgYIKoZIzj0EAwIDgYwAMIGIAkIAtzQ/knrW2ovCVoHAuq1v2cr0n3NenS/44lul
+3H1y52vn4Rm4CGU3wkzXU3qGO3YjhNjCXjhp3+uN2afFf1Wf3ECQgC4bumHVsfj
b5rwPIC5tvXS/A8upqIzqc0yt3OhpaDDOTWzzvZY7qFflCOl5p6pvUpHigqoZNg5
9xhNdM1CQSykOg==
-----END CERTIFICATE REQUEST-----
Step 5. Sign the CSR with CA and import the switch identity certificate signed by CA.
POD2IPN2(config)# crypto ca import ec521-tp certificate
input (cut & paste) certificate in PEM format:
-----BEGIN CERTIFICATE-----
MIIDzTCCAbWgAwIBAgIIC6zS76XYDm8wDQYJKoZIhvcNAQELBQAwajELMAkGA1UE
BhMCVVMxFzAVBgNVBAgTDk5vcnRoIENhcm9saW5hMRAwDgYDVQQHEwdSYWxlaWdo
MQ4wDAYDVQQKEwVDaXNjbzEMMAoGA1UECxMDU1ZTMRIwEAYDVQQDEwlTVlMgTGFi
Q0EwHhcNMjUwNTA3MTkxMDAwWhcNMjYwNTA3MTkxMDAwWjApMREwDwYDVQQDDAhQ
T0QySVBOMjEUMBIGA1UEBRMLRkRPMjY0OTBQNFQwgZswEAYHKoZIzj0CAQYFK4EE
ACMDgYYABAEZhPSLDs6+ogpD9rbYuSA1r0iGpZC962PEqrjzmCpNIESjovOmQ6E8
AYTiMG940fFh4gDs981a8nvFMFaMM1f8hgGboTsd3urjY6YJ7wx5/5uokF0n3DOn
ISOEjaUgihe3jzXicHE5uQhZbJHlxk0iJdMuTw/ggxm8+ryNGcQtHF3xEaNAMD4w
HgYJYIZIAYb4QgENBBEWD3hjYSBjZXJ0aWZpY2F0ZTAcBgNVHREBAf8EEjAQgghQ
T0QySVBOMocECuH9sTANBgkqhkiG9w0BAQsFAAOCAgEANWGb6zm9TDPaM1yhPMx7
8uai/pF7VQC8NSCdOKqr4w4+695ZjJuzqFL3msodOQK0EdgxpQ4+pEa5msRtK0i8
mms2X/Px3/EShxoHrZO1PUXNTyZidXpGd/yTrdQAl5JzpW4pEudrbCJMZEEYtqoP
wD+4OE8vKoYEgyWlDrpRZOZG1usZczuUhLZ8orkjXMhWC26Q5aqiCKkyg10Nt6nb
liToeYy2Q0cTesSZCKvRBv6Ewj5JuSLemURyB4GHY+LT+A9UNmEUM2n+OSVEL329
3hS0qd/YVaEuxjjlg7jNiZb+UsW7IRx3Q8Rouo++ISACpH/PJ61LnlVxhXombiS6
INoa0GvQONrl+lFT8ADIdZ/Ukd5Ubhc9bh/sYzf4MWtkK1wVO16Hv7vGpSMYonD6
a271im+tJPyKnnezQ6OykzlGqsL/Ta6JOdip/fEYp8UmRq9InDh23gDjqrojWL7k
1R/bZpc+baMYXd/2pohHMSN0sKN3zNrJTlnuk5KCqFx//4P7mAoyZYiTIDp1pkYS
VK65fJKD+pYxIhSP9wN8rnwtzSCWb0Z78sg006Y6wIXyTP0UB3FWhD+GxtTkmEce
ZnAQbgxpgrg5lhpAEVabpC/zRU4UzTuBmv/WoY12zwXCr5WLXEOWtIe8CwFjSnch
lfKuuebdZkbwz72r7OyyX/U=
-----END CERTIFICATE-----
POD2IPN2(config)#
Verify the switch identity certificate is enrolled.
POD2IPN2(config)# show crypto ca certificates ec521-tp
Trustpoint: ec521-tp
certificate:
subject=CN = POD2IPN2, serialNumber = FDO26490P4T
issuer=C = US, ST = North Carolina, L = Raleigh, O = Cisco, OU = SVS, CN = SVS LabCA
serial=0BACD2EFA5D80E6F
notBefore=May  7 19:10:00 2025 GMT
notAfter=May  7 19:10:00 2026 GMT
SHA1 Fingerprint=CA:B2:BF:3F:ED:2F:06:0B:C1:E4:DC:21:9F:9D:54:61:98:32:C5:13
purposes: sslserver sslclient

CA certificate 0:
subject=C = US, ST = North Carolina, L = Raleigh, O = Cisco, OU = SVS, CN = SVS LabCA
issuer=C = US, ST = North Carolina, L = Raleigh, O = Cisco, OU = SVS, CN = SVS LabCA
serial=20CD7402C4DA37F5
notBefore=Apr 28 17:05:00 2025 GMT
notAfter=Apr 28 17:05:00 2035 GMT
SHA1 Fingerprint=0E:B1:81:E9:5A:3E:D7:80:3B:C5:A8:05:9A:85:4A:95:C8:3A:C7:37
purposes: sslserver sslclient

POD2IPN2(config)#
Method 2 - CA Generated Key-pair (PFX Method)
If we are importing the keys as well as device and CA certificates directly in a PKCS#12 format instead of CSR method, we can use this method.
This method can be useful if certificates and keys are being managed from a certralized public key infrastructure (PKI) certificate authority as it can reduce the operational overheads in managing the certificates.
Trustpoint Configuration
Step 1. Create client trustpoint.
POD2IPN1(config)# crypto ca trustpoint svs
Step 2. Copy the PKCS#12 file (PFX format) into bootflash and import the file using the crypto ca import command.
Note: Ensure that PKCS#12 file contains the complete certificate chain and the private key as encrypted file
Tip: Verify the PKCS#12 file using these commands on a bash-shell.
openssl pkcs12 -info -in <pfx file> -nodes
file <pfx file> ---> should say data
POD2IPN1(config)# crypto ca import svs pkcs12 bootflash:pod2ipn1-new.pfx <password>
POD2IPN1#
POD2IPN1# show crypto ca certificates svs
Trustpoint: svs
certificate:
subject=C = US, ST = NC, L = RTP, O = Cisco, OU = SVS, CN = pod2ipn1, emailAddress = test@cisco.com
issuer=C = US, ST = North Carolina, L = Raleigh, O = Cisco, OU = SVS, CN = SVS LabCA
serial=35BBC2517EEA3EF5
notBefore=May 20 20:16:00 2025 GMT
notAfter=May 20 20:16:00 2026 GMT
SHA1 Fingerprint=AA:4A:11:7A:97:B8:E4:B8:C6:F6:F0:94:29:F3:5F:AE:AB:95:6A:E3
purposes: sslserver sslclient

CA certificate 0:
subject=C = US, ST = North Carolina, L = Raleigh, O = Cisco, OU = SVS, CN = SVS LabCA
issuer=C = US, ST = North Carolina, L = Raleigh, O = Cisco, OU = SVS, CN = SVS LabCA
serial=20CD7402C4DA37F5
notBefore=Apr 28 17:05:00 2025 GMT
notAfter=Apr 28 17:05:00 2035 GMT
SHA1 Fingerprint=0E:B1:81:E9:5A:3E:D7:80:3B:C5:A8:05:9A:85:4A:95:C8:3A:C7:37
purposes: sslserver sslclient
Step 3. Configure TLS for Tacacs, server groups and AAA configurations as mentioned in Method 1.
TACACS+ TLS Configuration
Caution: Perform these configuration changes through console with local credentials.
Step 1. Configure global tacacs tls.
POD2IPN2(config)# tacacs-server secure tls
Step 2. Change the ISE port to TLS port that ISE server is configured with.
POD2IPN2(config)# tacacs-server host 10.225.253.209 port 6049 timeout 60 single-connection
Step 3. Associate the ISE server configure on the switch to the trust point for TLS connection.
POD2IPN2(config)# tacacs-server host 10.225.253.209 tls client-trustpoint ec521-tp
Step 4. Create tacacs server group.
POD2IPN2(config)# aaa group server tacacs+ tacacs2
POD2IPN2(config-tacacs+)# server 10.225.253.209
POD2IPN2(config-tacacs+)# use-vrf management
Step 5. Verify the configuration.
POD2IPN2# sho run tacacs

feature tacacs+

tacacs-server secure tls
tacacs-server host 10.225.253.209 port 6049 timeout 60 single-connection
tacacs-server host 10.225.253.209 tls client-trustpoint ec521-tp
aaa group server tacacs+ tacacs2
    server 10.225.253.209
    use-vrf management
Step 6. Test the remote user before configuring AAA authentication.
POD2IPN2# test aaa group tacacs2 <username> <password>
user has been authenticated
POD2IPN2#
AAA Configuration
Caution: Ensure remote user authentication is successful before proceeding with AAA configurations.
Step 1. Configure AAA remote authentication.
POD2IPN2(config)# aaa authentication login default group tacacs2
Step 2. Configure AAA remote authorization after testing the command.
Caution: Ensure that you see authorization-status" as "AAA_AUTHOR_STATUS_PASS_ADD.
POD2IPN2#    test aaa authorization command-type config-commands default user <username> command "feature bgp"
sending authorization request for: user: pamemart, author-type:3, cmd "feature bgp"
user pamemart, author type 3, command: feature bgp, authorization-status:0x1(AAA_AUTHOR_STATUS_PASS_ADD)
Step 3. Configure AAA command and config-command authorization.
POD2IPN2(config)# aaa authorization config-commands default group tacacs2 local
POD2IPN2(config)# aaa authorization commands default group tacacs2 local
Certificate Renewal Process
This section describes the certificate renewal process when the configured certificates need to be replaced or are nearing expiration.
Note: Trust point does not need to be removed from TACACs configuration during renewal.
Step 1. Verify certificate validity dates
POD2IPN2# show crypto ca certificates <trustpoint name>
Trustpoint: KF_TP
certificate:
subject=CN = POD2IPN2.svs.lab
issuer=C = US, O = Keyfactor Command, OU = Certification Authorities, CN = Test
Drive Sub CA G1
serial=09DD28B44BDA6FFA4D261926A4B54DD45C8B8F4E
notBefore=Jul 17 02:52:28 2025 GMT
notAfter=Jul 17 02:52:27 2026 GMT
SHA1 Fingerprint=AE:12:62:D4:73:BB:4B:77:B5:E2:B5:71:91:0B:38:AC:8F:42:F6:41
purposes: sslserver sslclient

<snip>
Step 2. Delete certificates and keypairs from the trust point.
Caution: Deletion steps must be performed in this order.
POD2IPN2(config)# crypto ca trustpoint KF_TP
POD2IPN2(config-trustpoint)# delete certificate force
POD2IPN2(config-trustpoint)# no rsakeypair KF_TP
POD2IPN2(config-trustpoint)# delete ca-certificate
POD2IPN2(config-trustpoint)# exit
POD2IPN2(config)# no crypto key generate rsa label KF_TP exportable modulus 4096
POD2IPN2(config-trustpoint)# show crypto ca certificate KF_TP
Trustpoint: KF_TP
POD2IPN2(config-trustpoint)#
Step 3. Import new certificates from PFX file.
POD2IPN2(config)# crypto ca import <TP name> pkcs12 bootflash:<new pfx file> <passphrase>
Step 4. Verify new certificates
POD2IPN2(config)# show crypto ca certificates <trustpoint name>
Trustpoint: KF_TP
certificate:
subject=C = us, ST = nc, L = rtp, O = cisco, OU = svs, CN = pod2ipn2.svs.lab
issuer=C = US, O = Keyfactor Command, OU = Certification Authorities, CN = Test
Drive Sub CA G1
serial=6D6171F6DB2DD08C613937887E631D5CD35EDA18
notBefore=Aug 14 13:52:52 2025 GMT
notAfter=Aug 14 13:52:51 2026 GMT
SHA1 Fingerprint=4E:8A:CA:C7:E4:9D:05:83:6A:A7:27:FD:10:02:75:35:3F:05:37:96
purposes: sslserver sslclient

<snip>
Step 5. Test AAA authentication
POD2IPN2# test aaa group <tacacs group> <username> <password>
user has been authenticated
Test and Troubleshoot User Access for NX-OS
Validations
NX-OS Configuration Validation.
POD2IPN2# show crypto ca certificates
POD2IPN2# show crypto ca trustpoints
POD2IPN2# show tacacs-server statistics <server ip>
To show the user connections and role(s), use these commands.
show users
show user-account [<user-name>]
A sample output is shown below:
POD2IPN1# show users
NAME LINE TIME IDLE PID COMMENT
Admin-ro pts/5 May 15 23:49 . 16526 (10.189.1.151) session=ssh *
POD2IPN1# show user-account Admin-ro
user:Admin-ro
roles:network-operator
account created through REMOTE authentication
Credentials such as ssh server key will be cached temporarily only for this user account
Local login not possible...
Troubleshooting
These are useful debugs in troubleshooting TACACS+:
debug TACACS+ aaa-request
2016 Jan 11 03:03:08.652514 TACACS[6288]:  process_aaa_tplus_request:Checking for state of mgmt0 port with servergroup demoTG
2016 Jan 11 03:03:08.652543 TACACS[6288]:  process_aaa_tplus_request: Group demoTG found. corresponding vrf is management
2016 Jan 11 03:03:08.652552 TACACS[6288]:  process_aaa_tplus_request: checking for mgmt0 vrf:management against vrf:management of requested group
2016 Jan 11 03:03:08.652559 TACACS[6288]:  process_aaa_tplus_request:port_check will be done
2016 Jan 11 03:03:08.652568 TACACS[6288]:  state machine count 0
2016 Jan 11 03:03:08.652677 TACACS[6288]:  is_intf_up_with_valid_ip(1258):Proper IOD is found.
2016 Jan 11 03:03:08.652699 TACACS[6288]:  is_intf_up_with_valid_ip(1261):Port is up.
2016 Jan 11 03:03:08.653919 TACACS[6288]:  debug_av_list(797):Printing list
2016 Jan 11 03:03:08.653930 TACACS[6288]:  35 : 4 : ping
2016 Jan 11 03:03:08.653938 TACACS[6288]:  36 : 12 : 10.1.100.255
2016 Jan 11 03:03:08.653945 TACACS[6288]:  36 : 4 : <cr>
2016 Jan 11 03:03:08.653952 TACACS[6288]:  debug_av_list(807):Done printing list, exiting function
2016 Jan 11 03:03:08.654004 TACACS[6288]:  tplus_encrypt(659):key is configured for this aaa sessin.
2016 Jan 11 03:03:08.655054 TACACS[6288]:  num_inet_addrs: 1 first s_addr: -1268514550 10.100.1.10 s6_addr : fd49:42a0:033a:22e9::/64
2016 Jan 11 03:03:08.655065 TACACS[6288]:  non_blocking_connect(259):interface ip_type: IPV4
2016 Jan 11 03:03:08.656023 TACACS[6288]:  non_blocking_connect(369): Proceeding with bind
2016 Jan 11 03:03:08.656216 TACACS[6288]:  non_blocking_connect(388): setsockopt success error:22
2016 Jan 11 03:03:08.656694 TACACS[6288]:  non_blocking_connect(489): connect() is in-progress for server 10.1.100.21
2016 Jan 11 03:03:08.679815 TACACS[6288]:  tplus_decode_authen_response: copying hostname into context 10.1.100.21
Caution: Bash-shell must be enabled, and user must have bash permissions.
Enable SSL debug.
touch '/bootflash/.enable_ssl_debugs'
Show debug file contents.
cat /tmp/ssl_wrapper.log.*
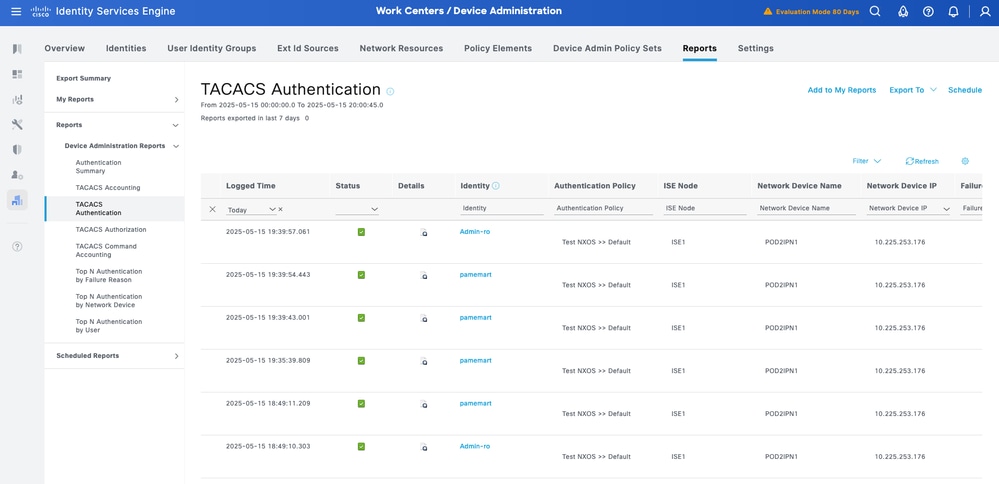
From the ISE GUI, navigate to Operations > TACACS Livelog. All the TACACS authentication and authorization requests are captured here, and the details button provides detailed information about why a particular transaction passed/failed.

For historic reports: Navigate to Work Centers > Device Administration > Reports > Device Administration to get the authentication, authorization, and accounting reports.
Revision History
| Revision | Publish Date | Comments |
|---|---|---|
3.0 |
19-Feb-2026
|
Updated the Doc Type and Added Infomation. |
2.0 |
20-Jan-2026
|
Updated for Components Used and Contributor List. |
1.0 |
11-Sep-2025
|
Initial Release |
Contributed by Cisco Engineers
- Pam Martinez BarajasCisco Consulting Engineer
- Pravardhan KalkurCustomer Delivery Architect
- Garrett FincherCisco Consulting Engineer
 Feedback
Contact Cisco
- Open a Support Case

- (Requires a Cisco Service Contract)