Introduction
This document describes CLI and GUI methods for Identity Services Engine (ISE) password reset and recovery based on the type of appliance.
Prerequisites
Requirements
Cisco recommends that you have knowledge of these topics:
- Basic knowledge of ISE.
- Basic knowledge of Cisco Integrated Management Controller.
Components Used
- ISE virtual machine (VMware version 13 for ESXi 6.5 (and later) )
- ISE 3715 physical appliance
The information in this document was created from the devices in a specific lab environment. All of the devices used in this document started with a cleared (default) configuration. If your network is live, ensure that you understand the potential impact of any command.
Password Reset Procedure
In Cisco ISE, Web GUI and CLI passwords can be different. Complete these steps to change the password:
GUI Password Reset
You can change the GUI password either via Web GUI or via CLI.
Using Web GUI Method
1 - 4. Navigate to Administration > Admin Access > Administrators > Admin Users.
5. Select the user.
6. Click Edit.

7.Enable Change Password.
8.Enter Current Password and New Password.

Using CLI Method
In CLI, run the command #application reset-passwd ise <username>
This prompts you to enter the new password.

When the new password is entered and confirmed, the password is successfully reset.

CLI Password Reset

Note: You cannot change the CLI password of ISE from your GUI. You can either do it via CLI command if you have CLI access. If you do not have CLI access, then you must perform password recovery process.
From CLI, run the command #password . You are prompted to enter the current password.

After correctly entering the current password, enter the new password to reset it.
Password Recovery Procedure
To perform password recovery, download the ISO file from software portal.
This document is demonstrated ISE 3.3 version using Cisco-ISE-3.3.0.430.SPA.x86_64.iso .
Password Recovery for SNS physical Appliance
There are two methods to recover password on SNS physical appliances:
- Password recovery through the use of Cisco Integrated Management Controller (CIMC)
- Password recovery through the use of a bootable USB
Password recovery through the use of CIMC
To perform Password Recovery, you need CIMC access.
If you do not have CIMC, refer to Setting Up the System With the Cisco IMC Configuration Utility to know more about CIMC configuration steps.
You can use CIMC connection to manage Cisco SNS-36XX, SNS-37XX appliances.
KVM utility through CIMC connection can be used to perform all operations including BIOS configuration on Cisco SNS-36XX or Cisco SNS-37XX appliance.
Step 1. Open any browser and search for CIMC ip address andprovide the username and password details in order to log in to the CIMC portal.

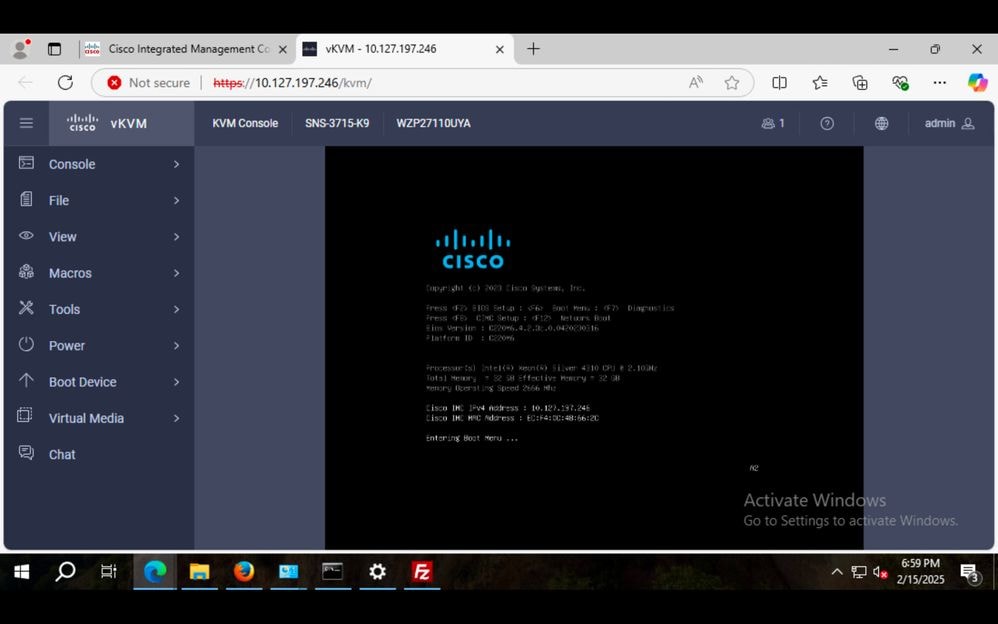
Step 2. ClickLaunch KVM Console.

Virtual Mediatab and select vKVM-Mapped vDVD.

Step 4. Select the ISO file and click Map Drive.

Step 5. Choose Macros > Static Macros >Ctrl-Alt-Del to boot the Cisco SNS-36XX or Cisco SNS-37XX appliance through use of the ISO image.

Step 6. Press F6 to bring up the boot menu. Entering boot menu then shows at the bottom of the screen.
Step 7. Select the CD/DVD that is mapped and click Enter.

Step 8. Select System Utilities (Keyboard/Monitor) or System Utilities (Serial Console) if you access through a local serial console port connection):


Step 11. From System Utilities, choose Recover Administrator Password Option 1.


Type option 1 and click Enter
Step 9. Select the required username from the list and press enter to reset the password. The console displays:


Step 10. Type the new password and type y to save the changes.


Password reset is complete.

Step 11. To access the CLI, Select Quit and reload, type option q.

Password recovery through the use of a bootable USB
Before You Begin: Create a bootable USB drive. See Create a Bootable USB Device to Install Cisco ISE.
Step 1. Plugin the bootable USB drive that has the bootable Cisco Secure ISE ISO image into the USB port.

Step 2. Power on the Cisco SNS-36XX or Cisco SNS-37XX appliance.
Step 3. Press F6 to enter BIOS menu.

Step 4. Choose USB from the boot menu.

Step 5. Select System Utilities (Keyboard/Monitor) or System Utilities (Serial Console) if you access is through a local serial console port connection:


Step 6. From System Utilities, choose Recover Administrator Password Option 1.


Select option 1 (Recover Administrator Password) .
Step 7. Select the required username from the list and press enter to reset the password.
The console displays:


Step 8. Type new password and type 'y' to save the changes.


Password reset is complete.

Step 9. To access the CLI, Select quit and reload, type option q.

Password Recovery for ISE Virtual Machine
Here, VMWare is the environment used, you can have Vsphere access to perform these steps:
Step 1. Upload the ISO file to the virtual machine datastore.
Step 2. Power off the ISE virtual machine.

Step 3. Select the VM from the list, Click Actions >Edit Settings.


Step 4. UnderVirtual Hardware > CD/DVD, check for ISE 3.3 ISO file "Cisco-ISE-3.3.0.430.SPA.x86_64.iso" and click OK.

Connect At PowerOn and click OK.

Step 6. UnderVM Options > Boot options, enableForce BIOS Setupand clickOK.


Step 7. Power on the ISE VM and monitor the VM console for BIOS prompt.


Step 8. Change the boot order of CD-ROM Drive and bring it to the first position.

Step 9. ClickEnter. It prompts a list of available boot options, SelectSystem Utilities (Keyboard/Monitor)option 3.


Step 10. On availableSystem Utilities, chose the Recover the Administrator Password. Option 1 provides the list of administrators accounts configured on ISE device.

Step 11. Type Option 1 to change the password of user admin and enter new password. Enter y to save the new password.


Password Recovery is completed
Step 12. Enter q to exit the System Utilities page.

Step 12. Change the CD/DVD settings to before and disable connect at Power On

 Feedback