Configure ISE 3.3 Native Multifactor Authentication with Duo
Available Languages
Contents
Introduction
This document describes how to integrate Identity Services Engine (ISE) 3.3 Patch 1 with Duo for Multifactor Authentication.
Prerequisites
Requirements
Cisco recommends that you have basic knowledge of these topics:
-
ISE
-
Duo
Components Used
From Version 3.3 Patch 1, ISE can be configured for native integrations with Duo services eliminating the need for Authentication Proxy.
The information in this document is based on:
- Cisco ISE Version 3.3 Patch 1
- Duo
- Cisco ASA version 9.16(4)
- Cisco Secure Client Version 5.0.04032
The information in this document was created from the devices in a specific lab environment. All of the devices used in this document started with a cleared (default) configuration. If your network is live, ensure that you understand the potential impact of any command.
Configure
Flow Diagram
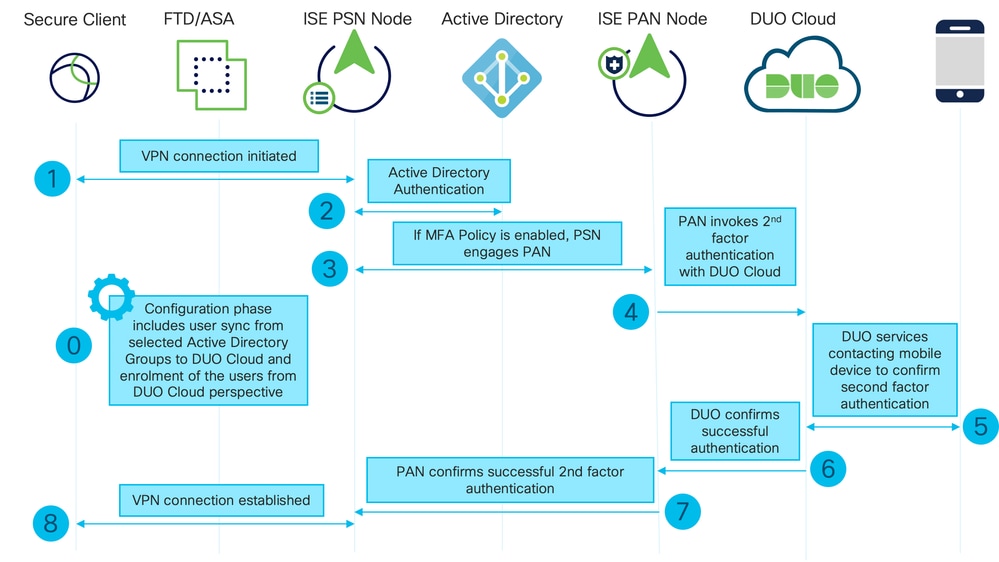
Steps
- The Configuration Phase includes the selection of Active Directory Groups, which users are synced to and this sync happens once the MFA wizard is completed. It consists of two steps. Lookups to Active Directory to retrieve the list of users and certain attributes. A call to the Duo Cloud with Cisco's ISE Admin API, which is made to push users there (Administrators are required to enroll users). Enrolling users can include the optional step of activating the user for Duo Mobile, which allows your users to use one-tap authentication with Duo Push.
- Once a VPN connection is initiated, the user inputs their username and password and clicks OK. The network device sends a RADIUS Access-Request to PSN.
- The PSN node authenticates the user via Active Directory.
- When the authentication succeeds and the MFA Policy is configured, PSN contacts Duo Cloud. A call to Duo Cloud with Cisco's ISE Auth API is made to invoke a second-factor authentication with Duo. ISE communicates with Duos service on SSL TCP port 443.
- A second-factor authentication takes place and the user completes a second-factor authentication process.
- Duo responds to PSN with the result of the second-factor authentication.
- The Access-Accept is sent to the Network Device and the VPN Connection is established.
Configurations
Select Applications to Protect
1. Navigate to Duo Admin Dashboard. Log in with Admin credentials.
2. Navigate to Dashboard > Applications > Application Catalog. Look for Cisco ISE Auth API and select + Add.
 ISE Auth API 1
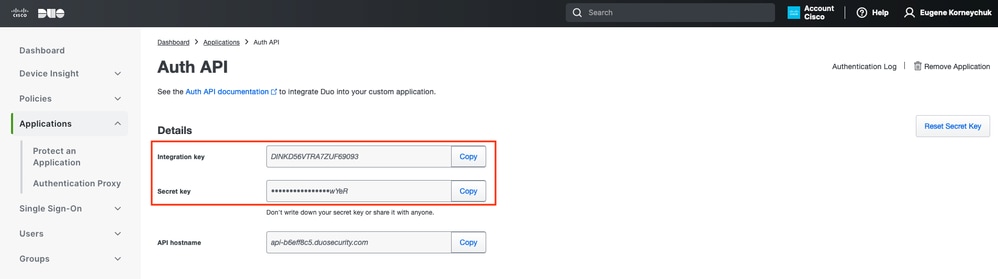
3. Make a note of the Integrationkey and Secret key.
 ISE Auth API 2
4. Navigate to Dashboard > Applications > Application Catalog. Look for Cisco ISE Admin API and select + Add.
 ISE Admin API 1
5. Make a note of the Integration key, Secret key, and API hostname.
 ISE Admin API 2
Configure API Permissions
1. Navigate to Dashboard > Applications > Application. Select Cisco ISE Admin API.
2. Check Grant Read Resource and Grant Write Resource permissions. Click Save Changes.
 Admin API Permissions
Integrate ISE with Active Directory
1. Navigate to Administration > Identity Management > External Identity Stores > Active Directory > Add. Provide the Join Point Name, Active Directory Domain and click Submit.
 Active Directory 1
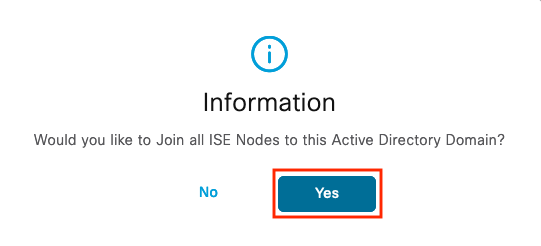
2. When prompted to Join all ISE Nodes to this Active Directory Domain, click Yes.
 Active Directory 2
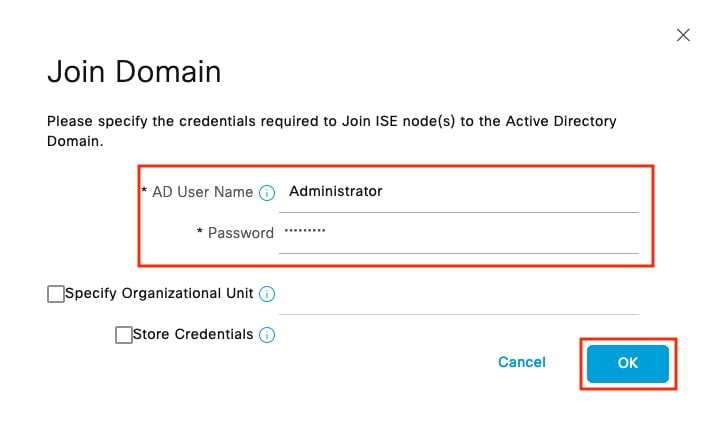
3. Provide the AD User Name and Password, click OK.
 Active Directory 3
4. The Active Directory account required for domain access in ISE can have either of these:
- Add workstations to domain user right in respective domain.
- Create Computer Objects or Delete Computer Objects permission on respective computers container where ISE machines account is created before it joins ISE machine to the domain.
5. The Status of AD is Operational.
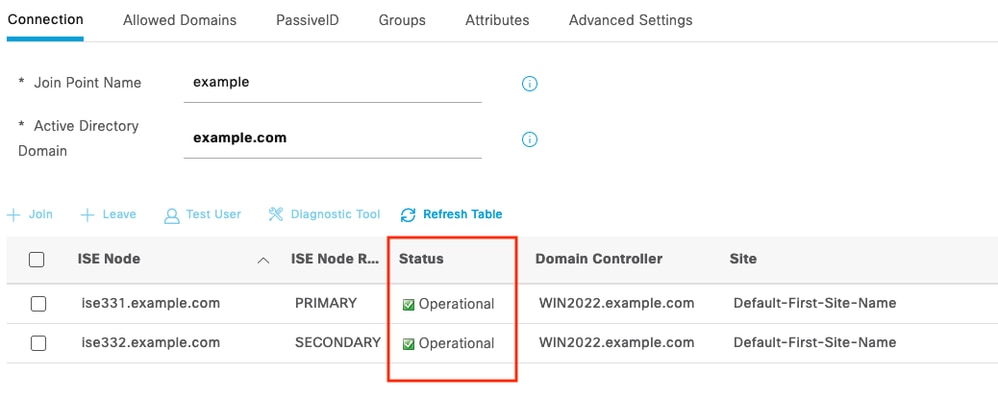 Active Directory 4
6. Navigate to Groups > Add > Select Groups From Directory > Retrieve Groups. Select the checkboxes against the AD Groups of your choice (which are used to sync users and for Authorization Policy):
 Active Directory 5
7. Click Save to save the retrieved AD Groups.
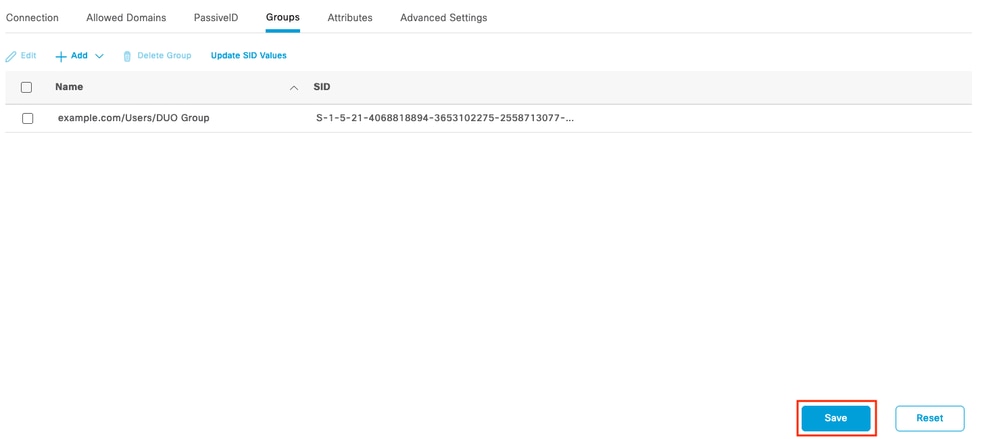 Active Directory 6
Enable Open API
- Navigate to Administration > System > Settings >API Settings > API Service Settings.Enable Open API and click Save.
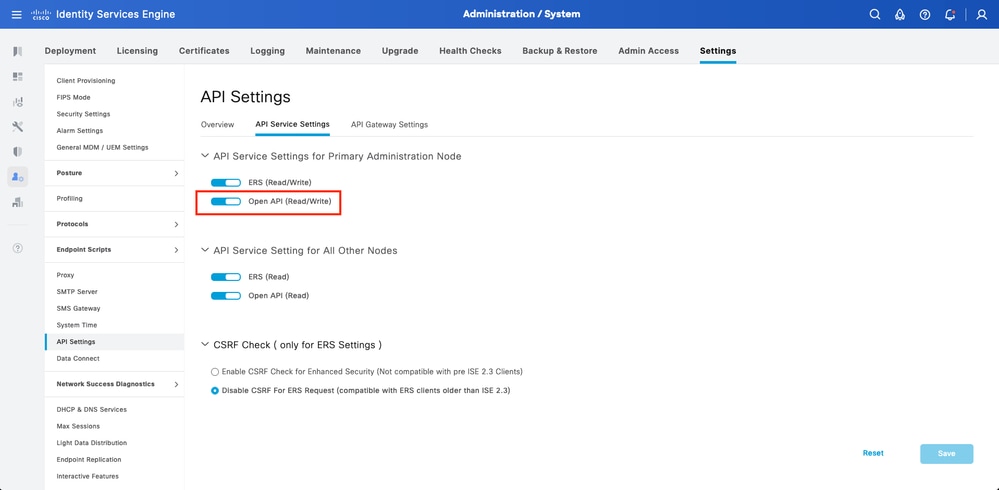 Open API
Enable MFA Identity Source
- Navigate to Administration > Identity Management > Settings > External Identity Sources Settings. Enable MFA and click Save.
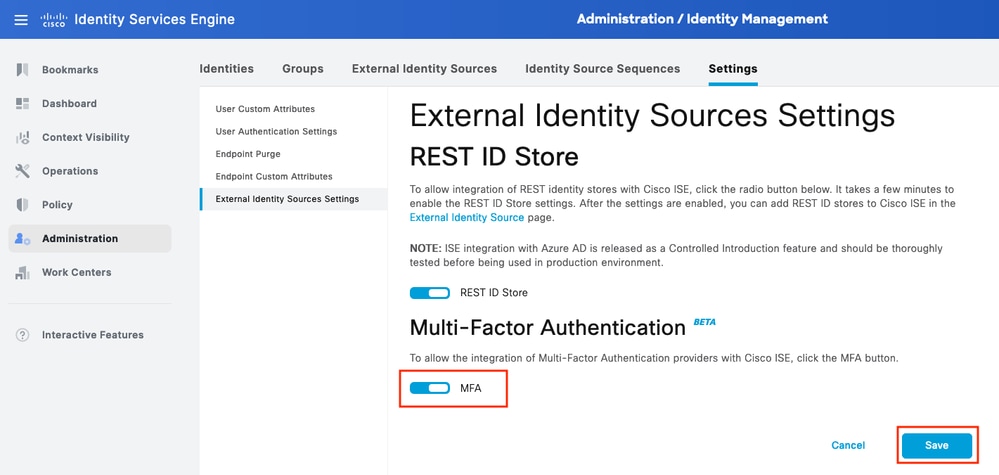 ISE MFA 1
Configure MFA External Identity Source
- Navigate to Administration > Identity Management > External Identity Sources. Click on Add and on the Welcome Screen click Let's Do It.
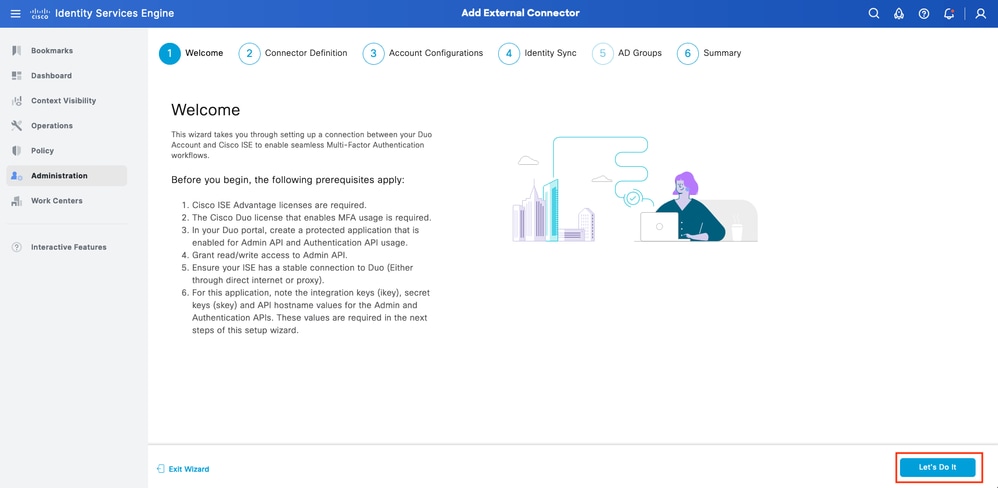 ISE Duo wizard 1
2. On the next screen, configure the Connection Name and click Next.
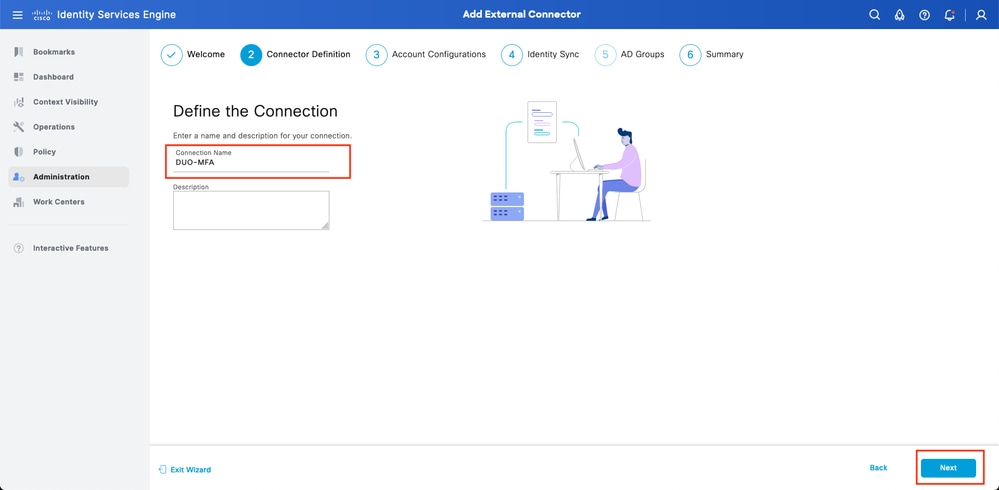 ISE Duo wizard 2
3. Configure the values of the API Hostname, Cisco ISE Admin API Integration, Secret Keys, Cisco ISE Auth API Integration, and Secret Keys from the Select Applications to the Protect step.
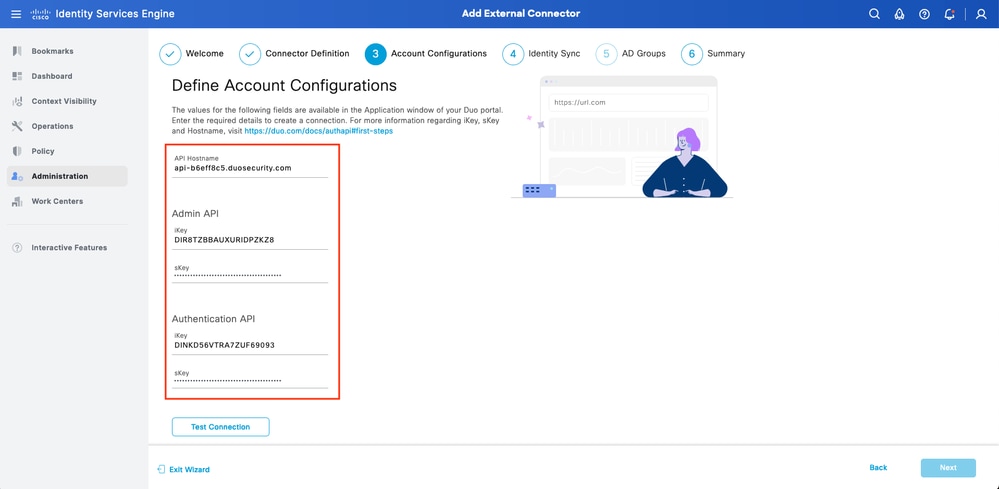 ISE Duo wizard 3
4. Click Test Connection and once the Test Connection succeeds, click on Next.
 ISE Duo wizard 4
5. Configure Identity Sync. This process synchronizes users from Active Directory groups you selected into the Duo Account using API credentials provided earlier. Select Active Directory Join Point then click Next.
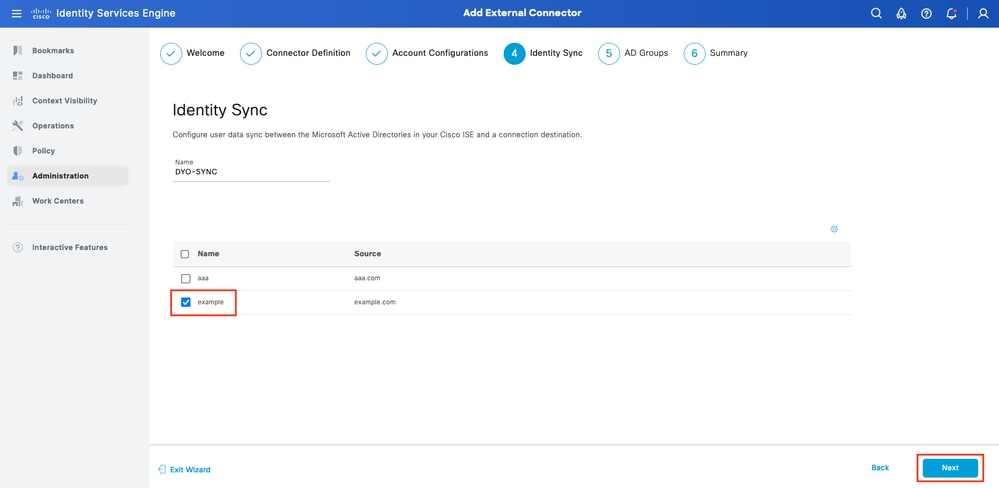 ISE Duo wizard 5
6. Select Active Directory Groups where you want users to sync with Duo. Click Next.
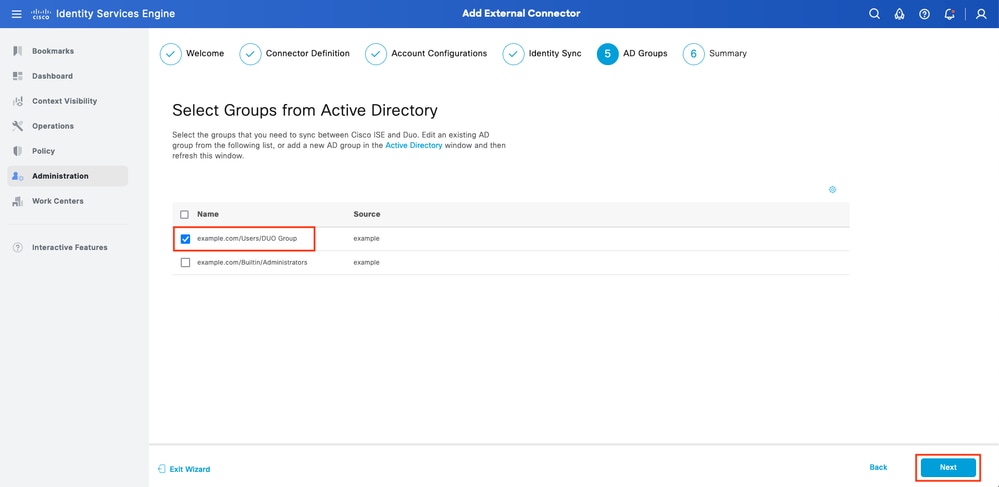 ISE Duo wizard 6
7. Verify the settings are correct and click Done.
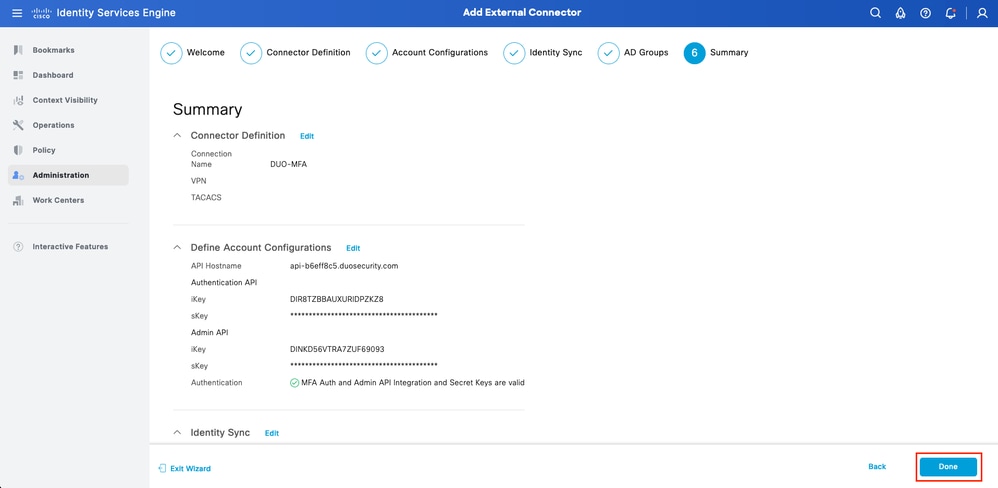 ISE Duo wizard 7
Enroll User into Duo
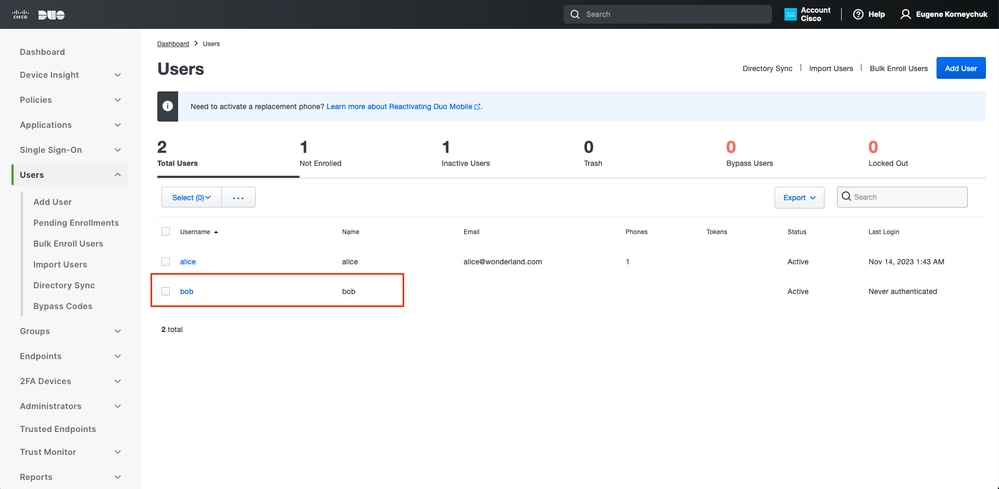
1. Open the Duo Admin Dashboard and navigate to Dashboard > Users.
2. Click on the user synchronized from ISE.
 Duo enroll 1
3. Scroll down to Phones and click Add Phone.
 Duo enroll 2
4. Enter the Phone Number and click Add Phone.
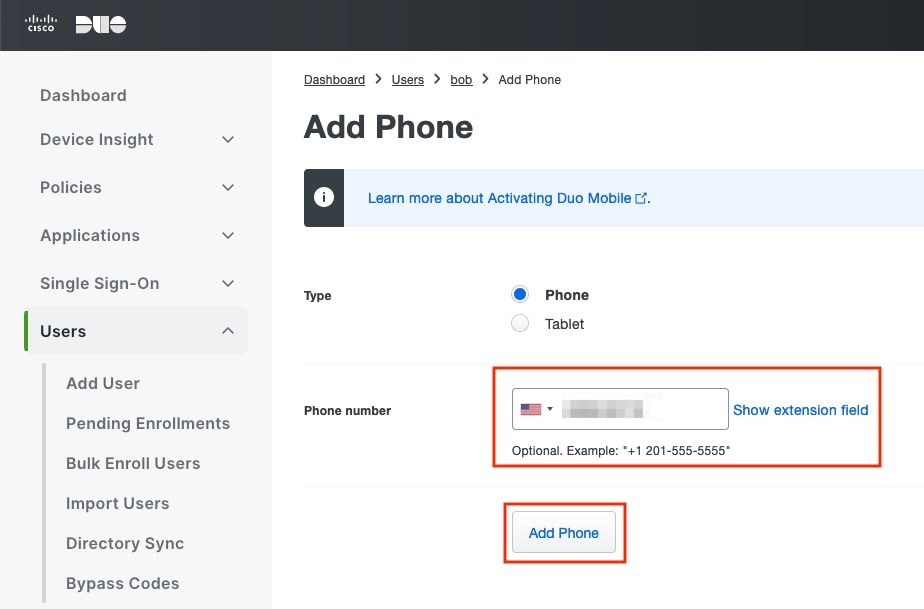 Duo Enroll 3
Configure Policy Sets
Configure Authentication Policy
1. Navigate to Policy > Policy Set and select the Policy Set where you want to enable MFA. Configure the Authentication Policy with Primary Authentication Identity Store as Active Directory.
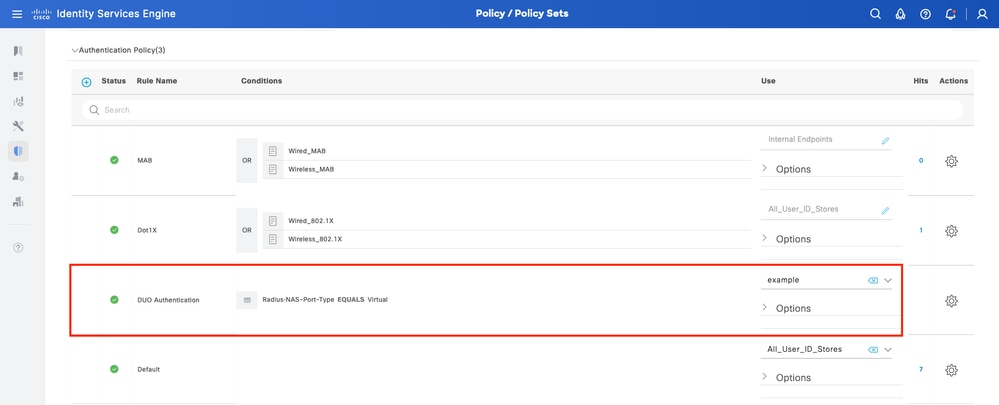 Policy Set 1
Configure MFA Policy
1. Once MFA is enabled on ISE, a new section in the ISE Policy Sets is available. Expand the MFA Policy and click on the + to add the MFA Policy. Configure MFA Conditions of your choice by selecting the DUO-MFA configured previously in the Use section.
2. Click Save.
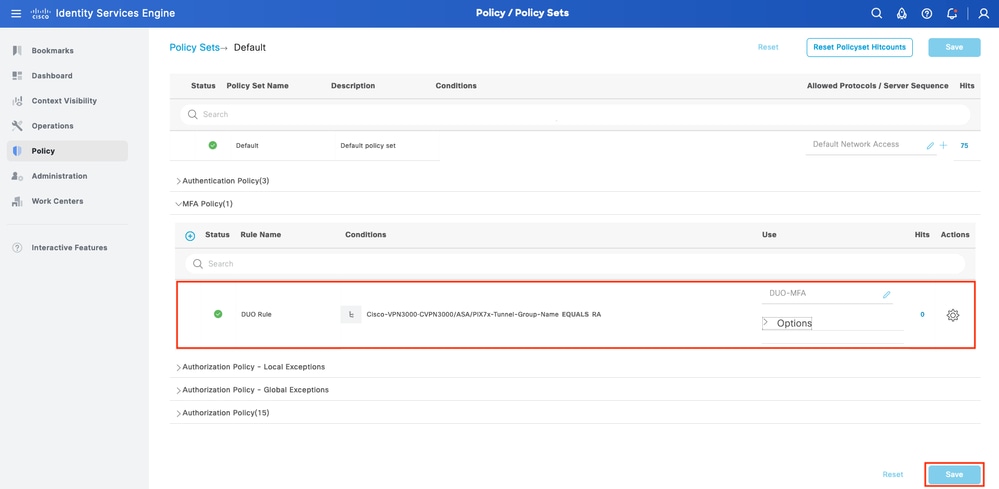 ISE Policy
Configure Authorization Policy
1. Configure the Authorization Policy with the Active Directory Group condition and permissions of your choice.
 Policy Set 3
Limitations
At the time of this document:
1. Only Duo push and phone are supported as a second-factor authentication method
2. No Groups are pushed to Duo Cloud, only User Sync is supported
3. These bullets are supported with multifactor authentication:
- VPN user authentication
- TACACS+ admin access authentication
Verify
1. Open Cisco Secure Client, click Connect and provide the Username and Password and click OK.
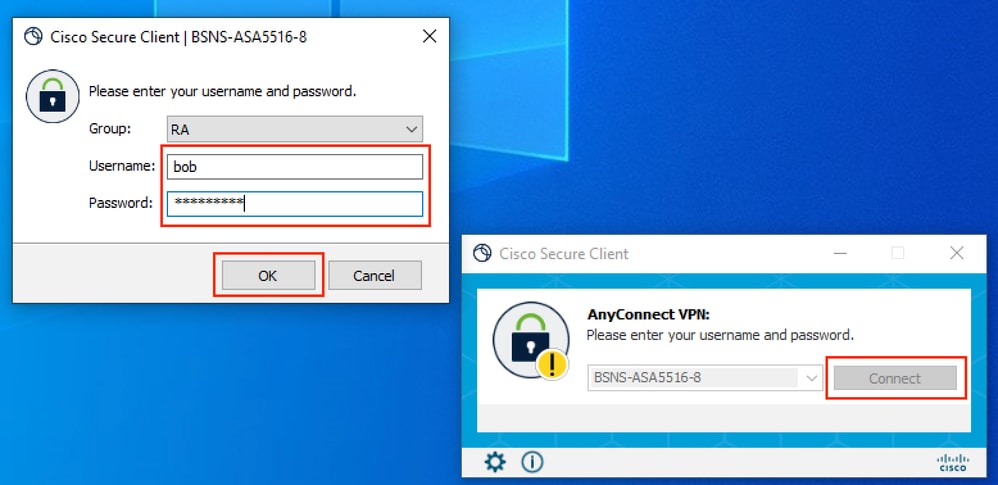 VPN Client
2. The users' Mobile Device must receive a Duo Push Notification. Approve it and the VPN Connection is established.
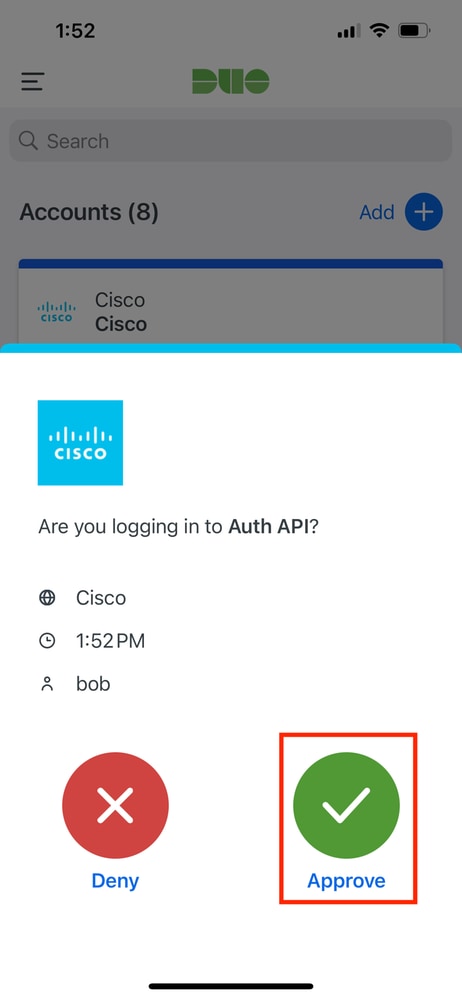 Duo Push
3. Navigate to ISE Operations > Live Logs to confirm the User Authentication.
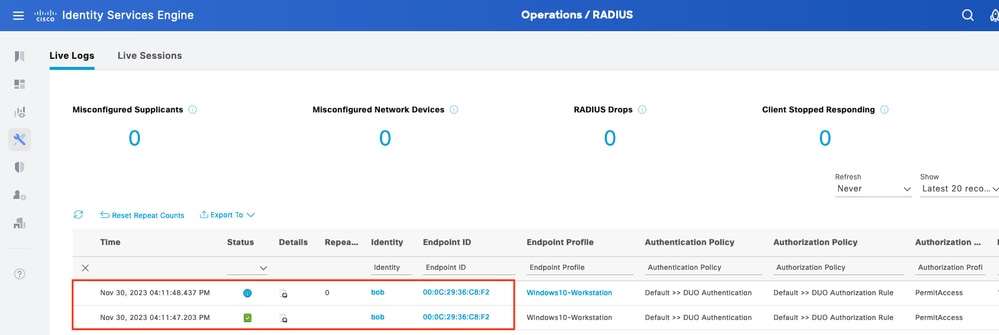 Live Logs 1
4. Click on the Details Authentication Report, verify the Authentication Policy, and Authorization Policy and Authorization Result. Scroll through the steps on the right. To confirm MFA was successful, the MultiFactor Authentication is Successful line must be present:
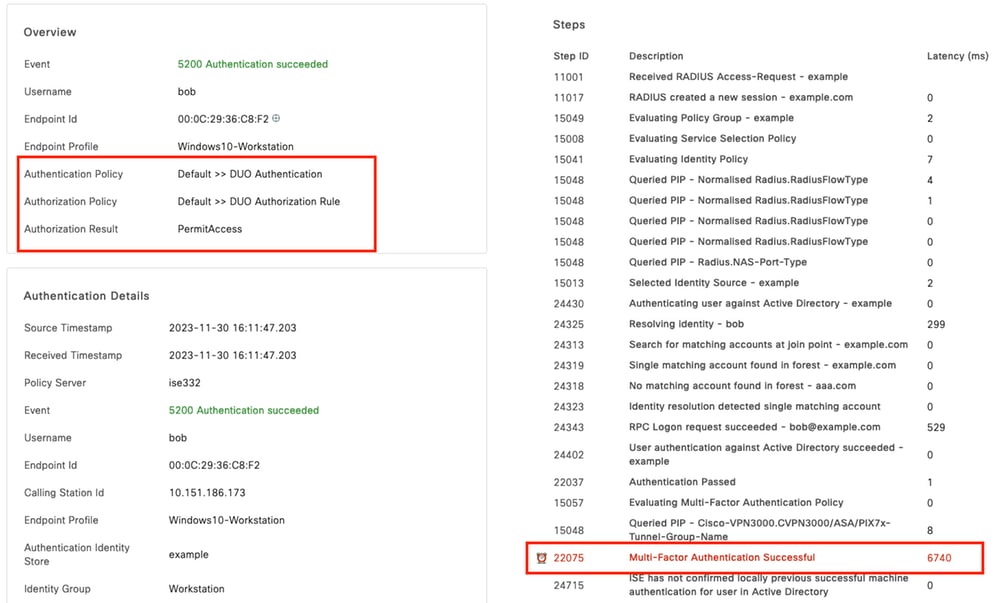 Live Logs 2
Troubleshoot
Debugs to enable on ISE:
| Use Case | Log Component | Log File | Key Log Messages |
| MFA related logs | policy-engine | ise-psc.log | DuoMfaAuthApiUtils -:::::- Submitted request to Duo Client manager DuoMfaAuthApiUtils --> Duo response |
| Policy related logs | prrt-JNI | prrt-management.log | RadiusMfaPolicyRequestProcessor TacacsMfaPolicyRequestProcessor |
| Authentication related logs | runtime-AAA | prrt-server.log | MfaAuthenticator::onAuthenticateEvent MfaAuthenticator::sendAuthenticateEvent MfaAuthenticator::onResponseEvaluatePolicyEvent |
| Duo Authentication, ID Sync related logs | duo-sync-service.log |
Revision History
| Revision | Publish Date | Comments |
|---|---|---|
3.0 |
12-Jun-2026
|
Updated Introduction, Title, spelling, grammar, sentence structure, alt text, spacing, inline URLs, HTML URL |
2.0 |
08-May-2025
|
Flow Update |
1.0 |
11-Dec-2023
|
Initial Release |
 Feedback
Contact Cisco
- Open a Support Case

- (Requires a Cisco Service Contract)