A Device Administration license allows you to use TACACS+ services on a Policy Service node. In a high availability (HA) standalone deployment, a Device Administration license permits you to use TACACS+ services on a single Policy Service node in the HA pair.
Configure TACACS+ over TLS 1.3 on an IOS XR Device with ISE
Available Languages
Contents
Introduction
This document describes an example for TACACS+ over TLS with Cisco Identity Services Engine (ISE) as server and a Cisco IOS® XR device as client.
Overview
The Terminal Access Controller Access-Control System Plus (TACACS+) Protocol [RFC8907] enables centralized device administration for routers, network access servers, and other networked devices through one or more TACACS+ servers. It provides authentication, authorization, and accounting (AAA) services, specifically tailored for device administration use cases.
TACACS+ over TLS 1.3 [RFC8446] enhances the protocol by introducing a secure transport layer, safeguarding highly sensitive data. This integration ensures confidentiality, integrity, and authentication for the connection and network traffic between TACACS+ clients and servers.
Using this Guide
This guide divides the activities into two parts to enable ISE to manage administrative access for Cisco IOS XR based network devices.
• Part 1 – Configure ISE for Device Admin
• Part 2 - Configure Cisco IOS XR for TACACS+ over TLS
Prerequisites
Requirements
Requirements to configure TACACS+ over TLS:
- A Certificate Authority (CA) to sign the certificate used by TACACS+ over TLS to sign the certificates of ISE and network devices.
- The root certificate from the Certificate Authority (CA).
-
Network devices and ISE have DNS reachability and can resolve hostnames.
Components Used
The information in this document is based on these software and hardware versions:
- ISE VMware virtual appliance, release 3.4 patch 2
- Cisco 8201 Router and Cisco NCS 5508/55A1 Router, release 25.3.1
The information in this document was created from the devices in a specific lab environment. All of the devices used in this document started with a cleared (default) configuration. If your network is live, ensure that you understand the potential impact of any command.
Licensing
Generate Certificate Signing Request for TACACS+ Server Authentication
Step 1. Log in to the ISE admin web portal using one of the supported browsers.
By default, ISE uses a self-signed certificate for all services. The first step is to generate a Certificate Signing Request (CSR) to have it signed by our Certificate Authority (CA).
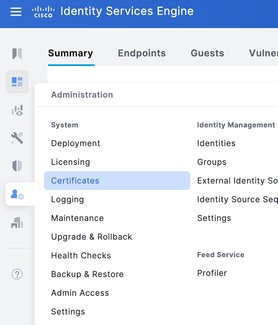
Step 2. Navigate toAdministration > System > Certificates.
Step 3. Under Certificate Signing Requests, click Generate Certificate Signing Request.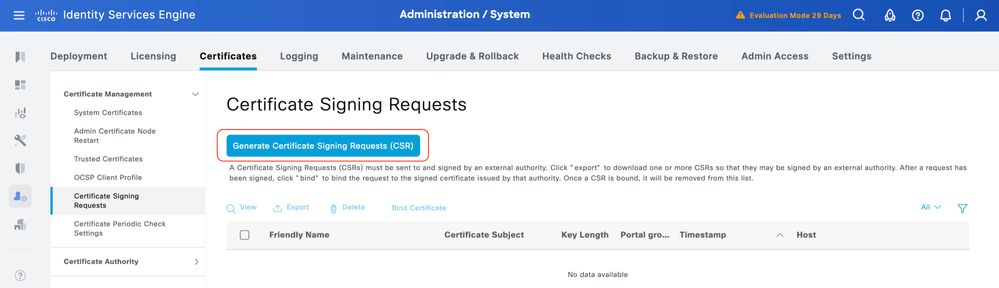
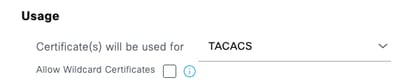
Step 4. SelectTACACS inUsage.
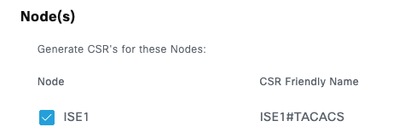
Step 5. Select the PSNs that have TACACS+ enabled.
Step 6. Fill the Subject fields with the appropriate information.
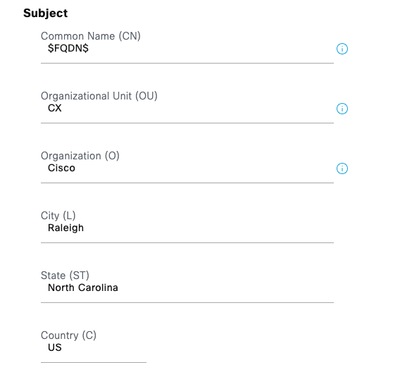
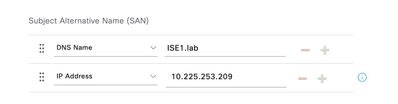
Step 7. Add the DNS Name and IP Address under Subject Alternative Name (SAN).
Step 8. Click Generate and then Export.
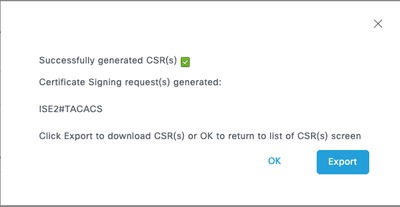
Now, you can have the certificate (CRT) signed by your Certificate Authority (CA).
Upload Root CA Certificate for TACACS+ Server Authentication
Step 1.Navigate to Administration > System > Certificates. Under Trusted Certificates, click Import.
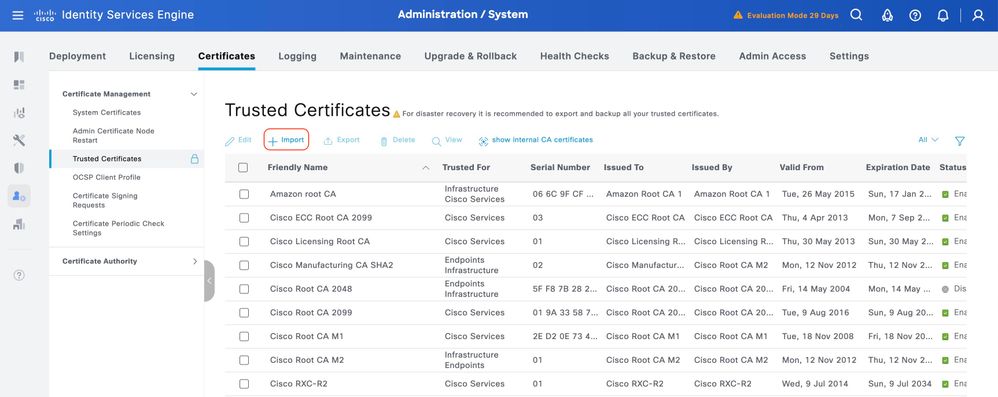
Step 2. Select the certificate issued by the Certificate Authority (CA) that signed your TACACS Certificate Signing Request (CSR). Make sure that the Trust for Authentication with ISE option is enabled.
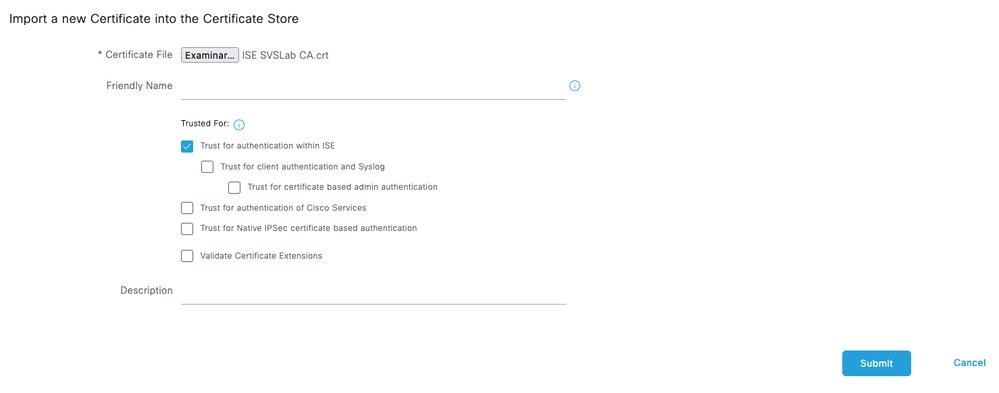
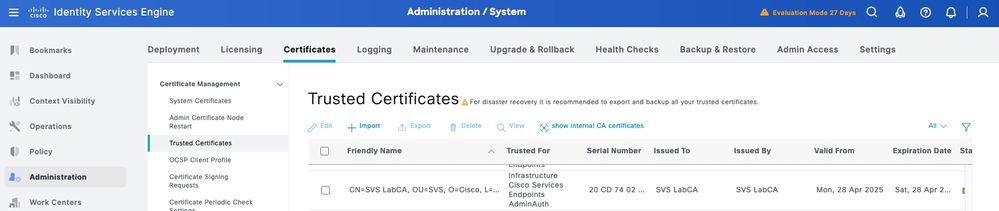
ClickSubmit. The certificate must now appear under Trusted Certificates.
Bind the Signed Certificate Signing Request (CSR) to ISE
Once the Certificate Signing Request (CSR) is signed, you can install the signed certificate on ISE.
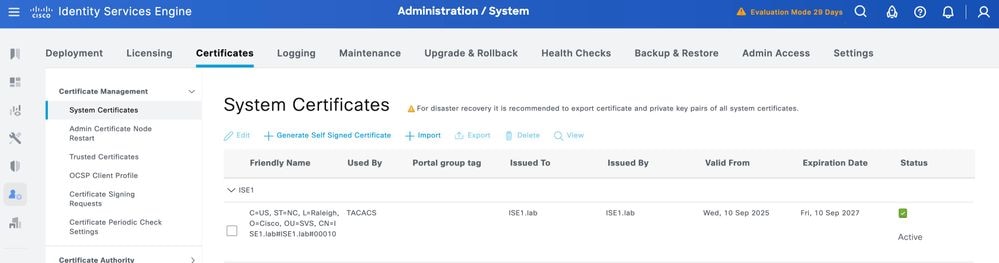
Step 1.Navigate to Administration > System > Certificates. Under Certificate Signing Requests, select the TACACS CSR generated in the previous step and click Bind Certificate.
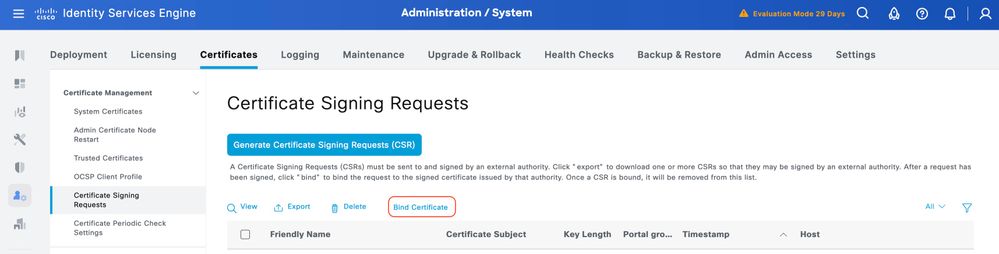
Step 2.Select the signed certificate and ensure the TACACS checkbox under Usage remains selected.

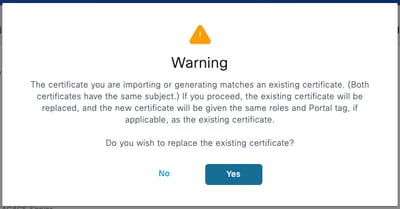
Step 3. Click Submit. If you receive a warning about replacing the existing certificate, click Yes to proceed.
The certificate must now be correctly installed. You can verify this under System Certificates.
Enable TLS 1.3
TLS 1.3 is not enabled by default in ISE 3.4.x. It must be manually enabled.
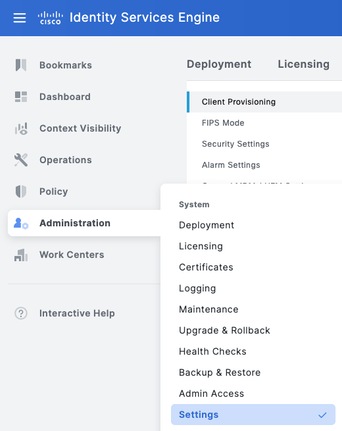
Step 1.Navigate to Administration > System > Settings.
Step 2. Click Security Settings, select the check box next to TLS1.3 under TLS Version Settings, then click Save.
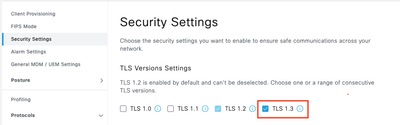

Warning: When you change the TLS version, the Cisco ISE application server restarts on all the Cisco ISE deployment machines.
Enable Device Administration on ISE
The Device Administration service (TACACS+) is not enabled by default on an ISE node. To enable TACACS+ on a PSN node:
Step 1. Navigate to Administration > System > Deployment. Select the check box next to the ISE node and click Edit.
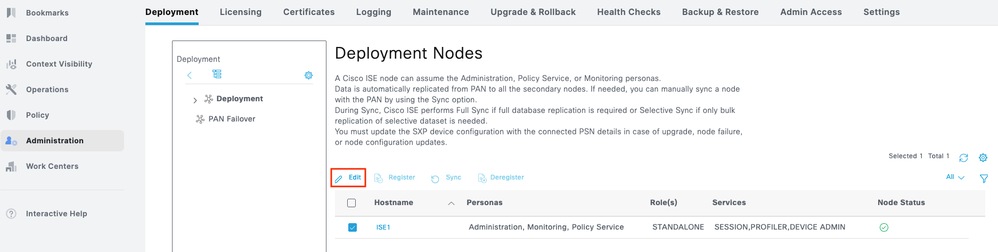
Step 2.Under GeneralSettings, scroll down and select the check box next to Enable Device Admin Service.
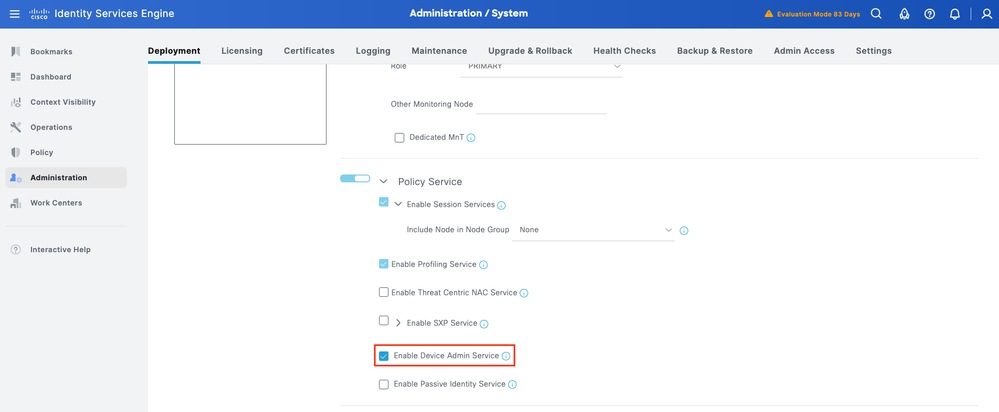
Step 3. Save the configuration. Device Admin Service is now enabled on ISE.
Enable TACACS Over TLS
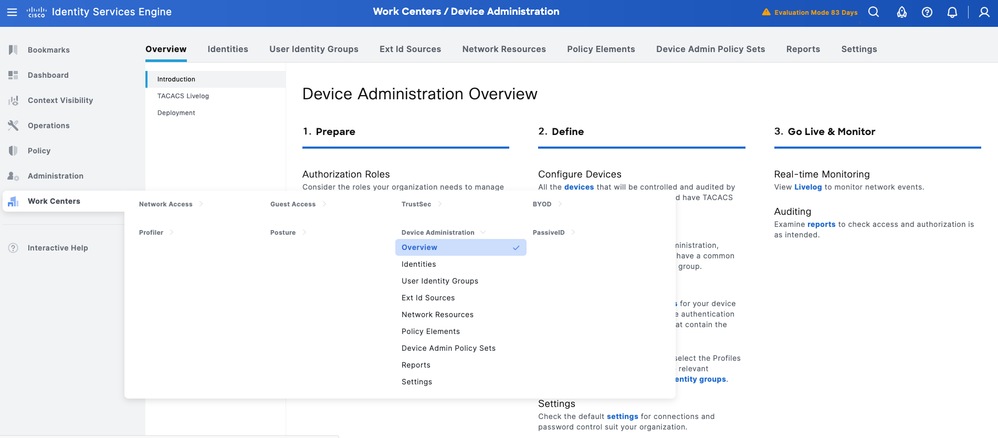
Step 1.Navigate to Work Centers > Device Administration > Overview.
Step 2.Click Deployment. Select the PSN nodes where you want to enable TACACS over TLS.
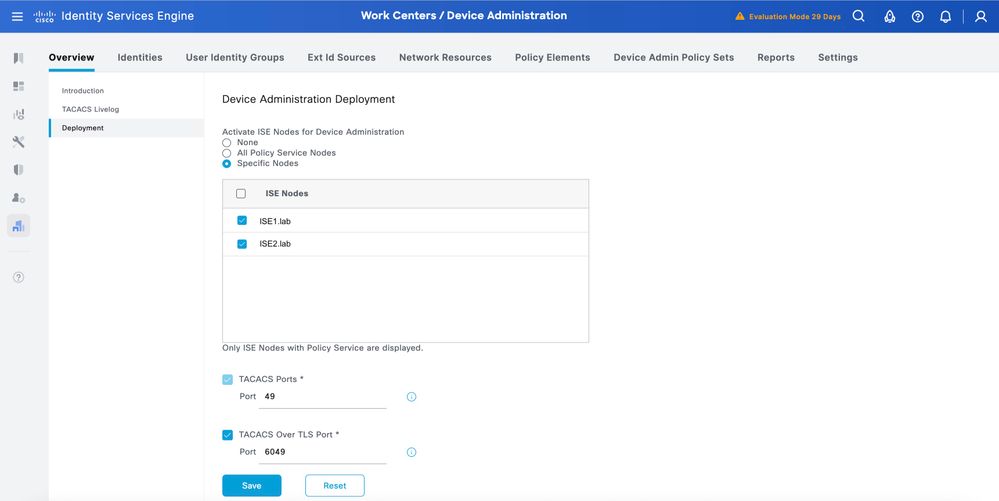
Step 3.Keep the default port 6049 or specify a different TCP port for TACACS over TLS, then click Save.
ISE Prerequisites and Miscellaneous Tasks
Create Network Device and Network Device Groups
ISE provides powerful device grouping with multiple device group hierarchies. Each hierarchy represents a distinct and independent classification of network devices.
Step 1. Navigate to Work Centers > Device Administration > Network Resources. Click Network Device Groups and create a group with the name IOS XR.
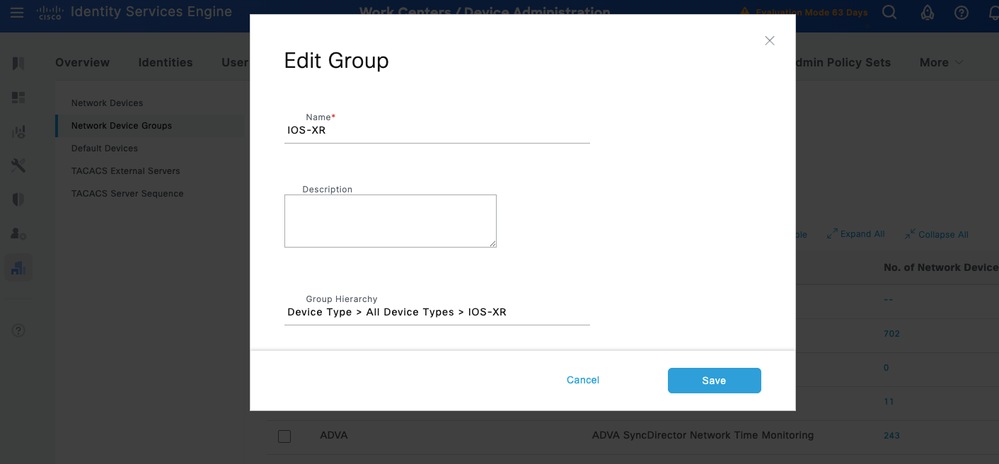

Tip: All Device Types and All Locations are default hierarchies provided by ISE. You can add your own hierarchies and define the various components in identifying a Network Device which can be used later in the Policy Condition
Step 2. Now, add a Cisco IOS XR device as a Network Device. Navigate to Work Centers > Device Administration > Network Resources > Network Devices. Click Add to add a new Network Device.
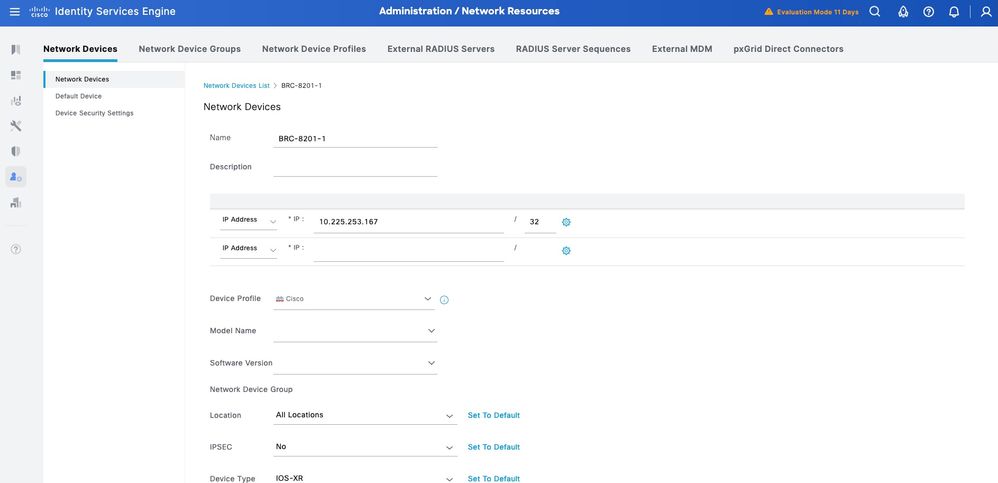
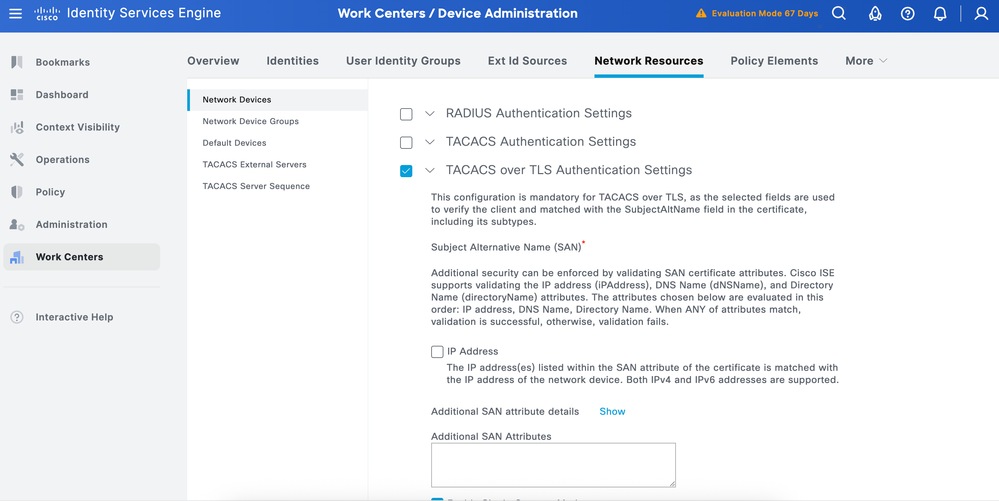
Step 3.Enter the IP address of the Device and make sure to map the Location and Device Type(IOS XR) for the Device. Finally, enable the TACACS+ over TLS Authentication Settings.
Tip: It is recommended to enable Single Connect Mode to avoid restarting the TCP session each time a command is sent to the device.
Configure Identity Stores
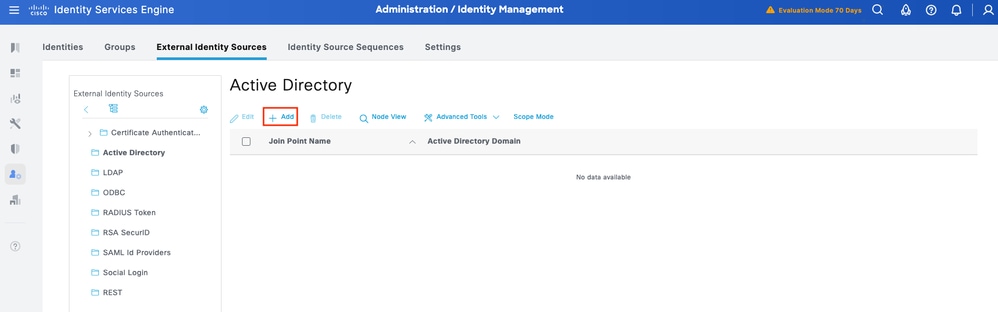
This section defines an Identity Store for the Device Administrators, which can be the ISE Internal Users and any supported External Identity Sources. Here uses Active Directory (AD), an External Identity Source.
Step 1. Navigate to Administration > Identity Management > External Identity Stores > Active Directory. Click Add to define a new AD Joint Point.
Step 2. Specify the Join Point name and the AD domain name and click Submit.

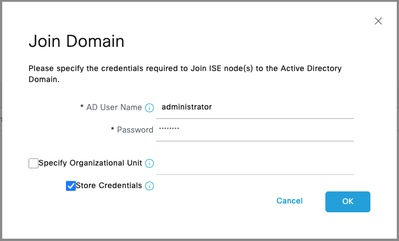
Step 3.Click Yes when prompted, Would you like to Join all ISE Nodes to this Active Directory Domain?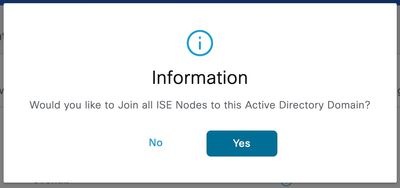
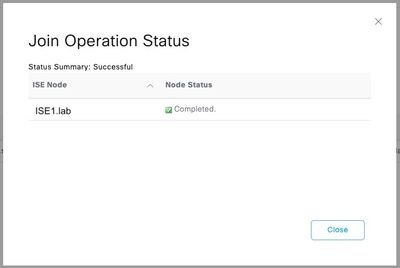
Step 4.Input the credentials with AD join privileges, and Join ISE to AD. Check the Status to verify it operational.
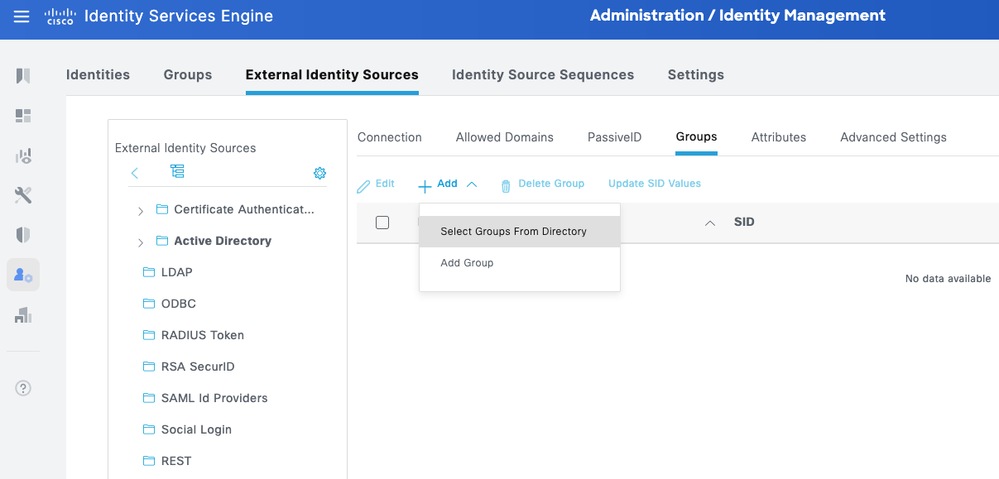
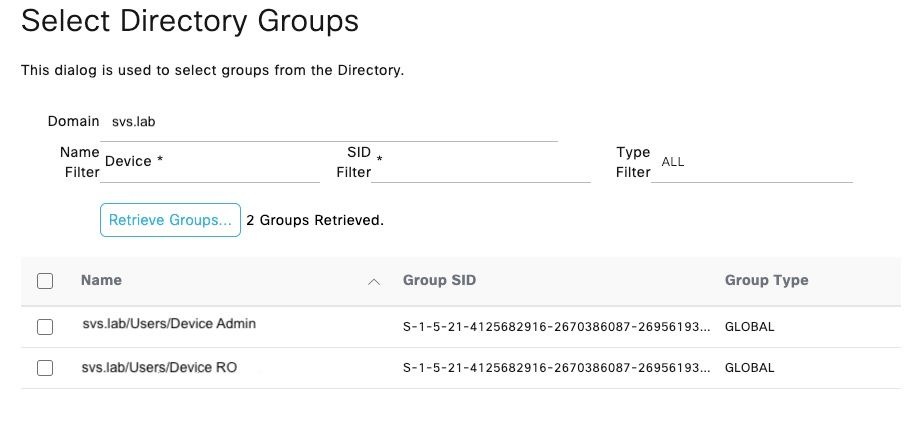
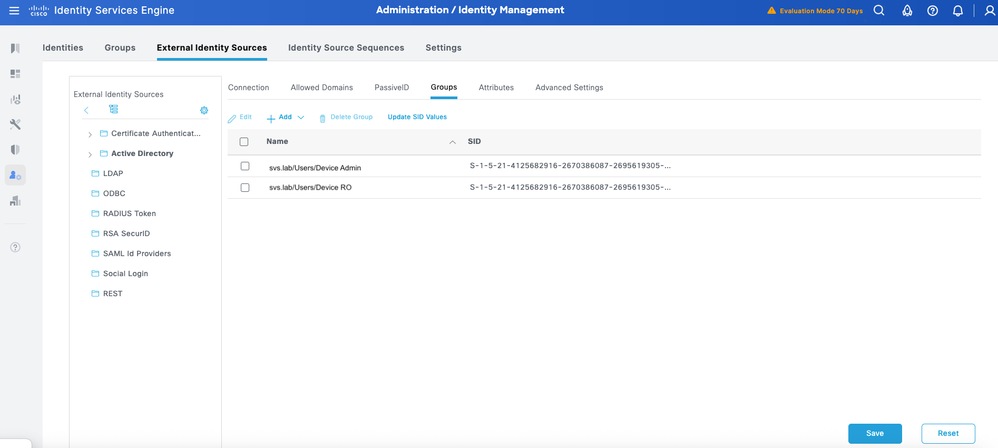
Step 5.Navigate to the Groups tab, and click Add to get all the groups needed based on which the users are authorized for the device access. This example shows the groups used in the Authorization Policy.
Configure TACACS+ Profiles
Map the TACACS+ Profiles to user roles on the Cisco IOS XR devices. In this example these are defined:
- Root System Administrator – This is the highest-privileged role in the device. The user with the root system administrator role has full administrative access to all system commands and configuration capabilities.
- Operator –This role is intended for users who need read-only access to the system for monitoring and troubleshooting purposes.
Define two TACACS+ Profiles: IOSXR_RW and IOSXR_RO.
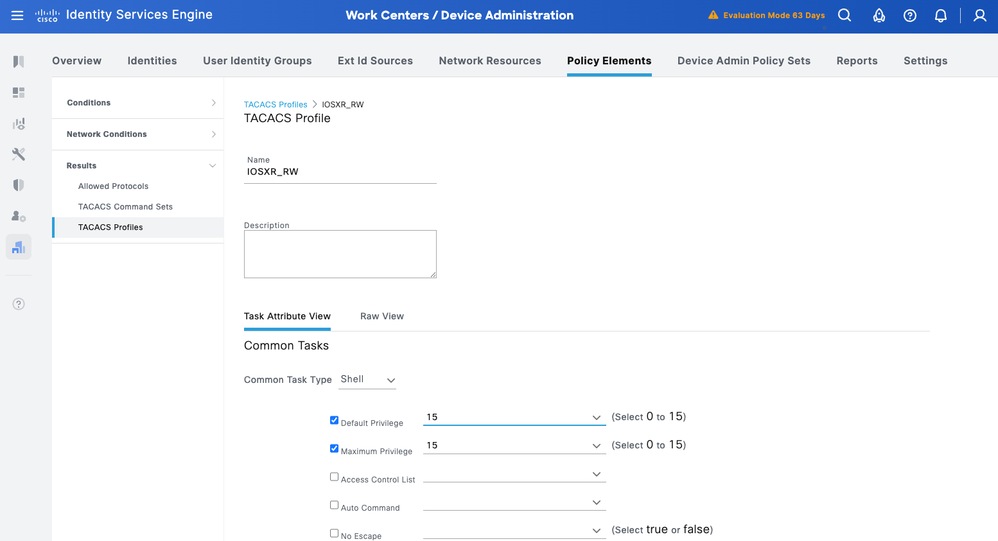
IOS XR_RW - Administrator Profile
Step 1. Navigate to Work Centers > Device Administration > Policy Elements > Results > TACACS Profiles. Add a new TACACS Profile and name it IOSXR_RW.
Step 2. Check and set the Default Privilege and Maximum Privilege as 15.
Step 3. Confirm the config and Save.
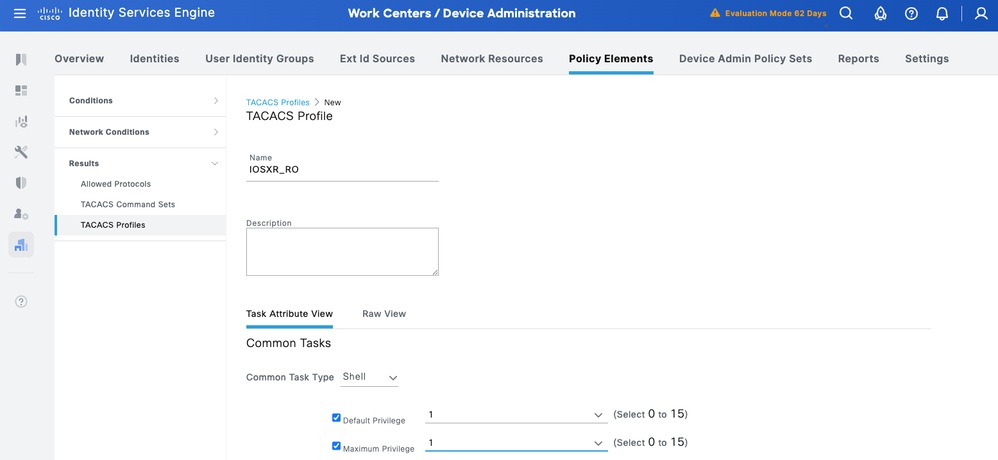
IOS XR_RO - Operator Profile
Step 1. Navigate to Work Centers > Device Administration > Policy Elements > Results > TACACS Profiles. Add a new TACACS Profile and name it IOSXR_RO.
Step 2. Check and set the Default Privilege and Maximum Privilege as 1.
Step 3. Confirm the config and Save.
ConfigureTACACS+ Command Sets
Define the TACACS+ Commands Sets: In this example, these are defined CISCO_IOSXR_RW and CISCO_IOSXR_RO.
CISCO IOS XR RW - Administrator Command Set
Step 1. Navigate to Work Centers > Device Administration > Policy Elements > Results > TACACS Command Sets. Add a new TACACS Command Set and name it CISCO_IOSXR_RW.
Step 2. Check the Permit any command that is not listed below checkbox (this allows any command for the administrator role) and click Save.

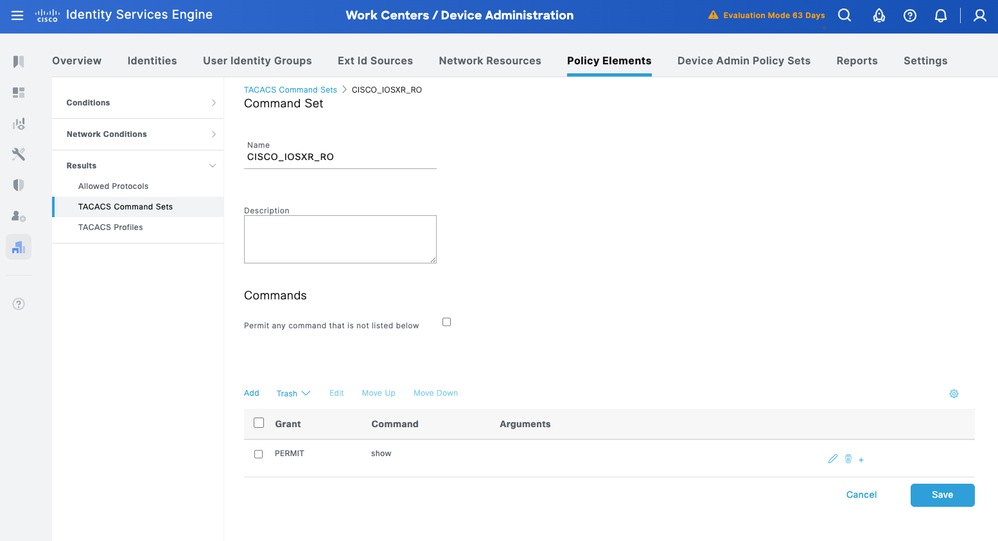
CISCO IOS XR RO - Operator Command Set
Step 1. From ISE UI, navigate to Work Centers > Device Administration > Policy Elements > Results > TACACS Command Sets. Add a new TACACS Command Set and name it CISCO_IOSXR_RO.
Step 2. In Commands section, add a new command.
Step 3. Select Permit from the Dropdown list for Grant column and enter show on the Command column; and click the check arrow.
Step 4. Confirm the data and click Save.
ConfigureDevice Admin Policy Sets
Policy Sets are enabled by default for Device Administration. Policy Sets can divide polices based on the Device Types so to ease application of TACACS profiles.
Step 1.Navigate to Work Centers > Device Administration > Device Admin Policy Sets. Add a new Policy Set IOS XR Devices. Under condition specify DEVICE:Device Type EQUALS All Device Types#IOS XR. Under Allowed Protocols, select Default Device Admin.
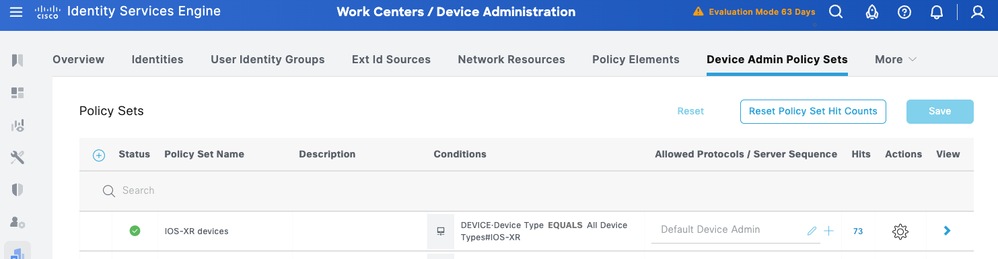
Step 2. Click Saveand click the right arrow to configure this Policy Set.
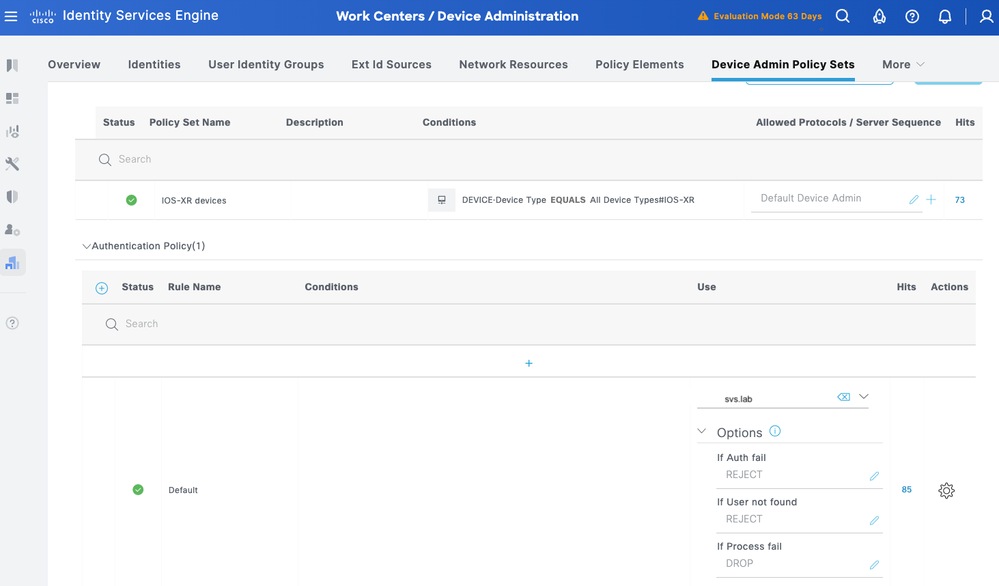
Step 3. Create the Authentication Policy. For Authentication, you use the AD as the ID Store. Leave the default options under If Auth fail, If User not foundandIf Process fail.
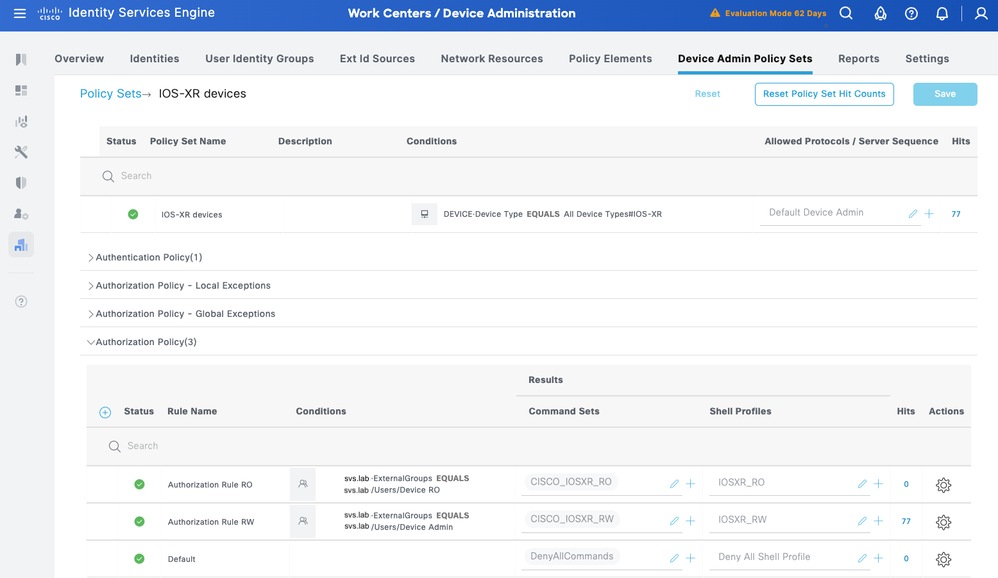
Step 4. Define the Authorization Policy.
Create the authorization policy based on user groups in Active Directory (AD).
For example:
- Users in the AD group Device RO are assigned the CISCO_IOSXR_RO Command Set and the IOSXR_RO Shell Profile.
- Users in the AD group Device Admin are assigned the CISCO_IOSXR_RW Command Set and the IOSXR_RW Shell Profile.
Part 2 - Configure Cisco IOS XR for TACACS+ over TLS 1.3

Note: For further details, please refer to IOS XR Security Configuration Guide: System Security Configuration Guide for Cisco 8000 Series Routers, IOS XR Release 25.1.x, 25.2.x, 25.3.x, 25.4.x
Verify Software Version
TACACS over TLS is supported from XR release 25.3.1. Ensure that the device meets the minimum required software version.
RP/0/RP0/CPU0:SVS-LAB-8201-1#sho ver
Cisco IOS XR Software, Version 25.3.1 LNT
Copyright (c) 2013-2025 by Cisco Systems, Inc.

Build Information:
Built By : swtools
Built On : Thu Sep 25 07:51:19 UTC 2025
Build Host : iox-lnx-153
Workspace : /auto/srcarchive12/prod/25.3.1/8000/ws
Version : 25.3.1

Caution: Ensure that the console connection is reachable and functioning properly.
Tip: It is recommended to configure a temporary user and change the AAA authentication and authorization methods to use local credentials instead of TACACS while making configuration changes, to avoid being locked out of the device.
Initial Configurations
Step 1. Ensure name-server (DNS) is configured and the router is successfully able to resolve Frequently Qualified Domain Names (FQDNs), especially the ISE server FQDN.
domain vrf mgmt name svs.lab
domain vrf mgmt name-server 10.225.253.247
no domain vrf mgmt lookup disable

RP/0/RP0/CPU0:SVS-LAB-8201-1#ping vrf mgmt ise1.svs.lab
Type escape sequence to abort.
Sending 5, 100-byte ICMP Echos to 10.225.253.209 timeout is 2 seconds:
!!!!!
Success rate is 100 percent (5/5), round-trip min/avg/max = 1/2/4 ms
Step 2. Clear any old/unused trustpoints and certificates. Ensure that there are no old trustpoints and certificates present. If you see any old entries, remove/clear them.
show crypto ca trustpoint
show crypto ca certificates

(config)# no crypto ca trustpoint <tp-name>
# clear crypto ca certificates <tp-name>
Note: You can manually create a new RSA keypair and attach it under trustpoint. If you do not create one, the default keypair is used. Defining ECC keypair under trustpoint is not currently supported.
Configure Trustpoint
Step 1. Keypair configuration (optional).
Note: You can manually create a new RSA keypair and attach it under trustpoint. If you do not create one, a default keypair is used.
Caution: Defining ECC keypair under trustpoint is not supported in XR 25.3.1 version.
RP/0/RP0/CPU0:SVS-LAB-8201-1(config)#crypto key generate rsa <key-label> 4096
RP/0/RP0/CPU0:SVS-LAB-8201-1(config)#crypto ca trustpoint <tp-name>
RP/0/RP0/CPU0:SVS-LAB-8201-1(config-trustp)#rsakeypair <key-label>
Step 2. Create trustpoint.
Tip: subject-alternative name (SAN) is optional (if being enabled on ISE), but recommended.
RP/0/RP0/CPU0:SVS-LAB-8201-1(config)#crypto ca trustpoint svs
RP/0/RP0/CPU0:SVS-LAB-8201-1(config-trustp)#vrf mgmt
RP/0/RP0/CPU0:SVS-LAB-8201-1(config-trustp)#crl optional
RP/0/RP0/CPU0:SVS-LAB-8201-1(config-trustp)#subject-name C=US,ST=NC,L=RTP,O=Cisco,OU=SVS,CN=SVS-LAB-8201-1.svs.lab
RP/0/RP0/CPU0:SVS-LAB-8201-1(config-trustp)#subject-alternative-name IP:10.225.253.167,DNS:SVS-LAB-8201-1.svs.lab
RP/0/RP0/CPU0:SVS-LAB-8201-1(config-trustp)#enrollment url terminal
RP/0/RP0/CPU0:SVS-LAB-8201-1(config-trustp)#rsakeypair svs-4096
RP/0/RP0/CPU0:SVS-LAB-8201-1(config-trustp)#commit
Note: If you need to use special characters in O or OU fields, you must use a backslash (\) before the special character. For example: O=Cisco Systems\, Inc.
Step 3. Authenticate Trustpoint by installing CA certificate.
RP/0/RP0/CPU0:SVS-LAB-8201-1#crypto ca authenticate svs

Enter the base64/PEM encoded certificate/certificates.
Please note: for multiple certificates use only PEM.
End with a blank line or the word "quit" on a line by itself

-----BEGIN CERTIFICATE-----
MIIFlDCCA3ygAwIBAgIIIM10AsTaN/UwDQYJKoZIhvcNAQELBQAwajELMAkGA1UE
BhMCVVMxFzAVBgNVBAgTDk5vcnRoIENhcm9saW5hMRAwDgYDVQQHEwdSYWxlaWdo
MQ4wDAYDVQQKEwVDaXNjbzEMMAoGA1UECxMDU1ZTMRIwEAYDVQQDEwlTVlMgTGFi
Q0EwHhcNMjUwNDI4MTcwNTAwWhcNMzUwNDI4MTcwNTAwWjBqMQswCQYDVQQGEwJV
UzEXMBUGA1UECBMOTm9ydGggQ2Fyb2xpbmExEDAOBgNVBAcTB1JhbGVpZ2gxDjAM
BgNVBAoTBUNpc2NvMQwwCgYDVQQLEwNTVlMxEjAQBgNVBAMTCVNWUyBMYWJDQTCC
AiIwDQYJKoZIhvcNAQEBBQADggIPADCCAgoCggIBAJvZUOyn2vIn6gKbx3M7vaRq
2YjwZlzSH6EkEvxnJTy+kksiFD33GyHQepk7vfp4NFU5OtQ4HC7t/A0v9grDa3QW
VwvV4MBbJhFM3s0J/ejgDYcMZhIAaPy0Zo5WLboOkXEiKjPLatkXojB8FVrhLF3O
jMBSqwa4/Wlniy5S+7s4FFxsCf20COWfBAsnrs0tatIIhmcnx+VLJP7MRm8f0w4m
mutNo7IhbJSrgAFXmjlbBjMmgspObULo/wxMHdTbtPBf11HRHTkNIo3qy04UADL2
WpoGhgT/FaxxBo2UBcnYVaP+jjRE0NYT973MCbVAAxtNVU6bEBR0z+LWniACzupm
+qh23SL43uW5A3iSw/BuU1E9p7B0e8oDNKU6gXlojKyLP/gC7j8AeP03ir+KZui8
b8X4iYn/67SbzZFhwxn3chkW4JYhQ4AImW1An2Q1+DMoZL7zRtSqQ3g9ZqRIMzQN
gJ+kQXe7QtT/u6m1MrtjE3gAEVpL334rTIxy9hpKZIkB86t2ZA3JX8CLsbCa13sA
z1XCoONX+6a1ekmXuAOI+t3c1sNbN2AtFi4cJovTA01xh60I4QnK+MNQKpTjt/E4
ydHl0rrurXsZummj9QBnkX4pqY7cDLHhdMKpbjDwg7jVLl783nTc9wYptQEPi5sw
83g9EMgKV0ARIiVUa/qlAgMBAAGjPjA8MAwGA1UdEwQFMAMBAf8wEQYJYIZIAYb4
QgEBBAQDAgAHMBkGCWCGSAGG+EIBDQQMFgpTVlMgTGFiIENBMA0GCSqGSIb3DQEB
CwUAA4ICAQAIT308oL2L6j/7Kk9VdcouuaBsN9o2pNEk3KXeZ8ykarNoxa87sFYr
AwXIwfAtk8uEHfnWu1QcZ3LkEJM9rHVCZuKsYd3D6qojo54HTpxRLgo5oKOdGayi
iSEkSSX9qyfLfINHR2JSVqJU6jLsy86X7q7RmIPMS7XfHzuddFNI4YDoXRX67X+v
O+ja6zTQqjO6lqJhmrSkyFbYf/ZTpe4d1OzJsZjNsNOr8bF9nOA/7qNZLp3Z3cpU
PU0KdbiSvRqnPw3e8TfITVmAzcx8COI2SrYFMSUazolVBvDy+xRKxyAtMbneGz6n
YdykCimThCKoKwp/pWpYBEqIEOf5ay1PKURO/8aj/B7aluJapXkmnj5qPeGhN0pB
Q9r14reov4so2EspkXS7CrH9yGfpIyTprokz1UvZBZ8vloI7YZmjFmem+5rT6Gnk
eU/lX7nV61SYG5W5K+I8uaKuyBHOMn7Amy3DYL5c5GJBqxpSZERbLXV+Q1tIgRU8
8ggzlPOdsS/i6Lo7ypYX0eB9HgVDCkzQsLXQuHGj/2WsgPgdRcjkvnyURk4Jx+Ib
xDrmo7e0XPpSW4l72a6Kl8CR3U2Cr4wsuvndPEq/qd2NRSBWffF0XE/AJHQG7STT
HaXLU9r2Ko603oecu8ysGTwLlIt/9T1/FOb0xZRugWcpJrVoTgDGuA==
-----END CERTIFICATE-----

quit
   Serial Number : AB:CD:87:FD:41:12:C3:FE:FD:87:D5
   Subject:
      CN=SVS LabCA,OU=SVS,O=Cisco,L=Raleigh,ST=North Carolina,C=US
   Issued By :
      CN=SVS LabCA,OU=SVS,O=Cisco,L=Raleigh,ST=North Carolina,C=US
   Validity Start : 17:05:00 UTC Mon Apr 28 2025
   Validity End : 17:05:00 UTC Sat Apr 28 2035
RP/0/RP0/CPU0:May 9 14:52:20.961 UTC: pki_cmd[66362]: %SECURITY-PKI-6-LOG_INFO_DETAIL : Fingerprint: 2A38FF1D7BA0D2782EE9926699C7F81BA9EBC77C8D01153C62D7A6BE09E7DA78
   SHA1 Fingerprint:
      0EB181E95A3ED7803BC5A8059A854A95C83AC737
Do you accept this certificate? [yes/no]: yes
RP/0/RP0/CPU0:May 9 14:52:23.437 UTC: cepki[153]: %SECURITY-CEPKI-6-INFO : certificate database updated
Note: If you have a Subordinate CA system, you need to import both Root CA and Sub CA certificates. Use the same command with Sub CA on top and Root CA at the bottom.
Step 4. Generate Certificate Signing Request (CSR).
RP/0/RP0/CPU0:SVS-LAB-8201-1#crypto ca enroll svs
Fri May 9 14:52:44.030 UTC
% Start certificate enrollment ...
% Create a challenge password. You will need to verbally provide this
password to the CA Administrator in order to revoke your certificate.
% For security reasons your password will not be saved in the configuration.
% Please make a note of it.

Password:
Re-enter Password:

% The subject name in the certificate will include: C=US,ST=NC,L=RTP,O=Cisco,OU=SVS,CN=10.225.253.167
% The subject name in the certificate will include:SVS-LAB-8201-1.svs.lab
% Include the router serial number in the subject name? [yes/no]: yes
% The serial number in the certificate will be: 4090843b
% Include an IP address in the subject name? [yes/no]: yes
Enter IP Address[] 10.225.253.167
Fingerprint: 36354532 38324335 43434136 42333545
Display Certificate Request to terminal? [yes/no]: yes
Certificate Request follows:

-----BEGIN CERTIFICATE REQUEST-----
MIIDQTCCAikCAQAwcjELMAkGA1UEBhMCVVMxCzAJBgNVBAgMAk5DMQwwCgYDVQQH
DANSVFAxDjAMBgNVBAoMBUNpc2NvMQwwCgYDVQQLDANTVlMxFzAVBgNVBAMMDjEw
LjIyNS4yNTMuMTY3MREwDwYDVQQFEwg0MDkwODQzYjCCASIwDQYJKoZIhvcNAQEB
BQADggEPADCCAQoCggEBALwx9w4DnTtrloDH9iOZxPvEDARwN0t4WrPEjaQclZUA
6ax6Cxq/0JlQiUf2+eQv+4rKZqAZ1xDhiaiMGqETnO0LKpwmtx10IqXL7UYMHHwF
9vRII52zomkWA8a63Wx66UkExaXoeXaf5HkLoqDu68X83U7LPvMe1sMwvmq7Rmy2
DAu30HB/JfYlQCHmTVFz3M5fBt86xx4t1nxTFU/4lRWMC73UdL5YdKJLjMpBT2tN
E3piZ+kL4p1c9U4RIBkU8/G4drzFbGvHCIkWkwI0cb1X2HgtbVQdCXTAwJDmr2O9
zd2ZCa5enTbOKHbNXuHjpy0k8MewKOV2muwxVcQbej8CAwEAAaCBiTAYBgkqhkiG
9w0BCQcxCxMJQzFzY28uMTIzMG0GCSqGSIb3DQEJDjFgMF4wDgYDVR0PAQH/BAQD
AgWgMCAGA1UdJQEB/wQWMBQGCCsGAQUFBwMBBggrBgEFBQcDAjAJBgNVHRMEAjAA
MB8GA1UdEQQYMBaCDjEwLjIyNS4yNTMuMTY3hwQK4f2nMA0GCSqGSIb3DQEBBQUA
A4IBAQBBXOeWF5ZUz701GFjuQHBBDgYb+3lhFOxbYm9psIWfv1uwjkKoL297tGHv
Iux7nMyrDVkSJ81i5BSTdd9FE6AbSFswjlYpO+IxkUM971Ejwg2rj+jABDR7I8SU
06Y06mS9x2ZJYqImeq8xwIr19Hi+7tyaLe6apfTIljdgVxB+Xyz0FJMckI05US3j
T/3aw/115RcXerdrh36oMUHEepUjIx/15u9s1c7e1mxACoQE6f9OA+fdg2zYt0ME
Z6VAw64cY+YF6iLbYv7c4lizO5Zj2NJbUKpeqijkFAkY/1rIxTHypzH/p2ma4zuS
46a+kLXsVHZ716ZMB3WrUzB2ZN0O
-----END CERTIFICATE REQUEST-----
---End - This line not part of the certificate request---
Redisplay enrollment request? [yes/no]: no
Step 5. Import CA signed certificate.
RP/0/RP0/CPU0:SVS-LAB-8201-1#crypto ca import svs certificate
Fri May 9 15:00:35.426 UTC


Enter the base64/PEM encoded certificate/certificates.
Please note: for multiple certificates use only PEM.
End with a blank line or the word "quit" on a line by itself

-----BEGIN CERTIFICATE-----
MIIE3zCCAsegAwIBAgIINL1NAUzx14UwDQYJKoZIhvcNAQELBQAwajELMAkGA1UE
BhMCVVMxFzAVBgNVBAgTDk5vcnRoIENhcm9saW5hMRAwDgYDVQQHEwdSYWxlaWdo
MQ4wDAYDVQQKEwVDaXNjbzEMMAoGA1UECxMDU1ZTMRIwEAYDVQQDEwlTVlMgTGFi
Q0EwHhcNMjUwNTA5MTQ1NzAwWhcNMjYwNTA5MTQ1NzAwWjByMQswCQYDVQQGEwJV
UzELMAkGA1UECAwCTkMxDDAKBgNVBAcMA1JUUDEOMAwGA1UECgwFQ2lzY28xDDAK
BgNVBAsMA1NWUzEXMBUGA1UEAwwOMTAuMjI1LjI1My4xNjcxETAPBgNVBAUTCDQw
OTA4NDNiMIIBIjANBgkqhkiG9w0BAQEFAAOCAQ8AMIIBCgKCAQEAvDH3DgOdO2uW
gMf2I5nE+8QMBHA3S3has8SNpByVlQDprHoLGr/QmVCJR/b55C/7ispmoBnXEOGJ
qIwaoROc7QsqnCa3HXQipcvtRgwcfAX29EgjnbOiaRYDxrrdbHrpSQTFpeh5dp/k
eQuioO7rxfzdTss+8x7WwzC+artGbLYMC7fQcH8l9iVAIeZNUXPczl8G3zrHHi3W
fFMVT/iVFYwLvdR0vlh0okuMykFPa00TemJn6QvinVz1ThEgGRTz8bh2vMVsa8cI
iRaTAjRxvVfYeC1tVB0JdMDAkOavY73N3ZkJrl6dNs4ods1e4eOnLSTwx7Ao5Xaa
7DFVxBt6PwIDAQABo4GAMH4wHgYJYIZIAYb4QgENBBEWD3hjYSBjZXJ0aWZpY2F0
ZTAOBgNVHQ8BAf8EBAMCBaAwIAYDVR0lAQH/BBYwFAYIKwYBBQUHAwEGCCsGAQUF
BwMCMAkGA1UdEwQCMAAwHwYDVR0RBBgwFoIOMTAuMjI1LjI1My4xNjeHBArh/acw
DQYJKoZIhvcNAQELBQADggIBAARpS5bEck+ojO12106WxedDQ8VduObBtrnOH+Nt
94EA1co7HEe4USf1FiASAX7rNveLpY3ICmLh+tQZYTZrQ93tb9mMTZg7exqN89ZU
VlXoB2UOTri5Kl0/+izEGgyNq42/ytAP8YO07HR/2jf7gfhoRvwcR5QNOEHv4o6l
Zma5Xio1sBbkA7JB2mpzzZg4ZjsyV8lRGXxxgyt1mwNmb7EiAc8lodRcgyp7FNh3
F/k9cMMMr5lM4Ysvoltx1k9AeLjzb2syv5/fG6QuOZdWwTaaQh0Y2h/cVDiV97wg
0DlmEfdSv6QrxQSujZr22RzVyKKHltuiV2B74pthUuGRBtfHS5XFy7uTTbfGX8M6
ZJw8rX1SADr8tDplrf1ZIrPmv3ZPP7woTB22yWzyd0use+5Ialb0w70twN4t/IIw
8CJu6HfnDXLDPZ0jsC8steffrSlopwGccp3j6aZKPFz+I/Purb44a9WxEWa2TA7H
+rloynBcGMetOHxVLnptlsC7Q4mN/MDXeGyW+OTNCirNEG/gqcu+dn9EnNKkE2WV
oF5370w+uNHoK8Bdt8mqadUT4OoUSqY8ArV0BomO5tzbemreVPmQAZ/IahZ7TqKo
3dGNonTAfFTESM1iujQ81iRKsikDHySnwcCM2nilCKZrhVq5IB8NK6jKRJZ0eQAX
vMt1
-----END CERTIFICATE-----
quit
Serial Number : C2:F4:AB:34:02:D2:76:74:65:34:FE:D5
Subject:
serialNumber=4090843b,CN=10.225.253.167,OU=SVS,O=Cisco,L=RTP,ST=NC,C=US
Issued By :
CN=SVS LabCA,OU=SVS,O=Cisco,L=Raleigh,ST=North Carolina,C=US
Validity Start : 14:57:00 UTC Fri May 09 2025
Validity End : 14:57:00 UTC Sat May 09 2026
SHA1 Fingerprint:
21E4DA0B02181D08B6E51F0CC754BCE5B815C792
Step 6. Verify the router identity certificate is enrolled.
RP/0/RP0/CPU0:SVS-LAB-8201-1#show crypto ca trustpoint svs detail

Trustpoint        :svs-new
=========================================================
KeyPair Label: the_default
CRL:optional
enrollment: terminal
subject name: C=US,ST=NC,L=RTP,O=Cisco,OU=SVS,CN=SVS-LAB-8201-1.svs.lab

RP/0/RP0/CPU0:SVS-LAB-8201-1#show crypto ca certificates svs
Wed May 14 14:55:58.173 UTC

Trustpoint       : svs-new
==================================================
CA certificate
  Serial Number  : 20:01:20:1F:B6:9D:C3:FE:43:78:FF:64
  Subject:
        CN=SVS LabCA,OU=SVS,O=Cisco,L=Raleigh,ST=North Carolina,C=US
  Issued By      :
        CN=SVS LabCA,OU=SVS,O=Cisco,L=Raleigh,ST=North Carolina,C=US
  Validity Start : 17:05:00 UTC Mon Apr 28 2025
  Validity End   : 17:05:00 UTC Sat Apr 28 2035
  SHA1 Fingerprint:
         0EB181E95A3ED7803BC5A8059A854A95C83AC737
Router certificate
  Key usage      : General Purpose
  Status         : Available
  Serial Number  : FD:AC:20:1F:B6:9D:C3:FE:98:43:ED
  Subject:
        serialNumber=4090843b,CN=brc-8201-1.svs.lab,OU=SVS,O=Cisco,L=RTP,ST=NC,C=US
  Issued By      :
        CN=SVS LabCA,OU=SVS,O=Cisco,L=Raleigh,ST=North Carolina,C=US
  Validity Start : 19:59:00 UTC Fri May 09 2025
  Validity End   : 19:59:00 UTC Sat May 09 2026
  SHA1 Fingerprint:
         AC17E4772D909470F753BDBFA463F2DF522CC2A6
Associated Trustpoint: svs
Configure TACACS & AAA with TLS
Caution: Perform the configuration changes through console with local credentials.
Step 1. Configure TACACS Server and AAA group.
tacacs source-interface MgmtEth0/RP0/CPU0/0 vrf mgmt
aaa group server tacacs+ tac_tls_sc
 vrf mgmt
 server-private 10.225.253.209 port 6049
  timeout 10
  tls
   trustpoint svs
  !
  single-connection
  single-connection-idle-timeout 30
Step 2. Configure AAA.
aaa accounting exec default start-stop group tac_tls_sc
aaa accounting system default start-stop group tac_tls_sc
aaa accounting network default start-stop group tac_tls_sc
aaa accounting commands default stop-only group tac_tls_sc
aaa authorization exec default group tac_tls_sc local
aaa authorization commands default group tac_tls_sc none
aaa authentication login default group tac_tls_sc local
Certificate Renewal Process
This section describes the certificate renewal process when the configured certificates need to be replaced or are nearing expiration.
Note: Trust point does not need to be removed from TACACS+ configuration during renewal.
Step 1. Verify current certificate validity dates.
RP/0/RP0/CPU0:SVS-LAB-8201-1#show crypto ca certificates svs-new
Thu Aug 14 15:13:37.465 UTC

Trustpoint : svs-new
==================================================
CA certificate
  Serial Number : 30:A2:10:14:C9:5E:B0:E0:07:CE:0A:24:16:69:90:ED:D1:34:B5:9B
  Subject:
        CN=Test Drive Sub CA G1,OU=Certification Authorities,O=Keyfactor Command,C=US
  Issued By :
        CN=Test Drive Root CA G1,OU=Certification Authorities,O=Keyfactor Command,C=US
  Validity Start : 22:12:45 UTC Thu Jun 26 2025
  Validity End : 22:12:44 UTC Tue Jun 25 2030

  CRL Distribution Point

http://svs.lab:8080/ejbca/publicweb/crls/search.cgi?iHash=m9uBlQsZDYy6wxomiFWB5Gv0AZM

  SHA1 Fingerprint:
        EA8FB276563B927FCAF0174D9FD1C58F3E8B5FF2
Trusted Certificate Chain
  Serial Number : 1F:A6:6E:2E:F8:AB:CE:B4:9C:B8:07:5A:9F:2B:32:02:B4:56:5C:96
  Subject:
        CN=Test Drive Root CA G1,OU=Certification Authorities,O=Keyfactor Command,C=US
  Issued By :
        CN=Test Drive Root CA G1,OU=Certification Authorities,O=Keyfactor Command,C=US
  Validity Start : 22:13:17 UTC Thu Jun 26 2025
  Validity End : 22:13:16 UTC Sun Jun 24 2035
  SHA1 Fingerprint:
        E225647FF9BDA176D2998D5A3A9770270F37D2A7
Router certificate
  Key usage : General Purpose
  Status : Available
  Serial Number : 7A:13:EB:C0:6A:8D:66:68:09:0B:32:C7:0C:D8:05:BD:81:72:9B:4E
  Subject:
        CN=brc-8201-1.svs.lab,OU=SVS,O=Cisco,L=RTP,ST=NC,C=US
  Issued By :
        CN=Test Drive Sub CA G1,OU=Certification Authorities,O=Keyfactor Command,C=US
  Validity Start : 16:38:36 UTC Wed Jul 30 2025
  Validity End : 16:38:35 UTC Thu Jul 30 2026
  CRL Distribution Point

http://svs.lab:8080/ejbca/publicweb/crls/search.cgi?iHash=X4as2q+6I9Bd4QglQa8g1xoH8GY
  SHA1 Fingerprint:
        B562F3CF507CE7F97893F28BC896794CFF6995C1
Associated Trustpoint: svs-new
Step 2. Delete existing trustpoint certificate.
RP/0/RP0/CPU0:SVS-LAB-8201-1#clear crypto ca certificates KF_TP
Thu Aug 14 15:25:26.286 UTC
certificates cleared for trustpoint KF_TP
RP/0/RP0/CPU0:Aug 14 15:25:26.577 UTC: cepki[382]: %SECURITY-CEPKI-6-INFO : certificate database updated
RP/0/RP0/CPU0:BRC-8201-1#
RP/0/RP0/CPU0:BRC-8201-1#
RP/0/RP0/CPU0:BRC-8201-1#show crypto ca certificates KF_TP
Thu Aug 14 15:25:37.270 UTC
RP/0/RP0/CPU0:BRC-8201-1#
Step 3. Re-authenticate and enroll trust point as described in the steps under Trustpoint Configuration.
Step 4. Verify certificate validity dates are updated.
RP/0/RP0/CPU0:SVS-LAB-8201-1#show crypto ca certificates KF_TP
Thu Aug 14 15:31:28.309 UTC

Trustpoint : KF_TP
==================================================
CA certificate
  Serial Number : 30:A2:10:14:C9:5E:B0:E0:07:CE:0A:24:16:69:90:ED:D1:34:B5:9B
  Subject:
CN=Test Drive Sub CA G1,OU=Certification Authorities,O=Keyfactor Command,C=US
  Issued By :
        CN=Test Drive Root CA G1,OU=Certification Authorities,O=Keyfactor Command,C=US
  Validity Start : 22:13:17 UTC Thu Jun 26 2025
  Validity End : 22:13:16 UTC Tue Jun 25 2030

  CRL Distribution Point

http://svs.lab:8080/ejbca/publicweb/crls/search.cgi?iHash=m9uBlQsZDYy6wxomiFWB5Gv0AZM
  SHA1 Fingerprint:
        EA8FB276563B927FCAF0174D9FD1C58F3E8B5FF2
Trusted Certificate Chain
  Serial Number : 1F:A6:6E:2E:F8:AB:CE:B4:9C:B8:07:5A:9F:2B:32:02:B4:56:5C:96
  Subject:
        CN=Test Drive Root CA G1,OU=Certification Authorities,O=Keyfactor Command,C=US
  Issued By :
        CN=Test Drive Root CA G1,OU=Certification Authorities,O=Keyfactor Command,C=US
  Validity Start : 22:13:17 UTC Thu Jun 26 2025
  Validity End : 22:13:16 UTC Sun Jun 24 2035
  SHA1 Fingerprint:
        E225647FF9BDA176D2998D5A3A9770270F37D2A7
Router certificate
  Key usage : General Purpose
  Status : Available
  Serial Number : 1F:B0:AE:44:CF:8E:24:62:83:42:2F:34:BF:D0:82:07:DF:E4:49:0B
  Subject:
        CN=brc-8201-1.svs.lab,OU=SVS,O=Cisco,L=RTP,ST=NC,C=US
  Issued By :
        CN=Test Drive Sub CA G1,OU=Certification Authorities,O=Keyfactor Command,C=US
  Validity Start : 15:17:29 UTC Thu Aug 14 2025
  Validity End : 15:17:28 UTC Fri Aug 14 2026

  CRL Distribution Point

http://svs.lab:8080/ejbca/publicweb/crls/search.cgi?iHash=X4as2q+6I9Bd4QglQa8g1xoH8GY
  SHA1 Fingerprint:
        D3CE0AEB51C5E8009F626A1A9FD633FB9AFA96DE
Associated Trustpoint: KF_TP
Verify and Troubleshoot
Verify the configuration.
show crypto ca certificates [detail]
show crypto ca trustpoint detail
show tacacs details
Debug for TACACS+.
debug tacacs tls
Debug TLS.
debug ssl error
debug ssl events
Test the remote user before configuring AAA authentication.
test aaa group tacacs2 <username> <password>
user has been authenticated
Clear the certificates (this deletes all certificates associated with a trust point).
clear crypto ca certificate <trustpoint name>
TACACS process restart (if necessary)
process restart tacacsd
Revision History
| Revision | Publish Date | Comments |
|---|---|---|
4.0 |
24-Apr-2026
|
Added Tech Content and Updated Formatting. |
1.0 |
30-Sep-2025
|
Initial Release |
 Feedback
Contact Cisco
- Open a Support Case

- (Requires a Cisco Service Contract)