Migrating from Integration with ACI Introduced in ISE 2.1 to ISE 3.4 Common Policy: An ISE Prescriptive Guide
Available Languages
The initial integration between Cisco Identity Services Engine (ISE release 2.1) and Application Policy Infrastructure Controller (APIC) relied exclusively on REST APIs. In this original approach, all control operations were managed from ISE, utilizing push and pull functions to interact with APIC. However, this implementation had significant limitations: it supported only a single APIC cluster, restricted integration to one tenant, one Virtual Routing and Forwarding (VRF) instance, and one Layer 3 Out (L3Out) connection. Throughout this document, this initial mechanism will be named phase 1 of the integration.
To address these constraints, the integration has been enhanced under the Common Policy framework from ISE release 3.4 to utilize pxGrid, a scalable and robust context-sharing mechanism. With pxGrid, it is now possible to connect multiple APIC clusters, support multiple tenants, multiple VRFs, and multiple L3Outs.
While there is no automated or seamless migration path between the original REST API-based integration and the enhanced pxGrid-based integration with Common Policy, this document outlines the steps to transition during a planned maintenance window.
Phase 1 Integration to Common Policy Comparison
| Feature category |
Phase 1 Integration |
Common Policy |
| Number of ACI Fabrics |
1 |
75 |
| Number of Tenants |
1 |
10 (per fabric) |
| Number of L3Outs |
1 |
500 (per fabric) |
| EPGs synced from ACI to ISE |
All EPGs from single integrated tenant. |
EPGs (and ESGs) can be synced from any tenant. User defined. Up to 500 per fabric |
| SGT synced to ACI as External EPGs |
Configured per SGT with “propagate to ACI” option. Can only be synced to single L3Out under single integrated tenant. |
Configured with flexible outbound SGT rules. Can by synced to multiple fabrics, tenants, and L3Outs. |
| Synced EPG/ESG naming convention |
User defined suffix |
Customizable suffix, prefix, or select ACI fields. |
| Synced SGT naming convention |
User defined suffix |
ISE_<SGT name> |
| Configuration |
ISE (APIC REST API only) |
ISE (APIC REST API and pxGrid) |
The following list describes acronyms and definitions for terms used throughout this document.
API: Application Programming Interface
APIC: Application Policy Infrastructure Controller
EPG: End Point Group
ESG: Endpoint Security Group
ISE: Identity Services Engine
L3Out: Layer 3 Out
pxGrid: Platform Exchange Grid
REST: Representational State Transfer
SGT: Security Group Tag
SXP: Security Group Tag Exchange Protocol
UI: User Interface
VRF: Virtual Routing and Forwarding
Migration from Phase 1 to Common Policy
With the system now set up to share groups and bindings in both directions and to use contracts or policies based on those groups, you may need to migrate from phase 1 integration to ACI integration within the new Common Policy solution. Currently, Common Policy does not provide an official migration strategy. To begin using Common Policy, you must first remove the phase 1 ACI integration and then rebuild the integration using the Common Policy method. Be sure to perform this process during a maintenance window.
The new ACI integration with Common Policy applies a different naming convention for SGTs and EPGs shared between domains. If you plan to apply the same policies in ISE (policy matrix), ACI (contracts), or any other device such as a firewall, you will need to recreate those policies after migrating from phase 1 to Common Policy. Record any policy configurations that need to be reapplied.
Pre-migration Requirements
Before beginning the migration, ensure your environment meets these minimum software requirements:
· Cisco ISE: Release 3.4 Patch 1 or later.
· Cisco APIC: Release 6.1(2) or later.
Preparation and Backup
- Perform backups: Take full configuration backups of both ISE and APIC.
- Document existing policies: Document the groups and bindings in ISE that are shared from APIC, along with any ISE policies that use those shared groups. Record all SGT/EPG bindings and policies in the ISE TrustSec matrix and APIC contracts. These will be deleted during the migration and must be recreated manually.
· Identify groups: List all Security Groups currently marked with the "Propagate to ACI" attribute.
Workflow to Migrate to Common Policy
To migrate from Phase 1 integration to Common Policy, perform these steps.
1. Remove the phase 1 Integration
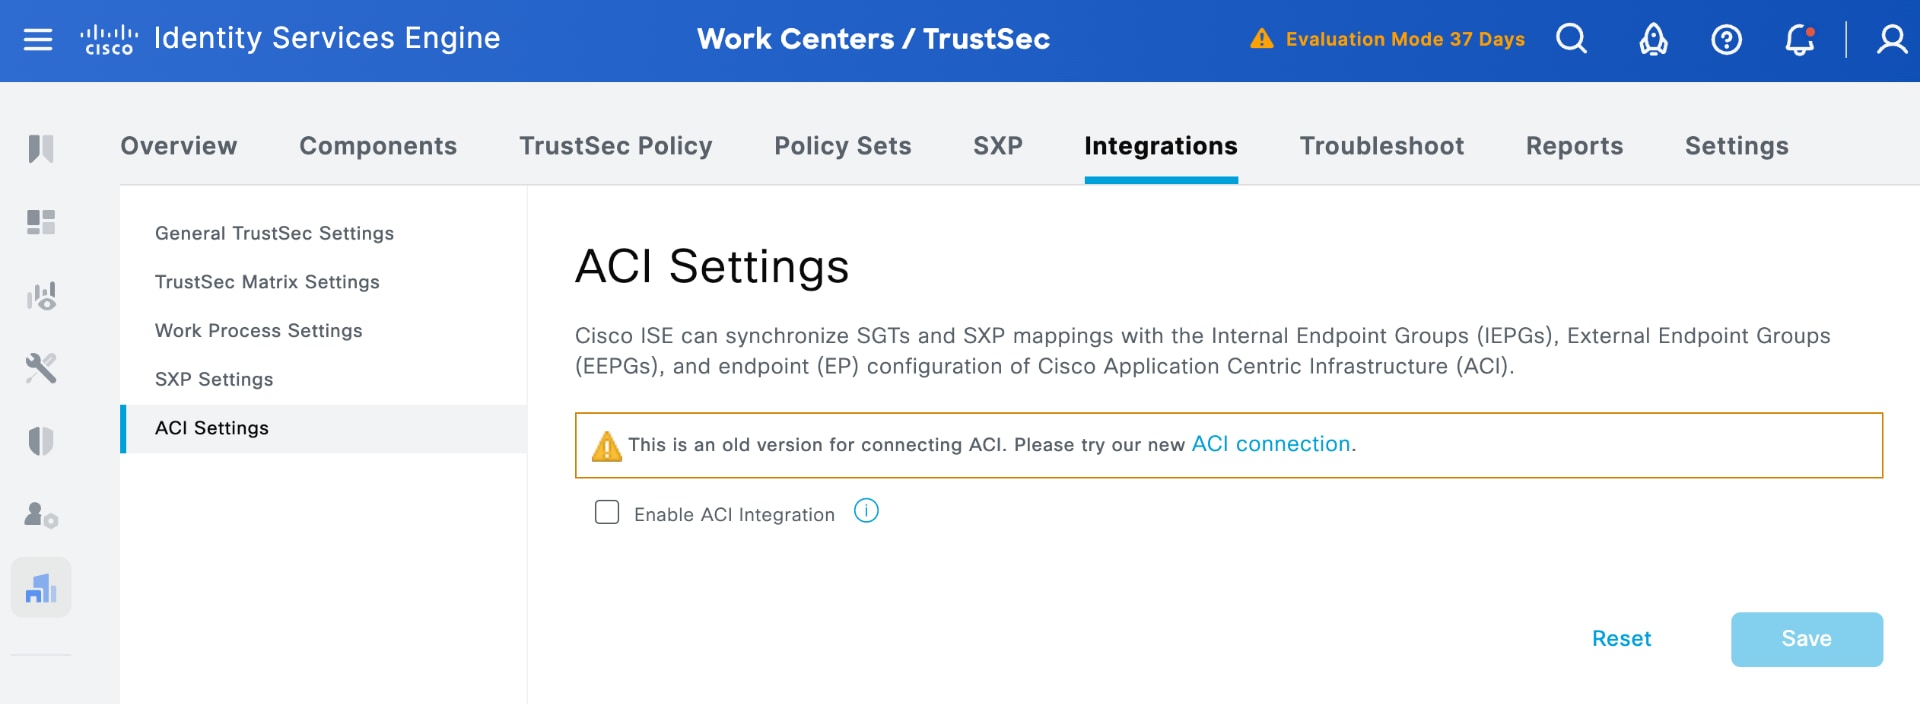
a. In ISE, navigate to Work Centers > TrustSec > Settings > ACI Settings.
b. Uncheck the 'Enable ACI integration' checkbox to disable the integration.
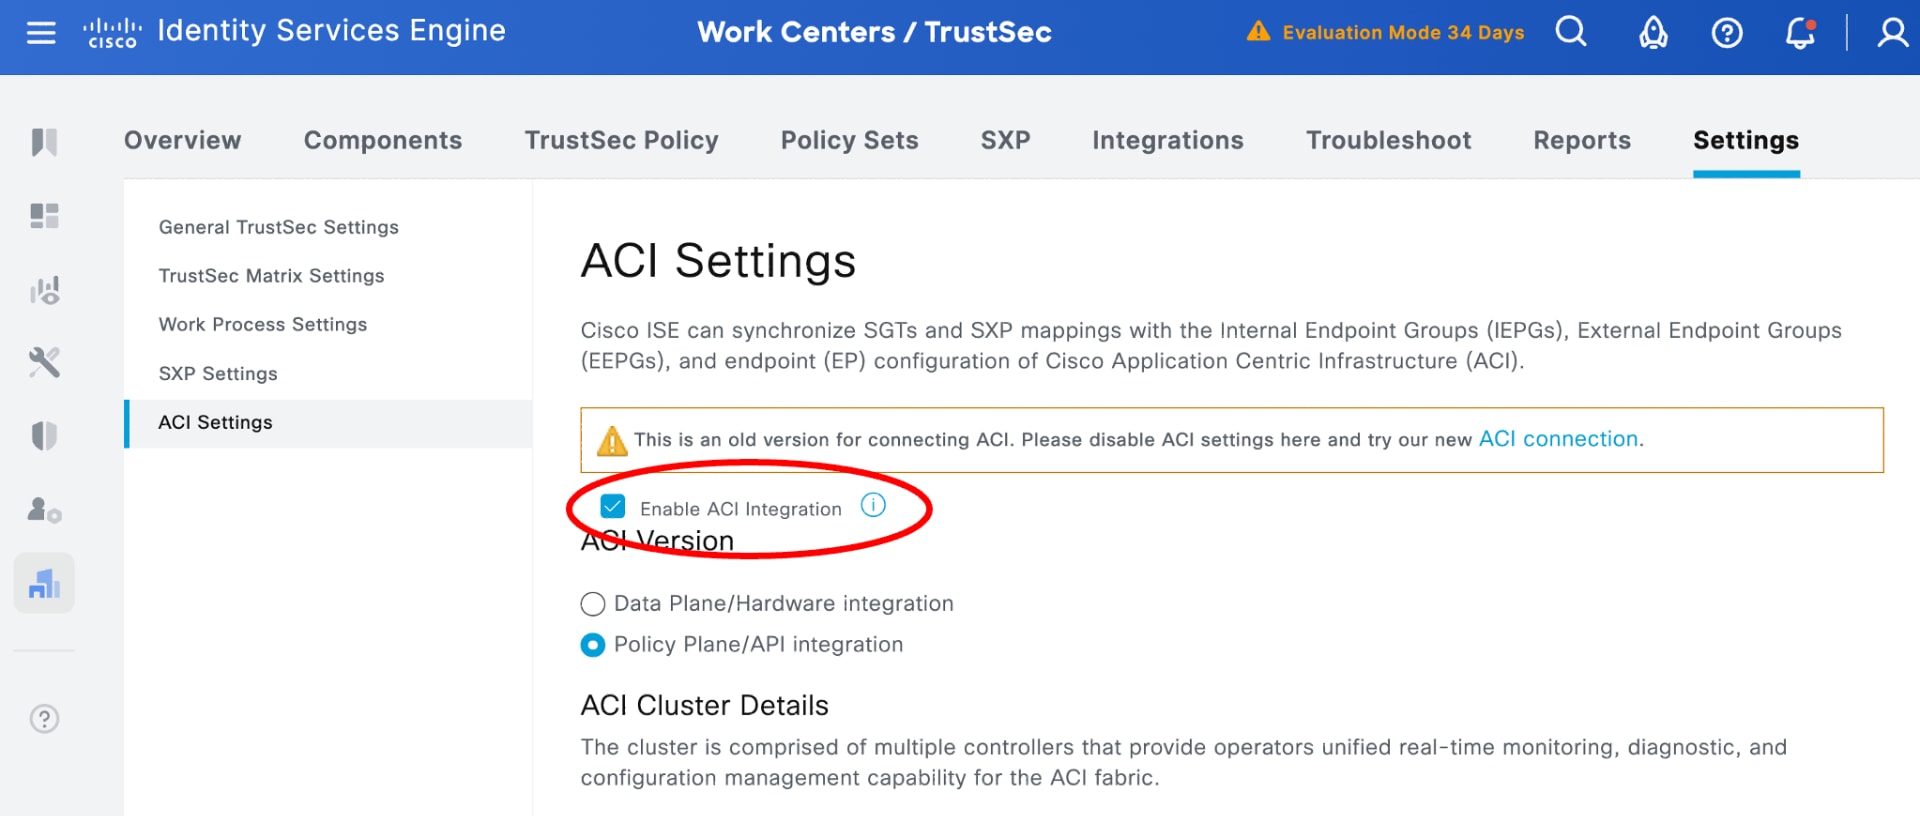
c. Click OK on the conformation pop-up to delete all the learned groups in ISE, all IP addresses to SGT bindings, and all policies/contracts in API.
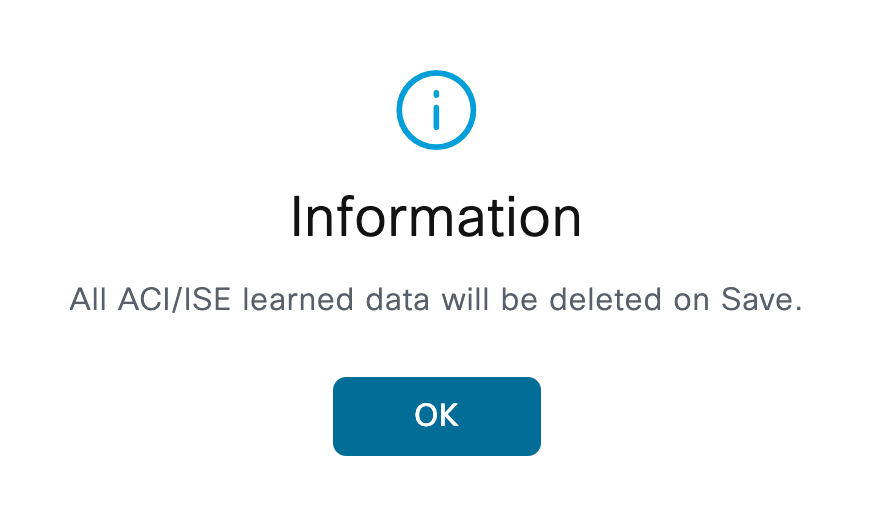
d. Click Save to inactivate the integration.

The SXP service restarts.
e. Verify that APIC-learned groups are removed from ISE and ISE-learned groups are removed from APIC.
In ISE, the system automatically removes the groups learned from APIC, deletes the associated bindings, and removes any policies that use those learned groups. In APIC, the system automatically removes the groups learned from ISE and deletes the provider and consumer sides of the associated contracts.
2. Add workload connection in ISE to integrate APIC
In Common Policy, you no longer use the "Propagate to ACI" checkbox on individual Security Groups. Instead, you can use Workload Connectors and Outbound Rules.
Before you begin
· Check that your network is running ISE release 3.4 Patch 1 or later,
· Check that your network is running APIC release 6.1(2) or later to support ISE-to-APIC integration within the Common Policy architecture.
In phase integration, you select the SGTs to be shared by ISE under each Security Group by navigating to Work Centers > TrustSec > Components > Security Groups.
With Common Policy integration, this approach is no longer applicable; the selection within the Security Group is no longer relevant. Instead, you select the groups to be shared by ISE in Common Policy using Outbound SGT Domain Rules.
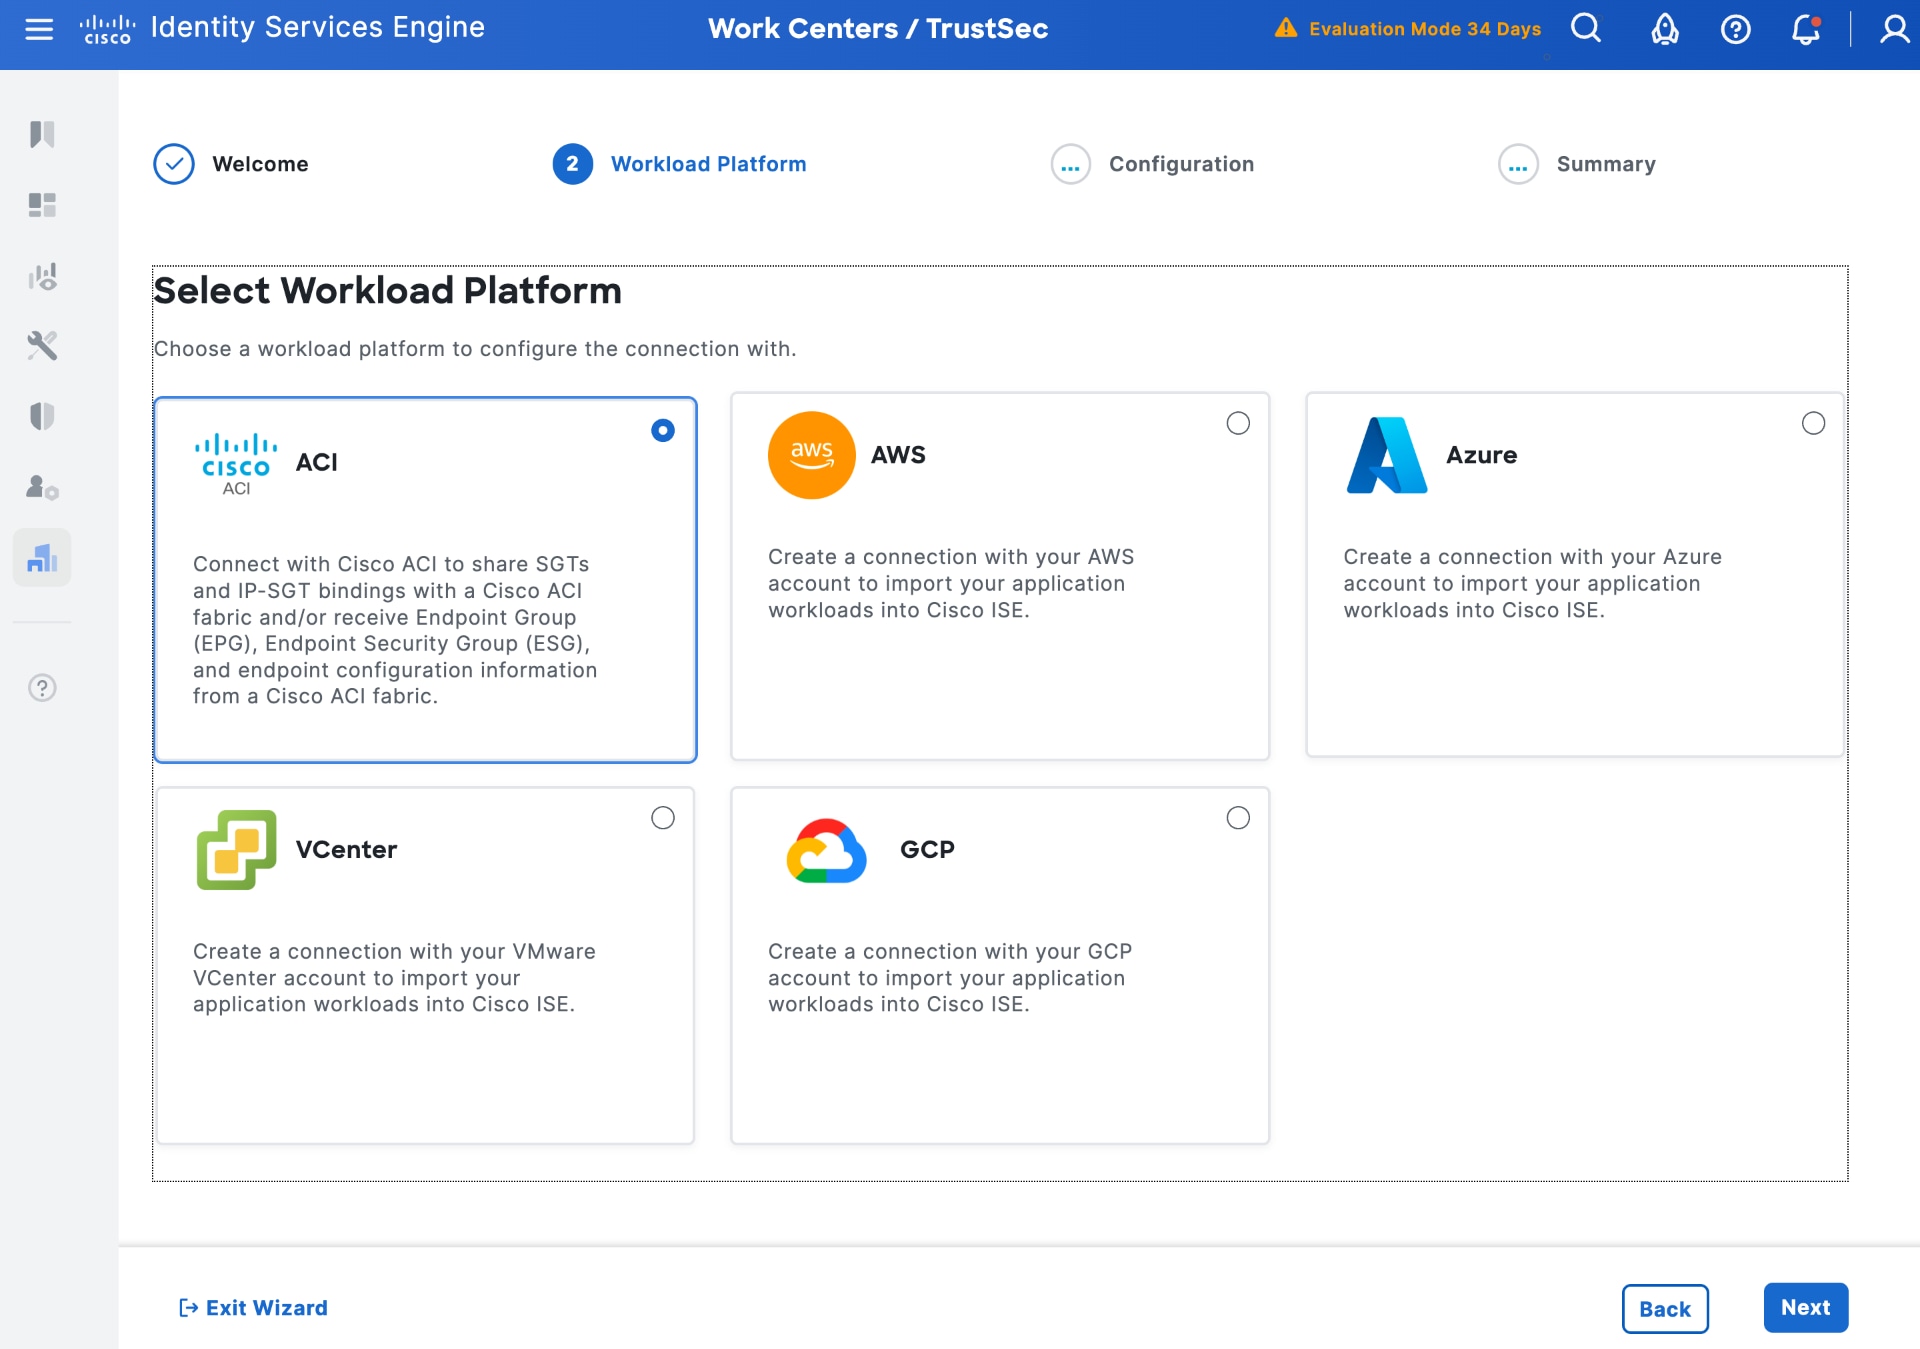
To establish a new ACI workload connection using Common Policy, perform these steps.
a. In ISE, navigate to Work Centers > TrustSec > Integrations > Workload Connectors > Workload Connections.
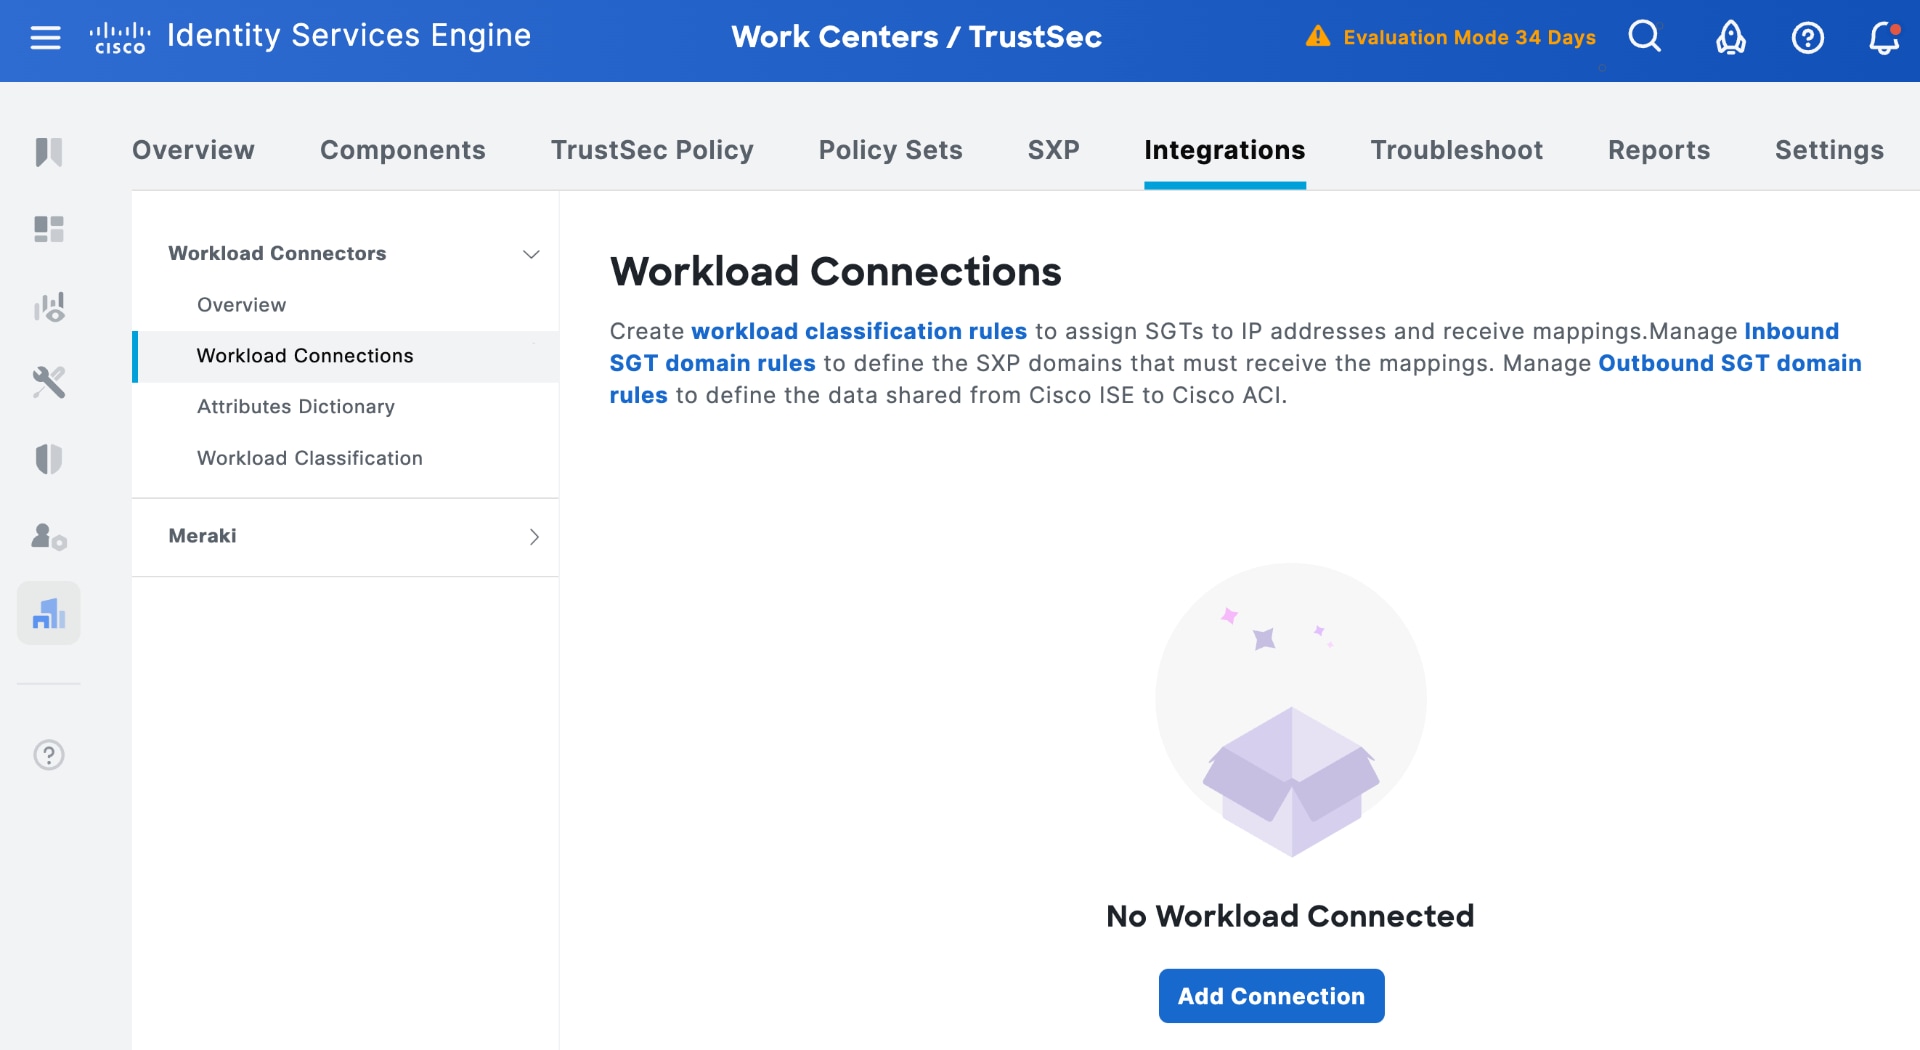
b. Click Add Connection and select Let's Do It in the welcome screen.
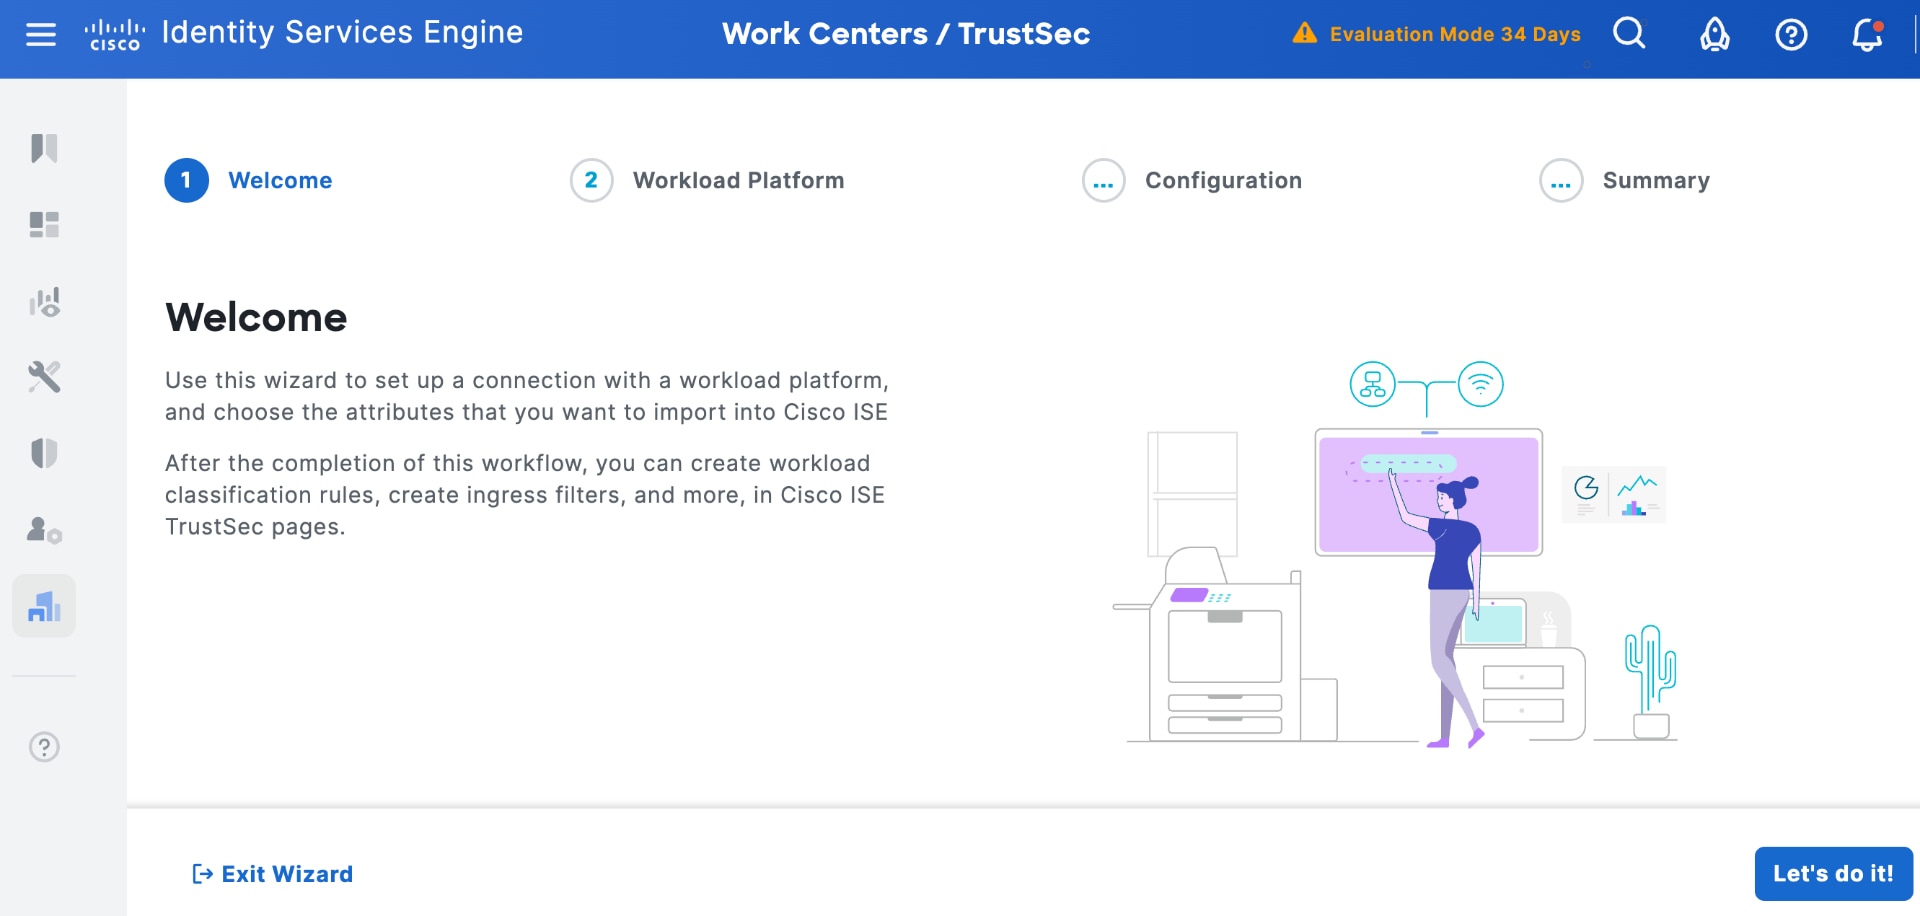
c. Select the ACI Workload Platform and click Next.
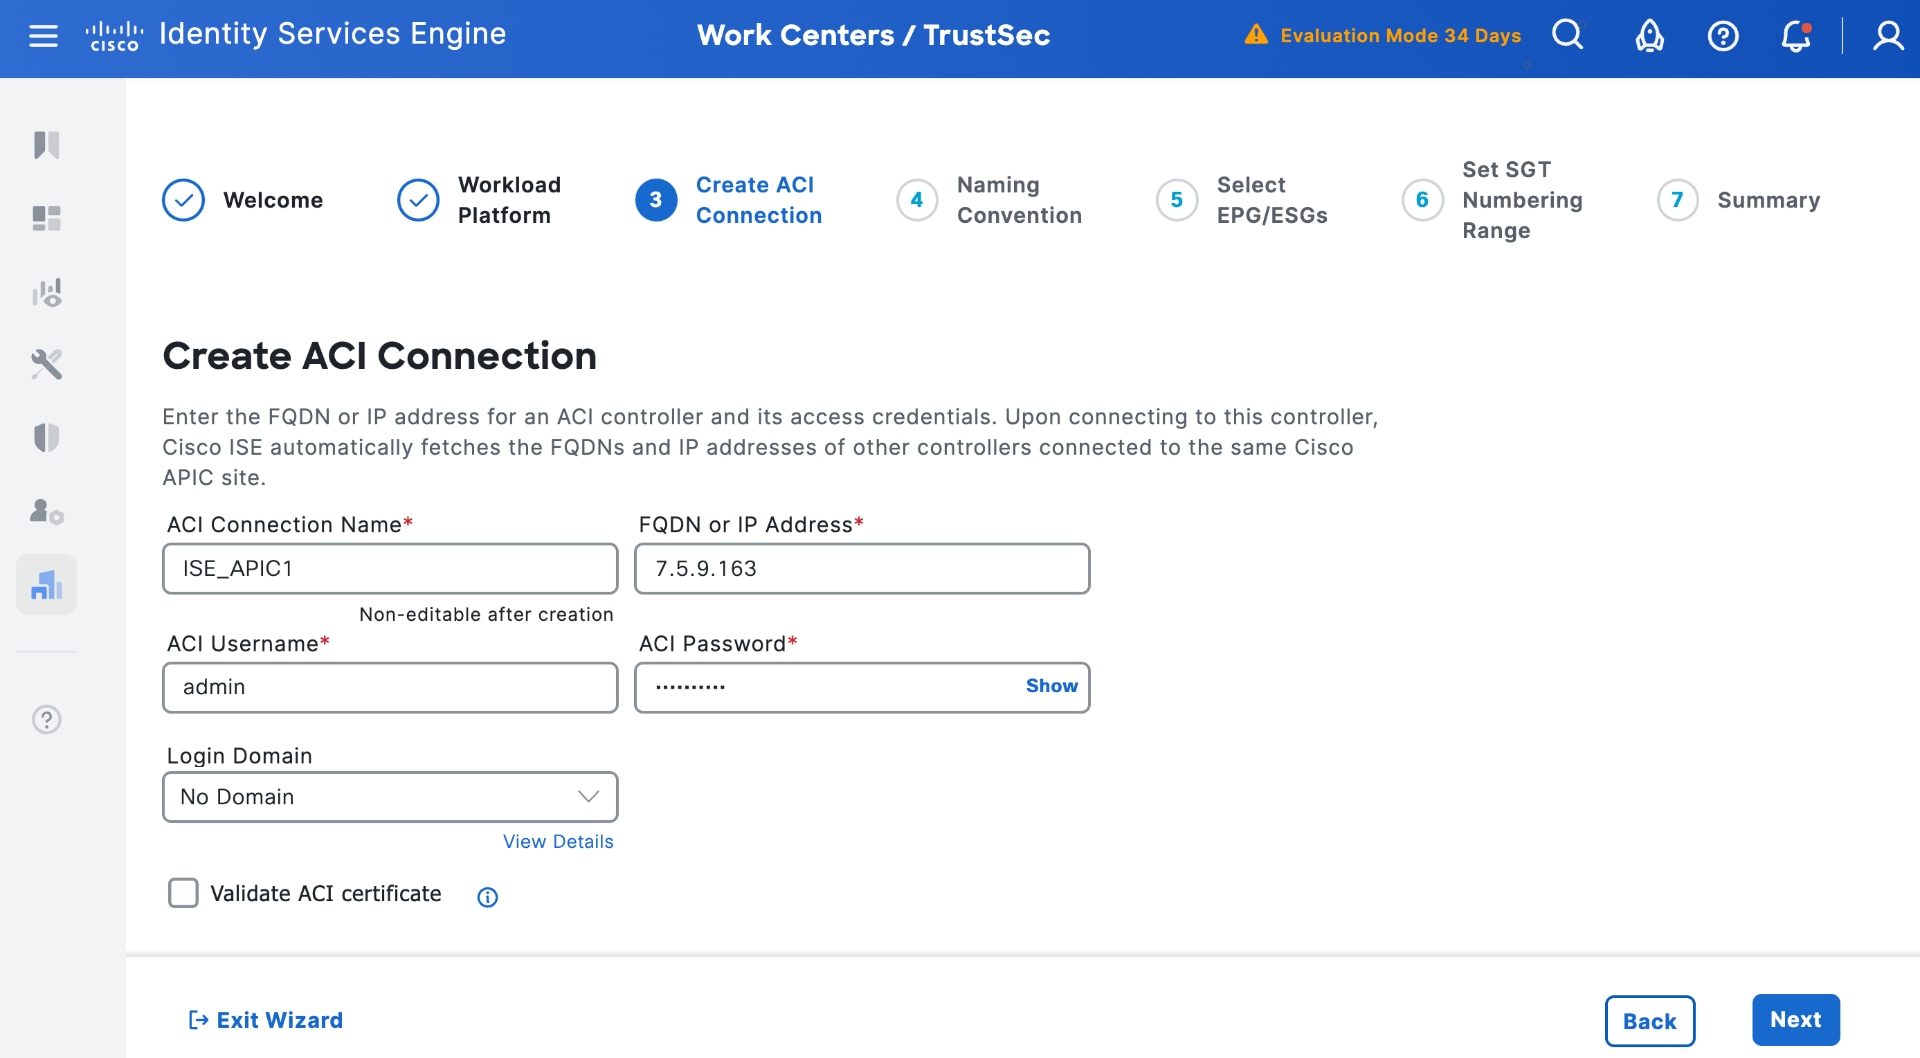
d. Create an ACI connection with the same APIC used for phase 1 integration (enter a login domain if used) and validate ACI certificate if using certificates. Select Next.
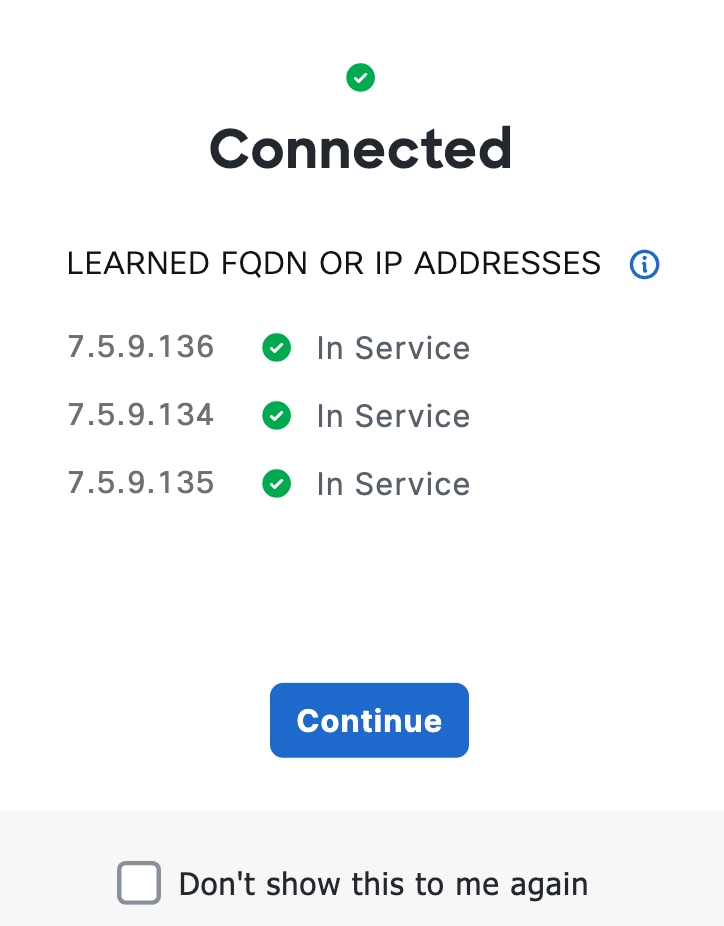
A pop-up displays the discovered APIC servers in the cluster. Click Continue.
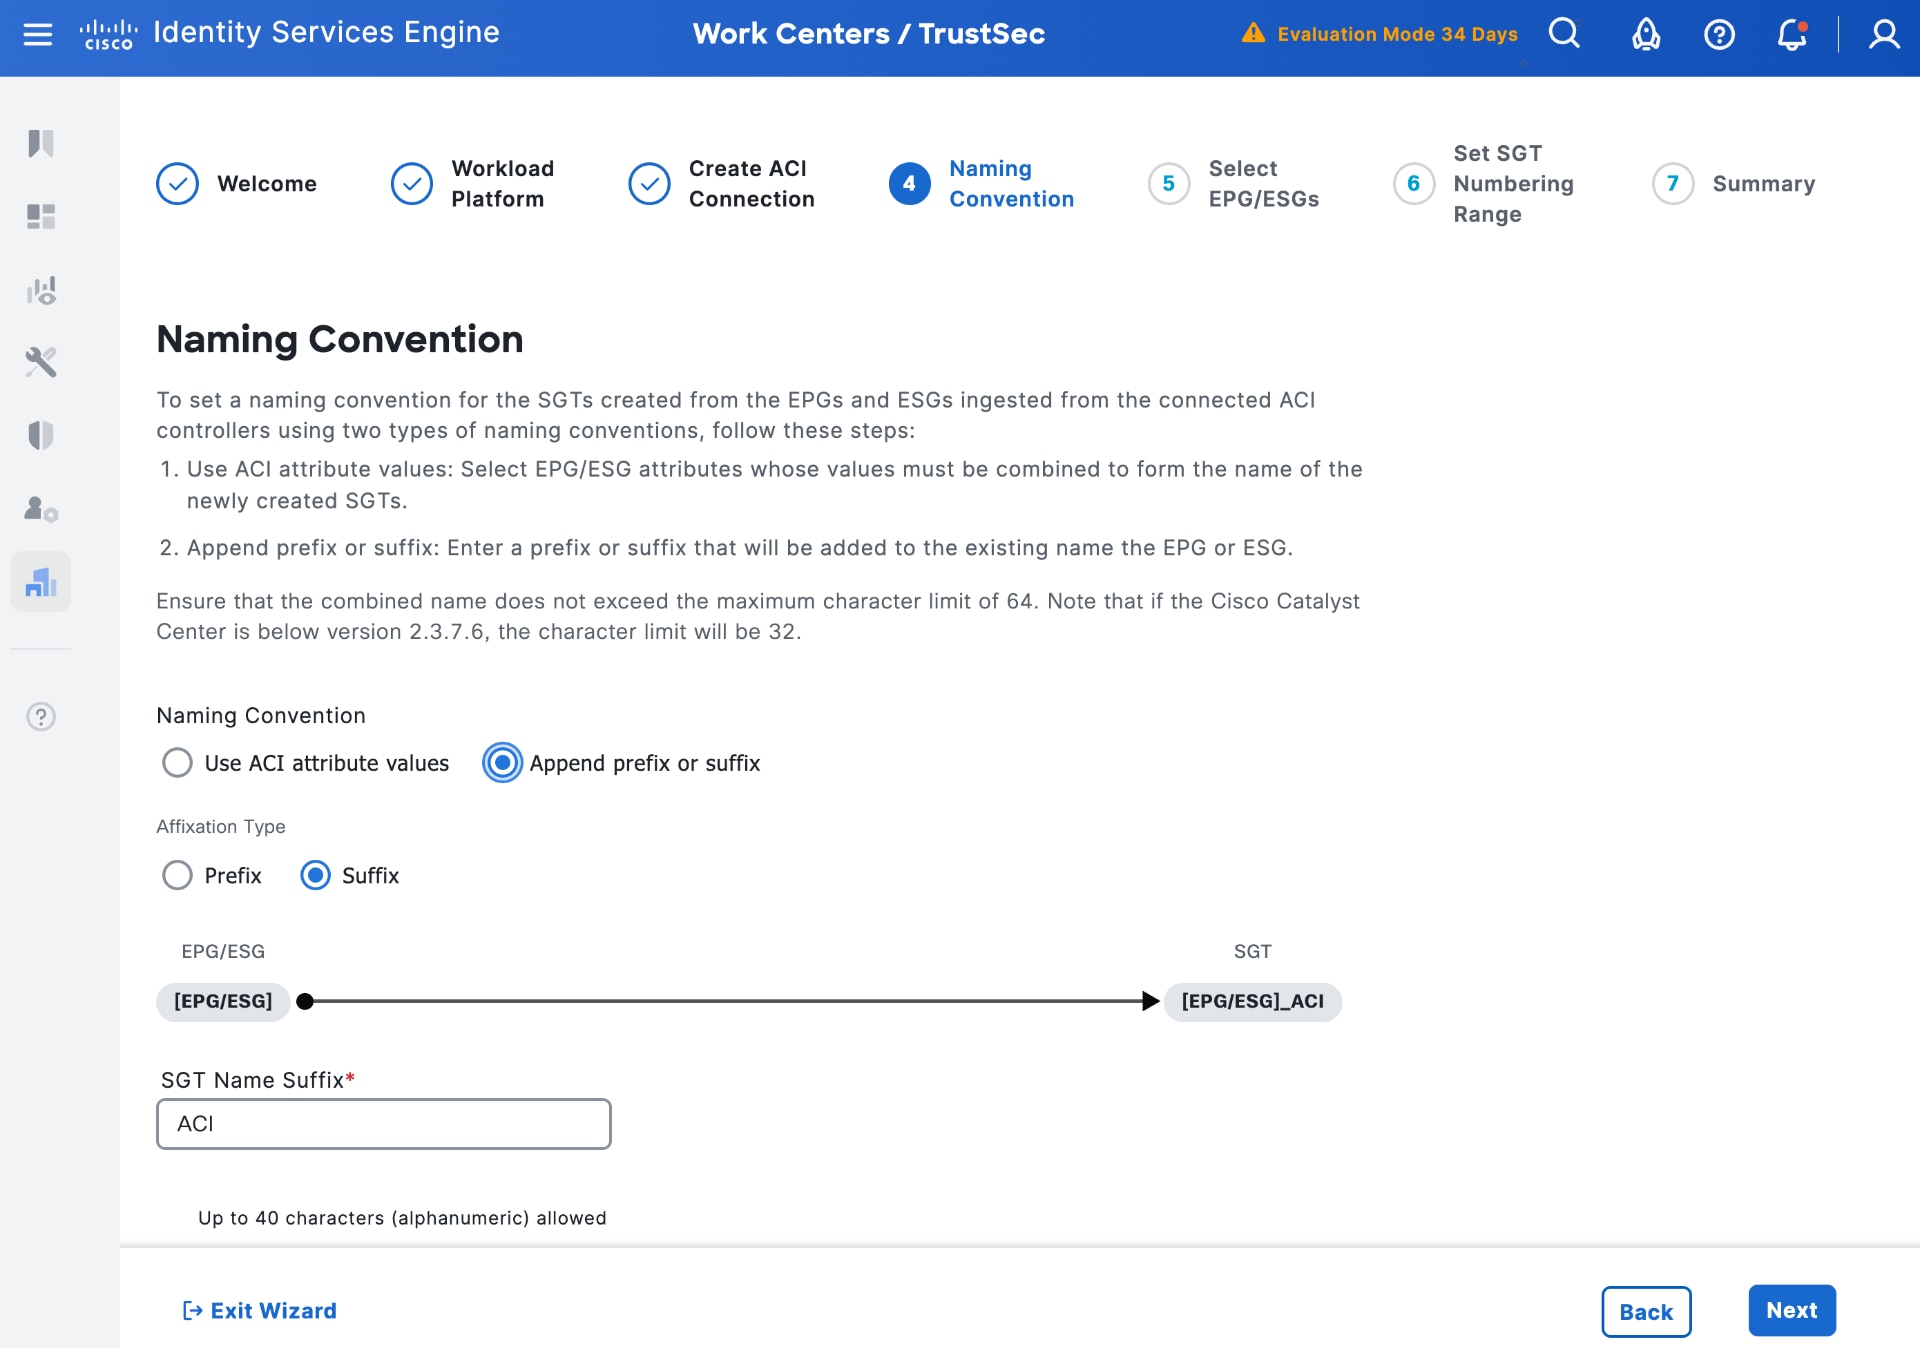
e. Use an appropriate naming convention for groups in ISE learned from ACI. You can select either prefix or suffix or use attributes learned from APIC.
f. Select Next to choose EPGs/ESGs to be learned by ISE.
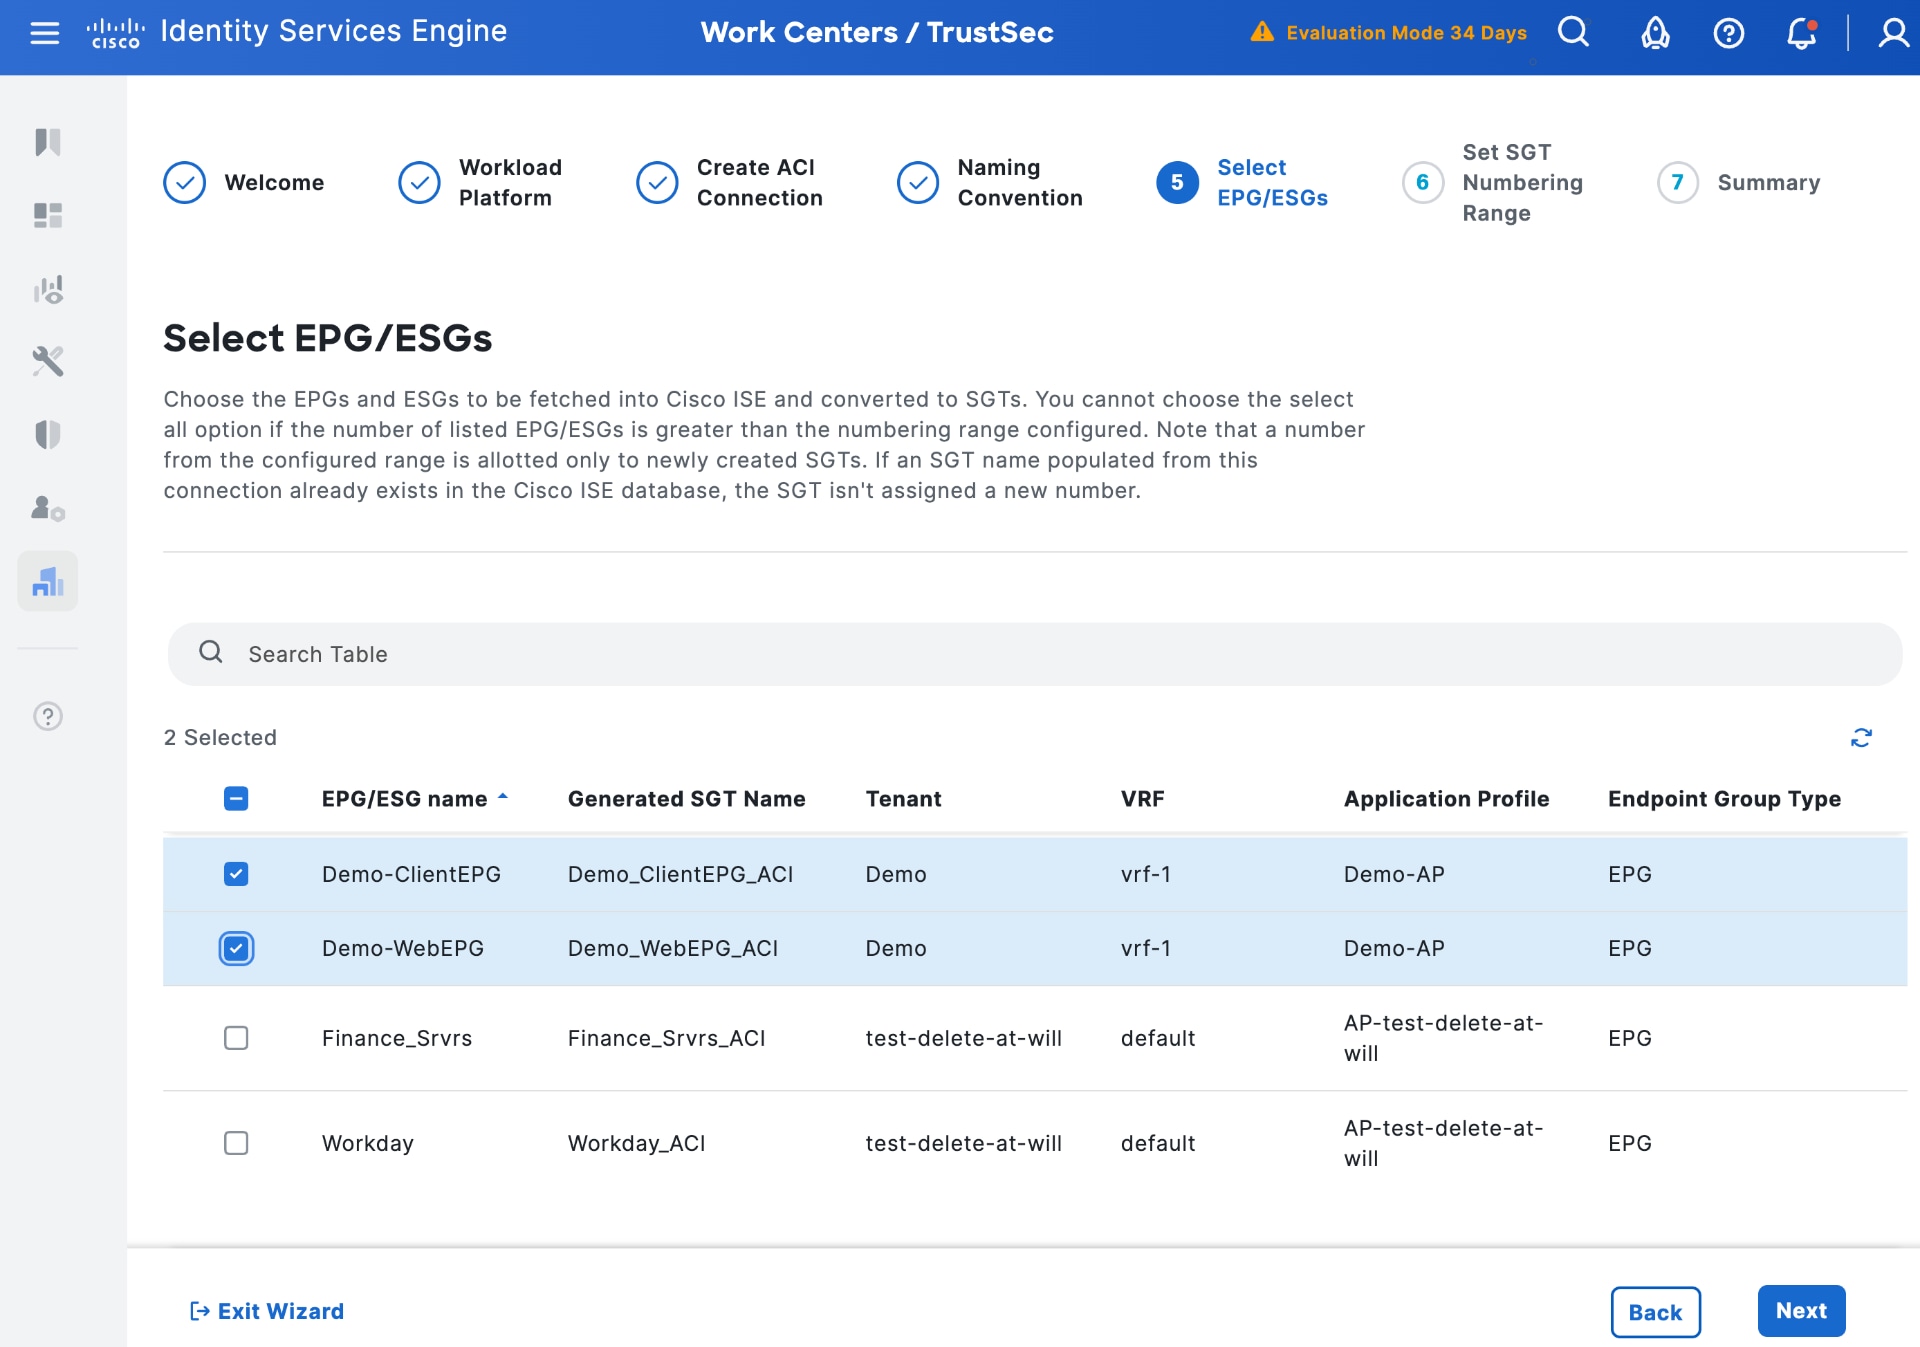
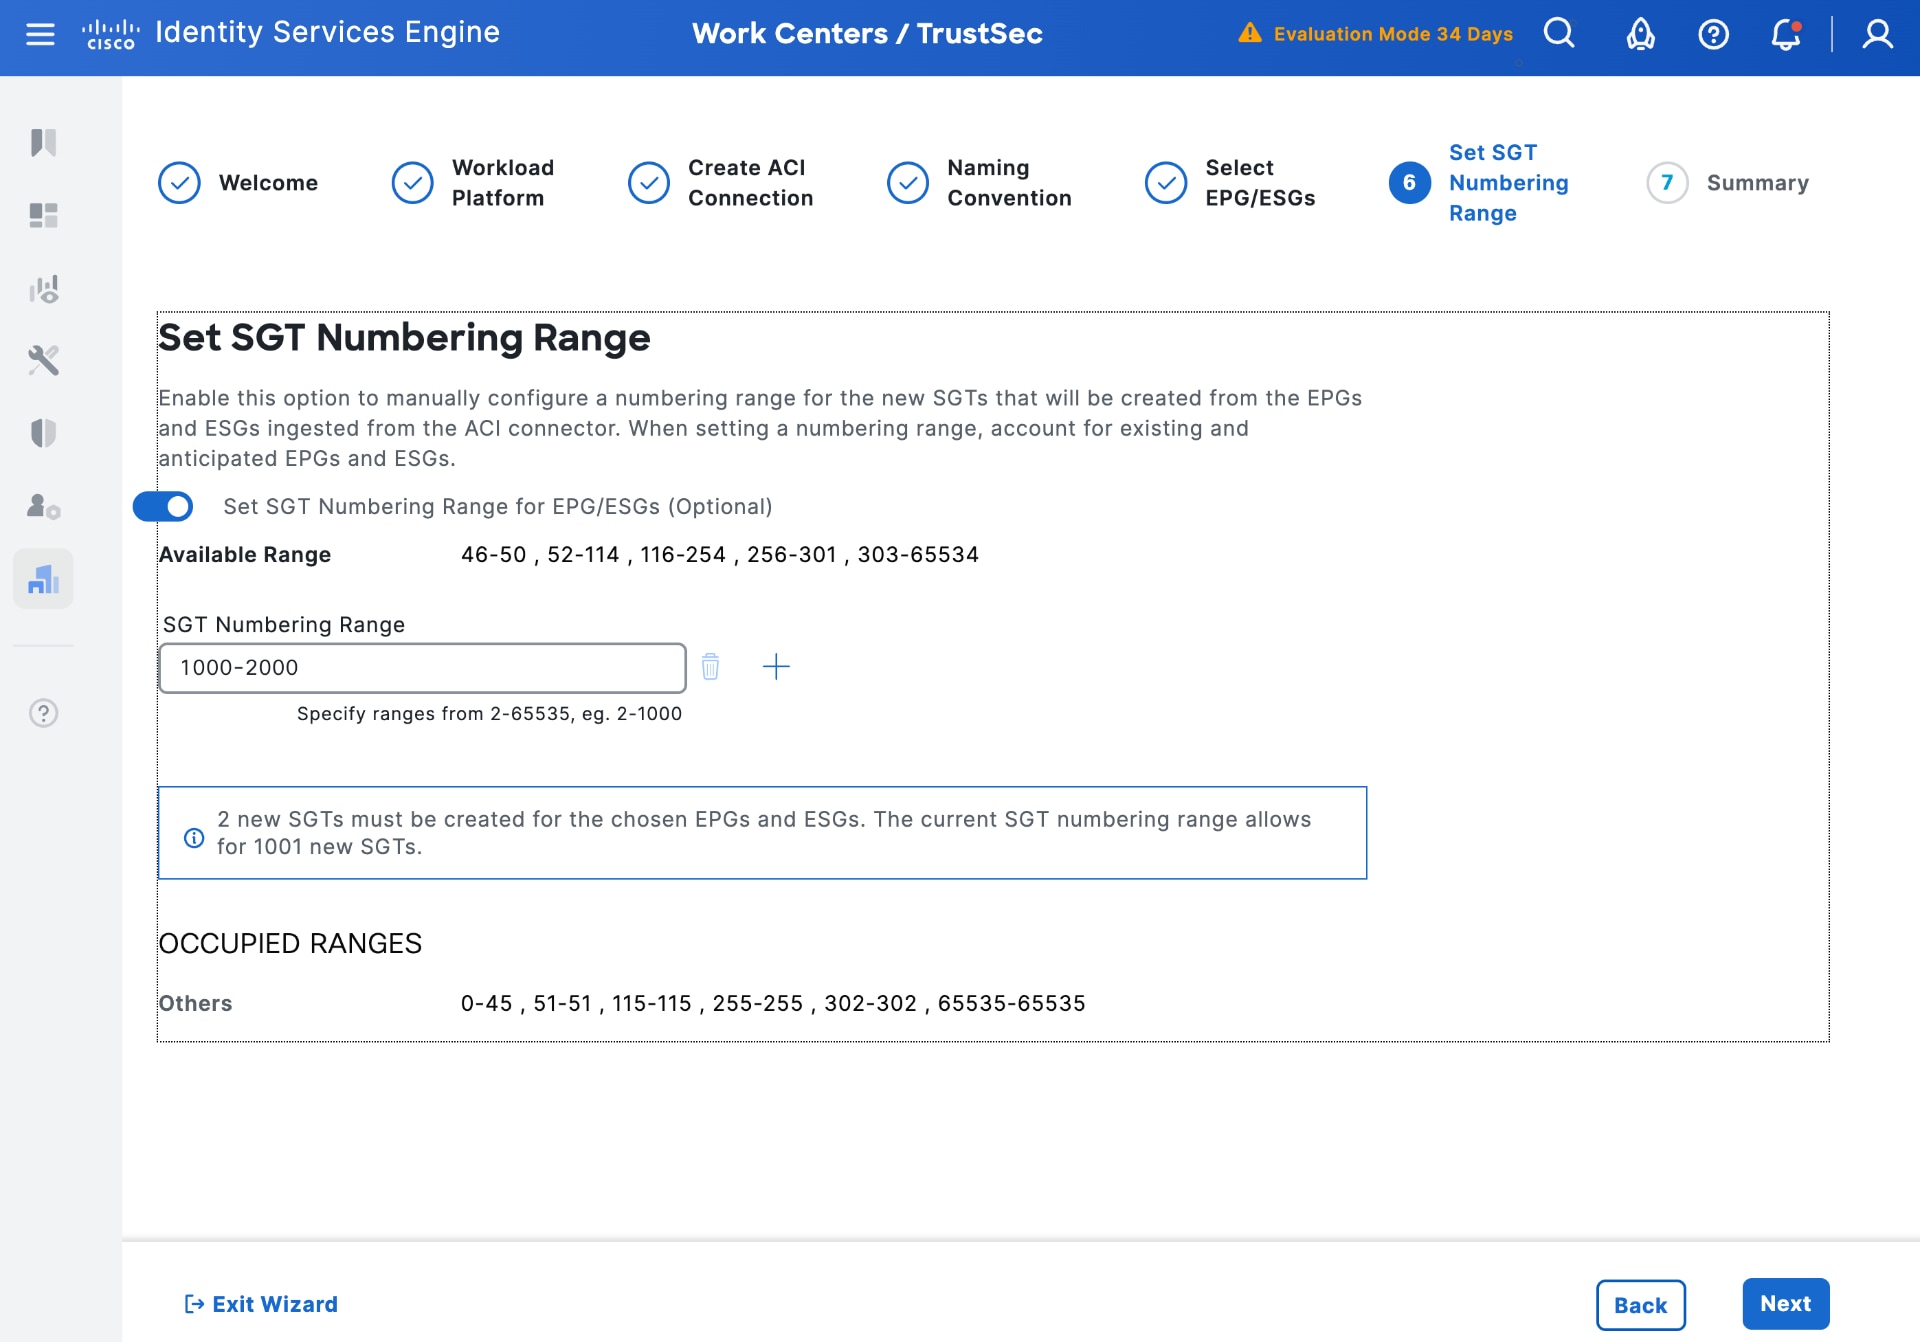
g. (Optional) Select Next to set the SGT numbering range for learned groups (next available is used otherwise).
h. Select Next to review the summary of the settings and then create the outbound SGT rule. A pop-up is displayed indicating the connection is created.
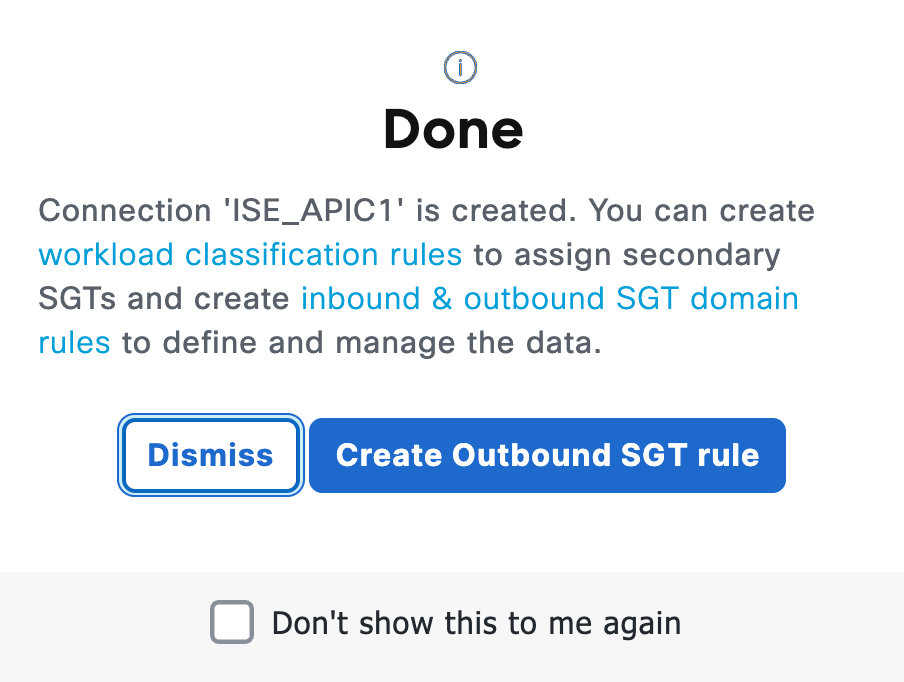
i. Select Dismiss. Verify ISE before sending groups to APIC. The Workload Connection popup is displayed as Connected.

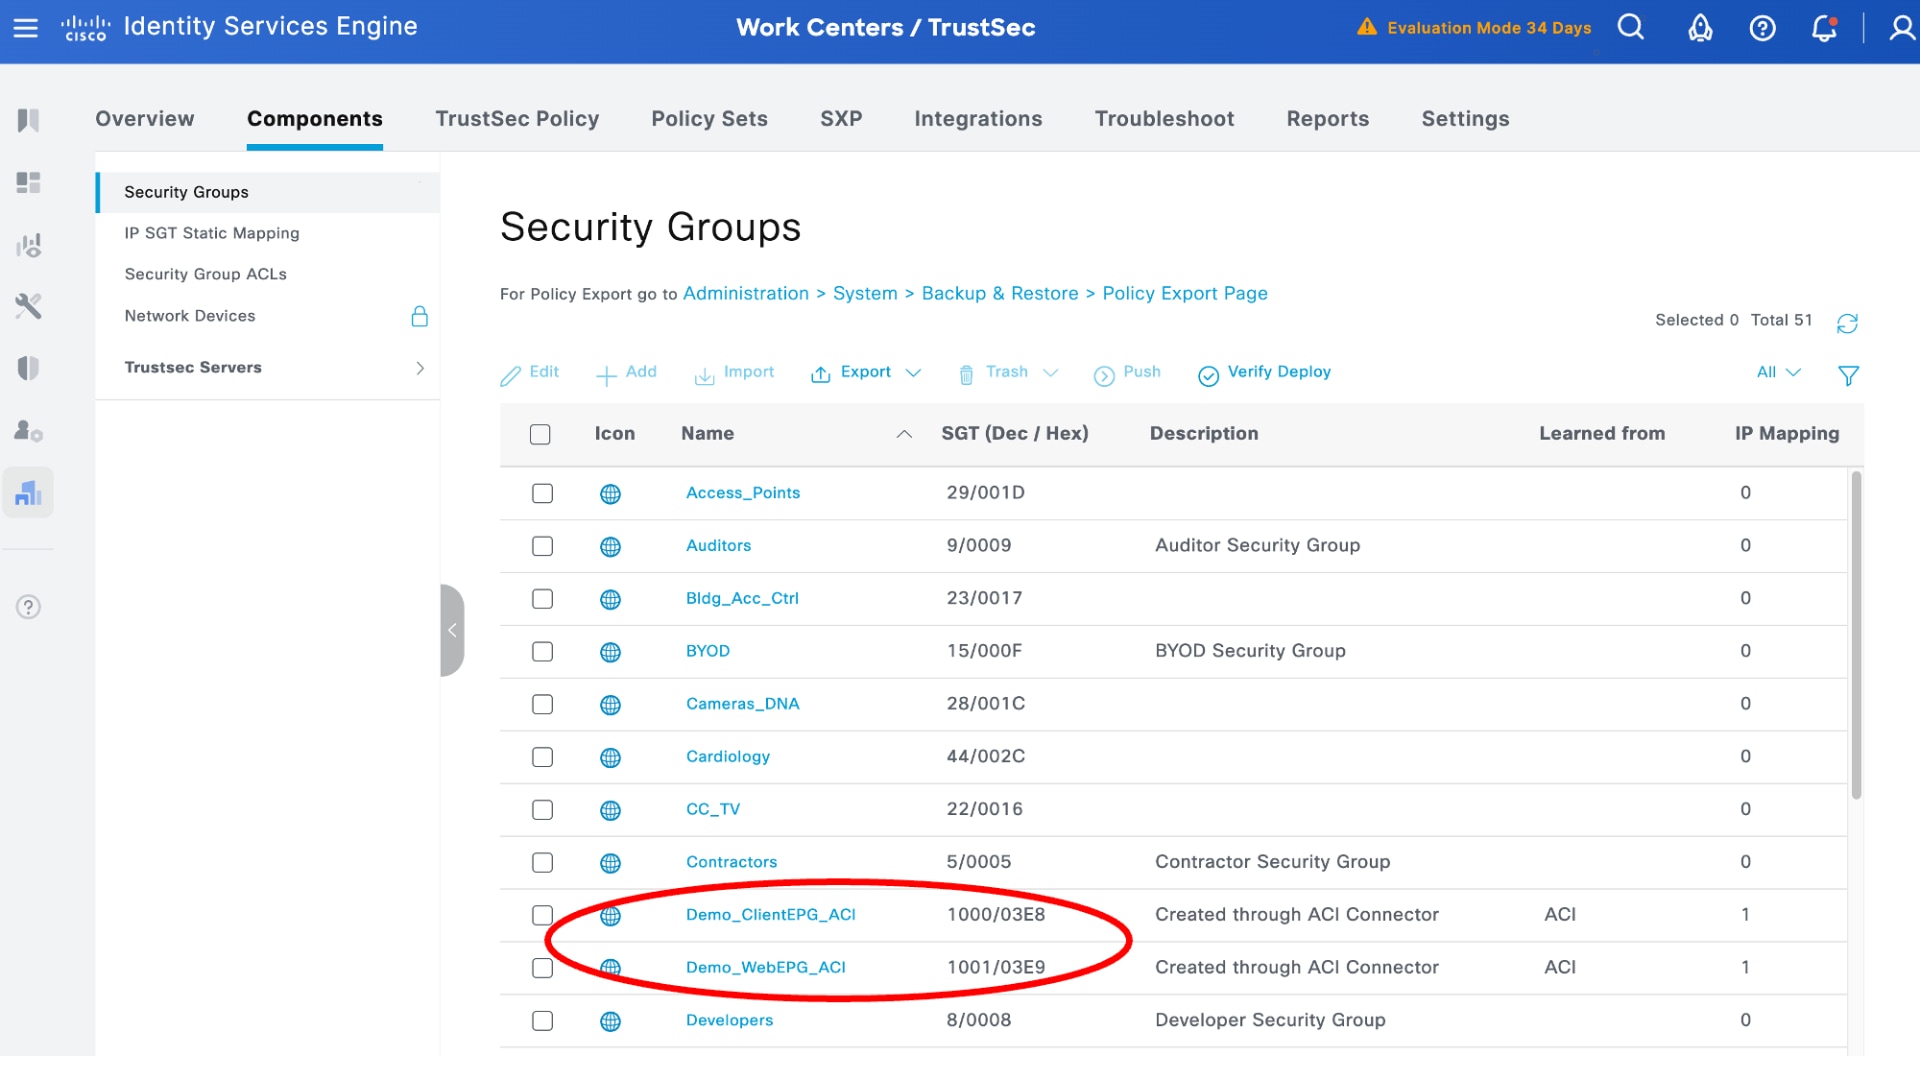
3. View ACI groups in Cisco ISE
You can view the selected ACI groups in Cisco ISE.
4. View IP bindings learned from APIC in ISE
Use the ISE SXP menu to view the SGT bindings. The result is the same as the phase 1 integration.
5. Configure security policies in ISE using groups learnt from APIC
You can configure security policies the same way as in phase 1. Under TrustSec Policy, add the same policies that you used previously in phase 1.
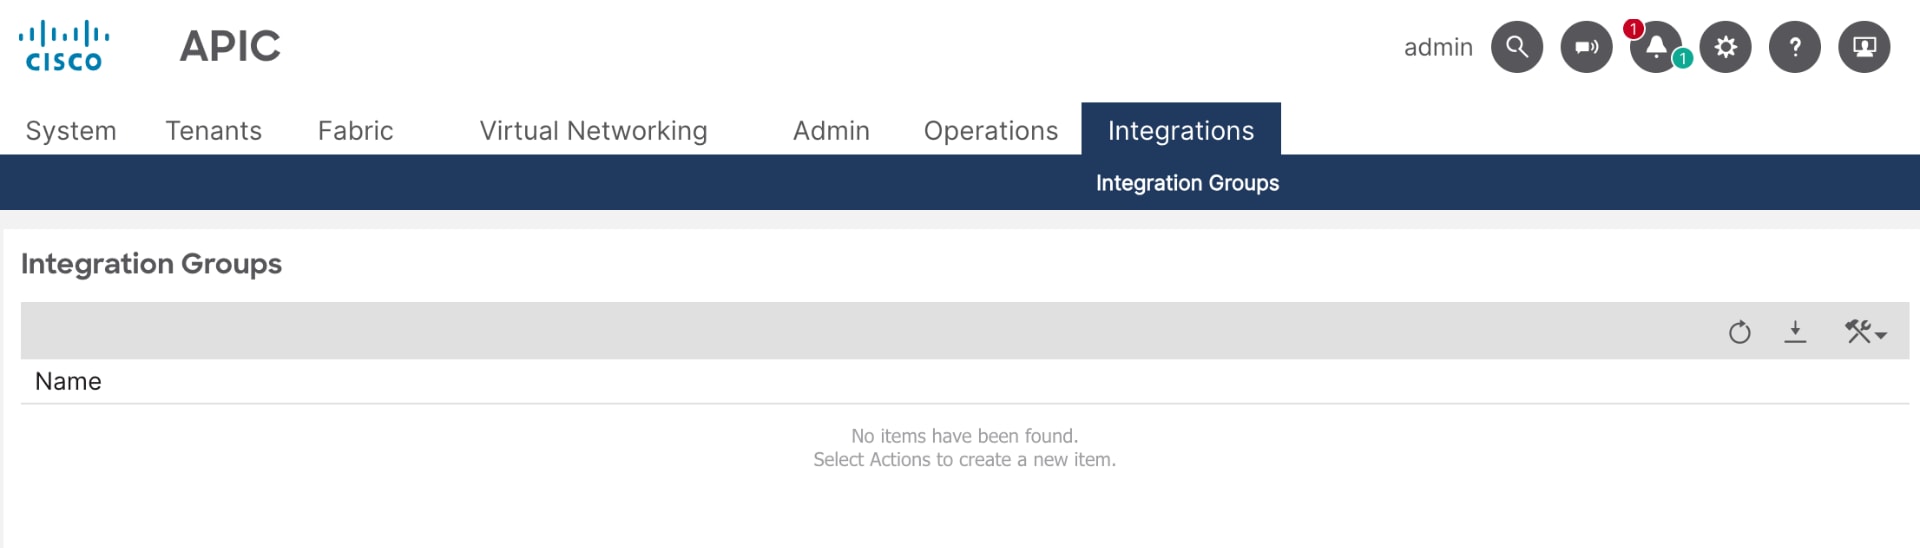
6. View APIC Integrations menu
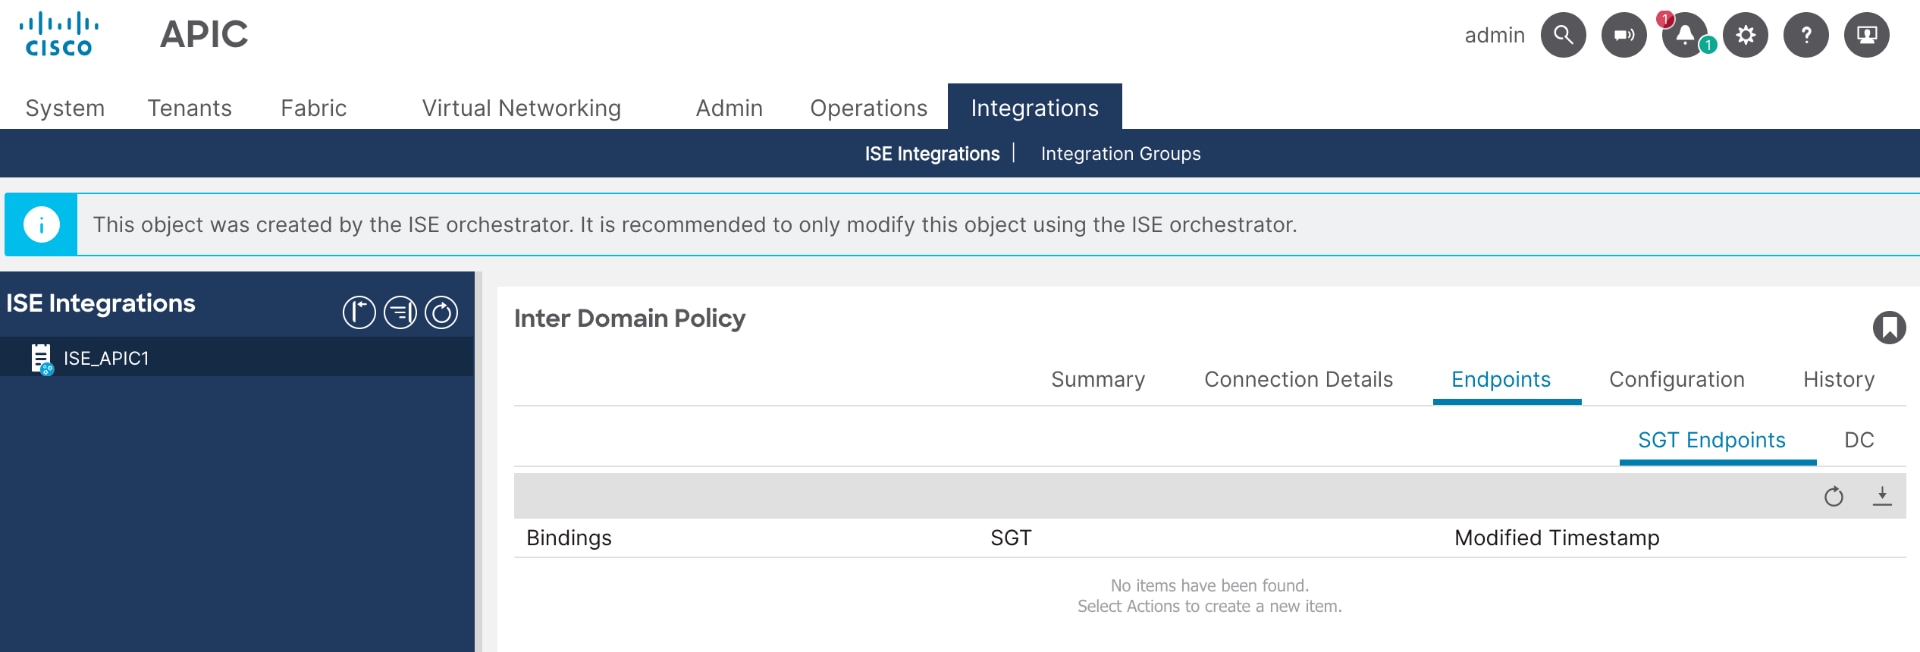
You can access the new Integrations menu in APIC, introduced with Common Policy integration. This menu displays the connection from ISE and shows the connection details.
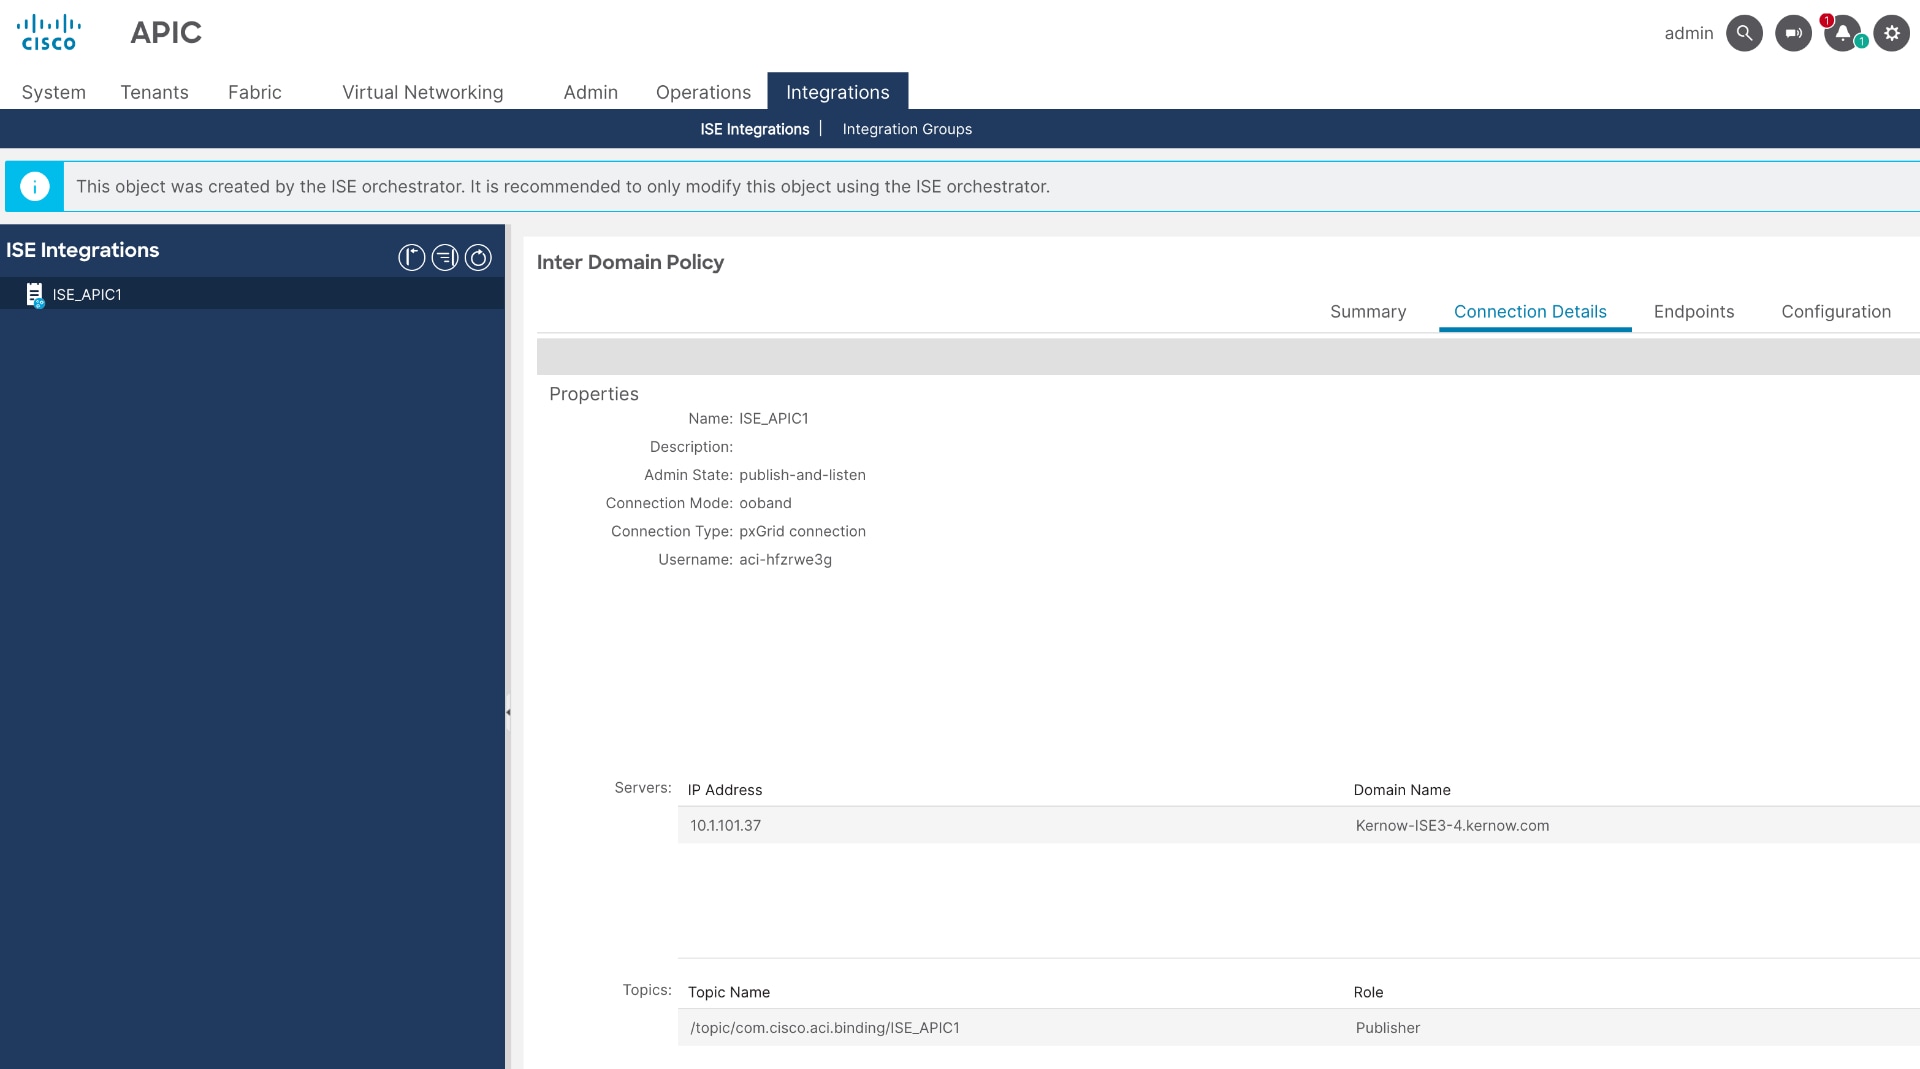
Note: There are no SGT endpoints learned from ISE yet because groups are shared explicitly through SXP rules.
7. Use outbound rules in ISE to share SGTs with APIC
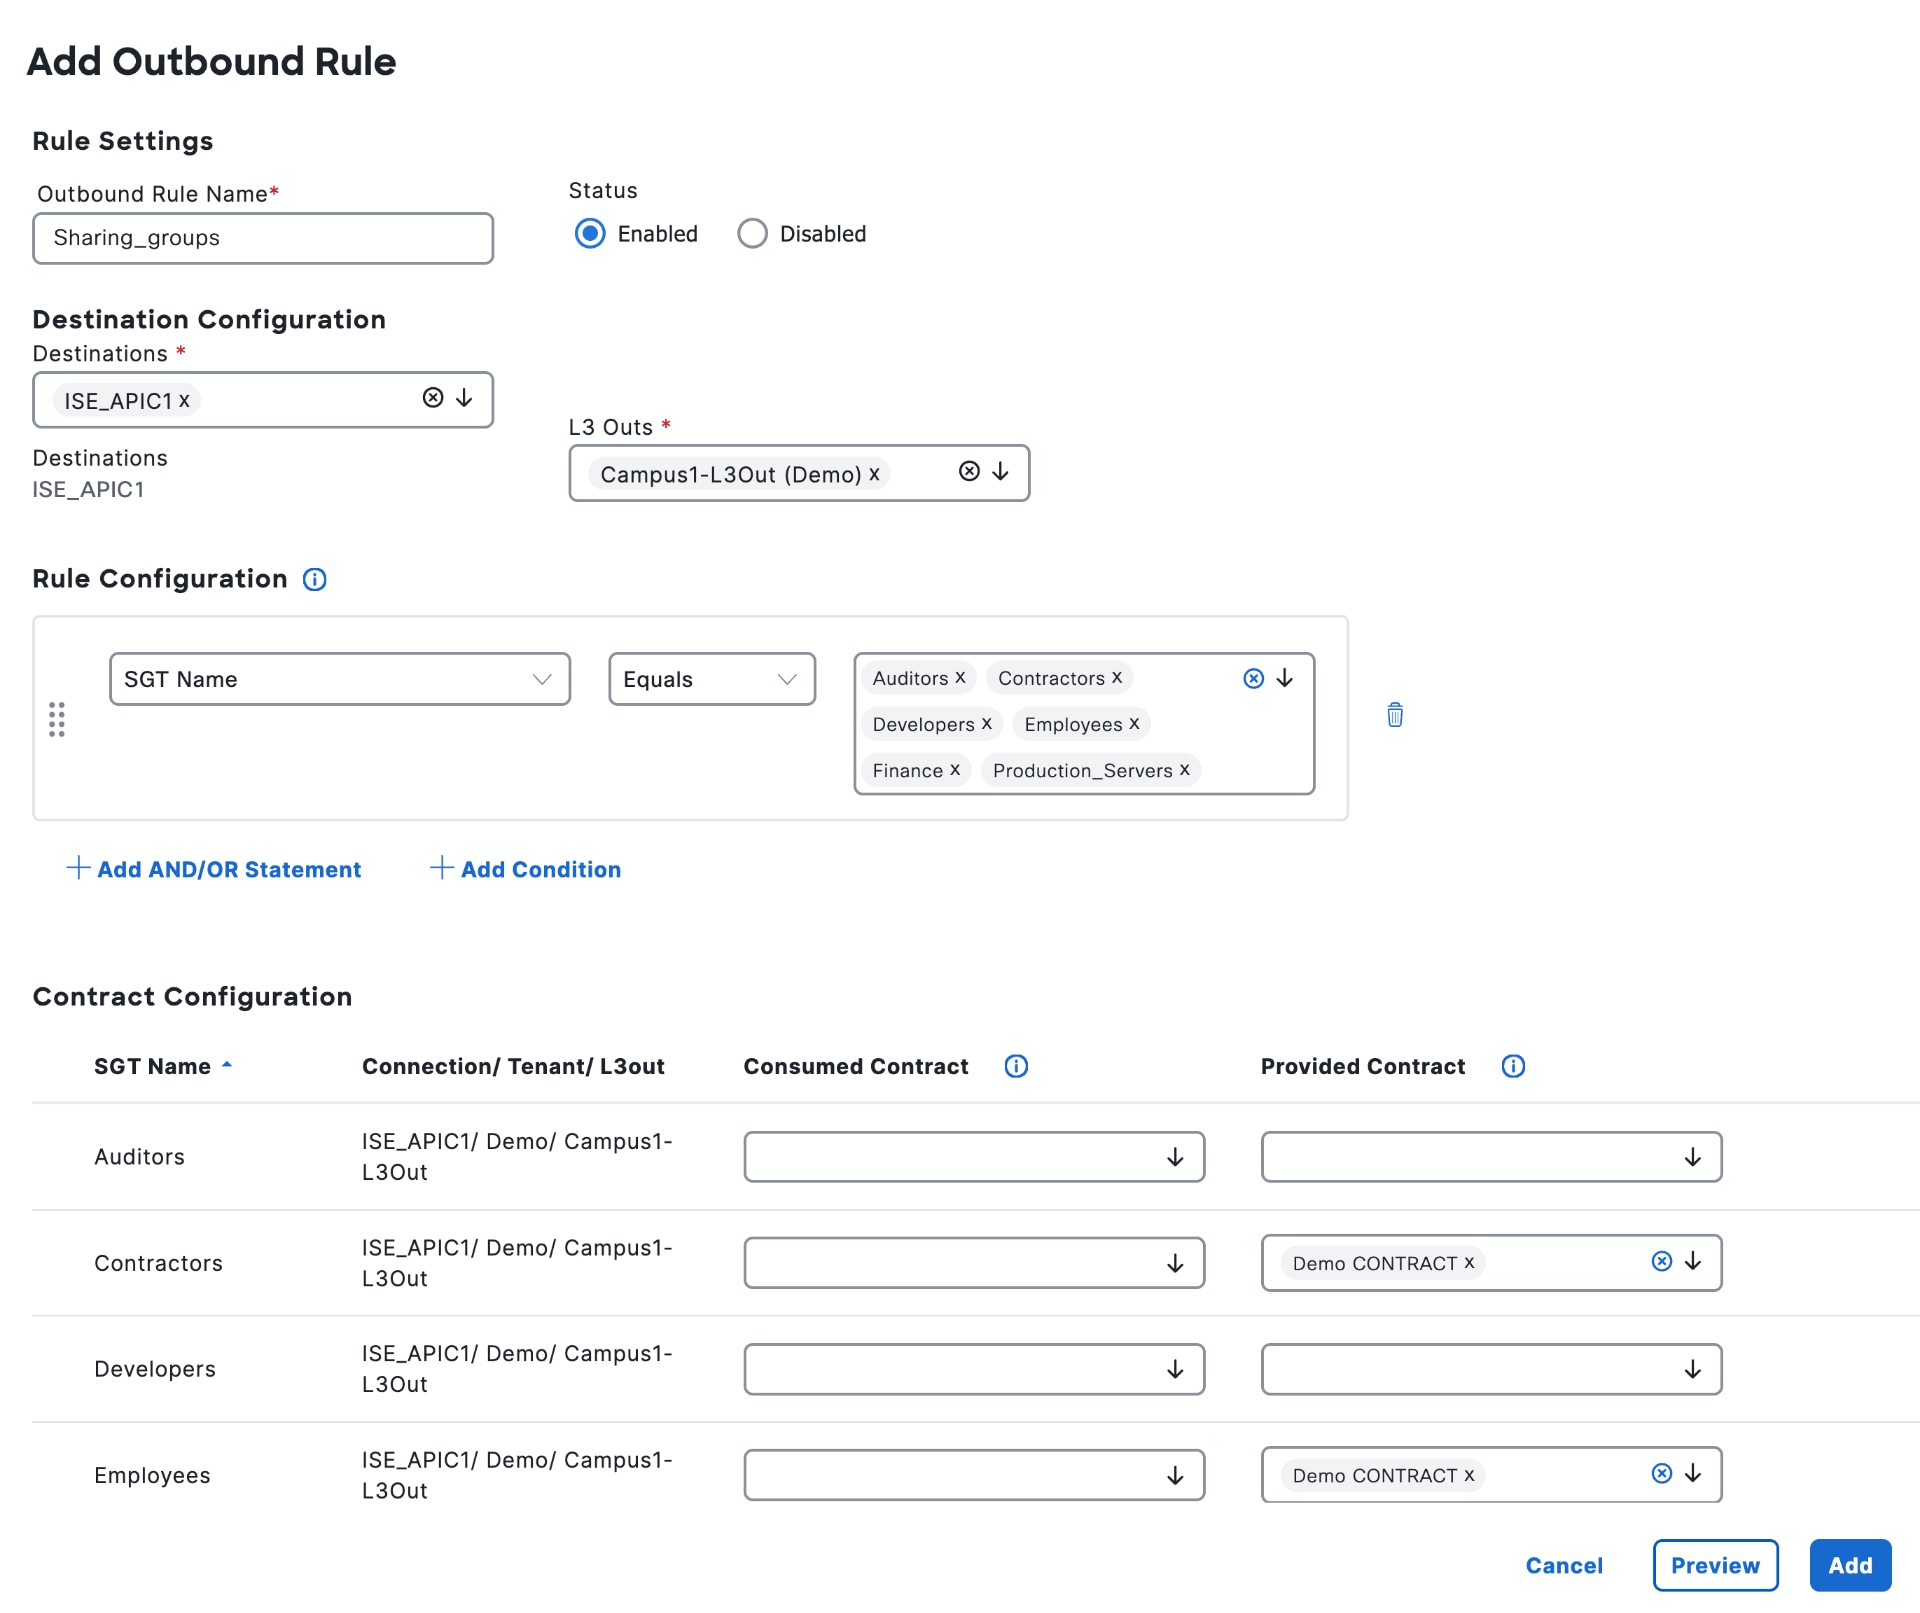
a. In ISE, navigate to Work Centers > TrustSec > SXP > Inbound & Outbound SGT Domain Rules > Outbound SGT Domain Rules.
b. Add an Outbound Rule, provide a name, select the APIC connection and the relevant L3Out, and then use the rules to share the required groups with ACI.
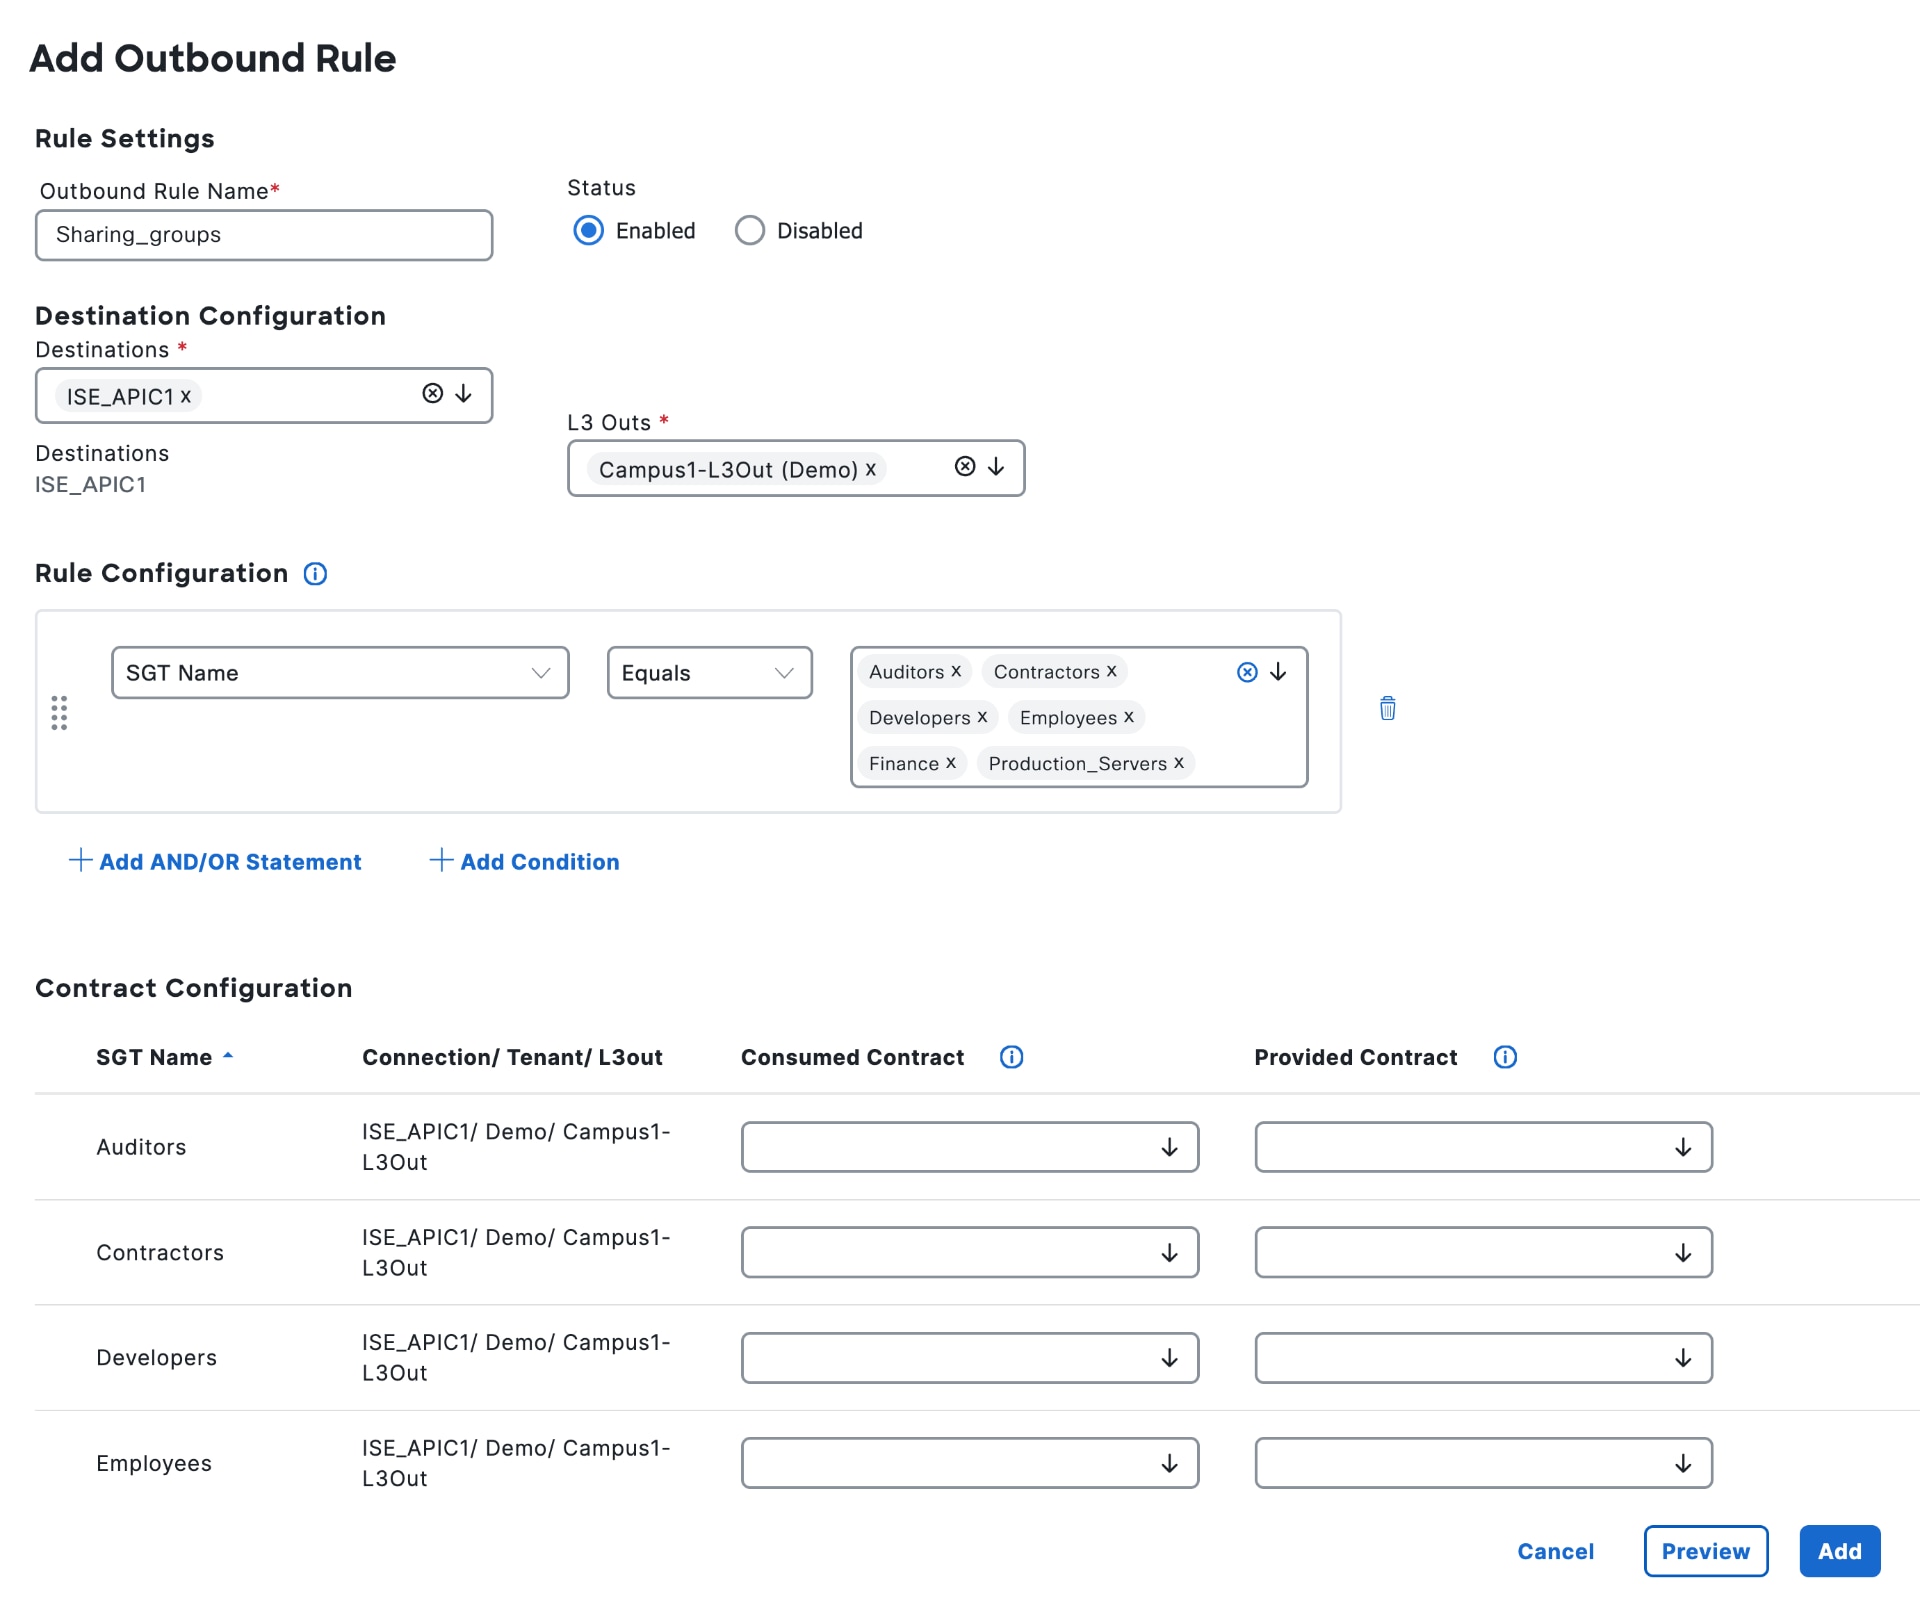
c. For each SGT you share, you can select a contract to automatically create the consumed and provided contract legs, allowing traffic to flow without needing to navigate to APIC. This setup mirrors the approach used in phase 1.
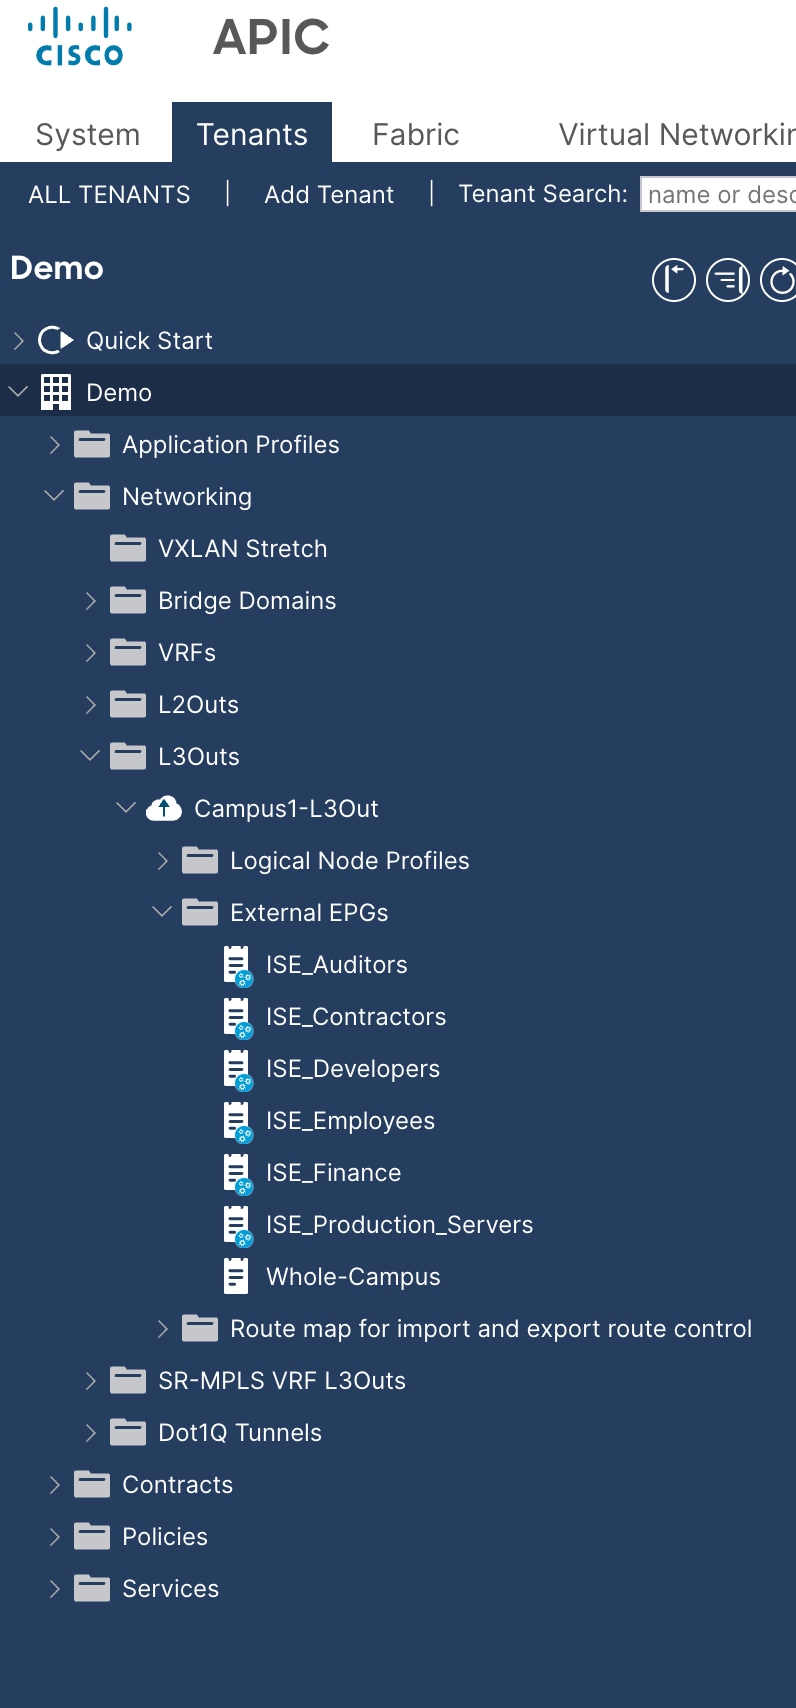
d. Select Add and Save. On APIC, you can view the External EPGs displayed as groups learned from ISE.
8. View IP bindings in APIC learned from ISE
The Integrations menu shows the bindings shared from ISE.
9. Set Up security policy on APIC using groups learned from ISE
APIC automatically builds the contract topology when you add the outbound rule in ISE. This topology matches the one used in phase 1.
Summary
With the introduction of Common Policy, the Phase 1 ISE-to-APIC integration is now considered obsolete. Although there are no current plans to remove support for Phase 1, and it remains configurable and operational with the latest software releases, any new deployments should use the newer integration methodology.
If you still using Phase 1 integration, we encourage you to plan a migration to Common Policy to take advantage of its enhanced capabilities.
ACI Integration Phase 1 Configuration Workflow
To remove the Phase 1 ACI integration from Cisco ISE, complete these steps.
1. Select ISE SGT groups to share with APIC
a. Log into Cisco ISE.
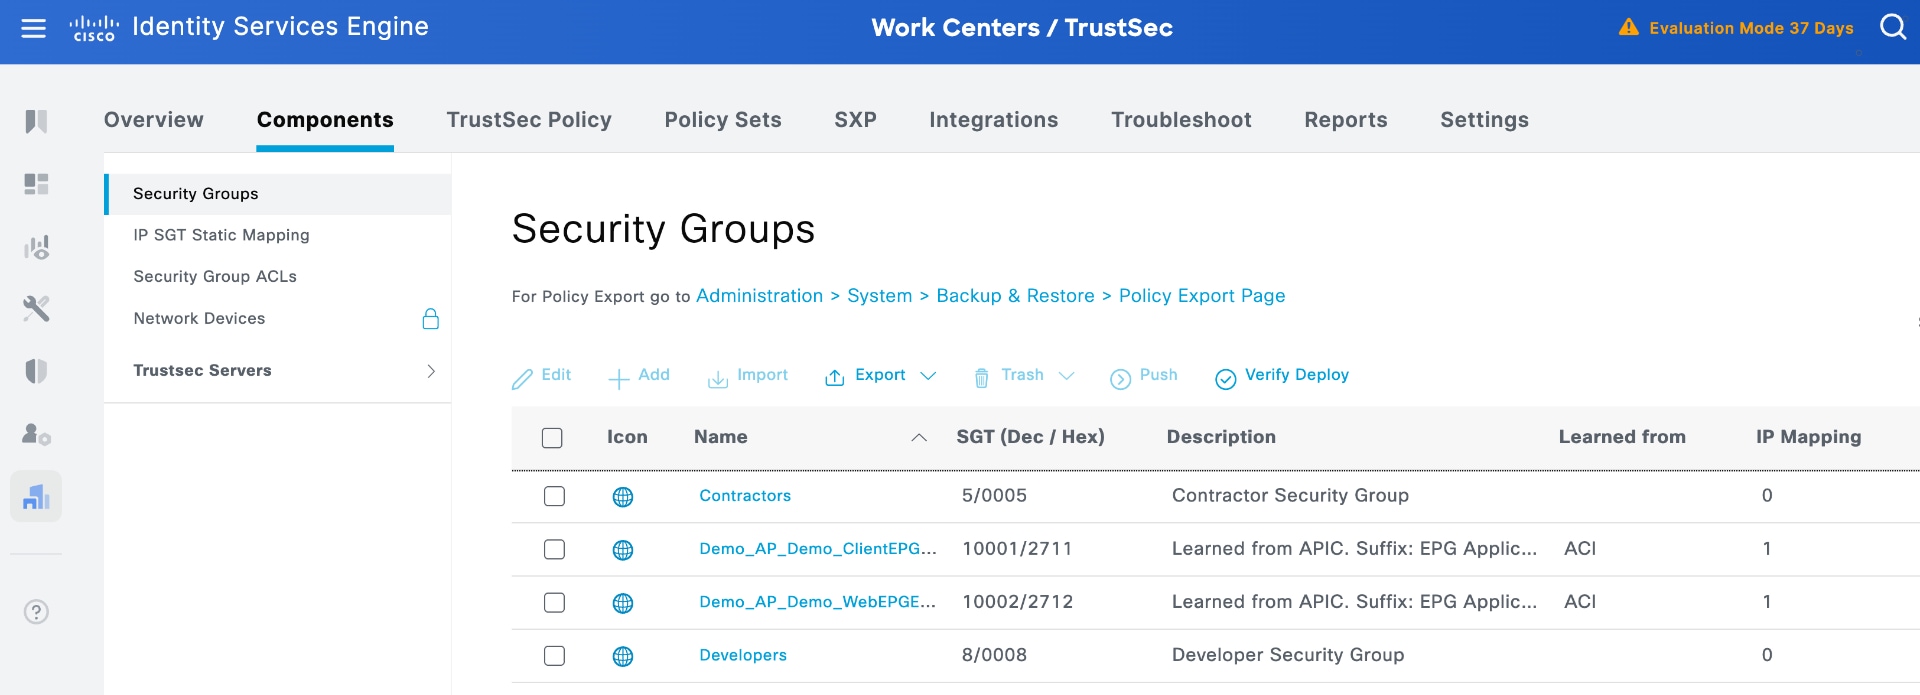
b. Navigate to Work Centers > TrustSec > Components > Security Groups and select a specific group to view the option to propagate that group in ACI.
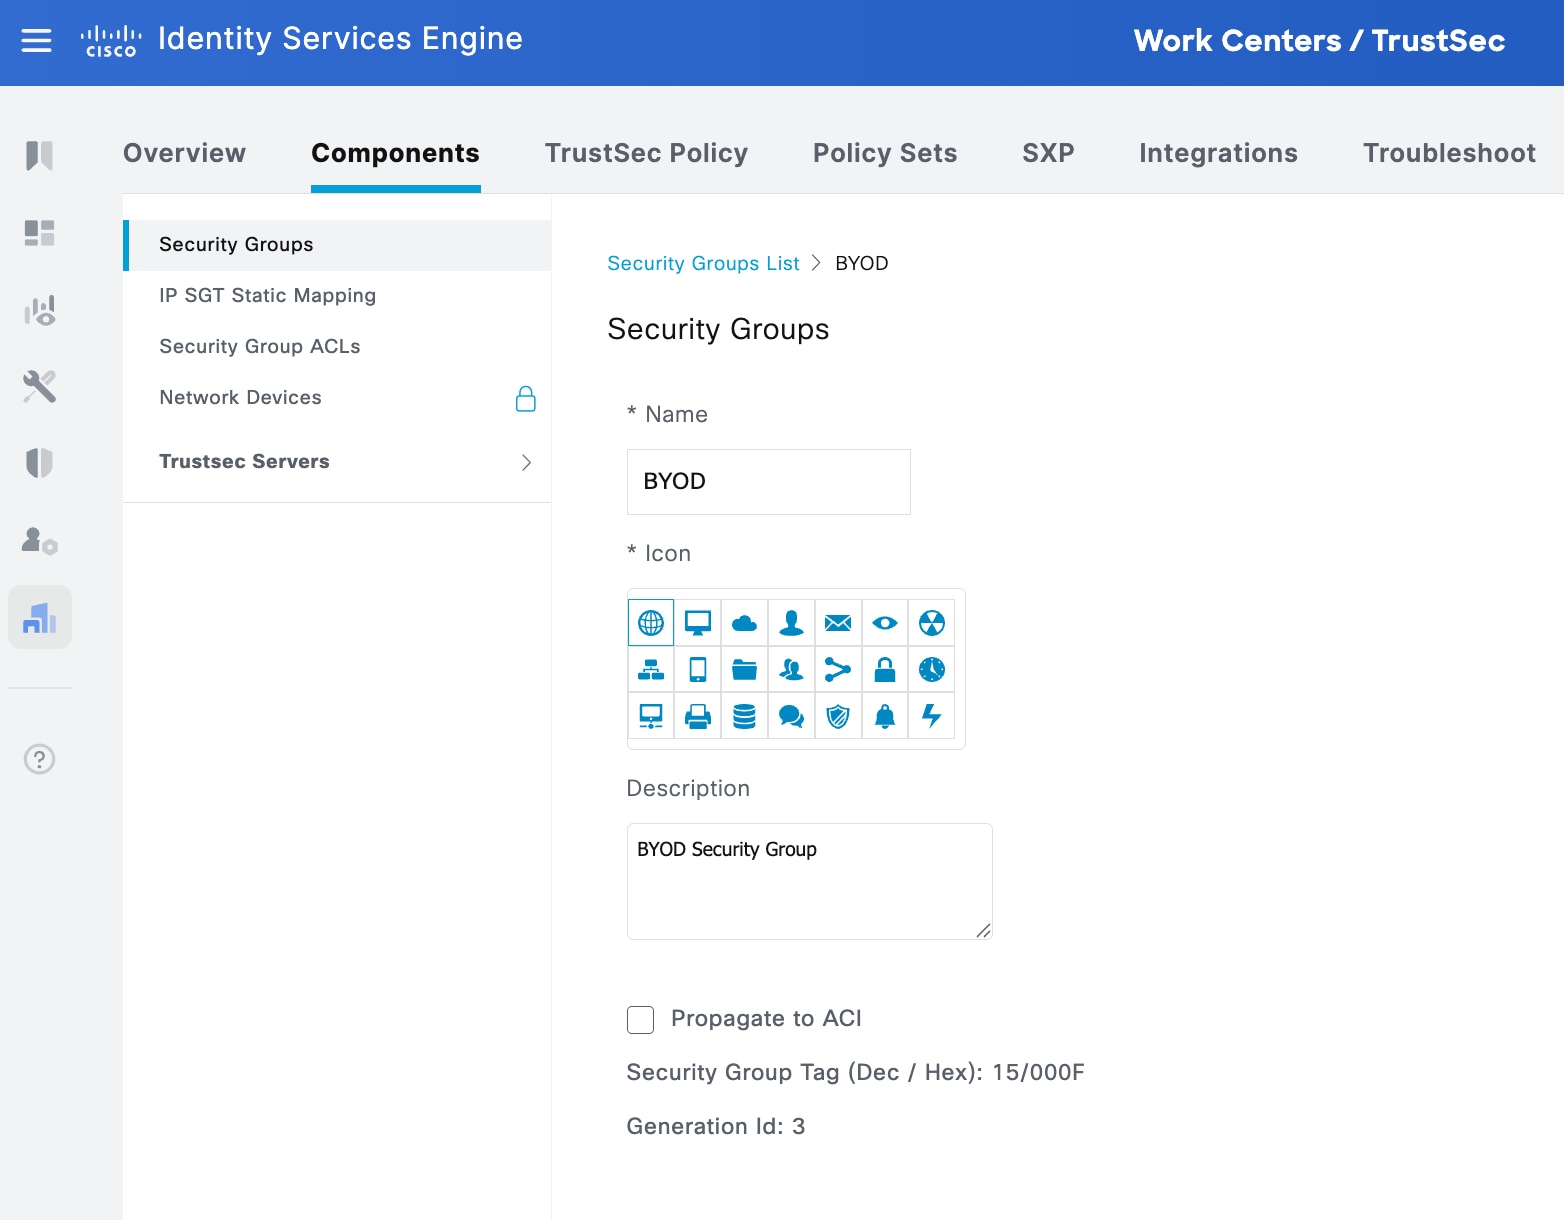
c. Check Propagate to ACI to share this group with ACI.
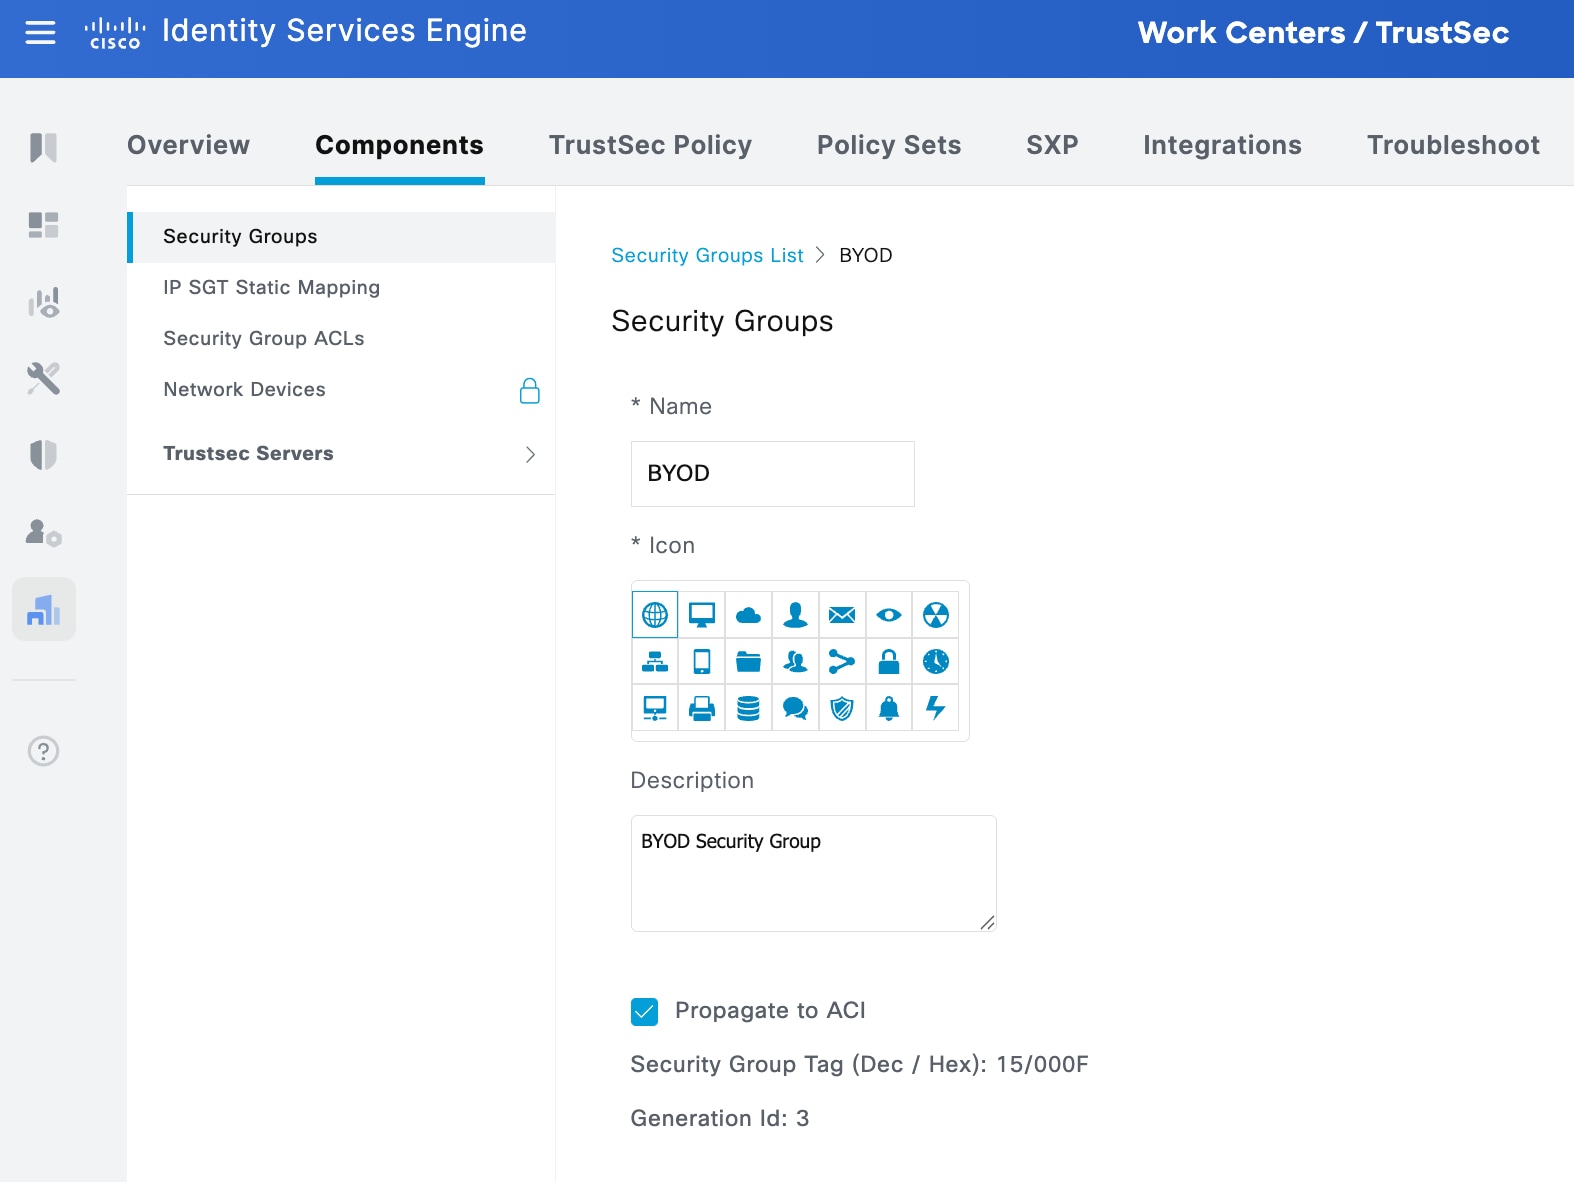
d. Repeat the steps above for selecting all the groups you wish to share with ACI.
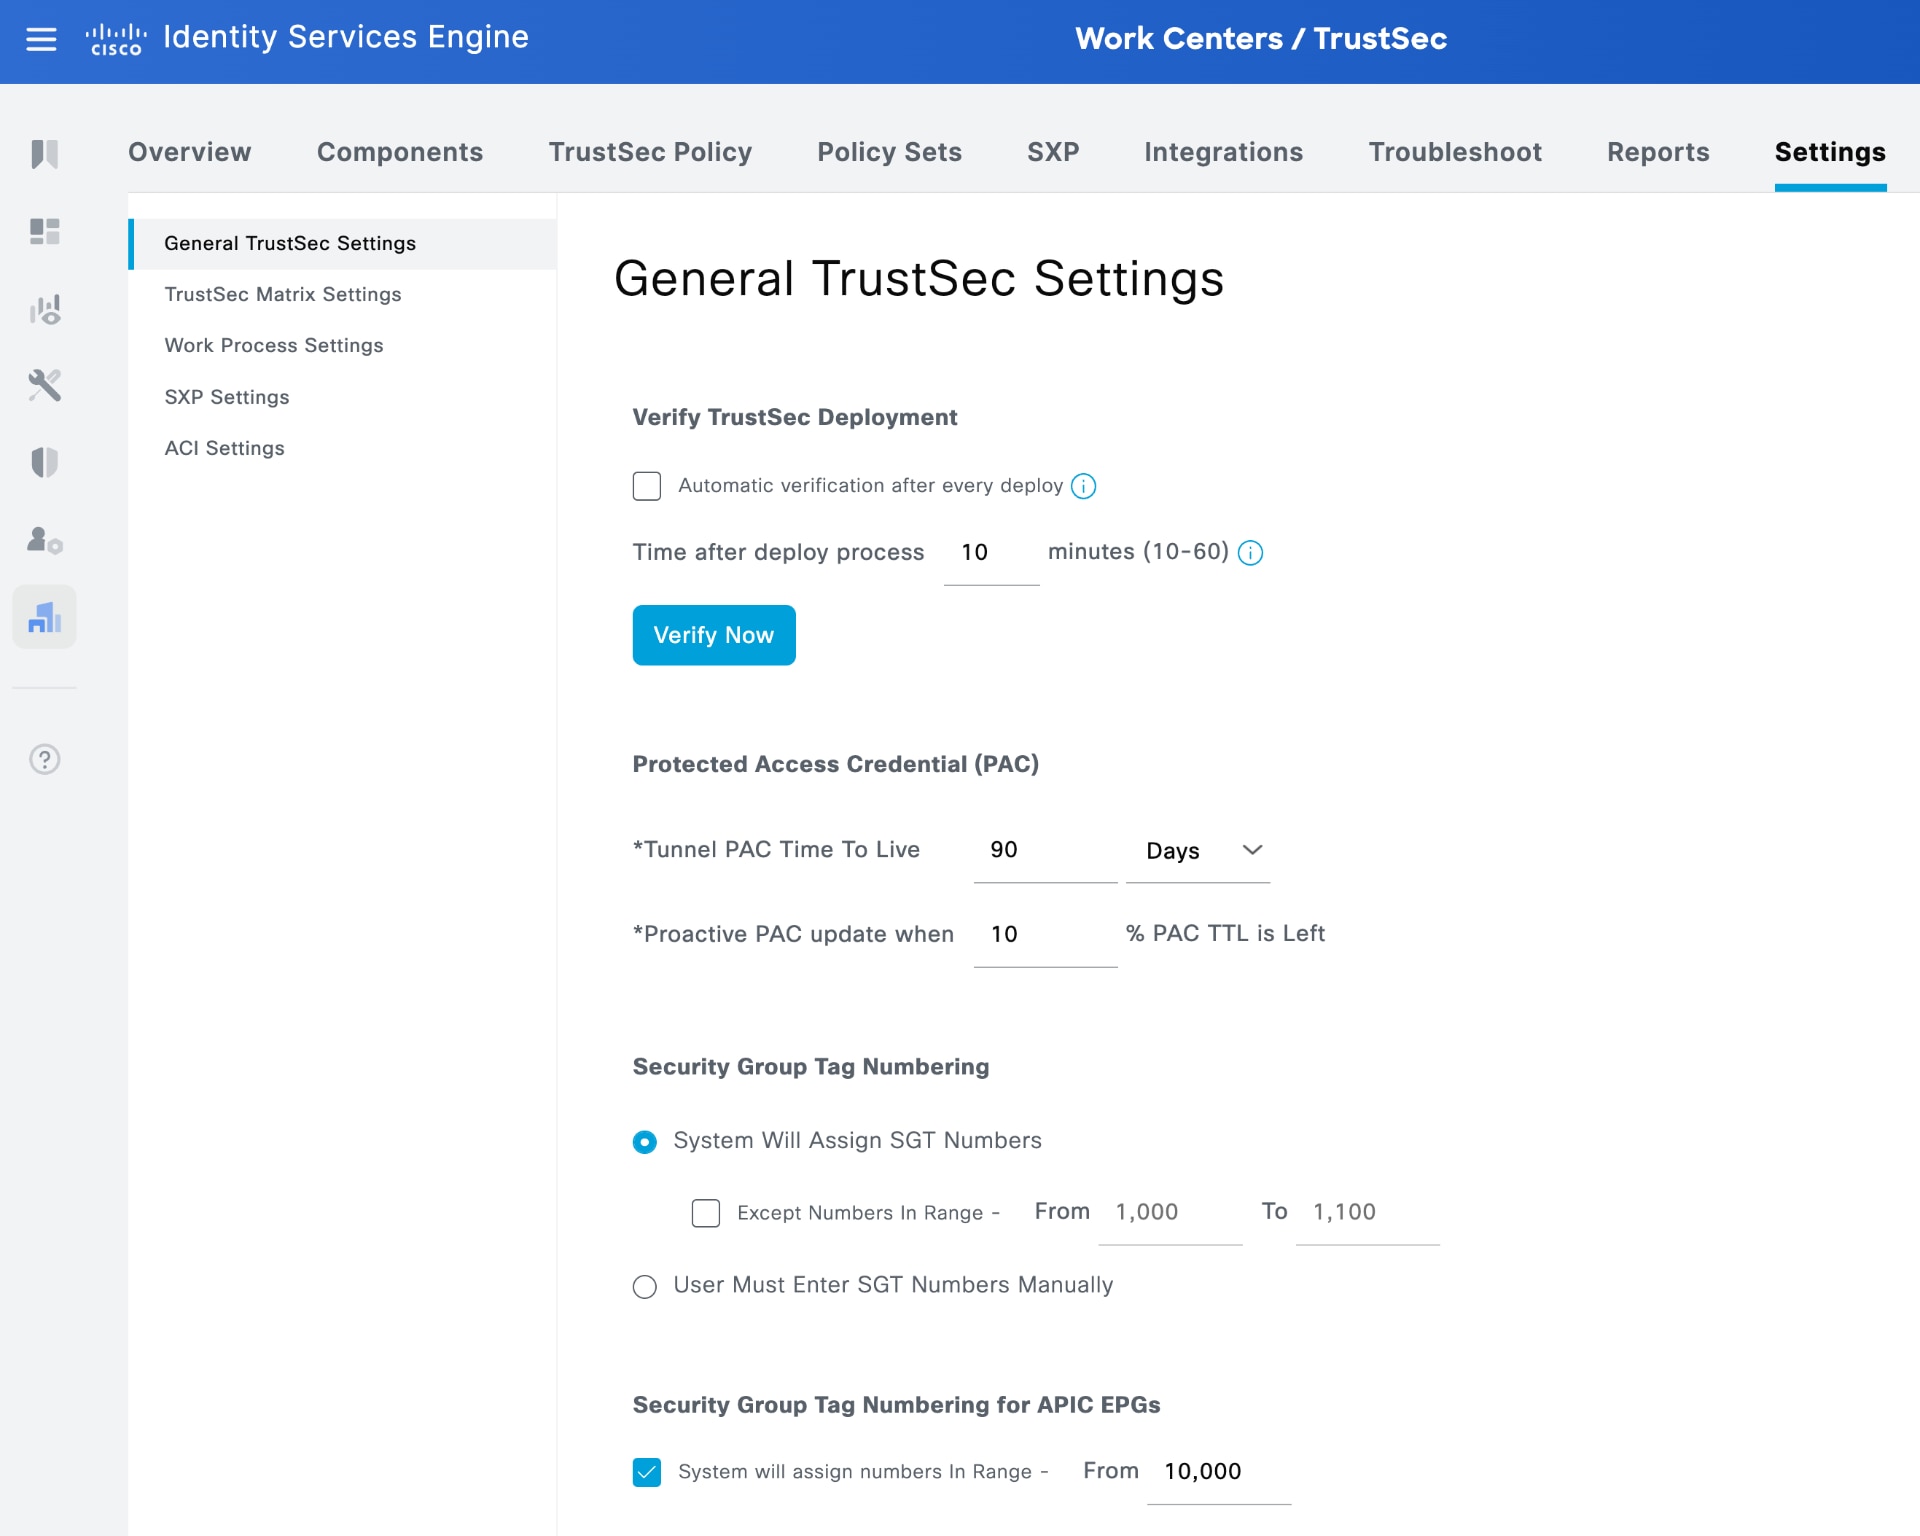
2. Select SGT number range in ISE for learned groups
Optionally set SGT numbering for groups learned from ACI.
From Cisco ISE 3.4 and later, the system notifies administrators about the availability of the ACI integration method.
.
a. Check the Enable ACI integration checkbox and click Save.
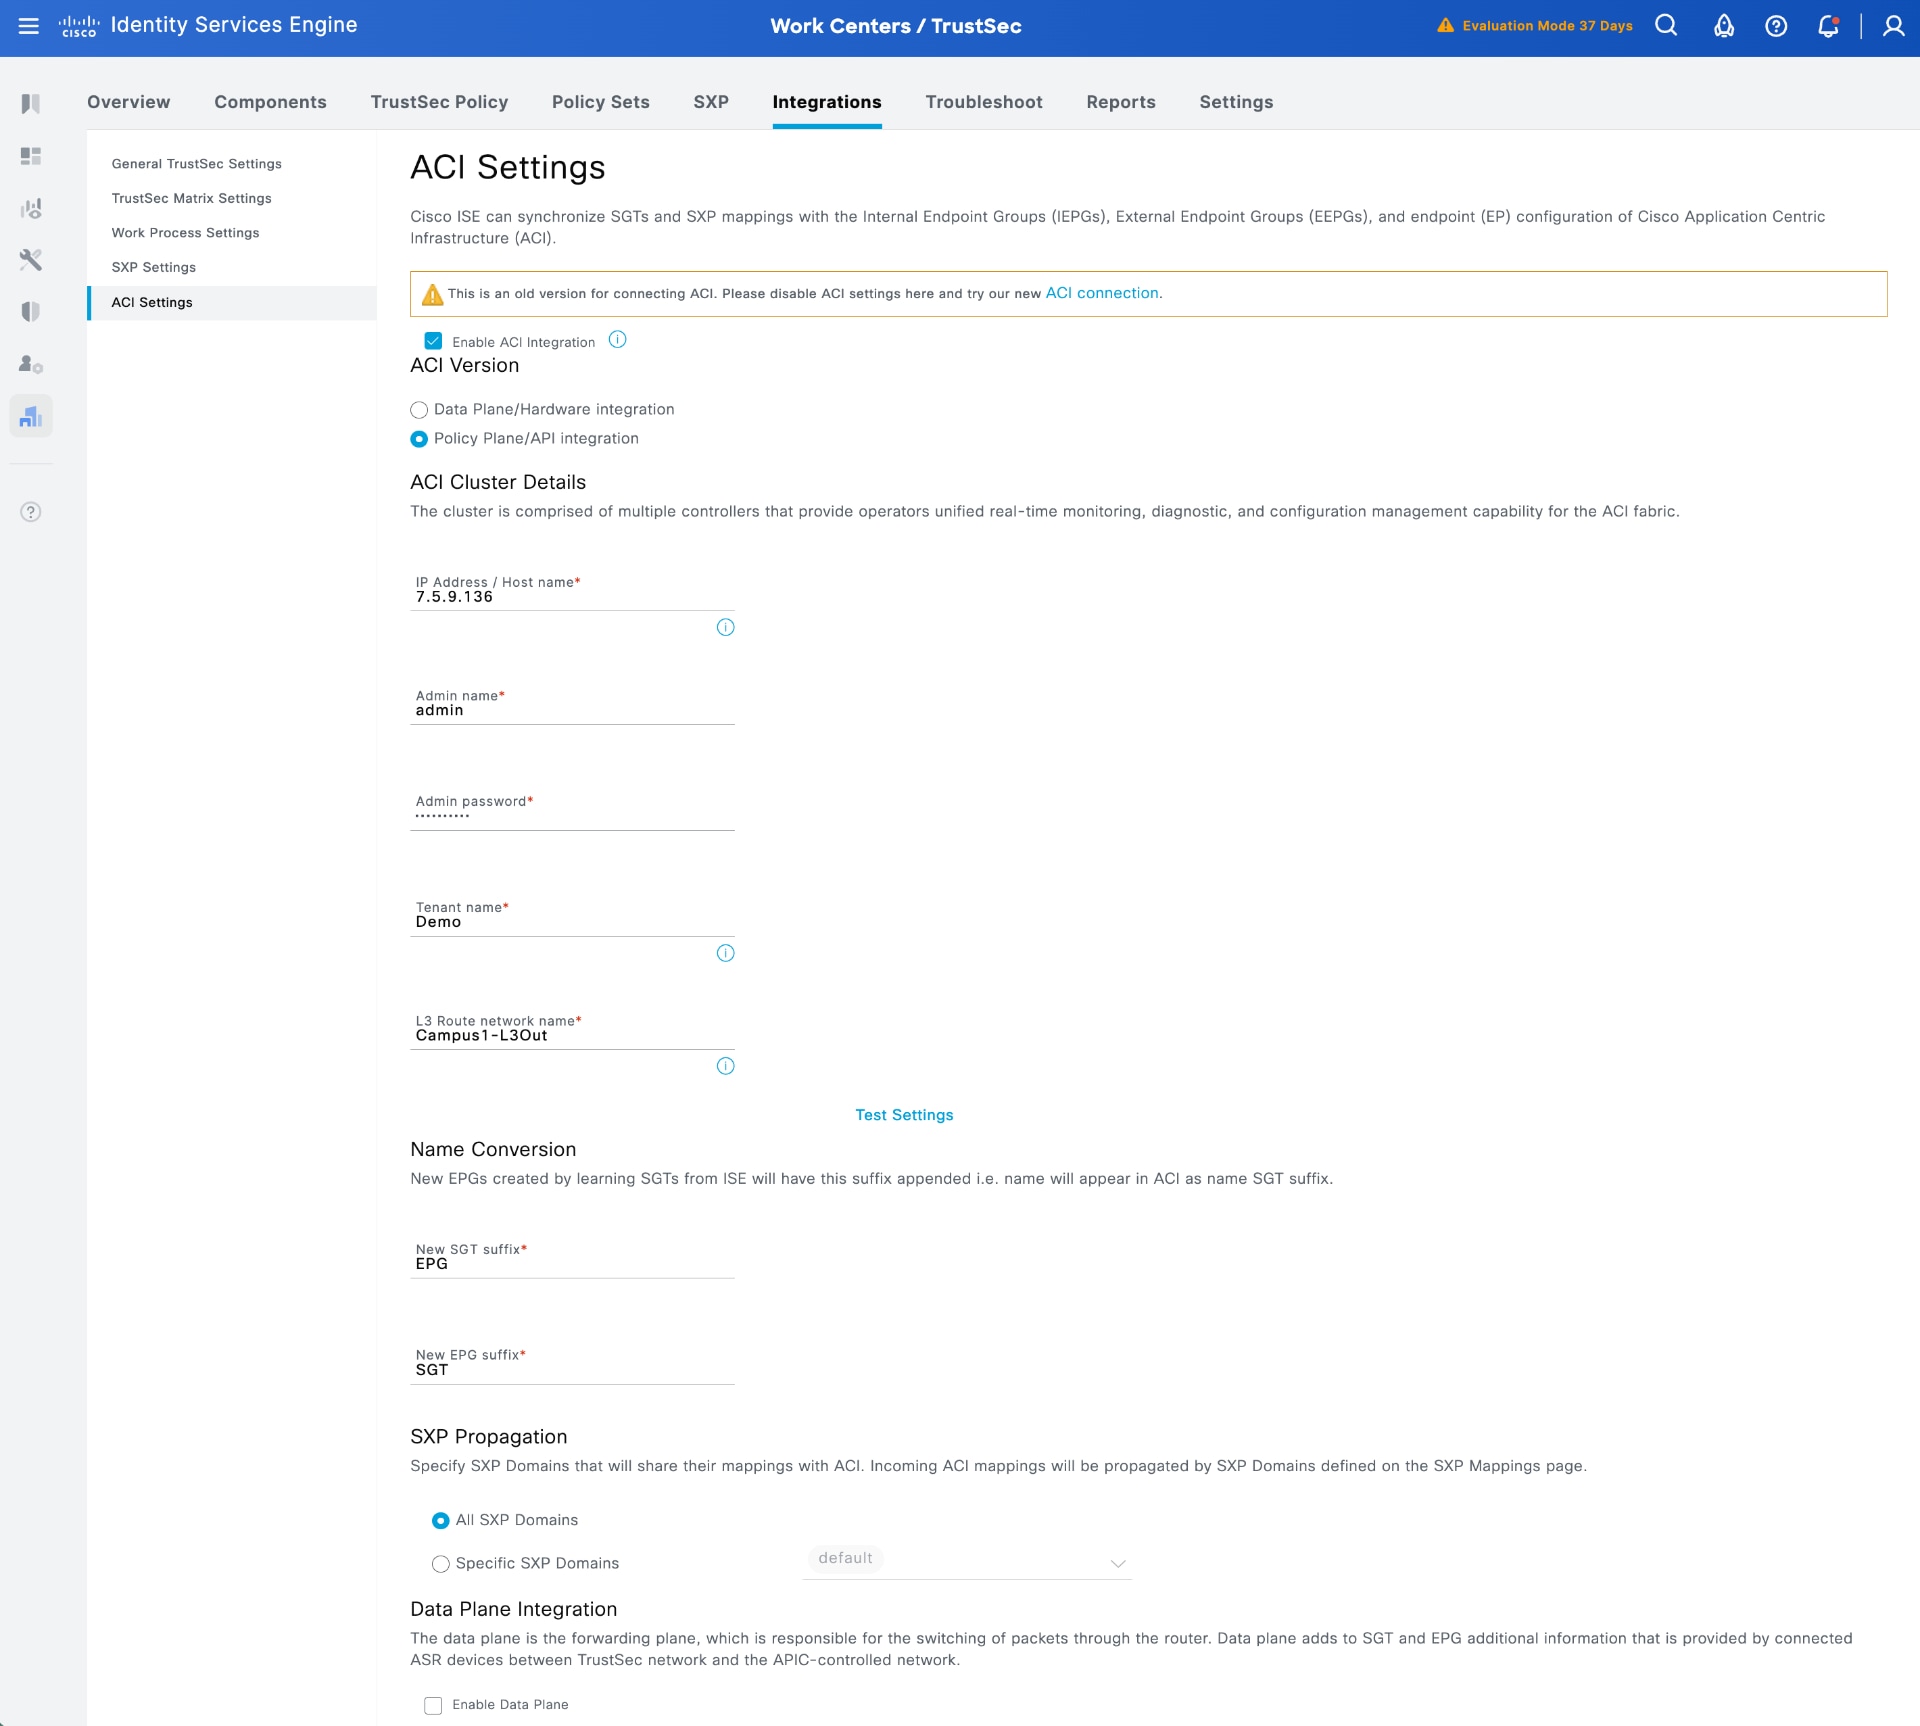
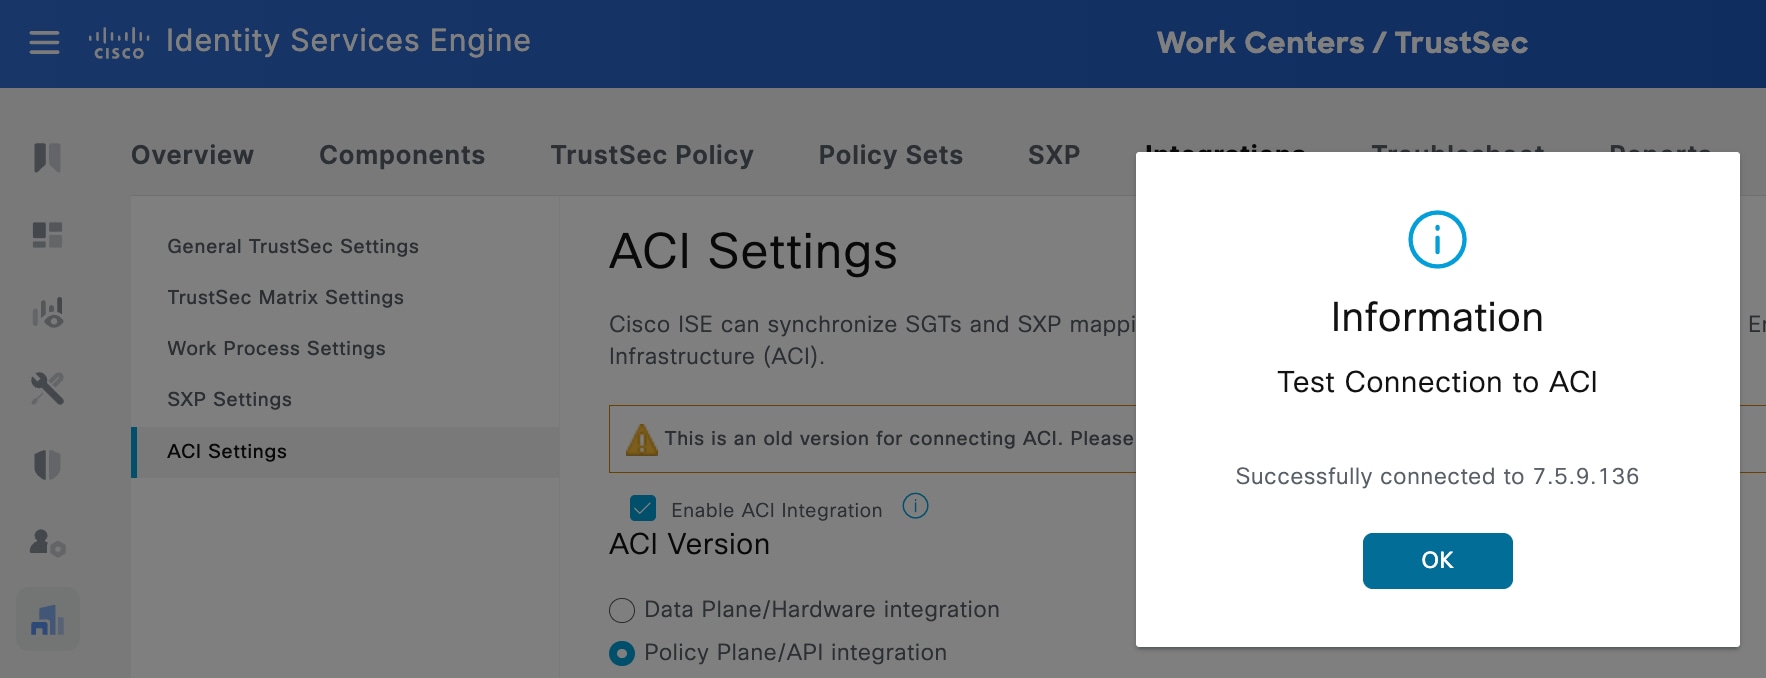
b. Enter the credentials, APIC IP address, tenant name, and L3Out name, and export and import the APIC certificate into the ISE Trusted Certificates store. Click the 'Test Settings' button in the middle of the user interface. This confirms a successful connection to APIC.
c. You can configure additional settings, such as assigning a new SGT suffix to groups learned from ACI and a new EPG suffix to groups sent to APIC. You can also specify which SXP domains to share their mappings with ACI. For more information, see the phase 1 deployment documentation.
d. Finalize the integration from ISE to APIC by clicking Save.
4. View groups shared from APIC to ISE
After the test connection is successful, ISE shares the selected SGTs with APIC, and APIC shares all EPGs configured under the tenant specified in the ACI settings page. For example, in this test, the tenant named "Demo" has two EPGs, and both are shared with ISE.
5. View groups shared from ISE to APIC
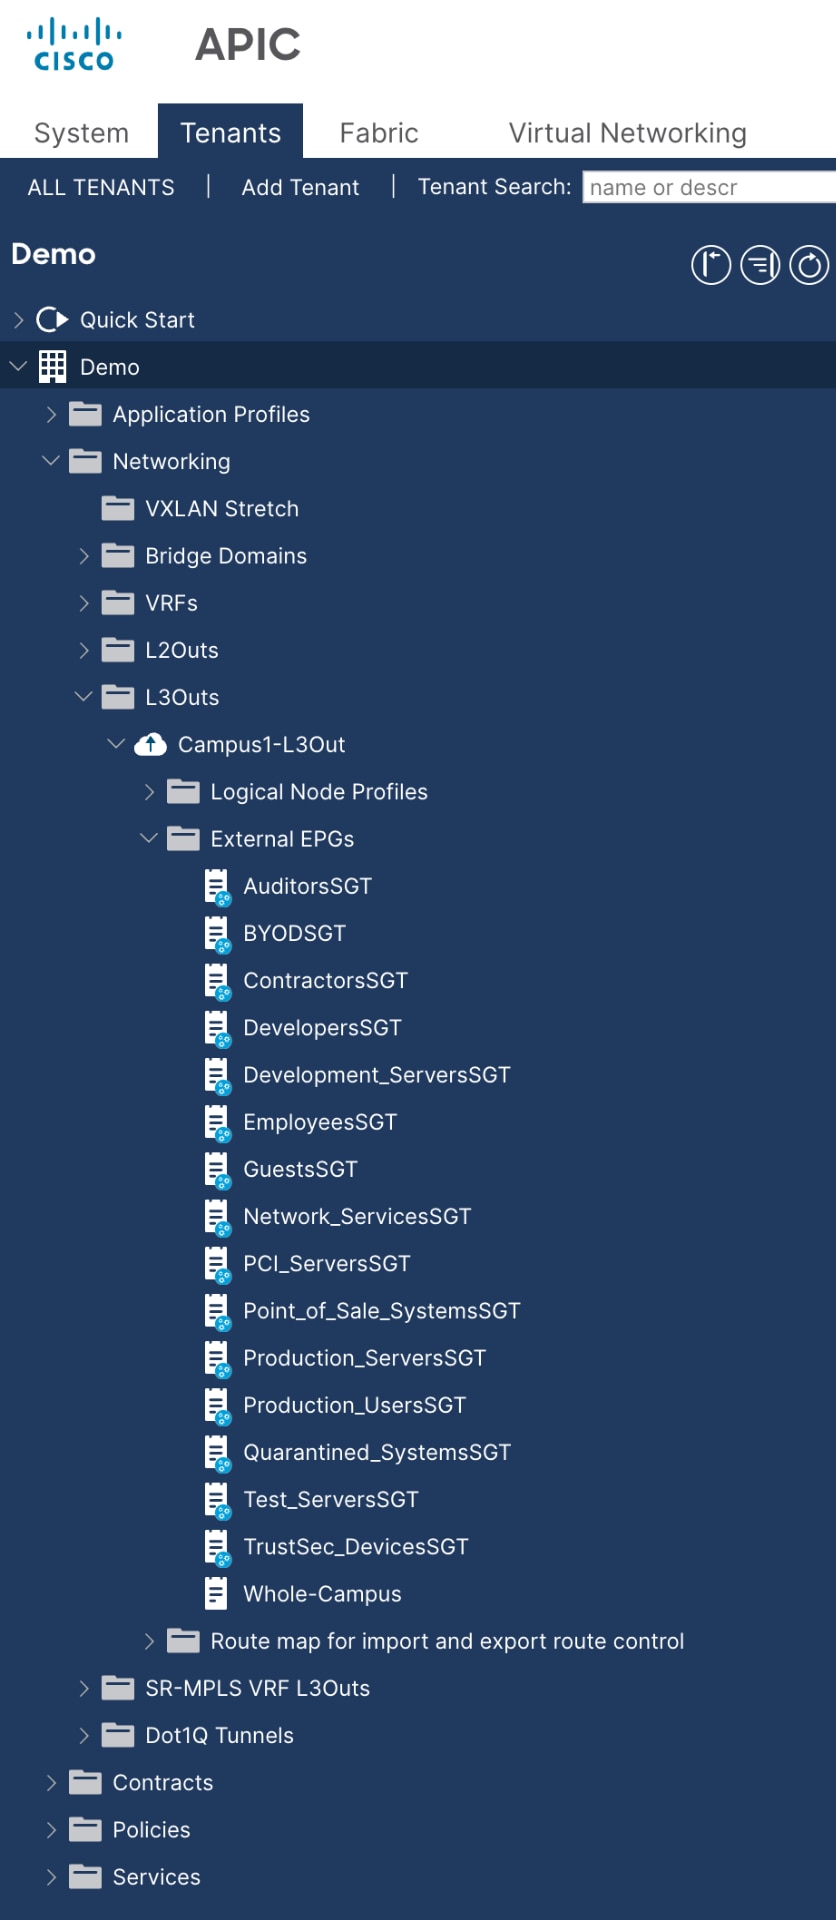
Additionally, in APIC, you can view all the groups that ISE shared, specifically those you chose to share under the Security Groups entries.
In APIC release 6.1(1), APIC introduces a new Integration menu that displays details about the pxGrid communication used in the updated integration with Common Policy. Because phase 1 integration does not utilize pxGrid, this Integration menu shows no information for phase 1.
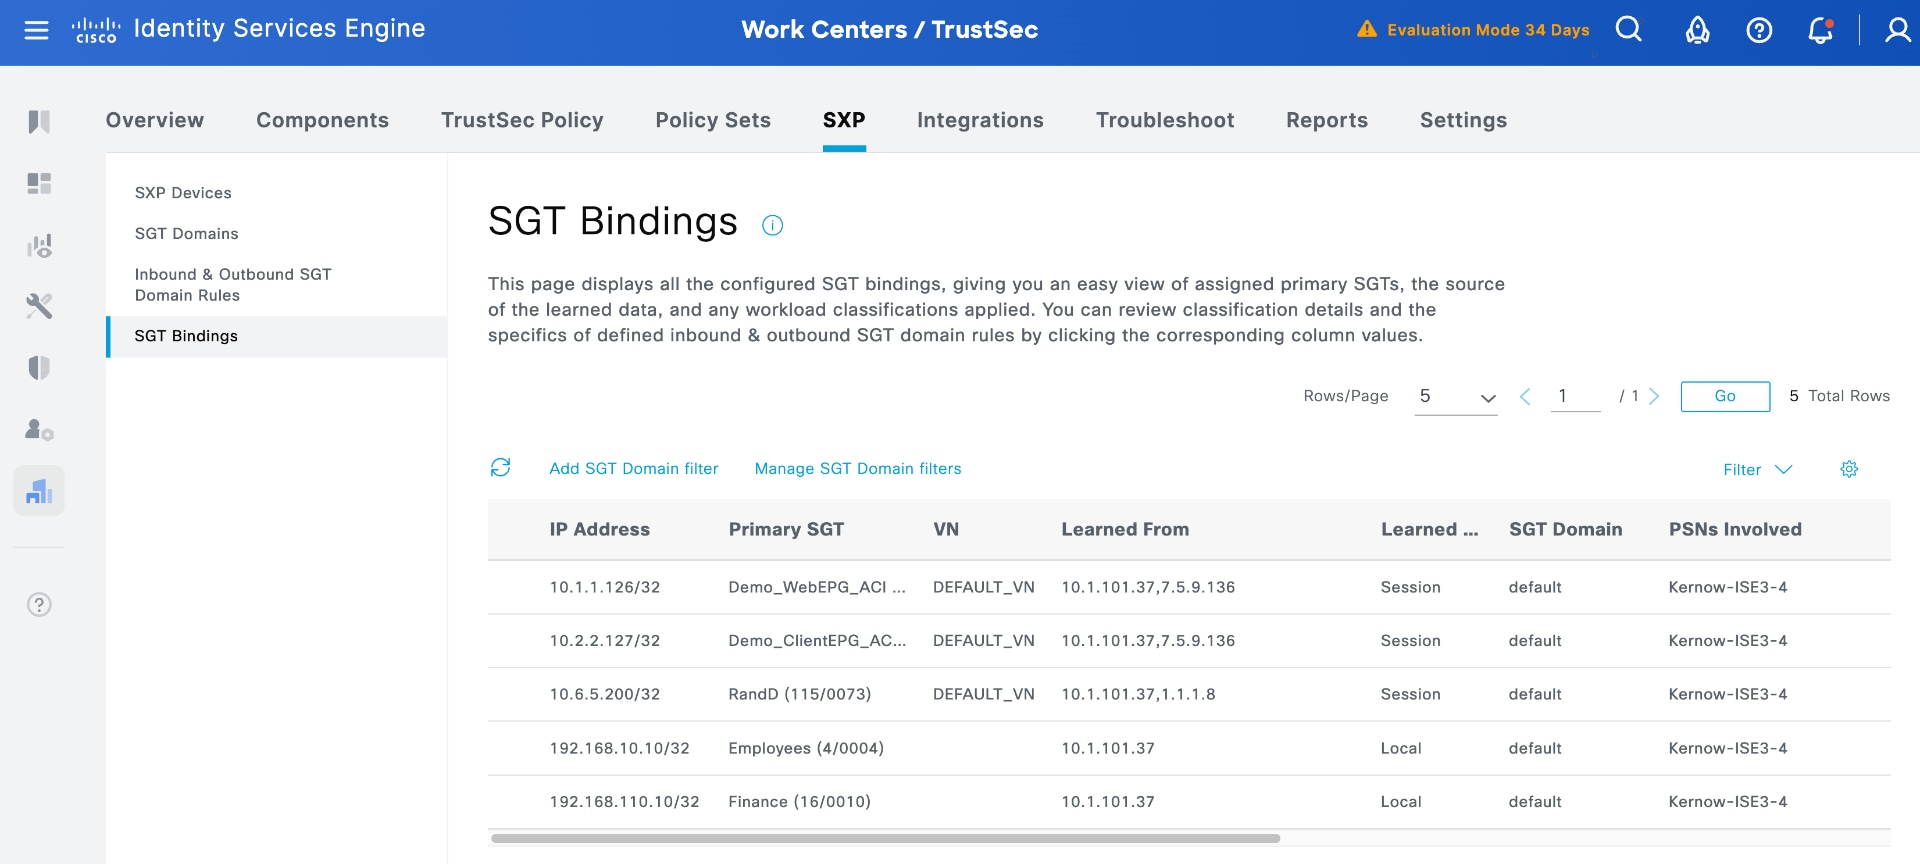
6. View IP bindings in ISE learned from APIC
In addition to sharing groups in both directions, the system also shares any IP addresses assigned to those groups.
In ISE, you can view the workload IP addresses assigned to the two learned groups by navigating to Work Centers > TrustSec > SXP > SGT Bindings.
In this example, each of the ACI groups contains a workload, as seen the top two entries in the figure.
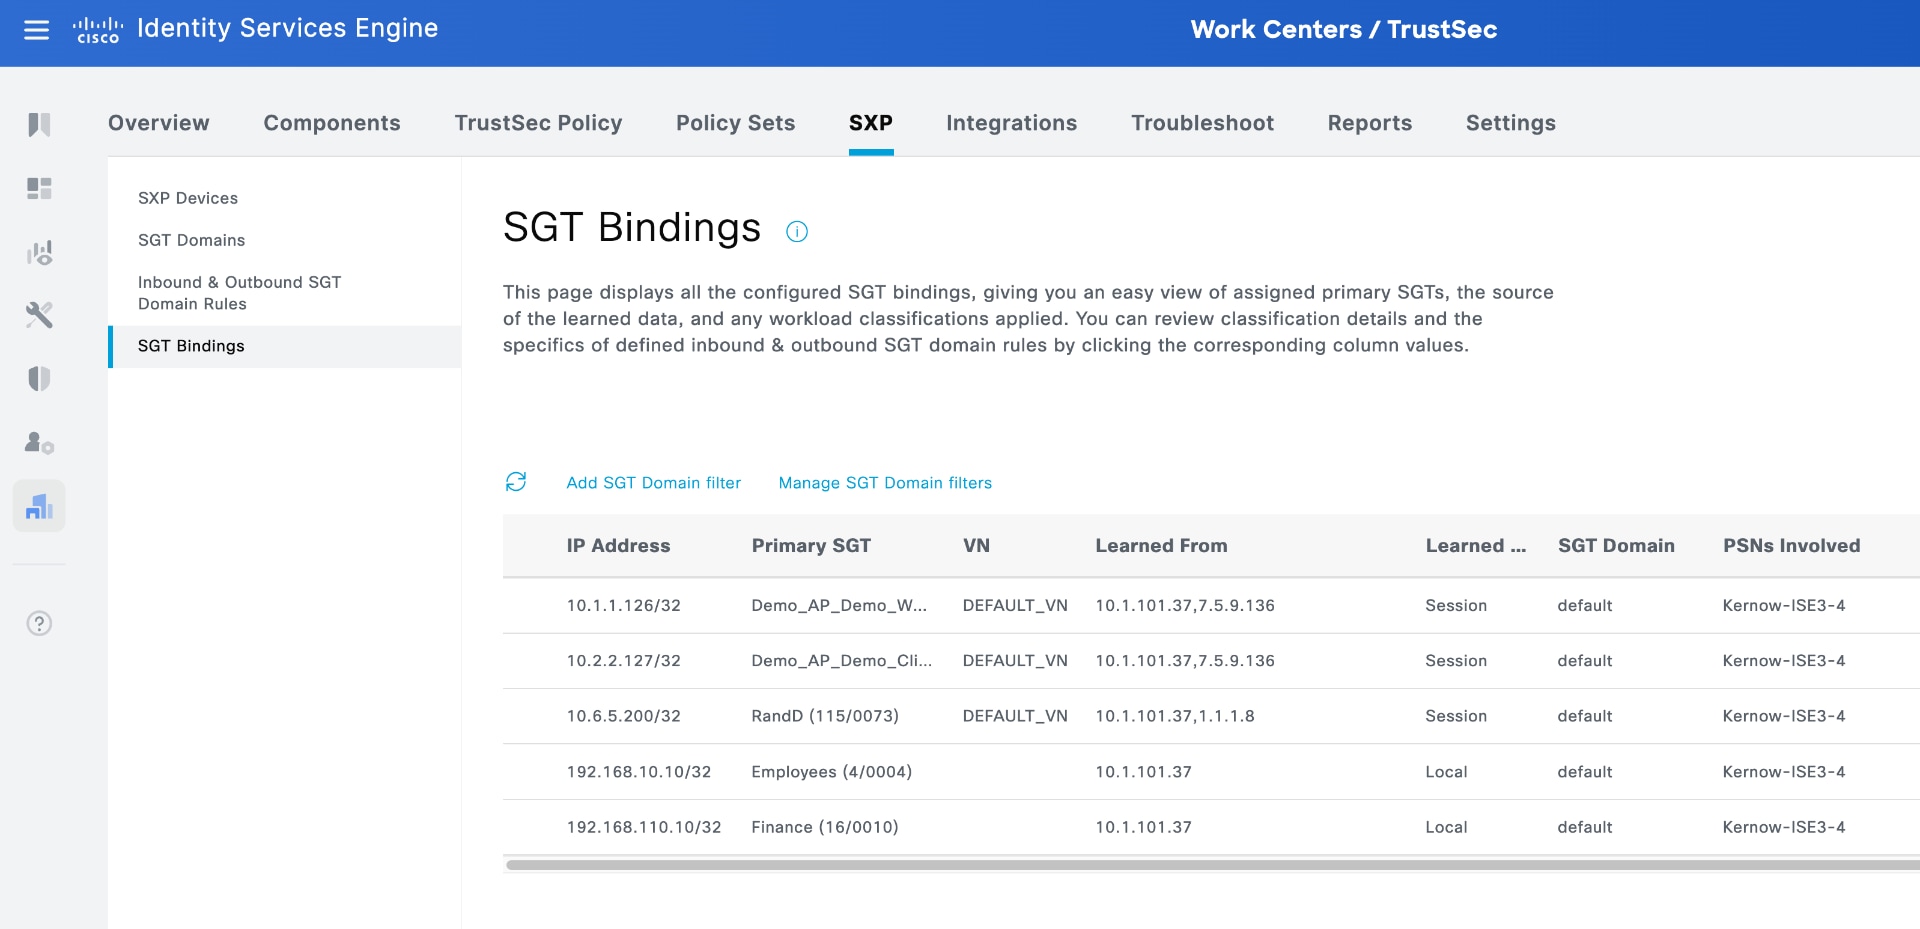
Because these bindings are in the SXP table, ISE shares them through SXP connections to remote destinations. For example, if these data center bindings are shared with a router or switch gateway between domains, that platform can download policy and enforce traffic flowing between the Campus Domain and the Data Center Domain.
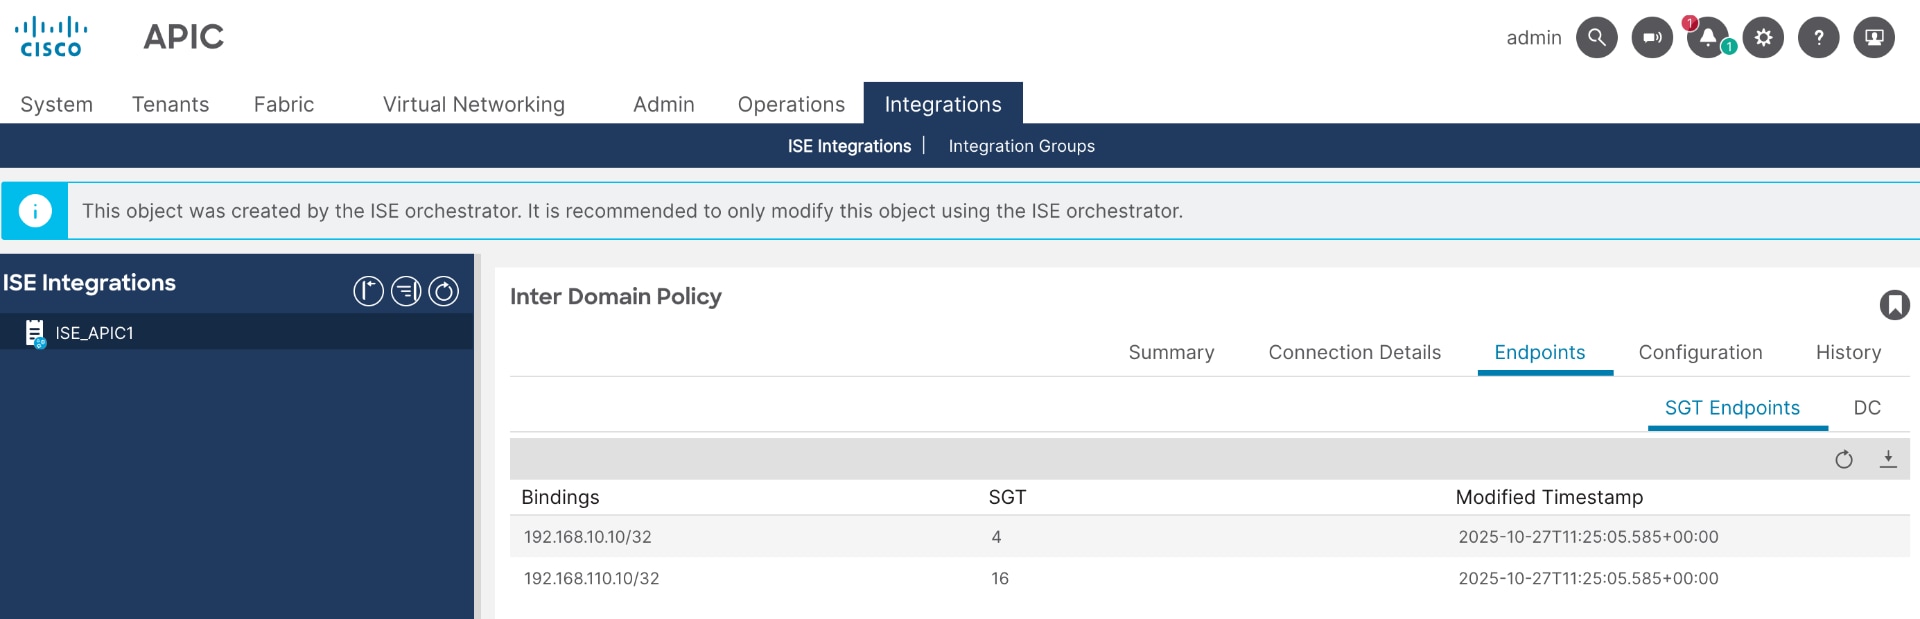
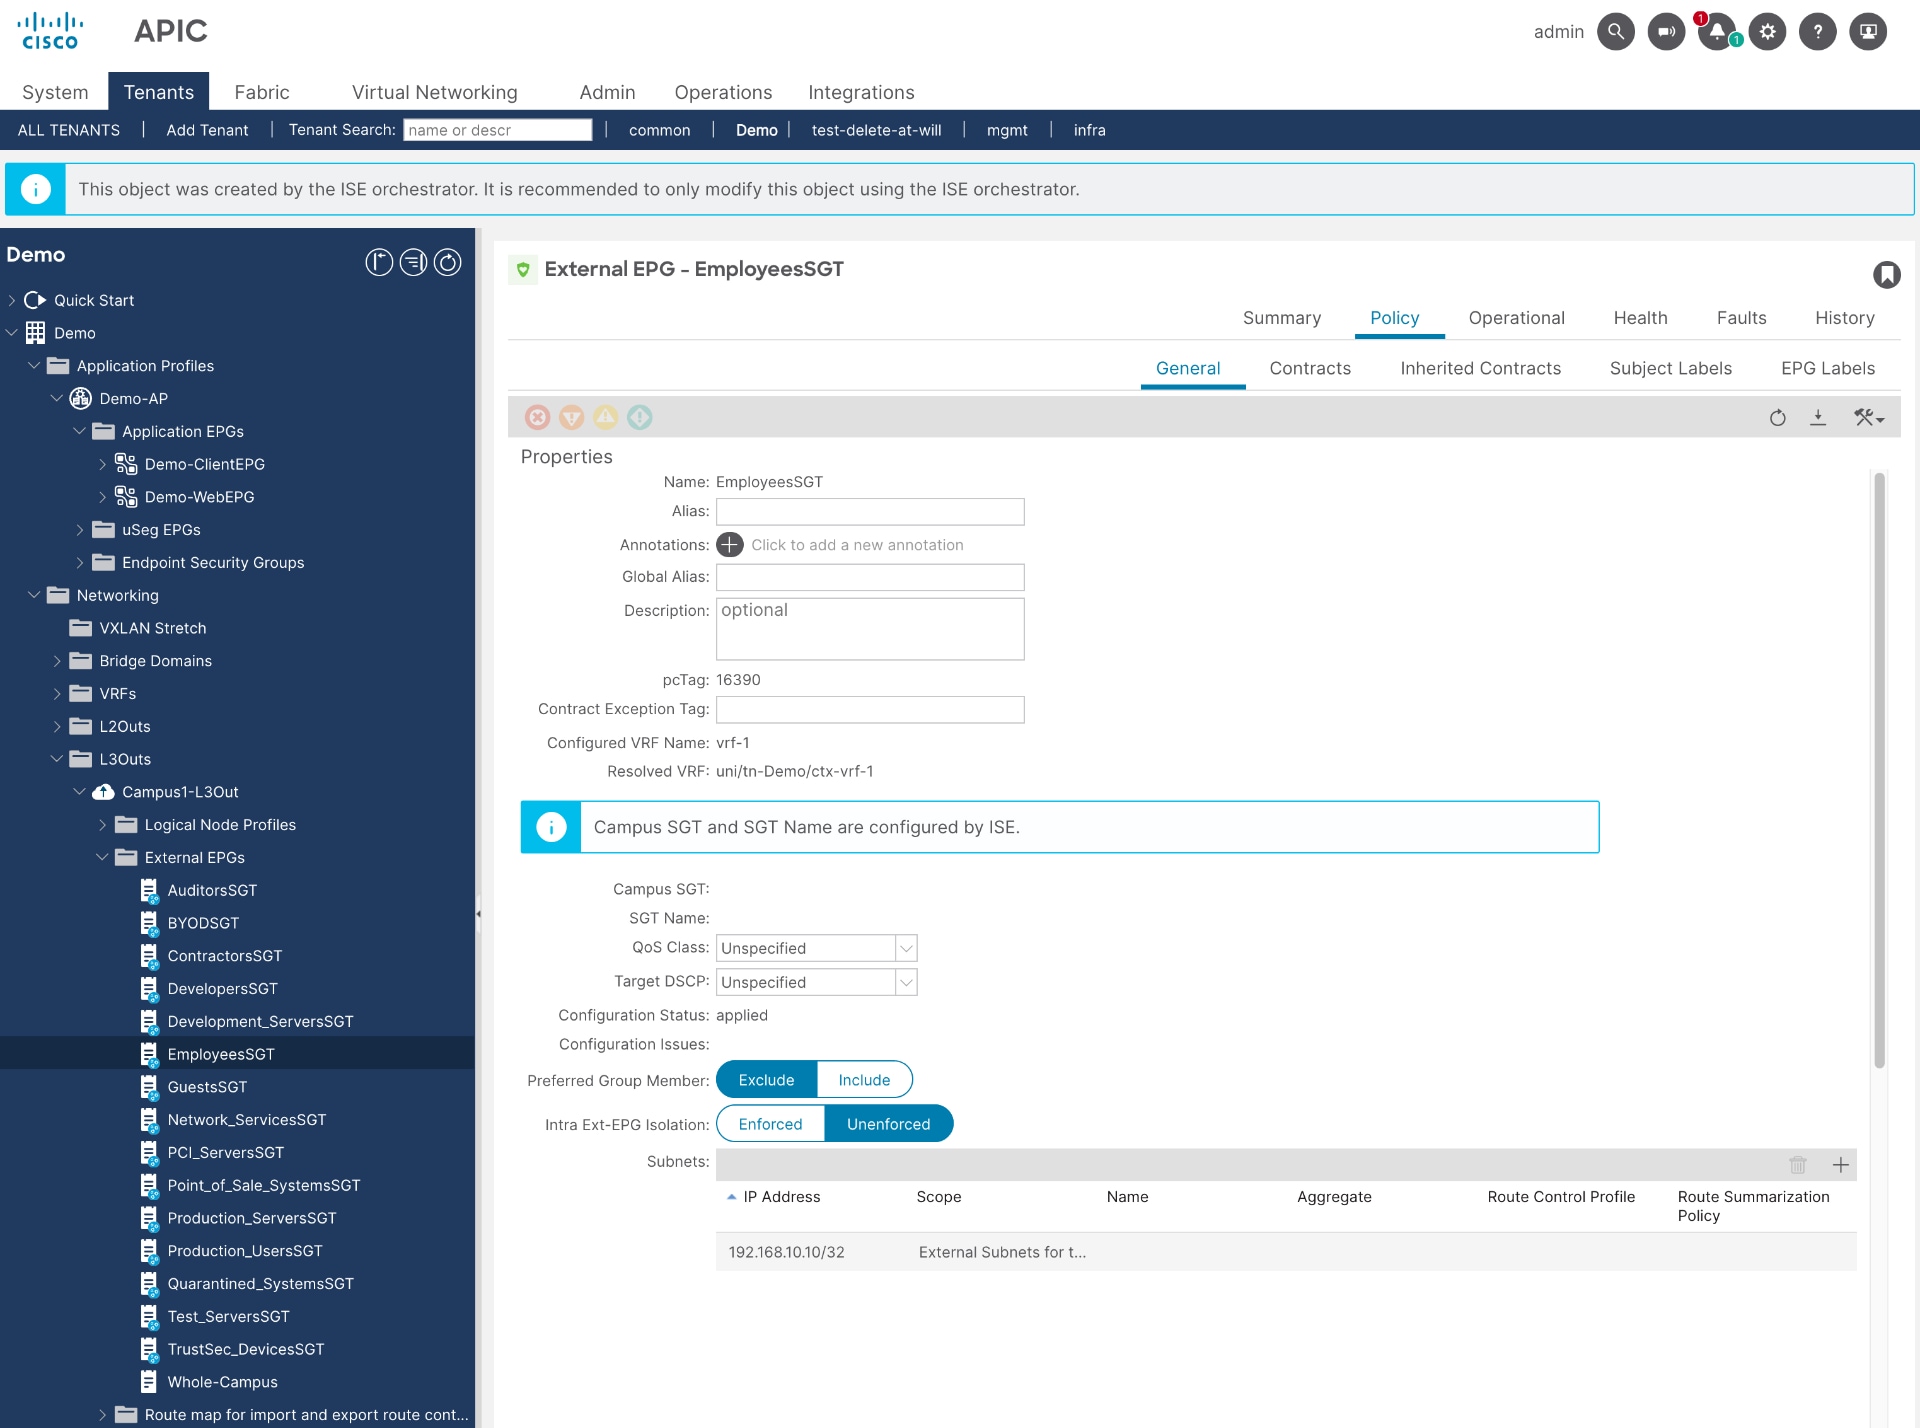
7. View IP bindings in APIC learned from ISE
In APIC, you can view the IP addresses assigned to the groups that have been shared by ISE.
For example, IP address 192.168.10.10 is assigned to the SGT "Employees," as shown in Figure 34. In the phase 1 policy plane integration, ISE programs the SGT bindings as subnets (/32 or /128) under External EPG. Now, in APIC, when you select the "Employees" External EPG, you can see the learned IP address assigned to that group.
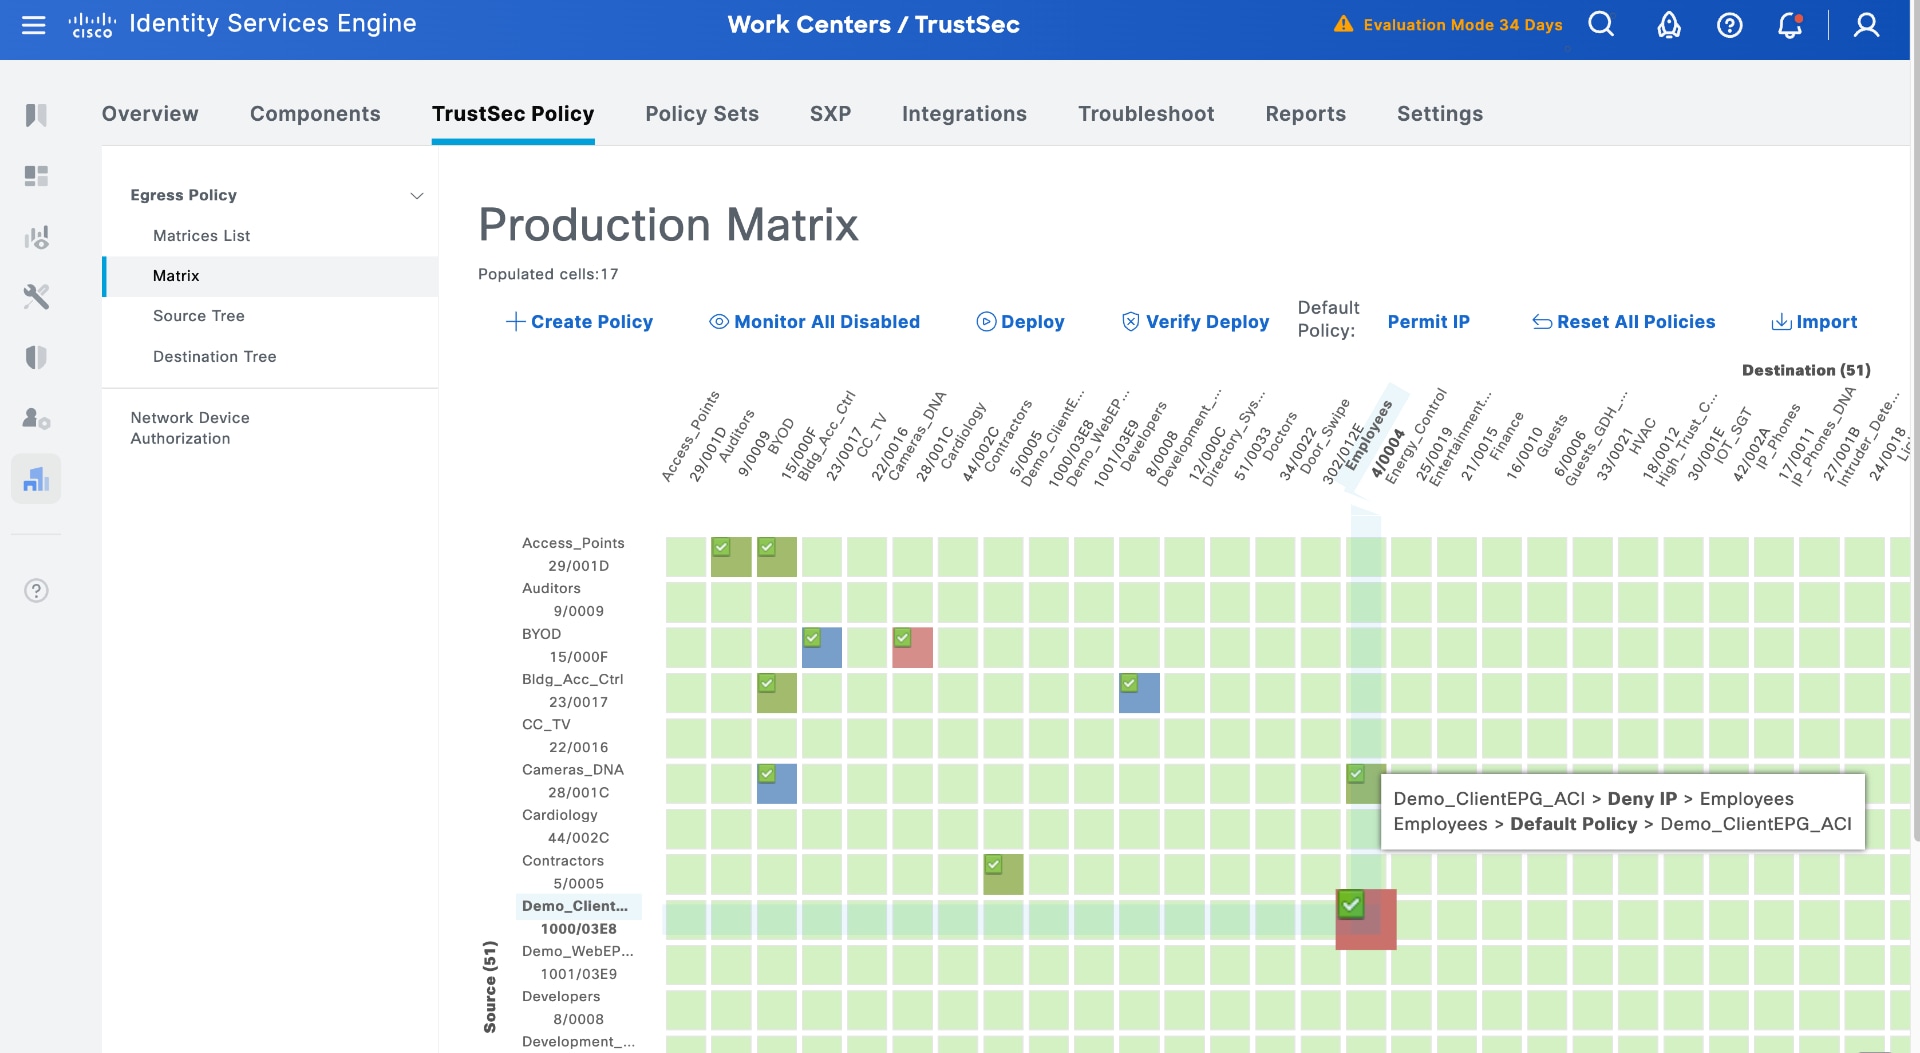
8. Set Up Security Policies in ISE Using Groups Learned from APIC
Now that groups and IP address memberships have been shared in both directions, you can configure security policies within both domains.
For example, in ISE, you can deny traffic from a group learned from ACI (Demo_ClientEPG) to an ISE group (Employees) or permit traffic from an ISE group (Contractors) to a group learned from ACI (Demo_WebEPG).
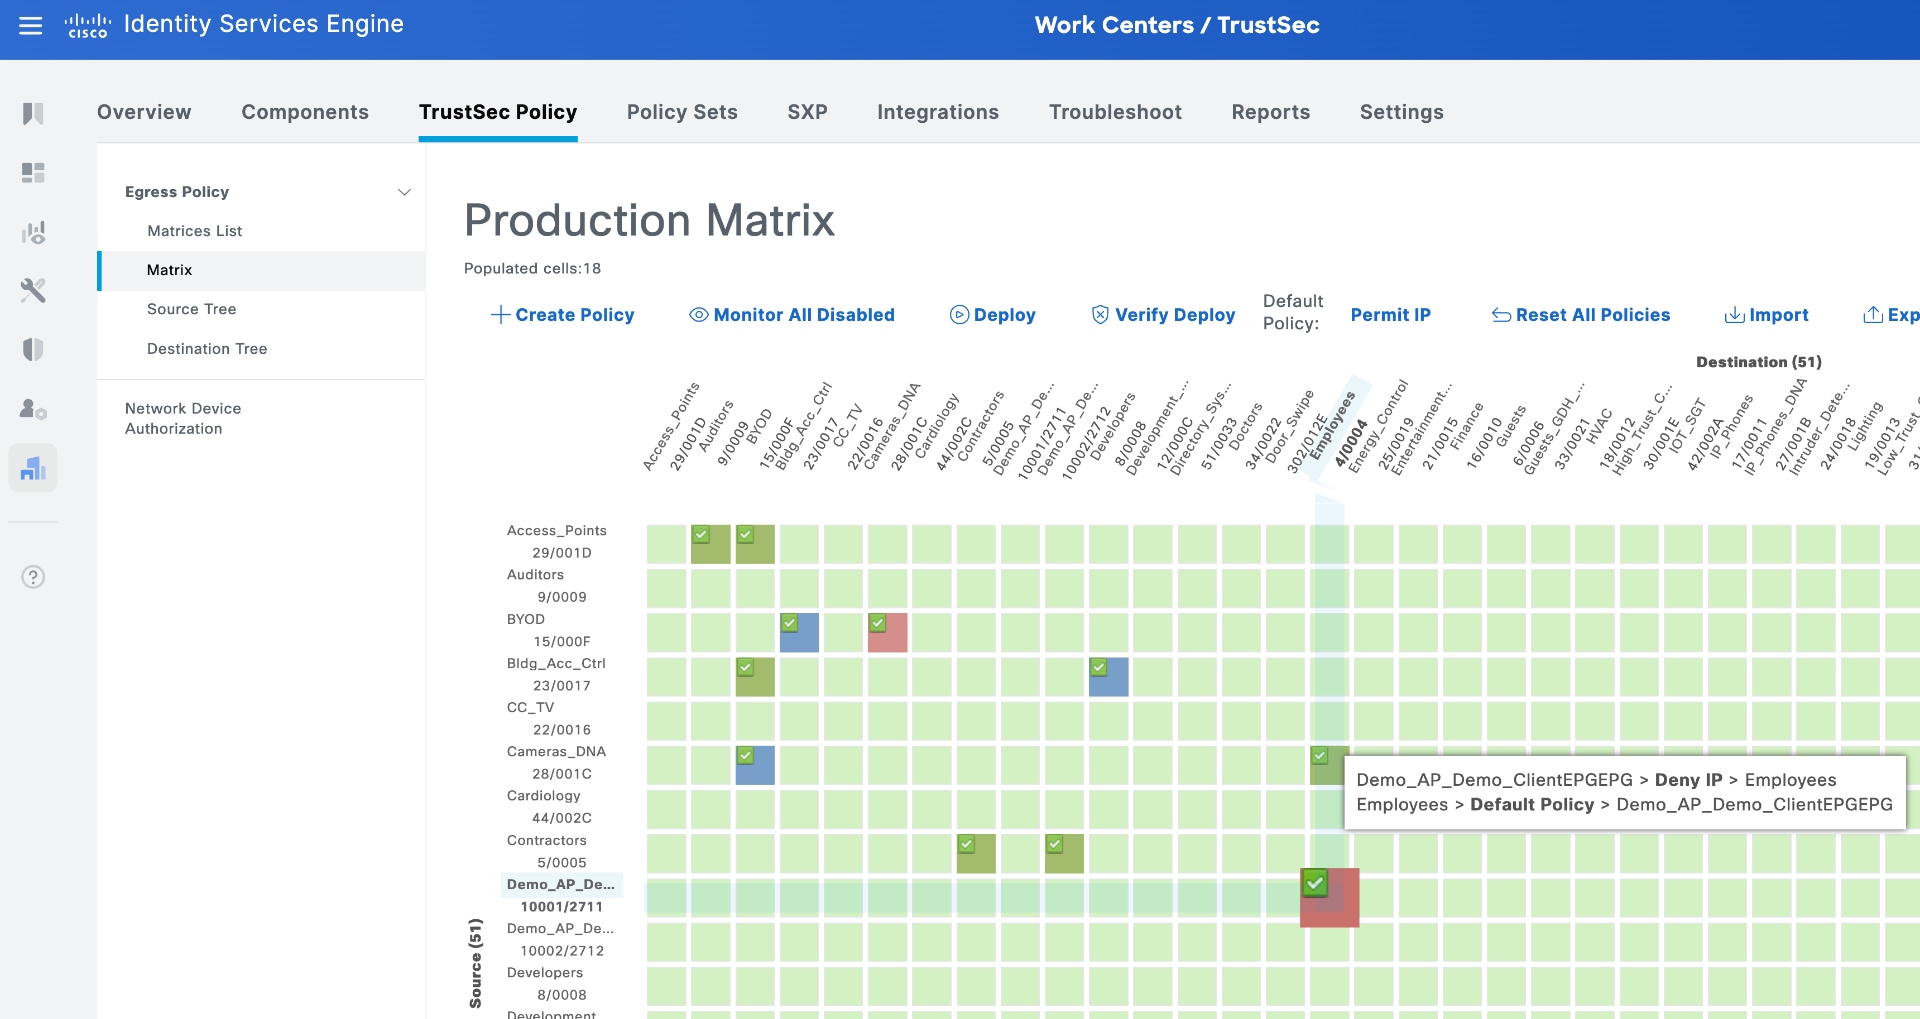
Using the router or switch gateway example between domains, when the gateway learns the bindings from SXP, it downloads these policies and enforces them on traffic flowing between the Campus Domain and the Data Center Domain.
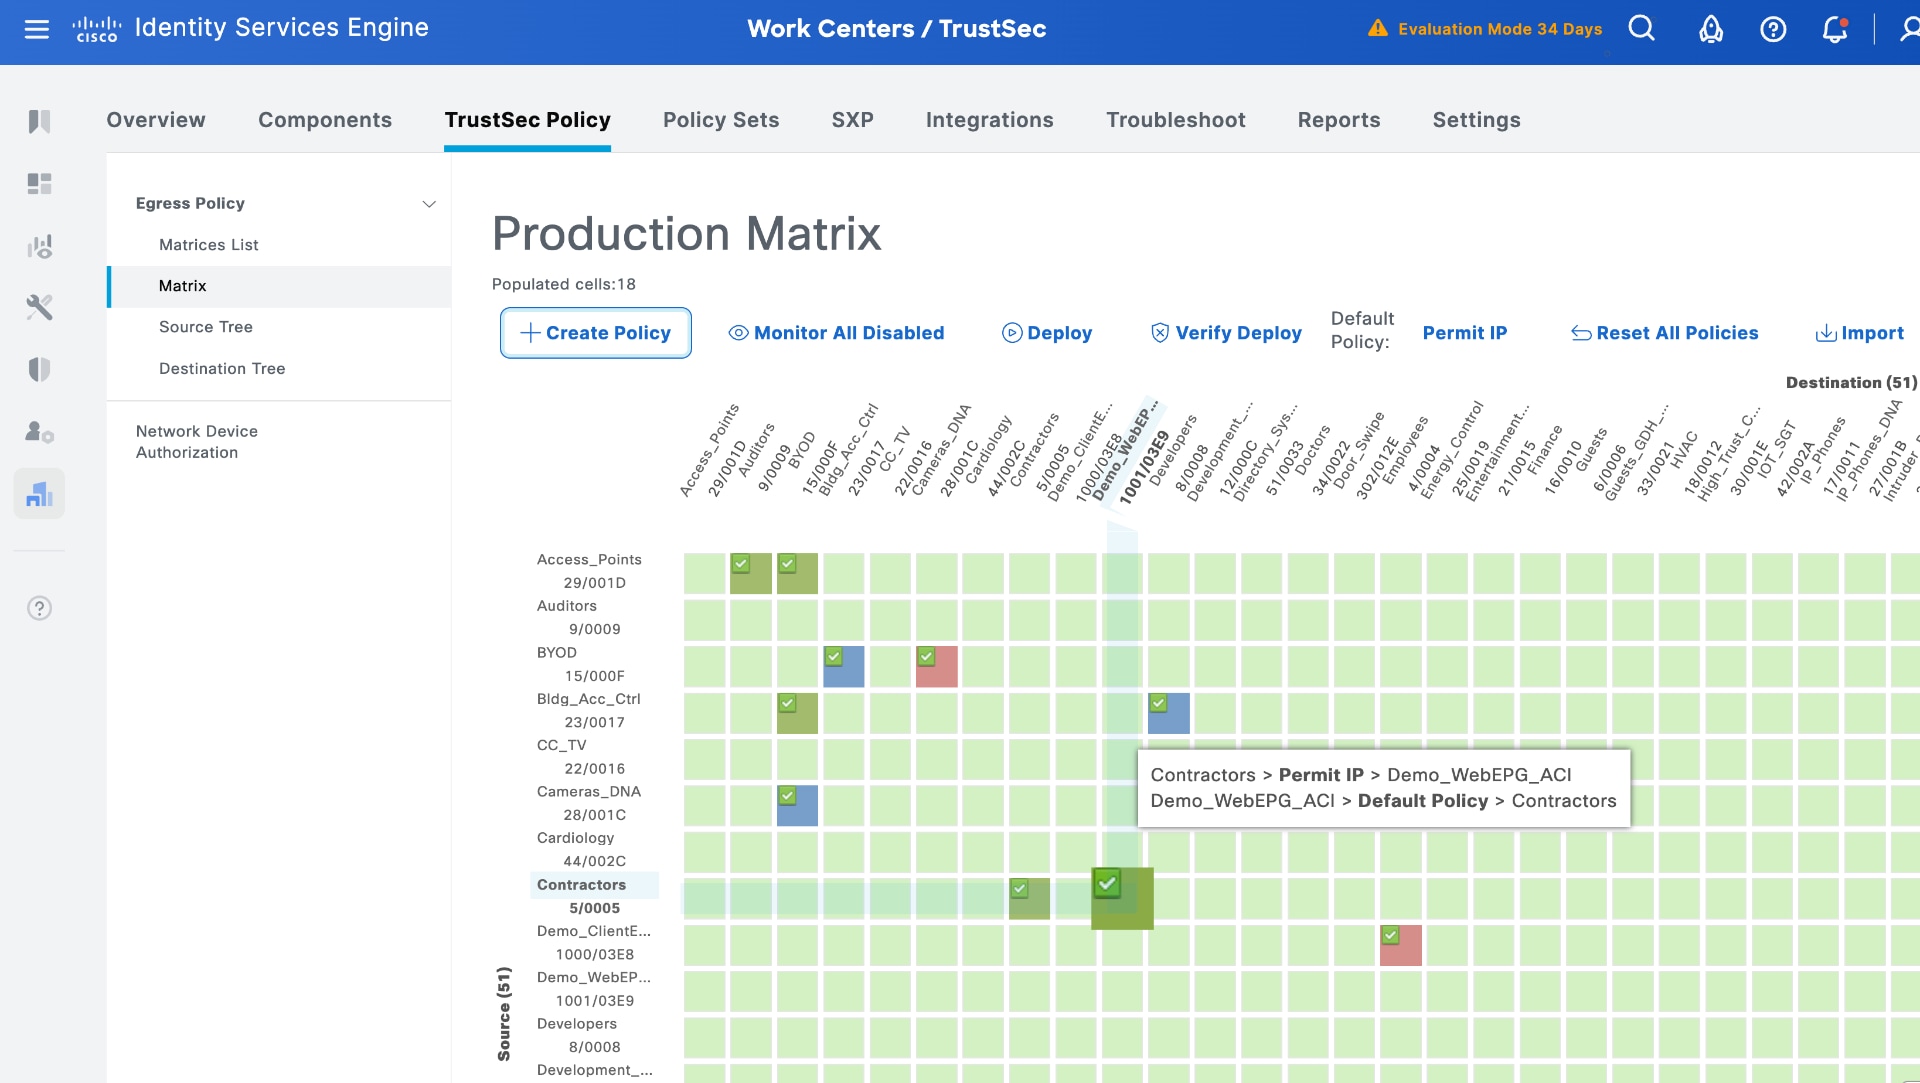
9. Set Up security policies in APIC using groups learned from ISE
You can also configure policies and contracts independently within the data center domain using APIC.
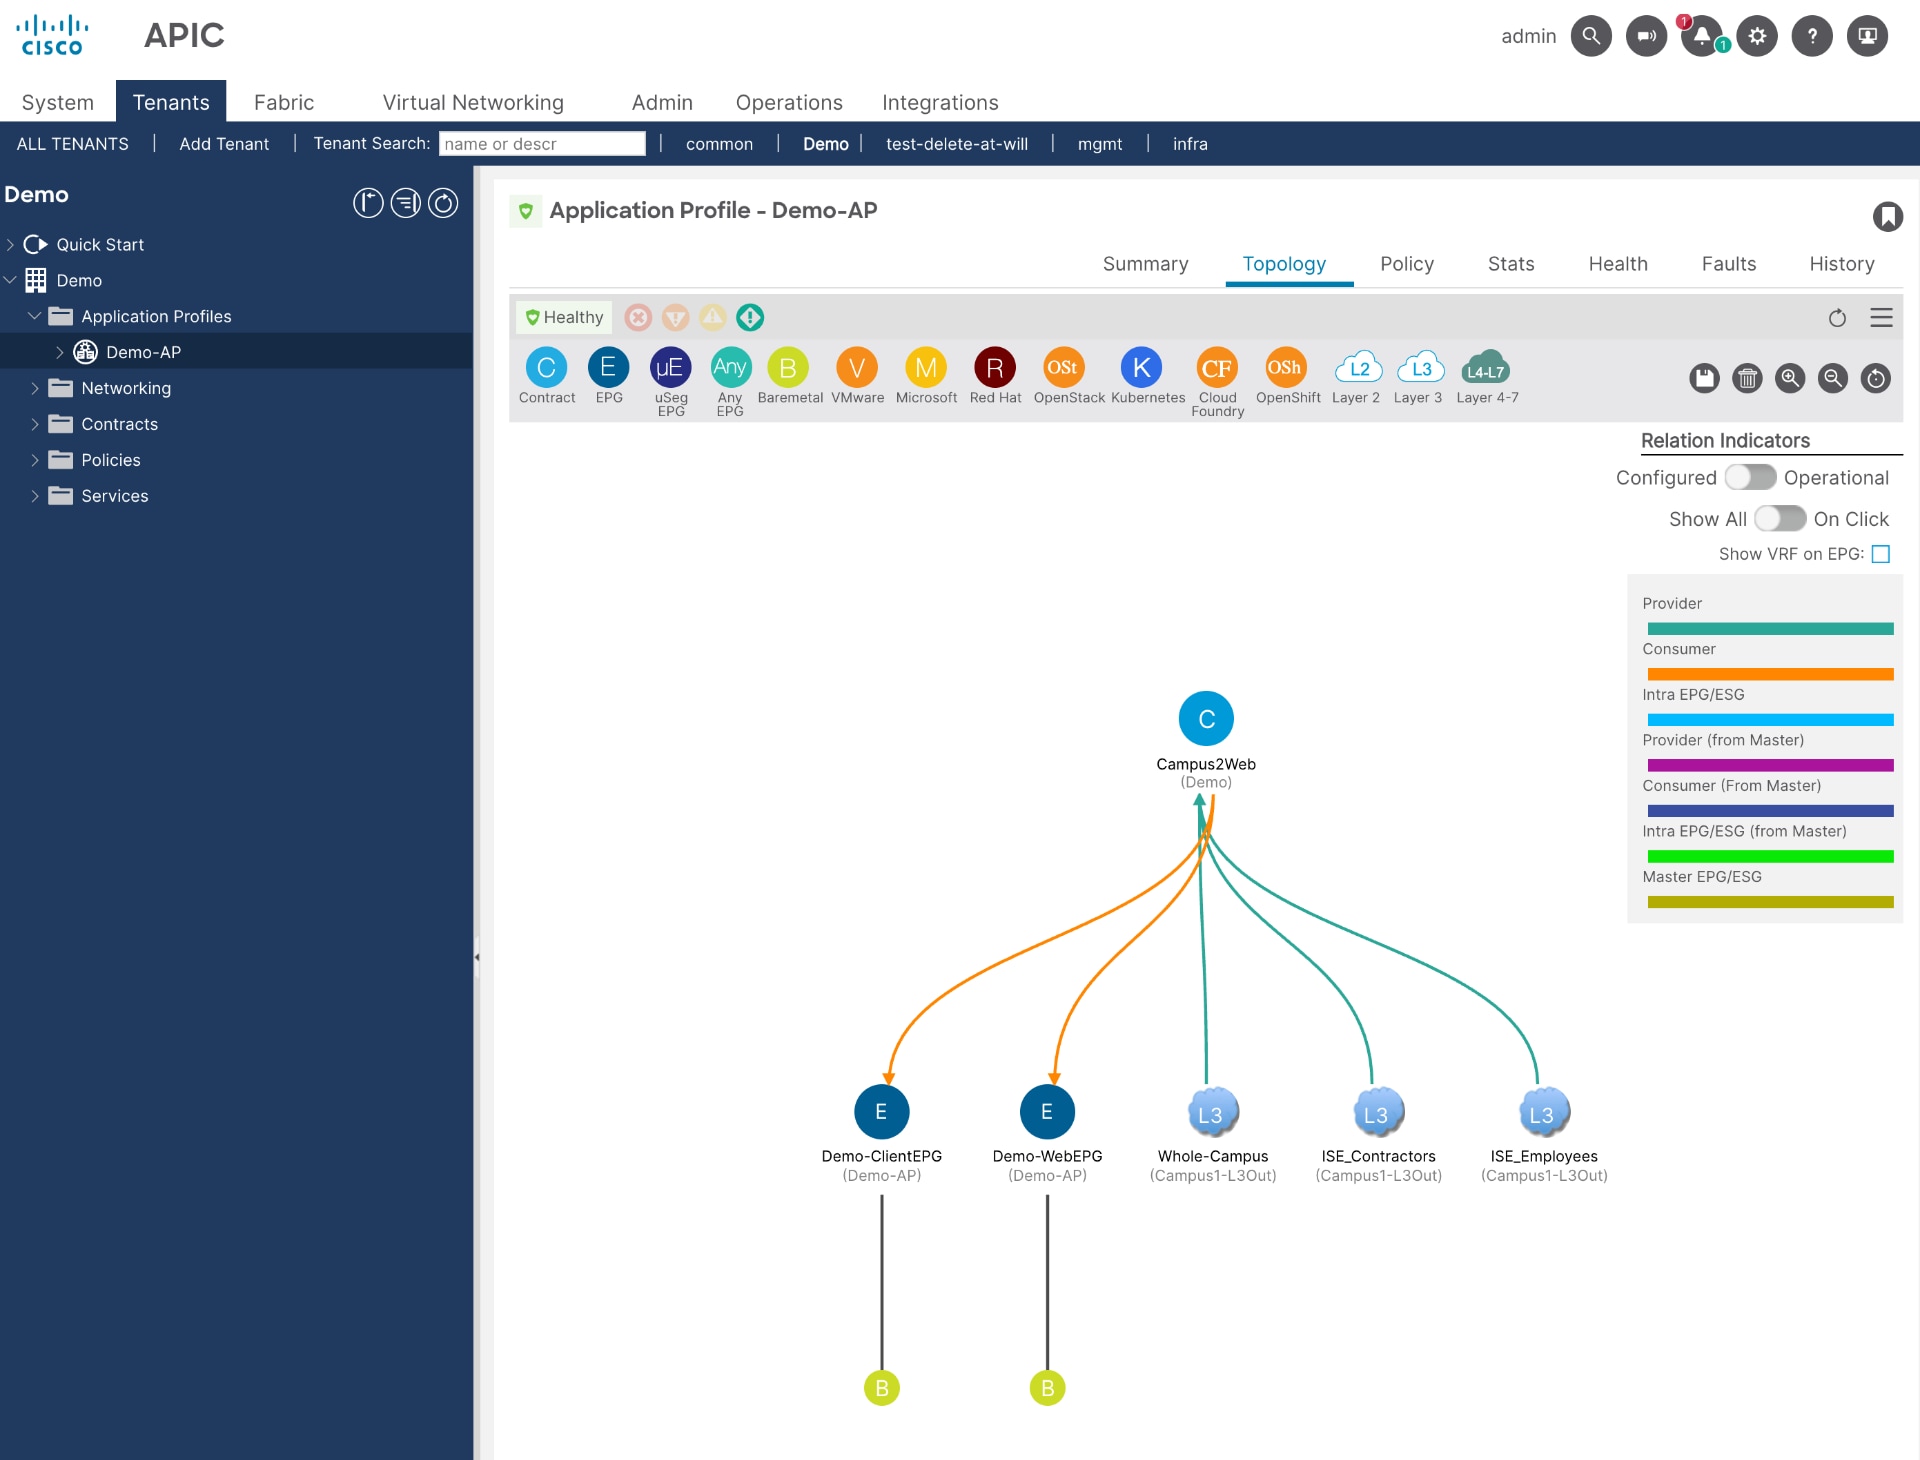
In APIC, navigate to Tenants, select the desired tenant, go to Application Profiles, choose the relevant Application Profile, and then select Topology from the sub-menu.
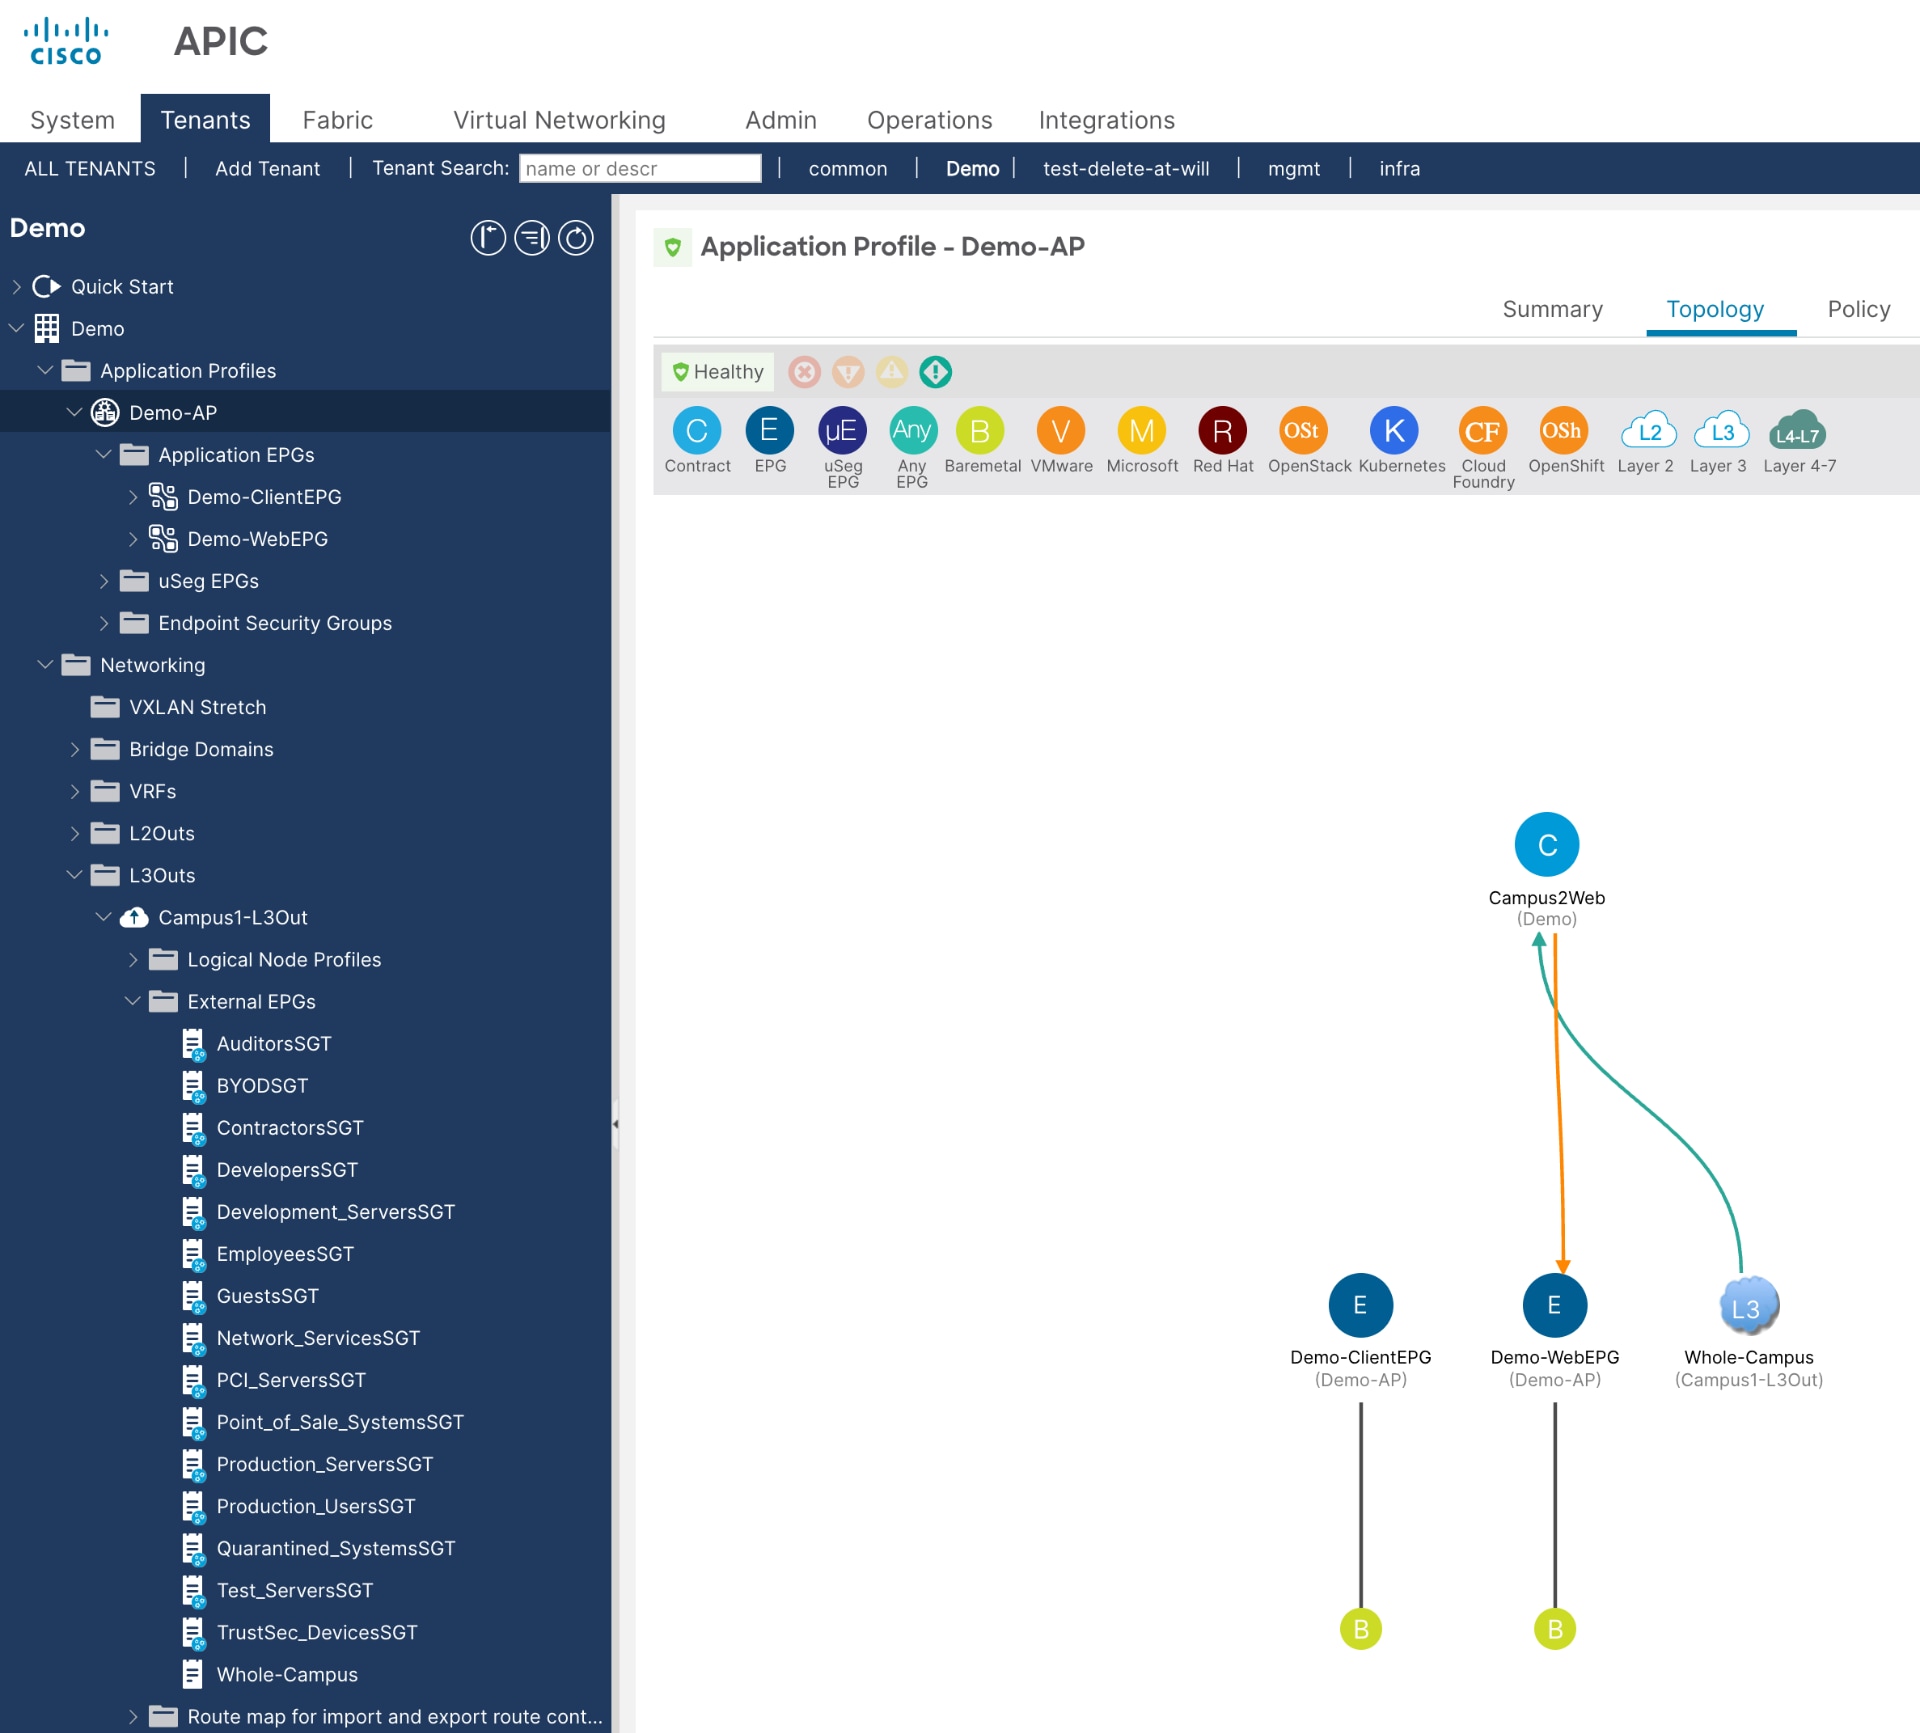
This example shows minimal configured contracts, but you can create contracts using groups learned from ISE (SGTs learned as External EPGs). While this document does not provide detailed steps for creating contracts in APIC, once you add contracts, they appear in the topology diagram as shown below.
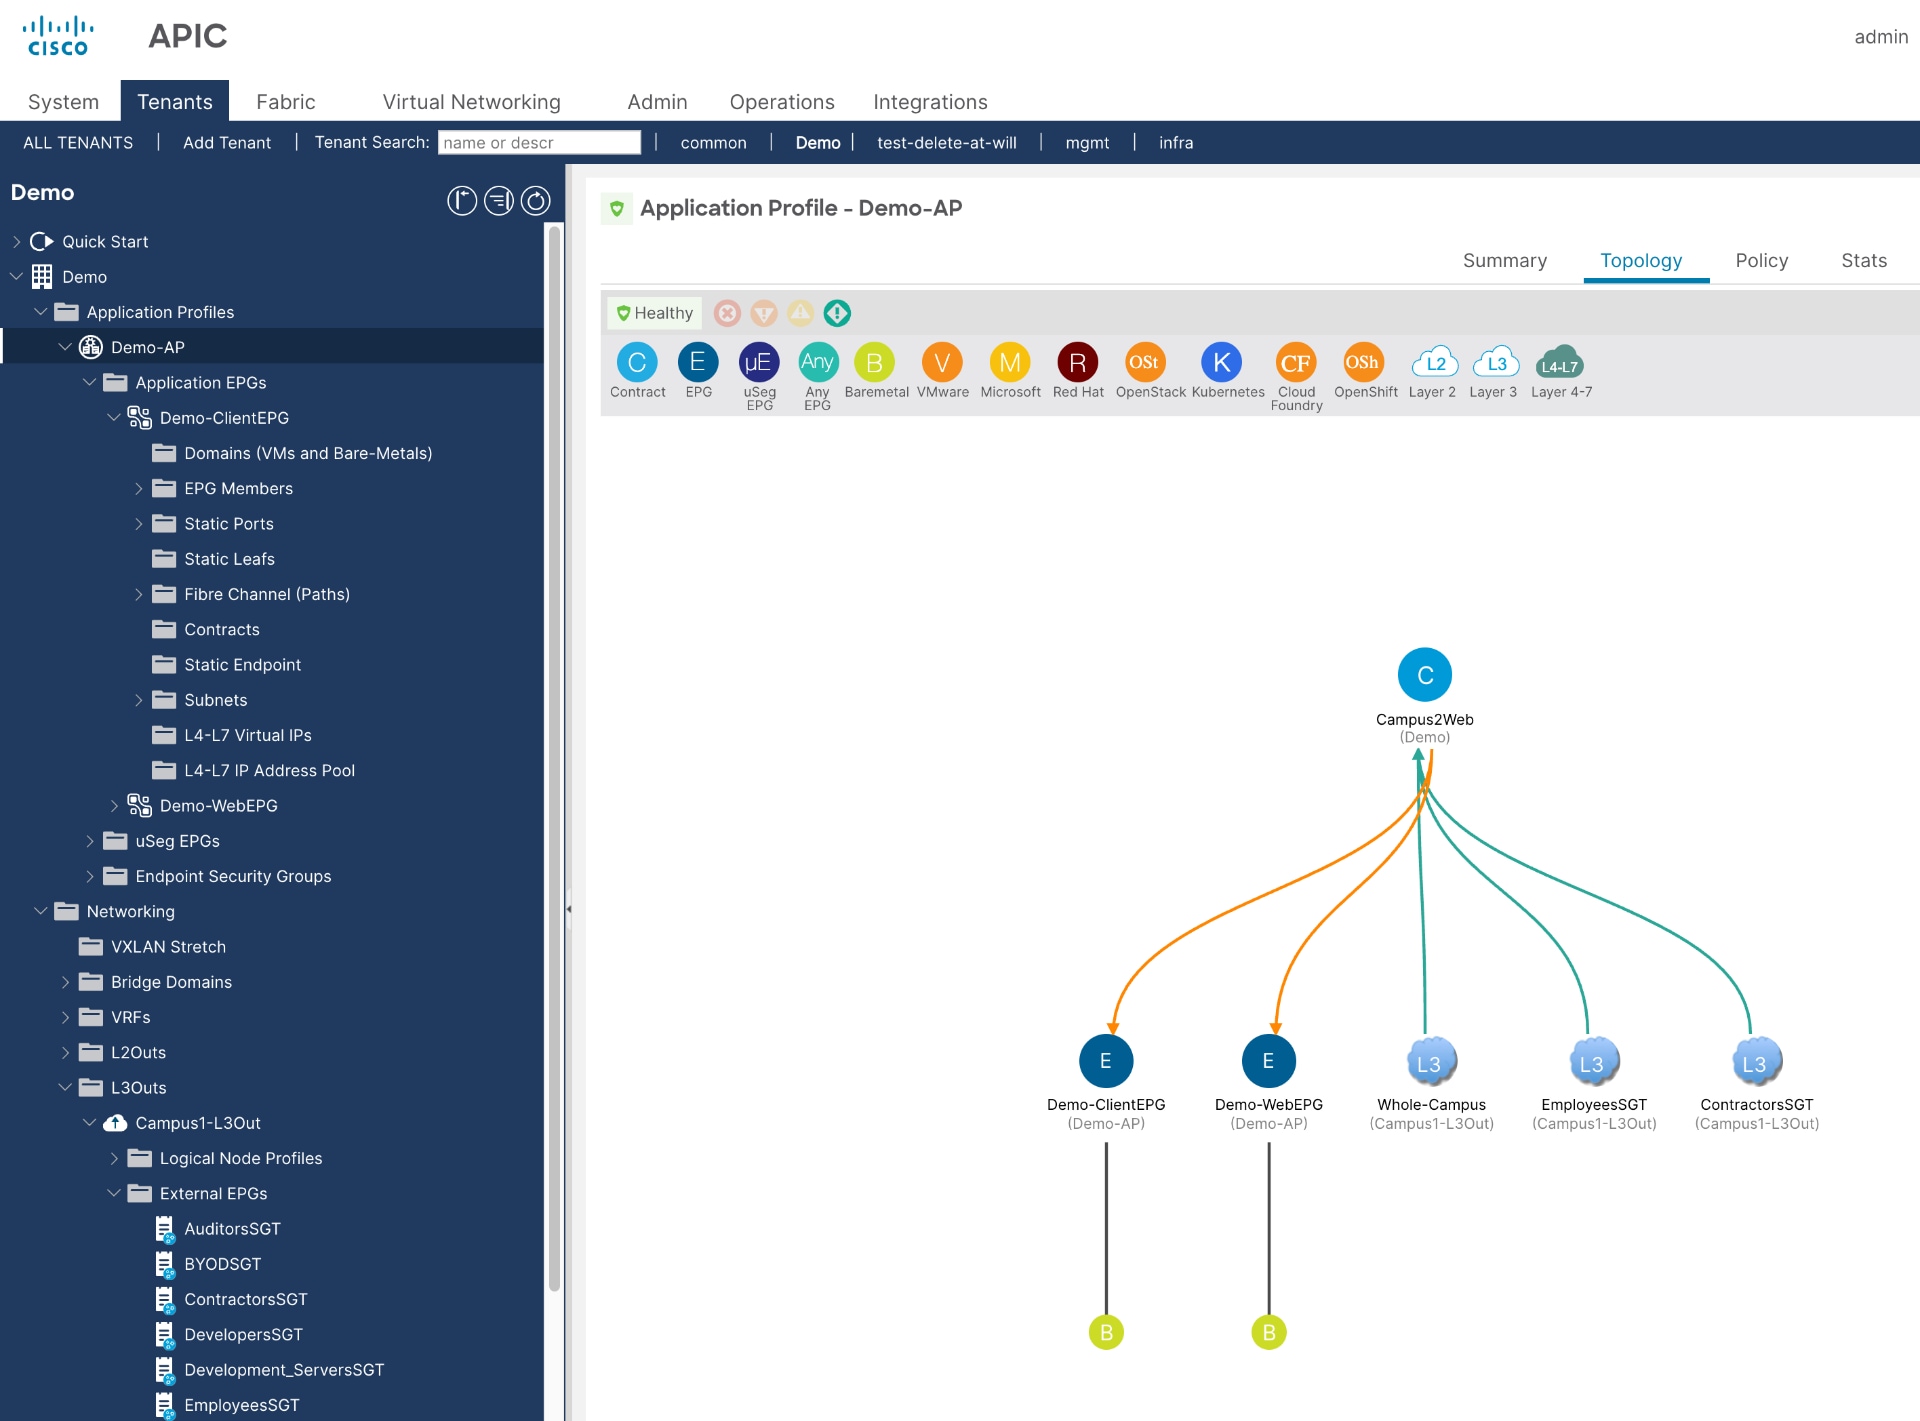
You can view the groups learned from ISE (EmployeesSGT and ContractorsSGT) utilizing the Campus2Web contract.
ISE/TrustSec to ACI Policy Plane Integration (Phase 1, from 2016)
Cisco Common Policy Integration Guide
Cisco APIC and Cisco ISE Integration
Connect Cisco Application Centric Infrastructure with Cisco ISE
Legal information
Cisco and the Cisco logo are trademarks or registered trademarks of Cisco and/or its affiliates in the U.S. and other countries. To view a list of Cisco trademarks, go to this URL: www.cisco.com/go/trademarks. Third-party trademarks mentioned are the property of their respective owners. The use of the word partner does not imply a partnership relationship between Cisco and any other company. (1721R)
Any Internet Protocol (IP) addresses and phone numbers used in this document are not intended to be actual addresses and phone numbers. Any examples, command display output, network topology diagrams, and other figures included in the document are shown for illustrative purposes only. Any use of actual IP addresses or phone numbers in illustrative content is unintentional and coincidental.
© 2026 Cisco Systems, Inc. All rights reserved.
 Feedback
Contact Cisco
- Open a Support Case

- (Requires a Cisco Service Contract)