Introduction
This document describes how to deploy an ISE virtual machine on the Nutanix environment using the standard Cisco ISE .iso image.
Prerequisites
Requirements
Cisco recommends that you have a basic knowledge of these topics:
- Cisco Identity Services Engine (ISE)
- Nutanix AHV (Acropolis HyperVisor)
Components Used
The information in this document is based on these software and hardware versions:
| Cisco UCS server C240-M5SX |
3 node cluster |
| Nutanix Acropolis Operating System (AOS) version |
7.0 |
| Nutanix AHV Hypervisor version |
10.0 |
| Nutanix Cluster Check (NCC )Version |
5.1.0 |
| Life Cycle Manager (LCM) Version |
3.1 |
| Cisco ISE Version |
3.4 |
The information in this document was created from the devices in a specific lab environment. All of the devices used in this document started with a cleared (default) configuration. If your network is live, ensure that you understand the potential impact of any command.
Configure
Prepare the Nutanix AHV for Cisco ISE Software Installation
- Download the Cisco ISE 3.4 .iso image from Cisco.com ISE Software Download.

Note: A Cisco.com login and Cisco service contract are required.
2. Check Nutanix and ISE version compatibility, using the compatibility check link.
3. Check the recommended resource reservations for different types of deployment on Nutanix AHV, Nutanix AHV Requirements.
|
Type
|
Number of CPUs
|
CPU Reservation (In GHz)
|
Memory (In GB)
|
Memory Reservation (In GB)
|
Hard Disks
|
|
Evaluation
|
4
|
No reservation
|
16
|
No reservation
|
300 GB
|
|
Extra Small
|
8
|
8
|
32
|
32
|
300 GB
|
|
Small
|
16
|
16
|
32
|
32
|
600 GB
|
|
Medium
|
24
|
24
|
96
|
96
|
1.2 TB
|
|
Large
|
24
|
24
|
256
|
256
|
2.4 TB (4*600 GB)
|
Nutanix AHV Requirements
|
Requirement Type
|
Minimum Requirements
|
|
CPU
|
- Evaluation
- Clock Speed: 2.0 GHz or faster
- Number of Cores: 2 CPU cores
- Production
- Clock Speed: 2.0 GHz or faster
- Number of Cores
Extra Small—8 processors (4 cores with hyperthreading enabled)
Small—12 processors (6 cores with hyperthreading enabled)
Large—16 processors (8 cores with hyperthreading enabled)
Cisco ISE supports Hyperthreading. We recommend that you enable Hyperthreading, if it is available.
Note: Even though Hyperthreading can improve overall performance, it does not change the supported scaling limits per virtual machine appliance. Additionally, you must still allocate CPU resources based on the required number of physical cores, not the number of logical processors.
|
|
Memory
|
- Evaluation:
- Basic—4 GB (for evaluating guest access and basic access policy flows)
- Advanced—16 GB (for evaluating advanced features such as pxGrid, Internal CA, SXP, Device Administration, and Passive Identity Services)
- Production:
|
|
Hard disks
|
- Evaluation: 300 GB
- Production:
300 GB to 2 TB of disk storage (size depends on deployment and tasks).
We recommend that your Virtual machine host server use hard disks with a minimum speed of 10,000 RPM.
Note: You must use 4*600 GB for 2.4 TB hard disk support.
|
|
KVM Disk Device
|
Disk bus - SCSI
|
|
NIC
|
1 GB NIC interface required (two or more NICs are recommended; six NICs are supported). Cisco ISE supports VirtIO drivers. We recommend VirtIO drivers for better performance.
|
|
Hypervisor
|
AOS - 6.8, Nutanix AHV - 20230302.100169
|
4. Upload the Cisco ISE .iso image file to Nutanix as shown here:
Step 1: Log in to the Nutanix Prism Web Console.
Step 2: Click the gear icon to open the Settings page.
Step 3: Click Image Configuration from the left pane.
Step 4: Click Upload Image.
Step 5: Create the image:
- Enter a name for the image.
- From the Image Type drop-down list, choose ISO.
- From the Storage Container drop-down list, choose the desired container.
- Specify the location of the ISE ISO image:
You can either specify a URL (to import the file from a web server) or upload the file from your workstation.
- Click Save.
Step 6: Wait until the new image appears in the Image Configuration page.
 Upload Image Option
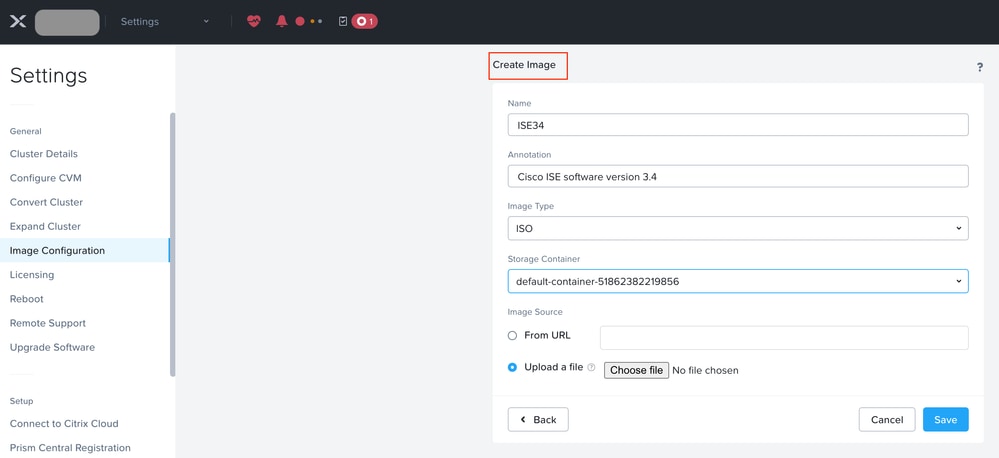 Create Image on Nutanix
Deploy Cisco ISE Virtual Machine (VM)
Ensure that the image of the Cisco ISE that you plan to deploy is appearing on the Image Configuration page.
Procedure
Step 1: Log in to the Nutanix Prism Web Console.
Step 2: From the main menu bar, click the view drop-down list, and choose VM.
Step 3: If not already displayed, select the Table tab.
Step 4: On the VM Dashboard, click Create VM.
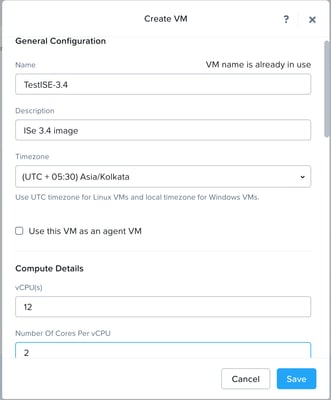 Create an ISE VM
Step 5: In the Create VM pane enter:
- Name for the Cisco ISE virtual instance.
- Optionally enter a description for the Cisco ISE virtual instance.
- Select the Timezone that you want the Cisco ISE to use.
Step 6: Enter the compute details:
- Enter the number of virtual CPUs to allocate to the Cisco ISE virtual instance.
- Enter the number of cores that must be assigned to each virtual CPU.
- Enter the amount of memory (in GB) to allocate to Cisco ISE virtual instance.
Step 7: In the Boot Configuration, select Legacy BIOS.
Step 8: Attach a disk to the Cisco ISE virtual instance:
- Under Disks, click Edit for CD-ROM.
- From the Operation drop-down list, choose Clone from Image Service.
- From the Bus Type drop-down list, choose SATA.
- From the Image drop-down list, choose the image that you want to use.
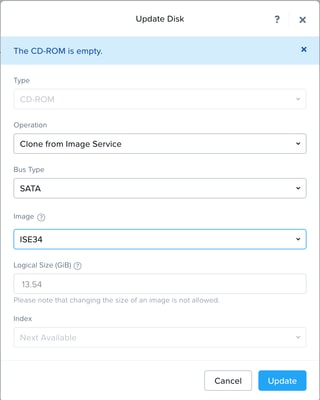 Mapping ISE Image to Disk
Step 9: Attach an additional disk to the Cisco ISE virtual instance:
- Click Add.
- Add an additional disk Under Disks, click Add New Disk.
- From the Operation drop-down list, choose Allocate on Storage Container.
- From the drop-down lBus Type ist, choose SCSI.
- Choose the Storage Container drop-down list, choose the desired container.
- Allocate the Logical Size of disk in GB.
- Click Add.
 Adding additional Disk in VM
Step 10: Configure virtual network interface.
Under Network Adapters (NIC), click Add New NIC, select a network, and click Add.
Step 11: Click Save to deploy the Cisco ISE VM. The ISE virtual instance appears in the VM table view and it is Power off by default. (image to be added).
Step 12: Access the NutanixController Virtual Machine (CVM) via ssh login and run the commands shown:
$acli <acropolis> vm.serial_port_create <Cisco ISE VM Name> type=kServer index=0<acropolis> vm.update <Cisco ISE VM Name> disable_branding=true <acropolis> vm.update <Cisco ISE VM Name> disable_hyperv=true
nutanix@NTNX-WZP2429001T-A-CVM:x.x.x.x:~$ acli
<acropolis> vm.serial_port_create TestISE-3.4 type=kServer index=0
VmUpdate: complete
<acropolis> vm.update TestISE-3.4 disable_branding=true
TestISE-3.4: complete
<acropolis> vm.update TestISE-3.4 disable_hyperv=true
TestISE-3.4: complete
Step 13: Exit Acropolis CLI and Power ON the VM to proceed with the installation using Cisco ISE ISO.
Step 14: When the VM boots, the console displays:
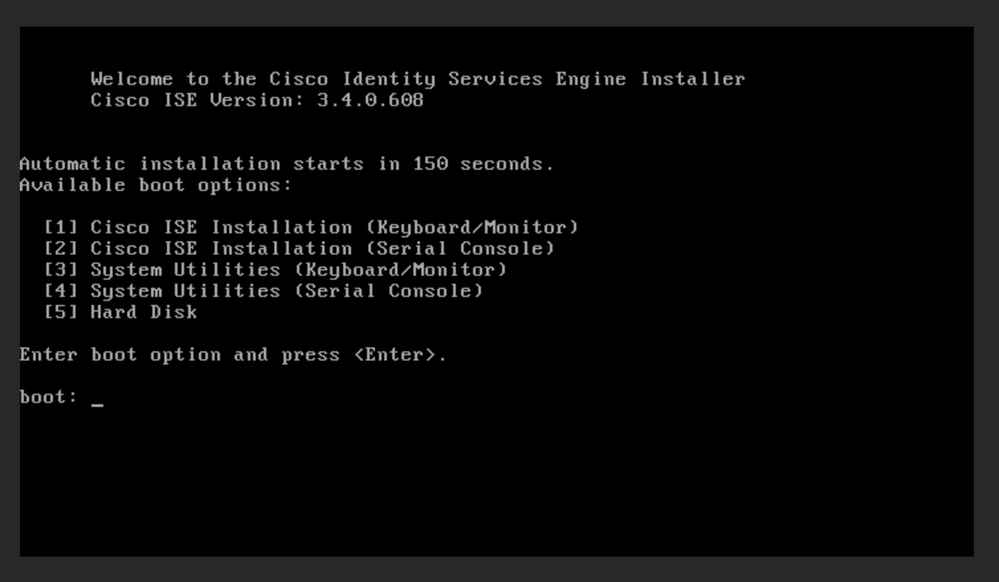 ISE image bootup prompt
Under the boot option, type 1 to select Cisco ISE Installation (Keyboard/Monitor) and press Enter.
The installer starts the installation of the Cisco ISE software. Allow 20 minutes for the installation process to complete. When the installation process finishes, the virtual machine reboots automatically. When the VM reboots, the console displays:
Type setup to configure your appliance localhost:
Step 15: At the system prompt, type setup and press Enter. The Setup Wizard appears and guides you through the initial configuration.
Limitations
Troubleshoot
There is currently no specific troubleshooting information available for this configuration.
Frequently Asked Questions (FAQs)
1. What is the compatibility between Cisco ISE and Nutanix versions?
Please check the Compatibility and Interoperability Matrix.
2. ISE Installation halted after booting the VM with ISE iso image?
After saving the VM configuration, before powering ON the VM, make sure to access the Nutanix CVM using your ssh login and run the commands listed in STEP 12.
3. How to migrate an ISE-VM-K9 from VMware to a Nutanix environment?
Use the backup and restore process of ISE upgrade guide (install ISE VM on Nutanix and restore the configuration backup taken from the ISE VM deployed on VMware). For more information, see Cisco Identity Services Engine Upgrade Journey, Release 3.4.

 Feedback