Install ISE on Azure Cloud Services
Available Languages
Download Options
Bias-Free Language
The documentation set for this product strives to use bias-free language. For the purposes of this documentation set, bias-free is defined as language that does not imply discrimination based on age, disability, gender, racial identity, ethnic identity, sexual orientation, socioeconomic status, and intersectionality. Exceptions may be present in the documentation due to language that is hardcoded in the user interfaces of the product software, language used based on RFP documentation, or language that is used by a referenced third-party product. Learn more about how Cisco is using Inclusive Language.
Contents
Introduction
This document describes how to Install a Cisco ISE IOS® instance using Azure Virtual Machine. Cisco ISE IOS is available on Azure Cloud Services.
Prerequisites
Requirements
Cisco recommends that you have knowledge of the Subscriptions and Resource Groups.
Component Used
The content of this document is based on these software and cloud services.
- Cisco ISE version 3.2.
- Microsoft Azure Cloud Services
The information in this document was created from the devices in a specific lab environment. All of the devices used in this document started with a cleared (default) configuration. If your network is live, ensure that you understand the potential impact of any command.
Procedure
Navigate to All Services > Subscriptions. Ensure that an Azure account with an active subscription and an enterprise agreement with Microsoft are present. Use Microsoft PowerShell Azure module CLI in order to execute commands to reserve space: (Refer to How to install Azure PowerShell for installing power shell and relevant packages).


Note: Replace the Tenant ID with your actual Tenant ID.
Complete the prerequisites atRequest host quota for Azure VMware Solution for more details.
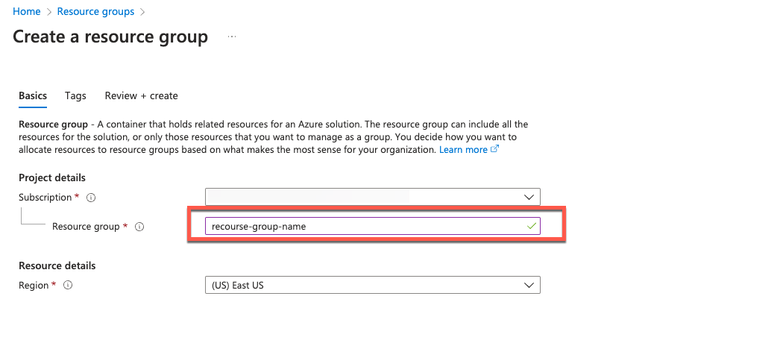
Create resource group after right subscription, navigating to All Services > Resource groups. Click Add. Enter the Resource group name.
Virtual Network and Security Groups
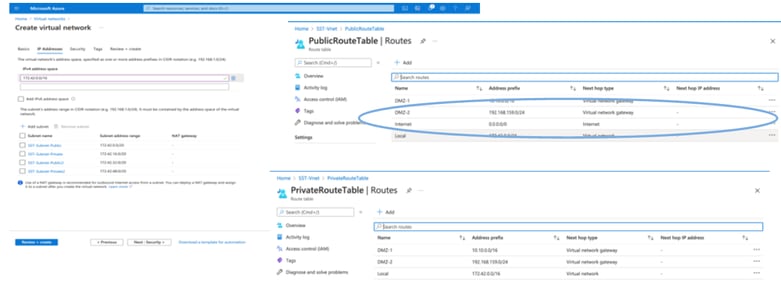
The Subnet which requires internet reachability must have the route table configured with next hop as internet. See examples of public and private subnetwork. PAN with public IP has both offline and online feed update working, while PAN with private IP must rely on offline feed updates.
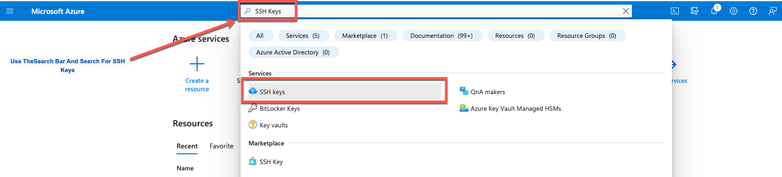
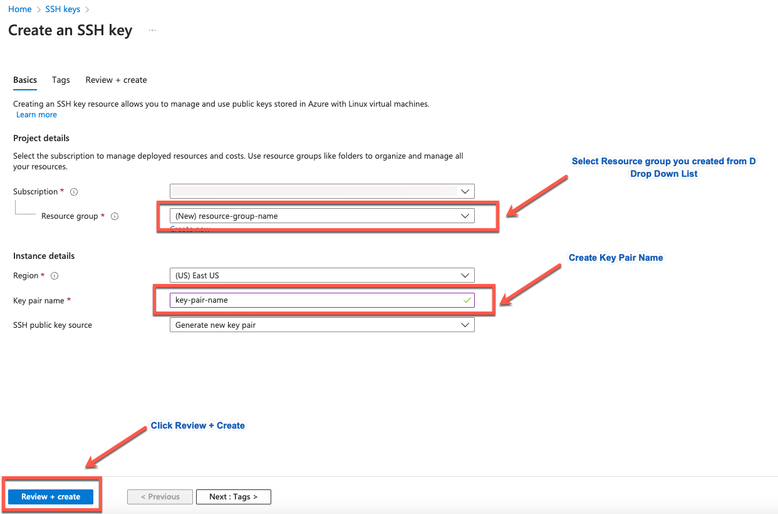
Create an SSH Key Pair
a. Use the search bar from the Azure Web Portal home page and search for SSH Keys.
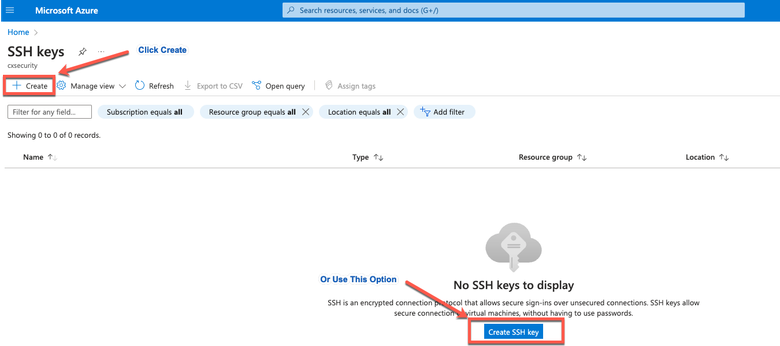
b. From the next window click Create.
c. From the next window, choose the Resource Group and Key Name. Then click Review + Create.
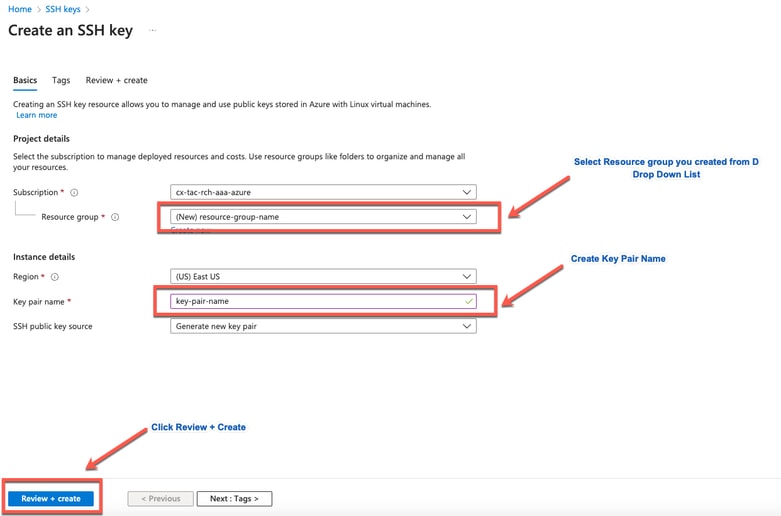
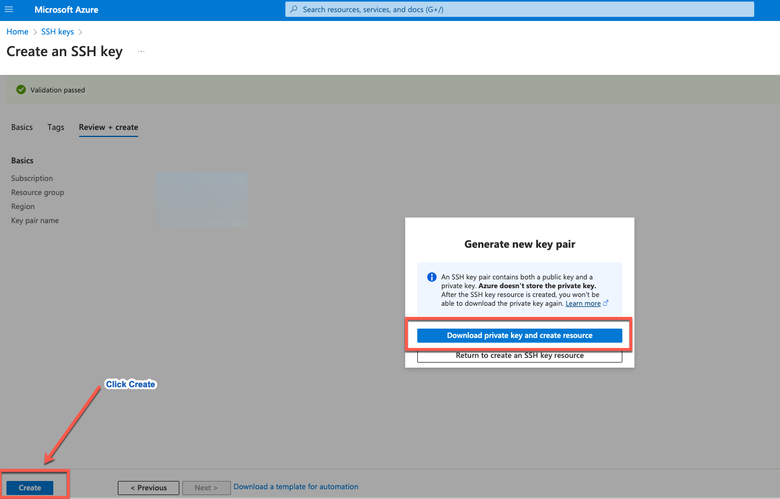
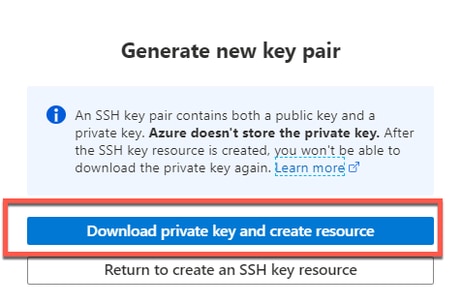
d. Then click Create and download Private Key.
Azure VM Sizes Supported by Cisco ISE

- The Fsv2-series Azure VM sizes are compute-optimized and are best suited for use as PSNs for compute-intensive tasks and applications.
- The Dsv4-series are general purpose Azure VM sizes that are best suited for use as PAN or MnT nodes or both and are intended for data processing tasks and database operations.
If you use a general-purpose instance as a PSN, the performance numbers are lower than the performance of a compute-optimized instance as a PSN. The Standard_D8s_v4 VM size must be used as an extra small PSN only.
Note: Do not clone an existing Azure Cloud image to create a Cisco ISE instance. Doing this can cause random and unexpected malfunctions in the created ISE machine.
Limitations of Cisco ISE in Microsoft Azure Cloud Services
-
If you create Cisco ISE using the Azure Virtual Machine, by default, Microsoft Azure assigns private IP addresses to VMs through DHCP servers. Before you create a Cisco ISE deployment on Microsoft Azure, you must update the forward and reverse DNS entries with the IP addresses assigned by Microsoft Azure.
Alternatively, after you install Cisco ISE, assign a static IP address to your VM by updating the Network Interface object in Microsoft Azure:
-
Stop the VM.
-
In the Private IP address settings area of the VM, in the Assignment area, click Static.
-
Restart the VM.
-
In the Cisco ISE serial console, assign the IP address as Gi0.
-
Restart the Cisco ISE application server.
-
-
Dual NIC is supported with only two NICs—Gigabit Ethernet 0 and Gigabit Ethernet 1. In order to configure a secondary NIC in your Cisco ISE instance, you must first create a network interface object in Azure, power off your Cisco ISE instance, and then attach this network interface object to Cisco ISE. After you install and launch Cisco ISE on Azure, use the Cisco ISE CLI in order to manually configure the IP address of the network interface object as the secondary NIC.
- The Cisco ISE upgrade workflow is not available in Cisco ISE on Microsoft Azure. Only fresh installs are supported. However, you can carry out backup and restoration of the configuration data.
- The public cloud supports Layer 3 features only. Cisco ISE nodes on Microsoft Azure do not support Cisco ISE functions that depend on Layer 2 capabilities. For example, working with DHCP SPAN profiler probes and CDP protocol functions through the Cisco ISE CLI are functions that are currently not supported.
- When you carry out the restore and backup function of configuration data, after the backup operation is complete, first restart Cisco ISE through the CLI. Then, initiate the restore operation from the Cisco ISE GUI.
- SSH access to Cisco ISE CLI using password-based authentication is not supported in Azure. You can only access the Cisco ISE CLI through a key pair, and this key pair must be stored securely. If you are using a Private Key (or PEM) file and you lose the file, you are unable to access the Cisco ISE CLI. Any integration that uses a password-based authentication method in order to access Cisco ISE CLI is not supported, for example, Cisco DNA Center Release 2.1.2 and earlier.
-
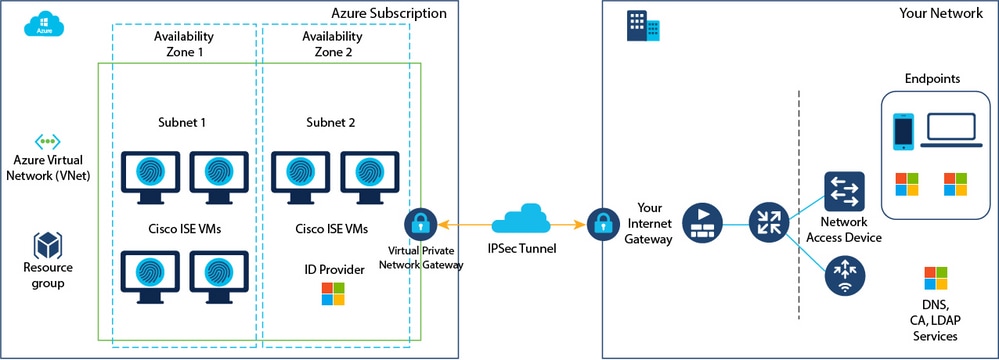
Cisco ISE IOS deployments on Azure typically leverage VPN solutions like Dynamic Multipoint Virtual Private Networks (DMVPN) and Software-Defined Wide Area Networks (SD-WAN), where the IPSec tunnel overheads can cause MTU and fragmentation issues. In such scenarios, Cisco ISE IOS does not receive complete RADIUS packets and an authentication failure occurs without triggering a failure error log.
A possible workaround is to seek Microsoft technical support in order to explore any solutions in Azure that can allow out-of-order fragments to pass to the destination instead of being dropped.
- CLI Admin user must be 'iseadmin'.
Configure
Example of ISE Deployment Connected to Azure Cloud
Configurations
- Step 1. Navigate to the Azure portal and log in to your Microsoft Azure account.
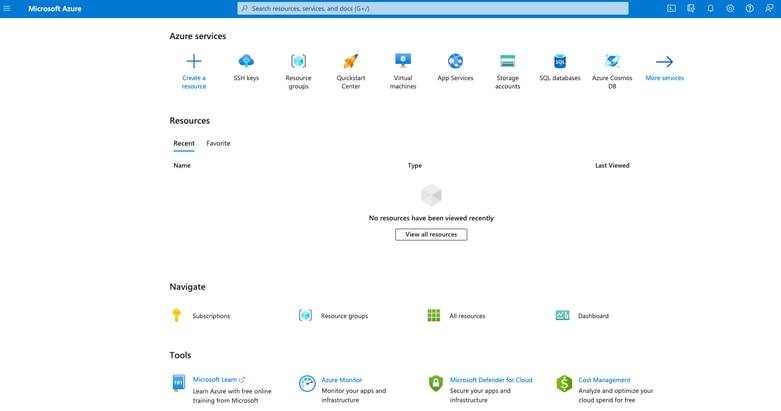
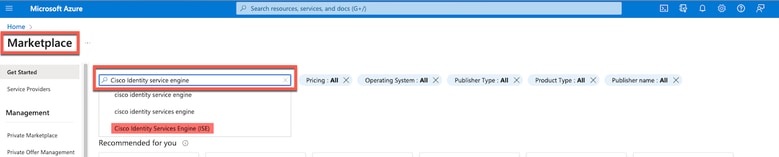
- Step 2. Use the search field at the top of the window in order to search for Marketplace.

- Step 3. Use the Search the Marketplace search field in order to search for Cisco Identity Services Engine (ISE).
- Step 4. Click Virtual Machine.
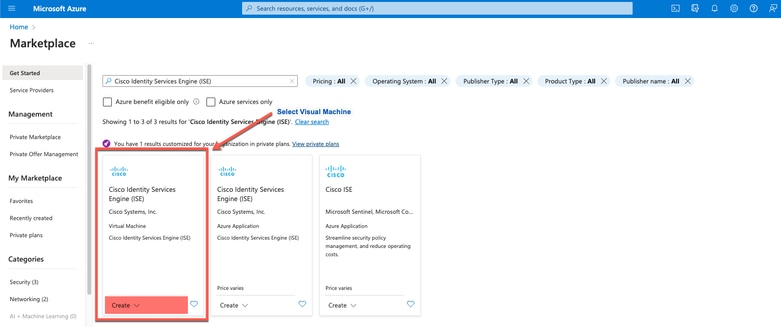
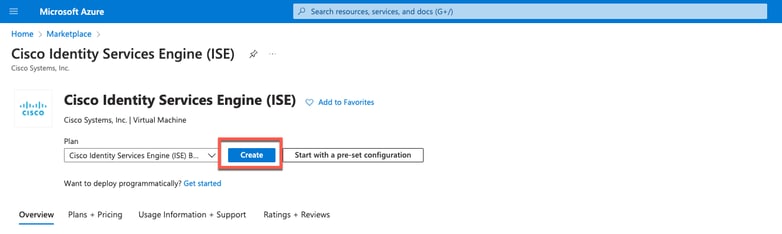
- Step 5. In the new window that is displayed, click Create.
- Step 6. In the Basics tab:
a. In the Project details area, choose the required values from the Subscription and Resourcegroup drop-down lists
b. In the Instance details area, enter a value in the Virtual Machine name field.
c. From the Image drop-down list, choose the Cisco ISE image.
d. From the Size drop-down list, choose the instance size that you want to install Cisco ISE with. Choose an instance that is supported by Cisco ISE, as listed in the table titled Azure Cloud.
Instances supported by Cisco ISE, are in the section Cisco ISE on Azure Cloud.
e. In the Administrator account > Authentication type area, click the SSH Public Key radio button.
f. In the Username field, enter iseadmin.
g. From the SSH public key source drop-down list, choose Use existing key stored in Azure.
h. From the Stored keys drop-down list, choose the key pair that you created as a prerequisite for this task.
j. In the Inbound port rules area, click the Allow selected ports radio button.
k. In the Licensing area, from the Licensing type drop-down list, choose Other.
 Create a Virtual Machine
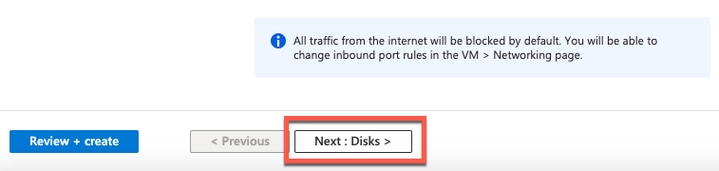
- Step 7. Click Next: Disks.
- Step 8. In the Disks tab, retain the default values for the mandatory fields and click Next: Networking.
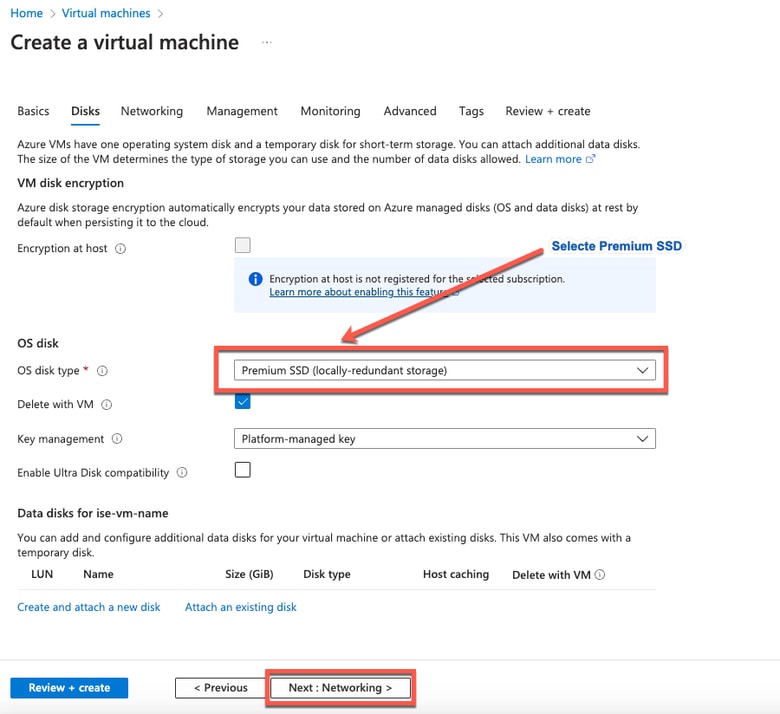
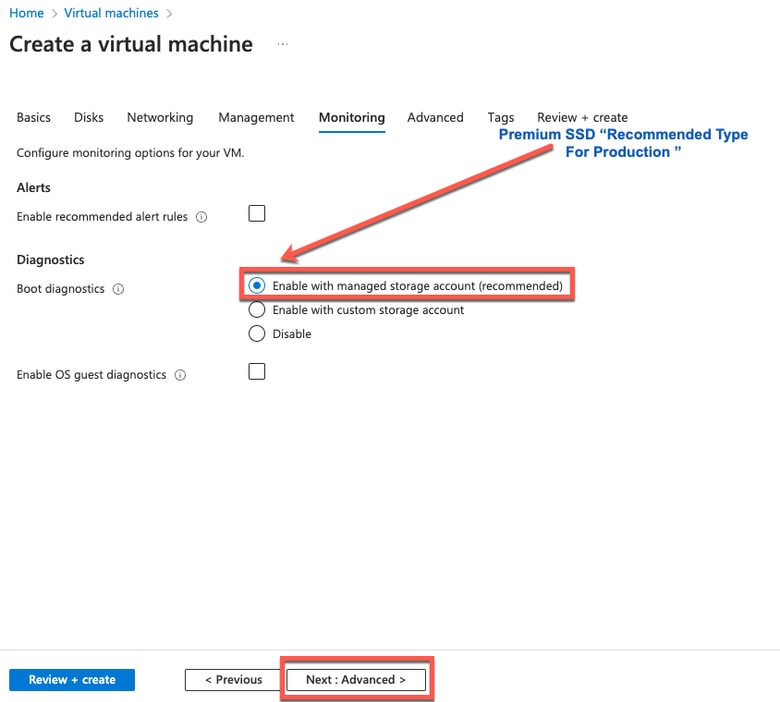
Note: For The Disk Type, there are more options from the drop-down list to choose from. You can choose the one that meets your Needs. Premium SSD is the Recommended Type for Production and Performance Sensitive Workloads.
- Step 9. In the Network Interface area, from the Virtual network, Subnet, and Configure network security group drop-down lists, choose the virtual network and subnet that you have created.
Note: The subnet with a public IP address receives online and offline posture feed updates, while a subnet with a private IP address only receives offline posture feed updates.
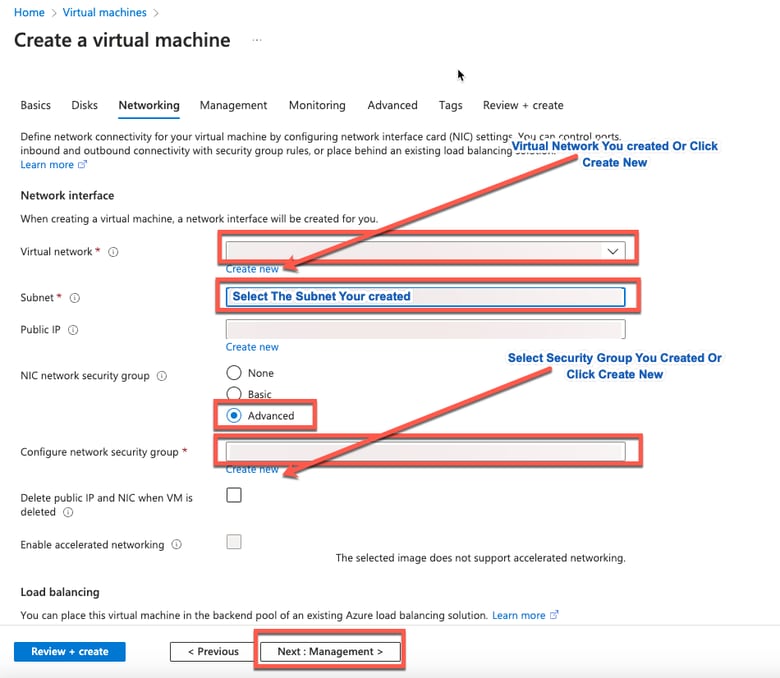
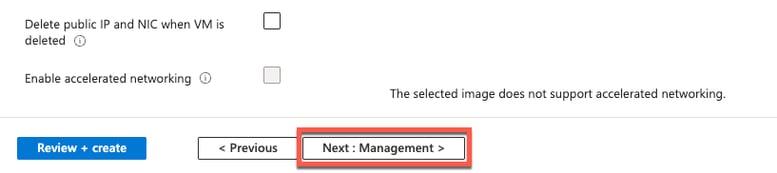
- Step 10. Click Next: Management.
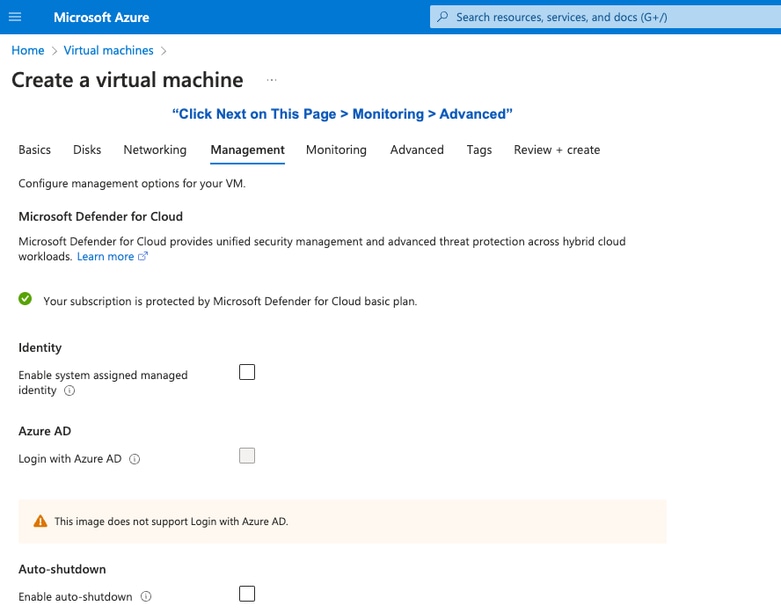
- Step 11. In the Management tab, retain the default values for the mandatory fields and click Next: Advanced.
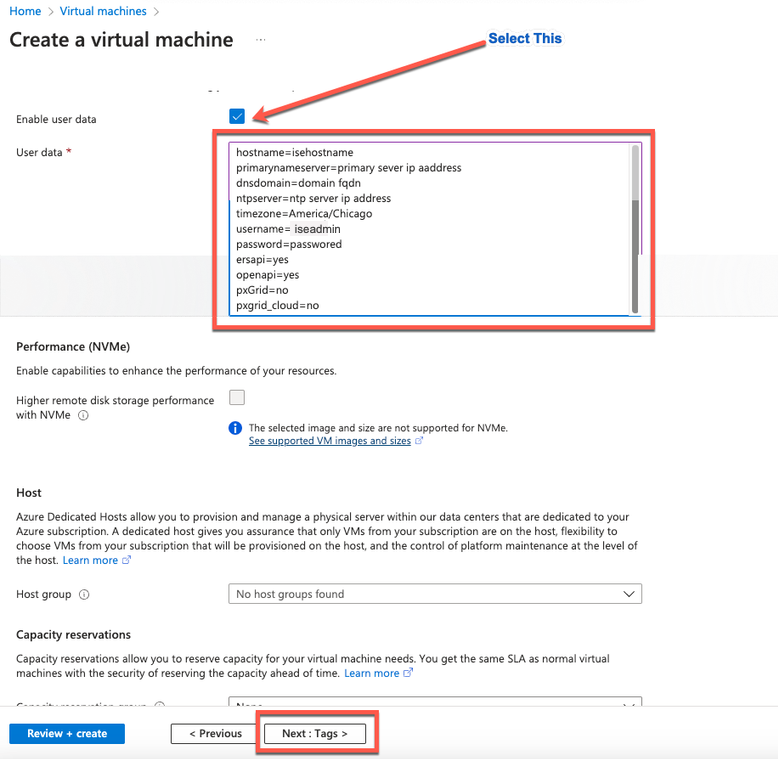
- Step 12. In the User data area, check the Enable user data check box.
In the User data field, complete the information:
hostname=<hostname of Cisco ISE>
primarynameserver=<IPv4 address>
dnsdomain=<domain name>
ntpserver=<IPv4 address or FQDN of the NTP server>
timezone=<timezone>
password=<password>
ersapi=<yes/no>
openapi=<yes/no>
pxGrid=<yes/no>
pxgrid_cloud=<yes/no>
Note: You must use the correct syntax for each of the fields that you configure through the user data entry. The information you enter in the User data field is not validated when it is entered. If you use the wrong syntax, Cisco ISE services do not come up when you launch the image.
See the Guidelines for the configurations that you must submit through the user data field:
a. hostname: Enter a hostname that contains only alphanumeric characters and hyphens (-). The length of the hostname must not exceed 19 characters and cannot contain underscores (_).
b. primary nameserver: Enter the IP address of the primary name server. Only IPv4 addresses are supported.
You can add only one DNS server in this step. You can add additional DNS servers through the Cisco ISE CLI after installation.
c. dnsdomain: Enter the FQDN of the DNS domain. The entry can contain ASCII characters, numerals, hyphens (-), and periods (.).
d. ntpserver: Enter the IPv4 address or FQDN of the NTP server that must be used for synchronization.
You can add only one NTP server in this step. You can add additional NTP servers through the Cisco ISE CLI after installation. Use a valid and reachable NTP Server since this is needed for ISE Operations.
e. time zone: Enter a time zone, for example, Etc/UTC. It is recommended that you set all the Cisco ISE nodes to the Coordinated Universal Time (UTC) time zone, especially if your Cisco ISE nodes are installed in a distributed deployment. This procedure ensures that the time stamps of the reports and logs from the various nodes in your deployment are always synchronized.
f. password: Configure a password for GUI-based login to Cisco ISE. The password that you enter must comply with the Cisco ISE password policy. The password must contain 6 to 25 characters and include at least one numeral, one uppercase letter, and one lowercase letter. The password cannot be the same as the username or its reverse (iseadmin or nimdaesi), cisco, or ocsic. The allowed special characters are @~*!,+=_-. See the 'User Password Policy' section in the Chapter 'Basic Setup' of the Cisco ISE Administrator Guide for your release.
g. ersapi: Enter yes in order to enable ERS, or no to disallow ERS.
h. openapi: Enter yes in order to enable OpenAPI, or no to disallow OpenAPI.
i. pxGrid: Enter yes in order to enable pxGrid, or no to disallow pxGrid.
j. pxgrid_cloud: Enter yes to enable pxGrid Cloud or no to disallow pxGrid Cloud. In order to enable pxGrid Cloud, you must enable pxGrid. If you disallow pxGrid, but enable pxGrid Cloud, pxGrid Cloud services are not enabled on launch.
 User Data Section
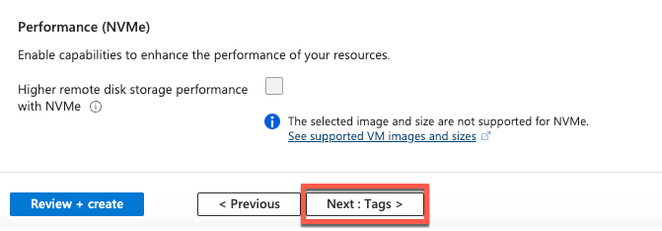
- Step 13. Click Next: Tags.
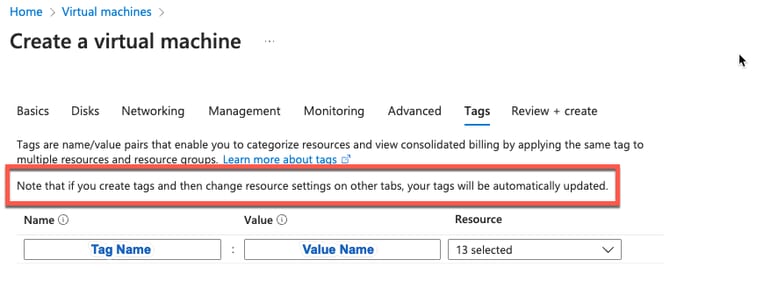
- Step 14. In order to create name-value pairs that allow you to categorize resources, and consolidate multiple resources and resource groups, enter values in the Name and Value fields.
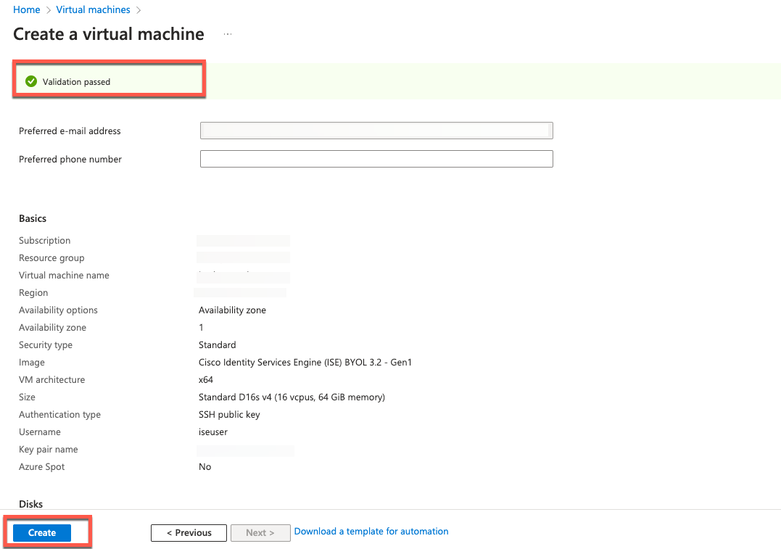
- Step 15. Click Next: Review + Create.

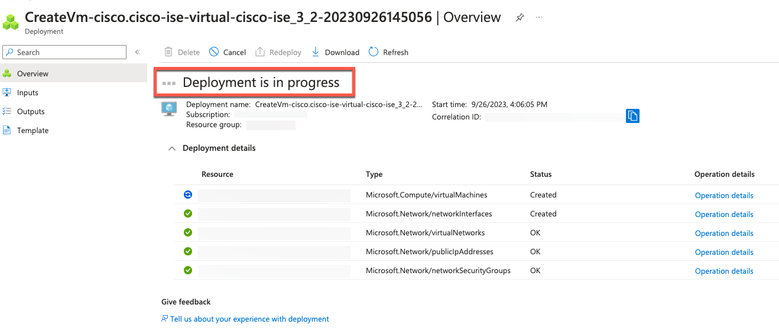
- Step 16. Review the information that you have provided so far and click Create.
The Deployment is in progress window is displayed. It takes about 30 minutes for the Cisco ISE instance to be created and available for use. The Cisco ISE VM instance is displayed in the Virtual Machines window (use the main search field in order to find the window).
What To Do Next
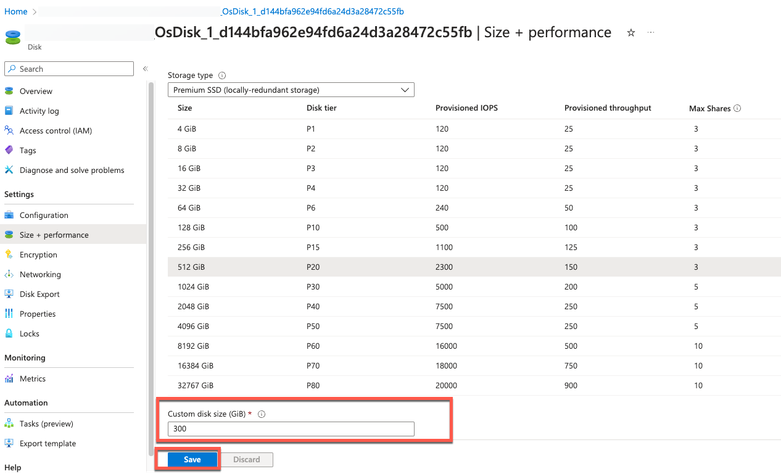
Due to a Microsoft Azure default setting, the Cisco ISE VM you have created is configured with only a 300 GB disk size. Cisco ISE nodes typically require more than 300 GB disk size. You can see the Insufficient Virtual Memory alarm when you first launch Cisco ISE from Microsoft Azure.
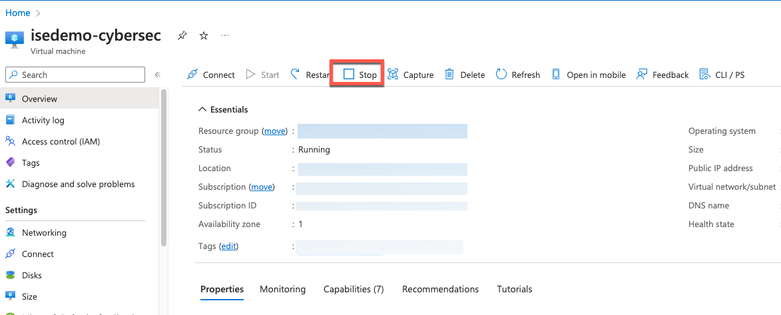
After the Cisco ISE VM creation is complete, log in to the Cisco ISE administration portal in order to verify that Cisco ISE is set up. Then, in the Microsoft Azure portal, carry out and complete steps in the Virtual Machines window in order to edit the disk size:
1. Stop the Cisco ISE instance.
2. Click Disk in the left pane and click the disk that you are using with Cisco ISE.

3. Click Size + performance in the left pane.
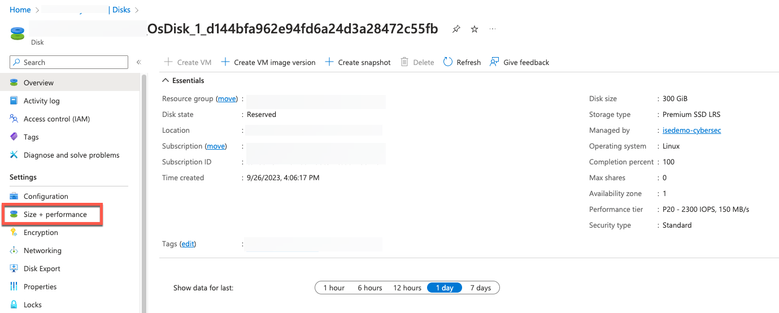
4. In the Custom disk size field, enter the disk size you want, in GiB.
Post Installation Tasks
For information about the post-installation tasks that you must carry out after successfully creating a Cisco ISE instance, see the Chapter 'Installation Verification and Post Installation Tasks' in the Cisco ISE Installation Guide for your Cisco ISE release.
Password Recovery and Reset on Azure Cloud
Complete the tasks that help you reset or recover your Cisco ISE virtual machine password. Choose the tasks that you need and carry out the steps detailed.
1. Reset Cisco ISE GUI Password Through Serial Console
- Step 1. Log in to Azure Cloud and choose the resource group that contains your Cisco ISE virtual machine.
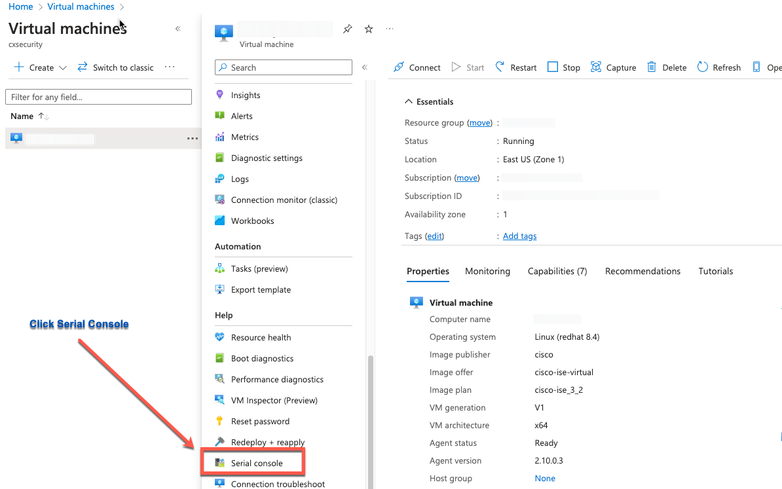
- Step 2. From the list of resources, click the Cisco ISE instance for which you want to reset the password.
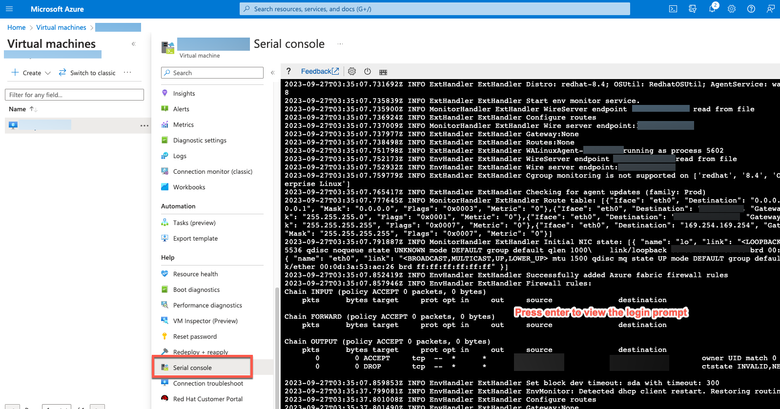
- Step 3. From the left-side menu, from the Support + Troubleshooting section, click Serial Console.
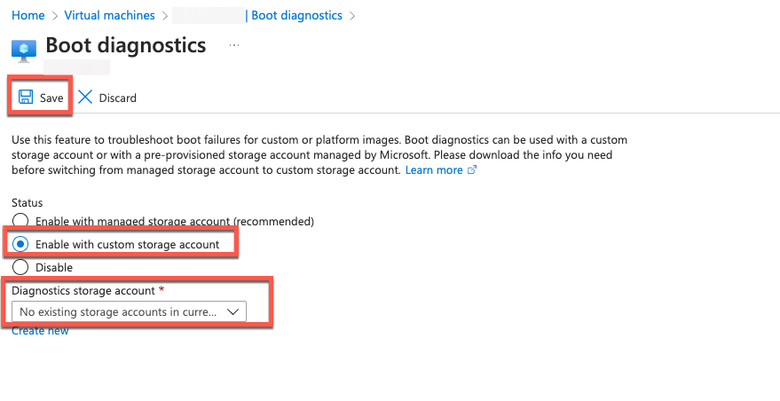
- Step 4. If you view an error message here, you have to enable boot diagnostics by carrying out the complete steps:
a. From the left-side menu, click Boot Diagnostics.
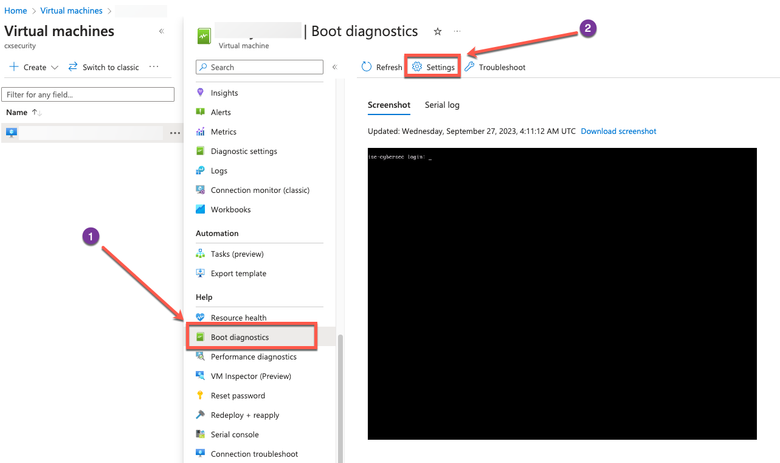
b. Click Enable with a custom storage account. Then click Save.
- Step 5. From the left-side menu, from the Support + Troubleshooting section, click Serial Console. The Azure Cloud Shell is displayed in a new window. If the screen is black, press Enter in order to view the login prompt.
- Step 8. Log in to the serial console. In order to log into the serial console, you must use the original password that was configured at the installation of the instance.
- Step 9. Use the application reset-passwd ise iseadmin command in order to configure a new GUI password for the iseadmin account.
2. Create a New Public Key Pair for SSH Access
Through this task, you add additional key pairs to a repository. The existing key pair that was created at the time of the Cisco ISE instance configuration is not replaced by the new public key that you created.
- Step 1. Create a new public key in Azure Cloud.
You get a pop-up window to choose Download private key and create a resource that downloads the SSH key as a .pem file.
- Step 2. In order to create a new repository to save the public key to, see Azure Repos documentation. If you already have a repository that is accessible through the CLI, skip to Step 3.
- Step 3. In order to import the new Public Key, use the command crypto key import <public key filename> repository <repository name>.
- Step 4. When the import is complete, you can log in to Cisco ISE via SSH using the new public key.
Revision History
| Revision | Publish Date | Comments |
|---|---|---|
1.0 |
04-Oct-2023
|
Initial Release |
Contributed by Cisco Engineers
- Ameer Al AzzawiSecurity Technical Consulting Engineer
 Feedback
Contact Cisco
- Open a Support Case

- (Requires a Cisco Service Contract)