Cisco ISE on Azure Cloud Services

Cisco ISE on Azure cloud

Cisco ISE is available on Azure cloud services. To configure and install Cisco ISE on Azure cloud, you must be familiar with Azure cloud features and solutions. Familiarize yourself with these Azure cloud concepts before starting:

  • Subscriptions and resource groups

  • Azure Virtual Machines. Refer to Instances, Images, SSH Keys, Tags, and VM Resizing.

Azure deployment methods

You can deploy Cisco ISE on Microsoft Azure using an Azure application or an Azure VM.

There are no differences in cost or Cisco ISE features when you deploy Cisco ISE using an Azure application or an Azure VM.

We recommend using the Azure application for these advantages it offers in comparison to the Azure VM:

  • Azure application allows you to easily configure Cisco ISE-specific choices directly through its UI instead of a user-data field as in the case of Azure VM configuration.

  • At the initial configuration of an Azure application, you can choose an OS disk volume ranging between 300 and 2400 GB. However, during the initial configuration of an Azure VM, you can change the OS disk volume to a fixed set of values provided in the Azure portal.

    You must carry out more steps after Cisco ISE installation and launch to reconfigure the virtual machine.

  • You can directly choose from the specific Azure VM sizes that Cisco ISE supports.

  • You can configure a static private IP address at the initial configuration.

You can use the Azure VM if:

  • you do not use the Azure portal UI to deploy Cisco ISE.

  • you need to use one of the additional settings that are available in the Azure VM configuration workflow.

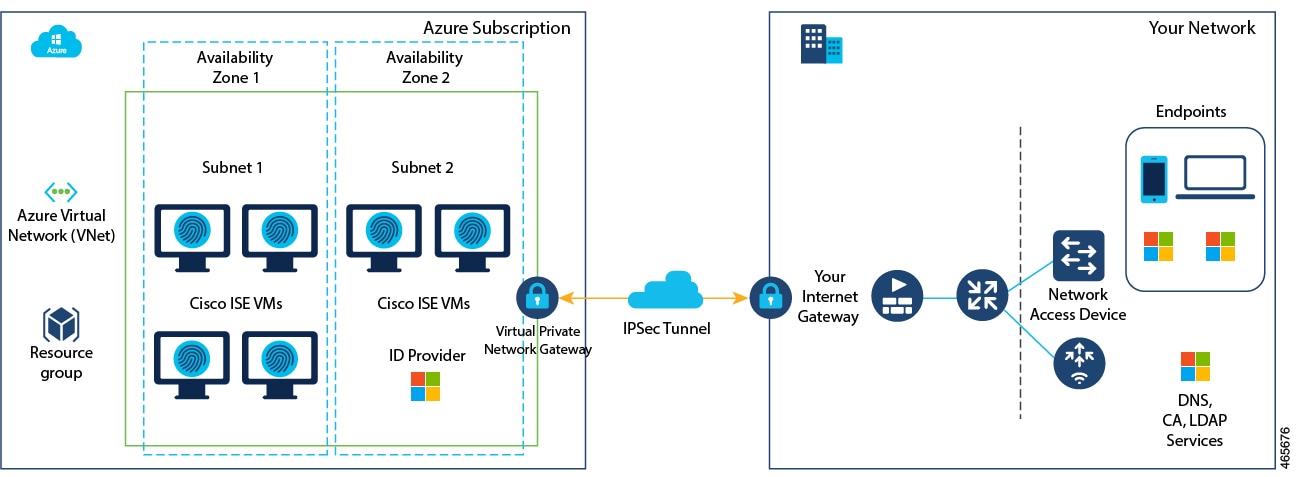
This is an example of a deployment connected to the Azure cloud.

Figure 1. Example of a deployment connected to Azure cloud

In addition to these deployment methods, you can also use Cisco Developed Terraform Script to install and automatically create multi-node Cisco ISE deployments on Azure.


Note


Do not clone an existing Azure cloud image to create a Cisco ISE instance.


Azure VM sizes supported by Cisco ISE

Cisco ISE can be installed by using one of these Azure VM sizes.

Table 1. Azure VM sizes that are supported by Cisco ISE

Azure VM sizes

vCPU

RAM (in GB)

Standard_D4s_v4

This instance supports the Cisco ISE evaluation use case. 100 concurrent active endpoints are supported.

4

16

Standard_D8s_v4

8

32

Standard_F16s_v2

16

32

Standard_F32s_v2

32

64

Standard_D16s_v4

16

64

Standard_D32s_v4

32

128

Standard_D64s_v4

64

256

Standard_D16ls_v6*

16

32

Standard_D32ls_v6*

32

64

*Supported only for Cisco ISE releases 3.3 patch 12, 3.4 patch 7, and 3.5 patch 4.

From Cisco ISE release 3.5, Standard_D4s_v4 and Standard_D16s_v4 VMs are not supported.

The Fsv2-series Azure VM sizes are compute-optimized and are best suited for use as PSNs for compute-intensive tasks and applications.

The Dsv4-series are general purpose Azure VM sizes that are best suited for use as PAN or MnT nodes or both and are intended for data processing tasks and database operations.

If you use a general purpose instance as a PSN, the performance numbers are lower than the performance of a compute-optimized instance as a PSN.

The Standard_D8s_v4 VM size must be used as an extra small PSN only.

For information on the scale and performance data for Azure VM sizes, refer to the Performance and Scalability Guide for Cisco Identity Services Engine.


Note


Microsoft may retire, restrict, or change the availability, reservation purchase, or reservation renewal support for Azure VM sizes over time. Cisco periodically updates the list of Azure VM sizes supported for Cisco ISE as Azure platform support and Cisco ISE cloud integration evolve.

Review the latest Microsoft Azure VM lifecycle and reservation guidance before deploying, resizing, or purchasing reservations for Cisco ISE on Azure.

The most recent Microsoft guidance indicates changes beginning July 1, 2026, affecting Reserved VM Instance purchases and renewals for certain VM series, including the Fsv2 series. This list includes Cisco ISE-supported VM sizes such as Standard_F16s_v2 and Standard_F32s_v2.

If you are replacing Standard_F16s_v2 or Standard_F32s_v2, which are no longer available for reserved instance renewals, Cisco strongly recommends using Standard_D32s_v4 as the alternative Cisco ISE-supported VM size. These instances remain available on a Pay-As-You-Go basis until Microsoft discontinues support.


Known limitations of Cisco ISE in Microsoft Azure cloud services

These are the known limitations with using Cisco ISE with Microsoft Azure cloud services:

  • If you create Cisco ISE using the Azure Virtual Machine, Microsoft Azure assigns private IP addresses to VMs through DHCP servers by default. Before creating a Cisco ISE deployment on Microsoft Azure, update the forward and reverse DNS entries with the IP addresses assigned by Microsoft Azure.

    After installing Cisco ISE, you can assign a static IP address to your VM by updating the Network Interface object in Microsoft Azure. To do this:

    1. Stop the VM.

    2. Choose Private IP address settings > Assignment > Static.

    3. Restart the VM.

    4. In the Cisco ISE serial console, assign the IP address to the Gi0 interface.

    5. Restart the Cisco ISE application server.

  • Dual NIC supports only two NICs: Gigabit Ethernet 0 and Gigabit Ethernet 1. To configure a secondary NIC, first create a network interface object in Azure, power off your Cisco ISE instance, and then attach the network interface object to your Cisco ISE.

    After you install and launch Cisco ISE on Azure, use the Cisco ISE CLI to manually configure the IP address of the network interface object as the secondary NIC.

  • You cannot upgrade Cisco ISE in a Microsoft Azure environment. You can only perform fresh installations. However, you can carry out backup and restore of configuration data. For information on upgrading hybrid Cisco ISE deployments, refer to Upgrade Guidelines for Hybrid Deployments.

  • The public cloud supports only Layer 3 features. Cisco ISE nodes on Microsoft Azure do not support Layer 2 features. For example, DHCP SPAN profiler probes and CDP protocol functions accessed through the Cisco ISE CLI are not supported.

  • To restore and back up configuration data, first complete the backup operation. Then, restart Cisco ISE through the CLI and initiate the restore operation from the Cisco ISE GUI. For more information, refer to the Chapter "Maintain and Monitor" in the Cisco ISE Administrator Guide for your release.

  • SSH access to the Cisco ISE CLI with password-based authentication is not supported in Azure. You can access the Cisco ISE CLI only through a key pair, which must be stored securely.

    If you use a private key (or PEM) file and lose the file, you cannot access the Cisco ISE CLI.

    Integrations that use password-based authentication to access the Cisco ISE CLI are not supported.

  • Cisco ISE deployments on Azure Cloud do not support Accelerated Networking. Enabling this feature may cause operations such as node registration and deregistration to fail.

Out-of-order fragmentation limitation for Cisco ISE deployments on Azure

Microsoft Azure's default virtual network stack drops out-of-order IP fragments for security reasons (specifically to address the FragmentSmack vulnerability), which prevents these fragments from reaching the destination virtual machine. This behavior can affect Cisco ISE deployments. As a result, Cisco ISE and network devices may not receive complete RADIUS packets, leading to authentication, authorization, and Dynamic Access Control List (DACL) push failures.

You may encounter this issue on all Cisco ISE versions when using the Azure default VPN Gateway, Azure ExpressRoute, or Azure Virtual WAN. This issue is especially common with large RADIUS packets, such as EAP-TLS packets with large certificates, DACL pushes, or RADIUS authentication and accounting requests with multiple attributes.

To mitigate this issue, deploy a third-party VPN gateway (such as Cisco Catalyst 8000V or Cisco ASAv) as an Azure virtual machine. This gateway terminates VPN tunnels from on-premises environments and supports fragmentation reassembly. The Azure default VPN Gateway does not support fragmentation reassembly.

After deploying third-party VPN gateways in Azure to establish site-to-site VPN connectivity with on-premises, perform these steps to ensure reliable handling of large RADIUS packets and to mitigate authentication failures due to fragmentation issues in Azure environments:

  1. On the third-party VPN gateway, enable ip virtual-reassembly to correctly reassemble fragmented packets, even if they are received out of order.

    For Catalyst 8000V, use this command:

    ip virtual-reassembly-out

    For Cisco ASAv, use this command:

    fragment reassembly full outside

  2. Enable fragmentation before encryption on the third-party VPN gateway, because NAT traversal for site-to-site VPNs may fragment large IPsec packets converted to UDP 4500.

    For Cisco ASAv, use this command:

    crypto ipsec fragmentation before-encryption

  3. In the Azure portal, enable IP forwarding on both the inside and outside interfaces of the VPN gateway VM.

  4. Update Azure routing tables to allow virtual network connectivity through the third-party VPN gateway. This allows access to on-premises resources.

If you continue to experience intermittent authentication failures after configuring these settings, open a Microsoft support ticket to enable the allow out-of-order fragments option for Azure VPN networking components in your subscription.


Note


To reduce packet fragmentation at both the network device (such as WLC or switch) and Cisco ISE egress, consider lowering the MTU on the network device's RADIUS source interface and Cisco ISE's RADIUS interface. While a general MTU value of 1400 bytes works well in most environments, optimal performance can be achieved by using Path MTU Discovery (PMTUD) tools to determine the best MTU between the subnets.


Create a Cisco ISE instance using an Azure VM

Cisco ISE can be deployed as a virtual machine in Microsoft Azure. Before creating an instance, prepare the required SSH key pair, virtual network gateways, subnets, security groups, and internet connectivity. For more information, refer to Overview of Cisco ISE instances on Azure.

Complete these prerequisites before you create the Cisco ISE instance:

  • Create an SSH key pair.

  • Create the virtual network gateways, required subnets, and security groups.

  • Ensure that the subnet that you want to use with Cisco ISE can reach the internet. In Microsoft Azure, in the Public Route Table window, configure the next hop of the subnet as the internet.

To understand compatibility information and known limitations when working with Cisco ISE deployments on Azure, refer to Compatibility information and Known Limitations.

Navigate to the Cisco ISE option on the Azure console

Follow these steps to navigate to the Cisco ISE option on the Azure console.

Procedure


Step 1

Go to https://portal.azure.com and log in to your Microsoft Azure account.

Step 2

Use the search field at the top of the window to search for Marketplace.

Step 3

Use the Search the Marketplace search field to search for Cisco Identity Services Engine (ISE).


Configure instance details

Follow these steps to configure the instance details on the Azure console.

Procedure


Step 1

Click Virtual Machine.

Step 2

In the new window that is displayed, click Create.

Step 3

In the Basics tab, perform these actions:


Configure OS disk size

Follow these steps to configure OS disk size.

Procedure


Step 1

Click Next: Disks.

Step 2

In the Disks tab, select a disk size from the OS Disk Size drop-down list or retain the default value.


Note


We recommend that you use a customer-managed key for disk encryption in the Key Management field. A platform-managed key is used by default. For more information on key creation, refer to About encryption key management.

For the rest of the mandatory fields, you can retain the default values.


Configure network interface

Follow these steps to configure a network interface.

Procedure


Step 1

Click Next: Networking.

Step 2

In the Network Interface area, from the Virtual network and Subnet drop-down lists, select the virtual network and subnet that you have created.

Note that a subnet with a public IP address receives online and offline posture feed updates, while a subnet with a private IP address receives only offline posture feed updates.


Configure user details

Follow these steps to configure the user details.

Procedure


Step 1

Click Next: Management.

Step 2

In the Management tab, retain the default values for the mandatory fields and click Next: Advanced.

Step 3

In the User data field, enter the parameters in the correct format.

You must use the correct syntax for each of the fields that you configure through the user data entry. The information you enter in the User data field is not validated. If you use incorrect syntax, Cisco ISE services might not start when you launch the image.

Follow these guidelines for the configurations that you submit through the User data field:

Table 2. Configuration guidelines for User Data field
Field Name Field Description Compliance and Behavior Changes
hostname

Enter a hostname that contains only alphanumeric characters and hyphen (-). The length of the hostname must be less than 19 characters and must not contain underscores (_).

Syntax must meet recommendations.
primarynameserver

Enter the IP address of the primary name server. Only IPv4 addresses are supported.

From Cisco ISE release 3.4:
  • You can configure secondary and tertiary name servers during installation by using the secondarynameserver and tertiarynameserver fields.

secondarynameserver

(From Cisco ISE release 3.4)

Enter the IP address of the secondary name server. Only IPv4 addresses are supported.

  • If you leave the secondarynameserver field blank and use only the tertiarynameserver field, the Cisco ISE services will not start.

tertiarynameserver

(From Cisco ISE release 3.4)

Enter the IP address of the tertiary name server. Only IPv4 addresses are supported.

Use only after secondarynameserver value is set.
dnsdomain

Enter the FQDN of the DNS domain. The entry can contain ASCII characters, numerals, hyphens (-), and periods (.).

Syntax must meet recommendations.

ntpserver

(renamed as primaryntpserver from Cisco ISE release 3.4)

Enter the IPv4 address or FQDN of the NTP server that must be used for synchronization, for example, time.nist.gov.

From Cisco ISE release 3.4:
  • The ntpserver field name is changed to primaryntpserver. If you use ntpserver, Cisco ISE services will not start.

secondaryntpserver

(From Cisco ISE release 3.4)

Enter the IPv4 address or FQDN of the secondary NTP server.
  • If you leave the secondaryntpserver field blank and use only the tertiaryntpserver field, the Cisco ISE services will not start.

tertiaryntpserver

(From Cisco ISE release 3.4)

Enter the IPv4 address or FQDN of the tertiary NTP server. Use only after secondaryntpserver value is set.
timezone

Enter a timezone, for example, Etc/UTC. We recommend that you set all the Cisco ISE nodes to the Coordinated Universal Time (UTC) timezone, especially if your Cisco ISE nodes are installed in a distributed deployment. This procedure ensures that the timestamps of the reports and logs from the various nodes in your deployment are always synchronized.

Syntax must meet recommendations.
password

Configure a password for GUI-based login to Cisco ISE. The password that you enter must comply with the Cisco ISE password policy. The password must contain 6 to 25 characters and include at least one numeral, one uppercase letter, and one lowercase letter. The password cannot contain or be the same as the username or its reverse (iseadmin or nimdaesi), cisco, or ocsic. The allowed special characters are @~*!,+=_-.  .

Refer to "User Password Policy" section in the chapter "Basic Setup" of the Cisco ISE Administrator Guide for your release.
ersapi

Enter yes to enable ERS, or no to disallow ERS.

Syntax must meet recommendations.
openapi

Enter yes to enable OpenAPI, or no to disallow OpenAPI.

From Cisco ISE release 3.4, OpenAPI services are enabled by default. You don't have to specify OpenAPI-related options when launching an instance.

pxGrid

Enter yes to enable pxGrid, or no to disallow pxGrid.

Syntax must meet recommendations.
pxgrid_cloud

Enter yes to enable pxGrid Cloud, or no to disallow pxGrid Cloud.

To enable pxGrid Cloud, you must enable pxGrid. If you disallow pxGrid, but enable pxGrid Cloud, pxGrid Cloud services are not enabled at launch.

From Cisco ISE release 3.5, pxGrid Cloud can be enabled only from Cisco ISE Cisco ISE GUI. Therefore, this field is not included in the user data.


Configure tags

Follow these steps to configure your tags:

Procedure


Step 1

Click Next: Tags.

Step 2

To create name-value pairs that allow you to categorize and consolidate multiple resources and resource groups, enter values in the Name and Value fields.


Review and create

Follow these steps to review the configurations you have created so far and to create a Cisco ISE instance.

Procedure


Step 1

Click Next: Review + Create.

Step 2

Review the information that you have provided so far and click Create.

The Deployment is in progress window is displayed. It takes about 30 minutes for the Cisco ISE instance to be created and available for use. The Cisco ISE VM instance is displayed in the Virtual Machines window (use the main search field to find the window).


Edit disk size

This section is applicable only if the disk size of your Cisco ISE VM is 300 GB. If you have chosen any other disk size, then these steps are not applicable.

Due to Microsoft Azure default settings, the Cisco ISE VM is configured with only 300 GB disk size. Cisco ISE nodes typically require more than 300 GB disk size. You might see the Insufficient Virtual Memory alarm when you first launch Cisco ISE from Microsoft Azure.

After you create the Cisco ISE VM, log in to the Cisco ISE administration portal to verify that Cisco ISE is set up correctly. Then, in the Microsoft Azure portal, carry out these steps in the Virtual Machines page to edit the disk size:

Procedure


Step 1

Stop the Cisco ISE instance.

Step 2

Click Disk in the left pane, and click the disk that you are using with Cisco ISE.

Step 3

Click Size + performance in the left pane.

Step 4

In the Custom disk size field, enter the disk size you want in GiB.


Create a Cisco ISE instance using Azure application

Before creating a Cisco ISE instance, create the Azure resources that you need, such as Resource Groups, Virtual Networks, Subnets, SSH keys, and so on.

Navigate to the Cisco ISE option on the Azure console

Follow these steps to navigate to the Cisco ISE option on the Azure console.

Procedure


Step 1

Go to https://portal.azure.com and log in to your Microsoft Azure account.

Step 2

Use the search field at the top of the window to search for Marketplace.

Step 3

Use the Search the Marketplace search field to search for Cisco Identity Services Engine (ISE).


Add instance details

Follow these steps to add the basic configuration details for the Cisco ISE instance.

Procedure


Step 1

Click Azure Application.

Step 2

In the new window that is displayed, click Create.

A five-step workflow is displayed.

Step 3

From the Basics tab, perform these actions.


Configure network settings

Follow these steps to configure the network settings.

Procedure


Step 1

Click Next.

Step 2

In the Network Settings tab, enter these details:

From Cisco ISE release 3.4,

  • the NTP Server field name is changed to Primary NTP Server.

  • the IP address or hostname of the secondary NTP server can be entered in the Secondary NTP Server field. Your entry is not validated upon input.

  • the IP address or hostname of the tertiary NTP server can be entered in the Tertiary NTP Server field. Your entry is not validated upon input. To use this field and to launch the application successfully, you must not leave the Secondary NTP Server field blank.

You can add only one NTP server in this step. You can add additional NTP servers through the Cisco ISE CLI after installation.

Note


If the entered IP address is incorrect or not reachable, Cisco ISE services may not be launched.


Configure services

Follow these steps to configure the services.

Procedure


In the Services tab:

  1. From the ERS drop-down list, choose Yes or No.

  2. From the Open API drop-down list, choose Yes or No. From Cisco ISE release 3.4, OpenAPIs are enabled by default. Therefore, this field is unavailable.

  3. From the pxGrid drop-down list, choose Yes or No.

  4. From the pxGrid Cloud drop-down list, choose Yes or No. From Cisco ISE release 3.5, pxGrid Cloud can be enabled only from the Cisco ISE GUI. Therefore, this field is unavailable.


Add user details

Follow these steps to add the user details.

Procedure


Step 1

Click Next to go to the User Details tab.

Step 2

In the User Details tab, enter the password in the Enter Password for iseadmin and Confirm Password fields.

The password must comply with the Cisco ISE password policy and contain a maximum of 25 characters.


User data parameters

This table lists the supported user data parameters, their required formats, and their availability across Cisco ISE releases. Refer to it when entering user data in the Advanced > User data section during Azure VM deployment.

Field Format Cisco ISE release 3.1 Cisco ISE release 3.2 Cisco ISE release 3.3 Cisco ISE release 3.4 Cisco ISE release 3.5
hostname hostname=<hostname of Cisco ISE> Supported Supported Supported Supported Supported
primarynameserver primarynameserver=<IPv4 address>

(primarynameserver=<IPv6 address> supported for AWS from Cisco ISE release 3.5)

Supported Supported Supported Supported Supported

Cisco ISE release 3.5 and later support IPv6 addresses in AWS deployments.

secondarynameserver secondarynameserver=<IPv4 address>

(secondarynameserver=<IPv6 address> supported for AWS from Cisco ISE release 3.5)

Not supported Not supported Not supported Supported.

You must enter a value in this field if you want to use the tertiarynameserver field.

Supported.

You must enter a value in this field if you want to use the tertiarynameserver field.

Cisco ISE release 3.5 and later support IPv6 addresses in AWS deployments.

tertiarynameserver tertiarynameserver=<IPv4 address>

(tertiarynameserver=<IPv6 address> supported for AWS from Cisco ISE release 3.5)

Not supported Not supported Not supported Supported.

You must first enter a value in the secondarynameserver field if you want to use this field.

Supported.

You must first enter a value in the secondarynameserver field if you want to use this field.

Cisco ISE release 3.5 and later support IPv6 addresses in AWS deployments.

dnsdomain dnsdomain=<example.com> Supported Supported Supported Supported Supported
ntpserver ntpserver=<IPv4 address or FQDN of the NTP server>

(ntpserver=<IPv6 address or FQDN of the NTP server> supported for AWS from Cisco ISE release 3.5)

Supported Supported Supported Not supported.

This field is replaced by primaryntpserver in Cisco ISE release 3.4 and later. Using ntpserver may prevent Cisco ISE services from starting.

Not supported. Use primaryntpserver instead.
primaryntpserver primaryntpserver=<IPv4 address or FQDN>

(primaryntpserver=<IPv6 address or FQDN of the NTP server> supported for AWS from Cisco ISE release 3.5)

Not supported Not supported Not supported Supported.

This field replaces ntpserver in Cisco ISE release 3.4 and later.

Supported.

Cisco ISE release 3.5 and later support IPv6 addresses in AWS deployments.

secondaryntpserver secondaryntpserver=<IPv4 address or FQDN>

(secondaryntpserver=<IPv6 address or FQDN of the NTP server> supported for AWS from Cisco ISE release 3.5)

Not supported Not supported Not supported Supported.

You must enter a value in this field if you want to use the tertiaryntpserver field.

Supported.

You must enter a value in this field if you want to use the tertiaryntpserver field.

Cisco ISE release 3.5 and later support IPv6 addresses in AWS deployments.

tertiaryntpserver tertiaryntpserver=<IPv4 address or FQDN>

(tertiaryntpserver=<IPv6 address or FQDN of the NTP server> supported for AWS from Cisco ISE release 3.5)

Not supported Not supported Not supported Supported.

You must first enter a value in the secondaryntpserver field if you want to use this field.

Supported.

You must first enter a value in the secondaryntpserver field if you want to use this field.

Cisco ISE release 3.5 and later support IPv6 addresses in AWS deployments.

timezone timezone=<timezone> Supported Supported Supported Supported Supported
username username=<admin> Supported (example: <admin>)

Supported from Cisco ISE release 3.1 patch 1.

Not supported.

iseadmin is the default user.

Not supported.

iseadmin is the default user.

Not supported.

iseadmin is the default user.

Not supported.

iseadmin is the default user.

username username=iseadmin Not mandatory Mandatory Mandatory Mandatory Mandatory
password password=<password> Supported Supported Supported Supported Supported
ersapi ersapi=<yes/no> Supported Supported Supported Supported Supported
openapi openapi=<yes/no> Supported Supported Supported OpenAPI is enabled by default. OpenAPI is enabled by default.
pxGrid pxGrid=<yes/no> Supported Supported Supported Supported Supported
pxgrid_cloud pxgrid_cloud=<yes/no> Not supported Not supported Supported.

This is only supported for Cisco ISE releases 3.3 and 3.4.

Supported.

This is only supported for Cisco ISE releases 3.3 and 3.4.

Not supported.

From Cisco ISE release 3.5, pxGrid Cloud can be enabled only from the Cisco ISE GUI.

Parameter syntax requirements

When specifying user data parameters for Cisco ISE on Cloud, do not enclose any attribute or value in single or double quotes. You must enter all values in plain text, without quotes.

Invalid entry

Valid entry

hostname="i34a"

hostname=i34a

primarynameserver="9.9.9.9"

primarynameserver=9.9.9.9

dnsdomain="example.com"

dnsdomain=example.com

primaryntpserver="north-america.pool.ntp.org"

primaryntpserver=north-america.pool.ntp.org

From Cisco ISE release 3.3, validation output messages are displayed in the serial console. These messages are visible only if the serial console is open at the time the output is generated.

Review and create

Follow these steps to review your configurations and create a Cisco ISE instance.

Procedure


Step 1

In the Review + create tab, review the details of the instance.

Step 2

Click Create.

The Overview window displays the progress of the instance creation.

Step 3

Use the search bar and navigate to the Virtual Machines window.

Your Cisco ISE instance is listed in the Virtual Machines window. It takes about 30 minutes to create a Cisco ISE instance.


What to do next

To verify the instances and learn about the tasks to perform after deployment, refer to Installation Verification and Post-Installation Tasks.

Postinstallation tasks

For information about the postinstallation tasks that you must carry out after creating a Cisco ISE instance, refer to the chapter "Installation Verification and Postinstallation Tasks" in the Cisco ISE Installation Guide for your release.

Compatibility information for Cisco ISE on Azure cloud

This section provides compatibility information that is unique to Cisco ISE on Azure cloud. For general compatibility details for Cisco ISE, refer to the Cisco Identity Services Engine Network Component Compatibility guide for your release.

Load balancer integration support

You can integrate the Azure Load Balancer with Cisco ISE for load balancing RADIUS traffic. However, these caveats are applicable:

  • The Change of Authorization (CoA) feature is supported only if client IP preservation is enabled when you configure Session Persistence property in the load balancing rule in the Azure portal.

  • Unequal load balancing might occur as the Azure Load Balancer supports only source IP affinity and does not support calling station ID-based sticky sessions.

  • Traffic can be sent to a PSN even if the RADIUS service is not active on the node, because the Azure Load Balancer does not support RADIUS-based health checks.

For more information on the Azure Load Balancer, refer to What is Azure Load Balancer?.

You can integrate the Azure Load Balancer with Cisco ISE for load balancing TACACS traffic. However, traffic might be sent to a Cisco ISE PSN even if the TACACS service is not active on the node, because the Azure Load Balancer does not support health checks based on TACACS+ services.

Password recovery and reset on Azure cloud

You can reset or recover your Cisco ISE VM password using these tasks. Select the necessary tasks and follow the detailed steps.

The Help > Reset Password option in the Azure portal is not supported for Cisco ISE Azure VM.

Reset Cisco ISE GUI password through serial console

Procedure


Step 1

Log in to Azure Cloud and choose the resource group that contains your Cisco ISE virtual machine.

Step 2

From the list of resources, click the Cisco ISE instance for which you want to reset the password.

Step 3

From the left-side menu, in the Help section, click Serial console.

The Azure Cloud Shell is displayed in a new window.

If the screen is black, press Enter to view the login prompt.

If you view an error message here, you may have to enable boot diagnostics by carrying out these steps:

  1. From the left-side menu, click Boot diagnostics.

  2. Click Enable with custom storage account.

  3. Choose the storage account and click Save.

Step 4

Log in to the serial console.

To log in to the serial console, you must use the original password that was configured at the installation of the instance.

Use the application reset-passwd ise iseadmin command to configure a new GUI password for the iseadmin account.


Create new public key pair for SSH access

Follow these steps to add additional key pairs to a repository.

The existing key pair that was created at the time of Cisco ISE instance configuration is not replaced by the new public key that you create.

Procedure


Step 1

Create a new public key in Azure Cloud. Refer to Generate and store SSH keys in the Azure portal.

Step 2

Log in to the Azure Cloud serial console.

Step 3

To create a new repository to save the public key, refer to Azure Repos documentation.

If you already have a repository that is accessible through the CLI, skip to step 4.

Step 4

To import the new public key, use this command:

crypto key import <public key filename> repository <repository name>

When the import is complete, you can log in to Cisco ISE via SSH using the new public key.