How to configure the dynamic firewall
This topic helps you understand the concepts and options to configure the dynamic firewall discussed in Dynamic Firewall.
Summary
The dynamic firewall integrates an identity source (such as Cisco ISE) with Cisco Identity Intelligence, which provides user trust information to the Secure Firewall Management Center.
-
Configure Cisco Identity Intelligence to collect user trust information.
-
Configure a supported Secure Firewall Management Center identity source.
-
Configure a supported identity realm.
-
Enable the dynamic attributes connector.
-
Configure the dynamic firewall.
Workflow
The following procedure provides a high-level overview of how to configure the dynamic firewall.
- As a Duo user with the Owner role, provision a Cisco Identity Intelligence tenant. You can provision a tenant from Duo Advantage as discussed in Provision Your Cisco Identity Intelligence Tenant.
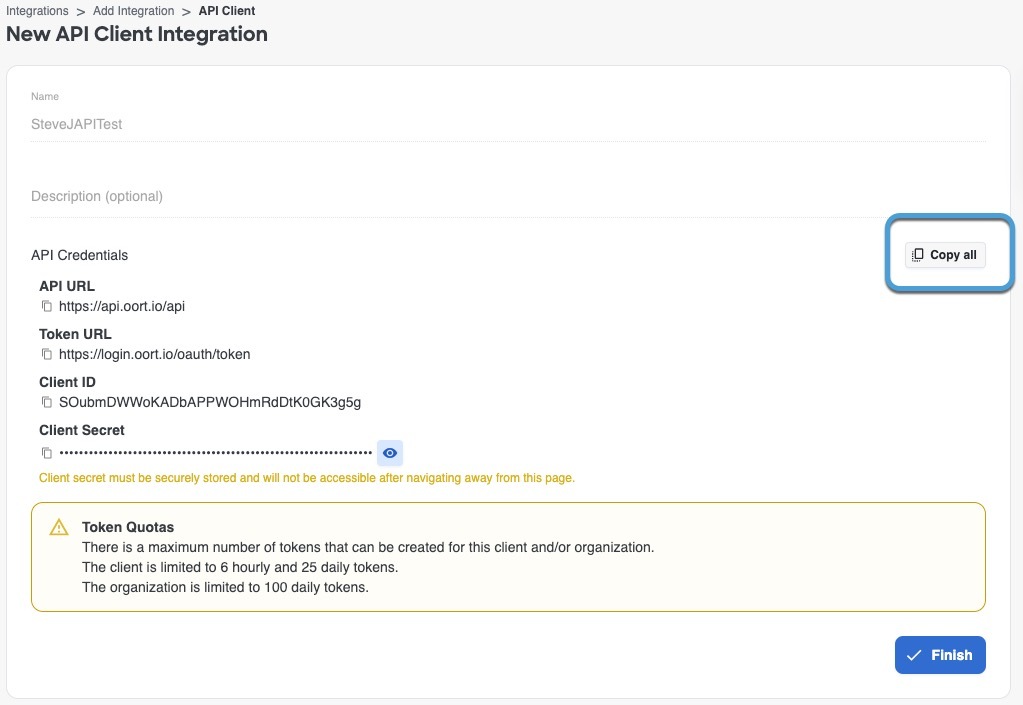
- In Cisco Identity Intelligence, create an API integration and use the information to set up the dynamic firewall. We use Cisco Identity Intelligence to find user and device risk information in your network. For more information about Cisco Identity Intelligence, see How-to Guides. For more information about this task, see Get required information for Identity Intelligence.
- (Microsoft Azure AD realm only.) In Identity Intelligence, create a Microsoft Entra ID integration. For more information, see Microsoft Entra ID (Azure AD) Data Integration.
-
Create an identity source. (If you already have an identity source, continue with the next step.)
You can do this in any of the following ways:
- The Configure Dynamic Firewall dialog box displays Configure links to start setting up your identity source.
- Click .
-
Create an identity realm.
We support the following realms:
- Create an LDAP realm or an Active Directory realm and realm directory Only Microsoft AD is supported; LDAP realms are not supported.
- Create a Microsoft Azure AD (SAML) realm for passive authentication
- Enable the dynamic attributes connector. The dynamic attributes connector is required to use the dynamic firewall. It enables your identity source to integrate with Identity Intelligence to provide enhanced insights into user activity. See Enable the dynamic attributes connector.
- Create the dynamic firewall instance. (If you already have a dynamic firewall instance, continue with the next step.) Click and click Configure Dynamic Firewall. See Create a dynamic firewall instance.
- Associate your identity source with Cisco Identity Intelligence. See Associate an identity source with Identity Intelligence.
-
View system-defined filters.
We create dynamic attributes filters for the following:
- Untrusted device
- Trusted device
- Untrusted user
- Questionable user
-
View system-defined access control rules.
We create an access control policy named Dynamic Firewall Policy (or similar) with the following rules:
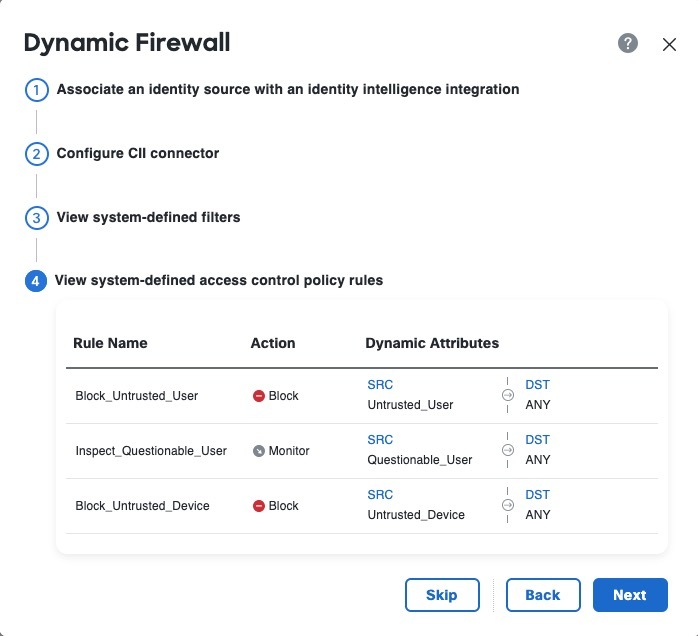
- Block an untrusted user from any source network to any destination network.
- Monitor a questionable user from any source network to any destination network.
- Block an untrusted device from any source network to any destination network.
Enable the dynamic attributes connector
Enable the dynamic attributes connector to allow objects from cloud networking products to be used in Secure Firewall Management Center access control and DNS rules.
This task discusses how to enable the dynamic attributes connector in the Secure Firewall Management Center. The dynamic attributes connector is an integration that enables objects from cloud networking products to be used in Secure Firewall Management Center access control and DNS rules.
This task is optional if you use the passive identity agent.
Procedure
|
Step 1 |
Log in to the Secure Firewall Management Center if you have not done so already. |
|
Step 2 |
Click . |
|
Step 3 |
Slide to Enabled. |
|
Step 4 |
The system displays messages when the dynamic attributes connector is enabled. In the event of errors, try again. If errors persist, contact Cisco TAC. See Connectors. |
Get required information for Identity Intelligence
Get the necessary credentials and configuration values from Identity Intelligence to enable integration with the dynamic firewall.
This task discusses how to create an API client, which provides all the get required information to set up Identity Intelligence in the dynamic firewall.
If you already have an API client and you know the values of all these parameters, you can skip this procedure and continue with Create a dynamic firewall instance:
-
Client ID
-
API URL
-
Token URL
-
Client Secret
Before you begin
Integrating with the dynamic firewall requires you to create an API client integration in Identity Intelligence.
Among the values you must know about your API client integration is the client secret, which is displayed when you create the API client only. For that reason you might need to create the API integration first.
For more information about creating an API cilent integration, see Public API.
Follow these steps to get required information for Identity Intelligence:
Procedure
|
Step 1 |
Log in to your Identity Intelligence tenant. |
|
Step 2 |
Click |
|
Step 3 |
Click Add Integration. |
|
Step 4 |
On the next page, under API Clients, click Add API Client. |
|
Step 5 |
Enter a Name and an optional Description. |
|
Step 6 |
Click Save and Generate Credentials. This figure shows an example.
|
|
Step 7 |
On the next page, click Copy all as this figure shows.
|
|
Step 8 |
Save the credentials for later use. |
|
Step 9 |
Click Finish. |
 (
(
What to do next
Create an identity source and realm for the dynamic firewall
Before you configure the dynamic firewall, you must configure a supported identity realm and identity source.
Configure an identity realm
These identity realms are supported:
-
Create an LDAP realm or an Active Directory realm and realm directory
Only Microsoft AD is supported; LDAP realms are not supported.
-
Create a Microsoft Azure AD (SAML) realm for passive authentication
Configure an identity source
These identity sources are supported:
-
On-premises Cisco ISE: Ways to configure the Cisco Identity Services Engine (Cisco ISE) identity source
-
Single or multiple Cisco ISE clusters:
Create a dynamic firewall instance
Create a new instance of the dynamic firewall to establish an association between an identity source and Identity Intelligence.
This task discusses how to create a new instance of the dynamic firewall, which is an association between an identity source and Identity Intelligence.
Before you begin
Complete all these steps:
-
Enable the dynamic attributes connector as discussed in Enable the dynamic attributes connector.
-
Create an identity source:
Follow these steps to create a dynamic firewall instance:
Procedure
|
Step 1 |
If you have not already done so, log in to the Secure Firewall Management Center. |
||
|
Step 2 |
Click . |
||
|
Step 3 |
Click The following figure shows an example.
|
||
|
Step 4 |
Click Create Dynamic Firewall. |
||
|
Step 5 |
Continue with Associate an identity source with Identity Intelligence. |
 next to the name of the identity source with which to add the

Associate an identity source with Identity Intelligence
Associate a supported identity source with Identity Intelligence to enable user and device trust ratings for dynamic firewall configuration.
This task discusses how you associate an identity source with Identity Intelligence, which provides user and device trust ratings to the Secure Firewall Management Center.
For more information, see User Trust Level.
Before you begin
Before you begin, make sure you:
-
Understand how the identity realm, identity source, and Identity Intelligence work together as discussed in Dynamic Firewall.
-
Completed the tasks discussed in Create a dynamic firewall instance.
Procedure
|
Step 1 |
Start with Create a dynamic firewall instance. |
|
Step 2 |
On the next page, from the left column, click your identity source. Then, in the right column, select the Cisco Identity Intelligence check box to add user intelligence, including user and device risk. The following figure shows an example.
|
|
Step 3 |
Click Next. |
|
Step 4 |
Continue with Configure Identity Intelligence. |

Configure Identity Intelligence
This task enables integration between the dynamic firewall and Identity Intelligence.
This task discusses how you associate an identity source with Identity Intelligence, which provides user and device risk ratings to the Secure Firewall Management Center.
Before you begin
Complete the tasks discussed in Associate an identity source with Identity Intelligence.
Procedure
|
Step 1 |
Complete the tasks discussed in Associate an identity source with Identity Intelligence. |
|
Step 2 |
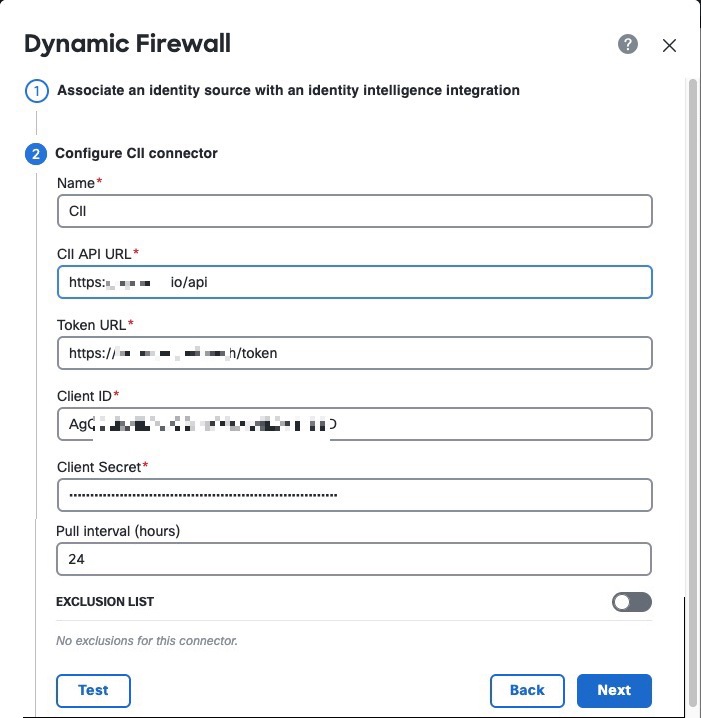
If you selected the Cisco Identity Intelligence check box, enter the information you found for Identity Intelligence as described in Get required information for Identity Intelligence. The following figure shows an example.
|
|
Step 3 |
(Optional.) For Identity Intelligence to consider a specific set of users as trusted, slide Exclusion List to Slider enabled ( Enter one user name per line in username@domain.com format. Users in this list are considered trusted by Identity Intelligence. |
|
Step 4 |
Click Test. Only if the test succeeds, continue with the next step. If any errors are displayed, check all of your Identity Intelligence values and try again. |
|
Step 5 |
Click Next. |
|
Step 6 |
Continue with View system-defined filters. |

View system-defined filters
This task allows you to examine and understand the system-defined dynamic attributes filters that are automatically created during the configuration process.
This task discusses how you associate an identity source with Cisco Identity Intelligence, which provides user and device risk ratings to the Secure Firewall Management Center.
Before you begin
Procedure
|
Step 1 |
The system displays a set of system-defined dynamic attributes filters, as shown in the following figure.
|
|
Step 2 |
View the system-created filters. Click |
|
Step 3 |
Click Next. |
|
Step 4 |
Continue with View system-defined access control rules. |
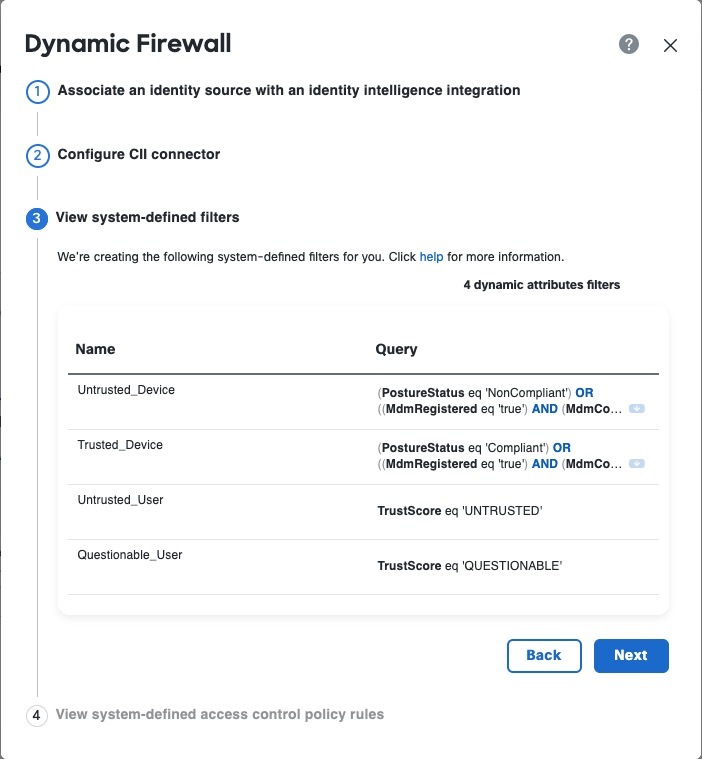
 on any row to expand the filter so you can view the filter and see its details.
View system-defined access control rules
This task allows you to review and decide whether to create system-defined access control rules for your dynamic firewall instance.
This task discusses access control rules created by the dynamic firewall.
Before you begin
Procedure
|
Step 1 |
View the system-created access control rules. The following figure shows an example.
|
|
Step 2 |
Choose one of these options:
|
|
Step 3 |
After you click Next, if you created access control rules successfully, the following page is displayed:
|

Edit the user exclusion list
Specify users provided by Identity Intelligence as always being trusted.
You can instruct Identity Intelligence to treat specific users as trusted.
Before you begin
Configure the dynamic firewall as discussed in Create a dynamic firewall instance.
Procedure
|
Step 1 |
If you haven't already done so, log in to the Secure Firewall Management Center. |
|
Step 2 |
Click . |
|
Step 3 |
Click |
|
Step 4 |
Click Edit CII Exclusion List. The following dialog box is displayed.
|
|
Step 5 |
In the provided field, enter one user name in Each user name is considered as trusted by Identity Intelligence. |

View and edit the system-created access control policy
Customize the system-created access control policy by adding devices, changing rules, reordering rules, or deleting rules to meet your specific network security requirements.
This topic discusses how you can edit the system-created access control rules and policy. Initially, the policy isn't associated with any devices but if you want to use it you can add devices, change rules, reorder rules, or delete rules.
Before you begin
Complete the tasks described in View system-defined access control rules.
Follow these steps to view and edit the system-created access control policy:
Procedure
|
Step 1 |
If you haven't already done so, log in to the Secure Firewall Management Center. |
|
Step 2 |
Click . |
|
Step 3 |
Click Edit ( The following figure shows a sample access control policy.
Note that in this access control policy, only the rule set to monitor questionable users logs anything. To adjust the logging settings, see Logging settings for access control policies. |
|
Step 4 |
Do any of the following:
|


 )
)
 Feedback