Use Dynamic Objects in Access Control Policies or DNS Policies

The dynamic attributes connector enables you to configure dynamic attributes filters, seen in the Secure Firewall Management Center as dynamic objects, in access control rules or DNS policies.

Dynamic objects in access control rules or DNS rules

A dynamic object is automatically pushed from the dynamic attributes connector to the Secure Firewall Manager after you create connectors and save a dynamic attributes filter on the connector.

You can use these dynamic objects on the access control rule's or DNS rule's Dynamic Attributes tab page. You can add dynamic objects as source or destination attributes.

Dynamic object usage examples

In an access control block rule, you can add a Finance dynamic object as a destination attribute to block access to Finance servers by whatever objects match the other criteria in the rule.

Dynamic attributes filter limitations


Note


You cannot create dynamic attributes filters for Generic Text, Office 365, Azure Service Tags, Webex, or Zoom. These types of cloud objects provide their own IP addresses.


Create dynamic attributes filters

Create dynamic attributes filters to expose them as dynamic objects in Secure Firewall Management Center for use in access control policies.

Dynamic attributes filters that you define using the Dynamic Attributes Connector are exposed in the Secure Firewall Management Center as dynamic objects that can be used in access control policies. For example, restrict access to an AWS server for the Finance Department to only members of the Finance group defined in Microsoft Active Directory.


Note


You cannot create dynamic attributes filters for Generic Text, Office 365, Azure Service Tags, Webex, or Zoom. These types of cloud objects provide their own IP addresses.


For more information about access control or DNS rules, see Create access control rules or DNS rules using dynamic attributes filters.

Before you begin

Connectors

Procedure


Step 1

Log in to the Secure Firewall Management Center.

Click Integrations > Dynamic Attributes Connector > Dynamic Attributes Filters.

Step 2

Do any of the following:

  • Add a new filter: click Add (add icon).

  • Edit or delete a filter: Click More (more icon), then click Edit or Delete at the end of the row.

Step 3

Enter the following information.

Item

Description

Name

Unique name to identify the dynamic filter (as a dynamic object) in a policy and in the Secure Firewall Management Center Object Manager (External Attributes > Dynamic Object).

Connector

From the list, click the name of a connector to use.

Query

Click Add add icon.

Step 4

To add or edit a query, enter the following information.

Item Description

Key

Click a key from the list. Keys are fetched from the connector.

Operation

Click one of the following:
  • Equals to exactly match the key to the value.

  • Contains to match the key to the value if any part of the value matches.

Values

Click either Any or All and click one or more values from the list. Click Add another value to add values to your query.

Step 5

Click Show Preview to display a list of networks or IP addresses returned by your query.

Step 6

When you're finished, click Save.

Step 7

(Optional.) Verify the dynamic object in the Secure Firewall Management Center.

  1. Log in to the Secure Firewall Management Center as a user with the Network Admin role at minimum.

  2. Click Objects > External Attributes > Dynamic Object.

    The dynamic attribute query you created should be displayed as a dynamic object.


Dynamic attributes rule conditions

Dynamic attributes rule conditions allow you to specify access control rules based on real-time properties such as network objects, device types, locations, and security tags. These conditions determine how access control rules match traffic based on various attributes, optimizing policy flexibility and accuracy.

Types of dynamic attributes

Dynamic attributes include:

  • (source or destination) Dynamic objects (such as from the dynamic attributes connector)

    The dynamic attributes connector enables you to collect data (such as networks and IP addresses) from cloud providers and send it to the Secure Firewall Management Center so they can be used in access control rules.

    For more information about the dynamic attributes connector, see About the dynamic attributes connector.

  • (source only) SGT objects contain tags either manually defined or defined in ISE. For more information, see Source and destination security group tag (SGT) matching and Security group tags.

  • (source only) Location IP objects, defined by Cisco ISE

  • (source only) Device type objects, defined by Cisco ISE (also referred to as endpoint profile objects)

Combining objects in rules

Dynamic attributes can be used as source criteria and destination criteria in access control rules. Use these guidelines:

  • Objects of different types are ANDd together

  • Objects of a similar type are ORd together

For example, if you choose source destination criteria SGT 1, SGT 2, and device type 1, the rule matches if device type 1 is detected on either SGT 1 or SGT 2.

If you select both a security group tag, and a dynamic object that lists IP addresses, the rule matches if traffic with the tag originating from, or destined to, one of those IP addresses.

View dynamic objects in the Secure Firewall Management Center

View dynamic objects created by the integration with Cisco APIC in the Objects > External Attributes > Dynamic Object.

(Optional.) This task discusses how you can view Cisco APIC network objects in the Objects > External Attributes > Dynamic Object.

Before you begin

Complete all of the previous tasks related to integrating Cisco APIC with the Secure Firewall Management Center.

Follow these steps to view dynamic objects in the Secure Firewall Management Center:

Procedure


Step 1

Log in to the Secure Firewall Management Center

Step 2

Expand Objects > External Attributes > Dynamic Object.

Dynamic objects have their own naming conventions; for example, AWS dynamic objects have names like aws_AMAZON .

Dynamic objects created by the integration with Cisco APIC have names matching the pattern:

APIC-site-name_tenant-name_application-profile-name_EPG-or-ESG-name

Example.

Dynamic objects are represented in the image, showcasing their naming conventions and structure, including examples of AWS dynamic object names and integration patterns.

Step 3

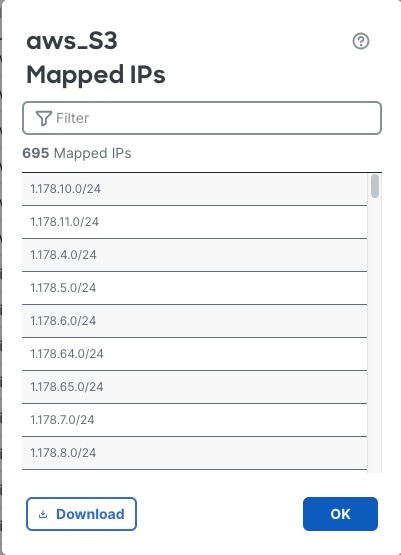
To view IP addresses associated with each dynamic object, click Dynamic objects are displayed with names that follow the pattern: APIC-site-name_tenant-name_application-profile-name_EPG-or-ESG-name. The image illustrates how to find and download IP addresses linked to a dynamic object. (IPs) at the end of the row.

Example:

Find and optionally download IP addresses associated with a dynamic object


What to do next

See Create access control rules or DNS rules using dynamic attributes filters.

Create access control rules or DNS rules using dynamic attributes filters

Create access control rules using dynamic objects that are based on dynamic attributes filters you have previously configured.

This topic discusses how to create access control rules using dynamic objects (these dynamic objects are named after the dynamic attributes filters you created previously).

To add dynamic attributes filters to DNS policies, see Create basic DNS policies.

To add dynamic attributes filters to DNS policies, see Creating Basic DNS Policies.

Before you begin

Create dynamic attributes filters as discussed in Create dynamic attributes filters.


Note


You cannot create dynamic attributes filters for Generic Text, Office 365, Azure Service Tags, Webex, or Zoom. These types of cloud objects provide their own IP addresses.


Follow these steps to create access control rules or DNS rules using dynamic attributes filters:

Procedure


Step 1

Log in to the Secure Firewall Management Center

Click Policies > Security policies > Access Control.

Step 2

Click Edit (edit icon) next to an access control policy.

Step 3

Click Add Rule.

Step 4

Click the Dynamic Attributes tab.

Step 5

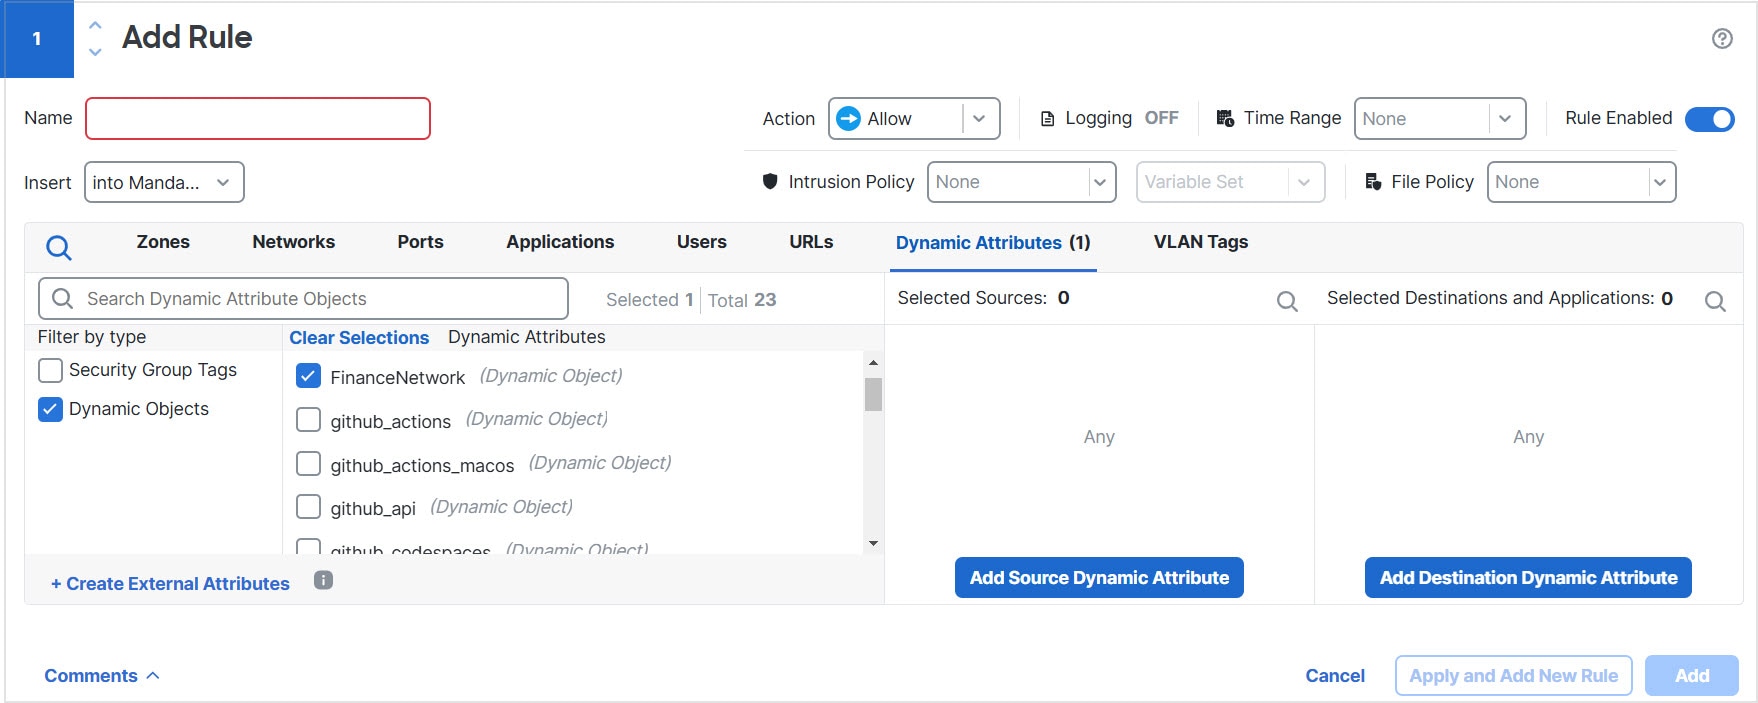
In the Available Attributes section, from the list, click Dynamic Objects.

The following figure shows an example.

Configure Dynamic Attributes created using the dynamic attributes connector as dynamic objects in access control rules. Use those exactly as you would network objects.

This example shows a dynamic object named APIC Dynamic Attribute that corresponds to the dynamic attribute filter created in the dynamic attributes connector.

Step 6

Add the desired object to source or destination attributes.

Step 7

Add other conditions to the rule if desired.

See Dynamic attributes rule conditions.


Use dynamic objects in DNS policies

Use dynamic objects in DNS rules to enable dynamic filtering capabilities based on attributes from the dynamic attributes connector.

The dynamic attributes connector enables you to configure dynamic filters seen in the Secure Firewall Management Center as dynamic objects, in DNS rules. For information about DNS policies, see DNS Policies for Security Intelligence.

A dynamic object is automatically pushed from the dynamic attributes connector to the Secure Firewall Management Center after you create connectors and save a dynamic attributes filter on the connector.

You can use these dynamic objects on the DNS rule's Dynamic Attributes tab page, similarly to the way you use Security Group Tags (SGTs). You can add dynamic objects as source or destination attributes, except for endpoint device type objects, which are source only.

Procedure


Step 1

Click Policies > Security policies > DNS and create or edit a DNS policy.

Step 2

Add or edit a rule.

Step 3

Click the Dynamic Attributes tab.

Step 4

In the Dynamic Attributes list, select the objects you want to use, then add them to the source or destination lists as appropriate.

Initially, all security group and dynamic objects are listed, by you can uncheck the Security Group option to see dynamic objects only.

Step 5

On the DNS tab, select the appropriate list or feed to match the DNS requests you are targeting.

Step 6

Add other conditions to the rule if desired and set the action.

Step 7

Click Save.