Standard Decryption Policies

The following topics provide details about standard decryption policies.

Standard decryption policies

A standard decryption policy is a decryption policy type that is simpler to set up than other policy types and optimizes network performance by reducing processing load.

Benefits of standard decryption policies

Traffic decryption requires significant processing and decrypting too much traffic can slow down your system. The standard decryption policy type helps minimize issues commonly experienced by customers by preventing excessive traffic decryption.

Decryption policy types

Decryption policy types include standard decryption policies and rule-based decryption policies.

Standard decryption policies

We recommend the standard decryption policy type because it's easy to set up with a wizard-like appearance, enabling you to easily pick security zones, users and networks, and other objects to use in your policy. A standard decryption policy is particularly suitable for users who are not familiar with the complexities of decryption policies.

This section provides an example of setting up a standard decryption policy.

This sample decryption policy decrypts outbound traffic to an outside security zone for all Special Identities or Guest users.

This policy decrypts outbound traffic only. All traffic from the OutsideZone security zone on any IPv4 network is decrypted using an internal CA named IntCA.

Key points about decryption policies include:

  • The rule is a partial example; more options are available.

  • You can configure inbound criteria, outbound criteria, or both.

  • In addition to objects, you can also optionally configure outbound decryption exclusions, such as:

    • Undecryptable applications (such as ones that use certificate pinning).

    • URL categories such as medical, trading, and finance.

  • You can configure outbound block criteria for certificate status and TLS version.

  • A standard policy has advanced policy options that are similar to rule-based policies.

Rule-based decryption policies

Rule-based decryption policies are created using a wizard that guides you through the available options for inbound decryption, outbound decryption, or both. After you create the rule-based decryption policy, you can add more rules to it, reorder rules, or make other changes to suit your needs.

A rule-based decryption policy is the most flexible but also the most potentially complicated. You can convert a standard decryption policy to a rule-based policy at any time.

Standard decryption policy deployment issues to versions earlier than 10.0.0

If you deploy a standard decryption policy to a device that runs a version earlier than 10.0.0, you can encounter compatibility issues.

  • If you configured any inbound decryption rules, the rule action is changed to Decrypt - Known Key on those devices. For more information about the kinds of incoming decryption actions, see Incoming traffic decryption.

  • The advanced policy option Intelligent Decryption Bypass requires the device to run version 7.7 or later. By default, this advanced option is disabled. If enabled, policy deployment fails when the device runs a version earlier than 7.7.

Create a new standard decryption policy

A standard decryption policy decrypts and inspects encrypted network traffic.

Decryption policy types

You can create these types of decryption policies:

  • Policy to protect inbound traffic: Decrypt network traffic coming into your network. You typically do this to decrypt and inspect traffic directed to an internal server.

  • Policy to protect outbound traffic: Decrypt network traffic going outside of your network to external servers.

Create a standard decryption policy with inbound protection

Create a decryption policy to decrypt and inspect traffic directed to an internal server for enhanced network security monitoring.

This task creates a standard decryption policy to decrypt network traffic coming into your network. You typically do this to decrypt and inspect traffic directed to an internal server. All options on this page are required.

Before you begin

Review what an inbound protection decryption policy means in Incoming traffic decryption.

To create a decryption policy with outbound protection instead, see Create a standard decryption policy with outbound protection.

Follow these steps to create a standard decryption policy with inbound protection:

Procedure


Step 1

Log in to Secure Firewall Management Center if you haven't already done so.

Step 2

Click Policies > Security policies > Decryption.

Step 3

Click Create New > Decryption Policy.

Step 4

In the provided fields, enter a Name and optional Description.

The following characters are not supported in decryption policy names:

  • #,;,{,},=,$,<,>

Step 5

Click Create Policy.

Step 6

Slide Inbound Decryption to Enabled as the following figure shows.

The diagram illustrates the steps involved in creating a policy with inbound protection, highlighting key components and their interactions within the security framework.


What to do next

Add these to your decryption policy:

Security zones

Security zones segment your network to help you manage, classify, and decrypt traffic flow by grouping interfaces across multiple devices. Security zones control or decrypt traffic based on its source and destination zone.

Zone configuration requirements

When configuring security zones, consider these requirements:

  • If you add both source and destination zones to a zone condition, matching traffic must originate from an interface in one of the source zones and leave through an interface in one of the destination zones.

  • All zones used in a zone condition must be of the same type (all inline, passive, switched, or routed).

  • You cannot use a zone with passive interfaces as a destination zone because devices deployed passively do not transmit traffic.

  • Minimize the number of matching criteria whenever possible, especially for security zones, network objects, and port objects. If you specify multiple criteria, the system must match every combination of the criteria contents.


Tip


Constraining rules by zone is one of the best ways to improve system performance. If a rule does not apply to traffic through any of device's interfaces, the rule does not affect that device's performance.


For more information:

Add security zones (inbound decryption)

Add security zones to an inbound standard decryption policy to specify Firewall Threat Defense device interfaces that send traffic to the internal server.

A security zone specifies a Firewall Threat Defense device interface that sends traffic to the internal server. Typically, for inbound protection, this will be an internal (or DMZ) interface.

You must choose both a source and destination security zone.

Before you begin

Complete the tasks discussed in Create a standard decryption policy with inbound protection.

Procedure

Step 1

Click Edit zones next to Security Zones.

Step 2

In the Security Zones dialog box, do any of the following:

  • Select the check box next to a security zone to add to either the source or destination.

  • To create a new security zone, click Create security zone object.

  • Search for a security zone by entering text in the Search Zones field and pressing Enter.

Note


Click Help (help icon) on any dialog box for more information.

Step 3

Click Add to Source to decrypt traffic that matches the source security zone or click Add to Destination to decrypt traffic that matches the destination security zone. If you select both source and destination zones, to be decrypted, traffic must match both zones.

Typically, your internal server should be the destination of an inbound decryption rule.

The following figure shows an example.

Sample inbound decryption policy that uses an outside security zone as the source and the inside or DMZ security zone as the destination.

Step 4

Click Save.

Step 5

See Internal server details (inbound decryption).


Internal server details (inbound decryption)

Protect your internal servers by decrypting and optionally inspecting traffic directed to them. Add internal servers you wish to protect using network objects, and optionally, ports to specify these servers.

Network conditions and tunnel rules

Networks control or decrypt traffic based on its source and destination IP address, using inner headers. Tunnel rules, which use outer headers, have tunnel endpoint conditions instead of network conditions.

You can use predefined objects to build network conditions.

Minimize the number of matching criteria, particularly for security zones, network objects, and port objects. When you specify multiple criteria, the system must match against each combination of the specified criteria.

For more information, see Add internal servers.

Add internal servers

Add internal servers to specify certificates, networks, and ports for traffic decryption, which enables protection of internal servers and optimizes processing time.

This task discusses how to choose certificates to use to decrypt traffic coming to internal servers you want to protect. In addition to choosing a certificate, you can also specify the network and port on which the internal server is located, saving processing time.

Before you begin

Complete the tasks discussed in Create a standard decryption policy with inbound protection.

Follow these steps to add internal servers:

Procedure

Step 1

Click Add new under Internal Server Details.

Step 2

In the Internal Servers dialog box, do any of the following:

  • Search for an internal certificate by entering text in the search field and pressing Enter.

  • From the Internal certificate object list, choose an existing certificate or click Add New to create a new one.

    Note


    The Secure Firewall Threat Defense device servicing the traffic must trust the certificate you upload to the rule. If you upload a self-signed certificate or a certificate not trusted by a certificate authority, and you want to replace the certificate later, you must update the policy's advanced settings in any of these ways:

    • Add the certificate to the Trusted CA certificates list.

    • Select the Require exact certificate match for inbound decryption check box.

    For more information about advanced policy options, see Standard decryption policy advanced options.

    For more information about replacing a certificate, see the discussion of Replace Cert in Incoming traffic decryption.

  • From the Destination network object list, click the network on which the internal server is located or click Add New to create a new one.

  • (Optional.) From the Destination port list, click the port on which to apply the decryption rule or click Add New to create a new one.

    For more information, see Upload an internal certificate for inbound protection.

Note


Click Help (help icon) on any dialog box for more information.

Step 3

Click Save.

This figure shows an example.

Sample internal certificate used in an inbound decryption rule.

Step 4

Save the decryption policy by clicking Save at the top of the page.

Step 5

If you're finished configuring your policy, see Decryption policy actions.


Create a standard decryption policy with outbound protection

This task enables you to create a standard decryption policy that protects servers outside your internal network by decrypting outbound connections.


Note


For information about potential issues when deploying a standard decryption policy to a device that runs a version earlier than 10.0.0, see Standard decryption policy deployment issues to versions earlier than 10.0.0.


The following task discusses how to create a standard decryption policy to protect servers outside your internal network. To decrypt outbound connections, all options on this page are required except where noted. To bypass or block certain outbound connections, only security zones and bypass or block options are required.

Before you begin

Review what an outbound protection decryption policy means in Decrypt and re-sign (outgoing traffic).

To create a decryption policy with inbound protection instead, see Create a standard decryption policy with inbound protection.

Procedure


Step 1

Log in to Secure Firewall Management Center if you haven't already done so.

Step 2

Click Policies > Security policies > Decryption.

Step 3

Click Create New > Decryption Policy.

Step 4

In the provided fields, enter a Name and optional Description.

The following characters are not supported in decryption policy names:

  • #,;,{,},=,$,<,>

Step 5

Click Create Policy.

Step 6

Slide Outbound Decryption to Enabled as the following figure shows.

The decryption policy with outbound protection is illustrated, showing the configuration settings that enable the system to decrypt and inspect outbound SSL/TLS connections.


Security zones

Security zones segment your network to help you manage, classify, and decrypt traffic flow by grouping interfaces across multiple devices. Security zones control or decrypt traffic based on its source and destination zone.

Zone configuration requirements

When configuring security zones, consider these requirements:

  • If you add both source and destination zones to a zone condition, matching traffic must originate from an interface in one of the source zones and leave through an interface in one of the destination zones.

  • All zones used in a zone condition must be of the same type (all inline, passive, switched, or routed).

  • You cannot use a zone with passive interfaces as a destination zone because devices deployed passively do not transmit traffic.

  • Minimize the number of matching criteria whenever possible, especially for security zones, network objects, and port objects. If you specify multiple criteria, the system must match every combination of the criteria contents.


Tip


Constraining rules by zone is one of the best ways to improve system performance. If a rule does not apply to traffic through any of device's interfaces, the rule does not affect that device's performance.


For more information:

Add security zones (outbound decryption)

Add security zones to an outbound standard decryption policy to specify Firewall Threat Defense device interfaces that send traffic to the external server.

A security zone specifies a Firewall Threat Defense device interface that sends traffic to the external server. You can configure source zones, destination zones, or both to control which traffic gets decrypted.

Before you begin

Complete the tasks discussed in Create a rule-based decryption policy with outbound connection protection.

Follow these steps to add security zones to an outbound decryption policy:

Procedure

Step 1

Click Edit zones next to Security Zones.

Step 2

In the Security Zones dialog box, do any of the following:

  • Select the check box next to a security zone to add to either the source or destination.

  • To create a new security zone, click Create security zone object.

  • Search for a security zone by entering text in the Search Zones field and pressing Enter.

Note


Click Help (help icon) on any dialog box for more information.

Step 3

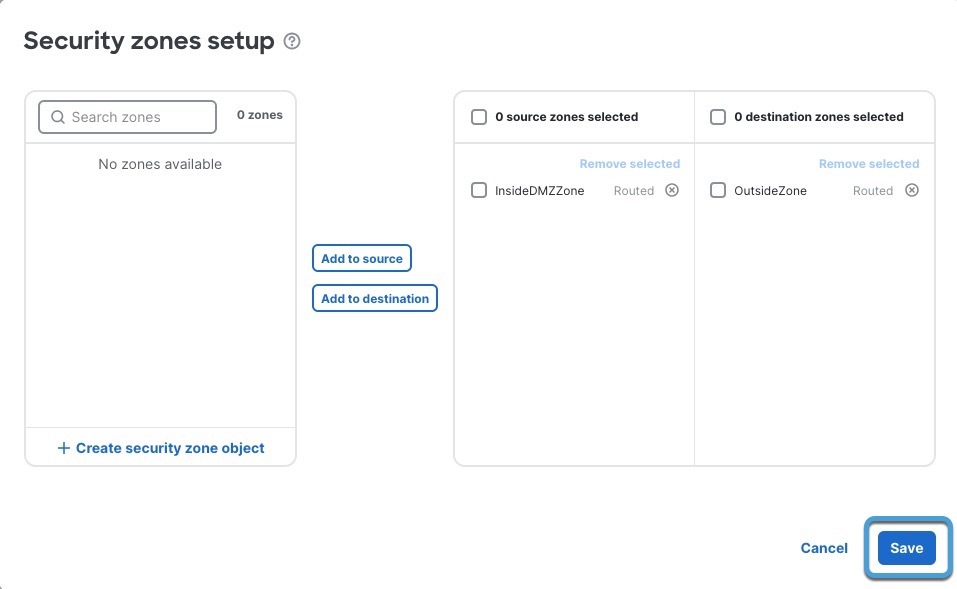
Click Add to Source to decrypt traffic that matches the source network or click Add to Destination to decrypt traffic that matches the destination network. If you select both source and destination networks, to be decrypted, traffic must match both security zones.

Typically, the server for which you're decrypting traffic should be in the destination zone.

The following figure shows an example.

Sample outbound decryption policy that decrypts traffic coming from an inside security zone going to destination outside security zone.

Step 4

Click Save.

Step 5

If you're finished configuring your policy, see Decryption policy actions.


Decrypt networks and users

This option enables you to enforce decryption and deep inspection for specific network objects and from specific users and groups in Microsoft AD, LDAP, or Local realms.

Network objects

Networks control or decrypt traffic by its source and destination IP address, using inner headers. Tunnel rules, which use outer headers, have tunnel endpoint conditions instead of network conditions.

You can use predefined objects to build network conditions.

Users and groups

You can choose to decrypt traffic from a subset of users and groups in your identity realms and you can also choose to decrypt traffic from special identities:

  • Failed Authentication: User who failed authentication with the captive portal.

  • Guest: Users configured as guest users in the captive portal.

  • No Authentication Required: Users that match an identity No Authentication Required rule action.

  • Unknown: Users that cannot be identified such as users who are not downloaded by a configured realm.

For more information, see Add networks and users.

Add networks and users

This task allows you to enforce decryption of outbound traffic from specific networks and from users and groups in Microsoft AD, LDAP, or Local realms.

Only traffic that matches all of the networks and users you select is decrypted.

Before you begin

Complete the tasks discussed in Create a standard decryption policy with outbound protection.

Follow these steps to add networks and users to your decryption policy:

Procedure

Step 1

Complete the tasks discussed in Create a standard decryption policy with outbound protection.

Step 2

Click Add new next to Decrypt Networks and Users.

Step 3

From the Source Network Objects list, do any of the following:

  • In the provided field, enter all or part of an existing network object to filter for that object.

  • Select the check box next to a network to decrypt. To decrypt traffic from all networks, click Add New and Save the row without selecting any networks.

  • Click Add new to add another network to the list.

    For more information, see Create a network object.

Step 4

From the Users list, select the check box next to each user or group name to decrypt.

To decrypt traffic from all users, click Add New and Save the row without selecting any users.

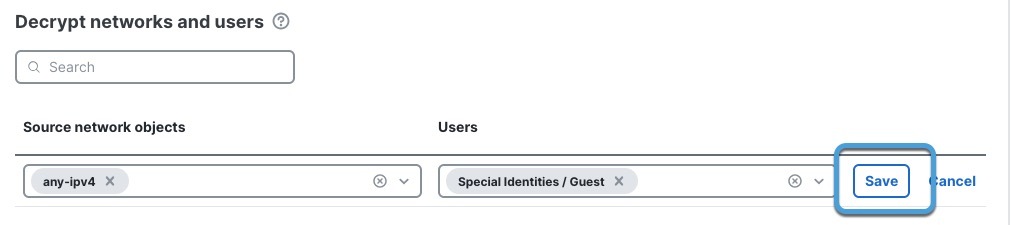
This figure shows an example of selecting a network and users to decrypt.

Sample outbound decryption policy that decrypts all IPv4 traffic going to users in the Special Identities or Guest groups.

Step 5

Click Save.

Step 6

If you're finished configuring your policy, see Decryption policy actions.


Internal certificate authority

An internal certificate authority resigns the traffic after it has been decrypted.

This topic discusses how to add an internal certificate authority (CA) to an outbound section of a standard decryption policy. The internal CA must be trusted by users on your network to avoid seeing untrusted certificate errors in their web browser.

For more information, see Add an internal CA for outbound protection.

Add an internal CA for outbound protection

This task allows you to add an internal CA to resign outgoing traffic for enhanced security in outbound protection scenarios.

This task discusses how to add an internal CA to resign outgoing traffic.

Before you begin

Complete the tasks discussed in Create a standard decryption policy with outbound protection.

Follow these steps to add an internal CA for outbound protection:

Procedure

In the Internal Certificate Authority list, do any of the following:


Generate an internal CA for outbound protection

This task allows you to generate an internal certificate authority object to protect outbound connections when creating a decryption rule.

This task discusses how you can optionally generate an internal certificate authority when you create a decryption rule that protects outbound connections. You can also perform these tasks using Objects as discussed in Upload a signed certificate issued in response to a CSR.

Before you begin

Make sure you understand the requirements for generating an internal certificate authority object as discussed in Internal certificate authority objects.

Procedure

Step 1

From the Internal CA list, click Create New > Generate CA.

Step 2

Give the internal CA a Name and provide a two-letter Country Name.

Step 3

Click Self-Signed or CSR.

For more information about these options, see Internal certificate authority objects.

Step 4

Enter the requested information in the provided fields.

Step 5

Click Save.

Step 6

If you chose CSR, after the signing request has been completed, click Install Certificate as follows:

  1. Repeat the preceding steps in this procedure.

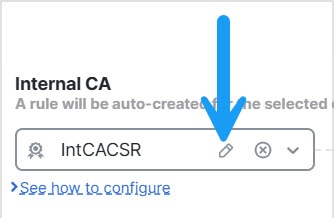
  2. Edit the CA from the Internal CA list as follows.

    To install an internal CA from a certificate signing request, click Edit next to the name of the internal CA

  3. Click Install Certificate.

  4. Follow the prompts on your screen to complete the task.

Step 7

Continue creating the policy as discussed in Create a rule-based decryption policy with outbound connection protection.


Upload an internal CA for outbound protection

Upload an internal certificate authority to create a decryption rule that protects outbound connections.

This task discusses how you can optionally upload an internal certificate authority when you create a decryption rule that protects outbound connections. You can also perform these tasks using Objects as discussed in Upload a signed certificate issued in response to a CSR.

Before you begin

Make sure you understand the requirements for generating an internal certificate authority object as discussed in Internal certificate authority objects.

Follow these steps to upload an internal CA for outbound protection:

Procedure

Step 1

From the Internal CA list, click Create New > Upload CA.

Step 2

Give the internal CA a Name.

Step 3

Paste or browse to locate the certificate and its private key in the provided fields.

Step 4

If the CA has a password, select the Encrypted check box and enter the password in the adjacent field.

Step 5

Continue creating the policy as discussed in Create a rule-based decryption policy with outbound connection protection.


Bypass traffic when decrypting

You can optionally allow certain traffic to pass through the device encrypted without decryption. Bypassing certain traffic has the additional advantage that system resources are not consumed for decrypting it.

Traffic bypass methods

You can review some reasons to leave traffic encrypted here: Best practice for deciding when to decrypt traffic. The system provides these ways to bypass traffic when decrypting:

  • Bypass source and destination networks: For example, traffic from internal servers located on an internal/DMZ network that you can trust doesn't need to be decrypted.

  • Bypass users: You can bypass decryption for users and groups you trust.

  • Bypass undecryptable applications: (Recommended) The typical reason to bypass outgoing traffic to applications is this traffic might use certificate pinning, which is not decryptable.

    For more information, see About TLS/SSL pinning.

  • Bypass categories: (Recommended) Bypass decrypting URL categories of sites for these reasons:

    • The categories represent applications (like personal finance or health) that might be illegal to decrypt and inspect.

    • Categories of websites Cisco has determined are low-risk.

  • Intelligent decryption bypass: Bypass servers based on the threat confidence levels of clients which is determined by the Encrypted Visibility Engine (EVE) and the URL category reputation.

    All devices to which a standard decryption policy with this option enabled are deployed must run version 7.7 or later; otherwise, policy deployment fails.

Bypass sources and destinations

(Optional) Bypass traffic from source or destination network objects. For example, if traffic originates from an internal network that has trusted devices, you can opt not to decrypt that traffic. Networks control or decrypt traffic by its source and destination IP address, using inner headers.

For more information, see Add bypass sources and destinations.

Add bypass sources and destinations

Add bypass sources and destinations to optionally bypass outbound traffic originating from source networks or going to destination networks that you trust.

You should generally bypass traffic only if you trust the traffic from these networks.

Before you begin

Complete the tasks discussed in Create a standard decryption policy with outbound protection.

Follow these steps to add bypass sources and destinations:

Procedure

Step 1

Click Add new under Bypass sources and destinations for either source network objects or destination network objects.

Step 2

In the dialog box that is displayed, do any of the following:

  • Search for a network object by entering text in the search field and pressing Enter.

  • From the Source network object or Destination network object list, choose an existing network object or click Add New to create a new one.

Note


Click Help (help icon) on any dialog box for more information.

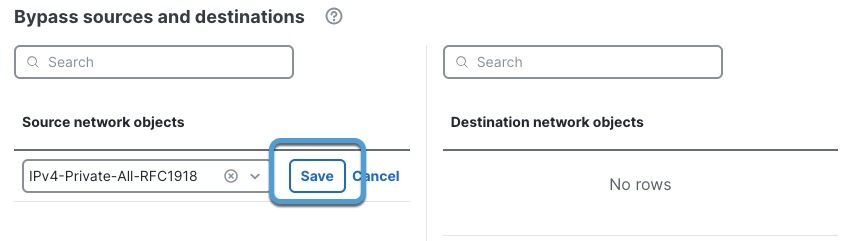
The following figure shows an example.

This sample outbound decryption policy bypasses traffic from an internal network.

Step 3

Click Save.

Step 4

If you're finished configuring your policy, see Decryption policy actions.


Bypass users

(Optional) You can choose to bypass decryption for users and groups in Microsoft Active Directory, LDAP, and Local realms. These users are typically ones you trust.

Bypass user configuration

You can choose to bypass a subset of users and groups in your identity realms and you can also choose to bypass from special identities:

  • Failed Authentication: User who failed authentication with the captive portal.

  • Guest: Users configured as guest users in the captive portal.

  • No Authentication Required: Users that match an identity No Authentication Required rule action.

  • Unknown: Users that cannot be identified such as users who are not downloaded by a configured realm.

For more information, see Add bypass users.

Add bypass users

Bypass decryption for users and groups in selected Microsoft AD, LDAP, and Local realms.

This task allows you to exclude specific users and groups from decryption processing by adding them to a bypass list.

Before you begin

Complete the tasks discussed in Create a standard decryption policy with outbound protection.

Follow these steps to add bypass users:

Procedure

Step 1

Click Add new under Bypass users.

Step 2

In the dialog box that is displayed:

  • From the Realm list, click the name of a realm.

  • From the User list, select the check box next to one or more users or groups for which to bypass decryption.

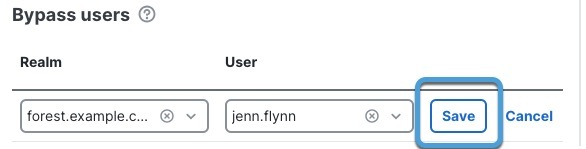
The following figure shows an example.

Sample outbound decryption policy that bypasses decryption for a particular user in the forest.example.com domain

Step 3

Click Save.

Step 4

Repeat the preceding steps as many times as necessary to bypass more users and groups.


Bypass applications

(Optional) You can bypass decryption for applications that cannot be decrypted.

Bypass application configuration

Check the box to not decrypt traffic when re-signing the certificate is likely to cause the connection to fail.

Typically, this behavior is associated with certificate pinning, which is discussed in TLS/SSL certificate pinning guidelines.

Undecryptable applications are updated automatically in the Vulnerability Database (VDB). You can find a list of all applications on the Secure Firewall Application Detectors page; the undecryptable tag identifies applications Cisco determines are undecryptable.

The list of undecryptable applications is maintained by Cisco.

For more information, see Add bypass applications.

Add bypass applications

Bypass decryption for applications that are typically undecryptable due to their use of certificate pinning or other security mechanisms that prevent standard SSL/TLS decryption.

This task discusses how to bypass decryption for applications (typically because those applications are undecryptable due to their using certificate pinning as discussed in About TLS/SSL pinning).

Before you begin

Complete the tasks discussed in Create a standard decryption policy with outbound protection.

Procedure

Step 1

Select the Bypass decryption of known undecryptable applications check box.

Step 2

Click Edit applications.

Step 3

From the list, do any of the following:

  • Click Select All to select all applications that Cisco has determined are undecryptable.

  • Select the check box next to the name of an application for which to bypass decryption.

  • Clear the check box next to the name of an application to decrypt connections to anyway.

The following figure shows an example.

Opt to bypass decrypting applications that are undecryptable, typically due to certificate pinning.

Step 4

Under Selected applications and filters, click Add New to add applications or application filters to bypass. Click Help for more information.

Step 5

Click Save.

Step 6

If you're finished configuring your policy, see Decryption policy actions.


Bypass URL categories and reputations

(Optional) Select categories and reputations, such as personal finance or health, that you do not want to decrypt.

URL categories and reputations information

URL categories and reputations are maintained by Cisco Talos.

For more information about categories, see Intelligence Categories.

For more information about reputations, see Web reputation levels.

To add URL categories and reputations to your decryption policy, see Add bypass URL categories and reputations.


Note


Depending on the laws in your area, decryption of such traffic might be prohibited. Consult an authority in your area for more information.


Add bypass URL categories and reputations

This task allows you to bypass decryption for specific URL categories and reputations to improve performance and reduce processing overhead for trusted or sensitive content.

This task is optional and discusses how to bypass decryption of categories and reputations, based on ratings provided by Cisco Talos.

The following figure shows the list of categories and reputations we recommend.

Example of using our recommended list of URL categories to not decrypt: finance, online trading, and health and medicine.

Before you begin

Complete the tasks discussed in Create a standard decryption policy with outbound protection.

Follow these steps to add bypass URL categories and reputations:

Procedure

Step 1

In the Bypass URL categories section, do any of the following:

  • To edit an existing category/reputation, click Edit (edit icon).

  • To delete an existing category/reputation, click Delete (delete icon).

  • To add a new category/reputation, click Add new.

  • To return the list of categories and reputations to the ones Cisco recommends, click Apply recommended settings.

Step 2

To add or edit a category/reputation, from the first list, click the name of a category.

For more information about categories, see Intelligence Categories.

Step 3

From the second list, click the name of a reputation.

For more information about reputations, see Web reputation levels.

The following figure shows an example of using Cisco's defaults and adding the Animals and Pets category with the Trusted reputation.

Step 4

Click Save.

This figure shows an example.

Example of using our recommended list of URL categories to not decrypt: finance, online trading, and health and medicine.

Step 5

If you're finished configuring your policy, see Decryption policy actions.


Intelligent decryption bypass

Intelligent decryption bypass allows very low-risk connections to dynamically bypass decryption. It leverages the power of the Encrypted Visibility Engine (EVE) and insights from Talos Server Reputation to assess both client and server risk in real-time.

Bypassing trusted connections reduces unnecessary decryption processing and conserves system resources. This also respects user privacy by not decrypting traffic that is classified as low-risk and trusted.

Classification and setup details

The bypass behavior applies broadly and covers many general browsing activities. For example, connections to www.CNN.com are not decrypted, but other connections that fetch assets from CNN's Content Delivery Networks (CDNs) may be decrypted if those URLs are not classified as Trusted.

Client classification is based on EVE's risk assessment which uses machine learning to identify traffic risk levels. URL classification is based on Talos URL reputation. Connections to trusted URLs from very-low risk clients are bypassed and not decrypted. All other connections, including connections to URLs that are not trusted or connections from clients classified at a higher risk level, are subject to decryption policies.

To set up Intelligent Decryption Bypass for an outbound decryption rule, locate Intelligent Decryption Bypass and set it to Slider enabled (slider enabled) to not decrypt traffic for very low-risk clients connecting to trusted servers, based on the threat confidence levels of clients which are determined by the Encrypted Visibility Engine (EVE) and the URL category reputation.

To view the current list of clients classified by trust level, visit Secure Firewall Application Detectors. For example, CNN.com is classified as Very Low. Make sure you understand what traffic you are choosing to not decrypt.

Block connections

You can choose to block any of these connection types:

  • SSL and TLS versions because some are considered unsecure.

  • Connections based on certificate status. For example, block outbound traffic to a server with an expired certificate because that server might not be trustworthy.

For more information, see Add block connections.

Add block connections

This task enables you to block outbound connections based on either old SSL or TLS versions or based on the server certificate status, enhancing security by preventing connections using insecure protocols or untrusted certificates.

This task discusses how to block connections based on either old SSL or TLS versions; or based on the server certificate status.


Note


Blocking affects all outbound connections and takes precedence over all other bypass and decryption conditions you choose.


Before you begin

Complete the tasks discussed in Create a standard decryption policy with outbound protection.

Procedure

Step 1

Locate the Block connections section.

Step 2

To block outbound traffic based on its SSL or TLS protcol version, slide Block based on TLS versions to Slider enabled (slider enabled).

Step 3

To block outbound traffic based on server certificate status, slide Block based on certificate status to Slider enabled (slider enabled).

Step 4

You have the following options:

  • From the list, select the check box next to an option to add that protocol or status to the policy.

  • Click x next to an item to remove it from the list.

  • Click Reset to default to return the list entries to their original values.

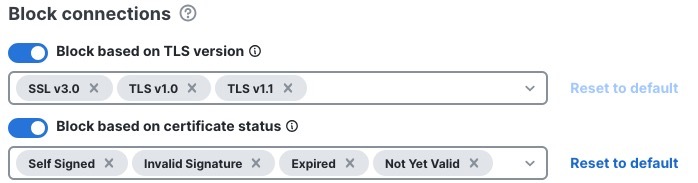
The following figure shows an example of blocking traffic with both TLS versions and server certificate status. Self-signed was added to the list of server certificates to block.

Example of blocking all traffic using unsecure ciphers like TLS 1.1 or unsafe certificate status like self-signed, expired, or not yet valid.

Step 5

If you're finished configuring your policy, see Decryption policy actions.


Standard decryption policy advanced options

Advanced decryption policy options allow you to fine-tune SSL/TLS decryption behavior. These optional settings control certificate matching, legacy site bypassing, protocol handling, and logging configuration. We recommend setting all advanced options to their default values unless specific requirements dictate otherwise.

Bypass legacy Cisco undecryptable sites

Enable this option to bypass decryption for websites with Distinguished Names (DNs) that Cisco has determined are undecryptable. To view the list of DNs, go to Objects > Distinguished Name > Object Groups.

Require exact certificate match for inbound decryption

Enable this option to require the use of the internal server's certificate in the decryption policy (this option is referred to as known key decryption). The default is to use a different certificate, which is more convenient for replacing the policy's certificate when needed. For more information, see Incoming traffic decryption actions.

Enable adaptive TLS server identity probe

Automatically enabled when TLS 1.3 decryption is enabled. A probe is a partial TLS connection with the server, the purpose of which is to obtain the server certificate and cache it. (If the certificate is already cached, the probe is never established.)

If TLS 1.3 Server Identity Discovery is disabled on the access control policy with which the decryption policy is associated, we attempt to use the Server Name Indication (SNI), which is not as reliable.

The adaptive TLS server identity probe occurs on any of the following conditions as opposed to on every connection as in earlier releases:


Note


Enable adaptive TLS server discovery mode is not supported on any Secure Firewall Threat Defense Virtual deployed to AWS. If you have any such managed devices managed by the Secure Firewall Management Center, the connection event PROBE_FLOW_DROP_BYPASS_PROXY increments every time the device attempts to extract the server certificate.


Decryption event logging options

To expedite troubleshooting and to inform yourself about how your decryption policies are working, we recommend you enable all logging options: bypassed traffic, decrypted traffic, and blocked traffic.

Enable QUIC Decryption

Whether to apply decryption rules to connections that use the HTTP/3 over the QUIC protocol. When you decrypt QUIC connections, the system can inspect the contents of the sessions for intrusions, malware, or other issues. You can also apply granular control and filtering of decrypted QUIC connections based on specific criteria in the access control policy. QUIC support is in line with RFC 9000, 9001, 9002, 9114, 9204.

Consider the following when implementing QUIC decryption:

  • On high availability or clustered devices, QUIC decryption works only if the connection remains on the same node. If the connection fails over, or is forwarded to another node, the connection drops and must be re-established. Multi-instance is supported without restrictions.

  • Rules that apply to QUIC traffic would include the UDP protocol with destination port 443.

  • Access control rules that apply to QUIC traffic would include the HTTP/3 or QUIC protocols, either explicitly or by implication.

The following limitations apply to QUIC decryption:

  • QUIC decryption applies to Firewall Threat Defense 7.6+ only. Devices running a lower release cannot decrypt QUIC connections.

  • Connections from browsers using the Chromium stack (Google Chrome, Opera, Edge) cannot be decrypted for outbound traffic. But inbound traffic from the same browsers can be decrypted.

  • Connection Migration as described in RFC 9000 is not supported. The concept of Connection ID in QUIC allows endpoints to retain the same connection in the event of address change.

  • Key update, session resumption, and QUIC version 2 are not supported.

  • Interactive Block and Interactive Block with Reset (in access control rules) is not supported. These actions will work as Block and Block with Reset.

  • The active connection-ID per connection is limited to 5. If necessary, you can modify these limits using the system support quic-tuning and system support quic-tuning-reset commands in the device CLI.

Enable TLS 1.3 decryption

Whether to apply decryption rules to TLS 1.3 connections. If you do not enable this option, the decryption rules apply to TLS 1.2 or lower traffic only. See TLS 1.3 decryption best practices.

Save the policy

After you have configured advanced policy options, see Decryption policy actions.

Add trusted CA certificates

Add trusted CA certificates to your decryption policy to ensure proper handling of your organization's certificates during traffic decryption.

This task is optional but strongly recommended. Adding issuer CAs for your organization's certificates helps avoid issues with decrypting traffic in your decryption policy.

Before you begin

Complete the tasks discussed in:

Follow these steps to add trusted CA certificates:

Procedure


Step 1

In your policy, expand Advanced Options.

Step 2

In the Trusted CA certificates list, do any of the following:

  • Click the name of a trusted CA certificate from the list.

  • To remove all certificates from the list, click The image illustrates the process of selecting a trusted CA certificate from a list, highlighting the options available for managing the certificates in a decryption policy..

  • To return the list to its original values, click Add recommended.


Decryption policy actions

You can perform these actions on a decryption policy.

  • Copy a decryption policy

  • Convert a standard decryption policy to a rule-based decryption policy, and

  • Generate a report about the decryption policy.

Convert a standard decryption policy to a rule-based decryption policy

This task allows you to use the additional customization available in a rule-based decryption policy.

After converting to a rule-based decryption policy, you cannot convert it back to a standard decryption policy. Also, you cannot convert any rule-based decryption policy to a standard decryption policy.

We provide this ability so you can use the additional customization available in a rule-based decryption policy. For more information, see Rule-based decryption policies.

Before you begin

Create a decryption policy as discussed in this guide.

Follow these steps to convert a standard decryption policy to a rule-based decryption policy:

Procedure


Step 1

Log in to Secure Firewall Management Center if you haven't already done so.

Step 2

Click Policies > Security policies > Decryption.

Step 3

Next to the decryption policy you wish to convert, in the Actions column, click More icon (more icon) then click Convert policy mode.

Step 4

You are required to confirm the action.

The system creates a backup policy with -backup appended to the name of the original policy. The original policy retains its name.


Copy a decryption policy

Copy an existing decryption policy to create a new policy with the same rules and settings.

Copying a decryption policy duplicates any rules in the policy and all of the policy's settings.

Before you begin

Create a decryption policy as discussed in this guide.

Follow these steps to copy a decryption policy:

Procedure


Step 1

Log in to Secure Firewall Management Center if you haven't already done so.

Step 2

Click Policies > Security policies > Decryption.

Step 3

Next to the decryption policy you wish to copy, in the Actions column, click More icon (more icon) then click Copy policy.

Step 4

When prompted, provide a name for the policy.

Step 5

Click Save.


Generate a decryption policy report

This task enables you to create a comprehensive decryption policy report for analysis and documentation purposes.

This topic discusses how to create a decryption policy report that includes these items (among other things):

  • List of rules

  • List of cipher suites

  • Policy's default action

  • Trusted CA certificates

Before you begin

Create a decryption policy as discussed in this guide.

Follow these steps to generate a decryption policy report:

Procedure


Step 1

Log in to Secure Firewall Management Center if you haven't already done so.

Step 2

Click Policies > Security policies > Decryption.

Step 3

Next to the decryption policy you wish to create a report, in the Actions column, click More icon (more icon) then click Generate report.

The system creates a PDF report and opens it for you using your default PDF application.