Configuration Deployment

This chapter describes how to download configuration changes to one or more managed devices.

Configuration deployment

Configuration deployment is a management process that enables centralized control and distribution of device settings from Firewall Management Center to managed devices.

Configuration changes that require deployment

Firewall Management Center marks out-of-date policies with red status text that indicates how many of its targeted devices need a policy update. Redeploy the policy to the devices to clear this status.

Deployment required

You must deploy changes after these configuration updates:

  • Modifying an access control policy: any changes to access control rules, the default action, policy targets, Security Intelligence filtering, advanced options including preprocessing, and so on.

  • Modifying any of the policies that the access control policy invokes: the SSL policy, network analysis policies, intrusion policies, file policies, identity policies, or DNS policies.

  • Changing any reusable object or configuration used in an access control policy or policies it invokes:

    • network, port, VLAN tag, URL, and geolocation objects

    • Security Intelligence lists and feeds

    • application filters or detectors

    • intrusion policy variable sets

    • file lists

    • decryption-related objects and security zones

  • Updating intrusion rules (SRU/LSP) or the vulnerability database (VDB).

  • Upgrading managed devices.

  • Upgrading the Firewall Management Center, in some cases. If deploy is required, affected devices are marked out of date (with a few exceptions). Reasons for needing to manually deploy include:

    • The device is running Snort 2.

    • The upgrade updated the LSP and scheduled LSP updates are off.

    • The upgrade updated the LSP and scheduled LSP updates are on, but automatic redeploy is off. Devices may not be marked out of date in this case. Note that if automatic redeploy is on, the redeploy will take place on schedule and you do not need to do it manually.

    • Specific configurations changed by the upgrade require a deploy.

    • You need to upgrade managed devices immediately. After Firewall Management Center upgrade, you cannot upgrade managed devices until you redeploy, even if they are not marked out of date.

You can change some of these configurations from multiple places in the web interface. For example, you can modify security zones using the object manager (Objects), but modifying an interface type in a device configuration (Devices > Device Management) can also change a zone and require a deployment.

Deployment not required

These updates do not require a deployment:

  • Security Intelligence updates to feeds and the global Block or Do Not Block lists.

  • URL filtering data updates.

  • Geolocation database (GeoDB) updates.

  • Firewall Management Center upgrades, in many cases. If deploy is required, affected devices are marked out-of-date (with a few exceptions).

Deployment preview

A deployment preview is a snapshot that provides all the policy and object changes to be deployed on the device.

The policy changes include the new policies, changes in the existing policies, and the deleted policies. The object changes include the added and modified objects which are used in policies. The unused object changes are not displayed because they are not deployed on the device.

Click the Preview icon next to a deployment job to view the configuration change log for that are pending to be deployed on the device. The change log includes:

  • Comparison View: Displays a side-by-side comparison of all the device configuration changes made since your last deployment.

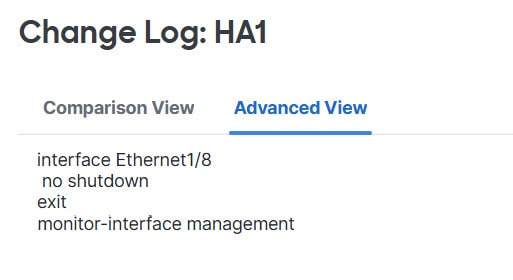
  • Advanced View: Displays the pending CLI commands to be applied to the device.

For more information about viewing the deployment preview, refer to Deploy configuration changes.

The preview shows all the default values, even when they are not altered, along with the other configured settings when an interface or a platform settings policy is added for the first time. Similarly, the high availability-related policies and default values for settings are shown, even when they are not altered, in the first preview after a high availability pair is configured or disrupted.

To view changes due to an auto rollback, refer to Edit Deployment Settings.

Unsupported features:

  • Object additions and attribute changes are displayed in the preview only if the objects are associated with any device or interface. Object deletions are not displayed.

  • Preview is not supported for the policies:

    • High availability

    • Network discovery

    • Network analysis

    • Device settings

  • User information at the rule level is not available for intrusion policies.

  • The preview does not show the reordering of rules across policies.

    For DNS policies, reordered rules appear in the preview list as rule additions and deletions. For example, moving a rule from position 1 to position 3 in the rule order is displayed as if the rule was deleted from position 1 and added as a new rule in position 3. Similarly, when a rule is deleted, the rules under it are listed as edited rules as they have changed their positions. The changes are displayed in the final order in which they appear in the policy.

  • Preview is not supported in these HA scenarios:

    • If a device was in standalone mode and if a chain is made, then an auto-deployment is triggered. For that particular job, preview is not supported. On hover over the Preview (preview icon), a message is displayed that it is a HA bootstrap deployment, and no preview is supported.

    • Configuration groups - Consider a flow in which a device was initially standalone. Subsequently, three deployments took place. In the fourth deployment, the device was a HA bootstrap deployment. After these, the user deploys devices 5, 6, and 7. The deployment 7 is an HA break deployment, and the user deploys devices 8, 9, and 10.

      In this flow, the preview between 3 and 5 is not supported because 4 was a HA deployment. Similarly, the preview between 8 and 3 is also not supported. Preview is supported only from 3 to 1, 7,6, 5, 4, and 10, 9, and 8.

    • If a device is broken (HA is broken) then the new device is considered as a fresh device.

Guidelines for selective policy deployment

The Firewall Management Center allows you to select a specific policy within the list of all the changes on the device that are due for deployment and deploy only the selected policy.

This table describes the policies that suppot selective deployment.

Table 1. Policies that support selective deployment

Type

Policy

Access control

  • Access control policies

  • Prefilter policies

  • QoS policies

Threat prevention and inspection

  • Intrusion policies

  • Malware and file policies

  • DNS policies

Identity and discovery

  • SSL / decryption policies

  • Identity policies

  • Network discovery

Device or network connectivity

  • NAT policies

  • Routing policies

  • VPN policies

Use the this table to understand the constraints and conditions for applying selective policy deployment.

Table 2. Limitations for selective deployment

Type

Description

Scenarios

Full deployment

Full deployment is necessary for specific deploy scenarios, and the Firewall Management Center does not support selective deployment in such scenarios. If you encounter an error in such scenarios, you may choose to proceed by selecting all the changes for deployment on the device.

Full deployment is required for:

  • The first deployment after you upgrade the Firewall Management Center or its devices.

  • The first deployment after you restore a device.

  • The first deployment after modifications to a device's interface settings.

  • The first deployment after modifications in the virtual router settings.

  • When a device moves to a new domain (global to sub-domain or sub-domain to global).

Associated policy deployment

The Firewall Management Center identifies interdependent policies which are interlinked. When one of the interlinked policies is selected, the remaining interlinked policies are automatically selected.

Scenarios wherein an associated policy is automatically selected:

  • When a new object is associated with an existing policy.

  • When an existing policy's object is modified.

Scenarios wherein multiple policies are automatically selected:

  • When a new object is associated with an existing policy, and the same object is already associated with other policies, all the associated policies are automatically selected.

  • When a shared object is modified, all the associated policies are automatically selected.

Interdependent policy changes (shown using color-coded tags)

The Firewall Management Center dynamically detects dependencies in-between policies, and between the shared objects and the policies. The interdependency of the objects or policies is shown using color-coded tags.

Scenarios wherein color-coded interdependent policies or objects are automatically selected:

  • When all the out-of-date policies have interdependent changes.

    For example, when an access control policy, an intrusion policy, and a NAT policy are out-of-date. Since access control policy and NAT policy share an object, all policies are selected together for deployment.

  • When all out-of-date policies share an object, and the object is modified.

Access Policy Group specifications

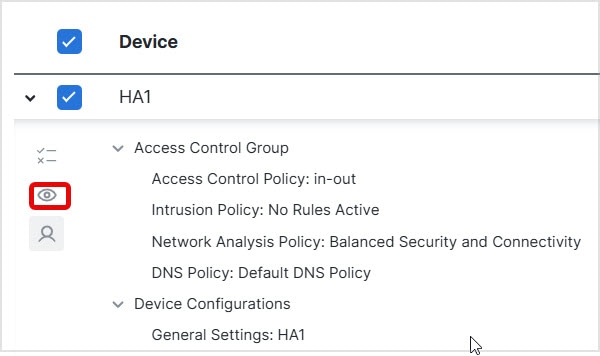
Access Policy Group policies are listed together in the preview window under Access Policy Group when you click View (View button).

The scenarios and the expected behavior for Access Policy Group policies are:

  • If the access control policy is out-of-date, all other out-of-date policies under this group, except file policy and intrusion policy, are selected when the access control policy is selected for deployment.

    However, if the access control policy is out-of-date, intrusion and file policies can be individually selected or deselected irrespective of whether the access control policy is selected or not, unless there are any dependent changes. For example, if a new intrusion policy is assigned to an access control rule, it indicates that there are dependent changes, then both the access control policy and the intrusion policy will be automatically selected when either of them is selected.

  • If no access control policy is out-of-date, other out-of-date policies in this group can be selected and deployed individually.

System username

The Firewall Management Center displays the username as system for specific management operations. This allows administrators to distinguish system-initiated actions from those performed by users.

The system username is applied to these operations:

  • Rollback

  • Upgrade

  • Firewall Threat Defense backup and restore

  • SRU update

  • LSP update

  • VDB update

Auto-enabling of application detectors

When you perform application control but disable required detectors, the Firewall Management Center automatically enables the appropriate system-provided detectors upon policy deployment. If no system-provided detector exists for the application, the Firewall Management Center enables the most recently modified user-defined detector.

Asset rediscovery with network discovery policy changes

When you deploy changes to a network discovery policy, the system deletes and then rediscovers MAC address, TTL, and hops information from the network map for the hosts in your monitored networks. Also, the affected managed devices discard any discovery data that has not yet been sent to the Firewall Management Center.

Snort restart scenarios

A Snort restart scenario is a situation that

  • causes the traffic inspection engine, referred to as the Snort process, on a managed device to restart,

  • interrupts inspection until the process resumes Whether traffic drops during this interruption or passes without further inspection depends on how the assigned device handles traffic. See Snort restart traffic behavior for more information., and

  • may result in resource demands that cause a small number of packets to drop without inspection when you deploy.

Common snort restart triggers

Any of these scenarios cause the Snort process to restart:

Inspection interruption warnings during deployment

When you deploy configurations, the Inspect Interruption column in the deploy page indicates if a deployed configuration will restart the Snort process on the Firewall Threat Defense device. When the traffic inspection engine referred to as the Snort process restarts, inspection is interrupted until the process resumes. Whether traffic is interrupted or passes without inspection during the interruption depends on how the traffic is handled by the device. You can proceed with the deployment, cancel the deployment and modify the configuration, or delay the deployment until a time when deploying would have the least impact on your network.

During deployment, when the Inspect Interruption column indicates Yes and you expand the device configuration listing, an icon will highlight any configuration type that may restart the Snort process. Moving your pointer over the icon displays a message saying that deployment may interrupt traffic.

This table summarizes how the deploy page displays inspection interruption warnings.

Table 3. Inspection interruption indicators

Type

Inspect interruption

Description

Firewall Threat Defense

Inspect Interruption (inspect interruption icon)Yes

At least one configuration would interrupt inspection on the device if deployed, and might interrupt traffic depending on how the device handles traffic. You can expand the device configuration listing for more information.

--

Deployed configurations will not interrupt traffic on the device.

Undetermined

The system cannot determine if a deployed configuration may interrupt traffic on the device.

Undetermined status is displayed before the first deployment after a software upgrade, or in some cases during a Support call.

Errors (error icon)

The system cannot determine the status due to an internal error.

Cancel the operation and click Deploy again to allow the system to redetermine the Inspect Interruption status. If the problem persists, contact Support.

sensor

--

The device identified as sensor is not the Firewall Threat Defense device; the system does not determine if a deployed configuration may interrupt traffic on this device.

For information on all configurations that restart the Snort process for all device types, see Configurations that restart the snort process when deployed or activated.

Inspect traffic during policy apply

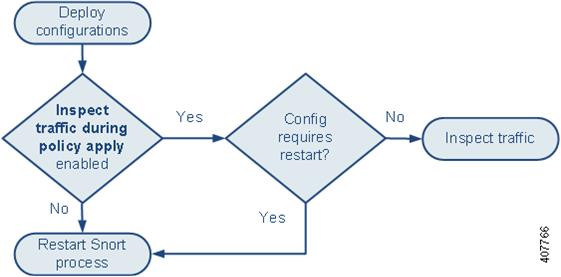
Inspect traffic during policy apply is an advanced access control policy general setting that enables managed devices to inspect traffic while configuration changes are applied, and allows inspection unless a deployed configuration requires the Snort process to restart.

Configuration options

You can configure this setting as follows:

  • Enabled — Traffic is inspected during the deployment unless certain configurations require the Snort process to restart. When a Snort restart is not needed, the system first uses the currently deployed access control policy to inspect traffic, then switches to the policy being deployed.

  • Disabled — Traffic is not inspected during the deployment. The Snort process always restarts when you deploy.

This graphic illustrates how Snort restarts can occur when you enable or disable Inspect traffic during policy apply.

Caution


When you deploy, resource demands may result in a small number of packets dropping without inspection. Additionally, deploying some configurations restarts the Snort process, which interrupts traffic inspection. Whether traffic drops during this interruption or passes without further inspection depends on how the target device handles traffic. See Snort restart traffic behavior and Configurations that restart the snort process when deployed or activated.


Snort restart traffic behavior

This reference explains how different devices handle traffic when the Snort process restarts.

Table 4. The Firewall Threat Defense and the Firewall Threat Defense Virtual Restart Traffic Effects

Interface configuration

Restart traffic behavior

inline: Snort Fail Open: Down: disabled

dropped

inline: Snort Fail Open: Down: enabled

passed without inspection

Some packets can be delayed in buffer for several seconds before the system recognizes that Snort is down. This delay can vary depending upon the load distribution. However, the buffered packets are eventually passed.

routed, transparent (including EtherChannel, redundant, subinterface): preserve-connection enabled (configure snort preserve-connection enable ; default)

For more information, see Cisco Secure Firewall Threat Defense Command Reference.

existing TCP/UDP flows: passed without inspection so long as at least one packet arrives while Snort is down

new TCP/UDP flows and all non-TCP/UDP flows: dropped

Note that traffic drops even when preserve-connection is enabled for:

  • plaintext, passthrough prefilter tunnel traffic that matches an Analyze rule action or an Analyze all tunnel traffic default policy action

  • connections that do not match an access control rule and are instead handled by the default action

  • decrypted TLS/SSL traffic

  • a safe search flow

  • a captive portal flow

routed, transparent (including EtherChannel, redundant, subinterface): preserve-connection disabled (configure snort preserve-connection disable )

dropped

inline: tap mode

egress packet immediately, copy bypasses Snort

passive

uninterrupted, not inspected


Note


In addition to traffic handling when the Snort process is down while it restarts, traffic can also pass without inspection or drop when the Snort process is busy, depending on the configuration of the Snort Fail Open Busy option (see Configure an Inline Set). A device supports either the Failsafe option or the Snort Fail Open option, but not both.

Note


When the Snort process is busy but not down during configuration deployment, some packets may drop on routed, switched, or transparent interfaces if the total CPU load exceeds 60 percent.

Warning


Do not reboot the system while the Snort Rule Update is in progress.

Snort-busy drops happen when snort is not able to process the packets fast enough. Lina does not know whether Snort is busy due to processing delay, or if is stuck or due to call blocking. When transmission queue is full, snort-busy drops occur. Based on Transmission queue utilization, Lina will try to access if the queue is being serviced smoothly.

Configurations that restart the snort process when deployed or activated

Deploying any of these configurations except AAB restarts the Snort process as described. Deploying AAB does not cause a restart, but excessive packet latency activates the currently deployed AAB configuration, causing a partial restart of the Snort process.

Access control policy advanced settings
  • Deploy when Inspect Traffic During Policy Apply is disabled.

  • Add or remove an SSL policy.

File policy

Deploy the first or last of any one of these configurations; note that while otherwise deploying these file policy configurations does not cause a restart, deploying non-file-policy configurations can cause restarts.

  • Take either of these actions:

    • Enable or disable Inspect Archives when the deployed access control policy includes at least one file policy.

    • Add the first or remove the last file policy rule when Inspect Archives is enabled (note that at least one rule is required for Inspect Archives to be meaningful).

  • Enable or disable Store files in a Detect Files or Block Files rule.

  • Add the first or remove the last active file rule that combines the Malware Cloud Lookup or Block Malware rule action with an analysis option (Spero Analysis or MSEXE, Dynamic Analysis, or Local Malware Analysis) or a store files option (Malware, Unknown, Clean, or Custom).

Note that access control rules that deploy these file policy configurations to security zones or tunnel zones cause a restart only when your configuration meets these conditions:

  • Source or destination security zones in your access control rule must match the security zones associated with interfaces on the target devices.

  • Unless the destination zone in you access control rule is any, a source tunnel zone in the rule must match a tunnel zone assigned to a tunnel rule in the prefilter policy.

Identity policy
  • When SSL decryption is disabled (that is, when the access control policy does not include an SSL policy), add the first or remove the last active authentication rule.

    An active authentication rule has either an Active Authentication rule action, or a Passive Authentication rule action with Use active authentication if passive or VPN identity cannot be established selected.

Network discovery
  • Enable or disable non-authoritative, traffic-based user detection over the HTTP, FTP, or MDNS protocols, using the network discovery policy.

Device management
  • MTU: Change the highest MTU value among all non-management interfaces on a device.

  • Automatic Application Bypass (AAB): The currently deployed AAB configuration activates when a malfunction of the Snort process or a device misconfiguration causes a single packet to use an excessive amount of processing time. The result is a partial restart of the Snort process to alleviate extremely high latency or prevent a complete traffic stall. This partial restart causes a few packets to pass without inspection, or drop, depending on how the device handles traffic.

TLS server identity discovery

Enabling or disabling TLS Server Identity Discovery will result in a Snort 2 restart.


Note


Snort 3 does not restart when TLS Server Identity Discovery is enabled or disabled.


Updates
  • System update: Deploy configurations the first time after a software update that includes a new version of the Snort binary or data acquisition library (DAQ).

  • For managed devices running Snort 3, deploying configurations the first time after installing a vulnerability database (VDB) update may temporarily interrupt application detection, but there will be no traffic interruptions.

Actions that immediately restart the snort process

These actions immediately restart the Snort process without requiring deployment. How the restart affects traffic depends on how the target device handles traffic. See Snort restart traffic behavior for more information.

Applications or application detectors
  • Activate or deactivate a system or custom application detector.

  • Delete an activated custom detector.

  • Save and Reactivate an activated custom detector.

  • Create a user-defined application.

When you perform any of these actions, a message warns you that continuing will restart the Snort process. The message allows you to cancel. The system restarts Snort on all managed devices in the current domain and any child domain.

High availability configuration

Create or break a Firewall Threat Defense high availability pair.

When you create or break a high availability pair, a message warns you that creating or breaking a high availability pair restarts the Snort process on the primary and secondary devices. The message allows you to cancel.

Requirements and prerequisites for deployment management

Before using the manual lookup features in the Firewall Management Center, ensure you meet these requirements.

  • You must have Administrator, Network Admin, or Security Approver privileges to access the deployment features.

  • Before deploying policy changes, you can compare the differences between the current device configuration and the pending policy, ensuring accuracy before you finalize the deployment. To use this feature, you must have the appropriate access rights, valid licenses for the specific policy, and be in the correct domain context.

Best practices for deploying configuration changes

Reliable management connection

The management connection between the Firewall Management Center and the device is a secure, TLS-1.3-encrypted communication channel between itself and the device.

To ensure reliable management connection, use a direct management path instead of routing management traffic through an additional encrypted tunnel, such as a Site-to-Site VPN. If the tunnel fails, you could lose management connectivity.

To maintain a reliable management connection, exclude management traffic from the VPN tunnel if it exits a VPN-terminating interface.


Caution


Avoid routing a device’s management connection through a VPN tunnel that terminates on the device itself. If a configuration update causes the tunnel to drop, you will lose the management connection and cannot recover the device configuration unless you connect directly to the device.


Maximum concurrent deployments

Avoid deploying to more than 25 percent of the maximum devices allowed for a Firewall Management Center in the same deployment task. For example, for the FMCv300, the maximum deployment task size is 75 devices (25 percent of 300). Deploying concurrently to more devices can cause performance issues.

Deployment of shared policies

For best performance, deploy to devices that use the same policies. Create a separate deployment task for each group of devices that share policies.

Time to deploy and memory limitations

Deployment time depends on multiple factors, including:

  • The configurations you send to the device. For example, if you dramatically increase the number of Security Intelligence entries you block, deployment can take longer.

  • Device model and memory. On devices with less memory, deployment can take longer.

Keep your configurations within the capability of your devices. If you exceed the maximum number of rules or policies supported by a target device, Firewall Management Center displays a warning. The maximum depends on a number of factors—not only memory and the number of processors on the device, but also on policy and rule complexity. For information on optimizing policies and rules, refer to Best practices for access control rules.

Use a maintenance window to lessen the impact of traffic interruptions

We strongly recommend you deploy in a maintenance window or at a time when interruptions will have the least impact.

Configuration deployment

Configuration deployment is the process of deploying configuration and policy updates to your Fireall Threat Defense devices after you make changes. This process allows you to apply changes to multiple components including device configurations, security policies, and network discovery settings.

Deployment components

Deploying updates applies to these components:

  • Device and interface configurations

  • Device-related policies, such as NAT, VPN, QoS, and platform settings policy

  • Access control and related policies: DNS, file, identity, intrusion, network analysis, prefilter, SSL

  • Network discovery policy

  • Intrusion rule updates

  • Configurations and objects associated with any of these elements

You can configure the system for automatic deployment by scheduling a deploy task or by setting the system to deploy when importing intrusion rule updates. Automating policy deployment is especially useful if you allow intrusion rule updates to modify system-provided base policies for intrusion and network analysis. Intrusion rule updates can also modify default values for the advanced preprocessing and performance options in your access control policies.

You can view deployment status in the Notifications pane.

Deploy configuration changes

Apply new or updated device configurations to managed devices.

After you change a device configuration, you must deploy the changes for them to take effect. Deploy during a maintenance window or off-peak hours to minimize potential traffic and inspection disruption.


Caution


When you deploy, resource demands may result in a small number of packets dropping without inspection. Additionally, deploying some configurations restarts the Snort process, which interrupts traffic inspection. Whether traffic drops during this interruption or passes without further inspection depends on how the target device handles traffic. See Snort restart traffic behavior and Configurations that restart the snort process when deployed or activated.

Before you begin

  • Confirm that all managed devices use the same revision of the Security Zones object. If you have edited security zone objects: Do not deploy configuration changes to any device until you edit the zone setting for interfaces on all devices you want to sync. You must deploy to all managed devices at the same time.

  • To preview the deployment changes, enable REST API access. To enable the REST API access, follow the steps in Enabling REST API Access in the Cisco Secure Firewall Management Center Administration Guide .


Note


The deployment process fails if the device configuration is being read at the device CLI during deployment. Do not execute commands such as show running-config during the deployment.


Procedure


Step 1

On the Firewall Management Center menu bar, click Deploy.

Step 2

For a quick deployment, check specific devices and then click Deploy, or click Deploy All to deploy to all devices. For additional deployment options, click Advanced Deploy.

The rest of this procedure applies to the Advanced Deploy screen.

Figure 1. Quick Deploy
Deploy
Figure 2. Advanced Deploy
Advanced Deploy

Step 3

Click Expand Arrow (expand arrow icon) to view device-specific configuration changes to be deployed.

Figure 3. Expand
Advanced Deploy
  • The Modified By column lists the users who have modified the policies or objects. On expanding the device listing, you can view the users who have modified the policies against each policy listing. For information about when the System user is shown (instead of the logged-in user), refer to System username.

    Note


    Usernames are not provided for deleted policies and objects.

  • The Inspect Interruption column indicates if traffic inspection interruption may be caused in the device during deployment.

    When the status indicates (Yes) that deploying will interrupt inspection, and perhaps traffic, on the Firewall Threat Defense device, the expanded list indicates the specific configurations causing the interruption with the Inspect Interruption (inspect interruption icon).

    If the entry is blank in this column for a device, then it indicates that there will be no traffic inspection interruptions on that device during deployment.

    For information about identifying configurations that interrupt traffic inspection and might interrupt traffic when deployed to the Firewall Threat Defense devices, refer to Inspection interruption warnings during deployment.

  • The Last Modified Time column specifies when you last made the configuration changes.

  • The Preview column allows you to preview the changes for the next deployment.

  • The Status column provides the status for each deployment. For more information, see Deployment status.

Step 4

In the Preview column, click Preview (preview icon) to see the configuration changes that you can deploy.

Figure 4. Preview
Preview

Note


If you change the Firewall Management Center name in Administration > Configuration > Information , the deployment preview does not specify this change, yet it requires a deployment.

For unsupported features for Preview, see Deployment preview .

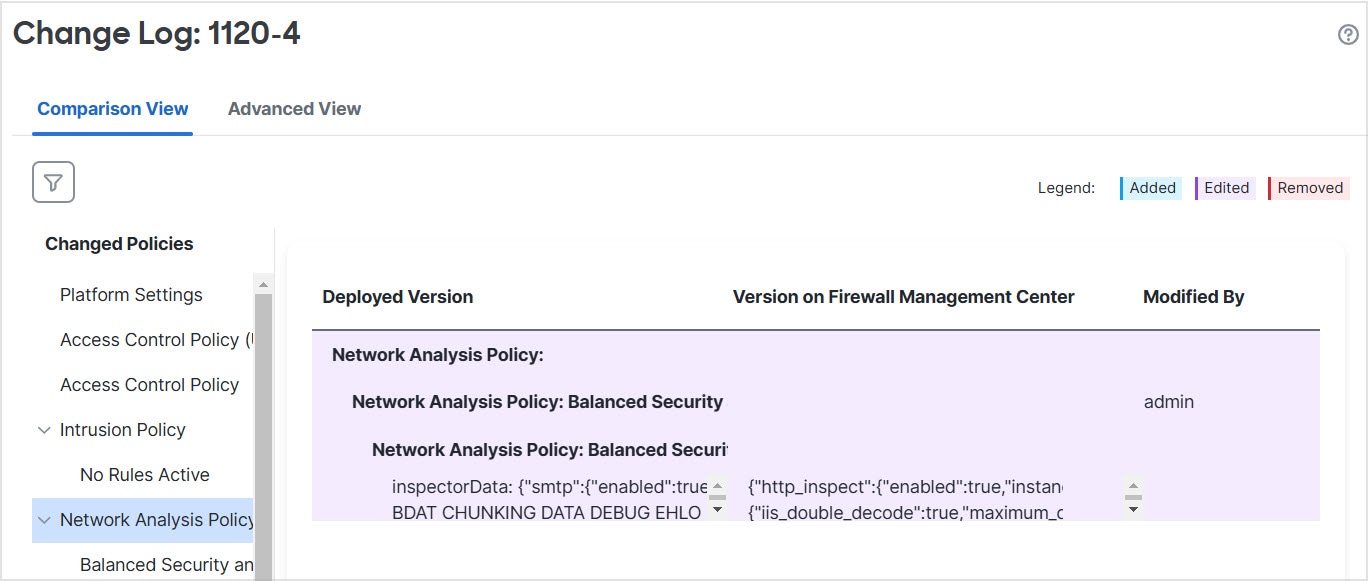
The Comparison View tab lists all the policy and object changes. The left pane lists all the different policy types that have changed on the device, organized in a tree structure.

Figure 5. Comparison View
Comparison View

The Filter(filter icon lets you filter the policies at the user level and policy level.

The right pane lists all the additions, changes, or deletions in the policy, or the object selected in the left pane. The two columns on the right pane provide the last deployed configuration settings (in the Deployed Version column) versus the changes that are due for deployment (in the Version on Firewall Management Center column). The last-deployed configuration settings are derived from a snapshot of the last saved deployment in the Firewall Management Center and not from the device. The background colors of the settings are color-coded as per the legend available on the top-right of the page.

The Modified By column lists the users who have modified, or added the configuration settings. At the policy level, the Firewall Management Center displays all the users who have modified the policy, and at the rule level, the Firewall Management Center displays only the last user who has modified the rule.

You can download a copy of the change log by clicking the Download Report button.

The Advanced View tab shows the CLI commands that will be applied. This view is useful if you are familiar with ASA CLI, which is used on the back end of the Firewall Threat Defense.

Figure 6. Advanced View
Advanced View

Step 5

Use Show or Hide Policy (Show or Hide Policy icon) to selectively view or hide the associated unmodified policies.

Figure 7. Show or Hide Policy
Show or Hide Policy

Step 6

Check the box next to the device name to deploy all configuration changes, or click Policy selection (policy selection icon ) to select individual policies or configurations to deploy while withholding the remaining changes without deploying them.

You can also view the interdependent changes for a certain policy or configuration using this option. The Firewall Management Center dynamically detects dependencies between policies (for example, between an access control policy and an intrusion policy), and between the shared objects and the policies. Interdependent changes are indicated using color-coded tags to identify a set of interdependent deployment changes. When one of the deployment changes is selected, the interdependent changes are automatically selected.

For more information, refer to Guidelines for selective policy deployment.

Note

 
  • When the changes in shared objects are deployed, the impacted policies should also be deployed along with them. When you select a shared object during deployment, the impacted policies are automatically selected.

  • Selective deployment is not supported for scheduled deployments and deployments using REST APIs. You can only opt for complete deployment of all the changes in these cases.

  • The pre-deployment checks for warnings and errors are performed not only on the selected policies, but on all the policies that are out-of-date. Therefore, the warnings or errors list shows the deselected policies as well.

  • Similarly, the Inspect Interruption column indication on the Deployment page considers all out-of-date policies and not just the selected policies. For information on the Inspect Interruption column, refer to Inspection interruption warnings during deployment.

Step 7

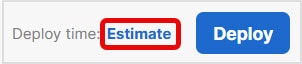
After you select the devices or policies to deploy, click Estimate to get a rough estimate of the deployment duration .

Figure 8. Estimate
Estimate
Figure 9. Deploy Time
Deploy Time

The time duration is a rough estimate (having around 70% accuracy), and the actual time taken for deployment may vary for a few scenarios. The estimate is dependable for deployments of up to 20 devices.

When an estimate is not available, it indicates that the data is not available, since the first successful deployment on the selected device is pending. This situation could occur after the Firewall Management Center reimage, version upgrade, or after a high availability failover.

Note


The estimate is incorrect and unreliable for bulk policy changes (in case of bulk policy migrations), and selective deployments because the estimate is based on the heuristic technique.

Step 8

Click Deploy .

Step 9

If the system identifies errors or warnings in the changes to be deployed, it displays them in the Validation Messages window. To view complete details, click the arrow icon before the warnings or errors.

You have the following choices:

  • Deploy—Continue deploying without resolving warning conditions. Check the Ignore warnings checkbox, to ignore warnings and deploy the changes. You cannot proceed if the system identifies errors.
  • Close—Exit without deploying. Resolve the error and warning conditions, and attempt to deploy the configuration again.

Configuration changes are deployed to the selected devices. You receive confirmation messages regarding success, warnings, or errors.

What to do next

  • (Optional) Monitor deployment status; see Viewing Deployment Messages in the Cisco Secure Firewall Management Center Administration Guide .

  • If the deployment fails, refer to Best practices for deploying configuration changes .

  • During deployment, if there are specific configuration changes in the deployment, the deployment failure may lead to traffic being interrupted. For example, in a cluster environment, an erroneous configuration of an IP address that is not in the same subnet as the Site IPs is configured on the interface. Due to this error, deployment fails and the device attempts to clear the configuration while the rollback operation is being processed. These events collectively lead to a deployment failure that interrupts the traffic.

    See the following table to know what configuration changes may cause traffic interruption when deployment fails.

    Table 5. Traffic interruption scenarios

    Configuration Changes

    Exists?

    Traffic Impacted?

    Threat Defense Service changes in an access control policy

    Yes

    Yes

    VRF

    Yes

    Yes

    Interface

    Yes

    Yes

    QoS

    Yes

    Yes


    Note


    The configuration changes interrupting traffic during deployment is valid only if both the Firewall Management Center and the Firewall Threat Defense are of version 6.2.3 or later.


Redeploy existing configurations to a device

Force-deploying existing configurations to a managed device ensures that its policy rules are fully regenerated and applied. This procedure is recommended during maintenance windows or when disruption to network traffic is minimal. Force-deploy takes longer than regular deployment because it generates all policy rules for the device.


Caution


When you deploy, resource demands may result in a small number of packets dropping without inspection. Additionally, deploying some configurations restarts the Snort process, which interrupts traffic inspection. Whether traffic drops during this interruption or passes without further inspection depends on how the target device handles traffic. See Snort restart traffic behavior and Configurations that restart the snort process when deployed or activated.

Before you begin

Procedure


Step 1

Choose Devices > Device Management.

Step 2

Click Edit (edit icon) next to the device where you want to force deployment.

Step 3

Click Device.

Step 4

Click Edit (edit icon) next to the General section heading.

Step 5

Click Force Deploy (force deploy icon).

Step 6

Click Deploy.

The system identifies any errors or warnings with the configurations you are deploying. You can click Proceed to continue without resolving warning conditions. However, you cannot proceed if the system identifies an error.


What to do next

Deployment management

Firewall Management Center provides a set of deployement management options to oversee configuration changes across your Firewall Threat Defense devices. These options enable you to monitor real-time deployment status, track historical records, and ensure configuration integrity through rollback capabilities. Additionally, you can utilize built-in reporting and policy comparison features to audit changes, verify compliance, and troubleshoot issues.

Deployment status

On the Deployment page, the Status column provides the deployment status for each device. If a deployment is in progress, a live progress indicator is displayed; otherwise, one of these deployment status values appears:

  • Pending: Indicates that there are changes in the device that need be deployed.

  • Warnings or errors: Indicates that the pre-deployment checks have identified warnings or errors for the deployment. You may continue deployment if there are warnings, but not if there are errors.


    Note


    The status column provides the warning or error status only for a single user session on the Deployment page. If you navigate away or refresh the page, the status changes to Pending.


  • Failed: Indicates that the previous deployment attempt failed. Click the status to view the details.

  • In queue: Indicates that deployment is initiated, and the system is yet to start the deployment process.

  • Completed: Indicates that deployment has completed successfully.

View deployment history

View deployment history to track and analyze past deployment activities, including successful deployments, failed deployments, and rollback operations.

In the deployment history, the last 10 successful deployments, the last 5 failed deployments, and last 5 rollback deployments are captured.

Procedure


Step 1

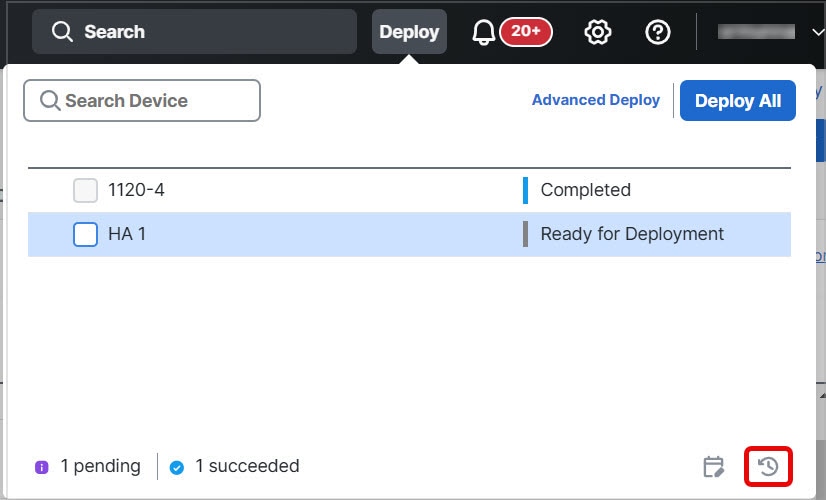
On the Firewall Management Center menu bar, click Deploy and then click Deployment History (deployment history icon).

Figure 10. Deployment history icon
Deployment History

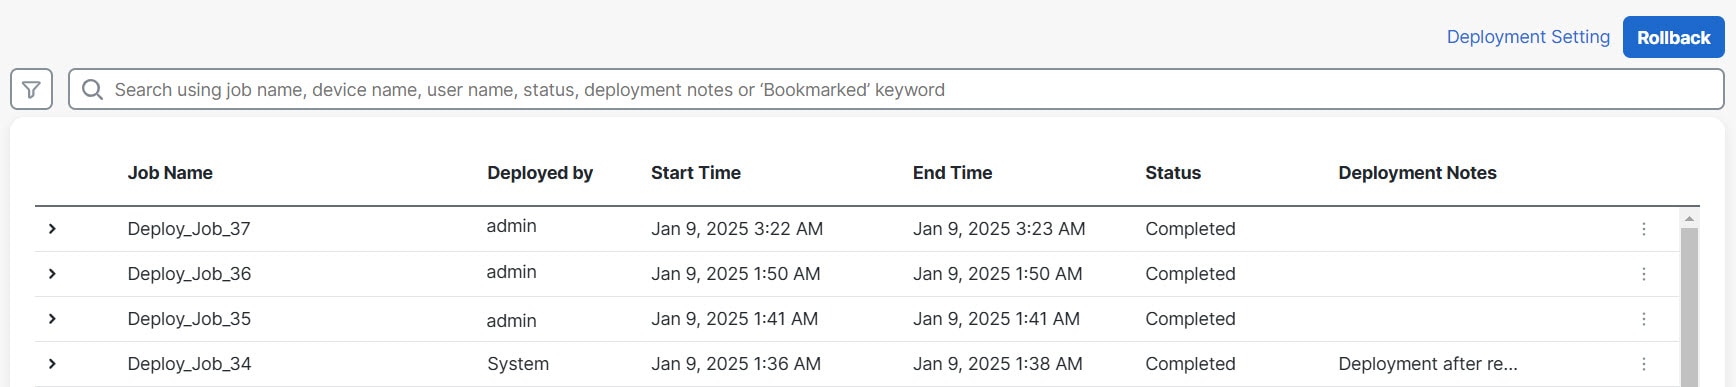
A list of all the previous deployment and rollback jobs is displayed in reverse chronological order.

Figure 11. Deployment history page
Deployment History

Step 2

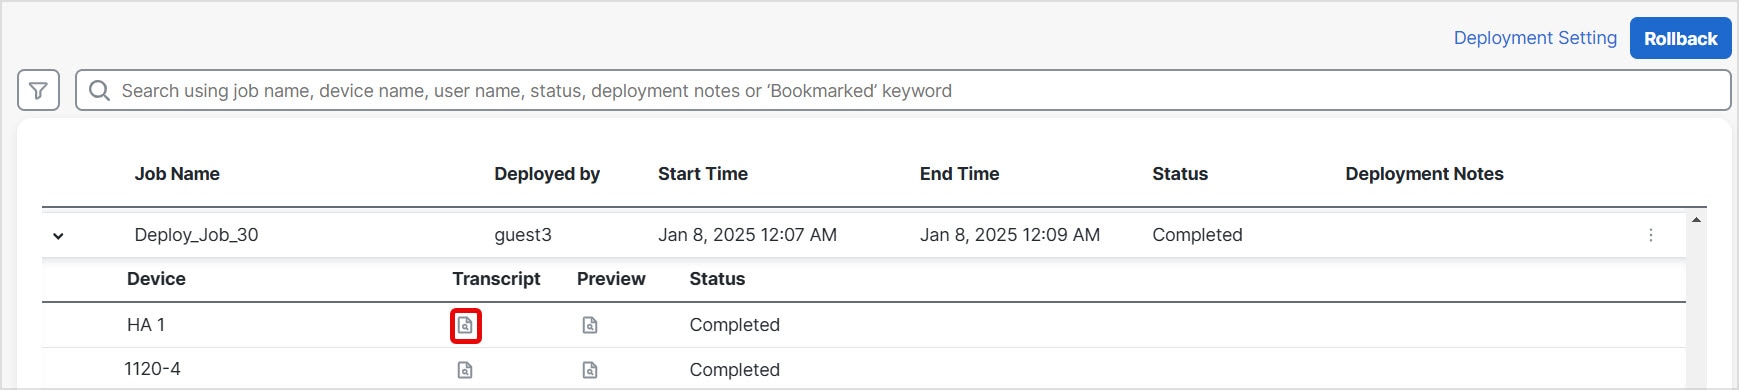
Click Expand Arrow (expand arrow icon) next to the required deployment job to view the devices included in the job and their deployment statuses.

Figure 12. Expand
Expand
  • View notes in the Deployment Notes column.

    Deployment notes are custom notes that a user can add as part of the deployment, and these notes are optional.

Step 3

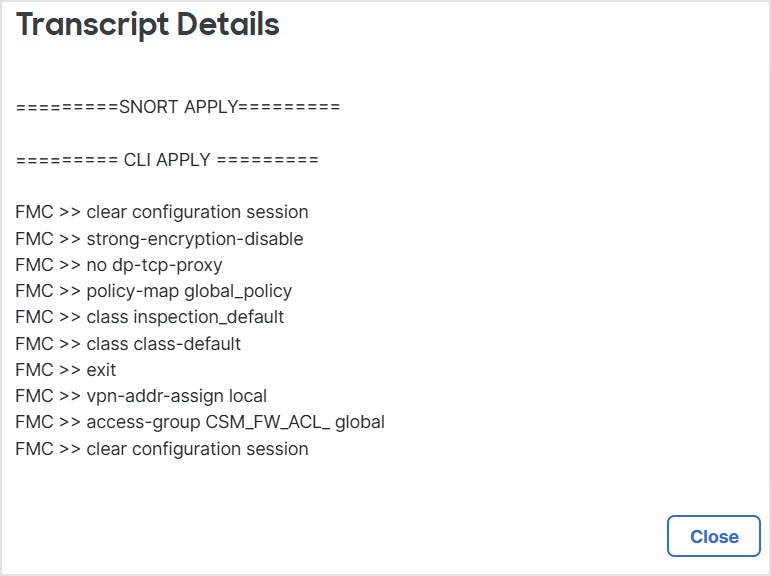
(Optional) Click Transcript Details (preview icon) to view the commands sent to the device, and the responses received.

Figure 13. Transcript details icon
Transcript Details Icon
Figure 14. Transcript details
Transcript Details

The transcript includes the following sections:

  • Snort Apply—If there are any failures or responses from Snort-related policies, then the messages are displayed in this section. Normally, the section is empty.

  • CLI Apply—This section covers features that are configured using commands that are sent to the device.

    Note


    The transcript for the rollback operation does not provide the CLI commands information. To view the rollback commands, see View the deployment rollback transcript.

  • Infrastructure Messages—This section shows the status of different deployment modules.

In the CLI Apply section, the deployment transcript includes commands that are sent to the device, and any responses returned from the device. These responses can be informative messages or error messages. For failed deployments, look for messages that indicate errors with the commands. Examining these errors can be particularly helpful if you are using FlexConfig policies to configure customized features. These errors can help you correct the script in the FlexConfig object that is trying to configure the commands.

Note

 
There is no distinction that is made in the transcript between commands that are sent for managed features and those generated from FlexConfig policies.

For example, the following sequence shows that Firewall Management Center sent commands to configure GigabitEthernet0/0 with the logical name outside. The device responded that it automatically set the security level to 0. Firewall Threat Defense does not use the security level for anything.


========= CLI APPLY =========

FMC >> interface GigabitEthernet0/0
FMC >>  nameif outside
FTDv 192.168.0.152 >> [info] : INFO: Security level for "outside" set to 0 by default.

Step 4

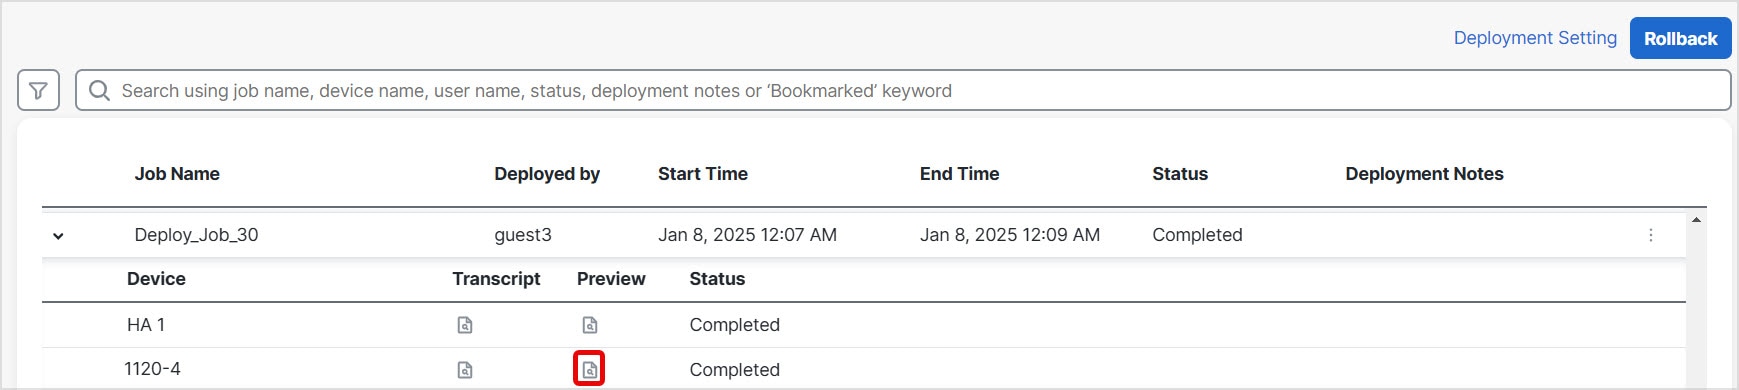
(Optional) Click Preview (preview icon) to view the policy and object changes deployed on the device versus the previously deployed version.

Figure 15. Preview icon
Preview Icon
  1. To compare any two versions and view the change log, choose the required versions in the drop-down boxes and click the Show button. The drop-down boxes show the deployment job name and the end time of the deployment.

    Figure 16. Compare versions
    Compare Versions

    Note


    The drop-down boxes also show failed deployments.

  2. The Modified By column lists the users who have modified the policies or objects.

    1. At the policy level, Firewall Management Center displays all the user names who have modified the policy.

    2. At the rule level, Firewall Management Center displays the last user who has modified the rule.

  3. You can also download a copy of the change log by clicking Download Report.

Note

 
  • Deployment history preview is not supported for certificate enrollments, HA operations, and failed deployments.

  • When a device is registered, preview is not supported for the job history record that is created.

Step 5

(Optional) Against each deployment job, click the More (more icon) icon and execute other actions:

  • Bookmark—To bookmark the deployment job.

  • Edit Deployment Notes—To edit your custom deployment notes that you added for a deployment job.

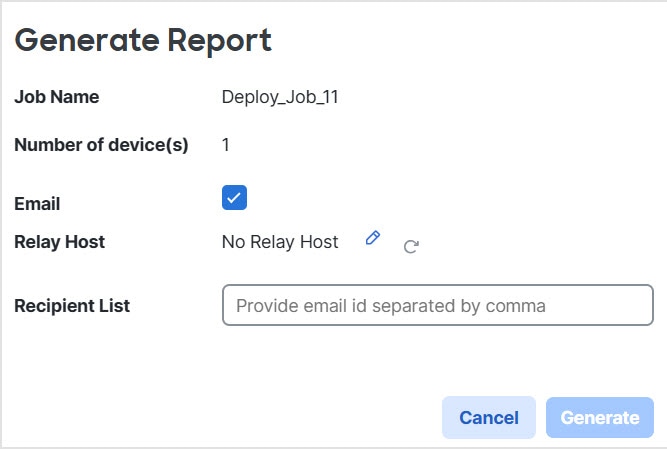
  • Generate Report—To generate a deployment report, which can be used for auditing. This report includes job properties with preview and transcript information, and the report can be downloaded as a PDF file.

    1. Click Generate Report to generate a deployment report.

      Figure 17. Generate report
      The Generate Report popup window allows users to check the Email checkbox to send the deployment report via email, provided the mail relay host is configured.
    2. In the Generate Report popup window, check the Email checkbox.

    3. The report can also be sent through email if mail relay host is configured. If the mail relay host in not configured, use the Edit (edit icon) icon to configure or modify the mail relay host. For more information, see Configuring a Mail Relay Host and Notification Address in the Cisco Secure Firewall Management Center Administration Guide.

    4. In the Recipient List, you can enter multiple email adddresses, separated by semicolons.

    5. Click Generate to generate the report, and this report is emailed to the recipients.

    6. In the Notifications task tab, you can track the progress. After the report generation is complete, click the link in the notification task tab to download the PDF report.


Set the number of configuration versions to retain

The Firewall Management Center stores device configuration history files as configuration versions. You can specify the number of configuration versions that you want to retain for a device. This setting allows you to estimate the size of the device configuration files on the disk and keep it within the allowed limit. Reducing the number of configuration versions can reduce the backup size and improve the high-availability synchronization speed of the Firewall Management Center.

Before you begin

  • This feature is not supported in Version 7.4.0.

  • In a high-availability deployment, configuration version settings are only available on the active Firewall Management Center.

Procedure

Step 1

Choose Deploy > Deployment History (deployment history icon).

Step 2

Click Deployment Setting.

Step 3

Choose the number of configuration versions that you want to retain for a device from the Number of Versions to Retain drop-down list.

Note


Reducing the number of versions removes the oldest configuration versions to match the version size you have selected. You will not be able to preview or roll back to the removed versions.

  • Maximum Permitted Disk Size: The maximum size for storing configuration versions is 20 GB. The Firewall Management Center calculates the size of configuration versions periodically and sends a health alert if the size of the configuration versions exceeds 20 GB. To resolve the health alert, choose a Number of Versions to Retain for which the estimated configuration version size is less than 20 GB.

  • Current Configuration Version Size: The size of the configuration files on the Firewall Management Center for the previous deployment.

  • Estimated Configuration Version Size: The approximate size of the configuration files on the Firewall Management Center. It is calculated based on the number of configuration versions you chose to retain.

Step 4

Click Save.


Deployment rollback

Deployment rollback is the process of reverting a device to a previously saved configuration state. This operation allows you to restore the device to its earlier state if a recent policy deployment results in unintended traffic behavior.


Note


Rollback is a disruptive operation. Executing a rollback terminates all existing connections and resets routing tables, which will cause a temporary interruption of traffic.


Identifying the disruptive configuration

When a deployment has caused unintended traffic interruption, identify the specific change responsible for the condition. To compare current and previous deployments:

Before a rollback

  1. Choose Deploy > Deployment History, expand the last deployed job that caused the traffic disruption, and click the Preview (preview icon).

    The preview page lets you compare deployments to identify specific changes from previous configurations.

  2. After identifying the change causing the problem, rectify the configuration and redeploy it on the device.

After a rollback

  1. After a successful rollback, choose Deploy > Deployment, and click the Preview icon next to the rolled back device.

  2. View the changes between the rolled back configuration and the current changes in the Firewall Management Center that are pending deployment.

  3. After identifying the change causing the problem, rectify the configuration, and redeploy it on the device.

Rollback reverts most configurations, but some exceptions apply. Refer the table below for details.

Rollback guidelines

Follow these guidelines to ensure successful configuration rollbacks.

  • You have to perform a deployment before you can roll back again.

  • After you perform a rollback, the rolled back devices are marked as out-of-date on the Firewall Management Center. The changes you made to the configuration are still pending for the next deployment. To see the pending changes, choose Deploy > Deployment, and click the Preview icon next to the rolled back device.

  • For devices with very large access lists, if the Object Group Search setting is disabled, then the rollback operation may take a longer duration to complete. To verify the Object Group Search setting, choose Devices > Device Management, and then select the device and click Edit Advanced Settings.

  • For the Firepower 4100/9300, make sure your current Firewall Chassis Manager interface configuration is the same for any rollback versions. Otherwise, the rollback interface configuration may not match your actual interfaces.

  • Independent certificate enrollments are also listed as deployment jobs in the Deployment History page. However, you cannot roll back to these versions. A rollback from a deployment version created after certificate enrollments reverts the certificate associations as well. In the next deployment after a rollback, manually associate the certificates before proceeding with the deployment.

  • If a deployment for a device with a FlexConfig object configured with a deployment frequency set to Once is rolled back, then you will not be able to redeploy the object even though it is displayed as out-of-date on the Preview page. After a rollback, you will have to manually unassign and then reassign the FlexConfig object to the device before the next deployment.

Rollback limitations

Observe these limitations that restrict the use of rollback functionality.

  • You can roll back to any one of the last 10 versions before the currently deployed version. Rollback to versions prior to these are not supported. The rollback icon is greyed out for unsupported versions.

  • Rollback is not supported if the manager access interface (Manager or data interface) is different between the rollback version and the current version.

  • If you upgrade the Firewall Management Center, all rollback versions from the previous software release will no longer be available for devices, even if you did not upgrade the devices.

  • If you upgrade the device, you can only roll back to versions on the current software release.

  • For High Availability, rollback is not supported in these scenarios:

    • When the version you want to roll back to contains the high-availability bootstrap configuration. In other words, the deployment when you first formed high availability for the standalone devices.

    • When a device that is currently in standalone mode was part of a high availability pair in the previous deployment version.

  • For clustering:

    • Rollback is not supported when a device that is currently in standalone mode was part of a cluster in the previous deployment version.

    • (Secure Firewall 3100/4200 and Firewall Threat Defense Virtual in a private cloud) If you change the clustering bootstrap configuration or add or delete nodes, you cannot roll back to a version prior to those changes.

Table 6. Configurations reverted and not reverted during rollback

Configurations that are reverted during a rollback

Configurations that are not reverted during a rollback

  • All policy configurations

  • Interface configurations

  • SRU configurations

  • VDB configurations

  • LSP configurations

  • VPN configurations

  • FXOS configurations

  • Snort binaries

  • Geo DB

Perform a rollback

Use rollback to revert a device to a previously deployed configuration when the traffic through the device is affected in an unintended way after a policy deployment.

You can roll back a device to a previously deployed configuration. After a policy deployment, if the traffic through the device is affected in an unintended way, rollback provides an option to revert the device to the earlier state, which existed before the faulty deployment.

Rollback reverts the configuration only on the selected devices.

Procedure

Step 1

Choose Deploy >Deployment History (deployment history icon).

A list of all the previous deployment jobs is displayed in reverse chronological order.

Step 2

Click Rollback.

Step 3

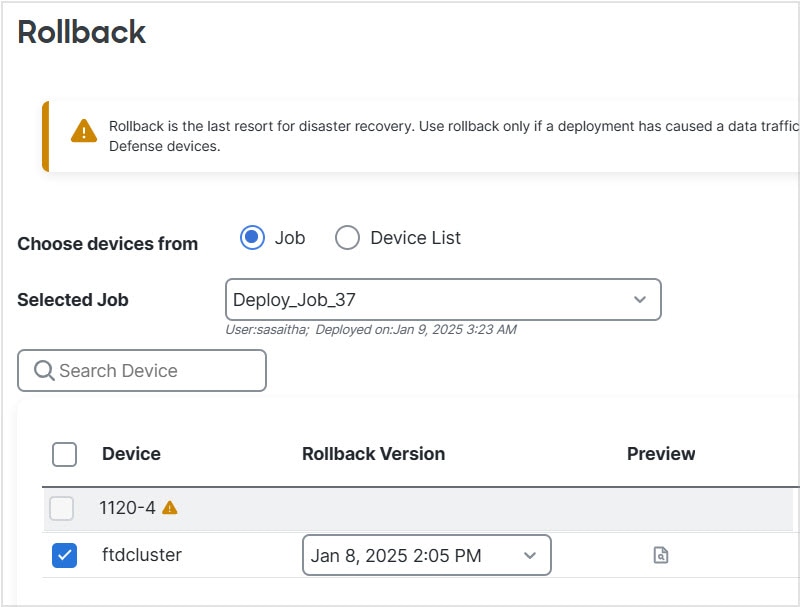
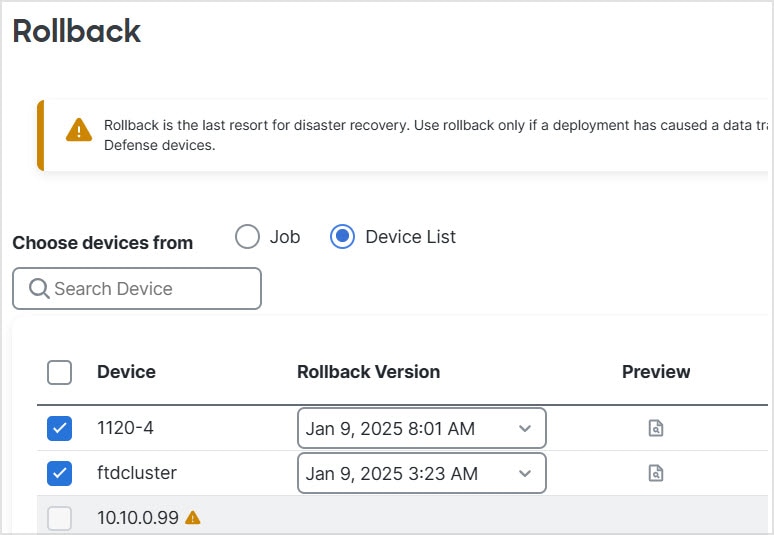
Filter the list of devices displayed by either clicking Job and choosing a job from the Selected Job drop-down list, or by clicking Device List.

Step 4

(Optional) Enter the device name in the Search Device search box to filter the device list.

Step 5

Check the box next to the devices you want to roll back and choose the version for each device from the Rollback Version drop-down list.

Figure 18. Selected job list
Selected Job List
Figure 19. Device list
Device List

The job names and associated deployment notes are also listed for a particular rollback version.

Step 6

(Optional) Click the Preview (preview icon) to view the changes deployed in the selected version.

Step 7

Click Rollback to restore the selected devices to the chosen configuration version.


What to do next

To verify rollback status, go to Deploy > Deployment and check the rollback status next to the device name.

View the deployment rollback transcript

View the CLI commands that were executed during a successful rollback operation to understand what changes were made to the device configuration.

Rollback transcript is a written version of the commands that are sent to the device, along with the responses returned from the device. If a rollback operation has failed, the reason for the failure can be viewed by clicking Deploy, and then click the Deployment History (deployment history icon). However, to know the CLI commands executed for a successful rollback operation, follow the steps given below after a rollback operation has completed.


Note


  • The CLI command information is available after a rollback is complete and is available only until the next deployment. The first deployment after a rollback operation erases all the rollback-related information.

  • For any rollback deployment, the deployment notes are updated automatically as rollback job. In the Deployment History page, the user can filter the rollback jobs easily using the search option.


Procedure

Step 1

On the Secure Firewall Management Center menu bar, choose Troubleshooting > Health > Monitor.

Step 2

Select the device, which was rolled back, from the left pane.

Step 3

Click View System & Troubleshooting Details link.

Step 4

Click Advanced Troubleshooting.

Step 5

Click Threat Defense CLI.

Step 6

Select show from the Command drop-down box.

Step 7

Enter running in the Parameter field.

Step 8

Click Execute.


Download policy changes report for multiple devices

Download reports on the policy and object changes made since your last deployment for multiple Firewall Threat Defense devices. Reports help you review pending changes before completing deployment. The reports are provided as a zip file containing:

  • A pending changes report for each device, previewing modifications to policy or objects that are to be deployed on the device. For more information, refer to Deploy configuration changes and Deployment Preview.

  • A consolidated report categorizing each device by report status.

Procedure


Step 1

Choose Deploy > Advanced Deploy.

Step 2

Check the check box next to the devices for which you want to generate a pending policy changes report, and then click Pending Changes Reports.

Step 3

Click Pending Changes Reports. Reports are generated in the background.

Step 4

On the Firewall Management Center menu bar, choose Notifications > Tasks to view the report generation task.

When the report request task is complete, the download link appears within the task notification.

Step 5

Click the Download Report(s) link to download the reports.


Compare policies

Policy comparison allows you to examine the differences between two policies or between a saved policy and the running configuration to review policy changes for compliance with your organization's standards or to optimize system performance.

You can compare these policy types:

  • DNS

  • File

  • Health

  • Identity

  • Network Analysis

  • SSL

The comparison view displays both policies in a side-by-side format. Differences between the two policies are highlighted:

  • Blue indicates that the highlighted setting is different in the two policies, and the difference is noted in red text.

  • Green indicates that the highlighted setting appears in one policy but not the other.

Before you begin

You can compare policies only if you have access rights and any required licenses for the specific policy, and you are in the correct domain for configuring the policy.

Procedure


Step 1

Access the management page for the policy you want to compare:

  • DNS—Policies > Security policies > DNS
  • File—Policies > Security policies > Malware & File
  • Health—Troubleshooting > + Show more > Health > Policies
  • Identity—Policies > Security policies > Identity
  • Network Analysis—Policies > Security policies > Access Control, and then click Network Analysis Policy or Policies > Security policies > Intrusion, and then click Network Analysis Policies.

    Note


    If your custom user role limits access to the first path listed here, use the second path to access the policy.

  • SSL—Policies > Security policies > Decryption

Step 2

Click Compare Policies.

Step 3

From the Compare Against drop-down list, choose the type of comparison you want to make:

  • To compare two different policies, choose Other Policy.
  • To compare two revisions of the same policy, choose Other Revision.
  • To compare another policy to the currently active policy, choose Running Configuration.

Step 4

Depending on the comparison type you choose, you have various choices:

  • If you are comparing two different policies, choose the policies you want to compare from the Policy A and Policy B drop-down lists.
  • If you are comparing the running configuration to another policy, choose the second policy from the Policy B drop-down list.

Step 5

Click OK.

Step 6

Review the comparison results:

  • Comparison Viewer—To use the comparison viewer to navigate individually through policy differences, click Previous or Next above the title bar.
  • Comparison Report—To generate a PDF report that lists the differences between the two policies, click Comparison Report.


Generate current policy reports

You can generate two types of reports for most policies: a single-policy report detailing the policy's current saved configuration, and a comparison report listing differences between two policies. You can generate a single-policy report for all policy types except health.


Note


Intrusion policy reports combine the settings in the base policy with the settings of the policy layers, and make no distinction between which settings originated in the base policy or policy layer.


Before you begin

  • Ensure you have the required access rights and licenses for the specific policy.

  • Verify you are operating within the correct domain for the policy you wish to report.

Procedure


Step 1

Access the management page for the policy for which you want to generate a report:

  • Access Control—Policies > Security policies > Access Control
  • DNS—Policies > Security policies > DNS
  • File—Policies > Security policies > Malware & File
  • Health—Troubleshooting > + Show more > Health > Policies
  • Identity—Policies > Security policies > Identity
  • Intrusion—Policies > Security policies > Intrusion
  • NAT—Policies > Network policies > NAT
  • Network Analysis—Policies > Security policies > Access Control, and then click Network Analysis Policy or Policies > Security policies > Intrusion, and then click Network Analysis Policies

    Note


    If your custom user role limits access to the first path listed here, use the second path to access the policy.

  • SSL—Policies > Security policies > Decryption

Step 2

Click Report (Report icon) next to the policy for which you want to generate a report.


History for configuration deployment

This reference provides a chronological history of configuration deployment features introduced across different software versions, including deployment rollback capabilities, advanced deployment views, report generation, and deployment preview functionality.

Feature

Minimum Firewall Management Center

Minimum Firewall Threat Defense

Details

Set the number of deployment history files to retain for device rollback.

7.2.6

7.4.1

Any

You can now set the number of deployment history files to retain for device rollback, up to ten (the default). This can help you save disk space on the Firewall Management Center.

New/modified screens: Deploy > Deployment History > Deployment Setting > Configuration Version Setting

View and generate reports on configuration changes since your last deployment.

7.2.6

7.4.1

Any

You can generate, view, and download the reports as a zip file on configuration changes since your last deployment:

  • A policy changes report for each device that previews the additions, changes, or deletions in the policy, or the objects that are to be deployed on the device.

  • A consolidated report that categorizes each device based on the status of policy changes report generation.

This is especially useful after you upgrade either the Firewall Management Center or Firewall Threat Defense, so that you can see the changes made by the upgrade before you deploy.

New/modified screens: Deploy > Advanced Deploy.

Generate and email a report when you deploy configuration changes.

7.2

Any

You can now generate a report for any deployment.

New/modified screens: Deploy > Deployment History icon > More > Generate Report

Deployment preview and user information in preview.

7.0

Any

The Deployment page has the following newly added features:

  • On the Deployment page, the Modified By column lists the users who have modified the policies against each policy listing.

  • Filter support for deployment – The Filter icon provided on the Deployment page provides an option to filter the device listings that are pending deployment. The Filter icon provides options to filter the listings based on selected devices and user names.

  • Deployment History Preview – Click Preview to view the policy and object changes deployed on the device versus the previously deployed version. In the deployment history, the last 10 successful deployments, the last five failed deployments, and last five rollback deployments are captured.

  • Deployment Notes – The Deployment Notes are custom and optional notes that a user can add as part of deployment. You can view the Deployment Notes column in the Deployment History page.

  • Deployment rollback is available for Snort 3 policies as well.

Roll back deployment on Firewall Threat Defense devices.

6.7

6.7

Rollback is a deployment functionality provided to remove the existing deployment on Firewall Threat Defense devices and to reconfigure the device with the previously deployed configuration.

New/modified pages: The Deploy > Deployment History page provides a new Rollback column with the rollback icons. Similar rollback icons can also be found when the jobs are expanded, to initiate rollback at the device level.

New deployment web interface.

6.6

Any

The Deploy button on the Firewall Management Center menu bar is changed to Deploy menu. There are two new sub-menu options under it. These are Deployment and Deployment History. The Deployment page has undergone an improvement along with newly added features, and the new Deployment History page provides a legend of all the previous deployments.

The Deployment page has the following newly added features:

  • Deployment status - On the Deployment page, the Status column provides the deployment status for each device.

  • Deployment estimate - The Estimate link is available on the Deployment page after you select a device, a policy, or a configuration. The Estimate link provides an estimate of the deployment duration once clicked.

  • Deployment preview - Preview provides a snapshot of all the policy and object changes to be deployed on the device. The policy changes include the new policies, changes in the existing policies, and the deleted policies. The object changes include the added and modified objects which are used in policies.

  • Selective policy deployment - Firewall Management Center allows you to select a specific policy within the list of all the changes on the device that are due for deployment and deploy only the selected policy.