Clientless Zero Trust Network Access

Clientless Zero Trust Network Access enables users to access protected TLS web applications through their browser using SAML identity providers, eliminating the need to install a client on the endpoint. This solution leverages Zero Trust Application Policies, Application Groups, and applications. This document describes how to configure these features, outlines their limitations, and provides information on deployment, monitoring, and troubleshooting.

Clientless Zero Trust Network Access

Clientless Zero Trust Network Access is based on Zero Trust Access principles. Zero Trust Access is a zero trust security model that eliminates implicit trust. The model grants the least privilege access after verifying the user, the context of the request, and after analyzing the risk if access is granted.

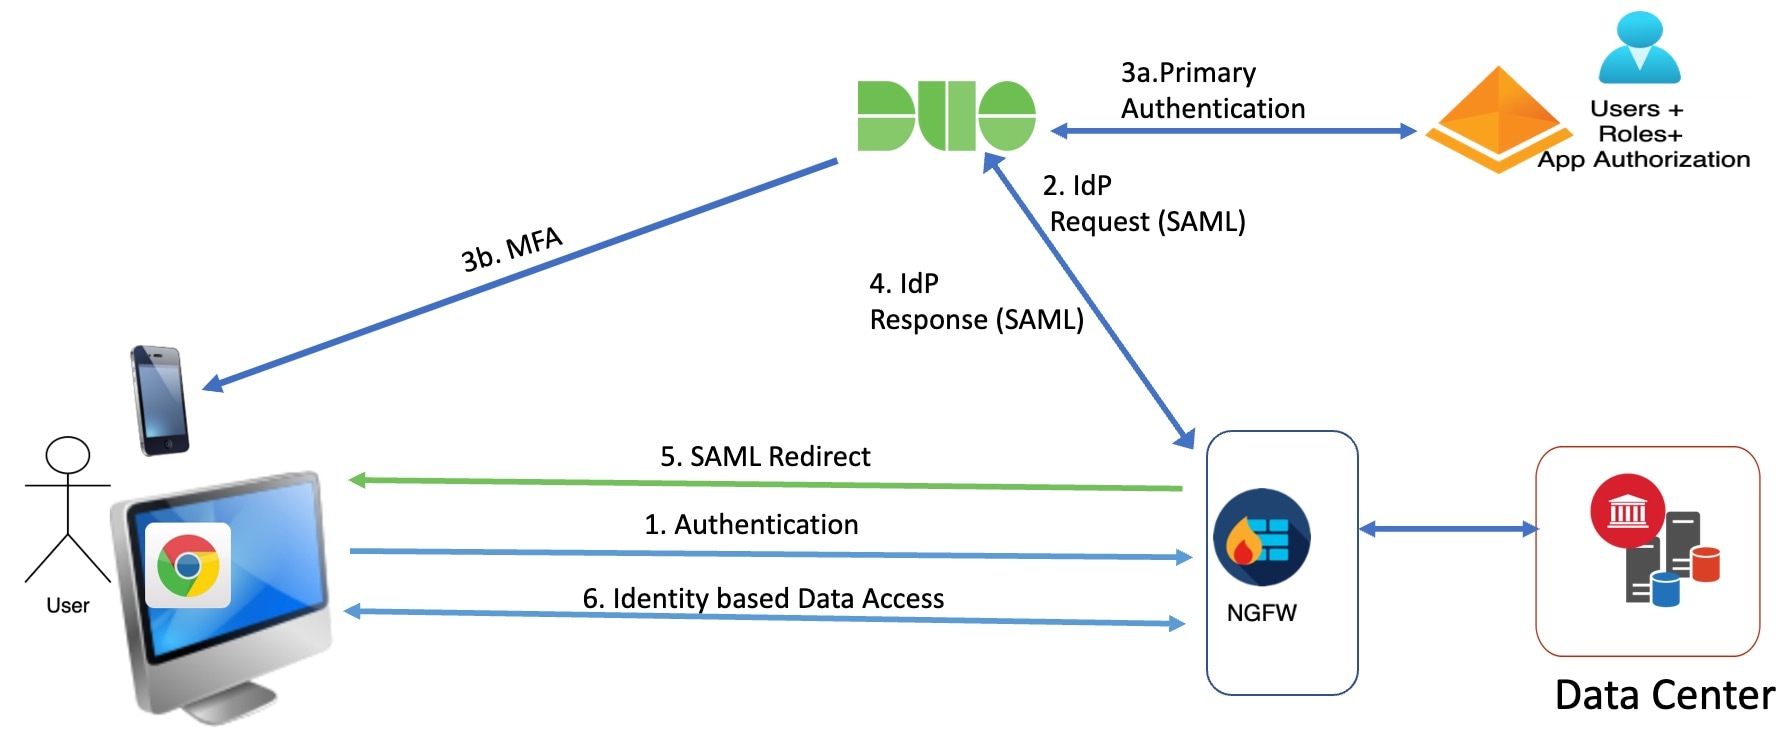
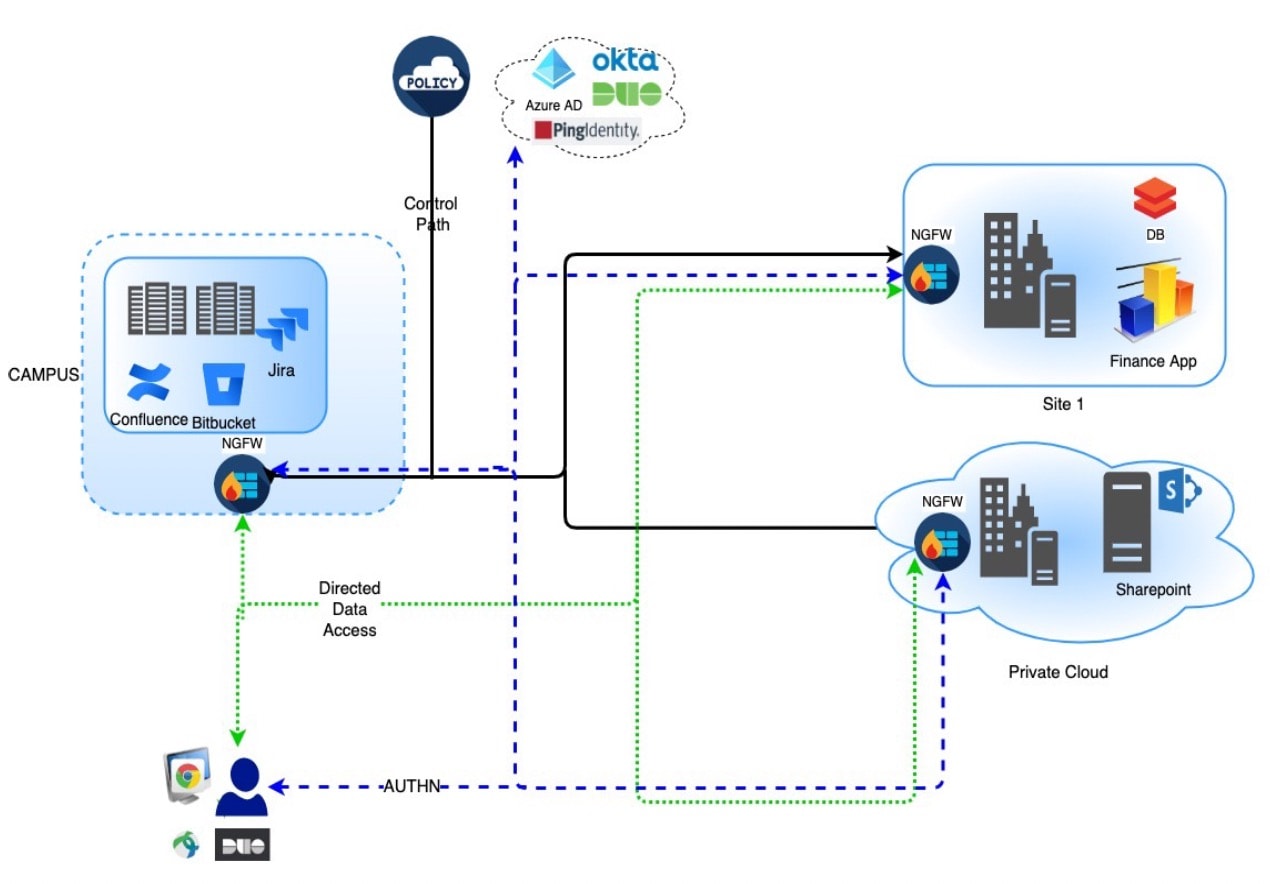
Clientless Zero Trust Network Access enables you to authenticate and authorize access to protected web-based resources and applications from inside (on-premises) or outside (remote) the network using an external Security Assertion Markup Language (SAML) identity provider (IdP) policy.

Key features

The solution includes these capabilities.

  • Supports multiple SAML-based identity providers such as Duo, Azure Active Directory (Azure AD), Okta, and other identity providers.

  • Client applications such as Cisco Secure Client are not required on the endpoint (client devices) for secure access.

  • Access and authentication are performed through the browser.

  • Supports only TLS web applications.

  • Agents such as Duo Health support client device posture. These agents evaluate the posture against a policy in Duo and provide access based on this evaluation. Third-party identity providers such as Okta or PingID perform this same functionality with their agents that support posture evaluation.

  • Supports HTTP-Redirect SAML binding.

  • Supports application groups that make it easier to enable clientless zero trust network access protection on a set of applications.

  • Leverages threat defense intrusion and malware protection on zero trust application traffic.

You can use the Secure Firewall Management Center web interface to create a Zero Trust Application Policy that allows you to define private applications and assign threat policies to them. The policy is application specific where the administrator decides the inspection levels based on the threat perception for that application.

Components of a Clientless Zero Trust Network Access configuration

A new configuration of Clientless Zero Trust Network Access consists of a Zero Trust Application Policy, Application Group, and Applications.

Configuration components

The configuration includes these main components:

  • Zero Trust Application Policy— consists of application groups, and grouped or ungrouped applications. Settings for Security Zones and Security Controls associate at a global level with all ungrouped applications and application groups.

    A global port pool is assigned to the policy, by default. A unique port is automatically assigned from this pool to each private application that is configured.

    Zero Trust Application policy consists of application groups, and grouped or ungrouped applications.

  • Application Groups—Consists of a logical group of applications that share SAML authentication settings and can optionally share Security Zones and Security Controls settings.

    Application Groups inherit the Security Zones and Security Controls settings from the global policy and can override the values.

    When you create an Application Group, you can use the same SAML IDP configuration to authenticate multiple applications. Applications that are part of an Application Group inherit the Application Group's SAML configuration. This eliminates the need to configure the SAML settings for each application. After the Application Group is created, new applications can be added to it without configuring the IDP for it.

    When an end user tries to access an Application that is part of group, the user is authenticated to the Application Group for the first time. When the user tries to access other applications that are part of the same Application Group, the user is provided access without being redirected again to the IDP for authentication. This prevents overloading the IDP with requests for application access and optimizes the usage of the IDP if a limit is enabled.

  • Applications—There are two types:

    • Ungrouped Applications— Are standalone applications. SAML settings must be configured for every application. The applications inherit the Security Zones and Security Controls settings from the global policy and can be overridden by the application.

    • Grouped Applications— Are multiple applications that are grouped under an Application Group. The SAML settings are inherited from the Application Group and cannot be overridden. However, the Security Zones and Security Controls settings can be overridden for each application.

These certificates are required for the configuration.

  • Identity Certificate—This certificate is used by Firewall Threat Defense to masquerade as the applications.Firewall Threat Defense behaves as a SAML Service Provider (SP). This certificate must be a wildcard or Subject Alternative Name (SAN) certificate that matches the FQDN of the private applications. It is a common certificate for all applications protected by Firewall Threat Defense.

  • IDP Certificate—The IDP provides a certificate for each defined Application or Application Group. This certificate must be configured so that Firewall Threat Defense can verify the IDP's signature on incoming SAML assertions.


    Note


    IDP certificates are commonly included within the metadata file; otherwise, users are required to have the IDP certificate readily available during the configuration of applications.


  • Application Certificate—The encrypted traffic from user to the application is decrypted by Firewall Threat Defense using this certificate for the purpose of inspection.


    Note


    This certificate is required to verify the cookies in the header to authorize connections, even if you are not conducting an IPS or Malware inspection.


How Clientless Zero Trust Network Access works

Summary

The key components involved in the Zero Trust Access clientless workflow are:

  • User: Initiates access requests through a browser and provides authentication credentials.

  • Identity Provider (IdP): Handles user authentication including primary and multi-factor authentication challenges.

  • Threat Defense: Validates HTTPS requests, processes SAML responses, and controls application access.

  • Application: The target resource that users access after successful authentication and authorization.

Workflow

Figure 1. Clientless zero trust network access workflow
The clientless zero trust network access workflow illustrates the stages of processing user requests, including user authentication, HTTPS request validation, and application access control.

These stages describe how the clientless zero trust network access workflow processes user requests:

  1. User types the application URL in the browser and threat defense validates the HTTPS request.
    • If the HTTPS request is valid, the user is redirected to the mapped port.
    • If the HTTPS request is invalid, the user is sent for authentication per application.
  2. The user is redirected to the configured identity provider (IdP).
  3. The IdP performs authentication challenges for the user.
    • The user is redirected to the configured primary authentication source.
    • The user is challenged with the configured secondary multi-factor authentication, if any.
  4. The IdP sends a SAML response to threat defense. The user ID and other necessary parameters are retrieved from the SAML response through the browser.
  5. The user is redirected to the application.
  6. The user is allowed access to the application after validation is successful.

How threat defense works with zero trust access

Summary

The key components involved in the Threat Defense Zero Trust Access process are:

  • Remote or on-premises user: Initiates HTTPS requests from an endpoint using a browser to connect to applications.

  • Threat Defense firewall: Intercepts user requests and redirects them to the identity provider for authentication and authorization.

  • Identity Provider (IdP): Handles the authentication and authorization process for users attempting to access protected applications.

  • Protected web applications: Applications secured behind the firewall that users can access after successful authentication.

Workflow

Figure 2. Threat defense deployment
The diagram illustrates the stages of Threat Defense deployment in a Zero Trust Access model, highlighting the roles of the Threat Defense firewall, Identity Provider, and protected web applications in the authentication and authorization process.

These stages describe how Threat Defense works with Zero Trust Access:

  1. Using a browser, a remote or on-prem user sends a HTTPS request to connect to an application from an endpoint.
  2. The HTTPS request is intercepted by the firewall that protects the application.
  3. The firewall redirects the user to application's configured IdP for authentication.

    Note


    In the figure, each firewall protects a set of web applications. The user can directly access the applications behind the firewall after authentication and authorization.


  4. After the authentication and authorization process is complete, the firewall allows the user to access the application.

Prerequisites for zero trust application policy

Licensing requirements

Ensure you have the necessary licensing before configuring Zero Trust Application Policy.

  • Smart license account with export-controlled features

  • (Optional) IPS and Threat licenses—You need these licenses if you use security controls.

Configuration requirements

Complete the required configurations for Zero Trust Application Policy implementation.

Limitations for Clientless Zero Trust Network Access

Be aware of the following limitations when using Clientless Zero Trust Network Access:

  • Supports only TLS-enabled web applications. All traffic must be decrypted.

  • Supports only SAML identity providers.

  • Supports IPv6; however, you can use only homogeneous network address translations (NAT) scenarios such as NAT66 and NAT44.

    NAT64, and NAT46 scenarios are not supported.

  • Clientless zero trust network access is available on Firewall Threat Defense only if Snort 3 is enabled.

  • By default, the Firewall Threat Defense device uses port 443 for secure communications. Because this is the same port used by TLS-enabled applications likely to be configured for zero trust network access, you must change the device's HTTP server port.

    Go to Devices > Platform Settings, then edit the Threat Defense Settings policy for the device, click HTTP Access, select the Enable HTTP Server check box, and enter a port other than 443 in the field. When you're finished, click Save in the upper right corner of the page.

    The following figure shows an example.

    The figure illustrates the configuration settings for enabling the HTTP server in the Threat Defense Settings policy, highlighting the necessary adjustments for port selection and the implications for protected web applications.

  • All hyperlinks in protected web applications must have a relative path and are not supported on individual mode clusters.

  • Protected web applications running on a virtual host or behind internal load balancers must use the same external and internal URL.

  • Not supported on applications with strict HTTP Host Header validation enabled.

  • If the application server hosts multiple applications and serves content based on the Server Name Indication (SNI) header in the TLS Client Hello, the external URL of the zero trust application configuration must match the SNI of that specific application.

Create a zero trust application policy

This task creates a Zero Trust Application Policy that enables secure access to private applications through authentication and authorization controls.

Before you begin

Ensure that you complete all the prerequisites listed in Prerequisites for zero trust application policy.

Procedure


Step 1

Choose Policies > Security policies > Zero Trust Application.

Step 2

Click Add Policy.

Step 3

In the General section, enter the policy name in the Name field. The description field is optional.

Step 4

Enter a domain name in the Domain Name field.

Ensure that the domain name is added to the DNS. The domain name resolves to the Firewall Threat Defense gateway interface from where the application is accessed. The domain name is used to generate the ACS URL for all private applications in an Application Group.

If you select an ACME certificate as the policy's identity certificate in the next step, the domain name must match the common name (CN) of the ACME certificate.

Note


When you change the domain name, the SAML Service Provider (SP) metadata gets updated. You must reconfigure these settings:

  • IdP with the new SAML SP metadata

  • DNS server with new domain name

When a deployment takes place after the domain name change, all the applications will be removed and readded, interrupting application access.

Step 5

Choose an existing certificate from the Identity Certificate drop-down list.

Click the Add (add icon) icon to configure a certificate enrollment object. For more information, see Add certificate enrollment objects.

You can choose an ACME certificate for authenticating the Firewall Threat Defense device as a SAML SP for a Zero Trust Application policy. ACME certificates automate the lifecycle management of SSL and TLS certificates, including their auto-renewal.

Step 6

Choose a security zone from the Security Zones drop-down list.

Click the Add (add icon) icon to add a new security zone.

To add security zones, see Create Security Zone and Interface Group Objects.

Step 7

The Global Port Pool section sisplays a default port range. Modify it, if required. Port values range from 1024 to 65535. A unique port from this pool is assigned to each private application.

Note

 
  • This port range should not conflict with the existing NAT range.

  • Ensure that any intermediary or third-party firewall devices in your network are configured to allow traffic across the entire range defined in the Global Port Pool. Blocking these ports prevents application access after SAML authentication and authorization.

Step 8

(Optional) In the Security Controls section, you can add an Intrusion or Malware and File policy:

  • Intrusion Policy—Choose a default policy from the drop-down list or click the Add (add icon) icon to create a new custom intrusion policy. For more information, see Creating a Custom Snort 3 Intrusion Policy topic in the latest version of the Cisco Secure Firewall Management Center Snort 3 Configuration Guide.

  • Variable Set—Choose a default variable set from the drop-down list or click the Add (add icon) icon to create a new variable set. For more information, see Create a variable set.

    Note


    To use variable sets, you must have the Secure Firewall Threat Defense IPS license for your managed devices.

  • Malware and File Policy—Choose an existing policy from the drop-down list. Click the Add (add icon) icon to create a new malware and file policy. For more information, see Manage file policies.

Step 9

Click Save to save the policy.


What to do next

  1. Create an Application Group. See Create an application group.

  2. Create an Application. See Create an application.

  3. Associate a Zero Trust Application Policy with a device. See Set targeted devices for zero trust access policy

  4. Deploy configuration changes. See Deploy Configuration Changes in the Cisco Secure Firewall Management Center Administration Guide.

Create an application group

Create an application group to enable SAML-based authentication and manage zero trust network access applications with centralized security controls.

Application groups allow you to organize and manage multiple applications under a single SAML configuration, providing centralized authentication and security policy enforcement for zero trust network access.

Before you begin

Create a zero trust application policy

Procedure


Step 1

Click Add Application Group.

Step 2

In the Application Group section, type the name in the Name field and click Next.

Step 3

In the SAML Service Provider (SP) Metadata section, the data is dynamically generated. Copy the values of the Entity ID and Assertion Consumer Service (ACS) URL fields or click Download SP Metadata to download this data in XML format for adding it to the IdP. Click Next.

Step 4

In the SAML Identity Provider (IdP) Metadata section, add the metadata using any one of the methods:

  • XML File Upload—Choose a file or drag and drop the XML file.

    The details of the Entity ID, Single Sign-On URL, and IdP Certificate are displayed.

  • Manual Configuration—Perform these steps:

    • Entity ID—Enter the URL that is defined in the SAML IdP to identify a service provider uniquely.

    • Single Sign-On URL—Enter the URL for signing into the SAML identity provider server.

    • IdP Certificate—Choose the certificate of the IdP enrolled in threat defense to verify the messages signed by the IdP.

      Click the Add (add icon) icon to configure a new certificate enrollment object. For more information, see Add certificate enrollment.

  • Configure Later—In the event you do not have the IdP metadata, you can configure it later.

Click Next.

Step 5

In the Re-authentication Interval section, enter the value in the Timeout Interval field and click Next.

The re-authentication interval allows you to provide a value that determines when a user must authenticate again.

Step 6

In the Security Zones and Security Controls section, the security zones and threat settings are inherited from the parent policy. You can override these settings. Click Next.

Step 7

Review the configuration summary. Click Edit to modify the details in any of the sections. Click Finish.

Step 8

Click Save.

The Application Group is created and is displayed on the Zero Trust Application page.


What to do next

  1. Create an application.

  2. Deploy configuration changes. See Deploy Configuration Changes in the Cisco Secure Firewall Management Center Administration Guide.

Add certificate enrollment

This task allows you to add certificate enrollment by configuring the certificate name and installing the IdP certificate in PEM format.

Certificate enrollment is required to establish secure authentication. You need to provide certificate information in the correct format to ensure proper system configuration.

Procedure


Step 1

Enter the Name.

Step 2

Paste the certificate information in the IdP Certificate field in PEM format.

Note

 
If the certificate is dependent on a root or intermediate certificate, you must install the dependant certificates. See Certificates.

Step 3

Click Save.


Create an application

This task creates a Grouped or Ungrouped Application to establish secure access controls for private applications within your Zero Trust Access policy framework.

Before you begin

  1. Create a zero trust application policy.

  2. Create an application group (required only for Grouped Applications).

Procedure


Step 1

Choose Policies > Security policies > Zero Trust Application

Step 2

Choose the policy.

Step 3

Click Add Application.

Step 4

In the Application Settings section, complete the following fields.

  • Application Name—Enter the application name.

  • External URL—Enter the URL that is used by the user to access the application.

  • Application URL—By default, the external URL is used as the Application URL. Uncheck the Use External URL as Application URL check box to specify a different URL.

    If Threat Defense uses an internal DNS, the Application URL must match an entry within that DNS to ensure it resolves to the application. In addition, if you enter a fully qualified domain name (FQDN) that could have either an IPv4 or IPv6 address, the FQDN must resolve to both IPv4 and IPv6. Threat Defense does not translate between these types of addresses.

  • Application Certificate—Choose the certificate for the private application. Click the Add (add icon) icon to configure an internal certificate object. For more information, see Add internal certificate objects.

  • Source Network Address Translation—Source Network Address Translation (source NAT) translates the source IP address in a packet to an address from a specified range.

    Enable Source Network Address Translation to specify an IP address range. The source IP address of an incoming request is translated to an IP address from the specified range. Source NAT works for both IPv4 and IPv6 addresses.

    • IPv4—Choose the source network for NAT from the list. Click Add (add icon) to create a network object. For more information, see Networks.

    • IPv6—Choose the source network for NAT from the list. Click Add (add icon) to create a network object. For more information, see Networks.

    Source NAT translates the source IP address of an incoming request to a routable IP address specified in the network object or the object group.

    Note


    Only object or object groups of type Host or Range are supported.

  • Application Group—Choose the Application Group from the drop-down list. See Create an application group.

    Note


    This field is not applicable for an ungrouped application.

Step 5

Click Next.

Step 6

Depending on the type of application:

  • For a Grouped Application, the SAML Service Provider (SP) Metadata, SAML Identity Provider (IdP) Metadata, and Re-authentication Interval are inherited from the Application Group and do not need to be configured by the user.

  • For an Ungrouped Application, perform these steps:

    1. In the SAML Service Provider (SP) Metadata section, the data is dynamically generated. Copy the Entity ID, Assertion Consumer Service (ACS) URL of the IdP, or click Download SP Metadata to download this data in XML format for adding it to the IdP. Click Next.

    2. In the SAML Identity Provider (IdP) Metadata section, add the metadata using any one of the methods:

      • XML File Upload—Choose a file or drag and drop the XML file.

        The details of the Entity ID, Single Sign-On URL, and IdP Certificate are displayed.

      • Manual Configuration—Perform these steps:

        • Entity ID—Enter the URL that is defined in the SAML IdP to identify a service provider uniquely.

        • Single Sign-On URL—Enter the URL for signing into the SAML identity provider server.

        • IdP Certificate—Choose the certificate of the IdP enrolled in threat defense to verify the messages signed by the IdP.

          Click the Add (add icon) icon to configure a new certificate enrollment object. For more information, see Add certificate enrollment.

      • Configure Later—If you do not have the IdP metadata, you can configure it later.

      Click Next.

    3. In the Re-authentication Interval section, enter the value in the Timeout Interval field and click Next. The reauthentication interval allows you to provide a value that determines when a user must authenticate again.

Step 7

In the Security Zones and Security Controls section, the security zones and threat settings are inherited from the parent policy or application group. You can override these settings. Click Next.

Step 8

Review the configuration summary. Click Edit to modify the details in any of the sections. Click Finish.

Step 9

Click Save.

The application is listed on the Zero Trust Application page and enabled by default.


What to do next

  1. Set targeted devices for zero trust access policy.

  2. Deploy configuration changes. See Deploy Configuration Changes in the Cisco Secure Firewall Management Center Administration Guide.

Create an ungrouped application

This task creates a standalone application for zero trust application access.

Before you begin

Create a zero trust application policy

Procedure


Step 1

Choose Policies > Access Control > Zero Trust Application

Step 2

Select the policy and click Add Application.

Step 3

In the Application Settings section, complete the following fields.

  • Application Name—Enter the application name.

  • Application Group—This field is not applicable for a standalone application.

  • External URL—Enter the URL that is used by the user to access the application.

  • Internal URL (FQDN or Network IP)—Enter the URL where the application is hosted on the internal server.

  • Application Certificate—Enter the certificate for the private application.

Click Next.

Step 4

In the SAML Service Provider (SP) Metadata section, the data is dynamically generated. Copy the Entity ID or ACS URL of the IdP or click Download SP Metadata to download this data in XML format for adding it to the IdP. Click Next.

Step 5

In the SAML Identity Provider (IdP) Metadata section, add the metadata using either one of the methods:

  • XML File Upload—Select a file or drag and drop the XML file.

  • Manual Configuration—Complete the following fields:

    • Entitv ID—The URL that is defined in the SAML IdP to identify a service provider uniquely.

    • Single Sign-On URL—The URL for signing into the SAML identity provider server.

    • Certificate—Certificate of the IdP enrolled into the threat defense to verify the messages signed by the IdP.

  • Configure Later—In the event you do not have the IdP metadata, you can configure it later.

Click Next.

Step 6

In the Re-authentication Interval section, enter the value in the Interval field and click Next.

Step 7

In the Interface Access and Security Controls section, the interface objects and threat settings are inherited from the parent policy. You can override these settings.

Step 8

Review the settings and click Finish.

Step 9

Click Save.


The Application is displayed on the policy page under Ungrouped Applications.

What to do next

Set targeted devices for zero trust access policy

Set targeted devices for zero trust access policy

Set the specific devices where a Zero Trust Application policy will be deployed to control application access and enforce security policies.

Each Zero Trust Application policy can target multiple devices; each device can have one deployed policy at a time.

Before you begin

  1. Create a zero trust application policy.

  2. Create an application group.

  3. Create an application.

Follow these steps to set targeted devices for Zero Trust Access Policy:

Procedure


Step 1

Choose Policies > Security policies > Zero Trust Application

Step 2

Choose the policy.

Step 3

Click Targeted Devices.

Step 4

Choose the devices where you want to deploy the policy using any one of the methods:

  • Choose a device in the Available Devices list and click >> or the Add (add icon) icon.

  • To remove a device from the Selected Devices list, choose a device and click << or the Delete (delete icon) icon.

Step 5

Click Apply to save policy assignments.

Step 6

Click Save to save the policy.


What to do next

Deploy configuration changes. See Deploy Configuration Changes in the Cisco Secure Firewall Management Center Administration Guide.

Edit a zero trust application policy

Edit the settings of a Zero Trust Application Policy to modify policy configurations, application groups, or individual applications according to your security requirements.

Follow these steps to edit the settings of a Zero Trust Application Policy.

Procedure


Step 1

Choose Policies > Security policies > Zero Trust Application

Step 2

Click Edit (edit icon) next to the Zero Trust Application Policy you want to edit.

Step 3

Edit your Zero Trust Application Policy.

You can change these settings or perform these actions:

  • Name and Description—Click Edit (edit icon) next to the policy name, make your changes, and click Apply.

  • To modify the policy settings:

    • Click Settings

    • Modify the settings as required.

      Important


      Editing the domain name for the SAML ACS URL interrupts application access.

    • Click Save.

  • To modify the Application Group settings:

    • Click Applications.

    • Click Edit (edit icon) next to the Application Group you want to edit.

    • In each section, click Edit to modify the settings, as required

      Important


      Editing the Application Group name interrupts application access.

    • Click Apply after you modify the settings in a section.

    • Click Finish.

    • Click Save.

  • To modify the Application settings:

    • Click Applications.

    • Click Edit (edit icon) next to the Application you want to edit.

    • In each section, click Edit to modify the settings, as required.

      Important


      Editing the Application name interrupts application access.

    • Click Apply after you modify the settings in a section.

    • Click Finish.

    • Click Save.

  • To enable, disable, or delete multiple Applications, choose the Applications, click the required bulk action, and click Save.

    Note


    These actions are also available in the right-click menu.

    • To enable all Applications, click Bulk Actions > Enable.

    • To disable all Applications, click Bulk Actions > Disable.

    • To delete all Applications, click Bulk Actions > Delete.

  • Click Return to Zero Trust Application to return to the policy page.


The Zero Trust Application Policy settings are updated with your changes.

What to do next

Deploy configuration changes. See Deploy Configuration Changes in the Cisco Secure Firewall Management Center Administration Guide.

Manage zero trust application policies

This task allows you to manage zero trust application policies to control access and security for applications in your network.

Procedure


Step 1

Choose Policies > Security policies > Zero Trust Application

Step 2

Choose the appropriate action for the zero trust application policies.

Step 3

Click Save.


What to do next

Ensure that there are no warnings before you deploy the configuration to threat defense. To deploy configuration changes, see Deploy Configuration Changes in the Cisco Secure Firewall Management Center Administration Guide.

Monitor zero trust sessions

This task enables administrators to effectively monitor Zero Trust Application Policy sessions through multiple methods including connection events, dashboard visualization, CLI commands, and diagnostic troubleshooting tools.

After a Zero Trust Application Policy is deployed, additional monitoring capabilities become available to track session activity, user behavior, and system performance. To monitor the zero trust sessions, do these steps.

Procedure


Step 1

Add Zero Trust fields to the connection events table view.

  1. Choose Events & Logs > + Show more > Connection > Events.

  2. Click the Table View of Connection Events tab.

  3. In the table view of events, multiple fields are hidden by default. To change the fields that are displayed, click the x icon in any column name to display a field selector.

  4. Select these fields:

    • Authentication Source

    • Zero Trust Application

    • Zero Trust Application Group

    • Zero Trust Application Policy

    • Zero Trust Application Host

    • Zero Trust Origin User

    • Zero Trust Proxy

    • Zero Trust Rule

    • Zero Trust Status

    • Zero Trust Tunnel ID

  5. Click Apply.

See Connection and Security-Related Connection Events in the Secure Firewall Management Center Administration Guide for more information on the connection events.

Step 2

Access the Zero Trust dashboard to monitor real-time session data.

The Zero Trust dashboard provides a summary of the top zero trust applications and zero trust users that are managed by the management center.

Choose Insights & Reports > Dashboard, and click the Zero Trust tab to access the dashboard.

The dashboard has the following widgets:

  • Top Zero Trust Applications

  • Top Zero Trust Users

Step 3

Use CLI commands to monitor and troubleshoot Zero Trust configurations.

Log in to the device CLI and use the following commands:

CLI Command

Description

show running-config zero-trust

View the running configuration for a zero trust configuration.

show running-config zero-trust-hybrid

View the running configuration for a universal zero trust configuration.

show zero-trust

Display the run-time zero trust statistics and session information.

show cluster zero-trust

Display the summary of zero trust statistics across nodes in a cluster.

clear zero-trust

Clear zero trust sessions and statistics.

show counters protocol zero_trust

View the counters that are hit for zero trust flow.

Step 4

Run diagnostic tools to troubleshoot Zero Trust configuration issues.

The diagnostics tool facilitates the troubleshooting process by detecting possible issues with zero trust configurations. The diagnostics can be classified into two types:

  • Application-specific diagnostics are used to detect issues such as:

    • DNS-related issues

    • Misconfigurations such as socket not open, and issues with classification and NAT rules.

    • Issues with deployment of zero trust policy or SSL rules

    • Issues with source NAT issues and exhaustion of PAT pool

  • General diagnostics are used to detect issues such as:

    • Strong cipher license not enabled

    • Invalid application certificate

    • SAML-related issues

    • Home agent and cluster bulk sync issues

  1. Click Diagnostics (The image illustrates the process of monitoring zero trust sessions, highlighting key diagnostic steps and options available in the Diagnostics dialog box for troubleshooting application issues.) next to the zero trust application that you want to troubleshoot. The Diagnostics dialog box appears.

  2. Choose the device from the Select Device drop-down list and click Run. A report is generated in the Reports tab after the diagnostic process is complete.

  3. To view, copy, or download the logs, click the Logs tab.


You have successfully configured comprehensive monitoring for Zero Trust sessions. The connection events table now displays Zero Trust-specific fields, the dashboard provides real-time visualization of top applications and users, CLI commands are available for detailed system monitoring, and diagnostic tools can identify and troubleshoot configuration issues.