Identity Source: Passive Identity Agent

The following topics discuss how to configure and use the passive identity agent.

The passive identity agent identity source

The passive identity agent identity source sends session data from Microsoft Active Directory (AD) to the Secure Firewall Management Center. All you need is a supported Microsoft AD setup as described in Realms and realm sequences.

Passive identity agent roles

The passive identity agent supports these roles: Standalone, Primary, and Secondary.


Note


You do not need to configure the Cisco Identity Services Engine (ISE) to use this identity source.


For more information on these roles, refer to About passive identity agent roles.

Passive identity agent system requirements

The passive identity agent supports Windows Server 2016, 2019, 2022, and 2025 on Active Directory servers, and Windows 11 or later on domain-joined Windows clients. The system time must be synchronized across the Secure Firewall Management Center, domain controllers, and the agent host.

Refer to Passive identity agent system requirements for more information.

Passive identity agent limitations

The passive identity agent has these limitations:

  • Up to 10 agents simultaneously

  • A single passive identity agent identity source monitors up to 50 AD directories

  • Up to 300,000 concurrent user sessions

  • IPv6 addresses are not supported (passive identity agent 1.0)

  • IPv6 addresses are supported (passive identity agent 1.1)

Deploy the passive identity agent

For information about deployment options, see Deploy the passive identity agent.


Note


We recommend you use the latest version of the passive identity agent.

To see the available versions, go to software.cisco.com.

To upgrade the passive identity agent, see Upgrade the passive identity agent software.


Deploy the passive identity agent

Deploy the passive identity agent software on any machine that is part of a Microsoft Active Directory (AD) domain that you want to use for user awareness and control.

Installation locations and agent types

You can install the passive identity agent software on any of the following machines:

  • The Microsoft Active Directory server

  • A domain controller

  • A client connected to the network that is neither the directory server nor a domain controller

Any particular passive identity agent can monitor one or several Active Directory domain controllers in the same domain.

The machine on which the passive identity agent is installed must communicate with the Secure Firewall Management Center using the TLS/SSL protocol. For more information, see Internet access requirements for the passive identity agent.

You can configure the following types of agents on the Microsoft AD directory server, domain controller, or on any client connected to the domain:

  • Standalone agent: One agent that can monitor one or several Active Directory domain controllers in the same domain.

  • Primary agent and secondary agent: Both can monitor one or several AD domain controllers in the same domain. To provide redundancy, you can install a primary agent and a secondary agent on different machines. The primary agent is responsible for communicating with the Secure Firewall Management Center. If communication fails, the secondary agent takes over.

Simple passive identity agent deployment

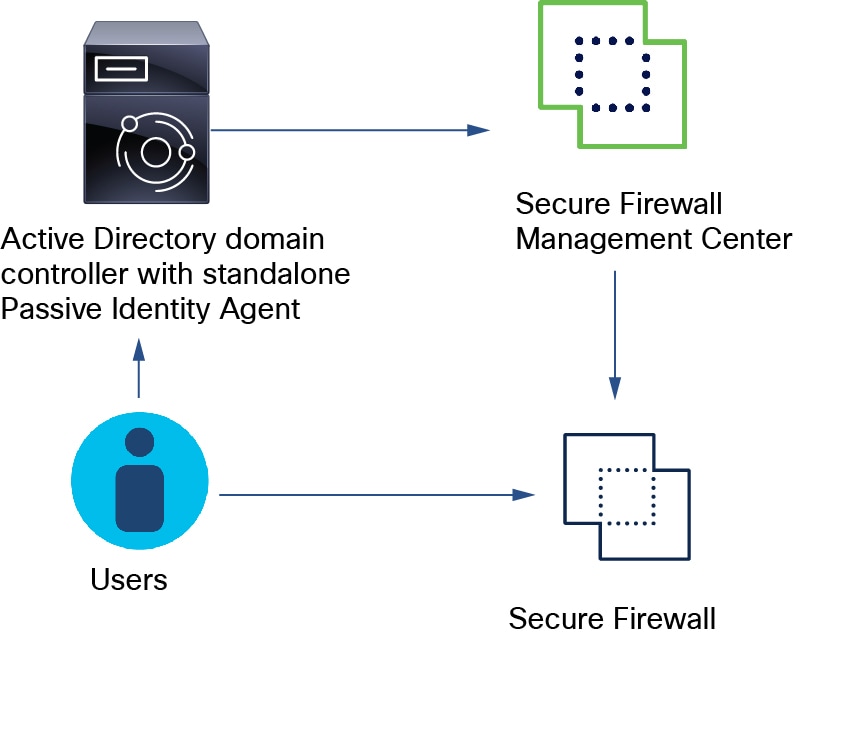
The following diagram shows the simplest passive identity agent deployment.

The simplest Passive Identity Agent is one standalone agent installed on the Active Directory domain controller. This agent sends user name and IP info to the firewall manager

Deployment architecture

In this example, a standalone passive identity agent is installed on the AD domain controller. Users log in and out of the AD domain. The agent sends user name and IP address information to the Secure Firewall Management Center. As users access the network, access control and identity policies deployed to the Secure Firewall Threat Defense determine whether or not access is allowed and how access is granted.

You can install a passive identity agent on the AD domain controller, directory server, or on any client connected to the domain you wish to monitor.

Single passive identity agent monitoring multiple domain controllers

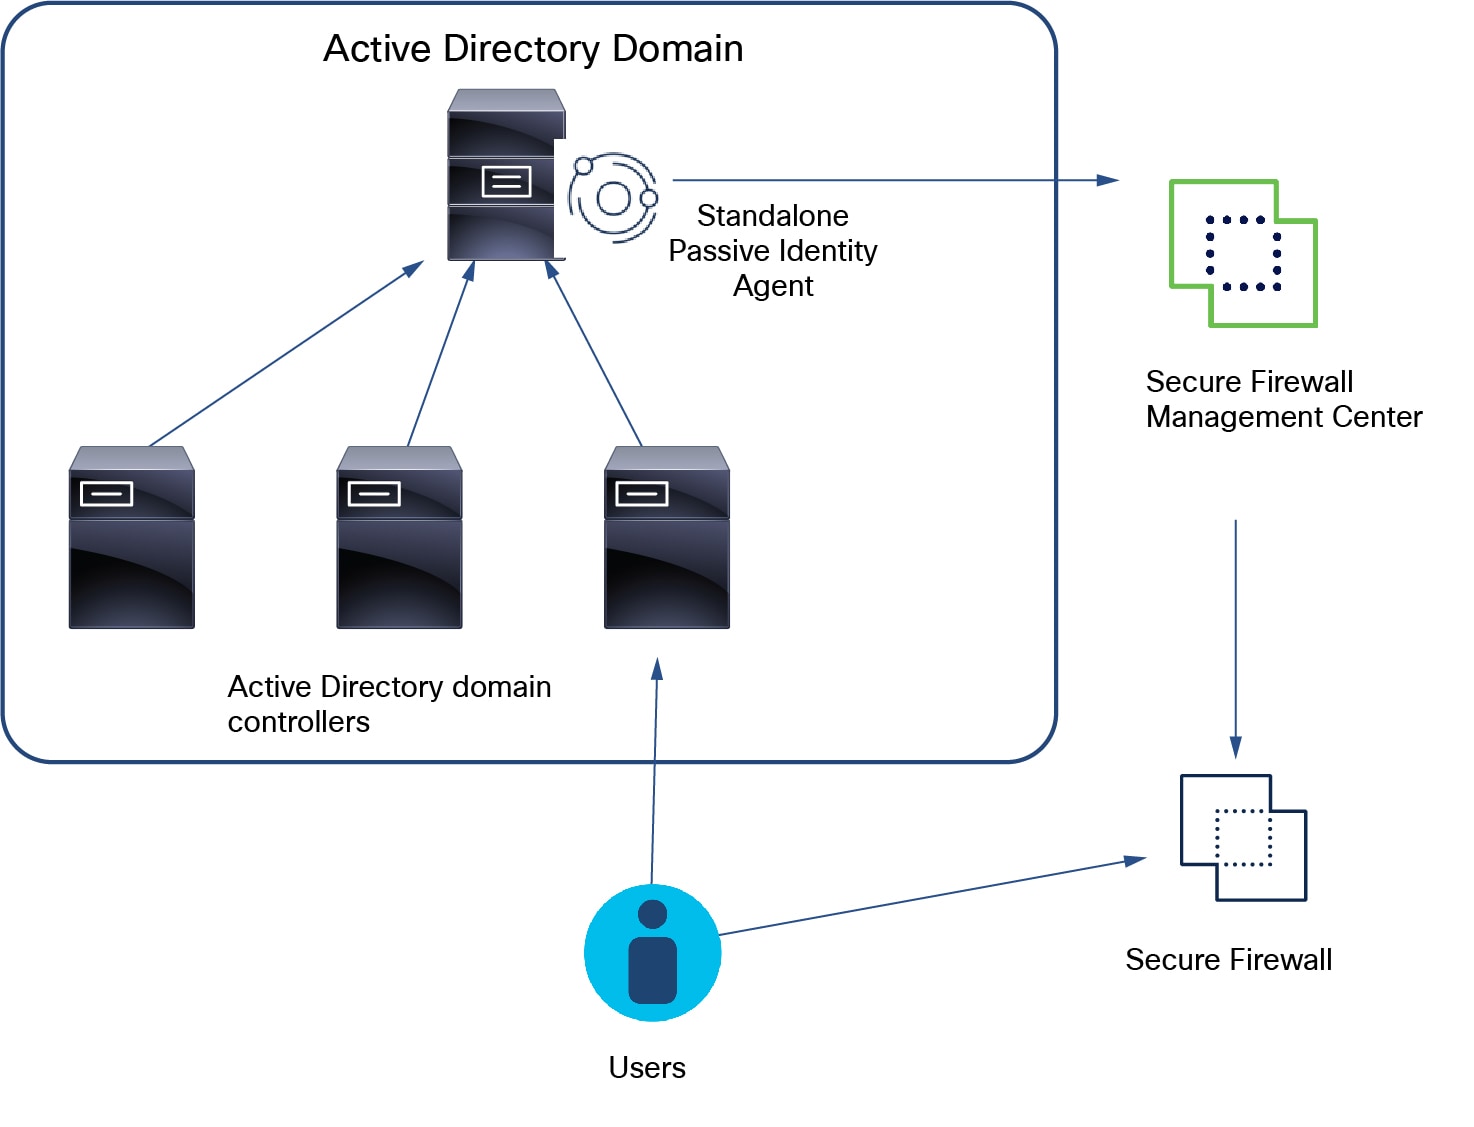
The diagram shows a standalone passive identity agent that monitors several AD domain controllers.

One standalone passive identity agent can be installed on the Active Directory domain and send user IP address information to the firewall manager

Architecture details

In this diagram, the standalone passive identity agent is installed on a client attached to the AD domain (or on the domain controller itself). Users log in to any domain controller and the agent sends user and IP address information to the Secure Firewall Management Center. As users access the network, access control and identity policies deployed to the Secure Firewall Threat Defense determine whether access is allowed and how access is permitted.

You can install a passive identity agent on the AD domain controller, directory server, or on any client connected to the domain you wish to monitor.

Multiple passive identity agents monitoring multiple domain controllers

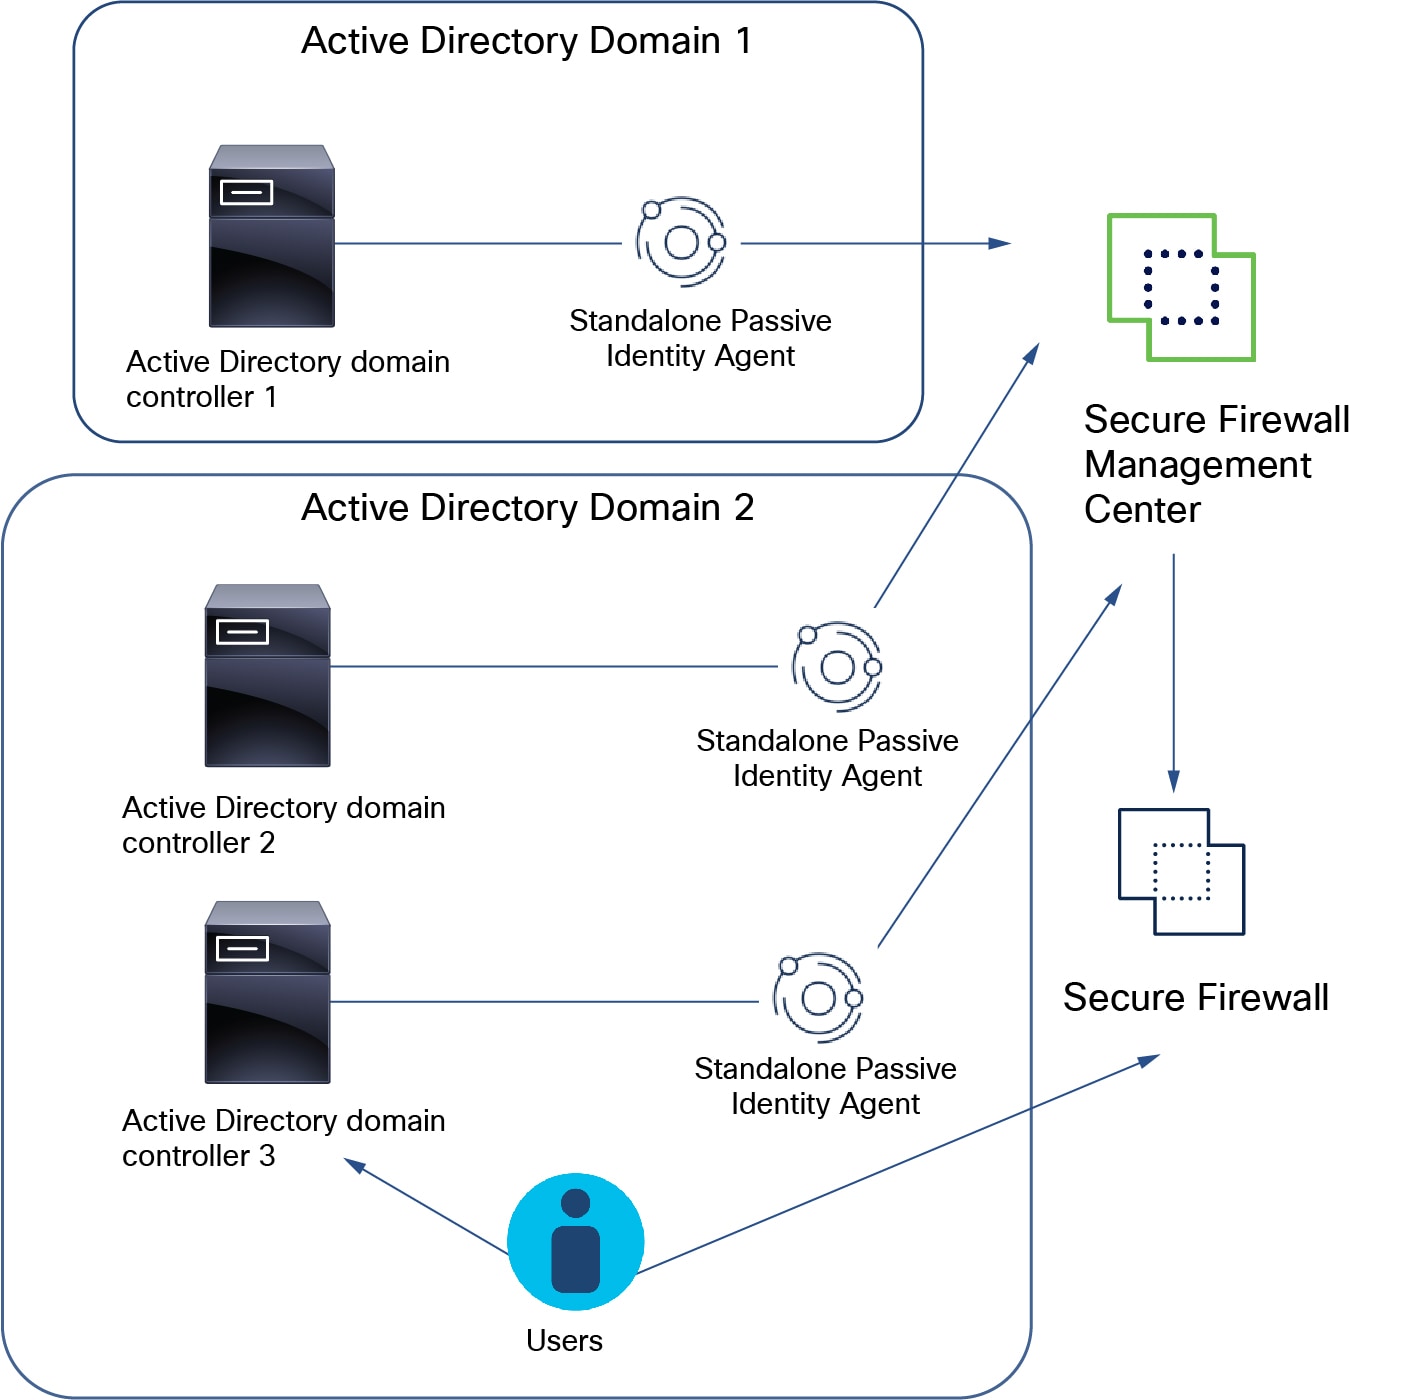
This figure illustrates how standalone agents monitor multiple AD domain controllers.

  • In AD domain 1, a standalone passive identity agent installed on a machine attached to AD domain controller 1 sends user and IP address mapping data to the Secure Firewall Management Center.

  • In AD domain 2, standalone agents installed on domain controllers 1 and 2 send user and IP address mapping data to the Secure Firewall Management Center.

You can deploy several standalone passive identity agents to monitor multiple Active Directory networks and send user IP information to the firewall manager

You can install a passive identity agent on an AD domain controller, a directory server, or on any client connected to the domain you want to monitor.

Deployment steps

The preceding figure shows three passive identity agents, each configured as a standalone. To do this:

  1. Create two Microsoft AD realms: one for each AD domain.

    See Create an LDAP realm or an Active Directory realm and realm directory.

  2. For AD domain 2, create two directories, one for each domain controller.

  3. Install the Passive Identity Agent software on a client that can log in to the domain.

    Configure each passive identity agent individually to communicate with the Secure Firewall Management Center on which you configure the passive identity agent source.

    See Install the passive identity agent software.

  4. Create the passive identity agent identity source.

    See Create a primary or secondary passive identity agent identity source.

Configure Passive identity agent primary and secondary agent deployments

Configure primary and secondary passive identity agents to provide redundancy and avoid a single point of failure in user identity monitoring.

To provide redundancy and to avoid a single point of failure, you can configure primary and secondary passive identity agents in any of the ways shown in this topic.

You can install a passive identity agent on the AD domain controller, directory server, or on any client connected to the domain you wish to monitor.

Procedure


Step 1

For a single AD domain controller with primary and secondary agents deployment:

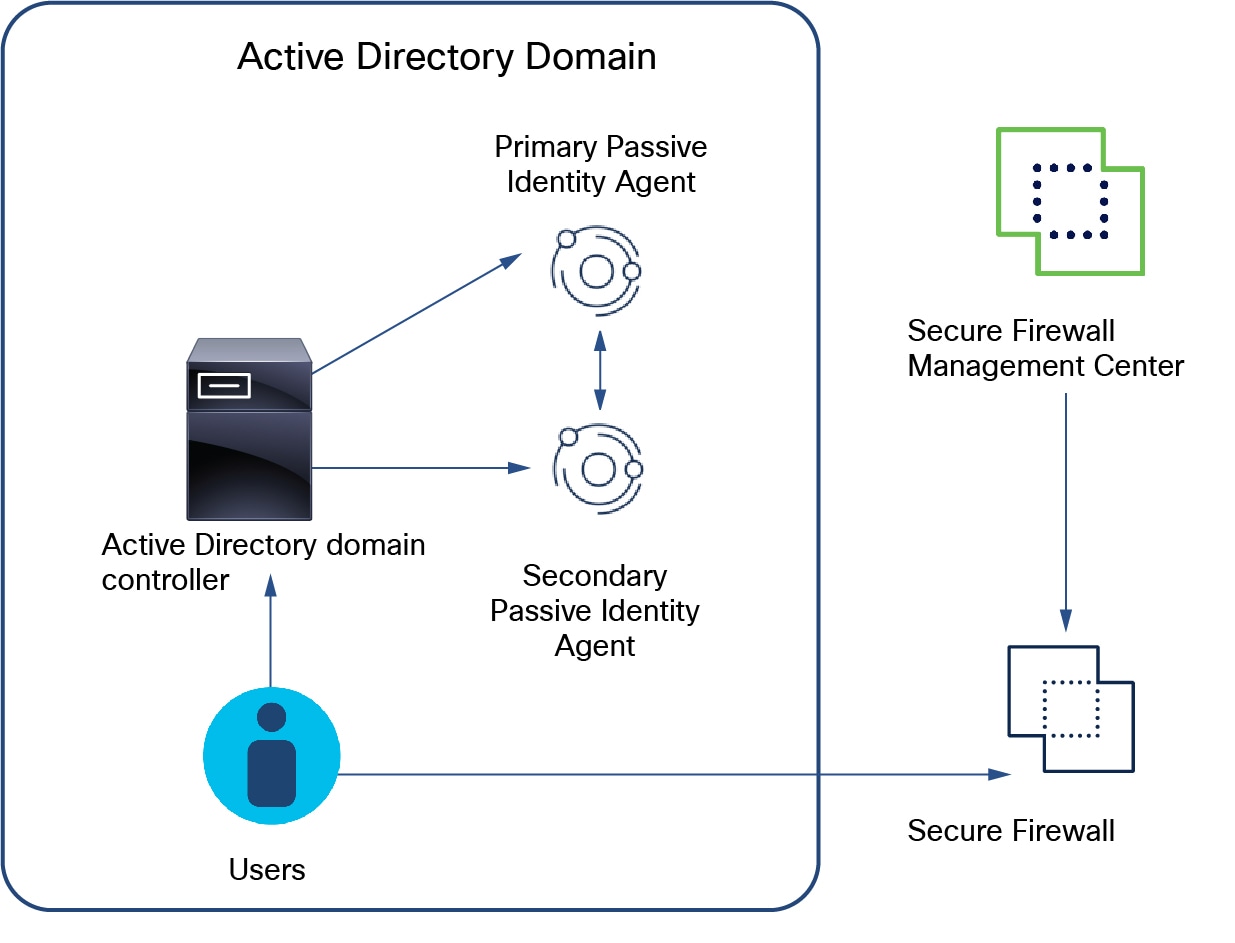
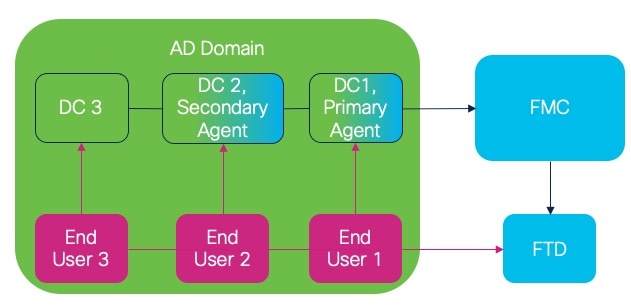
The following figure shows how to set up primary and secondary passive identity agents on one AD domain controller. If the primary agent fails, the secondary takes over.

The advantage of using primary and secondary passive identity agents is that if the primary agent does not communicate with the Secure Firewall Management Center for any reason, the secondary takes over. You can use other types of deployments (in other words, primary/secondary agents monitoring one AD domain or multiple domains

  1. Create a Microsoft AD realm that has one directory for the domain controller.

    See Create an LDAP realm or an Active Directory realm and realm directory.

  2. Install the passive identity agent software on any two network machines connected to the domain controller.

    Configure each passive identity agent individually to communicate with the Secure Firewall Management Center on which you configure the passive identity agent source.

    See Install the passive identity agent software.

  3. Create the identity source.

    See Create a primary or secondary passive identity agent identity source.

Step 2

For multiple AD domain controllers with primary and secondary agents deployment.

An example of primary and secondary agents installed on different AD domain controllers, all sending user IP information to the firewall manager

The preceding figure shows how to configure primary and secondary agents to monitor three AD domain controllers. If the primary agent fails, the secondary agent takes over.

  1. Create a Microsoft AD realm that has one directory for the domain controller.

    See Create an LDAP realm or an Active Directory realm and realm directory.

  2. Install the passive identity agent software on any machine connected to the domain controller.

    Configure each passive identity agent individually to communicate with the Secure Firewall Management Center on which you configure the passive identity agent source.

    See Install the passive identity agent software.

  3. Create the identity source.

    See Create a primary or secondary passive identity agent identity source.


Create a passive identity agent identity source

Configure the passive identity agent identity source to enable user identity monitoring and enhance access control in your network environment.

This provides high-level tasks required to configure the passive identity agent identity source in the Secure Firewall Management Center and to deploy agent software to your Microsoft Active Directory (AD) servers.

Before you begin

Follow these steps to create a passive identity agent identity source:

Procedure


Step 1

Enable the Dynamic Attributes Connector.

The dynamic attributes connector is a requirement to use the passive identity agent.

See Enable the dynamic attributes connector.

Step 2

Create a realm for your Microsoft AD domain and domain controllers.

Realms are connections between the Secure Firewall Management Center and the user accounts on the servers you monitor. They specify the connection settings and authentication filter settings for the server.

For more information, see Create an LDAP realm or an Active Directory realm and realm directory.

Step 3

Create a passive identity agent identity source.

The identity source allows the Secure Firewall Management Center and passive identity agent to communicate with each other. Create standalone, primary, or secondary agents, depending on your needs.

For more information, see:

Step 4

Create a passive identity agent user on the Secure Firewall Management Center.

We provide a role sufficient for the agent and manager to communicate with each other. We recommend using that role and no other for the passive identity agent user.

Step 5

Install the passive identity agent software.

The way you install the agent depends on your deployment.

You can install a passive identity agent on the AD domain controller, directory server, or on any client connected to the domain you wish to monitor.

For more information, see:


What to do next

Create an LDAP realm or an Active Directory realm and realm directory.

Configure the passive identity agent

These topics discuss how to configure the passive identity agent.

Enable the dynamic attributes connector

Enable the dynamic attributes connector to allow objects from cloud networking products to be used in Secure Firewall Management Center access controland DNS rules.

This task discusses how to enable the dynamic attributes connector in the Secure Firewall Management Center. The dynamic attributes connector is an integration that enables objects from cloud networking products to be used in Secure Firewall Management Center access controland DNS rules.

Procedure


Step 1

Log in to the Secure Firewall Management Center if you have not done so already.

Step 2

Click Integrations > Dynamic Attributes Connector.

Step 3

Slide to Enabled.

Step 4

Messages are displayed while the dynamic attributes connector is enabled.

In the event of errors, try again. If errors persist, contact Cisco TAC.


What to do next

See Create a connector.

Create a Microsoft Active Directory realm

passive identity agent requires you to create a Microsoft Active Directory (AD) realm and directories in the Secure Firewall Management Center.

Additional information

For detailed instructions on creating a Microsoft Active Directory realm and directories, see Create an LDAP realm or an Active Directory realm and realm directory.

Create a passive identity agent identity source

This task creates a passive identity agent that sends user session activity to the Secure Firewall Management Center.

Use this task to configure agent details, assign roles, and integrate with Microsoft AD for identity management and monitoring.

Before you begin

Complete the following:

Follow these steps to create a passive identity agent identity source:

Procedure


Step 1

Log in to the Secure Firewall Management Center as an administrator.

Step 2

Click Integrations > Identity > Identity Sources.

Step 3

Click Passive Identity Agent.

Step 4

If the dynamic attributes connector has not been enabled yet, you are prompted to do so.

For more information about enabling the dynamic attributes connector, see Enable the dynamic attributes connector.

Step 5

Click Create Agent.

Step 6

In the Configure Agent dialog box, enter the following information:

Item

Description

Name

Enter a unique name to identify this passive identity agent.

Description

Enter an optional description.

Role

Click one of the following:

  • Primary: The agent responsible for communicating with the Secure Firewall Management Center.

    Not available if you choose Standalone.

  • Secondary: Becomes the primary if the primary loses contact with the Secure Firewall Management Center.

    Not available if you choose Standalone.

  • Standalone: If there is only one passive identity agent.

For more information about roles, see Passive identity agent roles.

Step 7

Continue with:


Create a standalone passive identity agent identity source

Configure a standalone passive identity agent to enable identity management and user control.

This task discusses how to configure a standalone passive identity agent.

Before you begin

Complete the tasks discussed in Create a passive identity agent identity source.

Follow these steps to create a standalone passive identity agent identity source:

Procedure

Step 1

In the Configure Agent dialog box, enter the following information:

Item

Description

Role

Click Standalone.

Domain Controller

From the list, select the check box next to each domain controller that has a passive identity agent you wish to use for identity management and user control.

(Optional.) Click Add (add icon) to add a new one.

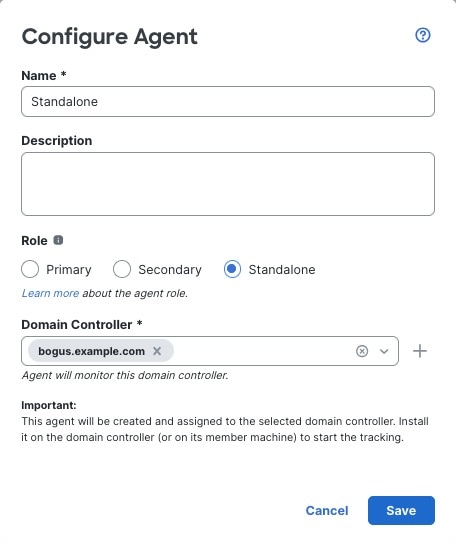
This figure shows an example of a standalone passive identity agent identity source.

When you create a standalone passive identity agent, you must specify a name and an AD domain controller defined by the realm

Step 2

In the Configure Agent dialog box, click Save.

Step 3

In the top right corner of the page, click Save.

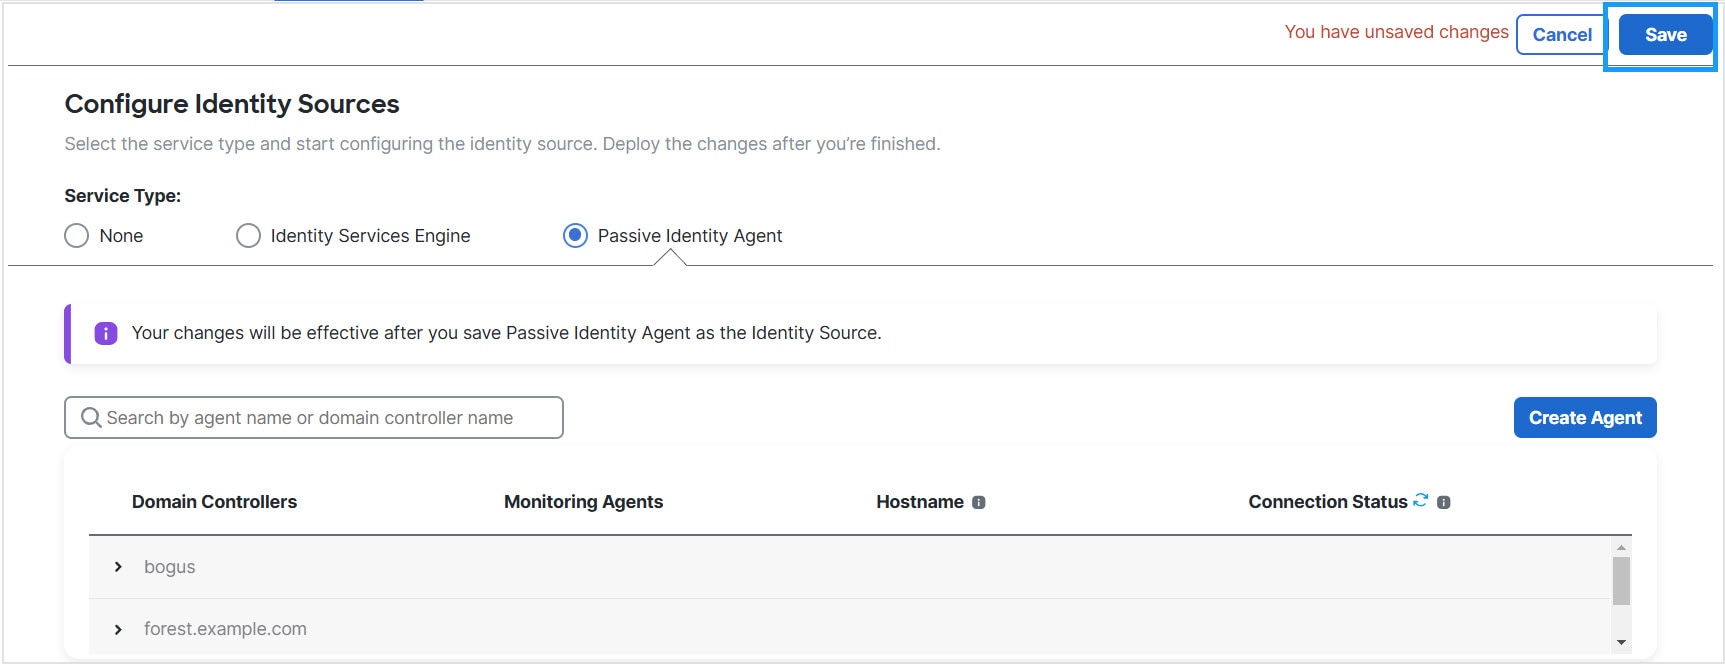
This figure shows an example.

You must click Save at the top of the page to save the identity source configuration

Note


The passive identity agent won't be active until you create a user and install the software.


What to do next

Create a primary or secondary passive identity agent identity source

This task enables you to configure a primary and secondary passive identity agent to manage user identities and ensure continuous communication with the firewall. You will assign agent roles, specify host details, and enable domain controller monitoring for identity management.

The following task continues from Create a passive identity agent identity source.

Before you begin

Complete the tasks discussed in Create a passive identity agent identity source.

Follow these steps to create a primary or secondary passive identity agent identity source:

Procedure

Step 1

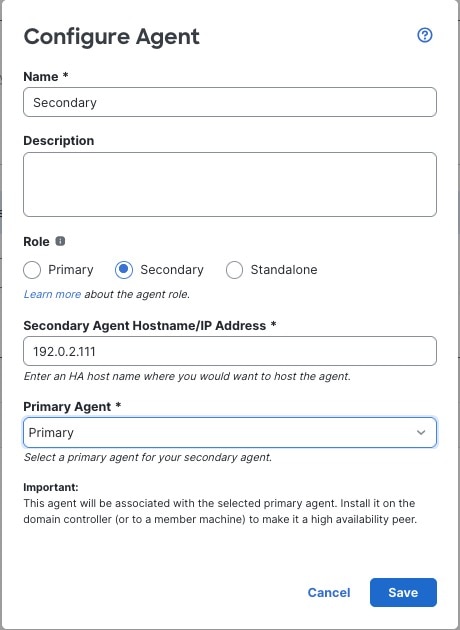
In the Configure Agent dialog box, enter the following information:

Item

Description

Role

Click one of the following:

  • Primary: The agent responsible for communicating with the Secure Firewall Management Center.

  • Secondary: Becomes the primary if the primary loses contact with the Secure Firewall Management Center.

For more information about roles, see Passive identity agent roles.

Primary Agent Hostname/IP Address

(Primary agent only.) Enter the fully qualified domain name or IP address of the server on which the primary passive identity agent is installed.

The passive identity agent version 1.0 supports IPv4 addresses and fully qualified domain names only. Version 1.1 supports IPv4, IPv6, and fully qualified domain names.

Secondary Agent Hostname/IP Address

(Secondary agent only.) Enter the fully qualified host name or IP address of the server on which the secondary passive identity agent is installed.

The passive identity agent version 1.0 supports IPv4 addresses and fully qualified domain names only. Version 1.1 supports IPv4, IPv6, and fully qualified domain names.

Primary Agent

(Secondary agent only.) From the list, click the name of the primary passive identity agent.

Domain Controller

(Primary agent only.) From the list, select the check box next to each domain controller that has a passive identity agent you wish to use for identity management and user control.

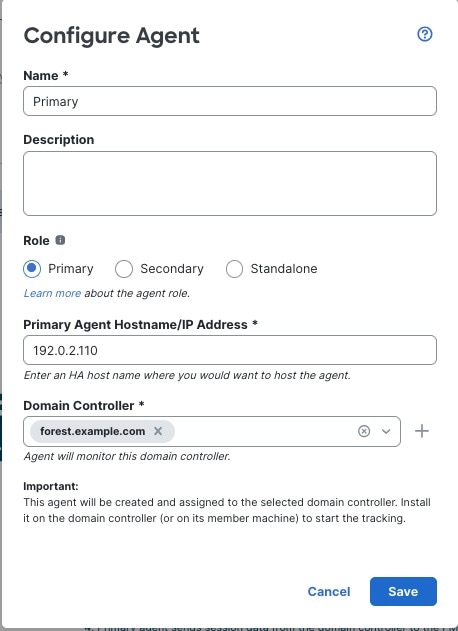
The following figure shows an example of a primary agent:

Create a primary passive identity agent that communicates with the secure firewall manager. If the primary agent fails to communicate with the secure firewall manager, the secondary takes over.

The following figure shows an example of a secondary agent:

Create a secondary passive identity agent to take over from the primary in the event it stops communicating with the secure firewall manager.

Step 2

In the Configure Agent dialog box, click Save.

Step 3

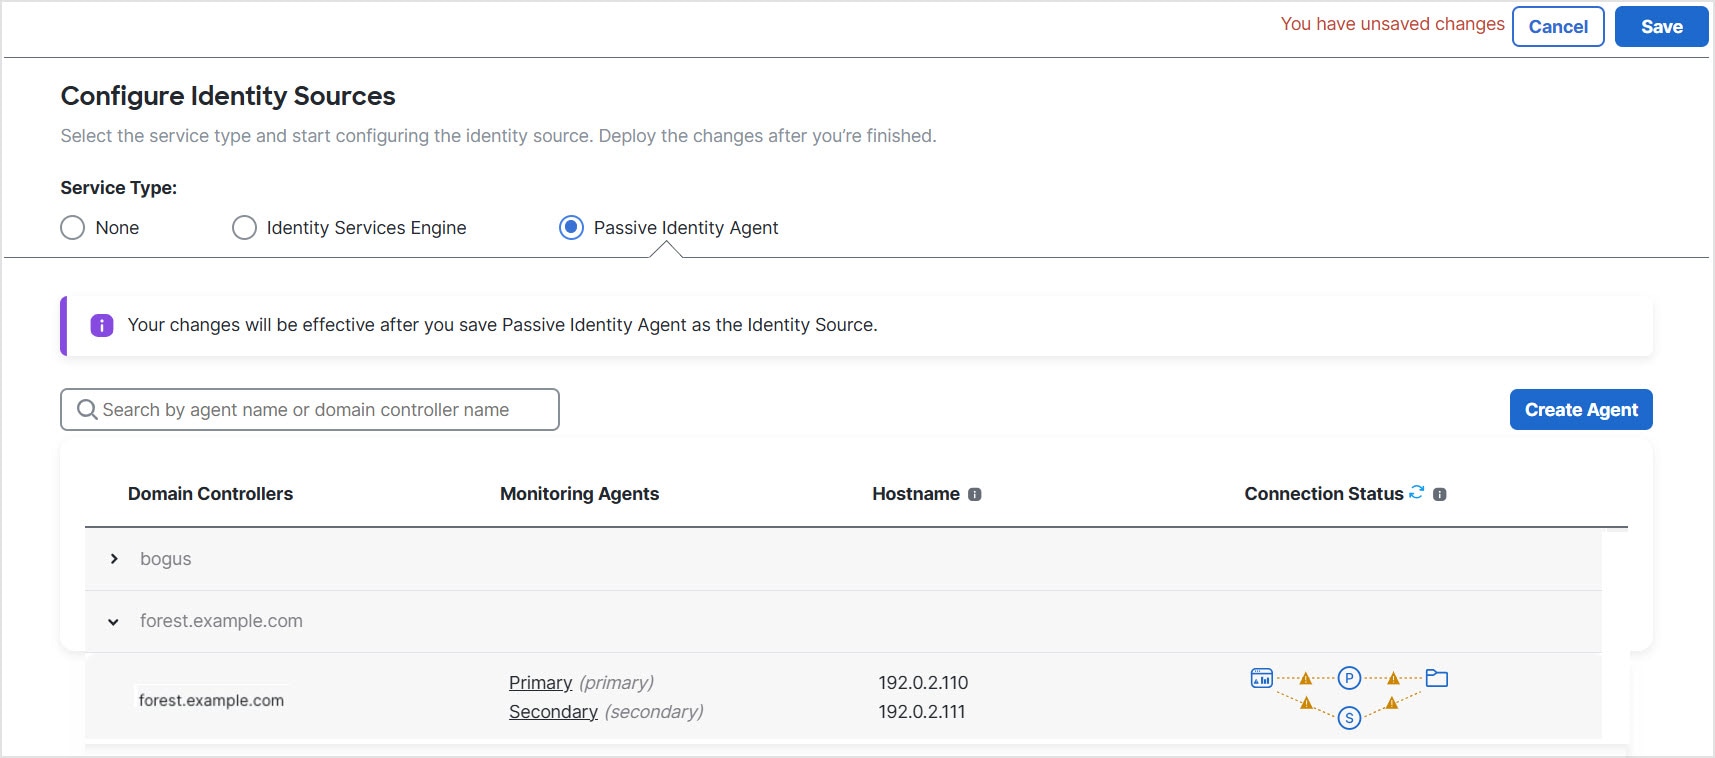
In the top right corner of the page, click Save.

The following figure shows an example.

In this example, there is a primary and secondar passive identity agent monitoring the domain forest.example.com.

Note


The passive identity agent won't be active until you create a user and install the software.


What to do next

Passive identity agent roles

A passive identity agent role determines how the agent functions in Active Directory environments for user and group monitoring.

Role types

The passive identity agent has the following roles:

  • Standalone: A passive identity agent that is not part of a redundant pair. A standalone agent can read users and groups from multiple Active Directory servers and domain controllers, provided the software is installed on all of them.

  • Primary: (Primary agent in a redundant pair.) Can be installed on a Microsoft AD domain controller, directory server, or any network client.

    Handles all communication with the Secure Firewall Management Center unless it stops communicating, in which case communication is handled by secondary agents.

  • Secondary: (Secondary, or backup, agent in a redundant pair.) Can be installed on a Microsoft AD domain controller, directory server, or any network client.

    Monitors the health of the primary agent and takes over if the primary agent stops communicating with the Secure Firewall Management Center.

The passive identity agent can monitor several AD domain controllers that are part of the same domain.

Create a Secure Firewall Management Center user for the passive identity agent

This task creates a Secure Firewall Management Center user with sufficient permissions to communicate with the passive identity agent.

This user has limited privileges to perform other tasks; the user is expected only to enable communication with the passive identity agent.


Note


Use only the Passive Identity User role for the passive identity agent user. In particular, do not use the Administrator role for the passive identity agent because Administrator will be logged off at a regular basis as the passive identity agent communicates with the Secure Firewall Management Center.


Note


You cannot use external authentication with the passive identity agent user.


Before you begin

  • Complete the tasks discussed in Create a passive identity agent identity source.

  • Verify that the setting for the Maximum session for users with Read/Write privileges field (under Administration > Configuration > User Configuration) remains at its default value. If you have adjusted the value, ensure that it is 100 or higher.

Procedure


Step 1

Log in to the Secure Firewall Management Center as an administrator.

Step 2

Click Administration > Users > User Accounts.

Step 3

Click Create User.

Step 4

Create the user as discussed in Add or Edit an Internal User in the Cisco Secure Firewall Management Center Administration Guide.

Step 5

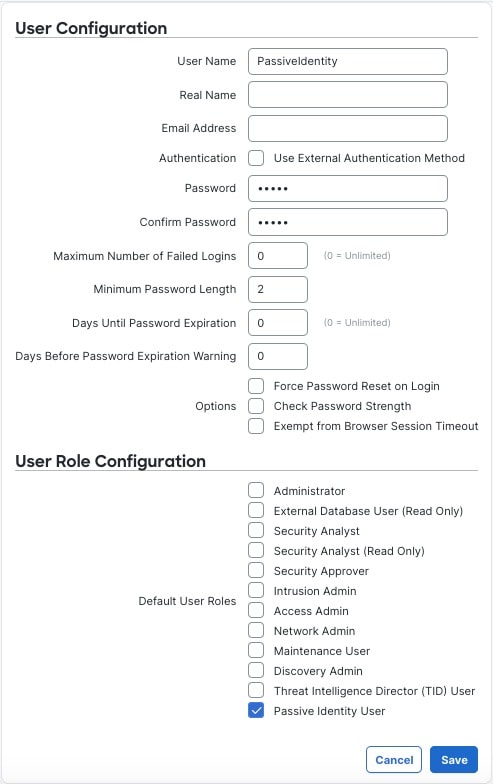
Select the Passive Identity User role.

The following figure shows an example.

The passive identity agent user must be assigned the Passive Identity User role and no other role.

Note


Do not choose a role for the passive identity agent user other than Passive Identity User because the agent will not function properly.

Step 6

Click Save.


What to do next

Passive identity agent installation.

Passive identity agent installation

The passive identity agent installation process requires specific prerequisites and tasks to deploy the agent in your environment.

Installation requirements

These topics discuss prerequisites and tasks required to install the passive identity agent.


Note


We recommend you use the latest version of the passive identity agent. To see the available versions, go to software.cisco.com. To upgrade the passive identity agent, see Upgrade the passive identity agent software


Prerequisites to install the passive identity agent

You must complete all of the tasks before you install the passive identity agent software.

Passive identity agent system requirements

This reference provides the system and software requirements for installing the passive identity agent, including supported Windows versions, synchronized system clocks, and necessary firewall software versions.

  • If you install the passive identity agent on a Windows Active Directory server, the server must run one of the following versions:

    • Microsoft Windows Server 2016

    • Microsoft Windows Server 2019

    • Microsoft Windows Server 2022

    • Microsoft Windows Server 2025


      Note


      If you use Microsoft Windows Server 2025, ensure that you select the LDAPS encryption method while creating an LDAP realm. For information on creating an LDAP realm, refer to "Create an LDAP realm or an Active Directory realm and realm directory" section in the Cisco Secure Firewall Management Center Device Configuration Guide.


  • If you install the passive identity agent on a Windows client attached to the domain, the client must run Windows 11 or later.

  • The system clock on all systems must be synchronized. We strongly recommend using the same NTP servers on all of them. This means:

    • The Secure Firewall Management Center.

      For more information, see Synchronize time on FTD devices.

    • All Windows Active Directory servers and domain controllers.

    • The machine on which the passive identity agent is installed.

  • Secure Firewall Management Center must run 7.6 or later.

  • Any Secure Firewall Threat Defense managed by the Secure Firewall Management Center must run 7.1 or later.

  • You must enable Snort 3 on the Secure Firewall Threat Defense devices.

Enable the windows event viewer to log kerberos authentication attempts

This task enables the Windows Event Viewer to log successful and unsuccessful Kerberos authentication attempts so that the passive identity agent can function properly by reading user sessions from the Event Viewer.

The passive identity agent reads user sessions from the Event Viewer so this setting is required for the passive identity agent to function properly.

For more information, see System audit policy recommendations on learn.microsoft.com.

Procedure

Step 1

Log in to the Active Directory Server as an administrator and open a DOS command prompt.

Step 2

Enter gpmc.msc to start the Group Policy Management Editor.

Step 3

If necessary, create a new Group Policy Object (GPO); if one already exists, edit it.

For more information about creating a GPO, see a resource like Create a Group Policy Object on learn.microsoft.com.

Step 4

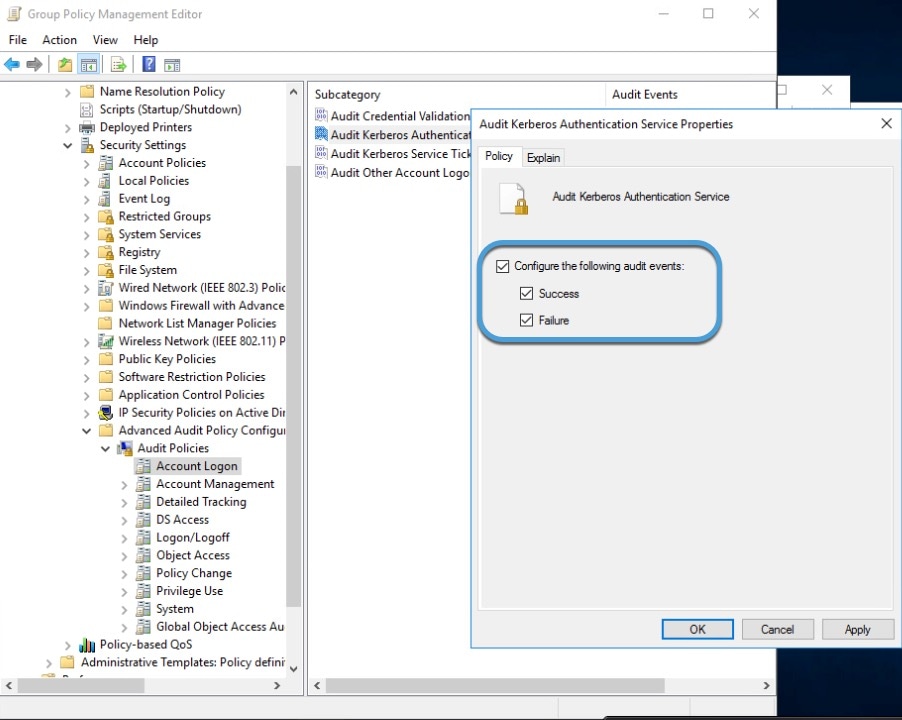
In your GPO, expand Computer Configuration > Policies > Windows Settings > Security Settings > Advanced Policy Configuration > Audit Policies.

Step 5

Click Account Logon.

Step 6

In the right pane, double-click Audit Kerberos Authentication Service.

Step 7

In the dialog box that is displayed, select all checkboxes which enables the system to log successes and failures.

The following figure shows an example.

The figure illustrates the Windows Event Viewer interface displaying logged Kerberos authentication attempts, highlighting relevant event details for monitoring and troubleshooting.

Step 8

Follow the prompts on your screen to save the changes.

Step 9

(Optional.) To update GPO immediately, enter gpupdate /force in your DOS command prompt window.


What to do next

See Add the Active Directory user to groups.

Add the Active Directory user to groups

Use this procedure to give the Active Directory and passive identity agent service user sufficient privileges to Active Directory.

To function normally, the passive identity agent must be able to connect to the domain and to read the Windows Event Log. This topic discusses how to give the proper privileges to:

  • The passive identity agent service user.

  • Active Directory user (namely, the Directory Username user in the Active Directory realm on the Secure Firewall Management Center).

Before you begin

You must be a Microsoft Server administrator familiar with how to add a user to a group and how to set a Windows service to run as a specific user.

Procedure

Step 1

Log in as an administrator to the system on which the passive identity agent is running.

You can log into any of the following:

  • The domain controller.

  • The Active Directory server.

Step 2

Start the Server Manager.

Step 3

Click Tools > Active Directory Users and Computers.

Step 4

Under Active Directory Users and Computers, expand the forest in which the directory user is defined.

The following figure shows an example.

In Active Directory Users and Computers, expand the forest to add a user from that forest to a group.

Step 5

Expand the organization unit or group to reveal the directory user. (You can create a new user by clicking New > User).

Step 6

Right-click the directory user and click Add to a group.

Step 7

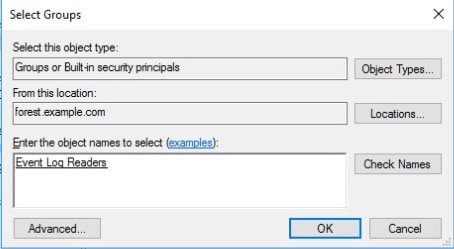
In the Select Groups dialog box, enter Event Log Readers and click Check Names.

The following figure shows an example.

Example of adding a user to the Event Log Readers group.

Step 8

Repeat the preceding tasks to add the user to the Domain Users group.

Step 9

In the Add Groups dialog box, click OK.


What to do next

See Install the passive identity agent software.

Install the passive identity agent software

Install the passive identity agent software to enable user identity monitoring and integration with your firewall management center.

This task discusses how to install the passive identity agent software. For a simple installation, you can install it on your Microsoft Active Directory (AD) domain controller; for other options, see Deploy the passive identity agent.


Note


We recommend you use the latest version of the passive identity agent. To see the available versions, go to software.cisco.com. To upgrade the passive identity agent, see Upgrade the passive identity agent software


Before you begin

Complete all of these tasks:

Follow these steps to install the Passive Identity Agent Software:

Procedure

Step 1

Download the passive identity agent from software.cisco.com.

Step 2

Log in as a member of the Administrators group to the machine on which to install the passive identity agent.

Step 3

Double-click CiscoPassiveIdentityAgentInstaller-1.1.1.msi and click Next.

Step 4

Choose a folder in which to install the passive identity agent and click Next.

The default installation folder is Program Files\Program Files (x86)\Cisco\Cisco Passive Identity Agent .

Step 5

Click Install.

Step 6

When the installation is done, click Finish and optionally check the box to start the passive identity agent.

Step 7

When the passive identity agent starts, click the On-Prem tab if you are using the agent with an on-premises Secure Firewall Management Center (physical or virtual) or click the Cloud tab if you are using the agent with Cloud-Delivered Firewall Management Center.

Step 8

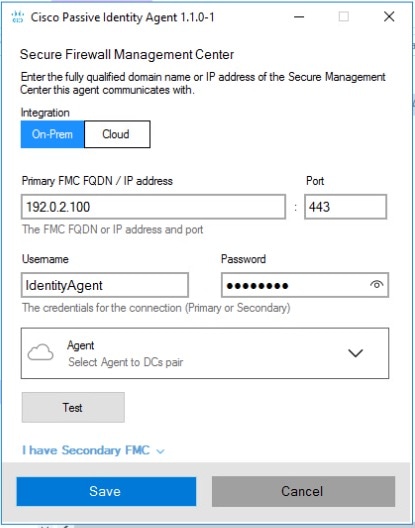
In the Cisco Passive Agent dialog box, enter the following information:

Item

Description

FMC FQDN / IP Address

Enter the address of the Secure Firewall Management Center on which you created the passive identity agent identity source.

The passive identity agent version 1.0 supports IPv4 addresses and fully qualified domain names only. Version 1.1 supports IPv4, IPv6, and fully qualified domain names.

Port

Enter the Secure Firewall Management Center listen port (by default, 443).

Username

Enter the username of the user you created in Create a Secure Firewall Management Center user for the passive identity agent.

Password

Enter the user's password.

Agent

Click the list to locate the domain controller of the passive identity agent you created previously on the Secure Firewall Management Center.

The following figure shows an example.

To install the Passive Identity Agent software, enter the required information in the dialog box and select a domain controller to monitor.

Step 9

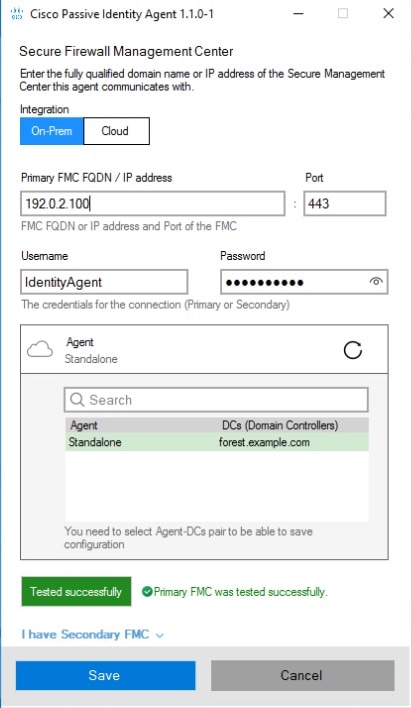
Click the Agent list.

  1. From the list, click the name of the domain controller to monitor.

  2. Click Test.

    The following figure shows an example.

    Make sure you test the connection before you save the configuration.

  3. If you have a high availability pair, click I have Secondary FMC and enter the secondary's IP address or fully qualified host name and its listen port.

  4. Only if the test succeeds, click Save.


What to do next

See Add Log On to the Passive Identity Agent Service.

Add Log On to the Passive Identity Agent Service

Use this procedure to enable the passive identity agent service to run as the Active Directory user. This user is the Directory Username user in the Active Directory realm on the Secure Firewall Management Center.

This task is optional but recommended. It ensures that the passive identity agent service runs with the minimal permissions required to send login information to the Secure Firewall Management Center.

Before you begin

Complete the tasks in Add the Active Directory user to groups.

You must be a Microsoft Server administrator who knows how to add a user to a group and set a Windows service to run as a specific user.

Procedure

Step 1

Log in as an administrator to the system on which the passive identity agent is running.

You can log into any of these:

  • the domain controller

  • the Active Directory server

Step 2

In the Windows search bar, enter Services.

Step 3

In the Services window, right-click Cisco Passive Identity Agent.

Step 4

Click Properties.

Step 5

In the Properties dialog box, click the Log On tab.

Step 6

Click This account.

Step 7

Click Browse. Follow the prompts on your screen to select the directory user.

Step 8

Enter the user's password in the provided fields.

Step 9

Click Apply.


What to do next

Uninstall the passive identity agent software

Remove the passive identity agent software from Microsoft AD servers when it is no longer needed or requires replacement.

This task discusses how to uninstall the passive identity agent software from your Microsoft AD servers.

Procedure


Step 1

Log in as an administrator to the machine on which the passive identity agent is installed.

Step 2

Search for Add or Remove Programs.

Step 3

Click Cisco Passive Identity Agent.

Step 4

Click Uninstall.

Step 5

You are required to confirm the uninstallation.


Monitor the passive identity agent

The passive identity agent indicates whether or not it can communicate with the Secure Firewall Management Center and other agents if it's configured as primary-secondary. View the status at Integrations > Identity > Identity Sources.

Deployments

A standalone passive identity agent is represented as follows.

A diagram illustrating the representation of standalone deployments and primary-secondary pairs, along with a table explaining the meaning of the indicators.

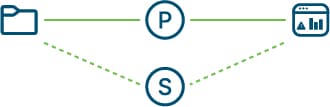
A primary-secondary pair is represented as follows.

The diagram illustrates the representation of standalone deployments and primary-secondary pairs, along with a table explaining the meaning of various indicators.

This table explains the meaning of the indicators.

Object

Meaning

The primary-secondary pair is illustrated, showing the relationship between the two components and their respective indicators. The accompanying table provides definitions for each indicator.

Secure Firewall Management Center

The image illustrates a standalone monitoring system setup, highlighting the key components and their interconnections for effective performance tracking.

Standalone Passive Identity Agent

The image illustrates a standalone Active Directory domain controller setup, highlighting its role in managing user authentication and directory services within a network.

Active Directory domain controller

The image illustrates the configuration of a standalone Active Directory domain controller, highlighting its role as the primary agent in the network setup.

Primary agent

The image illustrates the roles of the primary and secondary agents in an Active Directory domain controller setup, highlighting their status indicators and associated colors.

Secondary agent

Status indicators and colors

The passive identity agent indicates status using lines (that indicate whether communication with the Secure Firewall Management Center is active or standby) and colors (that indicate whether or not communication is successful).

This table explains the meanings of lines and colors:

Object

Meaning

Solid line

The agent that is responsible for communicating with the Secure Firewall Management Center.

Dashed line

Primary/secondary configuration only. The agent that is acting as the backup agent. In the event of a communication failure between the active (solid line) agent, this agent communicates with the Secure Firewall Management Center.

Blue

The status indicators show that both the green and blue agents are communicating normally, while the amber indicator requires further attention.

Agent communication is normal.

Amber

The status indicators show that both the green and blue agents are communicating normally, while the amber indicator requires further attention.

Agent has never successfully communicated with the Secure Firewall Management Center. A newly created agent line is amber and remains so until configuration is complete.

Red

The agent line status indicator shows amber for newly created agents, indicating that configuration is incomplete, while a red status signifies communication failure.

Communication is failing. To resolve the issues:

  • Verify the network connections between agents and the Secure Firewall Management Center.

  • Complete the configuration for the system (Microsoft AD server, domain controllers, and the Secure Firewall Management Center).

    For more information, see Create a passive identity agent identity source.

Manage the passive identity agent

passive identity agent management includes editing previously configured agents and deleting existing agent configurations.

Platform-specific management options

These topics describe how to edit or delete passive identity agents you previously configured on the Secure Firewall Management Center.

Edit passive identity agents

Edit passive identity agents to update configuration settings and maintain accurate identity source integration for your network security environment.

This task discusses how to edit passive identity agents you previously configured in the Secure Firewall Management Center.

Procedure


Step 1

Log in to the Secure Firewall Management Center as an administrator.

Step 2

Click Integrations > Identity > Identity Sources.

Step 3

Click Passive Identity Agent.

Step 4

Click Edit (edit icon) next to the agent to edit.

Step 5

Make the desired changes.

Step 6

Click Save.


Delete a standalone passive identity agent

Delete a standalone passive identity agent to remove its association from the Secure Firewall Management Center and Security Cloud Control for enhanced identity source management.

This task discusses how to delete a standalone passive identity agent.

Procedure


Step 1

Log in to the Secure Firewall Management Center as an administrator.

Step 2

Click Integrations > Identity > Identity Sources.

Step 3

Click Passive Identity Agent.

Step 4

Click Edit (edit icon) next to the agent to delete.

Step 5

Click Delete.

Step 6

Confirm the action when prompted.


Delete primary and secondary passive identity agents

This task allows you to remove unwanted or unused passive identity agents from your system configuration.

You must delete a secondary agent before you can delete a primary agent.

Procedure


Step 1

Log in to the Secure Firewall Management Center as an administrator.

Step 2

Click Integrations > Identity > Identity Sources.

Step 3

Click Passive Identity Agent.

Step 4

Click Edit (edit icon) next to a secondary agent to delete.

Step 5

Click Delete.

Step 6

Confirm the action when prompted.

Step 7

If you wish to delete a primary agent, first delete all secondary agents.


Troubleshoot the passive identity agent

Troubleshoot the passive identity agent software on your Windows AD domain controller or directory server.

This task helps you investigate and resolve user session issues with the passive identity agent by utilizing various troubleshooting methods including log analysis and event viewer investigation.

Procedure


Step 1

Set the log level by opening C:\Program Files\Program Files (x86)\Cisco\Cisco Passive Identity Agent\CiscoPassiveIdentityAgentService.exe.config in a text editor, save the file, and restart the Cisco Passive Identity Agent service.

By default, the passive identity agent logs at the INFO level.

Do not rename C:\Program Files\Program Files (x86)\Cisco\Cisco Passive Identity Agent\CiscoPassiveIdentityAgentService.exe.config ; otherwise, the passive identity agent will stop generating log files. Do not remove or change the .exe.config file extension.

Step 2

Generate troubleshooting files by logging in to the Microsoft Active Directory domain controller.

Step 3

Start the passive identity agent software.

Step 4

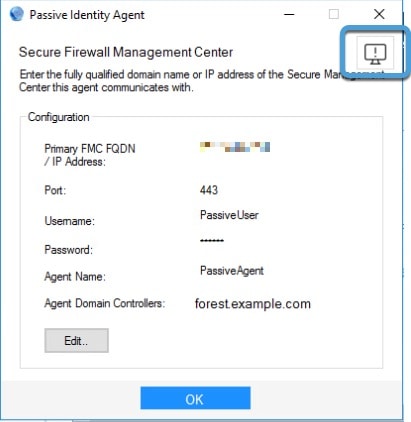
Click the Troubleshooting button in the top right corner of the window.

The following figure shows an example.

A confirmation message indicates that the troubleshoot logs have been successfully saved to the system's Downloads folder, with the file name starting with TroubleshootLogs.

The system displays a confirmation message and generates a .zip file containing troubleshooting files.

Your troubleshoot logs are saved to your system's Downloads folder; the file name starts with TroubleshootLogs .

Step 5

Manually view log files stored in plain text format in the agent's installation directory: C:\Program Files\Program Files (x86)\Cisco\Cisco Passive Identity Agent .

Use Notepad or another text editor to view these files. Log files rotate after reaching 10MB in size.

Step 6

Use the Microsoft Active Directory event viewer to look for Kerberos-related events if you are not seeing user sessions in the Secure Firewall Management Center.

Look for the following Kerberos-related events:

For general information about audit policy, see Audit Policy Recommendations on learn.microsoft.com.

For more information about Windows Group Policy Object settings, see Group Policy Objects on learn.microsoft.com.


Security requirements for the passive identity agent

To safeguard the system, you should install the passive identity agent on a protected internal network. Although the passive identity agent is configured to have only the necessary services and ports available, you must make sure that attacks cannot reach it.

If the passive identity agent and the Secure Firewall Management Center reside on the same network, you can connect the Secure Firewall Management Center to the same protected internal network as the passive identity agent.

Regardless of how you deploy your appliances, inter-system communication is encrypted. You must ensure that communications between appliances are not interrupted, blocked, or tampered with; for example, with a distributed denial of service (DDoS) or man-in-the-middle attack.

Internet access requirements for the passive identity agent

By default, the passive identity agent is configured to communicate with the Firepower System over the internet using HTTPS on port 443/tcp (HTTPS). If you do not want the passive identity agent to have direct access to the internet, you can configure a proxy server.

This section lists the ports the passive identity agent uses to communicate with other agents, the Secure Firewall Management Center , and Microsoft Active Directory.

Table 1. Passive Identity Agent port requirements

Port

Reason

443

Communicate with the Secure Firewall Management Center .

135

Communicate with Microsoft Active Directory using the MSRPC protocol.

9095

Communicate with other agents using the UDP protocol.

History for the passive identity agent

This reference provides the version history and feature introduction timeline for the passive identity agent.

Table 2. History for the passive identity agent

Feature

Minimum Firewall Management Center

Minimum Firewall Threat Defense

Details

Passive Identity Agent

7.6

7.1

This feature is introduced.

Passive identity agent version 1.1 is compatible with 7.6.0 and later and adds the following:

  • You can use either FQDN, IPv4, or IPv6 to connect from the Passive Identity Agent to the Secure Firewall Management Center or Security Cloud Control.

  • Sends both IPv4 and IPv6 user sessions from Microsoft Active Directory (AD) to the Firewall Management Center.

  • You can zip troubleshooting logs.

  • When you start the passive identity agent software, a list of prerequisites is displayed.

The passive identity agent identity source sends session data from Microsoft Active Directory (AD) to the Firewall Management Center. Passive identity agent software is supported on:

  • Microsoft AD server (Windows Server 2008 or later)

  • Microsoft AD domain controller (Windows Server 2008 or later)

  • Any client connected to the domain you want to monitor (Windows 8 or later)