Identity Source: pxGrid Cloud Identity (ISE 3.3 and Earlier)

This document discusses how to configure and use the pxGrid Cloud Identity Source with Cisco ISE version 3.3 and earlier.

pxGrid Cloud identity source

The Cisco Identity Services Engine (Cisco ISE) pxGrid Cloud identity source enables you to use subscription and user data from a server or cluster in Secure Firewall Management Center access control rules. Also, the identity source uses constantly changing dynamic objects from in access control policies in the Secure Firewall Management Center.

Integration technologies

The pxGrid Cloud identity source also uses:

  • The Cisco Platform Exchange Grid (pxGrid), which enables multivendor, cross-platform network system collaboration in things like security monitoring and detection systems, network policy platforms, asset and configuration management, identity, and access management. pxGrid Cloud is the cloud-based interface to Cisco ISE.

    More information about pxGrid is available in resources such as What is PxGrid? on devnet.

  • The Cisco Digital Network Architecture (Cisco DNA) delivers automation, security, predictive monitoring, and a policy-driven approach. It provides end-to-end network visibility and uses network insights to optimize network performance and deliver the best user and application experience.

    To use the pxGrid Cloud identity source with the Secure Firewall Management Center, you must Create a Cisco Account.

Restrictions for the pxGrid Cloud identity source

Before you set up the pxGrid Cloud identity source, note these restrictions:

  • pxGrid Cloud suppports these regions: us-west-2, eu-central-1, and ap-southeast-1.

  • For information about Cisco ISE versions and query sizes, see Query limitation in the pxGrid Cloud SDK on GitHub.

How the pxGrid Cloud identity source works

Summary

The key components involved in the pxGrid Cloud identity source are:

  • Secure Firewall Management Center: Uses the pxGrid Cloud SDK to programmatically retrieve user information

  • Cisco ISE: Provides user information, SGT, endpoint profile, and other details

  • pxGrid Cloud: Facilitates secure data exchange between the management center and ISE

  • Authentication process: Requires one-time passwords (OTP) to establish trusted communication

Workflow
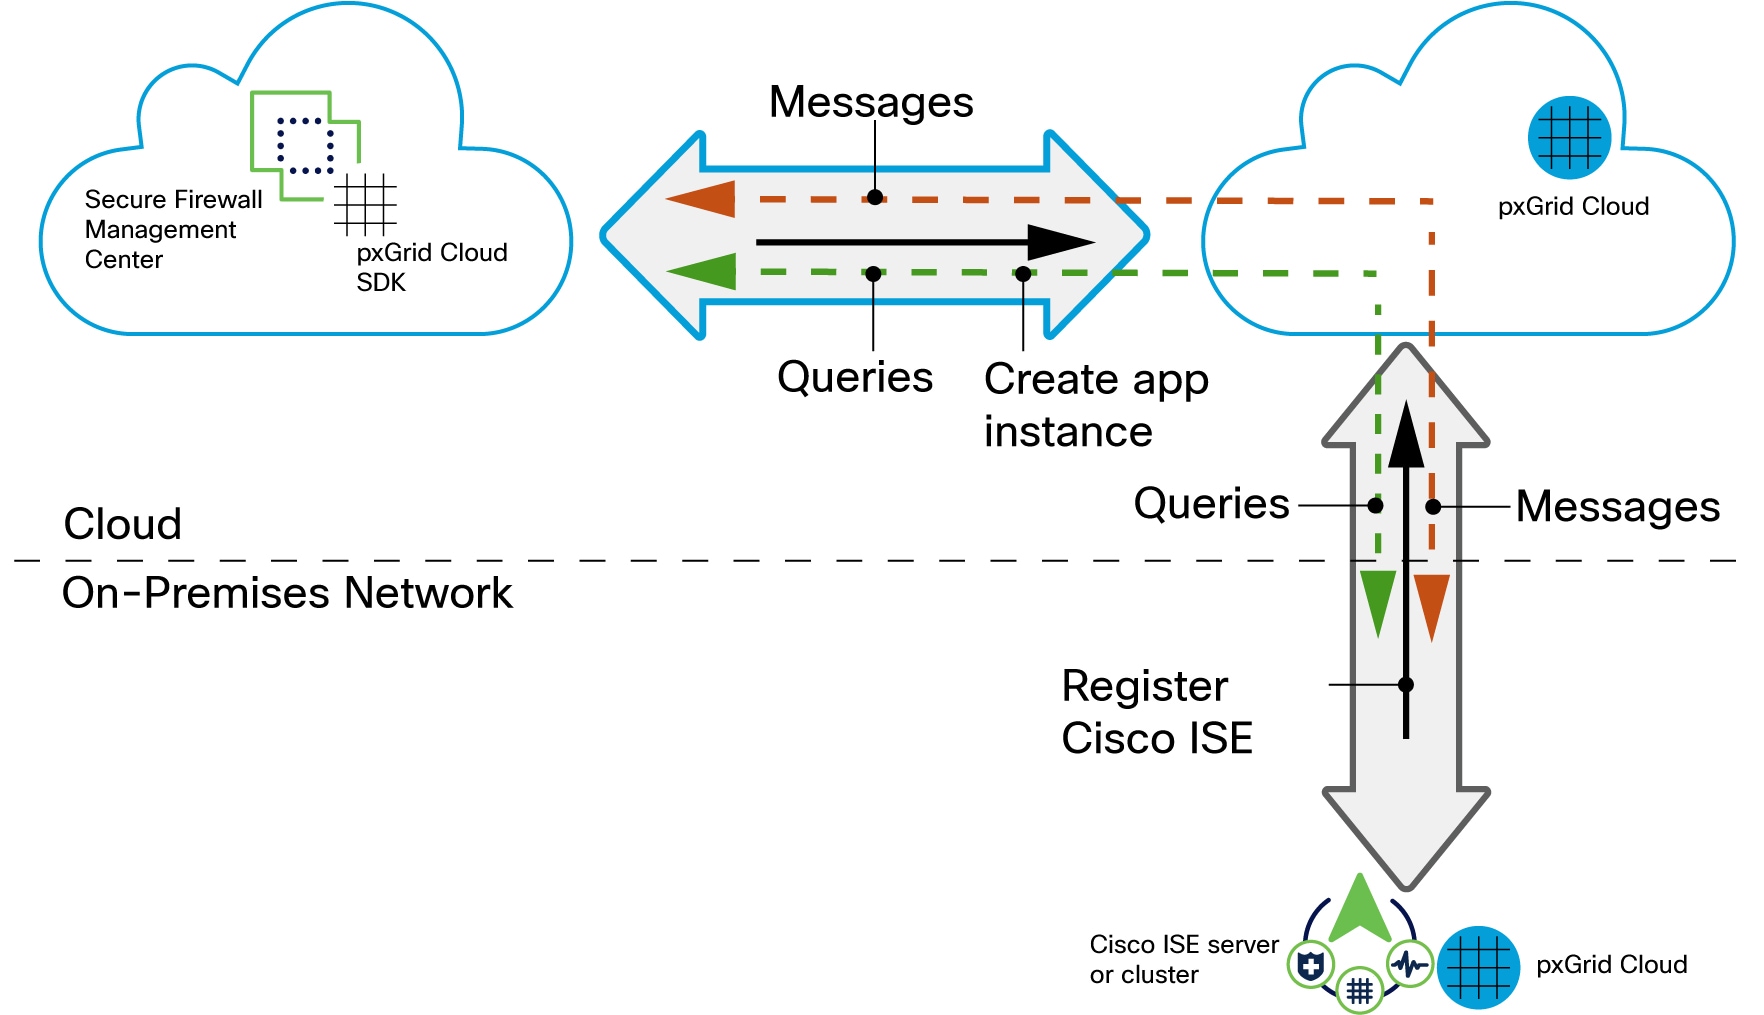
The image illustrates the stages of enabling pxGrid Cloud by the administrator, highlighting the key steps involved in the process.

These stages describe how the pxGrid Cloud identity source works:

  1. In Cisco ISE, the administrator enables the use of pxGrid Cloud.
  2. The administrator registers Cisco ISE as a product in pxGrid Cloud, which authenticates Cisco ISE and pxGrid Cloud and enables them to communicate with each other. The authentication process requires you to paste a one-time password (OTP) from pxGrid Cloud into Cisco ISE.
  3. In pxGrid Cloud, the administrator creates an "app instance" that generates an OTP for use in the Secure Firewall Management Center to authenticate the two with each other.
  4. After completing all the preceding tasks, the Secure Firewall Management Center (which includes the pxGrid Cloud SDK) can query Cisco ISE using pxGrid Cloud and retrieve sessions containing user information, SGT, endpoint profile, and other details. A Cisco ISE cluster downloads SGT/endpoint profile definition only from the primary node because the definitions are shared across all nodes.
  5. Many types of dynamic objects can be filtered and sent to the Secure Firewall Management Center as dynamic objects to be used in access control rules. These include: SGT, endpoint profile, posture status, and machine authentication. User information is retrieved from Cisco ISE and group information is retrieved from either Microsoft Active Directory or Azure Active Directory.

pxGrid Cloud identity source configuration

These topics summarize how to configure a pxGrid Cloud identity source either for ISE 3.3 and earlier or for ISE 3.4 and later. The steps are different so make sure you follow them exactly.

Configuring a pxGrid Cloud identity source (Cisco ISE 3.3 or earlier)

Before you begin, create a Cisco Account.


Important


This topic applies to Cisco ISE version 3.3 or earlier. If you are using a later version, see Configuring a pxGrid Cloud identity source instead.


Summary

The key components involved in configuring a pxGrid Cloud identity source are:

  • Cisco ISE: Enables pxGrid Cloud for secure data exchange and provides the data source for user information

  • Catalyst Cloud Portal: Manages registration and authentication between components, creates application instances, and provides one-time passwords for secure connection

  • Secure Firewall Management Center: Creates and activates the identity source connection to receive user data from Cisco ISE

This process establishes a secure cloud-based connection that enables the Secure Firewall Management Center to receive user and group information from Cisco ISE through the pxGrid Cloud service.

Workflow

Figure 1. Configure a pxGrid Cloud identity source
The image illustrates the configuration settings for a network device, highlighting key parameters and options available for setup. It serves as a reference for users to understand the configuration process. Enable the pxGrid Cloud service in Cisco ISE Register Cisco ISE with the Catalyst Cloud Portal Register Cisco ISE with the Catalyst Cloud Portal Create an app instance Enable the dynamic attributes connector Create an app instance Activate the app instance Activate the pxGrid Cloud identity source

These stages describe configuring a pxGrid Cloud identity source:

  1. Cisco ISE enables pxGrid Cloud functionality.
    • pxGrid Cloud enables you to subscribe to offers and to register apps (in this case, the Secure Firewall Management Center) for secure data exchange in a cloud environment
    For more information, see Enable the pxGrid Cloud service in Cisco ISE.
  2. The administrator registers Cisco ISE in the Catalyst Cloud Portal and authenticates communication between Cisco ISE and the Catalyst Cloud Portal. For more information, see Register Cisco ISE with the Catalyst Cloud Portal.
  3. The administrator registers the pxGrid Cloud with Cisco ISE and verifies the registration. For more information, see Register the pxGrid Cloud connection with Cisco ISE.
  4. The administrator creates an application instance in the Catalyst Cloud Portal and gets the one-time password (OTP).
    • The application instance enables the Secure Firewall Management Center to authenticate with Cisco ISE using the pxGrid Cloud service
    • The OTP, required for the next step, expires in 60 minutes
  5. The administrator enables the dynamic attributes connector if not already enabled.
    • The dynamic attributes connector is required to use the pxGrid Cloud identity source
    For more information, see Enable the dynamic attributes connector.
  6. The administrator creates the pxGrid Cloud identity source using the OTP from the previous step.
    • Linking the app enables the Secure Firewall Management Center to authenticate with Cisco ISE and the Catalyst Cloud Portal so it can receive user data from Cisco ISE
    For more information, see Create the identity source.
  7. The administrator activates the app instance in the Catalyst Cloud Portal. For more information, see Activate the app instance.
  8. The administrator activates the pxGrid Cloud identity source in the Secure Firewall Management Center. For more information, see Activate the pxGrid Cloud identity source

What’s next

After you have completed all the preceding tasks, you can:

  • Test the pxGrid Cloud identity source to make sure it's working properly. For more information, see Test the pxGrid Cloud identity source.

  • Create dynamic attributes filters, which define what dynamic objects are sent to the Secure Firewall Management Center. For more information, see Create dynamic attributes filters.

  • After you configure the pxGrid Cloud identity source, you can use dynamic objects, Microsoft AD user and groups, and Azure AD users and groups in access control rules.

Enable the pxGrid Cloud service in Cisco ISE

Enable the pxGrid Cloud service to establish outbound connections to Cisco pxGrid Cloud for cloud-based integration capabilities.

The pxGrid Cloud service allows Cisco ISE to connect to cloud-based services and share identity information securely. This service can be enabled on multiple nodes for high availability.

Before you begin

  • Ensure that you install and activate the Advantage license tier in your Cisco ISE deployment.

  • The pxGrid Cloud agent creates an outbound HTTPS connection to Cisco pxGrid Cloud. Therefore, you must configure Cisco ISE proxy settings if the customer network uses a proxy to reach the internet. To configure proxy settings in Cisco ISE, click the Menu icon () and choose Administration > System > Settings > Proxy.

  • The Cisco ISE Trusted Certificates Store must include the root CA certificate required to validate the server certificate presented by pxGrid Cloud. Ensure that the Trust for Authentication of Cisco Services option is enabled for this root CA certificate. To enable Trust for Authentication of Cisco Services, navigate to Administration > System > Certificates.

Follow these steps to enable the pxGrid Cloud service:

Procedure


Step 1

In the Cisco ISE GUI, click the Menu icon () and choose Administration > System > Deployment.

Step 2

Click the node on which you want to enable the pxGrid Cloud service.

Step 3

In the General Settings tab, enable the pxGrid service.

Step 4

Check the Enable pxGrid Cloud check box.

The pxGrid Cloud service can be enabled on two nodes to enable high availability.

Note


You can enable the pxGrid Cloud option only when the pxGrid service is enabled on that node.


Register Cisco ISE with the Catalyst Cloud Portal

Register Cisco ISE as an app in the Catalyst Cloud Portal to authenticate communication between the systems.

This task discusses how to register Cisco ISE as an app in the Catalyst Cloud Portal and to authenticate communication between the Catalyst Cloud Portal and Cisco ISE.

Also refer to Register Cisco ISE in the pxGrid Cloud Solution Guide.

Procedure


Step 1

Log in to the Cisco Cloud Catalyst Portal.

If prompted, choose an account to use.

Step 2

Click Register.

Step 3

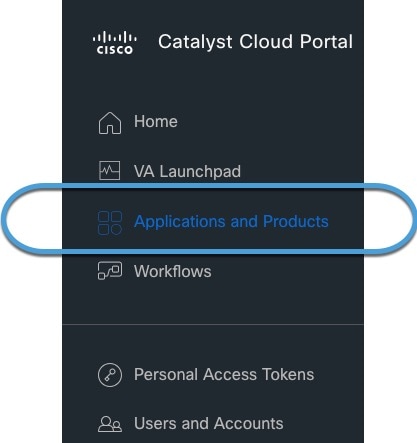
In the Catalyst Cloud Portal, click The Cisco DNA Portal interface displays the Applications and Products section, highlighting options for registration and management of services. > Applications and Products.

In the Cisco DNA Portal, go to Applications and Products

Step 4

At the top of the page, click Products.

Step 5

From the Region list, click us-west-2, eu-central-1, or ap-southeast-1.

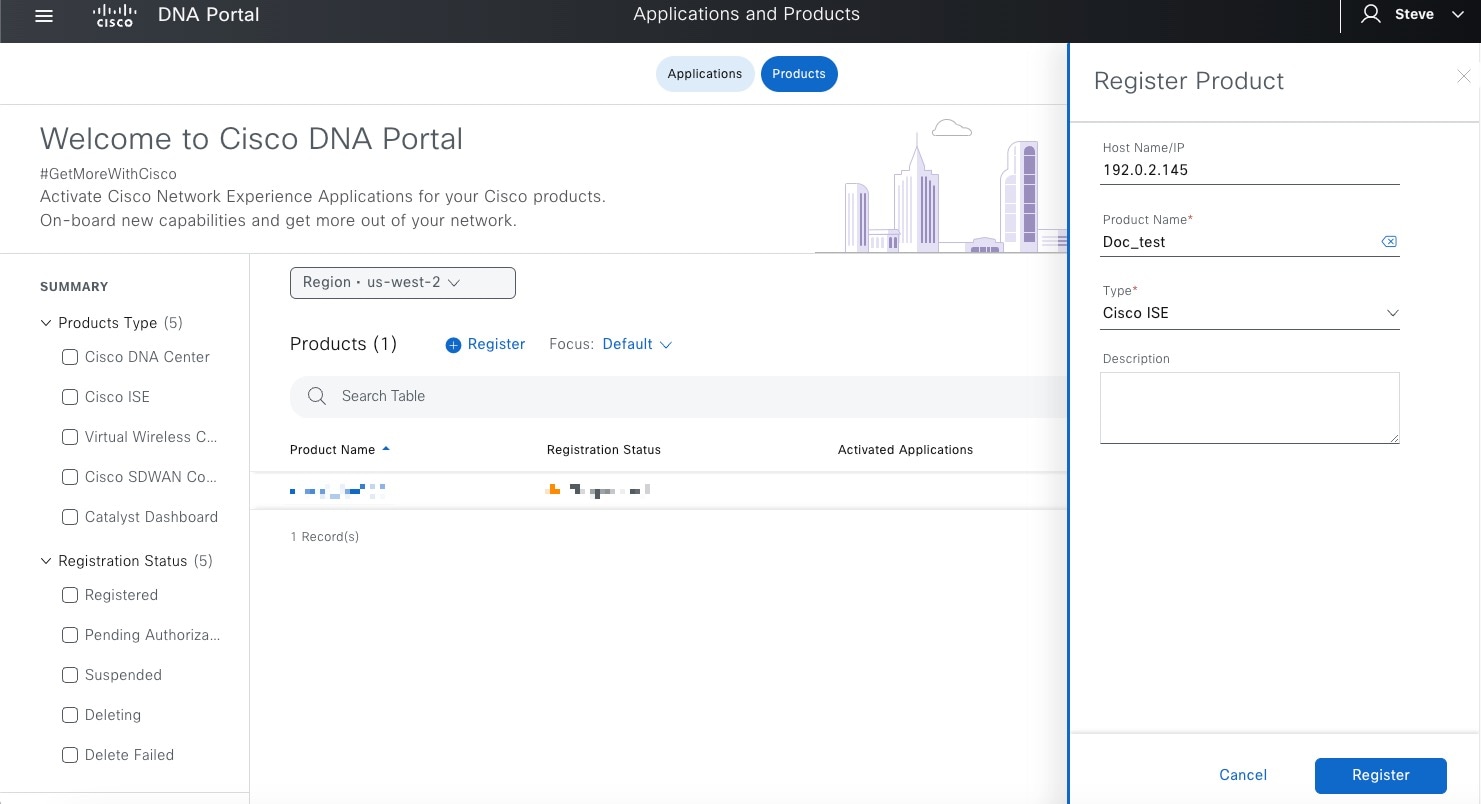
In the Cisco DNA Portal, click us-west-2

Step 6

Click Register.

The registration page appears.

Register the Cisco ISE product by entering its fully qualified domain name or IP address in the provided field

Step 7

Enter the required information.

  • Host Name/IP: (Optional.) Enter the ISE server's fully qualified domain name or IP address. If you enter an IP address, omit the scheme (for example, https:// ) and the port, if any.

  • Product Name: Enter a unique name to identify this server.

  • Type: From the list, click Cisco ISE.

  • Description: Enter an optional description.

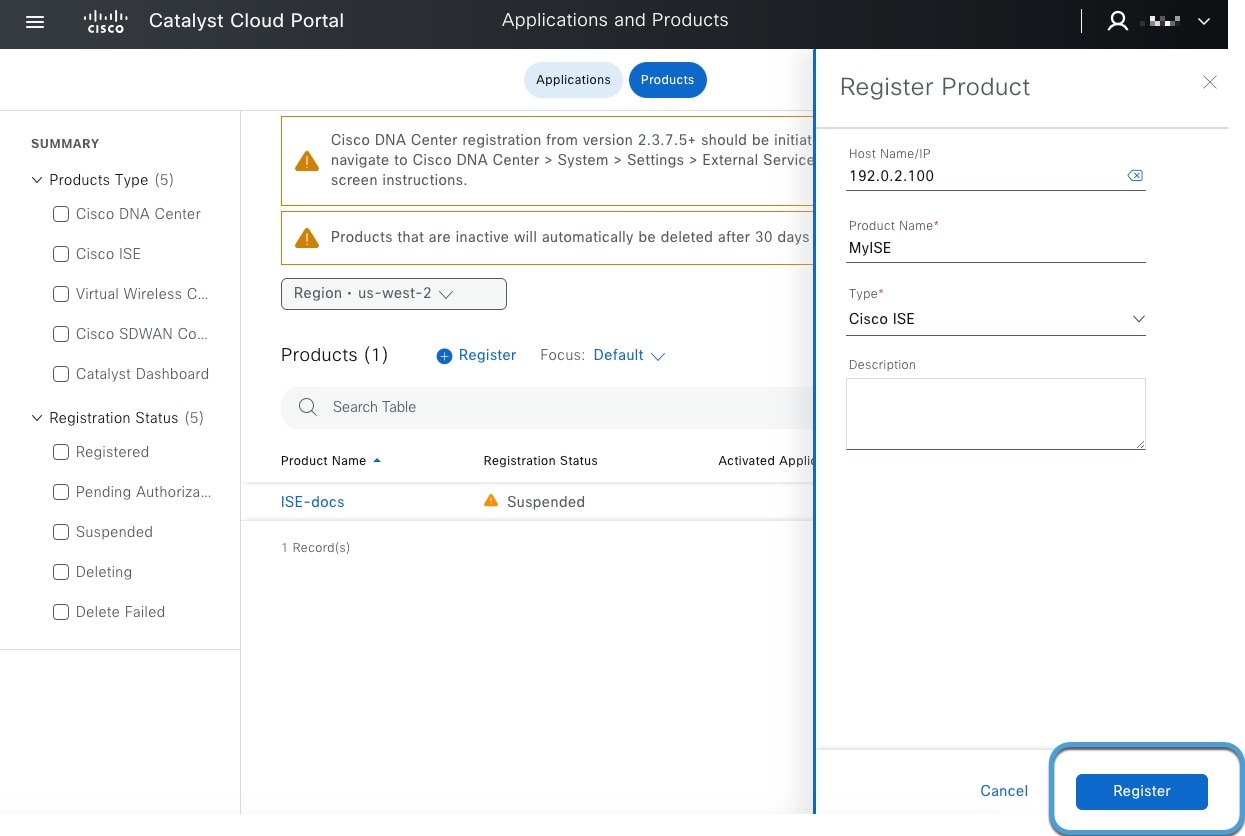
Step 8

Click Register.

Step 9

Generate a one-time password (OTP).

  • If you've previously registered ISE apps and see yours listed, click Generate OTP in the Actions column; you'll need it in the next part of this procedure.

  • If you're registering your app now, the OTP is displayed. Click The image shows the process of generating a one-time password (OTP) for an application registration, highlighting the Generate OTP button in the Actions column. This step is essential for completing the registration procedure. to copy it to the clipboard; you'll need it in the next part of this procedure.

What to do next

See Register the pxGrid Cloud connection with Cisco ISE.

Register the pxGrid Cloud connection with Cisco ISE

This task registers the pxGrid Cloud connection with Cisco ISE to enable pxGrid Cloud to send user data to the pxGrid Cloud identity source in Security Cloud Control.

Registering this connection enables communication between your identity services and cloud security services, facilitating the exchange of user authentication and authorization data.

Before you begin

Complete the tasks discussed in Register Cisco ISE with the Catalyst Cloud Portal.

Follow these steps to register the pxGrid Cloud connection with Cisco ISE:

Procedure


Step 1

Log in to Cisco ISE as an administrator.

Step 2

Click The image illustrates the steps required to register a connection, highlighting key actions and elements involved in the process. > Administration > pxGrid Services > Client Management > pxGrid Cloud Connection.

Step 3

Make sure all services are enabled with read/write privileges.

The following figure shows an example.

Enable all pxGrid Cloud Policy services in Cisco ISE

Step 4

In the left navigation bar, click pxGrid Cloud Connection.

Step 5

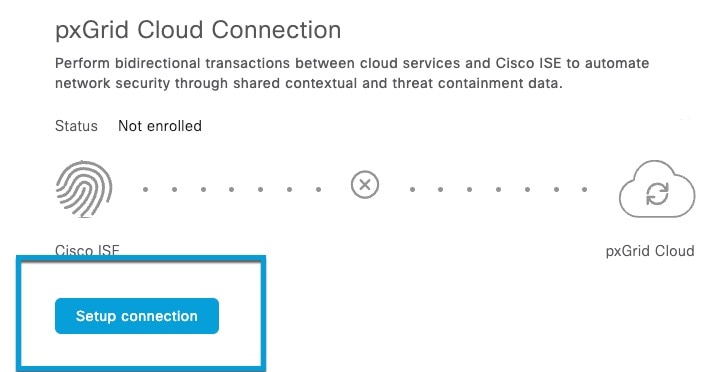
Click Setup Connection.

Click Setup Connection and enter the one-time password (OTP) you obtained earlier

Step 6

Paste the OTP value in the provided field.

Step 7

Click Connect.

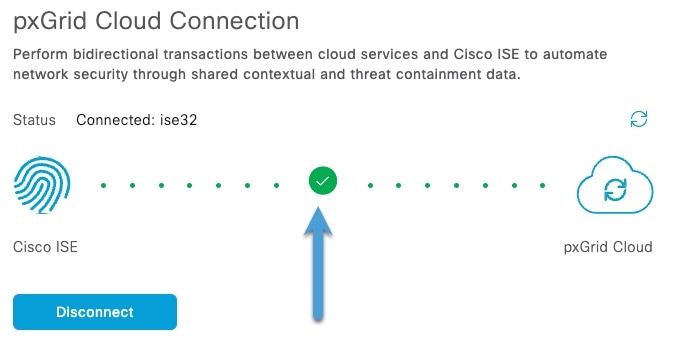
A green check mark confirms that connection was successful.

A green check mark indicates the connection was successful

Step 8

Confirm the setup has been successful:

  1. Log in to the Catalyst Cloud Portal.

  2. Click the Products tab.

  3. Click Refresh.

    In the Cisco DNA Portal, refresh the display to make sure the registration was successful

  4. Verify that Registered is displayed as the status of your product.


What to do next

Continue with Create the identity source.

Create a pxGrid Cloud identity source

The tasks discuss how to create a pxGrid Cloud identity source using Cisco ISE, the Catalyst Cloud Portal, and Security Cloud Control. You must complete all tasks in the order shown; in some cases, there is a time limit due to the expiration of a required One-Time Password (OTP).

Create an app instance

Create an application instance in the Catalyst Cloud Portal to establish a pxGrid Cloud identity source.

This task is one of several tasks you must perform to create a pxGrid Cloud identity source to send user session data to the Secure Firewall Management Center.

There is a one-hour time limit on the one-time password (OTP) required to complete this procedure successfully. You do not need to log in to Cisco ISE.

Before you begin

Complete all of these tasks first:

Procedure


Step 1

Log in to the Cisco Catalyst Cloud Portal.

Step 2

In the Catalyst Cloud Portal, click The Cisco DNA Portal interface displays the Applications and Products section, highlighting the steps to create an app instance. > Applications and Products.

In the Cisco DNA Portal, go to Applications and Products

Step 3

At the top of the page, click Applications.

Step 4

From the Regions list, click us-west-2, eu-central-1, or ap-southeast-1.

Step 5

Click Manage (or Activate) next to Firepower Management Center.

Step 6

Click Add.

Step 7

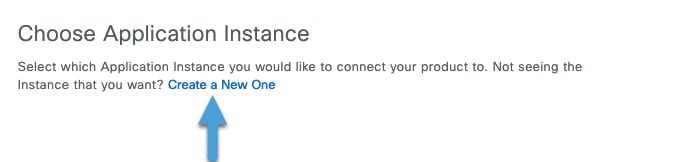
Click Create a New One.

The following figure shows an example.

Create a new application instance

Step 8

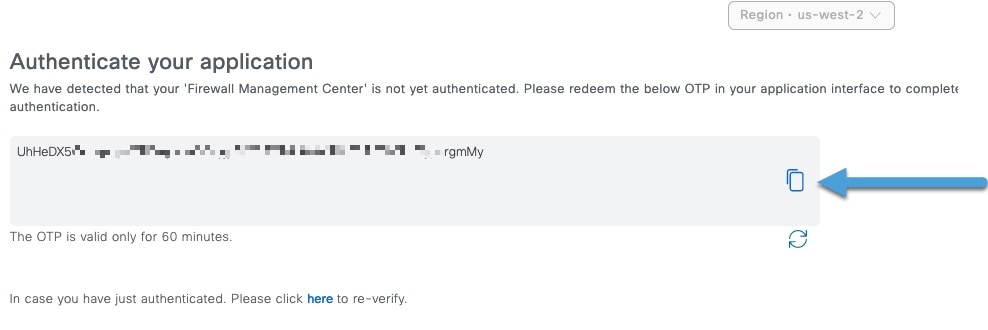
Click the copy button next to the displayed OTP.

Get the one-time password (OTP) for the application instance

Copy the OTP to a text file; it expires in 60 minutes.

Step 9

Continue with Create the identity source.


Create the identity source

This task creates a pxGrid Cloud identity source to send user session data to the Secure Firewall Management Center.

This task is one of several required to create a pxGrid Cloud identity source to send user session data to the Secure Firewall Management Center.

Before you begin

Complete the task discussed in Create an app instance.

Procedure


Step 1

Log in to the Secure Firewall Management Center

Step 2

Click Integrations > Identity > Identity Sources

Step 3

Click Identity Services Engine (pxGrid Cloud).

Step 4

Click Create pxGrid Application Instance.

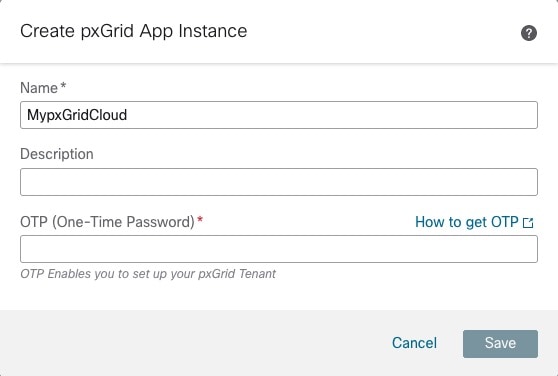
This figure shows an example.

Enter the required information, including the OTP, to create a pxGrid App Instance

Step 5

Enter the required information.

Value

Description

Name

Enter a name to uniquely identify this connector.

Description

Optional description.

OTP (One-Time Password)

Enter the OTP.

Step 6

Click Create.

Step 7

At the top of the page, click Save.


What to do next

Continue with Activate the app instance.

Activate the app instance

Activate an app instance to create a pxGrid Cloud identity source that sends user session data to the Secure Firewall Management Center.

There is a one-hour time limit on the one-time password (OTP) required to complete this procedure successfully. You do not need to log in to Cisco ISE.

Before you begin

Complete the task discussed in Create the identity source.

Follow these steps to activate the app instance:

Procedure


Step 1

Log in to the Cisco Catalyst Cloud Portal.

Step 2

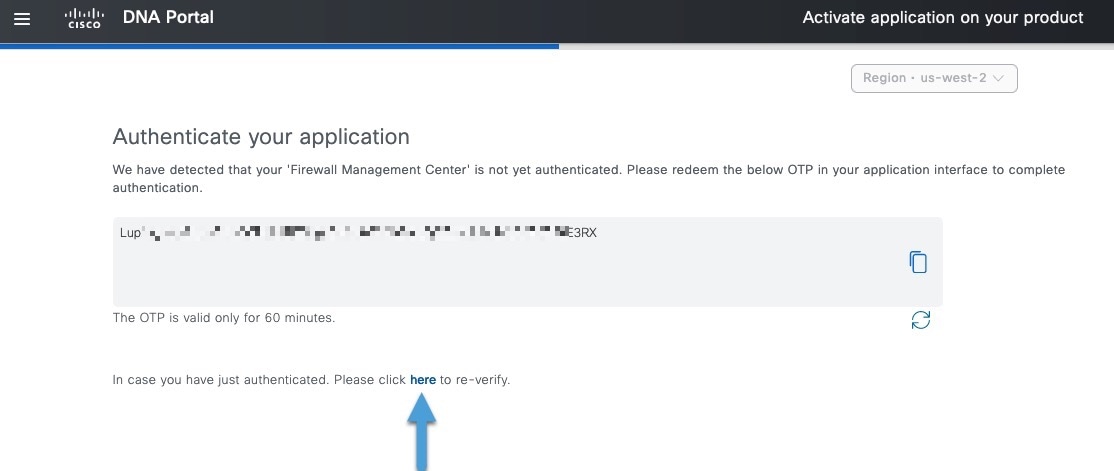
Reverify the app by clicking the word here as the following figure shows.

The image illustrates the steps required to activate the app instance, highlighting key actions and options within the application interface.

Step 3

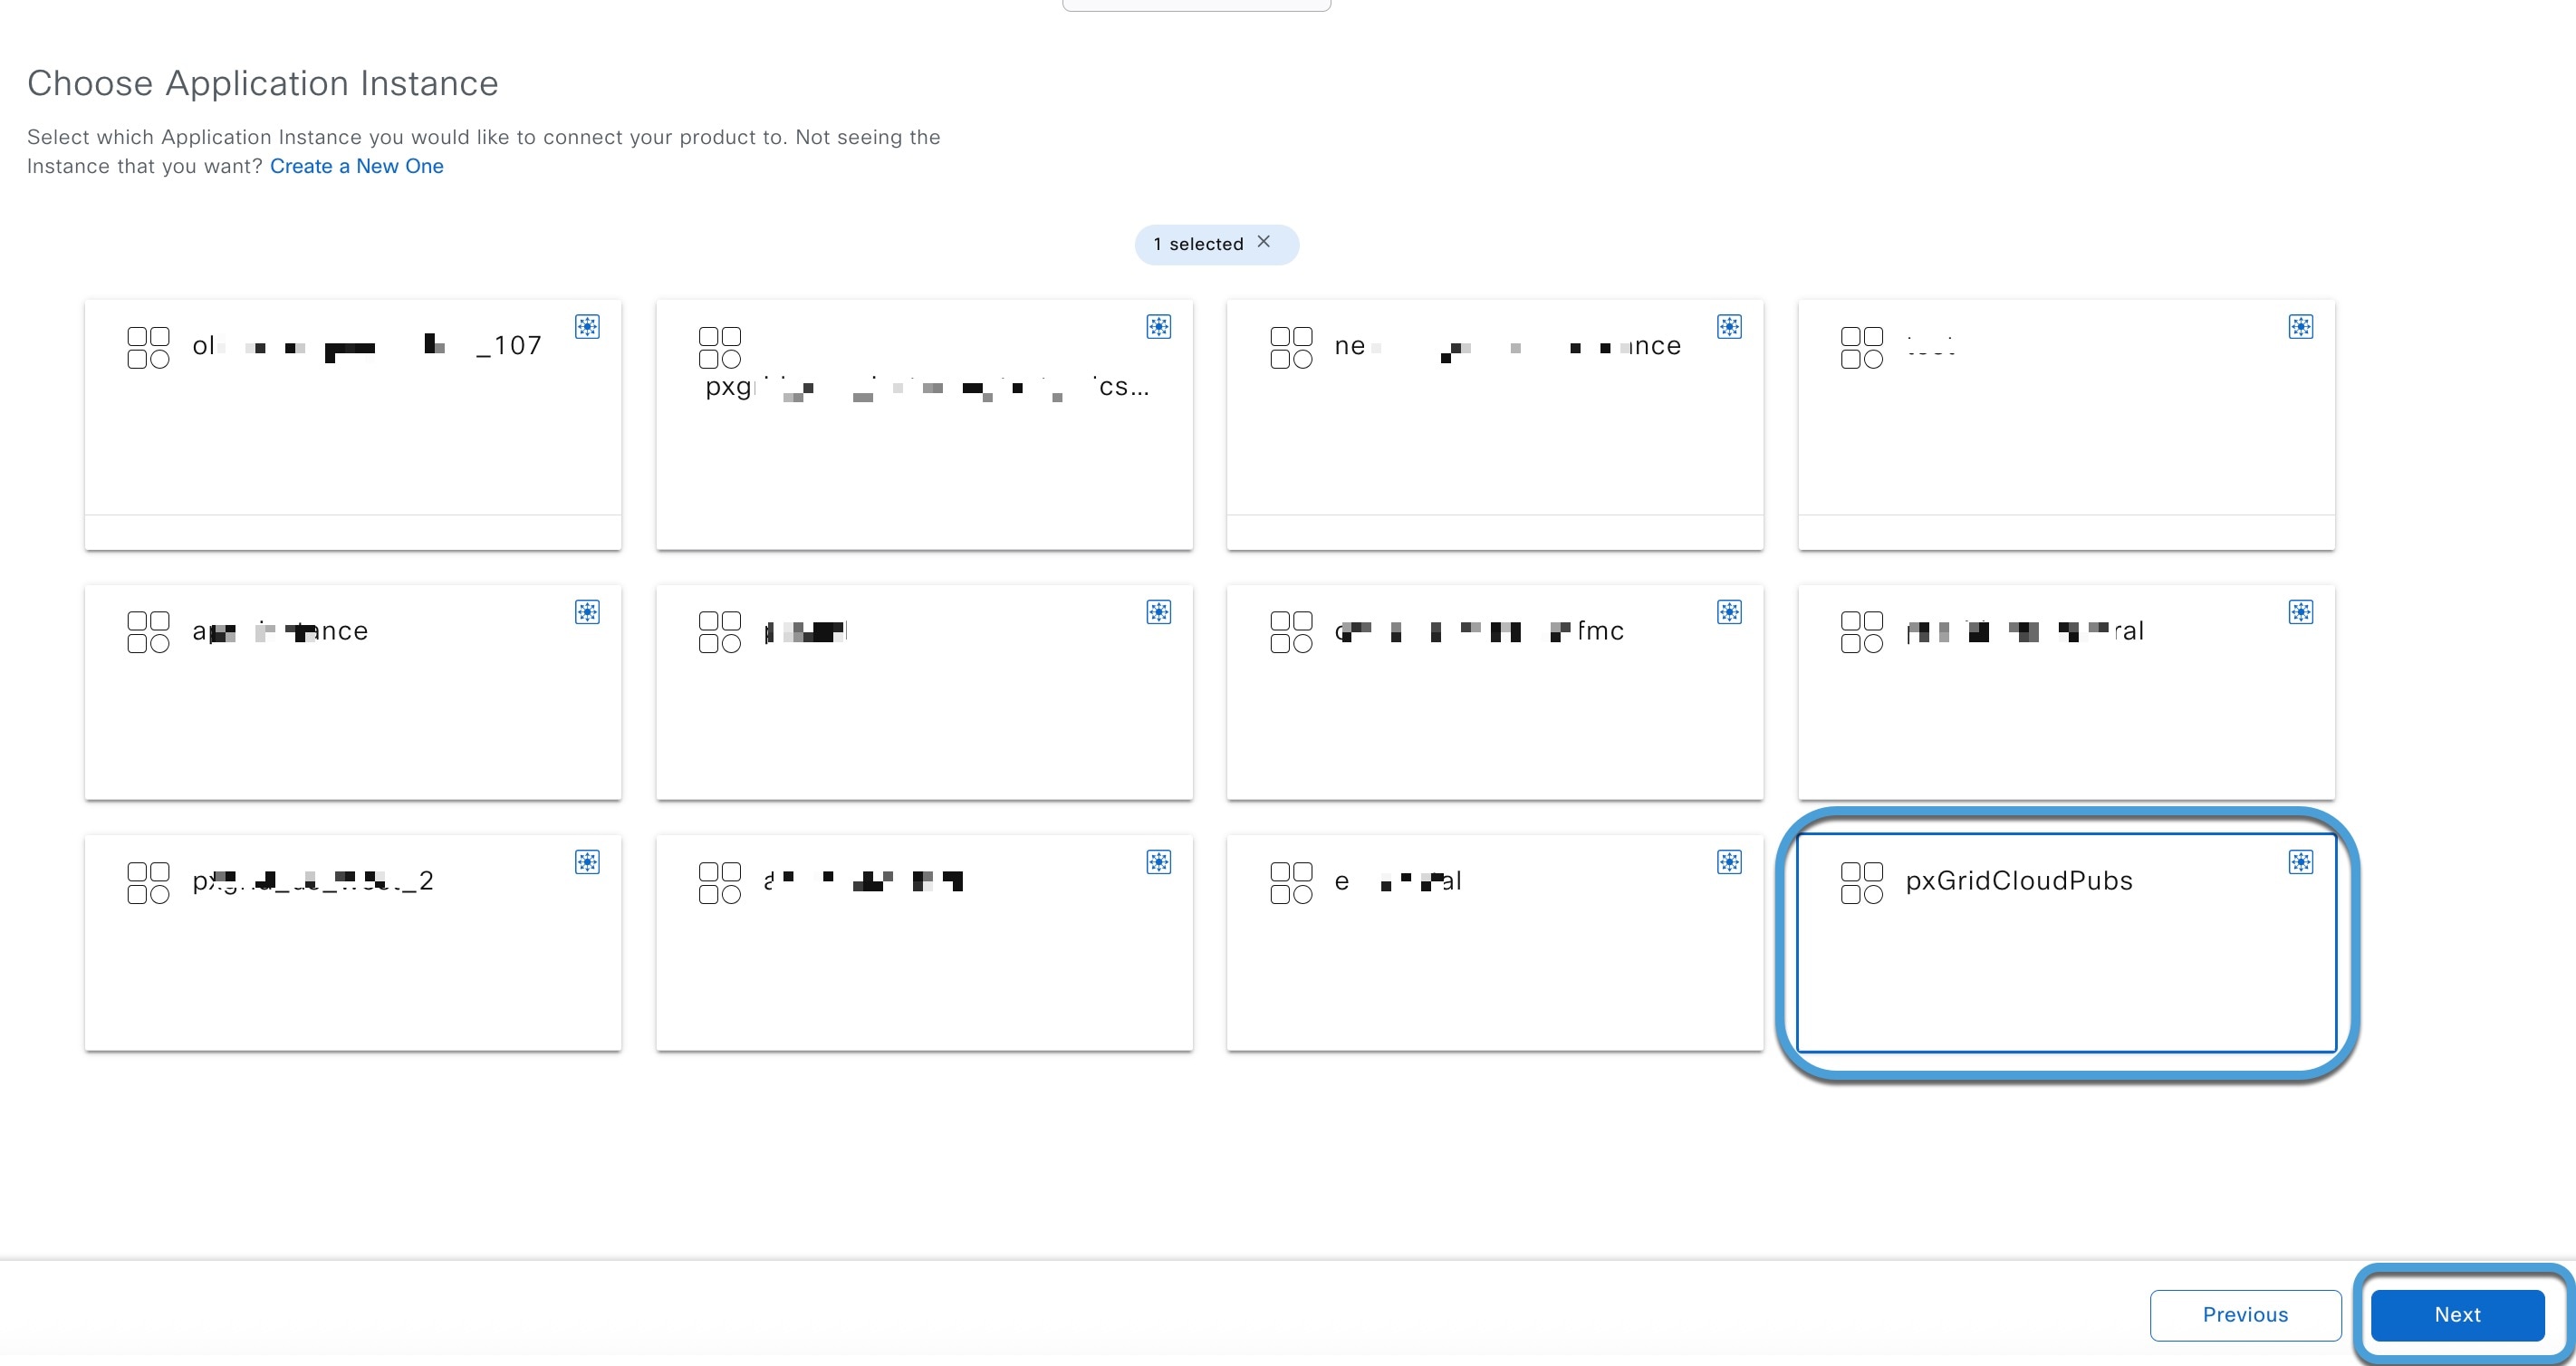
Click the name of the application instance you just created in Secure Firewall Management Center.

Step 4

Click Next.

Example:

The image illustrates the steps to activate the app instance, highlighting key actions and options available in the activation process.

Step 5

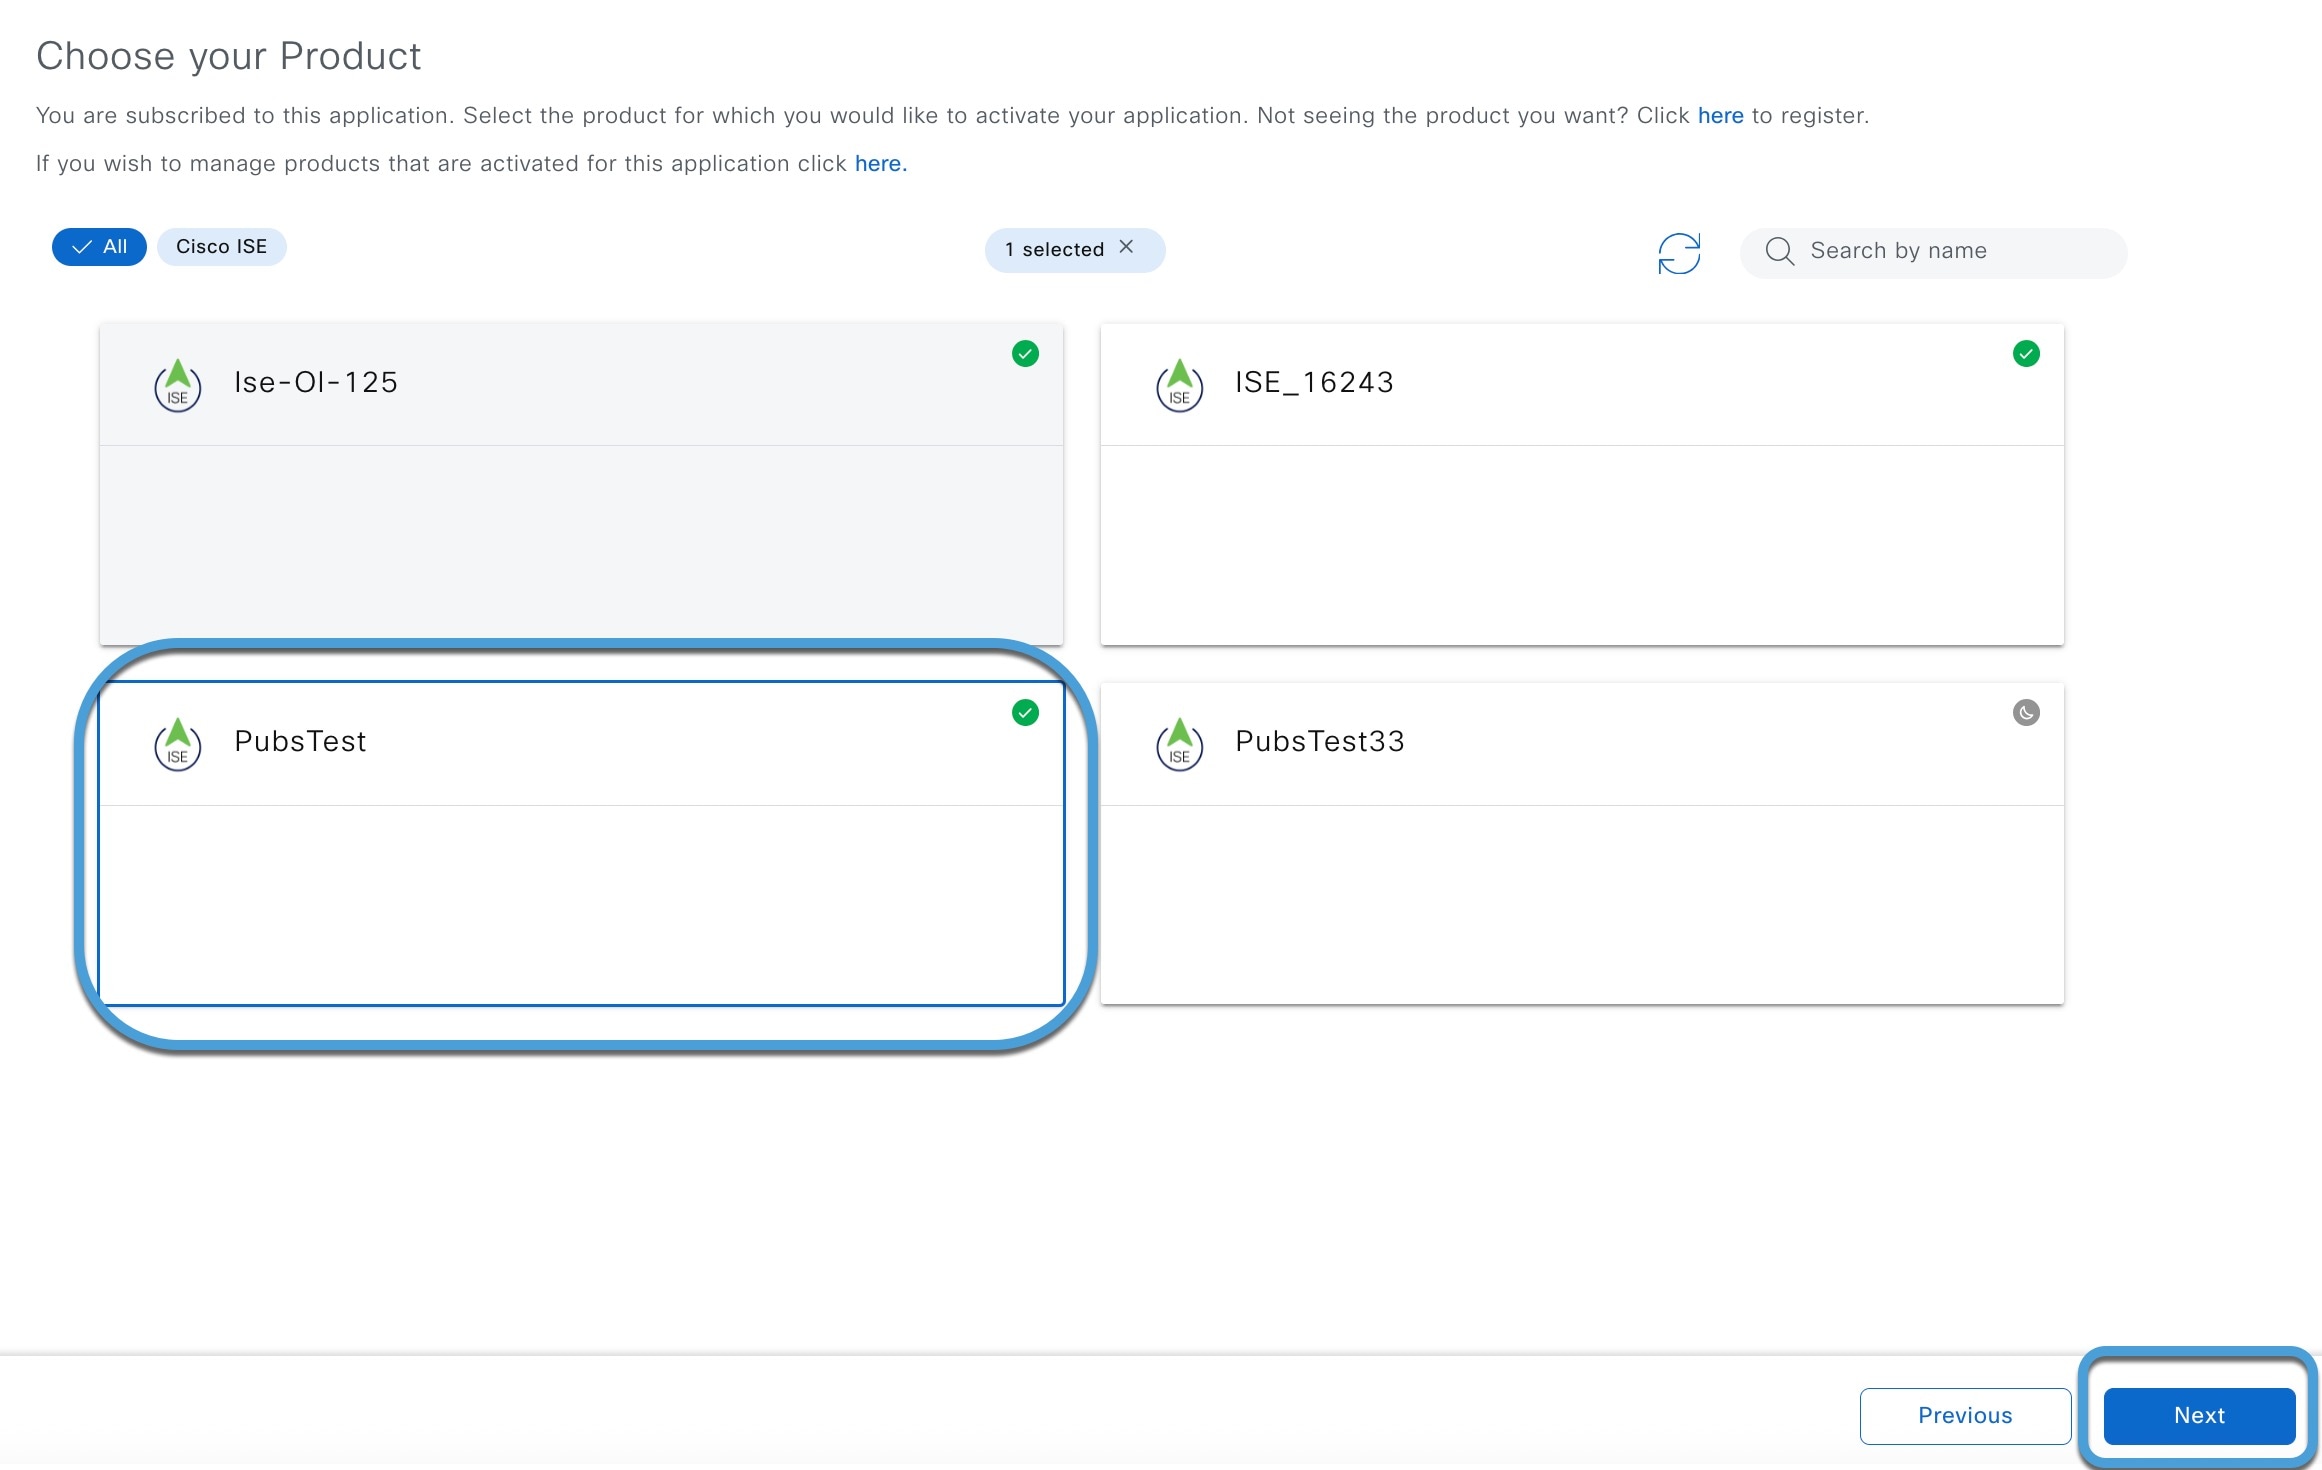
On the Choose Product page, click the name of the Cisco ISE product and click Next.

Example:

The image illustrates the steps to activate the app instance, highlighting key actions and options available in the activation process.

Step 6

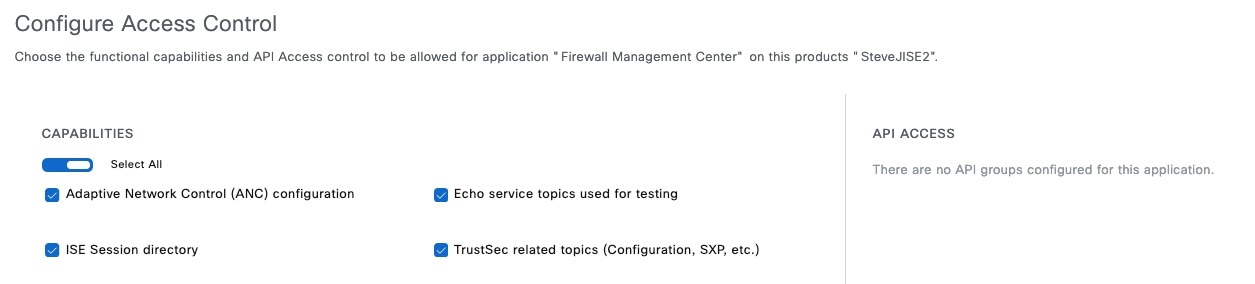
Select the check box next to each scope.

The following figure shows an example.

The app instance activation process is illustrated, showing the necessary steps and components involved in successfully activating the instance.

Step 7

Click Next.

Step 8

Review the displayed information for accuracy. Make sure all scopes are selected.

The following figure shows an example.

The app instance is successfully activated and ready to send user session data to the management center.

Step 9

Click Activate.

It can take several minutes for the app instance to be activated.

Continue with Activate the pxGrid Cloud identity source.


Activate the pxGrid Cloud identity source

This task activates the pxGrid Cloud identity source to enable identity services integration in your security infrastructure.

This task explains how to activate the pxGrid Cloud identity source in the Secure Firewall Management Center.

Before you begin

Complete the tasks discussed in Activate the app instance.


Note


Only one pxGrid Cloud identity source can be active at a time.


Procedure


Step 1

Log in to the Secure Firewall Management Center.

Click Integrations > Identity > Identity Sources.

Step 2

Click Identity Services Engine (pxGrid Cloud).

Step 3

Click Save at the top of the page.

Step 4

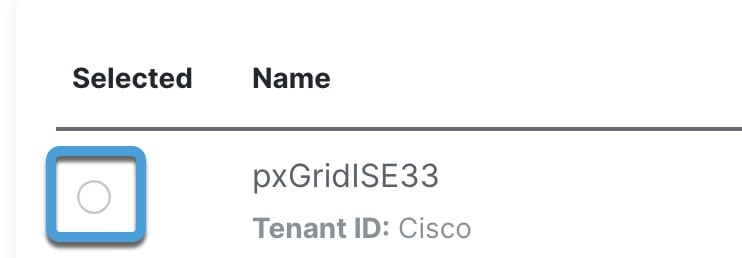
If a green check mark is not displayed next to the name of the identity source, select it.

Example:

The image illustrates the activation process for a specific device, highlighting key steps and components involved in the procedure.

Step 5

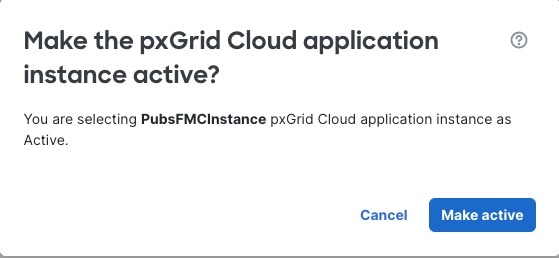
Click Make Active.

Example:

The image illustrates the process of selecting a check box to enable the receipt of ISE user session information from the server.

Step 6

(Optional.) Select the following options if desired:

  • Session Directory Topic: Select the check box to receive ISE user session information from the Cisco ISE server.

  • SXP Topic: Select the check box to receive updates to SGT-to-IP mappings when available from the ISE server. This option is required to use destination SGT tagging in access control rules.

  • ISE Network Filter: Optional filter you can set to restrict the data that Cisco ISE reports. If you provide a network filter, Cisco ISE reports data from the networks in that filter.

    You have the following options:

    • Leave the field blank to specify any.

    • Enter a single IPv4 address block using CIDR notation.

    • Enter a list of IPv4 address blocks using CIDR notation, separated by commas.

Step 7

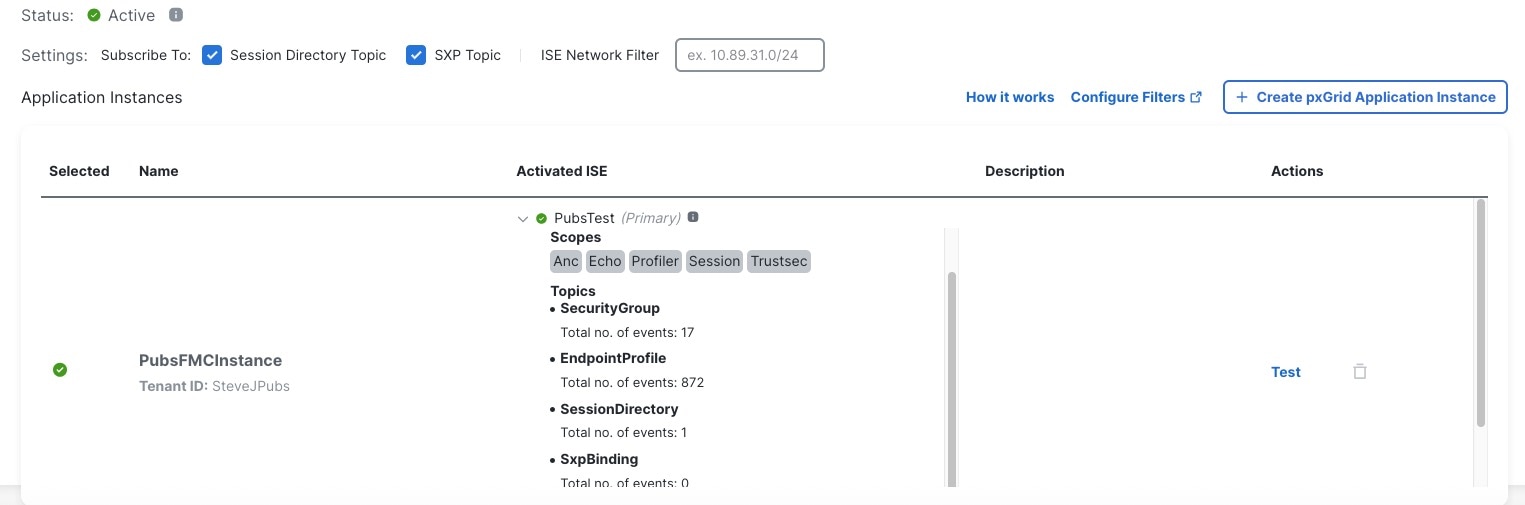
Under Activated ISE, expand the identity source.

Example normal result:

The image illustrates the process of entering IPv4 address blocks in CIDR notation, highlighting both a normal and an error result for user input.

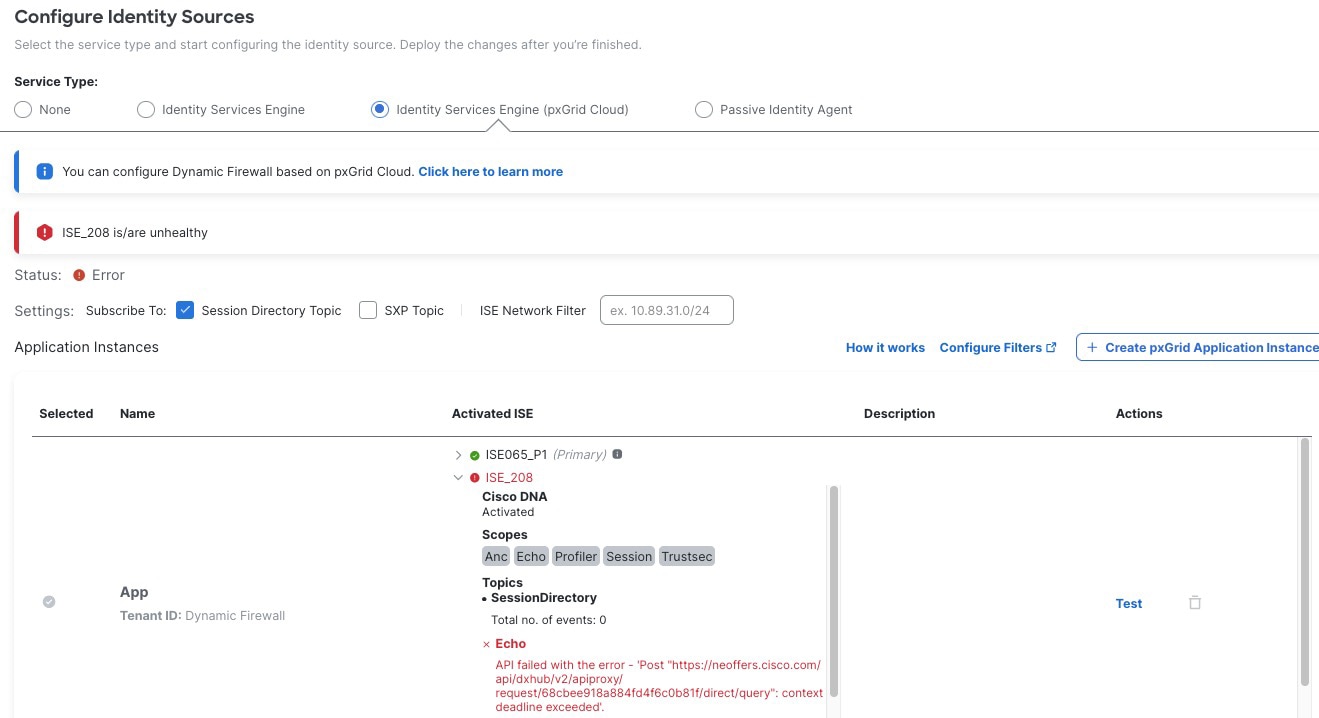
Example error result:

The image illustrates the process of entering a list of IPv4 address blocks in CIDR notation, highlighting both a normal result and an error result for user guidance.

In the event of an error, see Test the pxGrid Cloud identity source.

Step 8

Verify the status is Active and that all scopes and topics are displayed.

Wait a few minutes for data to be downloaded.


What to do next

See Test the pxGrid Cloud identity source.

Test the pxGrid Cloud identity source

This task enables you to perform diagnostics using the Secure Firewall Management Center to determine if the identity source is working.

Errors might include communication with Cisco ISE, or with the Cisco ISE configuration with Catalyst Cloud Portal.

Procedure


Step 1

Step 2

Log in to the Secure Firewall Management Center.

Step 3

Step 4

Click Integrations > Identity > Identity Sources.

Step 5

Click Identity Services Engine (pxGrid Cloud).

Step 6

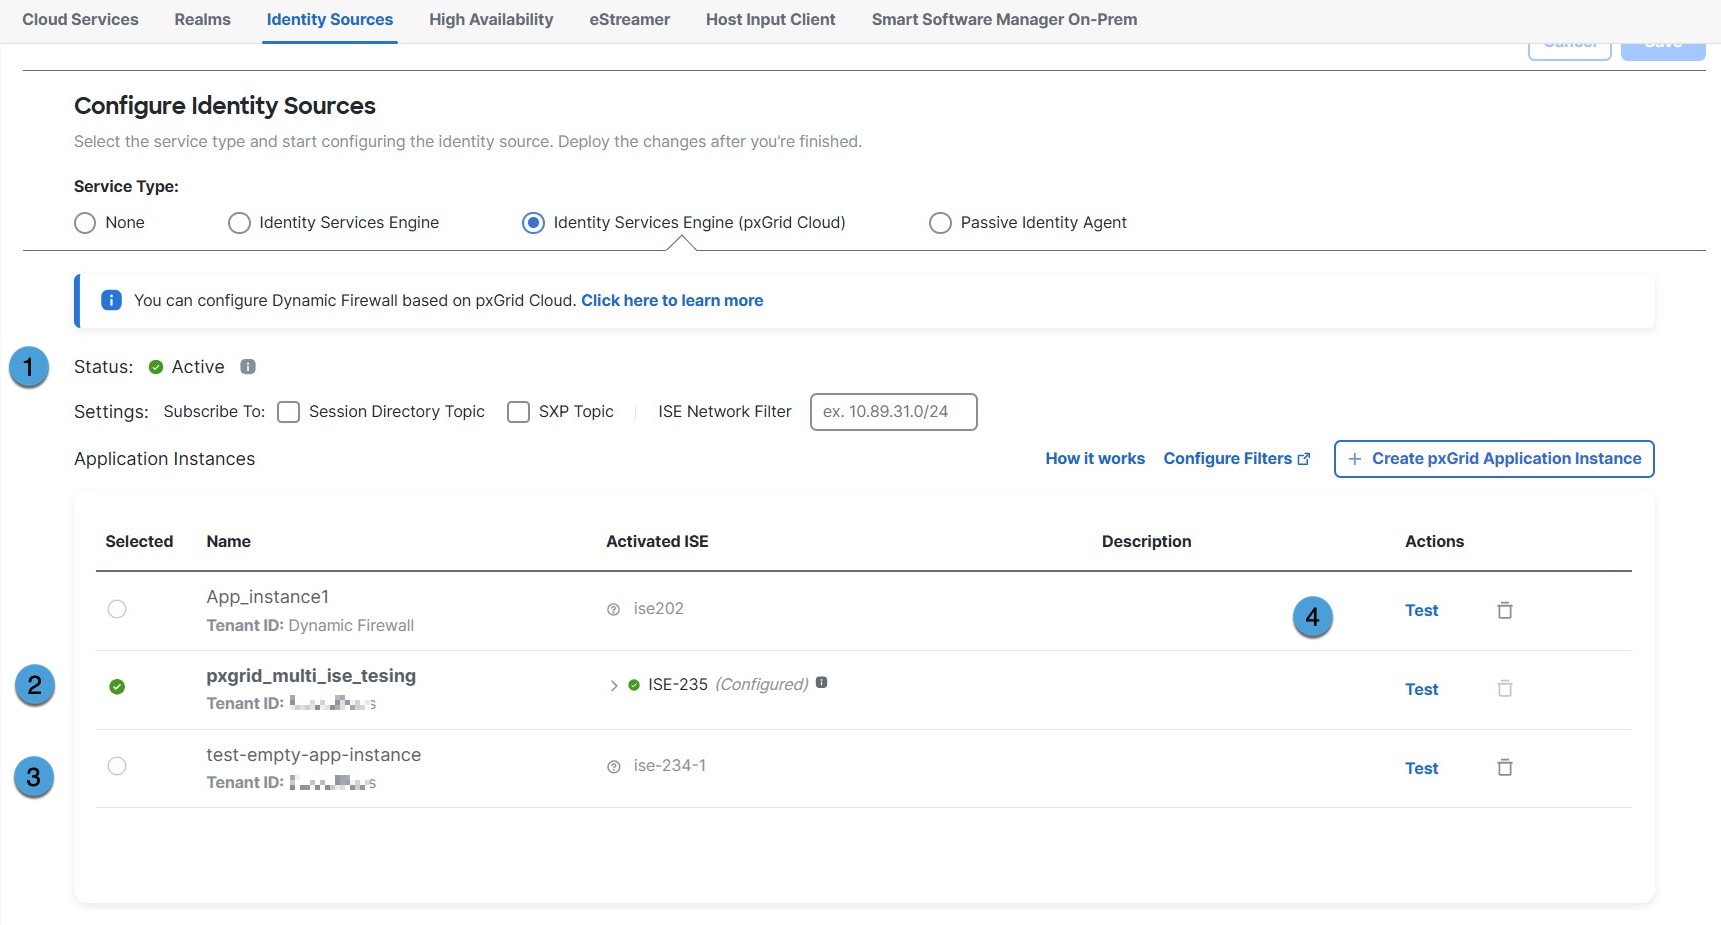
Review the configuration status information.

The following figure shows an example configuration.

The figure illustrates an example configuration with numbered areas that correspond to details provided in the accompanying table.

The following table has more information about the numbered areas in the figure.

Number

Meaning

1

Overall status

Any errors in the overall status of the Cisco ISE app instances are displayed. In that case, scroll to that instance and either expand the error message or click Test for more information.

2

Active

A green check mark indicates the app is active.

3

Inactive

A dimmed app instance is inactive. You can activate it by selecting the check box next to its name and then clicking Make active.

4

Test button

Click Test to perform diagnostic tests that show more detailed status of the app instance.

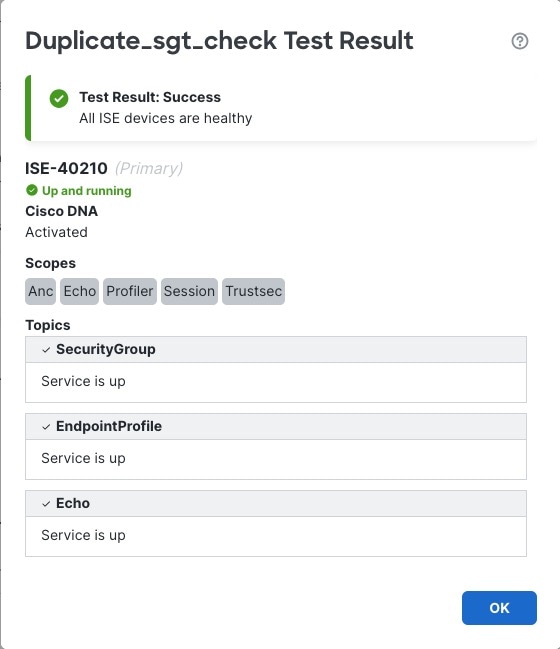
The following figure shows a sample success message.

The figure displays a sample success message from a diagnostic test performed on an app instance, indicating that the instance is functioning correctly.

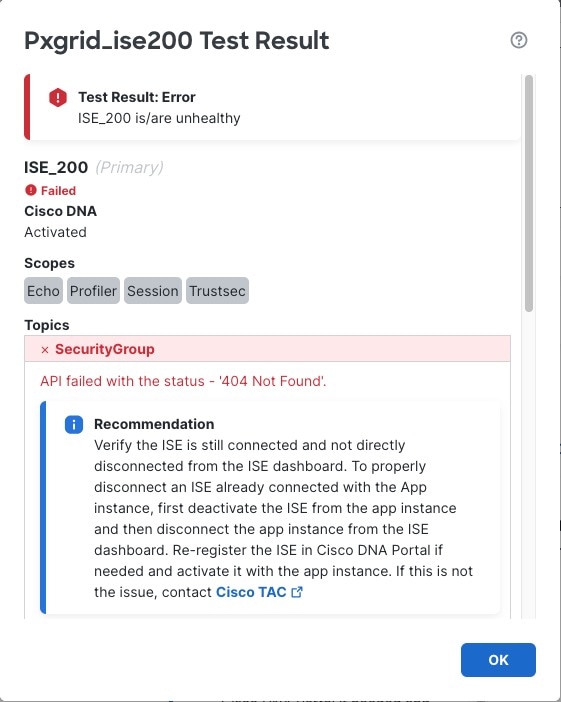
The following figure shows an example error result.

The figure displays a sample success message from the diagnostic tests performed on the app instance, indicating that the tests have completed successfully.

Step 7

Click Test to perform diagnostic tests.

If errors occur, use the following error code reference to help diagnose and solve issues with Cisco ISE, pxGrid Cloud, and the Catalyst Cloud Portal. If these suggestions do not work, or if you have a different issue, contact Cisco TAC.

Table 1. Error code troubleshooting

Error Code

Troubleshooting Steps

403 – Forbidden

Verify the Cisco ISE product is not in a Pending or Suspended state in the Catalyst Cloud Portal. If suspended, verify that Cisco ISE is registered as discussed in Enable pxGrid Cloud service in Cisco ISE and register your device. Additionally, verify pxGrid Cloud services are publicly available.

404 – Not Found

Verify the Cisco ISE server is not directly disconnected from the Cisco ISE dashboard. To properly disconnect Cisco ISE already connected with the app instance, first deactivate Cisco ISE from the app instance and then disconnect the app instance from the Cisco ISE dashboard.

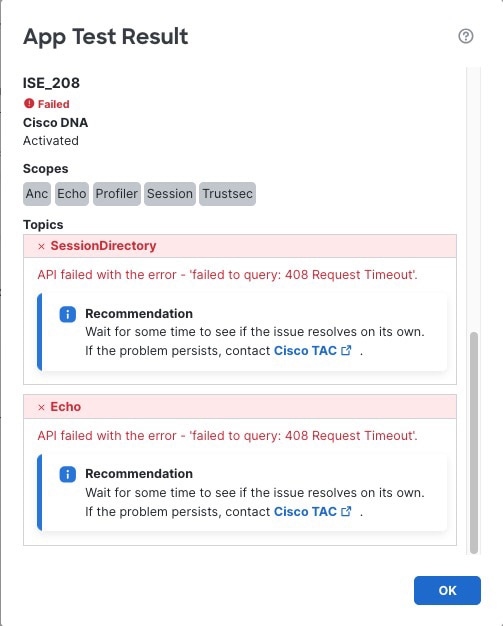
408 – Request Timeout

Check whether there are any general connectivity issues with Cisco ISE and verify pxGrid Cloud connectivity status is Connected in the ISE dashboard under The image illustrates a 408 Request Timeout error message, indicating that the server did not receive a complete request from the client within the server's allotted timeout period. > Administration > pxGrid Services > Client Management > pxGrid Cloud Connection. Verify the Cisco ISE server is not directly disconnected from the Cisco ISE dashboard.

413 – Content Too Large

Review the pxGrid Cloud API limitations on GitHub. If needed, consider upgrading your Cisco ISE version to fully utilize pxGrid Cloud support.

500 – Internal Server Error

Check that the Cisco ISE server is operational and that pxGrid Cloud services are active (verify MNT, SXP, pxGrid nodes, and so on). For more information, see Monitoring and debugging in the Cisco pxGrid chapter in the Cisco Identity Services Engine Administrator Guide.

Step 8

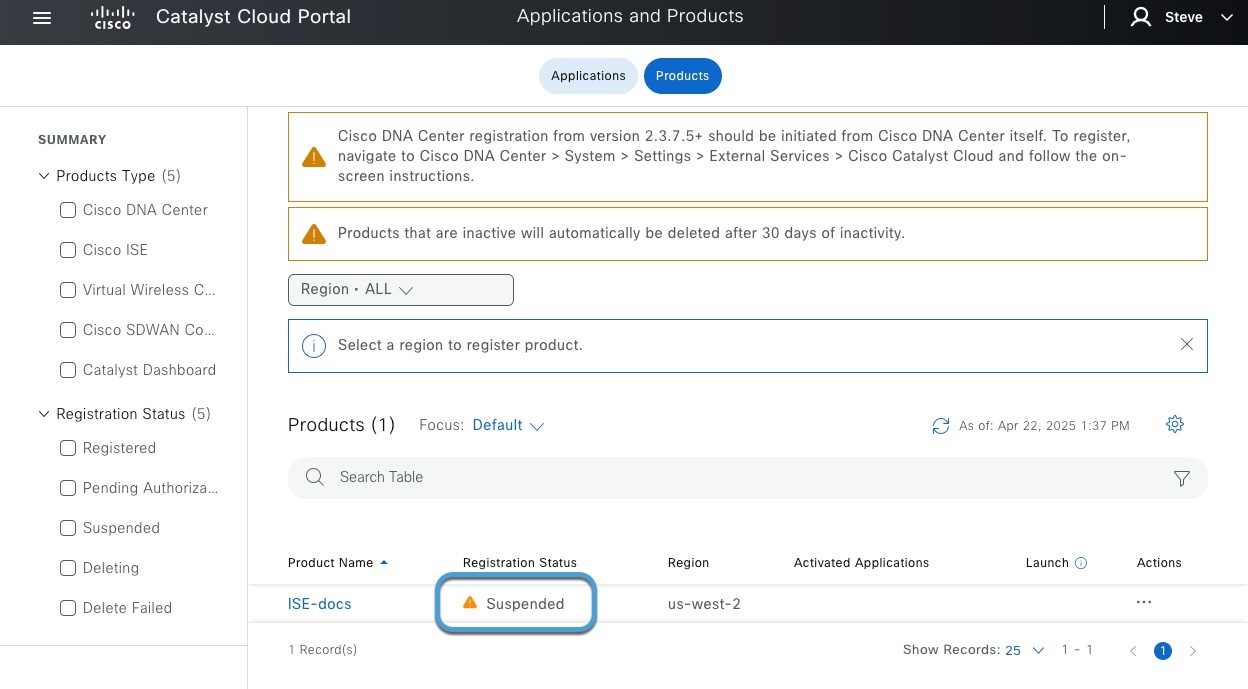
If the product is in a Pending or Suspended state, verify that it is active.

  1. Log in to the Catalyst Cloud Portal.

  2. In the Catalyst Cloud Portal, go to The figure illustrates an example of a suspended product within the Cisco DNA Portal, highlighting its status and relevant details. > Applications and Products.

    Example:

    In the Cisco DNA Portal, go to Applications and Products

  3. Click the Products tab.

    Example:

    The following figure shows an example of a suspended product.

    The figure illustrates a suspended product within the Cisco DNA Portal, highlighting its status and relevant details for user reference.

  4. To correct the issue, in the Actions column, click The figure illustrates a suspended product within the Cisco DNA Portal, highlighting its status and relevant details for user reference. and click Generate OTP.

  5. Use the OTP as discussed in Create the identity source.

Step 9

If you encounter a cluster member not reachable error, find what node is not reachable.

If a member of the Cisco ISE cluster is not reachable, a page like this is displayed:

The error page indicates that a member of the cluster is not reachable, providing options for troubleshooting and further actions.

To find what node is not reachable, log in to Cisco ISE primary administration node as an administrator and click click the Menu icon () and choose Administration > System > Deployment, then see Node Status in a Cisco ISE Deployment.


Create dynamic attributes filters

Create dynamic attributes filters to expose them as dynamic objects in Secure Firewall Management Center for use in access control policies.

Dynamic attributes filters that you define using the Dynamic Attributes Connector are exposed in the Secure Firewall Management Center as dynamic objects that can be used in access control policies. For example, restrict access to an AWS server for the Finance Department to only members of the Finance group defined in Microsoft Active Directory.


Note


You cannot create dynamic attributes filters for Generic Text, Office 365, Azure Service Tags, Webex, or Zoom. These types of cloud objects provide their own IP addresses.


For more information about access control or DNS rules, see Create access control rules or DNS rules using dynamic attributes filters.

Before you begin

Create a connector

Procedure


Step 1

Log in to the Secure Firewall Management Center.

Click Integrations > Dynamic Attributes Connector > Dynamic Attributes Filters.

Step 2

Do any of the following:

  • Add a new filter: click Add (add icon).

  • Edit or delete a filter: Click More (more icon), then click Edit or Delete at the end of the row.

Step 3

Enter the following information.

Item

Description

Name

Unique name to identify the dynamic filter (as a dynamic object) in a policy and in the Secure Firewall Management Center Object Manager (External Attributes > Dynamic Object).

Connector

From the list, click the name of a connector to use.

Query

Click Add add icon.

Step 4

To add or edit a query, enter the following information.

Item Description

Key

Click a key from the list. Keys are fetched from the connector.

Operation

Click one of the following:
  • Equals to exactly match the key to the value.

  • Contains to match the key to the value if any part of the value matches.

Values

Click either Any or All and click one or more values from the list. Click Add another value to add values to your query.

Step 5

Click Show Preview to display a list of networks or IP addresses returned by your query.

Step 6

When you're finished, click Save.

Step 7

(Optional.) Verify the dynamic object in the Secure Firewall Management Center.

  1. Log in to the Secure Firewall Management Center as a user with the Network Admin role at minimum.

  2. Click Objects > External Attributes > Dynamic Object.

    The dynamic attribute query you created should be displayed as a dynamic object.


Create access control rules or DNS rules using dynamic attributes filters

Create access control rules using dynamic objects that are based on dynamic attributes filters you have previously configured.

This topic discusses how to create access control rules using dynamic objects (these dynamic objects are named after the dynamic attributes filters you created previously).

To add dynamic attributes filters to DNS policies, see Create basic DNS policies.

To add dynamic attributes filters to DNS policies, see Creating Basic DNS Policies.

Before you begin

Create dynamic attributes filters as discussed in Create dynamic attributes filters.


Note


You cannot create dynamic attributes filters for Generic Text, Office 365, Azure Service Tags, Webex, or Zoom. These types of cloud objects provide their own IP addresses.


Follow these steps to create access control rules or DNS rules using dynamic attributes filters:

Procedure


Step 1

Log in to the Secure Firewall Management Center

Click Policies > Security policies > Access Control.

Step 2

Click Edit (edit icon) next to an access control policy.

Step 3

Click Add Rule.

Step 4

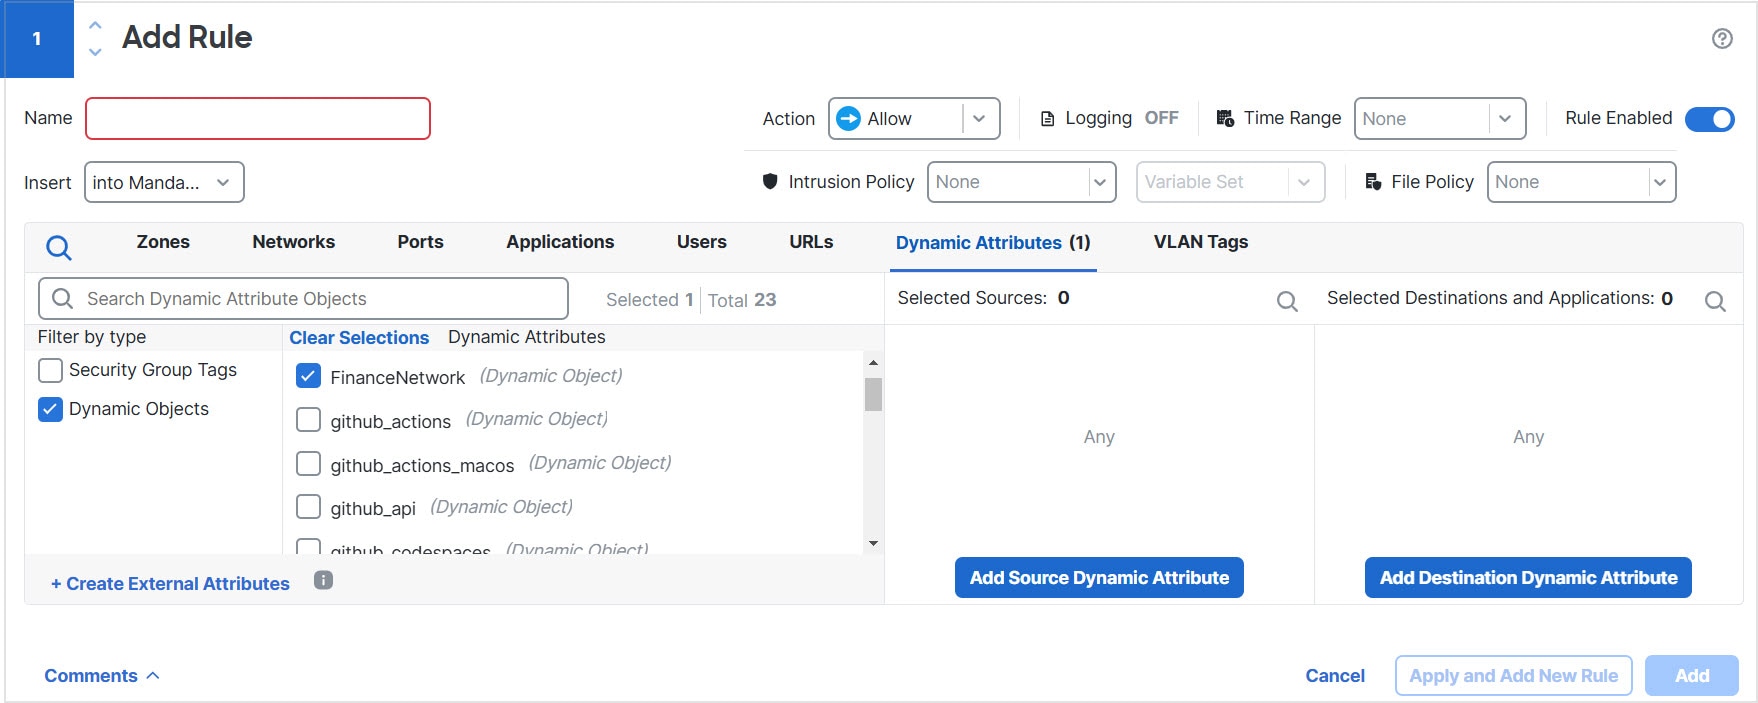
Click the Dynamic Attributes tab.

Step 5

In the Available Attributes section, from the list, click Dynamic Objects.

The following figure shows an example.

Configure Dynamic Attributes created using the dynamic attributes connector as dynamic objects in access control rules. Use those exactly as you would network objects.

This example shows a dynamic object named APIC Dynamic Attribute that corresponds to the dynamic attribute filter created in the dynamic attributes connector.

Step 6

Add the desired object to source or destination attributes.

Step 7

Add other conditions to the rule if desired.


What to do next

See Dynamic attributes rule conditions.

Troubleshoot the pxGrid Cloud identity source

These topics describe troubleshooting the pxGrid Cloud identity source.

Primary device cannot be processed

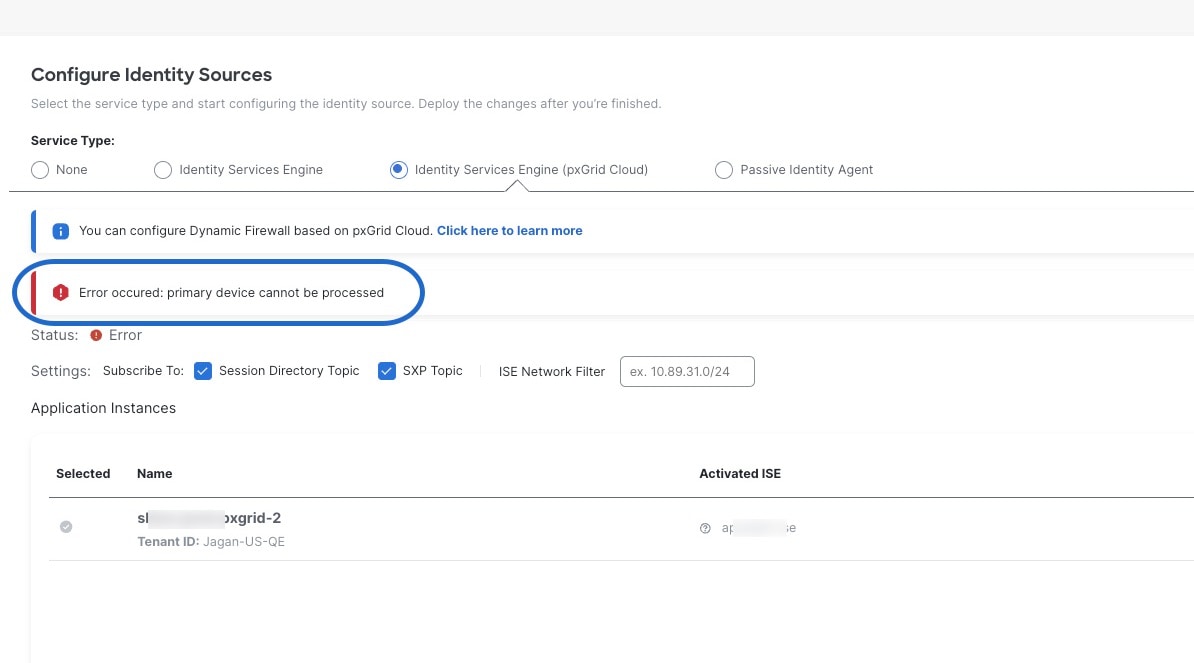
This task resolves the error "primary device cannot be processed" or "ISE is unhealthy" that occurs when a Cisco ISE cluster is associated with more than one app instance.

Each Cisco ISE cluster must be associated with one and only one app instance, typically in a single dedicated tenant.

If you associate a Cisco ISE with more than one app instance, an error such as Error occured: primary device cannot be processed or ISE is unhealthy is displayed for the identity source.

Example:

An error such as "primary device cannot be processed" or "ISE is unhealthy" indicates a misconfigured Cisco ISE cluster. A cluster can be associated with only one app instance.

The solution is to deactivate the ISE properly from other app instances for that tenant, before using it in any other tenant or app instance

Procedure


Step 1

Log in to the Cisco Catalyst Cloud Portal.

Step 2

At the top of the page, click Applications.

Step 3

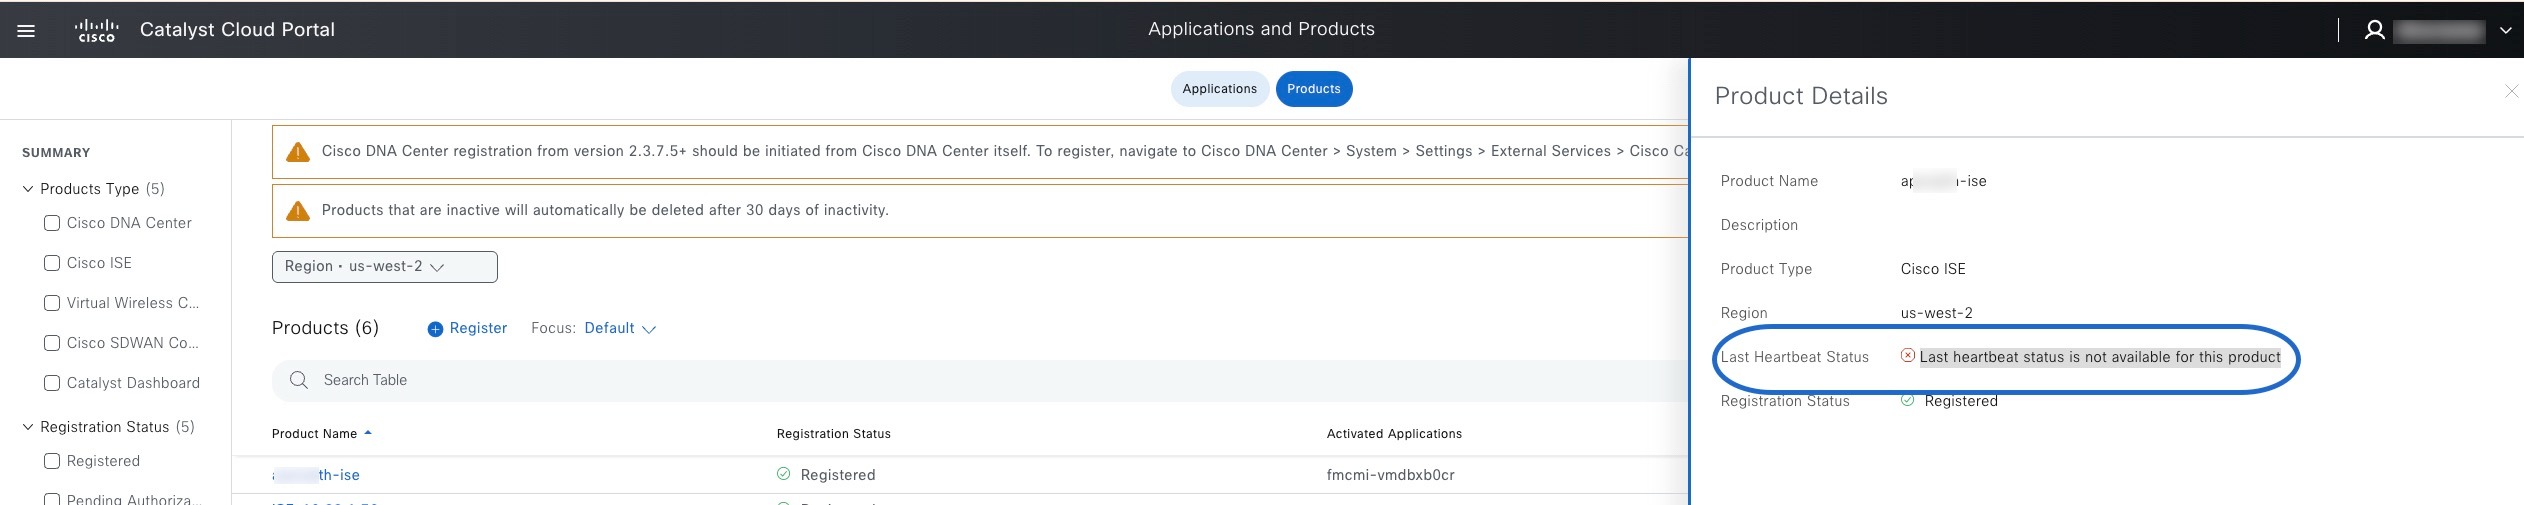
Locate a Cisco ISE product that is activated and verify it is the one causing the issue.

Example:

In the Cisco DNA Portal, locate the ISE product that is experiencing the error and deactivate it.

Step 4

Wait for the product to be removed.

Step 5

Deactivate the app instance as described in Deactivate the pxGrid Cloud app instance.


Deactivating and deleting the pxGrid Cloud identity source

Deactivating the FMC app instance in the Catalyst Cloud Portal is an optional task to troubleshoot issues with the Cisco ISE integration.

You should delete the pxGrid Cloud identity source from the Secure Firewall Management Center when you are certain you don't want to use it again.

Deactivate the pxGrid Cloud app instance

This task explains how to deactivate a pxGrid Cloud app instance using the Catalyst Cloud Portal when your Cisco ISE or pxGrid Cloud stops working or you need to update it.

This is an optional task. You should do this only if your Cisco ISE or pxGrid Cloud stops working or you need to update it.

Before you begin

Make sure your current pxGrid Cloud identity source is active as discussed in Activate the pxGrid Cloud identity source.

Follow these steps to deactivate the pxGrid Cloud app instance:

Procedure


Step 1

Log in to the Cisco Catalyst Cloud Portal.

Step 2

In the Catalyst Cloud Portal, click The image illustrates the steps to deactivate an app instance in the Cisco DNA Portal, highlighting the Applications and Products section. > Applications and Products as the following figure shows:

In the Cisco DNA Portal, go to Applications and Products

Step 3

Click Applications.

Step 4

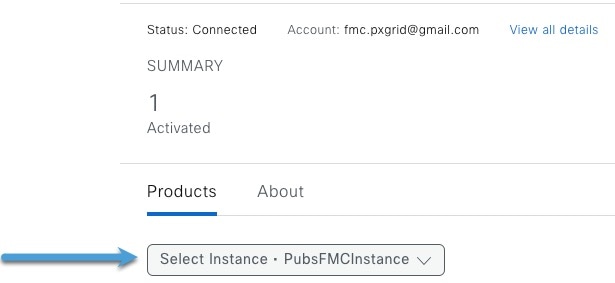
Click Manage for Firewall Management Center.

From the Select Instance list, click the name of the firewall application you created earlier.

Example:

The image illustrates the process of deactivating an app instance in the Cisco DNA Portal, highlighting the relevant options and interface elements.

Step 5

In the Actions column, click More icon (more icon) > Deactivate.

Step 6

Wait until the product is removed.

You can click Refresh (refresh icon) to see updated status if necessary.

Step 7

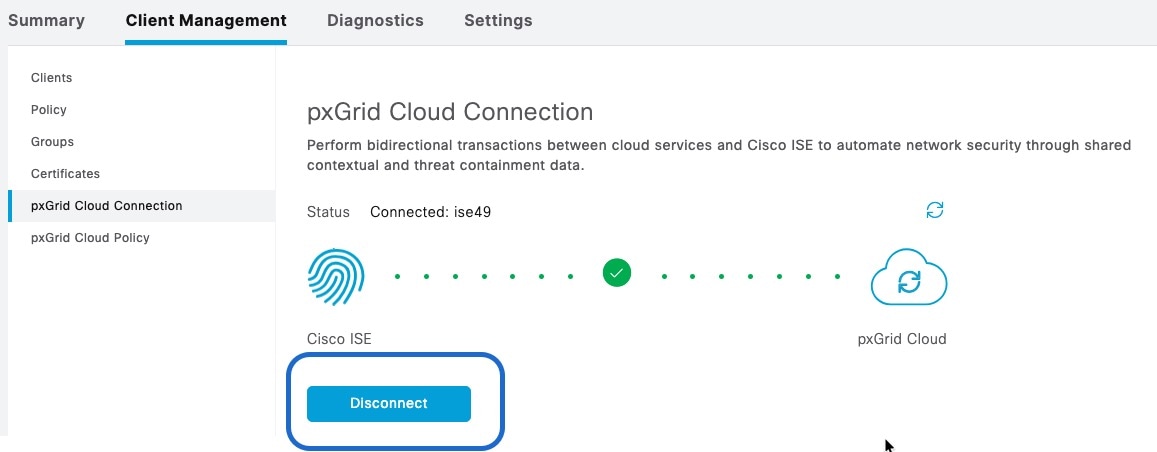
ISE 3.3 or earlier: Disconnect the app instance:

  1. Log in to Cisco ISE as an administrator.

  2. Click Administration > pxGrid Services > Client Management > pxGrid cloud connection.

  3. Click Disconnect.

    Example:

    Disconnect Cisco ISE from pxGrid Cloud as part of reconfiguring the identity source

Step 8

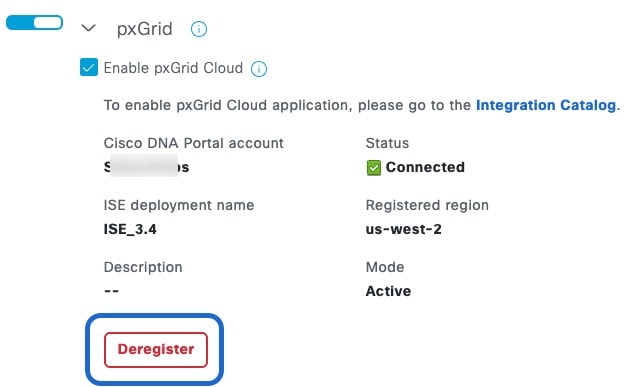
ISE 3.4 or later: Deregister the app instance:

  1. Log in to Cisco ISE as an administrator.

  2. Click Administration > System > Deployment.

  3. Expand Deployment.

  4. Click the name of the ISE node.

  5. In the General Settings tab page, scroll to locate pxGrid.

  6. Click Deregister.

    Example:

    Deregister Cisco ISE from pxGrid Cloud as part of reconfiguring the identity source

Step 9

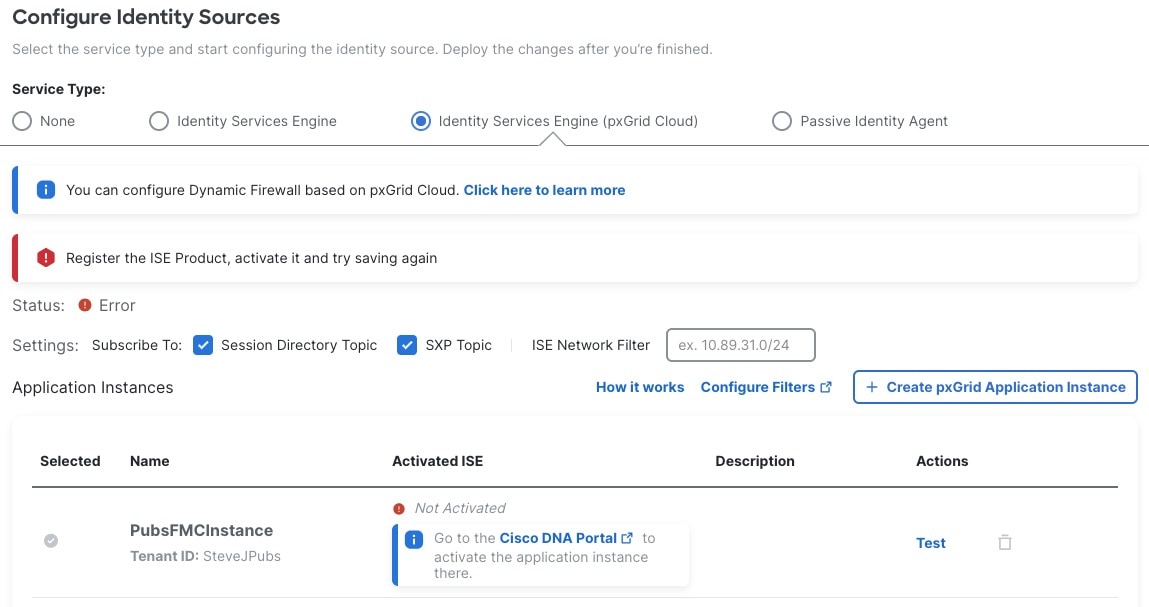
To verify the app instance is deactivated in Secure Firewall Management Center:

  1. Log in to Secure Firewall Management Center.

  2. Click Integrations > Identity > Identity Sources

  3. Click Identity Services Engine (pxGrid Cloud).

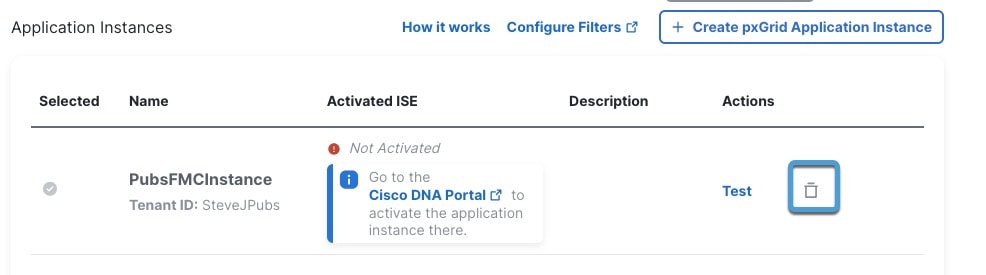
  4. Verify that Not Activated is displayed in the Activated ISE column.

    Example:

    The app instance is shown as deactivated, with "Not Activated" indicated in the Activated ISE column.


What to do next

Delete the pxGrid Cloud identity source

Delete the pxGrid Cloud identity source from Secure Firewall Management Center when you no longer need it.

This task explains how to delete the pxGrid Cloud identity source from Secure Firewall Management Center, which is necessary if you do not want to use it again.

Before you begin

Deactivate the FMC app instance from the Catalyst Cloud Portal as discussed in Deactivate the pxGrid Cloud app instance.

Follow these steps to delete the pxGrid Cloud identity source:

Procedure


Step 1

Log in to the Secure Firewall Management Center.

Click Integrations > Identity > Identity Sources.

Step 2

Click Identity Services Engine (pxGrid Cloud).

Step 3

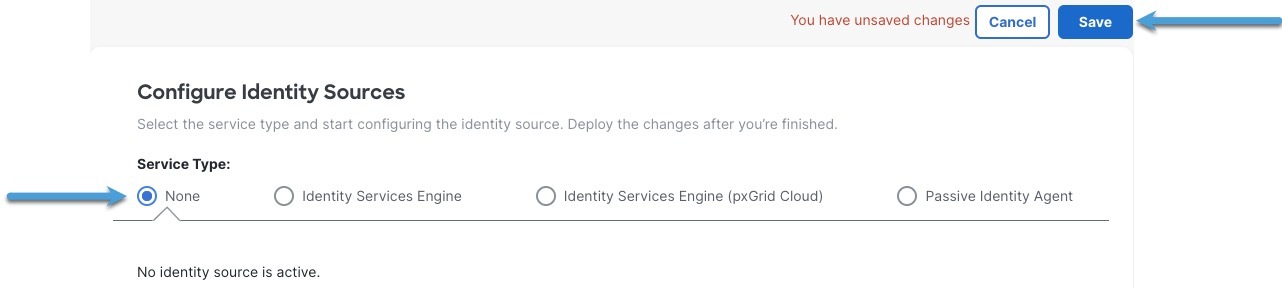
For Service Type, click None.

Example:

The image illustrates the process of deleting an item from a digital interface, highlighting the confirmation dialog that appears to ensure the user intends to proceed with the deletion.

Step 4

Click Save.

Step 5

Confirm your choice when prompted.

Step 6

Click Identity Services Engine (pxGrid Cloud).

Step 7

Click Delete (delete icon).

Example:

The image illustrates the process of deleting an item from the system, highlighting the steps involved in the deletion procedure.

Step 8

Confirm the action when prompted.