Cisco Optical Network Controller Configuration Guide, Releases 26.x.x

PDF

Cisco Optical Network Controller Configuration Guide, Releases 26.x.x

Software image management and upgrade

Want to summarize with AI?

Log in

This section explains software image management and upgrade, including backup types, SFTP storage formulas, upgrade orchestration, and node software upgrades. Use it to understand software operation workflows.


Software image management and upgrade is a Cisco Optical Network Controller capability that

  • supports the related optical network management workflow,

  • provides context for configuration, monitoring, or troubleshooting tasks, and

  • helps operators understand how the feature behaves before they use it.

Software image management and upgrade details

Table 1. Feature history

Feature Name

Release Information

Feature Description

Software Image Management and Upgrade (SWIMU) Enhancements

Release 26.1.1

SWIMU enhancements enables you to perform granular upgrades, allowing for the independent management of the Cisco Optical Software Manager (COSM) and its associated devices. Additionally, the Cisco Optical Network Controller (CONC) supports High Availability (HA) node upgrades, ensuring seamless transitions for redundant COSM instances.

The Software Image Management and Upgrade (SWIMU) is a Cisco Optical Network Controller application which provides a centralized interface for managing and orchestrating software upgrades across Cisco Optical Site Manager managing NCS1K and NCS2K devices. It streamlines the upgrade process, offering tools for image distribution, software activation, and commit operations.

The SWIMU app also provides you the option to backup and restore the nodes and Cisco Optical Network Controller database.

Components of SWIMU

The SWIMU App is divided into these tabs:

  • Backup and Restore:

  • Node Backup and Restore: Manages node backups and restores, including on-demand backups, uploading images to nodes, and group management.

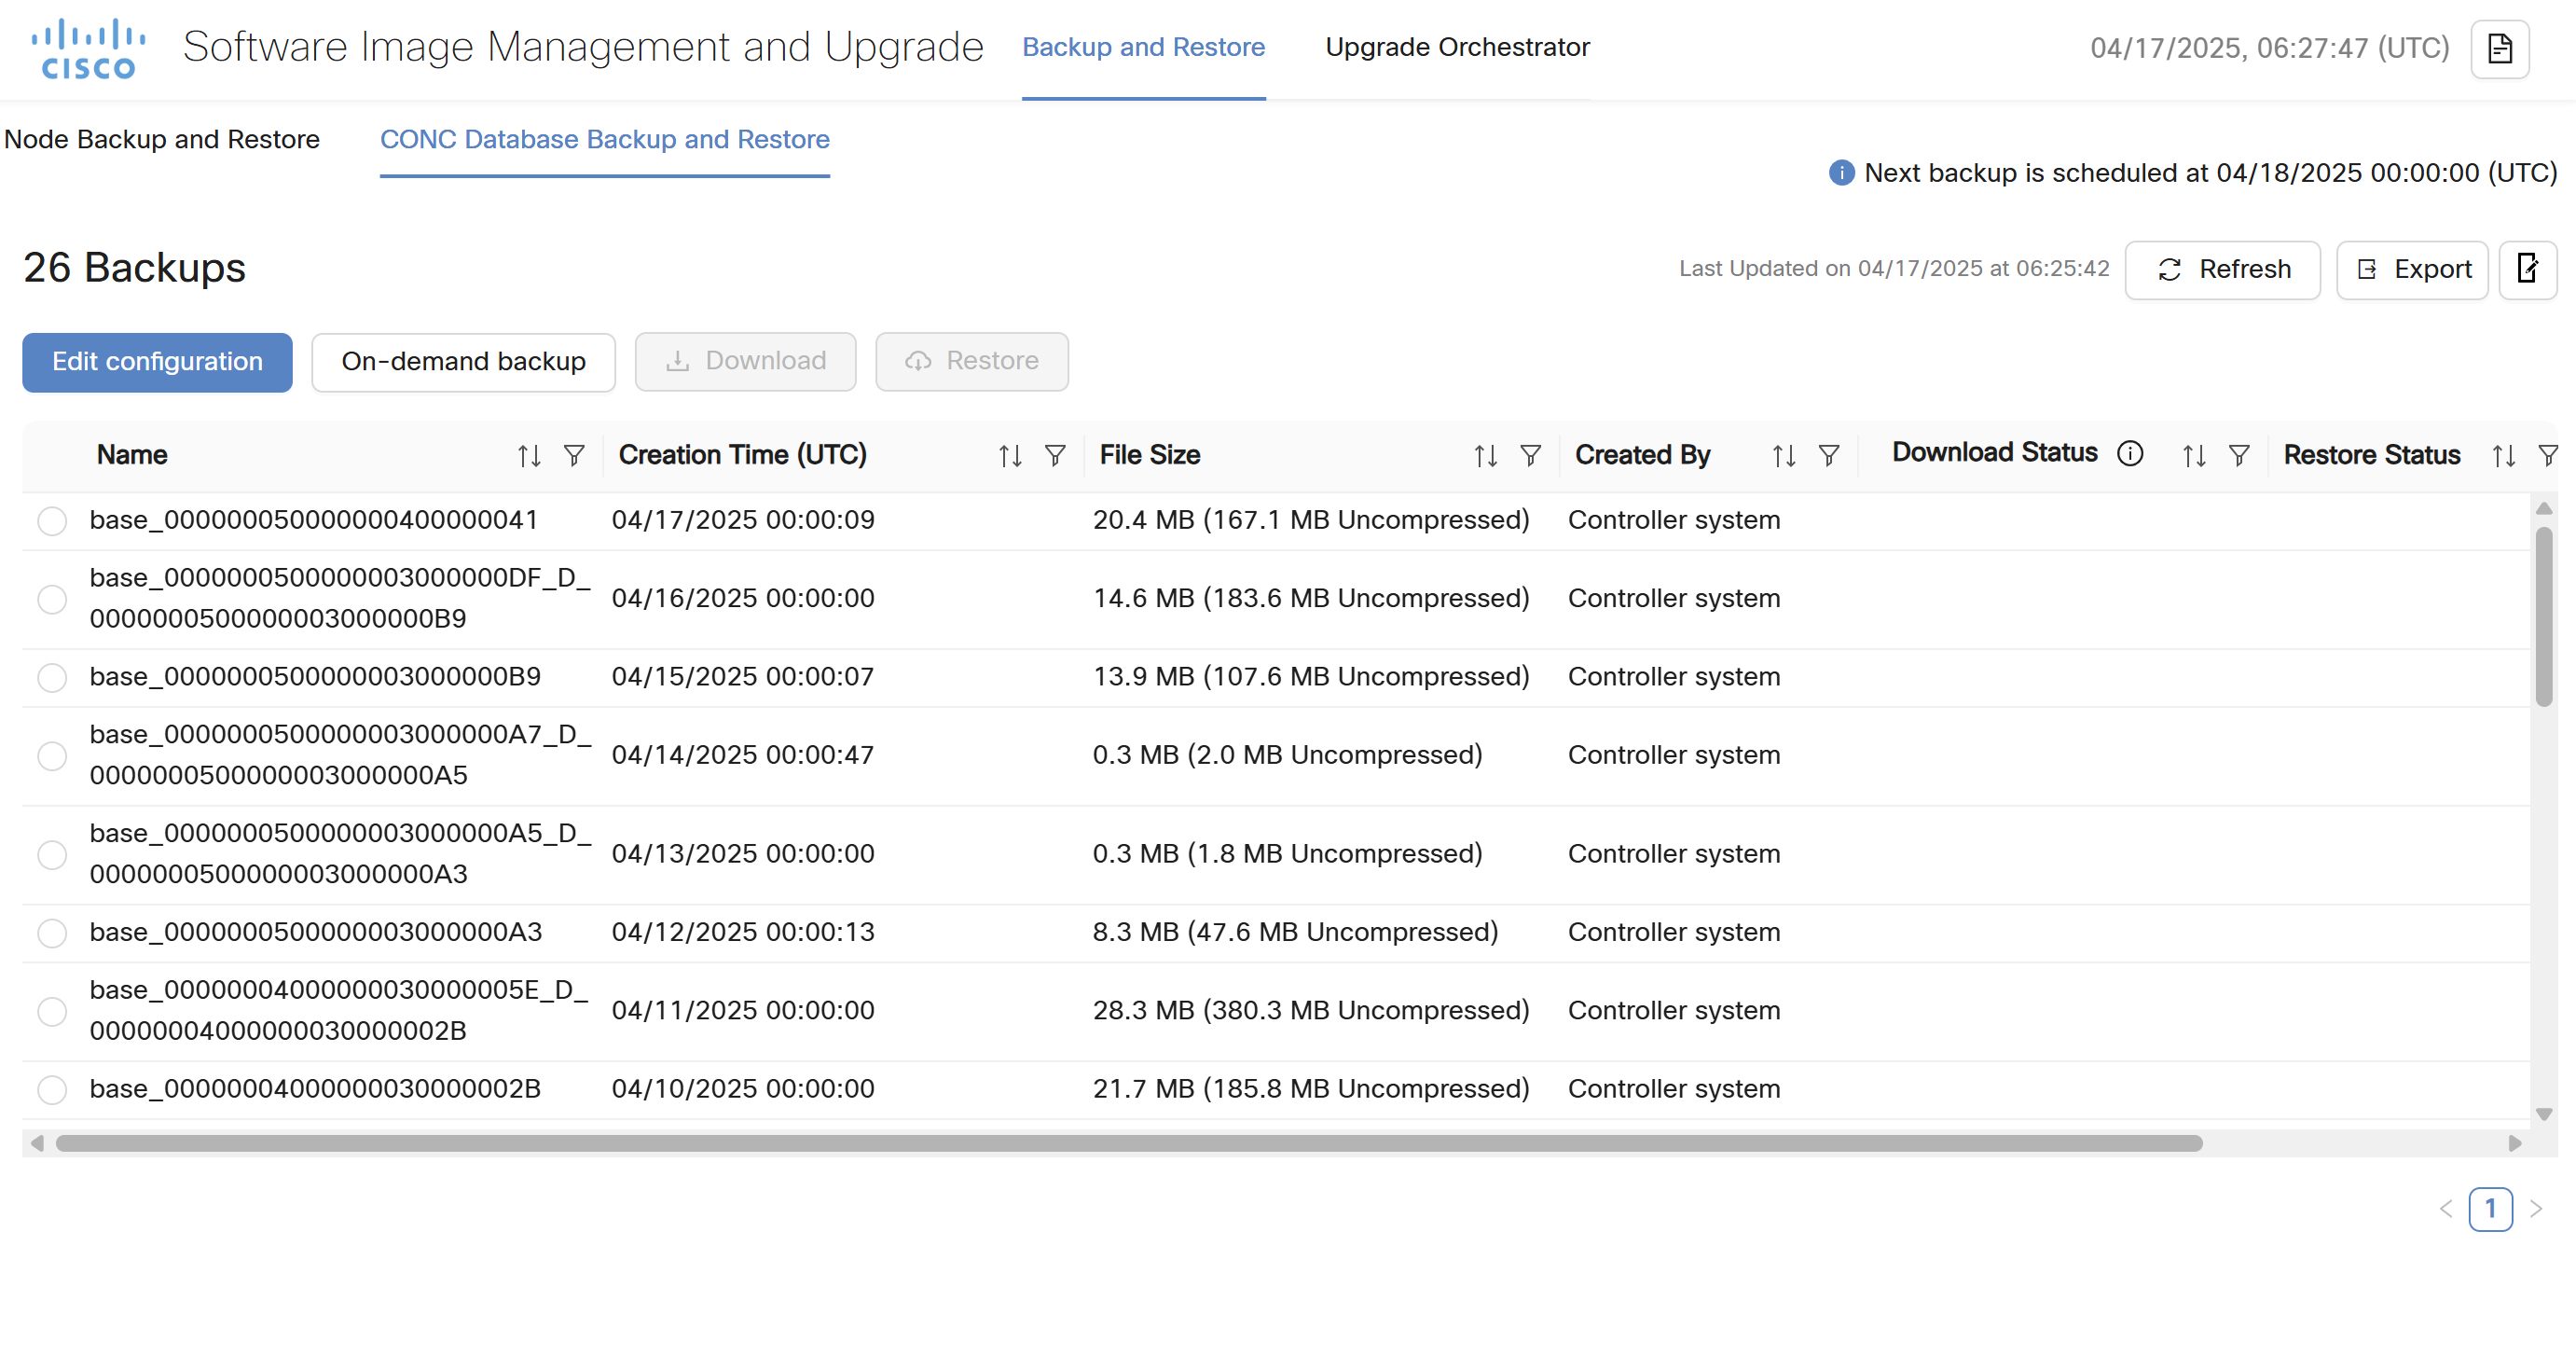
  • CONC Database Backup and Restore: Manages CONC database backups and restores, allowing administrators to schedule backups, trigger on-demand backups, edit backup configuration, download backup files, and restore from backups.

  • Upgrade Orchestrator:

  • Node Software Upgrade:

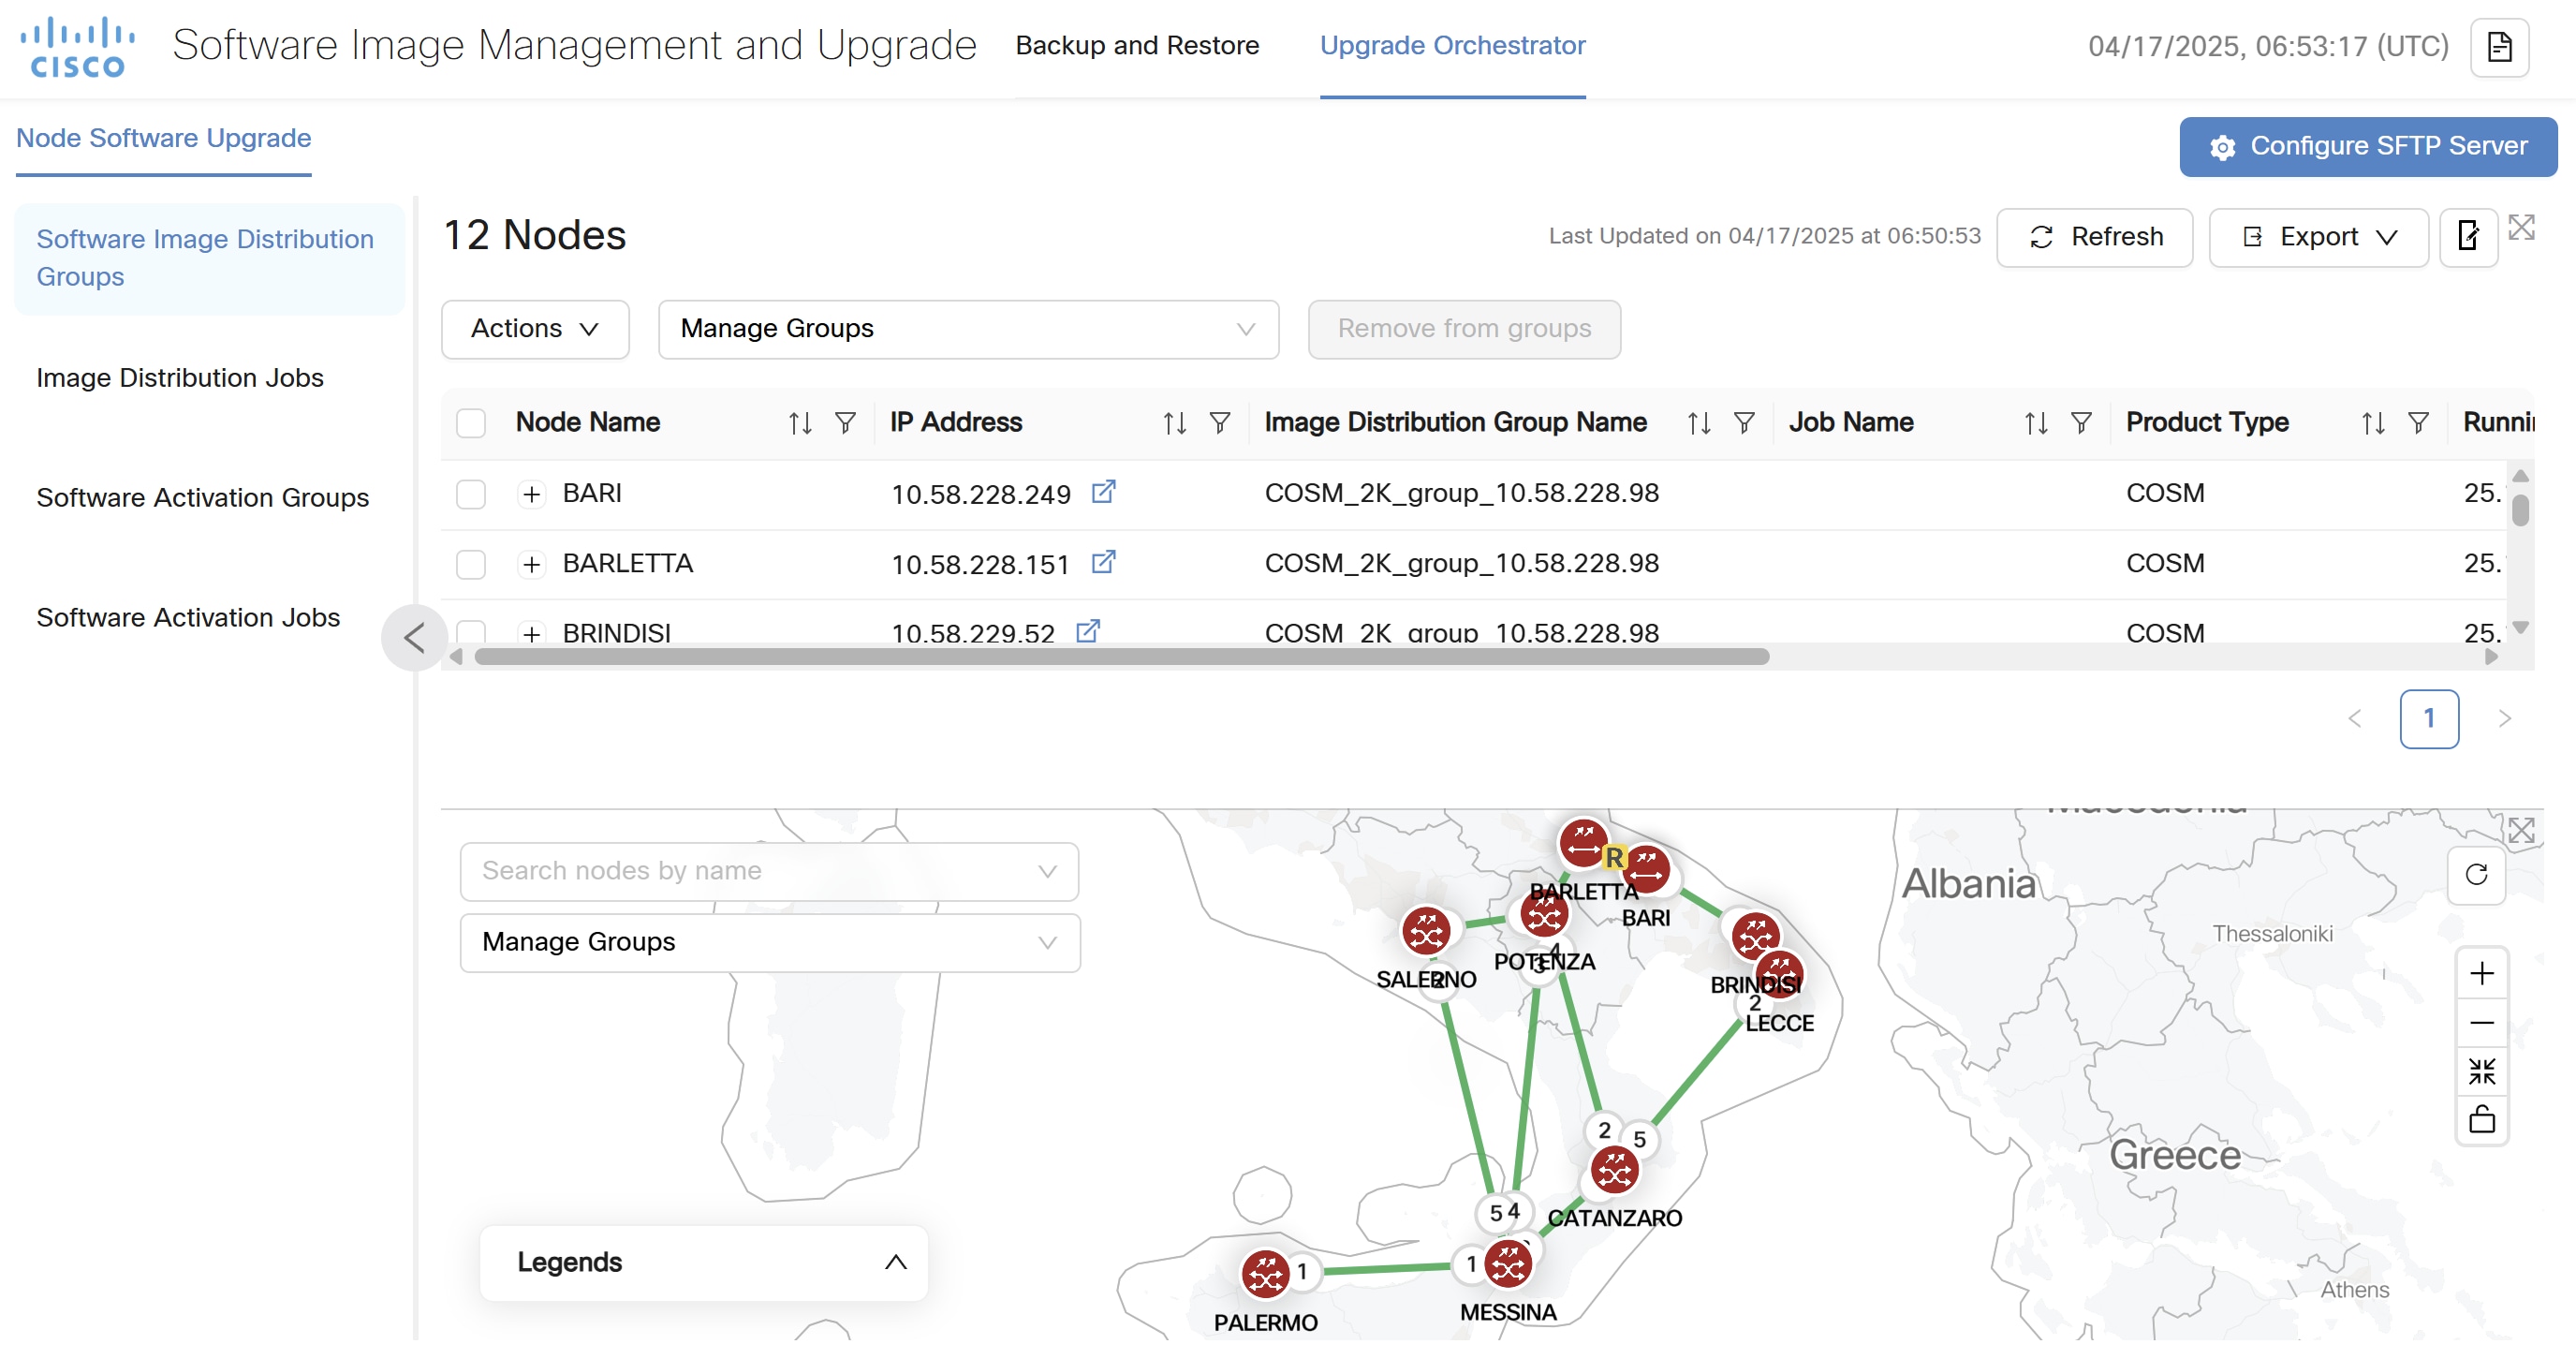
  • Software Image Distribution Groups: Create and manage groups for software image distribution.

  • Image Distribution Jobs: Schedule and monitor image distribution jobs to copy software images to nodes and subtended devices under those nodes.

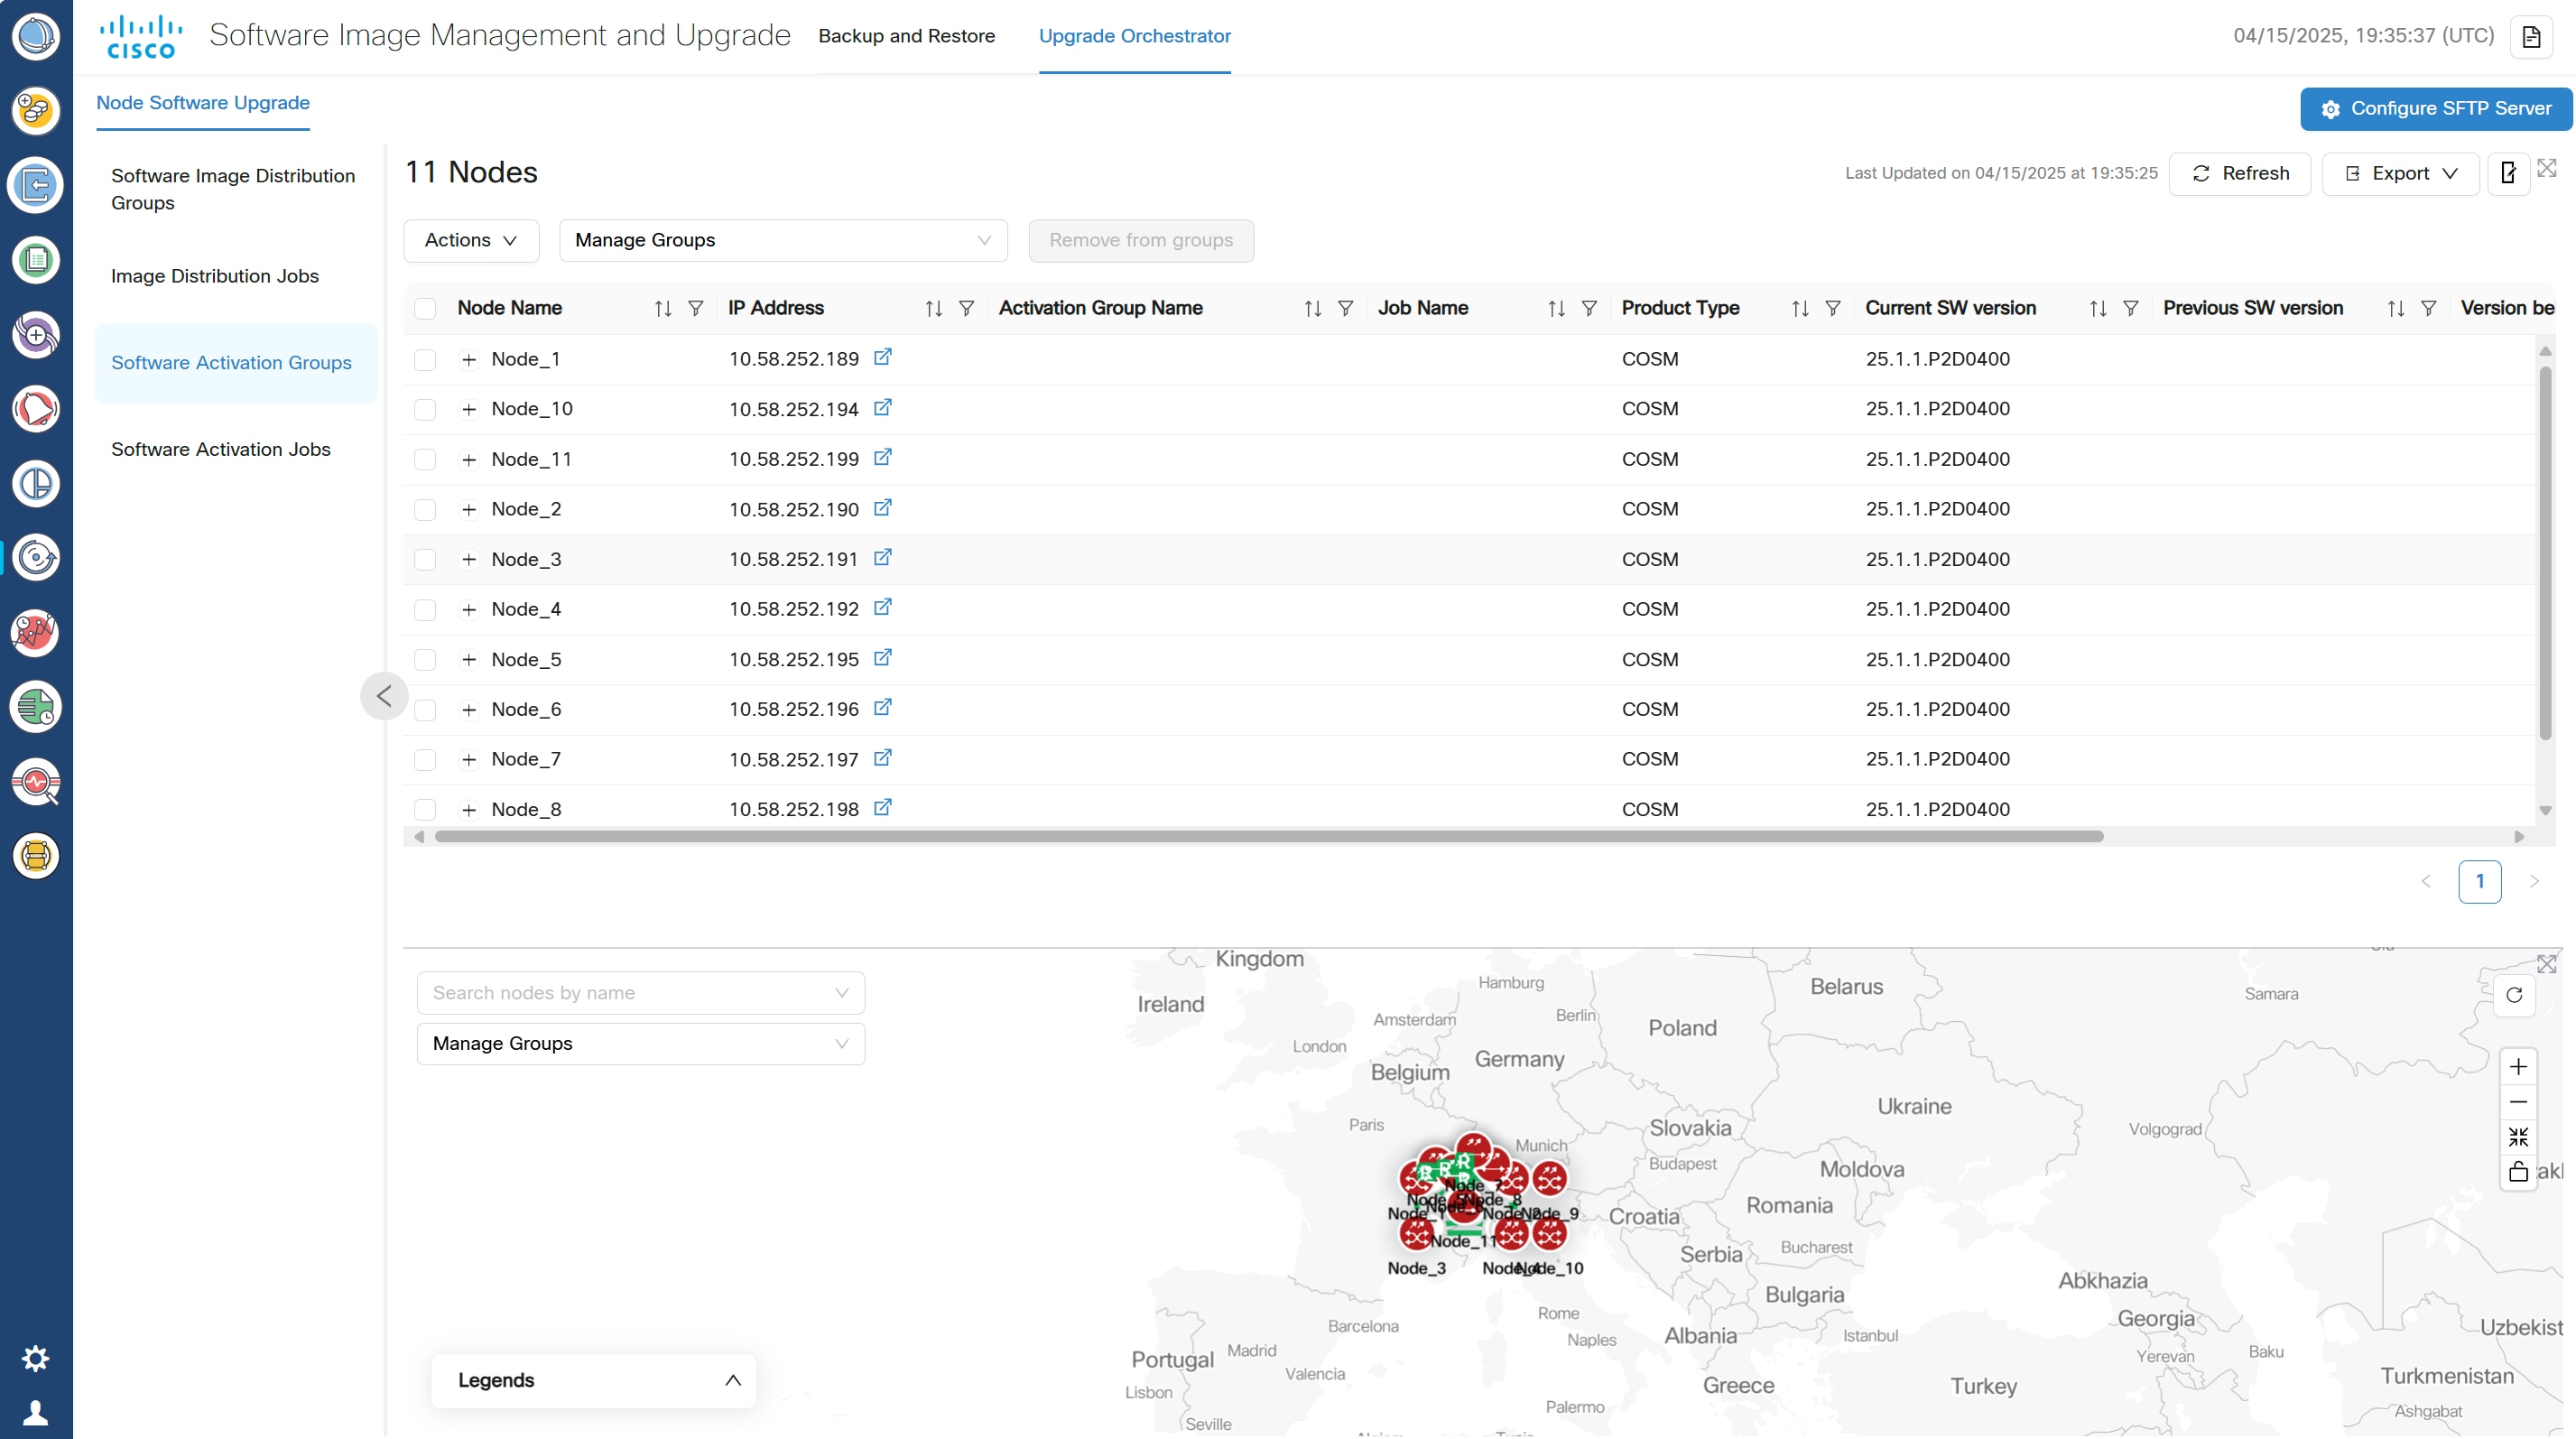
  • Software Activation Groups: Create and manage groups for software activation.

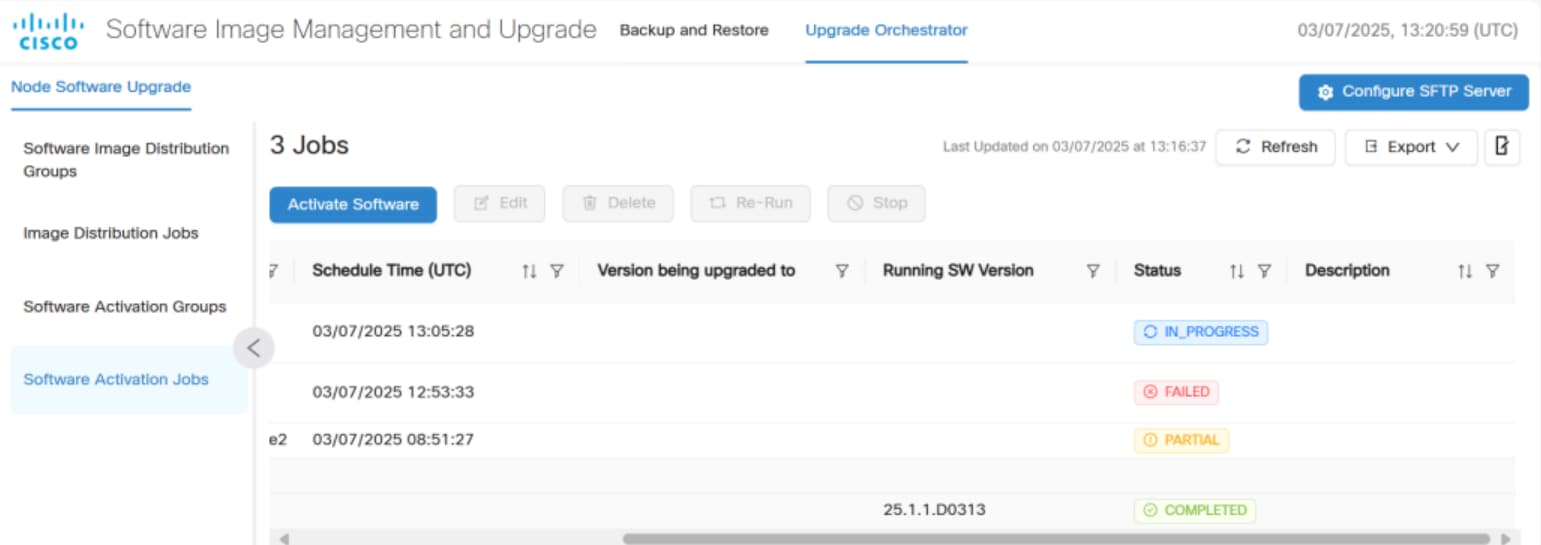
  • Software Activation Jobs: Schedule and monitor software activation jobs to upgrade nodes and subtended devices .

Benefits of Using SWIMU

Using SWIMU you can backup the node configuration database and upload it to external or internal SFTP servers. Files can be distributed and saved to and from the Cisco Optical Site Manager devices while providing granularity to the underlying devices. It helps in:

  • Centralized Management: Provides a single interface for managing backups, restores, and upgrades.

  • Granular Control: Allows detailed configuration of nodes used while scheduling a backup job on top of a node.

  • Manage Tasks: It helps manage file storage, distribution, scheduling, and monitoring based tasks.

  • Efficiency: The distribution and scheduling prevent network overload and ensure efficient operations.

  • Flexibility: Supports ad hoc backups with detailed scheduling options.

  • Transparency: Allows to track the progress with notifications to keep users informed of task statuses.

  • Long-term Storage: Ensures backup files are stored for an extended period, with configurable storage options.

Note

Granularity happens at the node level but not at the device which is under the node level. Restore can be done at the device level through Cisco Optical Site Manager nodal UI using the cross-launch option in Cisco Optical Network Controller Nodes or SWIM applications.

SFTP Servers

There are two types of SFTP servers allowed for backup and restore purpose.

  • Internal SFTP server: It is the default SFTP server provided by Cisco Optical Network Controller itself which stores the backup DB in Cisco Optical Network Controller database.

  • External SFTP servers: You can configure for Cisco Optical Network Controller DB backup or restore as part of external server storage or upload.

Types of Backup

There are two types of backup:

Table 2. Backup Types
On-Demand Backup Scheduled Backup
Immediate Backup Regular Intervals
User-Initiated Automated Process

Formula for Calculating External Backup Storage Size

To calculate the storage size required for backup for external and internal SFTP servers use the given formula:

External SFTP Server Storage Formula

Backup Storage Size = (Network Total Devices x Size of Device x Requested Archive Period) / Backup Reoccurrence

Table 3. External SFTP Server Storage Formula Parameters

Parameter

Description

Network Total Devices

The number of onboarded devices.

Size of the Device

The size of an individual device.

Requested Archive Period

The duration for which the backup files are stored in days

Backup Reoccurrence

The frequency of the backup collection for devices in days.

Internal SFTP Server Storage Formula

Backup Storage Size = ((Number of Small Nodes * 4.7 MB) + (Number of Medium Nodes * 4.85 MB) + (Number of Large Nodes * 5.1 MB) + (Number of XL Nodes * 5.4 MB)) * 5

Table 4. Internal SFTP Server Storage Formula Parameters

Parameter

Description

Small Nodes

Small device - 4.6 MB /4.8 MB.

Medium Nodes

(4 degree ROADM or (2x10¹⁰-OLT, 1x10¹⁴ - device) ) - 4.8 MB / 4.9 MB

Large Nodes

(6-degree ROADM) - 5.1 MB

XL (8-degree ROADM) Nodes

5.4 MB

Note

Minimum allowed job interval is hourly.

For an hourly job over a period of 10 hours, file retention is 5 per node.

((Number of small nodes * 4.7 MB) + (Number of medium nodes * 4.85 MB) + (Number of Large nodes * 5.1 MB) + (Number of XL nodes * 5.4 MB)) * 5

Cleanup of Storage

The cleanup of the storage in SFTP servers will be done based on the memory threshold value set by the user during the configuration of the SFTP server. The minimum threshold value is 50 and this is specific to external SFTP servers only.
Configure an SFTP server

The Software Image Management and Upgrade (SWIMU) app relies on SFTP (Secure File Transfer Protocol) servers for storing and retrieving software images and backups. You can configure up to two external SFTP servers in addition to the default local SFTP server.

The Software Image Management and Upgrade (SWIMU) app relies on SFTP (Secure File Transfer Protocol) servers for storing and retrieving software images and backups. You can configure up to two external SFTP servers in addition to the default local SFTP server.

Before you begin

Before configuring an external SFTP server, ensure the following requirements are met:

  • Write Permissions: The remote path folder must have write permissions enabled, allowing the external user to perform uploads.

  • SSH Version Compatibility: The SFTP server SSH version must be either 7.x or 8.x. Backups and uploads fail if the SSH version is incompatible.

  • Router Static Settings: Configure router static settings for each node separately. See Configure Static Route on Peer Devices for detailed instructions.

  • Time Synchronization: The Cisco Optical Network Controller VM time must be synchronized with the device backend time.

Follow these steps to configure SFTP server:

Procedure

1.

Click theConfigure SFTP Server in the SWIMU app.

The SFTP Servers configuration screen is displayed.
2.

On the SFTP Servers configuration screen, click Add.

The Add SFTP Server screen is displayed.
3.

Enter the information:

  • SFTP Server Name: A descriptive name for the SFTP server.

  • IP Address: The IP address of the SFTP server.

  • Username: The username for accessing the SFTP server.

  • Password: The password for the specified username.

  • Remote Path: The directory path on the SFTP server where software images and backups will be stored.

  • Disk memory space utilisation threshold for file overwrite(%): The percentage of memory threshold allowed for each SFTP server. The minimum threshold value is 50. Anything exceeding the threshold will be cleaned up.

4.

Click Check Connectivity Status.

Verify that the status displays Connection Successfully Established before saving the configuration.

Connectivity status check creates the directory in the remote path if it does not already exist.
5.

Click Save.

6.

Select the target SFTP server and click Edit to modify SFTP server details.

  1. Modify the details.

  2. Click Check Connectivity Status.

  3. Click Save.

Note

Do not edit or delete an SFTP server while an active job is in progress using that server.

7.

Select the target SFTP server and click Delete to delete an SFTP server.

The configure SFTP server task is complete.


Back up and restore nodes

Node Backup and Restore enables administrators to create and manage backups of individual nodes in the network. This feature is crucial for disaster recovery and ensuring data integrity. It allows administrators to perform on-demand backups, upload images to nodes, and organize nodes into backup/restore groups.

Node Backup and Restore enables administrators to create and manage backups of individual nodes in the network. This feature is crucial for disaster recovery and ensuring data integrity. It allows administrators to perform on-demand backups, upload images to nodes, and organize nodes into backup/restore groups.

Figure 1. Node Backup and Restore
screenshot of links app

Before you begin

  • For the backend upload to proceed you must configure the router static settings for each node separately. See Configure Static Route on Peer Devices for more details on how to configure the static routes of a node.

  • The Cisco Optical Network Controller time must be the same as the device time.

  • If a node backup fails, the NODE-BACKUP-FAILURE alarm alarm is raised.

Follow these steps to back up and restore nodes:

Procedure

1.

Create a nodes group

  1. Click Backup, Restore and Group Management > Manage Groups > Create Group

  2. Enter the Group Name and Description and click Save.

  3. Select the nodes from the Nodes table.

  4. Click Manage Groupsand click + next to the group name to add the nodes.

Note
  • You can also click and select any node from the Topology screen on the right and click the + icon appearing on top of the node and click Update. This will add these nodes to the group.

  • Before scheduling backup jobs, you need to create a node group using the Manage Groups option.

2.

Select a node and use options Upload to Node or create On-Demand Backup or Manage Groups and Remove from Groups by clicking each one of them.

  • Before restoring the nodes you can click on Upload to Node option for initiating file transfer of backup files from Cisco Optical Network Controller's internal or external storage. Cisco Optical Network Controller automatically selects files for that node, based on the file name.

  • You can cross launch to COSM nodal UI from any node in the Node table using the cross-launch option when you want to do the restoration.

  1. For scheduling the On-Demand Backup jobs. Click On-Demand Backup after selecting the nodes.

    This will schedule the on-demand jobs in the Backup -Jobs scheduler.

  2. Click Remove from Groups after selecting the nodes that you want to remove from the group.

3.

Click Jobs to view the job summary and scheduler panel.

  1. Click Schedule Backup to schedule backup jobs.

    Enter the Job Name, SFTP Server, Groups, Start Date Time, Recurrence, and Description and click Schedule.

    Note

    Recurrence option allows you to repeat the job scheduling based on Hourly/Daily/Weekly/Monthly intervals. The scheduling can be done using the current time + five minutes after the first occurrence.

  2. Click Edit to edit the schedule of the existing scheduled backup jobs.

  3. Click Delete to delete the selected job from the backup scheduled job list.

  4. Click Refresh to refresh the job scheduler table.

    Note

    You can track the status of each scheduled job in back up job list using the Status column in the table. The Status can be Not Started or In progress or Completed or Failed.

  • If a backup or restore job fails, review the error message in the Jobs section.

  • Ensure that the SFTP server is properly configured and accessible.

  • Verify that the node is online and reachable.

The back up and restore nodes task is complete.


Back up and restore the database

CONC Database Backup and Restore enables administrators to create and manage backups of the Cisco Optical Network Controller database. This feature is crucial for disaster recovery and ensuring data integrity. It allows administrators to schedule backups, trigger on-demand backups, edit backup configurations, download backup files, and restore from existing backups.

CONC Database Backup and Restore enables administrators to create and manage backups of the Cisco Optical Network Controller database. This feature is crucial for disaster recovery and ensuring data integrity. It allows administrators to schedule backups, trigger on-demand backups, edit backup configurations, download backup files, and restore from existing backups.

The CONC Database Backup and Restore tab contains these components:

  • Backup Table: Lists existing Cisco Optical Network Controller database backups with details such as:

  • Name: A unique identifier for the backup.

  • Creation Time (UTC): The date and time the backup was created.

  • File Size: The compressed and uncompressed size of the backup file.

  • Created By: The entity that initiated the backup (e.g., Controller system, internal).

  • Download Status: Indicates whether the backup has been downloaded.

  • Restore Status: Indicates whether a restore operation is in progress.

  • Type: Indicates the type of backup (delta or full).

  • Full backup is a complete backup of the entire Cisco Optical Network Controller database. It is taken every 7 days or after a fresh or new installation.

  • Delta backup is an incremental backup that captures only the changes (the difference) made to the Cisco Optical Network Controller database since the last full backup. Delta backups are taken daily at 12 AM by default, and this time and recurrence is modifiable. Hourly Recurrence can be every 6 or 12 hours and Daily recurrence can be 1, 2, or 3 days.

  • Action Buttons: Provides the following actions:

  • Edit configuration: Allows editing of backup settings or scheduling.

  • On-demand backup: Manually triggers a new database backup.

  • Download: Downloads a selected backup file to Cisco Optical Network Controller VM(disabled unless a backup is selected).

  • Restore: Restores the Cisco Optical Network Controller database from a selected backup (disabled unless a backup is selected).

  • Scheduling Information: Displays the next scheduled backup time.

Before you begin

  • The Cisco Optical Network Controller Database Backup and Restore feature relies on a properly configured SFTP server.

  • Ensure that the SFTP server has sufficient storage space for the backups.

  • If a backup fails, the BACKUP-FAILURE alarm alarm is raised.

  • If the upload of a backup to the SFTP server fails, the UPLOAD-FAILURE alarm alarm is raised.

Follow these steps to back up and restore the database:

Procedure

1.

Perform an On-demand backup.

  1. Navigate to Backup and Restore > CONC Database Backup and Restore.

    Figure 2. Node Backup and Restore
    screenshot
  2. Click On-demand backup and confirm by clicking OK.

    Note

    You can perform up to 10 On-demand backups per day.

A new database backup is created and the backups table is updated to show this new backup.

2.

Download the database

  1. Navigate to Backup and Restore > CONC Database Backup and Restore.

  2. Select the backup you want to download from the table.

  3. Click Download.

    Note

    Cisco Optical Network Controller does not allow manual deletion of backups. Backups older than the retention period are automatically deleted.

  4. Enter a prefix string to be part of the downloaded file name and click OK.

    This prefix allows you to easily identify a backup file.

  5. Access Cisco Optical Network Controller VM CLI using SSH.

  6. Go to the path /data/local-path-provisioner/pvc-*conc-database-backup* to view the downloaded file.

3.

Restore the database

Note

Cisco Optical Network Controller automatically validates the integrity of the selected backup before starting the restore process. Only backups that pass integrity validation are restored. If validation fails, the restore operation is aborted to prevent recovery from a corrupted or incomplete backup.

  1. Navigate to Backup and Restore > CONC Database Backup and Restore.

  2. Select the backup you want to restore from the table.

  3. Click Restore and confirm the operation.

The Cisco Optical Network Controller database is restored from the selected backup.
4.

Edit the backup configuration

  1. Click Edit configuration.

  2. Choose your Preferred Backup Time (UTC) and Recurrence preferences.

  3. Choose Backup file retention time (weeks) and set Password to secure backup files.

    Cisco Optical Network Controller does not allow manual deletion of backups. Backups older than the retention period are automatically deleted.

  4. Enable the check box if you want to Copy the backup files to SFTP server and enter the SFTP Server details.

    • SFTP Server Name: A descriptive name for the SFTP server.

    • IP Address: The IP address of the SFTP server.

    • Username: The username for accessing the SFTP server.

    • Password: The password for the specified username.

    • Remote Path: The directory path on the SFTP server where software images and backups will be stored.

    • Disk memory space utilisation threshold for file overwrite(%): The percentage of memory threshold allowed for each SFTP server. The minimum threshold value is 50. Anything exceeding the threshold will be cleaned up.

  5. Click Apply.

5.

Upload a downloaded backup file bundle to another Cisco Optical Network Controller instance.

Example:

tar -zvxf <downloaded_file_name>
printf "user_password" | od -A n -t x1 | tr -d ' \n' | awk '{printf "%-64s", $0}' | sed 's/ /0/g'
openssl enc -d -aes-256-ecb -in <encrypted_backup_file_name.tar.gz> -out <decrypted_backup_file_name.tar.gz> -K <key>
sedo backup upload <decrypted_backup_file_name.tar.gz>
  1. Extract the downloaded backup bundle using the following command.

    Note

    This step is not required if your backup file is copied from the external SFTP server.

    This command extracts all the required delta and full backup files.
  2. Run the following command to generate the decryption key using your password.

    Replace user_password with your actual password in the command.

    This command generates a 64-character key required for decryption.
  3. Decrypt the backup file using the generated key using the following command.

    Replace the placeholders with actual file names and key.

    This command generates the decrypted backup file.
  4. Upload the decrypted backup file to the Cisco Optical Network Controller server using the following sedo command.

The back up and restore the database task is complete.


Orchestrate software upgrades

Use the upgrade Orchestrator to distribute images to the nodes and activate the images on the nodes.

Use the upgrade Orchestrator to distribute images to the nodes and activate the images on the nodes.

Cisco Optical Network Controller uses Software Image Distribution Groups and Software Activation Groups to distribute images and upgrade nodes in bulk.

Before you begin

  • For the backend upload to proceed you must configure the router static settings for each node separately. See Configure Static Route on Peer Devices for more details on how to configure the static routes of a node.

  • The Cisco Optical Network Controller time must be the same as the device time.

  • You must download the golden ISO from software.cisco.com and place it in the external SFTP server.

  • Image Authenticity: Cisco Optical Network Controller does not validate the authenticity of the Golden ISO image. It is your responsibility to ensure the image is valid and trustworthy.

  • Number of Images: There is no set limit to the number of images that can be uploaded to the local SFTP server. We recommend you store up to 5 iso images in the local sftp server.

  • Software Image Distribution Groups and Software Activation Groups tables display the current software version only if CONC was used to upgrade the software in the node.

Follow these steps to orchestrate software upgrades:

Procedure

1.

Upload ISO Images to the Local SFTP Server.

Example:

sedo object-store list onc-sw-iso
sedo object-store put <file> <destination> [flags]
sedo object-store bucket delete onc-sw-iso/<file-name>
  1. Verify File Availability: To check if a file is available on the local SFTP server, use the following command:

  2. Upload an ISO Image: To upload an ISO image to the local SFTP server, use the following command:

    • <file>: The path to the ISO image file on your local system.

    • <destination>: The destination path on the SFTP server, including the bucket name and desired file name.

    Example: sedo object-store put <image-name.giso> onc-sw-iso/<image-name.giso>

  3. Delete a File: To delete a file from the local SFTP server, use the following command:

    • <file-name>: The name of the file to delete.

    Example: sedo object-store bucket delete onc-sw-iso/test.iso

2.

Create Image Distribution Groups.

  1. Navigate to the Upgrade Orchestrator tab and select Node Software Upgrade > Software Image Distribution Groups

    Figure 3. Upgrade Orchestrator
    screenshot
  2. Click Actions and select Expand all to expand nodes in the table to view the subtended devices under the node.

  3. Click Manage Groups and select New Group.

    You can also Mange groups from the topology view in the Upgrade Orchestrator.

  4. Enter a Group Name and Description.

  5. Select the nodes to include in the group and click Manage Groups.

  6. Click the + icon next to a group name to add the nodes to the group.

  7. Select a node and click Remove from groups to remove the node from the group it is a member of.

Note

Groups for NCS 2000 nodes are autocreated by Cisco Optical Network Controller.

You cannot delete the autocreated NCS 2000 groups. You can edit the name and description of the autocreated NCS 2000 groups.

You cannot add the autocreated NCS 2000 nodes to NCS1000 groups or NCS1000 nodes to NCS 2000 autocreated groups.

3.

Create an Image Distribution Job.

  1. Navigate to the Upgrade Orchestrator tab and select Node Software Upgrade > Image Distribution Jobs

  2. Click Distribute Image.

  3. Select the nodes or groups you want to distribute the images to.

    Figure 4. Upgrade Orchestrator
    screenshot
    Table 5. Select node(s) or group(s) options

    UI options

    Actions

    Copy only to COSM radio button

    Copies the image to Cisco Optical Site Manager only

    Note

    COSM NCS 1000 Series: Image is copied to hosting device(s) automatically.

    COSM NCS 2000 Series: Image is copied to the COSM only.

    Copy to COSM and device(s) under node radio button

    Copies images to Cisco Optical Site Manager and sub-tended devices.

    Group(s) or Node(s) search bar

    Displays the list of node groups

    Back

    Goes back to the Orchestrator Upgrade tab.

    Next

    Moves to the next step.

  4. Select an SFTP server from the drop-down list or give the details of the SFTP server.

  5. Select the ISO image file to distribute.

  6. Schedule the job to start immediately or later.

  7. Click Schedule and choose a later time or schedule the job to run immediately.

  8. Click the status for a device in the status column to view detailed status.

  9. Select a job and click Stop to stop the job in the nodes in which the job has not started.

    The job continues on the nodes on which it was in progress.

  10. Select a job and click Edit to make changes to the job.

    A job that is in progress cannot be edited.

  11. Select a job and click Delete to delete a job that has completed or failed.

Note

The image distribution job table has an additional column Type to indicate the granular type of job.

Note

For NCS 2000 nodes, Image distribution takes place for all nodes in a group. You cannot select a subset of nodes to distribute images.

If a job status is PARTIAL, it means the job succeeded for some of the nodes, but failed for other nodes in the group of devices that the job was initiated for.

If a job fails, fix the issues in the failure status and click Re-Run.

4.

Create Software Activation Groups.

  1. Navigate to the Upgrade Orchestrator tab and select Node Software Upgrade > Software Activation Groups

    Figure 5. Upgrade Orchestrator
    screenshot of links app

    You can also Mange groups from the topology view in the Upgrade Orchestrator.

  2. Click Actions and select Expand all to expand nodes in the table to view the individual devices.

  3. Click Manage Groups and select New Group.

  4. Enter a Group Name and Description.

  5. Select the nodes or individual devices to include in the group and click Manage Groups.

  6. Click the + icon next to a group name to add the nodes to the group.

  7. Select a node and click Remove from groups to remove the node from the group it is a member of.

Note

Groups for NCS 2000 nodes are autocreated by Cisco Optical Network Controller.

You cannot delete the autocreated NCS 2000 groups. You can edit the name and description of the autocreated NCS 2000 groups.

You cannot add the autocreated NCS 2000 nodes to NCS1000 groups or NCS1000 nodes to NCS 2000 autocreated groups.

5.

(Optional) Copy a group to Software Activation Groups from Software Image Distribution Groups.

  1. Click Software Image Distribution Groups > Manage Groups

  2. Click the copy button next to a group name.

  3. Click Software Activation Groups > Manage Groups

  4. Click Paste at the top right corner.

6.

Create a Software Activation Job.

Note

Software upgrade of a Cisco Optical Site Manager high-availability configuration from Cisco Optical Network Controller is not supported when the standby Cisco Optical Site Manager instance is either down or not present in a Cisco Optical Site Manager high-availability deployment. Configure or restore the active and standby peer status in Cisco Optical Site Manager before software activation. This prevents software-version misalignment between active and standby Cisco Optical Site Manager nodes.

  1. Navigate to the Upgrade Orchestrator tab and select Node Software Upgrade > Software Activation Jobs

  2. Click Activate Software.

  3. Select the target devices or groups.

    Table 6. Select Groups or Nodes or Devices options

    UI options

    Actions

    Activate only COSM radio button

    Activates only Cisco Optical Site Manager

    Note

    COSM NCS 1000 Series: This activation job automatically performs an upgrade of hosting device(s) as well.

    COSM NCS 2000 Series: Only COSM is activated.

    Activate both COSM and Device(s) radio button

    Activates both Cisco Optical Site Manager and the selected subtended device(s). The activation job upgrades Cisco Optical Site Manager and selected subtended device(s).

    Note

    COSM NCS 1000 Series: The NCS 1000 hosting device(s) will be auto-selected if you have not selected the hosting device(s).

    COSM NCS 2000 Series: Activation of both Cisco Optical Site Manager and device(s) works based on the selected subtended device(s).

    Activate only Device(s)

    Activates only the selected subtended device(s). The activation job upgrades the subtended device(s) software version.

    Note

    COSM NCS 1000 Series: The NCS 1000 hosting device(s) will be auto-selected if you have not selected the hosting device(s).

    COSM NCS 2000 Series: Activation of device(s) works based on the selected subtended device(s). If COSM is not upgraded to the same, this option first upgrades the COSM and then proceed with the subtended device(s).

    Group(s) or Node(s) or Device(s) search bar

    Displays the list of nodes, devices and groups

    Back

    Goes back to the Orchestrator Upgrade tab.

    Next

    Moves to the next step.

    Figure 6. Upgrade Orchestrator
    screenshot
    Note

    After you click Next, based on the selection of the radio button related to activation target, an Information message appears explaining the goal of the job.

    Figure 7. Upgrade Orchestrator
    screenshot
    Figure 8. Upgrade Orchestrator
    screenshot
    Figure 9. Upgrade Orchestrator
    screenshot
  4. Choose the software package from the drop-down.

  5. Schedule the job to start immediately or later.

  6. Click Schedule and choose a later time or schedule the job to run immediately.

  7. Click the status for a device in the status column to view detailed status.

    Expand the jobs displayed in a hierarchical manner to find the device activation status for every node and respective subtended devices.

  8. Select a job and click Stop to stop the job in the nodes in which the job has not started.

    The job continues on the nodes on which it was in progress.

  9. Select a job and click Edit to make changes to the job.

    A job that is in progress cannot be edited.

  10. Select a job and click Delete to delete a job that has completed or failed.

    Note

    The software activation jobs table has an additional column Type to inform about the Activation Type.

    Figure 10. Upgrade Orchestrator
    screenshot of links app

If a job status is PARTIAL, it means the job succeeded for some of the nodes, but failed for other nodes in the group of devices that the job was initiated for.

If a job fails, click Troubleshoot in the failure status to cross launch the site manager.

For NCS 2000 devices, the diagnostics page of site manager is launched. Use the logs to troubleshoot the failure.

For NCS 1000 devices, the devices tab is launched. Use the CLI to troubleshoot the failure.

Note

After troubleshooting the failure, click Re-Run.

The orchestrate software upgrades task is complete.