Cisco Crosswork Network Controller 7.2 Administration Guide

PDF

Change the system settings

Want to summarize with AI?

Log in

Guides you through the process of modifying system settings for Crosswork Data Gateway, including requirements for administrator access, IPv6 formatting, and custom SCP port configuration when accessing the Change Current System Settings menu.


This section provides a clear, step-by-step procedure for administrators to modify system settings in Crosswork Data Gateway using the Change Current System Settings menu. It outlines the required prerequisites, such as administrator access and special formatting rules, and guides users through the process to ensure system configurations are updated accurately and efficiently. This helps maintain operational integrity and supports necessary adjustments as network or application needs evolve.

Crosswork Data Gateway allows you to configure various system settings. The Change Current System Settings menu provides access to these options.

Follow these steps to modify the current system settings:

Before you begin

Ensure you are aware of these considerations and requirements:

  • Enrollment token: The Enrollment Token menu option is intended for users of Crosswork Data Gateway for Cloud applications.

  • Administrator access: Only the administrator can modify system settings.

  • IPv6 address format: When you use an IPv6 address, enclose it in square brackets (for example, [1::1] ).

  • SCP port configuration: If you need to use a custom SCP port (not the default port 22), specify the port in the SCP command with the syntax:
    scp -p 55 {file name} [user@hosts:]destination
    In this example, 55 is the custom port number.

Procedure


1.

From the Main Menu, select 3 Change Current System Settings.

2.

Select the setting that you want to modify.


Configure the NTP time

It is essential for the NTP time to be synchronized between the controller application and its Crosswork Data Gateway instances.

If the time is not synchronized, session handshakes fail, and functional images will not be downloaded. In such cases, the following error message will be logged in the controller-gateway.log: Clock time not matched and sync failed.

How to access the log files

Use the Run show-tech command. For more information, see Run the Showtech Command. You can check the NTP reachability for both the controller application and Crosswork Data Gateway by using the Controller Reachability and NTP Reachability options from the Main Menu > Vitals. For more information, see View the Crosswork Data Gateway vitals.

If NTP is incorrectly configured, the error Session not established will appear.

Key considerations for NTP configuration

  • When configuring Crosswork Data Gateway to use authentication via a keys file, the chrony.keys file must follow the specific format that is documented at chrony.conf documentation.

  • For sites using ntpd and a ntp.keys file, you can convert the ntp.keys to a chrony.keys file using the conversion tool available at ntp2chrony tool.

    This tool converts the ntpd configuration into a chrony compatible format, but only the keys file is needed for importing into Crosswork Data Gateway.

Follow the steps to configure NTP settings:

Procedure

1.

From the Change Current System Settings menu, select Configure NTP.

2.

Enter the details for the new NTP server:

  • Server list with each server separated by a space

  • Use NTP authentication?

  • Key list, with each key separated by a space, and the number of keys must match the number of servers in the list

  • Key file passphrase to use Secure Copy Protocol (SCP) to the VM

  • Key file passphrase to SCP to the VM

3.

Click OK to save the settings.


Configure the DNS

By configuring DNS in Crosswork Network Controller, users can enable the system to resolve hostnames to IP addresses, ensuring reliable communication with external servers and services. This setup is essential for seamless integration, software updates, and connectivity to various network resources.

To configure DNS settings for Crosswork Data Gateway, use these steps:

Procedure

1.

From the Change Current System Settings menu, select Configure DNS and click OK.

2.

Enter the new DNS server addresses and domain.

3.

Click OK to save the settings.


Configure the control proxy

If a proxy server was not configured during the installation, you can set up the proxy server using this option.

Procedure

1.

From the Change Current System Settings menu, select Configure Control Proxy and click OK.

2.

In the confirmation dialog, click Yes to proceed. Click Cancel if you do not wish to proceed.

3.

Enter the following Proxy server details:

  • server URL,

  • bypass addresses,

  • proxy username, and

  • proxy passphrase.

4.

Click OK to save the settings.


Configure static routes

Static routes are typically configured when Crosswork Data Gateway receives addition or deletion requests from the collectors. The Configure Static Routes option from the main menu can also be used for troubleshooting purposes.

Caution

Static routes configured using this option are lost when the Crosswork Data Gateway reboots.


Add the static routes

Before you begin

To add a static route, complete the steps.

Procedure

1.

From the Change Current System Settings menu, select 4 Configure Static Routes.

2.

To add a static route, select Add.

3.

Select the interface for which you want to add a static route.

4.

Select the IP version.

5.

Enter the IPv4 or IPv6 subnet in CIDR format when prompted.

6.

Click OK to save the settings.


Delete the static routes

Before you begin

To delete a static route, complete the steps.

Procedure

1.

From the Change Current System Settings menu, select 4 Configure Static Routes.

2.

To delete a static route, select Delete.

3.

Select the interface for which you want to delete a static route.

4.

Select the IP version.

5.

Enter the IPv4 or IPv6 subnet in CIDR format.

6.

Click OK to save the settings.


Configure the syslog system

The syslog server can be configured during Day0 installation through the configuration file. If you wish to modify the syslog server list, port number, protocol, or certificate file later (Day1 or beyond), you can use the Interactive Console.

Note

For syslog server configuration with IPv4 or IPv6 support on different Linux distributions, refer to your system administrator and configuration guides.

Syslog configuration modes:

  • Simultaneous: Crosswork Data Gateway sends messages to all the configured syslog server addresses. If one of the servers is unresponsive, the message is queued to the disk until the servers respond.

  • Failover: Crosswork Data Gateway sends messages to the first syslog server address. If the server is unavailable, the message is sent to the subsequent configured address. If all servers are unresponsive, the message is queued to the disk until a server responds.

To configure syslog, complete these steps.

Procedure

1.

From the Change Current System Settings menu, select 5 Configure Syslog.

2.

In the Use Syslog window, select True to continue configuring the syslog server.

3.

Enter the values for the syslog attributes:

  • Server address or hostname: Enter a space-delimited list of IPv4 or IPv6 addresses for one or more syslog servers that are accessible from the management interface.

  • Port: Enter the port number of the syslog server.

  • Protocol: Choose UDP, TCP, or RELP for sending system logs.

  • Use Syslog over TLS?: To encrypt syslog traffic using TLS, select True.

  • TLS Peer Name: Enter the syslog server’s hostname as it appears in the server certificate SubjectAltName or Subject Common Name.

  • Syslog Root Certificate File URI: Enter the URI for the PEM-formatted root certificate of the syslog server, which is retrieved using SCP.

  • Syslog Certificate File Passphrase: Enter the password for the SCP user to retrieve the syslog certificate chain.

4.

Click OK to save the settings.


Create the new SSH keys

Creating new SSH keys overwrites the current keys.

Procedure

1.

From the Change Current System Settings menu, select 6 Create new SSH keys.

2.

Click OK.

Crosswork Data Gateway launches an auto-configuration process that generates new SSH keys.


Import a certificate

If you update any certificate except the Controller Signing Certificate, the collector restarts.

Crosswork Data Gateway allows you to import these certificates:

  • Controller signing certificate file

  • Controller SSL or TLS certificate file

  • Syslog certificate file

  • Proxy certificate file

Procedure

1.

From the Change Current System Settings menu, select Import Certificate.

2.

Select the certificate you want to import.

3.

Enter the SCP URI for the selected certificate file.

4.

Enter the passphrase for the SCP URI and click OK.


Configure the vNIC2 MTU

You can modify the vNIC2 MTU only if you are using 3 NICs and:

  • If your interface supports jumbo frames, the valid MTU range is 60 to 9000.

  • If the interface does not support jumbo frames, the valid MTU range is 60 to 1500.

Setting an invalid MTU causes Crosswork Data Gateway to revert to the currently configured value. Ensure that the MTU value is within the supported range as specified in your hardware documentation. Errors related to MTU changes are logged in kern.log and can be viewed after running showtech.

Procedure

1.

From the Change Current System Settings menu, select Configure vNIC2 MTU.

2.

Enter the desired vNIC2 MTU value.

3.

Click OK to save the settings.


Configure the timezone of the Crosswork Data Gateway VM

By default, the Crosswork Data Gateway VM launches with the UTC timezone.

Update the timezone so that all Data Gateway processes, including Showtech logs, reflect the correct timestamp for your location.

Procedure

1.

Log in to the Crosswork Data Gateway VM.

2.

Select Change Current System Settings in the Crosswork Data Gateway VM interactive menu.

3.

Select Configure Timezone from the menu.

4.

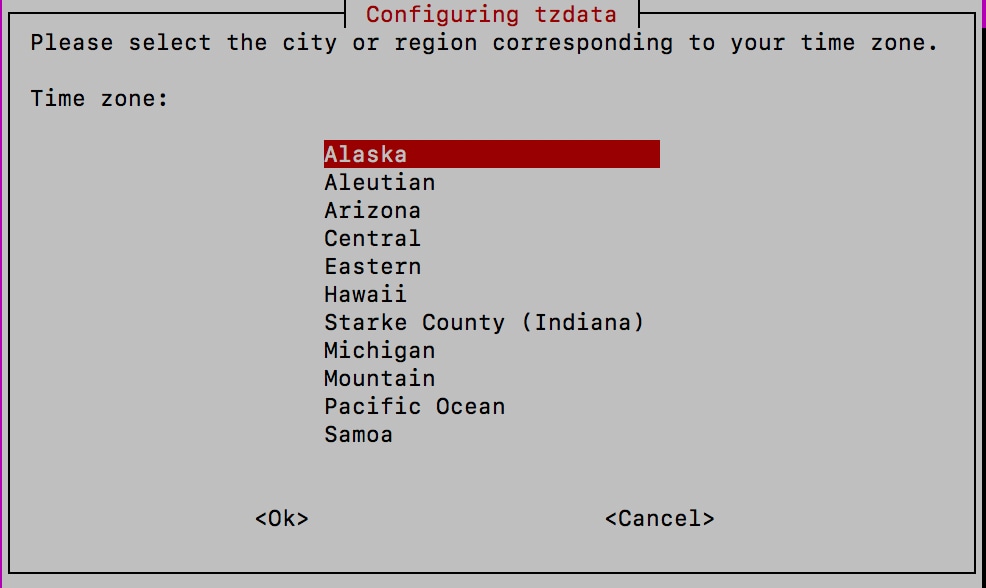
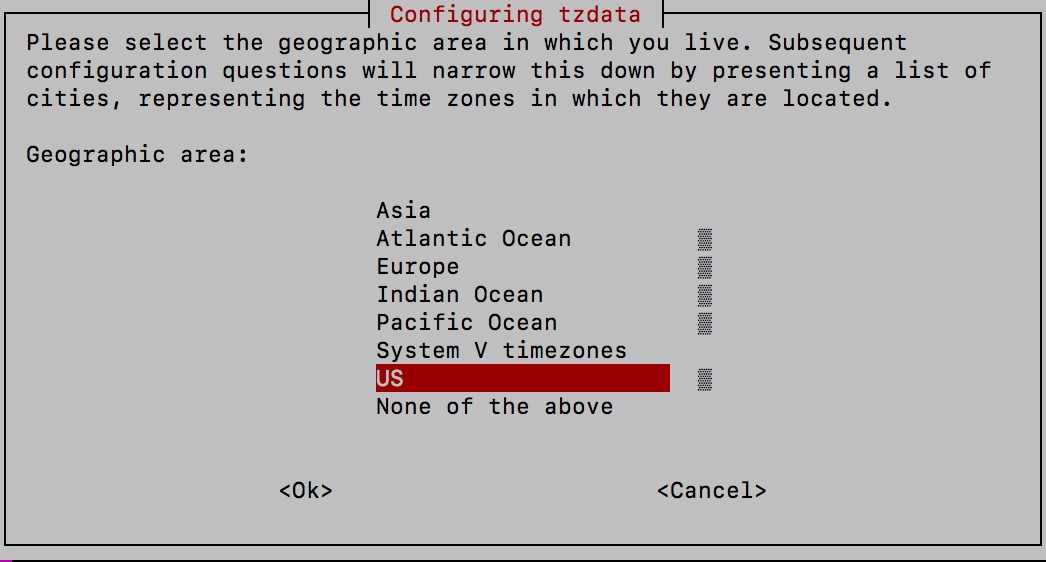
Select the geographical area in which you are located.

Figure 1. Geographic area selection
Timezone Settings - Geographic Area Selection
5.

Select the city or region that corresponds to your timezone.

Figure 2. Region selection
Timezone Settings - Region Selection
6.

Select OK to save the settings.

7.

Reboot the Crosswork Data Gateway VM to apply the new timezone to all processes.

8.

Log out of the Crosswork Data Gateway VM.


Configure the password requirements

You can configure various password requirements.

Procedure

1.

From the Change Current System Settings menu, select Configure Password Requirements.

2.

Select the password requirement you want to change.

Set the options for the selected requirement:

  • Password Strength

  • Password History

  • Password Expiration

  • Login Failures

  • Login Grace Time

3.

Click OK to save the settings.


Configure the simultaneous login limits

By default, Crosswork Data Gateway supports ten simultaneous sessions for the dg-admin and dg-oper users on each VM. To change this limit, use these steps:

Procedure

1.

From the Change Current System Settings menu, select Configure Simultaneous Login Limits.

2.

In the window that appears, enter the desired number of simultaneous sessions for the dg-admin and dg-oper users.

3.

Click OK to save your changes.


Configure an idle timeout

After a specified idle timeout, the system will automatically log out any inactive user session.

Procedure

1.

From the Change Current System Settings menu, select b Configure Idle Timeout.

2.

Enter the desired idle timeout value in the window that appears.

3.

Enter OK to save your changes.


Configure a remote auditd server

To export logs to a remote auditd server, perform the steps in this procedure.

Procedure

1.

From the Change Current System Settings menu, select c Configure Auditd.

2.

Enter the following details.

  • Remote auditd server address.

  • Remote auditd server port.

3.

Select OK to save your changes.


Configure the login check frequency

You can configure the number of permissible login attempts allowed after a failed login. If you want to disable the feature, set the frequency to zero.

Procedure

1.

From the Change Current System Settings menu, select Configure Login Check Frequency and click OK.

2.

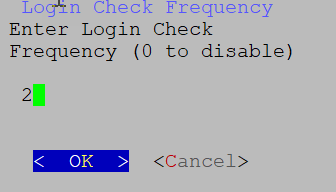
In the Login Check Frequency window, enter the number of login attempts you want to allow after a failure. To disable the feature, enter 0.

Figure 3. Login check frequency
Login Check Frequency Window

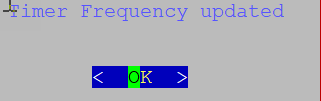
After the timer is updated, a confirmation window appears.

Figure 4. Timer frequency
Timer Frequency Updated Window

Configure an interface address

After deploying a Crosswork Data Gateway instance, you can reconfigure the network interfaces that are associated with it. The reconfiguration allows you to modify an interface’s name, IP address, or security group association.

Before you begin

Before reconfiguring the interface address, make sure to:

  • Ensure that all devices are detached from the Crosswork Data Gateway instance.

  • Verify that the Crosswork Data Gateway instance is in maintenance mode.

Procedure

1.

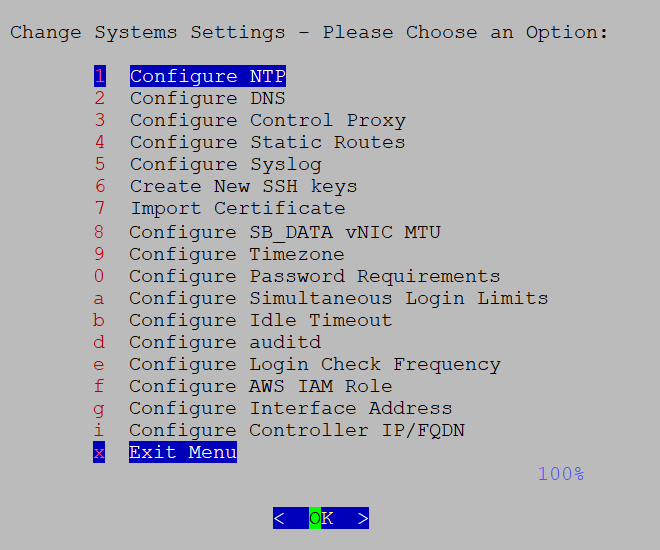
From the Change System Settings menu, select Configure Interface Address.

Figure 5. System settings
Change System Settings Menu
2.

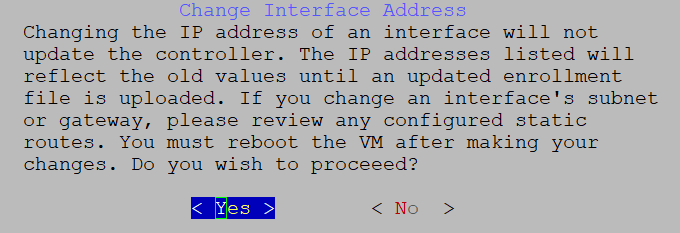
In the Change Interface Address confirmation box, click Yes.

Figure 6. Change interface address confirmation message
Change Interface Address Confirmation Message
3.

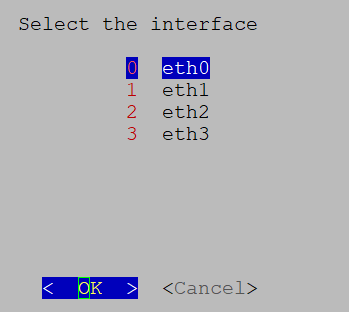
Select the interface that you want to reconfigure with options are eth0 , eth1, eth2, or eth3. Click OK.

Figure 7. Interface selection
Interface Selection Menu
4.

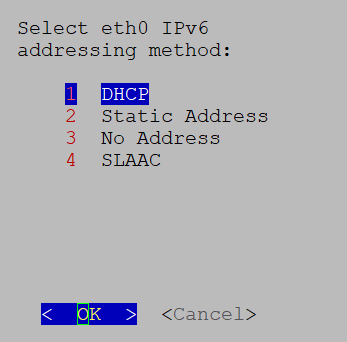
Choose the IPv4 addressing method for the interface. You can select from:

  • DHCP

  • Static Address

  • No address

Note

Cisco recommends that you select the option you configured during the Day0 installation.

Figure 8. IPv6 address selection
IPv6 Address Selection
5.

Enter the IPv4:

  • address and click OK.

  • netmask address and click OK.

6.

In the Skip Interface IPv4 Gateway Configuration confirmation box, select True or False and click OK.

7.

If you selected True in the previous step, specify the IPv4 gateway address.

8.

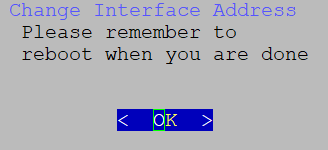
In the Change Interface Address confirmation box, click OK.

Figure 9. Confirmation message
Confirmation Message
9.

After reconfiguring the interface, reboot the VM to apply the changes.


Configure the controller IP for Crosswork Data Gateway

This topic explains the procedure for configuring the Controller IP or fully qualified domain name (FQDN) for the Crosswork Data Gateway after enabling the Geo Redundancy feature.

When a Data Gateway is deployed with an invalid Controller IP, it may get stuck in the enrollment process. To address this, reconfigure the Controller IP. Also, if a Data Gateway is enrolled to a Crosswork and there is a change in Controller virtual IP address (VIP IP) or the IP is changed to FQDN due to the enabled Geo Redundancy feature, it needs to be reconfigured.

To configure the controller IP for a new enrollment or change the controller IP of an existing Crosswork that the Data Gateway is enrolled with:

Navigate to the Data Gateway on the active cluster before the geo redundancy feature is enabled.

Procedure

1.

From the Change Current System Settings menu, select Configure Controller IP/FQDN

2.

Enter the SCP URI for the controller signing certificate file.

3.

Enter the SCP passphrase or the SCP user password for the controller-signing certificate file.

4.

Enter the IP address for the controller.

A message appears to confirm that Crosswork has updated the IP address or FQDN of the controller, and the VM is rebooted.


View the Crosswork Data Gateway vitals

To view Crosswork Data Gateway vitals, use these steps.

Procedure

1.

From the Main Menu, select Vitals.

2.

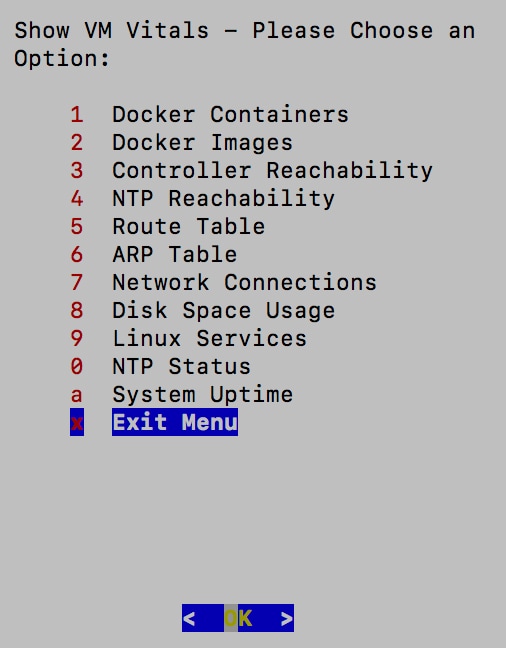
From the Show VM Vitals menu, select the vital you want to view.

Figure 10. Show the VM vitals
Show VM Vitals Menu

Vital

Description

Docker Containers

The system displays the following vitals for the Docker containers currently instantiated in the system.

• Container ID

• Image

• Name

• Command

• Created Time

• Status

• Port

Docker Images

The system displays the following details for the Docker images currently saved in the system.

• Repository

• Image ID

• Created Time

• Size

• Tag

Controller Reachability

The system displays the results of the controller reachability test run.

• Default IPv4 gateway

• Default IPv6 gateway

• DNS server

• Controller

• Controller session status

NTP Reachability

The system displays the results of NTP reachability tests.

• NTP server resolution

• Ping

• NTP Status

• Current system time

Route Table

The system displays the IPv4 and IPv6 routing tables.

ARP Table

The system displays the ARP tables.

Network Connections

The system displays the current network connections and listening ports.

Disk Space Usage

The system displays the current disk space usage for all partitions.

Linux Services

The system displays the status of these Linux services.

  • NTP

  • SSH

  • Syslog

  • Docker

  • Crosswork Data Gateway Infrastructure containers.

Check NTP Status

The system displays the NTP server status.

Check System Uptime

The system displays the system uptime.