Cisco Crosswork Network Controller 7.2 Administration Guide

PDF

Manage credential profiles

Want to summarize with AI?

Log in

Use the topics in this section to create, edit, import, export, and delete credential profiles used for device management.


A credential profile is a collection that

  • stores credentials for various network protocols (such as SNMP, Telnet, SSH, and HTTP) set at the device level,

  • enables consistent application of credentials when adding devices or providers, and

  • automates device configuration changes, streamlines monitoring, and facilitates communication with providers.

Credential profiles may include as many protocols and their corresponding credentials as needed within a single profile. They must contain credentials that match those configured on devices.


Credential profiles page

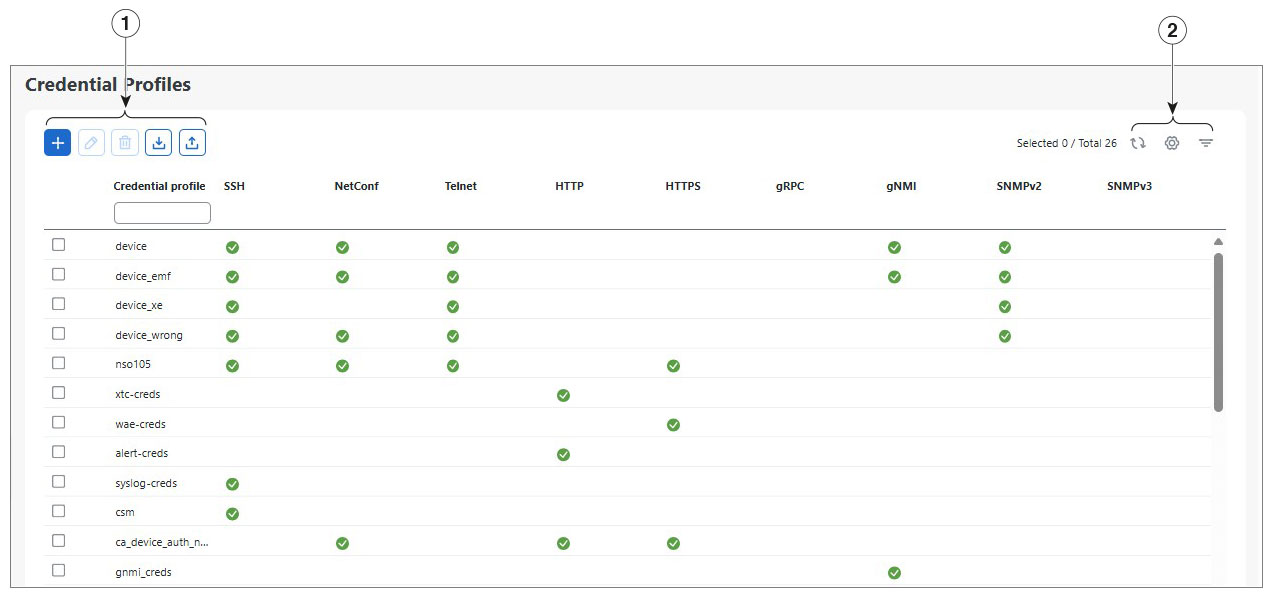
From the Credential profiles page, you can create a new credential profile, update the settings configured for an existing profile, or delete a profile. To open this page, choose Device Management > Credential profiles.

Figure 1. Credentials profile page
Credentials profile page
Table 1. Credentials profile page items
Item Description

1

Click Add icon to add a credential profile. See Create credential profiles.

Click Edit icon to edit the settings for the selected credential profile. See Edit credential profiles.

Click Delete icon to delete the selected credential profile. See Delete credential profiles.

Click Import icon to import new credential profiles from a CSV file. You can also download a CSV file template by clicking this icon. The template includes sample data that you can use as a guide for building your own CSV file. See Import credential profiles using a CSV file.

Click Export icon to export credential profiles to a CSV file. See Export credential profiles.

2

Click Refresh icon to refresh the Credential Profiles window.

Click Settings icon to choose the columns to make visible in the Credential Profiles window.

Click Set Filter icon to set filter criteria on one or more columns in the Credential Profiles window.

To clear a filter, click the corresponding [X] in the Filters menu.


Create credential profiles

This section explains how to create a new credential profile using the Crosswork Network Controller UI.
Note

If you have many credential profiles to import, you may find it more efficient to put the information in a CSV file and import the file. Refer to Import credential profiles using a CSV file for instructions.

To create a new credential profile, complete these steps:

Procedure

1.

Choose Device Management > Credential Profiles > Add icon.

2.

Enter a descriptive profile name to ensure it is easily distinguishable from other credential profiles. The name can contain a maximum of 128 alphanumeric characters. You can use letters, numbers, dots (.), underscores (_), and hyphens (-).

3.

Select a protocol from the Connectivity type drop-down list. Confirm what connection types must be configured in a credential profile for specific providers. Refer to Provider families for a list of supported provider families.

4.

Complete the applicable credentials and ensure they match what is already on the device.

5.

To add more protocols, click + Add Another and repeat the previous steps.

6.

Click Save.


Import credential profiles using a CSV file

If you need to add many credential profiles, add the information to a CSV file and import it. Importing credential profiles from a CSV file adds the profiles to the database. Any duplicate profiles that already exist are overwritten.

Additional security

To maintain network security, use asterisks instead of real passwords and community strings in any CSV file you plan to import. After the import, follow the steps in Edit credential profiles to replace the asterisks with actual passwords and community strings.

Considerations when replacing an existing CSV file

When you re-import a credential profile CSV file that you have exported and edited, all passwords and community strings in the exported file are replaced with asterisks (*). You cannot re-import an exported credential profile CSV file with blank passwords.

To import credential profiles using a CSV file, complete these steps:

Procedure

1.

Choose Device Management > Credential Profiles > Import icon.

2.

If you have not already created a credential profile CSV file to import:

  1. Click the Download sample 'Credential template (*.csv)' file link and save the CSV file template to your local drive.

  2. Open the template using your preferred tool and edit one row for each credential profile. See Credential profile template guidelines.

  3. When you are finished, save the new CSV file.

3.

Click Browse to navigate and open the CSV file.

4.

With the CSV file selected, click Import.

The credential profiles you imported should now be displayed in the Credential Profiles window.


Credential profile template guidelines

Use these guidelines when editing the credential template:

  • Use a semicolon to separate multiple entries in the same field. Use two semicolons with no space between them to indicate that you are leaving the field blank. The order in which you enter values in each field is important because it determines how fields are mapped to each other. For example, if you enter SSH;NETCONF;TELNET in the Connectivity Type field and you enter UserTom;UserDick;UserHarry; in the User Name field, the entries are mapped in order.

    • SSH: UserTom

    • NETCONF: UserDick

    • TELNET: UserHarry

  • Enter SNMP community string information exactly as currently entered on your devices. Failure to do so will result in loss of device connectivity, and inability to collect certain KPI data or execute configured Playbooks on devices associated with the credential profile.

  • Password and community string information associated with a user ID are stored in plain text in the CSV file you prepare. Review the security implications of storing credentials and apply appropriate safeguards.

  • Delete the sample data rows before saving the file. If you keep the sample rows, the imported data will include both sample and intended information. Column header rows are always ignored during import.

  • Each row defines a credential profile. This table helps you populate each credential profile.

    Table 2. Credential profile template guidelines
    Field Entries Required or Optional

    Credential Profile

    The name of the credential profile. For example, nso or srpce.

    Required

    Connectivity Type

    Valid values are SSH, SNMPv2, NETCONF, TELNET, HTTP, HTTPS, GNMI, SNMPv3, or TL1.

    Required

    • Devices—SNMP and SSH are required to avoid operational errors due to clock synchronization checks.

    • SR-PCE—Since SR-PCE is considered a provider and a device, SSH, and HTTP are required.

    • NSO—NETCONF is required.

    Note

    SSH and SNMP credentials are mandatory for onboarding devices and synchronizing with the NSO provider.

    User Name

    For example, NSOUser

    Required if Connectivity Type is SSH, NETCONF, TELNET, HTTP, HTTPS, SNMPv3, or GRPC.

    Password

    The password for the specified User Name.

    Required

    Enable Password

    Use an Enable password. Valid values are: ENABLE, DISABLE, or leave blank (unselected)

    Required if Connectivity Type is SSH or TELNET. Otherwise leave the field blank.

    Enable Password Value

    Specify the Enable password to use.

    Required if Connectivity Type is SSH or TELNET, and Enable Password is set to ENABLE. Otherwise leave blank.

    SNMPV2 Read Community

    For example: readprivate

    Required if Connectivity Type is SNMPv2

    SNMPV2 Write Community

    For example: writeprivate

    Required if Connectivity Type is SNMPv2

    SNMPV3 User Name

    For example: DemoUser

    Required if Connectivity Type is SNMPv3

    SNMPV3 Security Level

    Valid values are noAuthNoPriv, AuthNoPriv or AuthPriv

    Required if Connectivity Type is SNMPv3

    SNMPV3 Auth Type

    Valid values are

    • HMAC_SHA2-512

    • HMAC_SHA2_384

    • HMAC_SHA2_256

    • HMAC_SHA2_224

    • HMAC_MD5

    • HMAC_SHA

    Required if Connectivity Type is SNMPv3 and SnmpV3 Security Level is AuthNoPriv or AuthPriv

    SNMPV3 Auth Password

    The password for this authorization type.

    Required if Connectivity Type is SNMPv3 and SnmpV3 Security Level is AuthNoPriv or AuthPriv

    SNMPV3 Priv Type

    These SNMPv3 Privacy Types are supported:

    • CFB_AES_128

    • CBC_DES_56

    • AES-192

    • AES-256

    • 3-DES

    Required if Connectivity Type is SNMPv3 and SnmpV3 Security Level is AuthPriv

    SNMPV3 Priv Password

    The password for this privilege type.

    Required if Connectivity Type is SNMPv3 and SnmpV3 Security Level is AuthPriv


Edit credential profiles

To edit credential profiles, complete these steps.

Warning

If you change the settings in a credential profile without first changing the settings on the associated device, you might lose connectivity, be unable to collect some KPI data, or be unable to execute configured playbooks on devices associated with the modified profile. For example, if the SNMP community string on the device does not match the value in the credential profile, SNMP-based KPIs will not function.

Before you begin

  • Export a CSV backup of the profiles you want to change. Refer to Export credential profiles for instructions.

  • Change settings on any associated devices.

Procedure

1.

Choose Device Management > Credentials.

2.

Select the profile check box for the profile you want to update. Click Edit icon.

3.

Make the necessary changes and then click Save.

Note

If the device is not updated within 30 seconds after you modify connectivity or credential profile information, move the device state to DOWN and then UP. This action triggers CLI reachability, and the updated values are displayed.


Export credential profiles

When you export credential profiles, the system saves the selected profiles in a CSV file. You can use this CSV file to quickly create backup copies of your credential profiles. You can edit the CSV file as needed and re-import it to add new credential profiles or modify existing data.

The exported credential profiles CSV file does not contain real passwords or community strings. All the characters in the password and community string entries are replaced with asterisks. If you plan to modify and re-import the CSV file, use asterisks instead of actual passwords or community strings. To replace the asterisks with actual values after importing, see Edit credential profiles for instructions.

Procedure

1.

Choose Device Management > Credential Profiles.

2.

(Optional) In the Credential Profiles page, filter the credential profile list as needed.

3.

Select the profile check boxes for the profiles you want to export.

4.

Click Export icon. Depending on your browser, you will be prompted to select a path and file name for saving the CSV file, or to open the file immediately.


Delete credential profiles

To delete a credential profile, complete these steps:

Note

You cannot delete a credential profile that is associated with one or more devices or providers.

Procedure

1.

Export a backup CSV file that contains the credential profile you plan to delete. For instructions, refer to Export credential profiles.

2.

Check whether any devices or providers are using the credential profile you plan to delete. To do this, filter on the Credential Profile column. This column is available in the Devices window (choose Device Management > Credential Profiles) and in the Providers window (choose Administration > Manage Provider Access).

3.

Reassign the devices or providers to a different credential profile. For instructions, see Change the credential profile for multiple network devices and Edit provider settings.

4.

After all devices and providers have had their credential profiles reassigned, from the main menu, choose Device Management > Credential Profiles.

5.

In the Credential Profiles window, choose the profile that you want to delete and then click Delete icon.


Change the credential profile for multiple network devices

If you want to change the credential profile for many network devices, it is often more efficient to edit device information in a CSV file. The process includes these steps:

  1. Export a CSV file containing the devices whose credential profiles you want to change. Refer to Export device information to a CSV file for instructions.

  2. Edit the CSV file, changing the credential profile for each device (this credential profile must already exist).

  3. Save the edited file.

The credential profile linked to these devices must include the authorization credentials for each protocol configured during onboarding. If any protocol-specific credentials are missing or incorrect in the profile, the CSV import will succeed, but reachability checks for these devices will fail.

Before you begin

Ensure that the credential profile you intend to switch to already exists; otherwise, the CSV import will fail. If you haven't created the necessary credential profile, do so before proceeding.

Procedure

1.

From the main menu, choose Device Management > Devices. The Network Devices tab is displayed by default.

2.

Choose the devices whose credential profiles you want to change. Your options are:

  • Click Export icon to include all devices.
  • Filter the device list by entering text in the Search field or by filtering specific columns. Then click Export icon to include only the filtered list of devices.
  • Check the boxes next to the device records you want to change. Then click Export icon to include only the devices that have been checked.
3.

Edit and save the new CSV file using the tool of your choice. Be sure to enter the correct credential profile name in the Credential Profile field for each device.

4.

Click Import icon.

5.

In the Import dialog box, click Browse, choose the new CSV file, and click Import.