- Preface
- Basic Functionality
- Basic Configurations
- Configuring System
- Configuring Green Ethernet
- Configuring Thermal Protection
- Configuring Ports
- Configuring Security
- Configuring Aggregation
- Configuring Link OAM
- Configuring Loop Protection
- Configuring Spanning Tree
- Configuring MVR
- Configuring LLDP
- Configuring SyncE
- Configuring EPS
- Configuring MEP
- Configuring ERPS
- Configuring MAC Table
- Configuring VLANs
- Configuring VLAN Translation
- Configuring Ethernet Services
- Configuring Performance Monitor
- Configuring QoS
- Configuring HQoS
- Configuring Mirroring
- Configuring PTP
- Configuring sFlow
- Configuring Traffic Test
- Configuring Traffic Test Loops
- Configuring DDMI
- Configuring UDLD
- Configuring Flex Links
- Monitoring System
- Monitoring Green Ethernet
- Monitoring Thermal Protection
- Monitoring Ports
- Monitoring Link OAM
- Monitoring Security
- Monitoring Aggregation
- Monitoring Loop Protection
- Monitoring Spanning Tree
- Monitoring MVR
- Monitoring LLDP
- Monitoring Ethernet Services
- Monitoring Performance Monitor
- Monitoring PTP
- Monitoring MAC Table
- Monitoring VLANs
- Monitoring sFlow
- Monitoring DDMI
- Monitoring UDLD
- Monitoring Flex Links
- Diagnostics
- Maintenance
- Use Cases
Configuring Traffic Test Loops
- Configuring Traffic Test Loops
- Traffic Test Loop Function
- EVC Domain Latching Loop Overview
- Configuration Examples
- User Interface Reference
Configuring Traffic Test Loops
This chapter describes the Traffic Test Loop feature and how to use it.
A traffic test loop can be used to return selected Ethernet frames in the direction from which they came. This feature is intended for Service Activation Testing (SAT) and troubleshooting for point-to-point and multipoint services across multiple Carrier Ethernet Networks (CENs).
Traffic Test Loop Function
Loop Instances
A single system can contain several loop instances. Only four instances can however be active at any given point in time.
Loop Modes
The system supports two different loop modes:
-
Static Loopback
-
Latching Loopback (as specified in MEF 46)
The Static Loopback mode is fully configured and controlled by management actions. Once configured and activated the loop will operate until explicitly changed or deactivated by another management operation.
The Latching Loopback mode combines management operations and OAM frame exchange to enable operational control of the loop from a remote system without management interface access. The loop must be initially provisioned by the management interface but it can be activated and deactivated using a standard Y.1731 OAM frame sequence.
The Latching Loopback mode conforms to the MEF 46 specification with the exceptions listed in the MEF 46 Non-Conformance Statement section.
Both modes are configured in a similar way. Since the static loops were added first the latching loop function has been implemented as an "add-on" function to the existing loop function.
Loop Domain
A loop instance must be created within one of the following domains. The domain determines which frames to loop.
|
Domain |
Frames to Loop |
|---|---|
|
Port |
All ingress or egress frames on the selected port. |
|
VLAN |
All ingress or egress frames on the selected port with the configured VLAN. |
|
EVC |
All ingress or egress frames classified as belonging to the EVC. |
|
EVC Subscriber |
All ingress or egress frames classified as belonging to the EVC and located in the subscriber domain of the EVC and tagged with an optional Subscriber VID. |
Loop Type
The loop type determines which type of frames to loop and the action performed on the looped frames.
|
Domain |
Frames to Loop |
||
|---|---|---|---|
|
MAC Loop |
All frames in the flow are looped. The source MAC (SMAC) address and destination MAC (DMAC) addresses are swapped. |
||
|
OAM Loop |
Only Y.1731 OAM Loopback Messages (LBM) and Delay Measurement Messages (DMM) frames are looped. LBM frames are converted to LBR frames and DMM frames are converted to DMR frames.
|
Loop Direction
The loop can be configured with two different directions.
|
Direction |
Description |
|---|---|
|
Facility |
This loop is pointing out to the port. Looping is done from ingress to egress. |
|
Terminal |
This loop is pointing into the forwarding plane. Looping is done from egress to ingress. |
Loop Residence Port
Any loop instance must be configured with a residence port regardless of the domain and direction settings. The residence port indicates the point in the system where frames that would otherwise have been forwarded is returned to the sender.
The valid choices of residence port depend on the domain and direction settings.
Warning Ignore
When enabling a Port domain facility loop all frames on the port will be looped including any management IP frames - management access will be lost on this port. To ensure that the user is aware of these consequences a warning is printed and the loop is not enabled. To enable the loop, the user must append the ICLI command with the keyword 'warning-ignore'.
EVC Domain Latching Loop Overview
The Port and VLAN loop domains are rather simple to understand and setup. But the EVC and EVC Subscriber domains are a bit more complex, especially when used in conjunction with the Latching Loopback mode.
The figure below shows a generalized view of a switch, together with the various possible locations for a latching loop instance in the EVC and EVC Subscriber domains.
The vertical ellipsis in the middle represents the actual layer-2 MAC/VLAN switch function. The small rectangles at the edge of the larger box represents ports on the switch. In case of an EVC the ports are marked with their role (NNI or UNI/ENNI).
The tag notation is explained in the figure below:
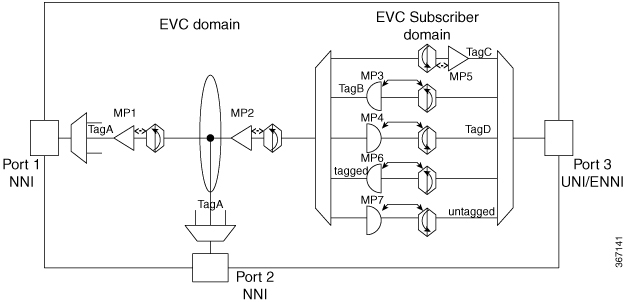
Tag notation:
-
TagA is the first tag on NNI.
-
TabB is the second tag on NNI.
-
TagC and TagD are first tag on UNI/ENNI.
MEP/MIP notation:
-
MP1 is an EVC Down-MEP on NNI and the LLFS is TagA.
-
MP5 is a Down-MEP on UNI/ENNI and the LLFS is TagC.
-
MP4 is a Down-MIP on UNI/ENNI and the LLFS is TagD.
-
MP7 is a Down-MIP on UNI/ENNI and the LLFS is Untagged.
-
MP2 is an Up-MEP on UNI and the LLFS is TagA.
-
MP3 is an Up-MIP on UNI and the LLFS is TagA+TagB.
-
MP6 is an Up-MIP on UNI and the LLFS is TagA+Untagged.
Valid Feature Combinations
This table shows the supported loop paramaters combinations.
|
Domain |
Static Loop |
Latching Loop |
||
|---|---|---|---|---|
|
Facility |
Terminal |
Facility |
Terminal |
|
|
Port |
Supported |
Not Applicable |
Not Applicable |
Not Applicable |
|
VLAN |
Supported |
Not Applicable |
Supported |
Not Applicable |
|
EVC Subscriber |
Supported |
Supported |
Supported |
Supported |
Valid Residence Port Types
This table shows the type of EVC ports that can be used as a residence port depending on the other settings.
 Note | The table is relevant only for EVC domain loops. |
|
Domain |
Direction |
Valid Port Types |
|---|---|---|
|
EVC |
Facility |
NNI ports |
|
Terminal |
UNI ports |
|
|
EVC Subscriber |
Facility |
UNI ports |
|
Terminal |
UNI ports |
MEF 46 Non-Conformance Statement
The system provides a Latching Loopback function which is fully MEF 46 conformant with the following exceptions:
-
On a Serval-1 system a Terminal loop will loop the whole residence port due to limitations in the system hardware. This means that other flows using the same port will be affected when the loop is activated.
-
A single latching loopback instance can only reference a single Maintenance Point (MEP or MIP).
Configuration Examples
The following sections describe various ICLI configuration examples based on the feature description section.
It is recommended to perform a restore to default operation before starting to configure any of the examples in the following sections.
# reload defaults
#
Note the following points with respect to the syntax:
-
Lines that starts with an exclamation mark denotes an explanatory comment. You do not have to enter these in the ICLI console.
-
Text in bold denote user input. These are the commands you need to type.
-
Other text denotes command response from the system.
-
Blank lines are occasionally inserted to increase readability.
-
Wrapped CLI command lines (i.e. user input) will be shown with a '>' marker at the start of the wrapped text.
-
Truncated CLI output lines will be shown with a '<...>' marker at the end of the line.
- Static Loopback
- Port Facility Loop
- EVC Terminal Loop
- Latching Loop
- VLAN Facility Loop
- EVC Subscriber Facility Loop
Static Loopback
This section contains examples of how to set up a static loop.
Port Facility Loop
This example describes how to create a simple static loop for port 1/1. The loop has type = MAC-Loop. The direction is set to facility, which means that all frames received by the port are looped back out on the port. The loop instance is given instance number '1'.
! Enter configuration mode
# configure terminal

! Create the loop
(config)# traffic-test-loop 1 type mac-loop interface GigabitEthernet 1/1 direction facility
> domain port admin-state disabled

! Give the loop a name
(config)# traffic-test-loop 1 name MyLoop

! The loop instance is now created but not active.
! Activate the loop
(config)# traffic-test-loop 1 admin-state enabled warning-ignore

! The loop instance is now active and will loop frames. Without 'warning-ignore' a warning is given and the loop is not active.

! Leave configuration mode and view the loop state
(config)# exit
# show traffic-test-loop 1

Traffic Test Loop:
 inst    name      type   opctrl   direction   domain   flow                   port <...>
    1  MyLoop  mac-loop   static    facility     port      -    GigabitEthernet 1/1 <...>

! Enter configuration mode again
# configure terminal

! Deactivate the loop
(config)# traffic-test-loop 1 admin-state disabled

! Remove the loop instance
(config)# no traffic-test-loop 1
EVC Terminal Loop
This example shows how to create a static terminal loop of type MAC-Loop in the EVC domain.
The example assumes that an EVC has already been created with EVC ID = 1, and with port 1/2 as a UNI port.
! Enter configuration mode
# configure terminal

! Create the loop
(config)# traffic-test-loop 1 type mac-loop interface GigabitEthernet 1/2 direction terminal domain evc 1 admin-state disabled

! Give the loop a name
(config)# traffic-test-loop 1 name MyEVCLoop

! Activate the loop
(config)# traffic-test-loop 1 admin-state enabled

! The loop instance is now active and will loop frames.

! Leave configuration mode and view the loop state
(config)# exit
# show traffic-test-loop 1

Traffic Test Loop:
 inst  name               type   opctrl  direction  domain   flow                 port <...>
    1  TRAFFIC_<...>  mac-loop   static   terminal     evc      1  GigabitEthernet 1/2 <...>

! Enter configuration mode again
# configure terminal

! Remove the loop instance (not strictly necessary to deactivate first)
(config)# no traffic-test-loop 1
Latching Loop
This section contains examples of how to set up a latching loop.
Note | When setting up a latching loop instance it is very important that the instance is initially created with admin-state = disabled and that the admin-state is not set to enabled until the latching loop function has been configured for the instance. Otherwise the loop will behave as a static loop and will immediately start to loop frames! |
VLAN Facility Loop
This example shows how to create a latching loop for VLAN 200 on port 1/1. The loop will have type = MAC-Loop. The direction will be set to facility. The latching loop OAM frame handling will be enabled using a MEP with instance ID = 1 and will be provisioned with a source MAC (SMAC) filter = 00:11:22:33:44:55. Refer to [AN1105] for details on how to create MEPs.
With this configuration, only frames arriving on port 1/1 with VLAN tag 200 and with the specified SMAC address will be looped.
The example also shows how to inspect the state of an actively looping instance.
! Enter configuration mode
# configure terminal

! Create the MEP used for handling the latching loop OAM frames
(config)# mep 1 down domain vlan flow 200 level 0 interface GigabitEthernet 1/1

! Create the loop
(config)# traffic-test-loop 1 type mac-loop interface GigabitEthernet 1/1 direction facility
> domain vlan 200 admin-state disabled

! Give the loop a name
(config)# traffic-test-loop 1 name MyLlVlanLoop

! Setup the Latching Loop function
(config)# traffic-test-loop 1 ll mep 1 smac 00:11:22:33:44:55

! Enable the loop
(config)# traffic-test-loop 1 admin-state enabled

! The loop instance is now enabled but not active, i.e. it will not start to loop
! until it receives a valid Latching Loop LLM "Activate" OAM frame.

! Leave configuration mode and view the basic loop state
(config)# exit
# show traffic-test-loop 1

Traffic Test Loop:
  inst          name      type  opctrl  direction  domain  flow                   port <...>
     1  MyLlVlanLoop  mac-loop latch-l   facility    vlan   200    GigabitEthernet 1/1 <...>

! show the specific latching loop state
# show traffic-test-loop 1 ll

Traffic Test Latching Loop:
  inst   mep               smac      admin         oper     timer
     1     1  00-11-22-33-44-55    enabled     inactive        0s

! Note that the "oper" state is 'inactive' and that the "timer" value is 0s which
! indicate that the loop is not active and it not looping traffic.

! Ensure that the latching loop is activated using an LLM OAM packet exchange
! using a remote system. Set the expiry timer to e.g. 30 seconds.

! show the specific latching loop state
# show traffic-test-loop 1 ll

Traffic Test Latching Loop:
  inst   mep               smac      admin         oper     timer
     1     1  00-11-22-33-44-55    enabled           up       27s

! Wait for at least 30 seconds and check the state again.
# show traffic-test-loop 1 ll

Traffic Test Latching Loop:
  inst   mep               smac      admin         oper     timer
     1     1  00-11-22-33-44-55    enabled     inactive        0s

! Remove the loop instance
(config)# no traffic-test-loop 1
EVC Subscriber Facility Loop
This example shows how to create a latching loop in the subscriber domain of an EVC using C-VID = 10. The example assumes that an EVC has already been created with EVC ID = 1, and with port 1/2 as a UNI port. Please refer to [AN1142] for details on how to create an EVC.
The latching loop OAM frame handling will be enabled using a MIP with instance ID = 1 and will be provisioned with a source MAC (SMAC) filter = 00:11:22:33:44:55. Refer to [AN1105] for details on how to create MEPs.
With this configuration, only frames arriving on port 1/2 with C-VID = 10 and with the specified SMAC address will be looped.
! Enter configuration mode
# configure terminal

! Create the MIP used for handling the latching loop OAM frames
(config)# mep 1 mip down domain evc vid 10 flow 1 level 4 interface GigabitEthernet ½

! Create the loop
(config)# traffic-test-loop 1 type mac-loop interface GigabitEthernet 1/1 direction facility
> domain evc 1 subscriber vid 10 admin-state disabled

! Setup the Latching Loop function
(config)# traffic-test-loop 1 ll mep 1 smac 00:11:22:33:44:55

! Enable the loop
(config)# traffic-test-loop 1 admin-state enabled

! The loop instance is now enabled but not active, i.e. it will not start to loop
! until it receives a valid Latching Loop LLM "Activate" OAM frame.
User Interface Reference
This section describes all configurable and viewable parameters for the Traffic Test Loop function.
The content of this section applies to both static and latching loopback modes.
iCLI Interface
All Traffic Test Loop operations use the traffic-test-loop command name.
- Show Command
- Main Configuration Command
- Naming Loop Instance
- Controlling Subscriber Domain Settings
- Controlling Latching Loopback Mode
- Controlling Administrative State
Show Command
The command syntax for viewing settings and status is as follows:
show traffic-test-loop [ <inst> ] [ ll ]
|
Argument |
Explanation |
|---|---|
|
<inst> |
This optional argument is the 1-offset identifier number assigned to the loop instance. If this is omitted, all instances will be shown. |
|
ll |
This optional argument will display special configuration and state for a Latching Loopback loop. If this is omitted only the common configuration and state will be shown, regardless of the mode of the loop. |
Main Configuration Command
The main command syntax for configuring loops is as follows:
traffic-test-loop <inst>
type { mac-loop | { oam-loop [ level <level> ] } }
 	interface <port_type> <port>
direction { terminal | facility }
domain {
 		port |
 		{ evc <evc_id> [ subscriber { all | untagged | { vid <sub_vid> } } ] } |
 		{ vlan <vlan_vid> }
	}
 	[ admin-state { enabled | disabled } ]
[ warning-ignore ]
|
Argument |
Description |
|---|---|
|
<inst> |
This argument is the 1-offset identifier number assigned by the user to the loop instance when it is created. |
|
type |
Selects the type of the loop as explained in section 2.1.4. If the type is set to "OAM Loop" then a MEG level value must also be provided. |
|
interface |
Selects the residence port for the loop. |
|
direction |
Selects the direction of the loop. |
|
domain |
Selects the domain for the loop. |
|
evc_id |
The ID of the EVC if the domain is set to "EVC". The EVC must exist when activating the loop. |
|
subscriber |
Optional EVC Subscriber settings if the domain is set to "EVC". |
|
all |
All frames in the EVC subscriber domain will be looped. |
|
untagged |
Only untagged frames in the EVC subscriber domain will be looped. |
|
vid <sub_vid> |
Only frames tagged with subscriber VID <sub_vid> in the EVC subscriber domain will be looped. |
|
vlan_vid |
The VLAN VID to use if the domain is set to "VLAN". |
|
admin-state |
Controls the administrative state of the loop. The default value is "disabled". |
|
warning-ignore |
Ignore the warning when enabling a Port Domain facility loop. The loop is enabled. |
Naming Loop Instance
This sub-command can be used to change the display name of an existing loop instance.
traffic-test-loop <inst> name <name>
|
Argument |
Description |
|---|---|
|
<inst> |
This argument is the 1-offset identifier number assigned by the user to the loop instance when it is created. |
|
name |
A display name to help the user identify the loop instance. The name can at most contain 32 characters and may not contain spaces. |
Controlling Subscriber Domain Settings
The EVC subscriber settings can also be (re-)configured using a separate command.
traffic-test-loop <inst> subscriber [ all | untagged | { vid <vlan_id> } ]
Controlling Latching Loopback Mode
A loop instance is by default created as a static loop but the latching loop mode can be enabled after initial creation with this separate command.
traffic-test-loop <inst> ll mep <mep_id> smac <mac_address>
|
Argument |
Description |
||
|---|---|---|---|
|
<inst> |
This argument is the 1-offset identifier number assigned by the user to the loop instance when it is created. |
||
|
ll |
Indicate that the remaining command arguments are related to the latching loop mode. |
||
|
mep <mep_id> |
Indicate the MEP or MIP instance which shall be responsible for processing Latching Loopback OAM frames (LLM/LLR) for the loop. This MEP/MIP must be created on the residence port defined for the loop. It must also be assigned to a similar domain as the loop.
|
||
|
smac <mac_address> |
The Source MAC (SMAC) filter to use for the loop. This is used to select frames to include in the loop but LLM OAM frames sent to the loop must also use this SMAC address. |
Controlling Administrative State
The loop administrative state can be set in the main configuration command, but it can also be controlled for an existing loop instance with this separate command.
traffic-test-loop <inst> admin-state { enabled | disabled }
Note | When setting up a latching loop instance it is very important that the instance is initially created with admin-state = disabled (the default value) and that the admin-state is not set to enabled until the latching loop function has been enabled for the instance. Otherwise, the loop immediately starts to loop frames! |
Web Interface
The web interface provides the same configuration options for the Traffic Test Loop function as the ICLI interface described in section . Please refer to this section for a detailed description of the various parameters.
The Traffic Test Loop function can be reached in the web interface using the menu on the left as follows:
-
Expand the Top-most Configuration level
-
Expand the Traffic Test level (located near the bottom)
-
Select the Loop menu entry (see the screenshot to the right).
The main overview page is then shown.
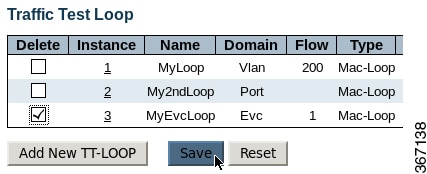
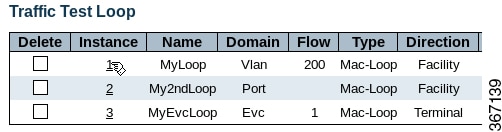
Viewing Existing Loop Instances
The main overview page displays all configured loop instances together with their main configuration and current state.

Creating a New Loop
To create a new loop instance:
-
Click Add New TT-LOOP. A new row is inserted in the overview table.
Figure 3. Creating a New Loop 
-
Fill in the parameters for the loop and click Save.
-
To cancel the loop creation, click Reset. Alternatively, click Delete in the first column.
Deleting a Loop Instance
To delete one or more existing loop instances, select the checkbox in the first column of the loop row(s) you want to delete and click Save.
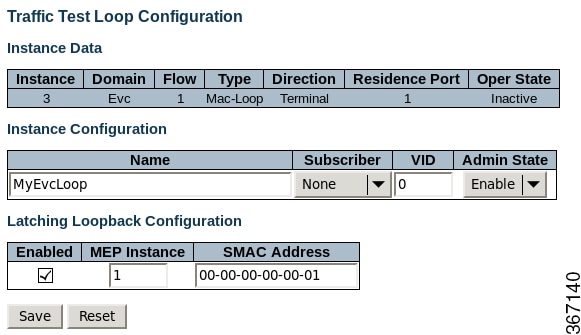
Modifying a Loop Instance
To change the settings of an existing loop instance, click the hyperlinked instance number in the Instance column.
The following loop parameters cannot be changed after they are created in the Web interface:
-
Instance number
-
Domain
-
Flow association
-
Type
-
Direction
-
Residence port
 Feedback