Cisco Security Cloud Control: Secure Firewall ASA Management

PDF

Cisco Security Cloud Control: Secure Firewall ASA Management

Manage ASA certificates

Want to summarize with AI?

Log in

Learn how to manage ASA certificates, including identity certificates, trusted CA certificates, CSR handling, export, edit, and deletion tasks.


Digital certificates provide digital identification for authenticating devices and individual users. A digital certificate includes information that identifies a device or user, such as the name, serial number, company, department, or IP address. A digital certificate also includes a copy of the public key for the user or device. For more information on digital certificates, see the "Digital Certificates" chapter in the "Basic Settings" book of the Cisco ASA Series General Operations ASDM Configuration, X.Y document.

Certificate Authorities (CAs) are trusted authorities that “sign” certificates to verify their authenticity, thereby guaranteeing the identity of the device or user. CAs also issue identity certificates.

  • Identity Certificate — Identity certificates are certificates for specific systems or hosts. You can generate these yourself using the OpenSSL toolkit or get them from a Certificate Authority. You can also generate a self-signed certificate. CAs issue identity certificates, which are certificates for specific systems or hosts.

  • Trusted CA Certificate — Trusted CA certificates are certificates that the system can use to sign other certificates. These certificates differ from internal identity certificates with respect to the basic constraints extension and the CA flag, which are enabled for CA certificates but disabled for identity certificates. A trusted CA certificate is self-signed and called a root certificate.

The Remote Access VPN uses digital certificates for authenticating secure gateways and AnyConnect clients (endpoints) to establish a secure VPN connection.

Guidelines for Certificate Installation

Read the following guidelines for certificate installation on ASA:

  • Certificate can be installed on a single or multiple ASA devices simultaneously.

  • Only one certificate can be installed at a time.

  • Certificate can be installed only on a live ASA device and not on a modal device.

Install ASA Certificates

You must upload the digital certificates as trustpoint objects and install them on the ASA devices managed by Security Cloud Control.

Note

Ensure that the ASA device has no out-of-band changes, and all staged changes have been deployed.

The following lists the digital certificates and formats supported by Security Cloud Control:

  • Identity Certificate can be installed using the following methods:

    • PKCS12 file import.

    • Self-Signed certificate

    • Certificate Signing Request (CSR) import.

  • Trusted CA Certificate can be installed using PEM or DER format.

Watch the screencast demonstrates the steps for installing certificates on ASA using Security Cloud Control. It also shows steps for modifying, exporting, and deleting installed certificates.

Supported Certificate Formats

  • PKCS12: PKCS#12, P12, or PFX format is a binary format for storing the server certificate, any intermediate certificates, and the private key in one encryptable file. PFX files usually have extensions such as .pfx and .p12.

  • PEM: PEM (originally “Privacy Enhanced Mail”) files contain ASCII (or Base64) encoding data and the certificate files can be in .pem, .crt, .cer, or .key formats. They are Base64 encoded ASCII files and contain "-----BEGIN CERTIFICATE-----" and "-----END CERTIFICATE-----" statements.

  • DER: DER (Distinguished Encoding Rules) format is simply a binary form of a certificate instead of the ASCII PEM format. It sometimes has a file extension of .der, but it often has a file extension of .cer, so the only way to tell the difference between a DER .cer file and a PEM .cer file is to open it in a text editor and look for the BEGIN/END statements. Unlike PEM, DER-encoded files do not contain plain text statements such as -----BEGIN CERTIFICATE-----.

Trustpoints Screen

After onboarding the ASA device into Security Cloud Control, on the Security Devices tab, select the ASA device and in the Management pane on the left, click Trustpoints.

In the Trustpoints tab, you'll see the certificates that are already installed on the device.

  • The "Installed" status indicates that the corresponding certificate is installed successfully on the device.

  • The "Unknown" status indicates that the corresponding certificate doesn't contain any information. You need to remove and upload it again with the correct details. Security Cloud Control discovers all the unknown certificates as trusted CA certificates.

  • Click the row that shows "Installed" to view certificate details on the right pane. Click more to see additional details of the selected certificate.

  • An installed Identity Certificate can be exported in PKCS12 or PEM format and imported into other ASA devices. See Exporting an Identity Certificate.

  • Only the advanced settings can be modified on an installed certificate.

    • Click Edit to modify the advanced settings.

    • After making the changes, click Send to install the updated certificate.


Install an Identity Certificate Using PKCS12

You can select an existing trustpoint object created for PKCS12 format and install it on the ASA device. You can also create a new trustpoint object from the installation wizard and install the certificate on the ASA device.

Before you begin

Procedure

1.

In the navigation bar, click Security Devices.

2.

To install an identity certificate on a single ASA device, do the following:

  1. Click the Devices tab.

  2. Click the ASA tab and select an ASA device.

  3. In the Management pane on the right, click Trustpoints.

  4. Click Install.

Note

You can also install a certificate on multiple ASA devices. Select multiple ASA devices and in the Devices Action on the right, click Install Certificate.

3.

From Select Trustpoint Certificate to Install, click one of the following:

4.

Click Send.

This installs the certificate on the ASA device

Note

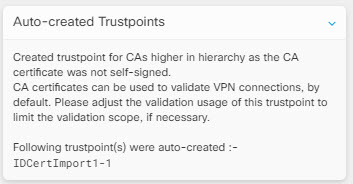
If you are importing a PKCS12 certificate that has intermediate CAs installed on it, ASA automatically creates and installs trustpoint objects on the device for every intermediate CA certificate that is not installed already. When you click on the identity certificate, you'll see a message on the right pane, as shown in the following example.


Install a Certificate Using Self-Signed Enrollment

You can select an existing trustpoint object created for a self-signed certificate and install it on the ASA device. You can also create a new trustpoint object from the installation wizard and install the certificate on the ASA device.

Before you begin

Procedure

1.

In the navigation bar, click Security Devices.

2.

To install an identity certificate on a single ASA device, do the following:

  1. Click the Devices tab.

  2. Click the ASA tab and select an ASA device.

  3. In the Management pane on the right, click Trustpoints.

  4. Click Install.

Note

You can also install a signed certificate on multiple ASA devices. Select multiple ASA devices and in the Devices Action on the right, click Install Certificate.

3.

From Select Trustpoint Certificate to Install, click one of the following:

4.

Click Send.

For self signed enrollment type trustpoints, the Issuer Common Name status will always be the ASA device since the managed device is acting as its own CA and does not need a CA certificate to generate its own Identity Certificate.


Manage a Certificate Signing Request (CSR)

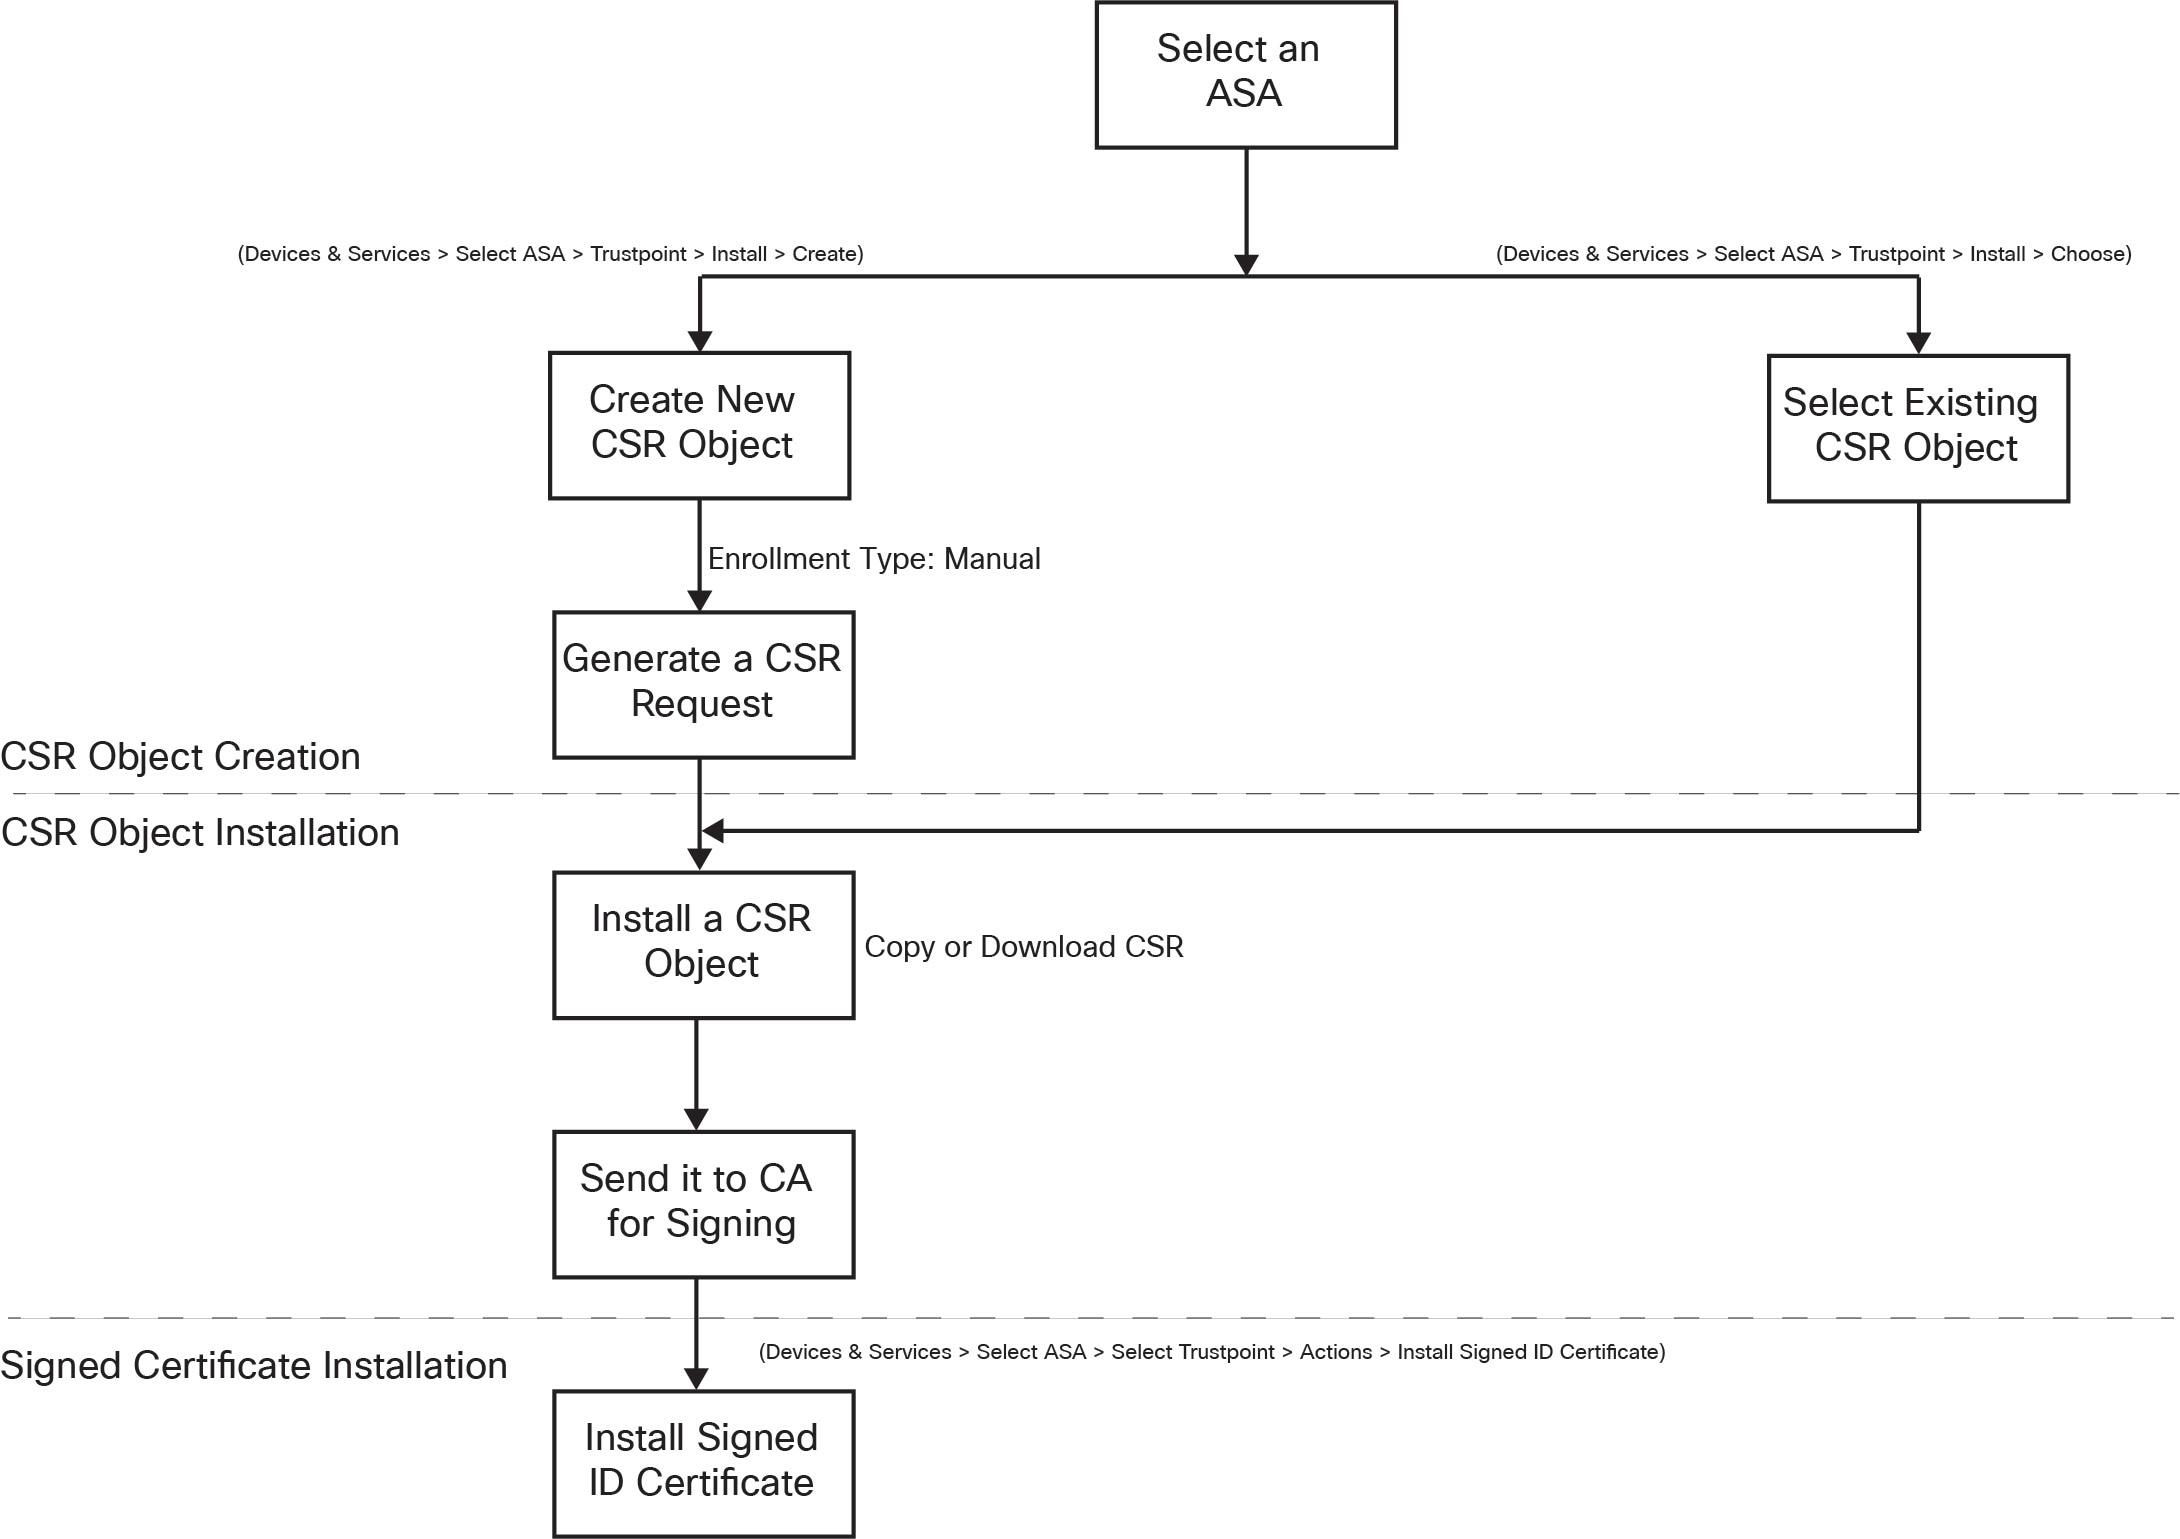
You must first generate a CSR request and then get this request signed by a trusted Certificate Authority (CA). Then, you can install the signed identity certificate issued by the CA on the ASA device.

The following diagram depicts the workflow for generating CSR and installing a certified issued certificate in ASA:


Generate a CSR Request

Procedure

1.

In the navigation bar, click Security Devices.

2.

Click the Devices tab.

3.

Click the ASA tab and select an ASA device.

4.

To install an identity certificate on a single ASA device, do the following:

5.

Click Install.

6.

From Select Trustpoint Certificate to Install, click one of the following:

7.

Click Send.

This generates an unsigned Certificate Signing Request (CSR).

8.

Click the copy icon copy_icon.png to copy the CSR details. You can also download the CSR request in ".csr" file format.

9.

Click OK.

10.

Submit the certificate signing request (CSR) to the Certificate Authority to sign the certificate.


Install a Signed Identity Certificate Issued by a Certificate Authority

Once the CA issues the signed certificate, install it on the ASA device

Procedure

1.

In the Trustpoint screen, click the CSR request with the Status as "Awaiting Signed Certificate Install" and in the Actions pane on the right, click Install Certified ID Certificate.

2.

Upload the signed certificate received from the CA. You can drag and drop the file or paste its contents in the provided field. The trustpoint commands are generated based on the trustpoint you selected.

3.

Click Send.

This installs the signed identity certificate to the ASA device. Installing certificates will immediately deploy changes to the device.

Note

You can also install a certificate on multiple ASA devices. Select multiple ASA devices and in the Devices Action on the right, click Install Certificate.


Install a Trusted CA Certificate in ASA

Before you begin

Procedure

1.

In the navigation menu, click Security Devices.

2.

Click the Devices tab.

3.

Click the ASA tab and select an ASA device.

4.

To install an identity certificate on a single ASA device, do the following:

  1. Select an ASA device and in the Management pane on the right, click Trustpoints.

  2. Click Install.

Note

You can also install a certificate on multiple ASA devices. Select multiple ASA devices and in the Devices Action on the right, click Install Certificate.

5.

From Select Trustpoint Certificate to Install, click one of the following:

6.

Click Send.

This installs the trusted CA file on the ASA device.


Export an Identity Certificate

You can export and import the keypair and issued certificates associated with a trustpoint in PKCS12 or PEM format. This format is useful to manually duplicate a trustpoint configuration on a different ASA.

Procedure

1.

In the navigation menu, click Security Devices.

2.

Click the Devices tab.

3.

Click the ASA.

4.

Select the ASA device and in the Management on the right, click Trustpoints.

5.

Click the identity certificate to export the certificate configuration. Alternatively, you can search for the certificate by entering its name in the search field.

6.

In the Actions pane on the right, click Export Certificate.

7.

Choose the certificate format by clicking the PKCS12 Format or the PEM Format.

8.

Enter the encryption passphrase used to encrypt the PKCS12 file for export.

9.

Confirm the encryption passphrase.

10.

Click Export to export the certificate configuration.

An information dialog box appears, informing you that the certificate configuration file has been successfully exported to the location that you specified.

What to do next

If you want to view the downloaded identity certificate, execute the following commands in the directory where the certificate was downloaded:
  1. To decode certificate in base64 format:
    openssl base64 -d -in <file_name>.p12 -out <file_name>_b64.p12
  2. To view certificate:
    openssl pkcs12 -in <file_name>_b64.p12 -passin pass:<password> 

Edit an Installed Certificate

You can modify only the advanced options of the installed certificate.

Procedure

1.

In the left pane, click Security Devices.

2.

Click the Devices tab.

3.

Click the ASA tab.

4.

Select the ASA device and in the Management on the right, click Trustpoints.

5.

Click the certificate to modify and in the Actions pane on the right, click Edit.

6.

Modify the required parameters and click Save.


Delete an Existing Certificate from ASA

You can delete a certificate one after another. After deleting a certificate, it cannot be restored.

Procedure

1.

In the left pane, click Security Devices.

2.

Select the ASA device and in the Management on the right, click Trustpoints.

3.

Click the certificate to be deleted and in the Actions pane on the right, click Remove.

4.

Click OK to remove the selected certificate.