Cisco Security Cloud Control: Secure Firewall ASA Management

PDF

Cisco Security Cloud Control: Secure Firewall ASA Management

Upgrade bulk ASA and ASDM in Security Cloud Control Firewall Management

Want to summarize with AI?

Log in

Learn how to upgrade ASA and ASDM images on multiple ASA devices in Security Cloud Control Firewall Management using compatible images from the Cisco repository or your own repository.


Procedure

1.

Review ASA and ASDM Upgrade Prerequisites for upgrade requirements and important information about upgrading ASA and ASDM images.

Note

If you are upgrading an ASA 1000 or 2000 series device, be sure to read Configuration Prerequisites for 1000 and 2000 Series.

2.

(Optional) In the left pane, click Security Devices.

3.

Create a change request label to identify the devices upgraded by this action in the change log.

4.

Click the Devices tab.

5.

Use the filter to narrow down the list of devices you may want to include in your bulk upgrade.

6.

From the filtered list of devices, select the devices you want to upgrade.

7.

In the Device Actions pane, click Upgrade.

8.

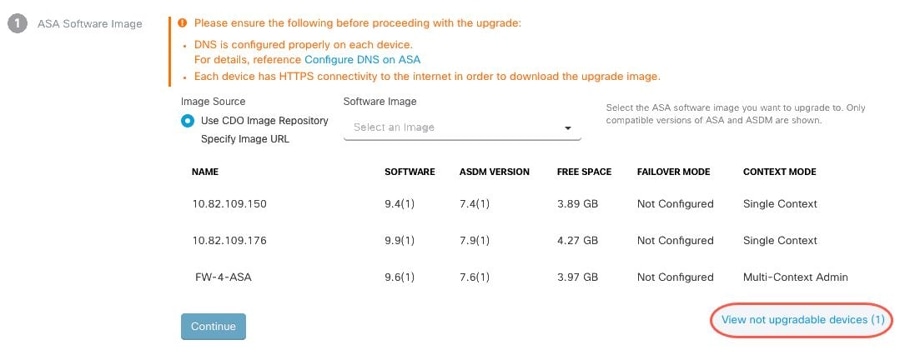
On the Bulk Device Upgrade page, the devices that can be upgraded are presented to you. If any of the devices you chose are not upgradable, Security Cloud Control gives you a link to view the not upgradable devices.
9.

In step 1, click Use Security Cloud Control Image Repository to select the ASA software image you want to upgrade to, and click Continue.

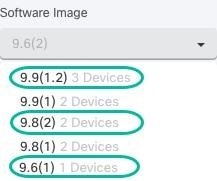
The list indicates how many of the ASAs you chose can be upgraded to the software version you chose. In the example below, all of the devices can be upgraded to version 9.9(1.2), two devices can be upgraded to 9.8(2), and one of the devices can be upgraded to 9.6(1).

Security Cloud Control alerts you if any of the software versions you chose are incompatible with any of the devices you chose. In the example below, Security Cloud Control cannot upgrade the 10.82.109.176 device to a version earlier than it already runs.

10.

In step 2, select the ASDM image you want to upgrade to. You are only presented with ASDM choices that are compatible with the ASA you can upgrade.

11.

In step 3, confirm your choices and decide whether you only want to download the images to your ASAs or copy the images, install them, and reboot the device.

12.

Click Perform Upgrade when you are ready.

Note

If the upgrade fails, Security Cloud Control displays a message. Often the reason for a failed upgrade is a network issue preventing the ASA and ASDM images from being transferred to the ASA.

13.

Alternatively, if you want Security Cloud Control to perform the upgrade later, select the Schedule Upgrade check box. Click the field to select a date and time in the future. When you are done, click the Schedule Upgrade button.

14.

(For multi-context mode) After the admin context and the security contexts boot, you may see that the security contexts display the message, "New certificate detected." If you see that message, accept the certificate for all security contexts. Accept any other changes caused by the upgrade.

15.

Look at the notifications tab (notifications tab) for the progress of the bulk upgrade action. If you want more information about how the actions in the bulk upgrade job succeeded or failed, click the blue Review link and you will be directed to the Jobs page (Jobs page).

16.

If you created and activated a change request label, remember to clear it so that you don't inadvertently associate other configuration changes with this event.


Upgrade Multiple ASAs with Images from your own Repository

Procedure

1.

Review ASA and ASDM Upgrade Prerequisites for upgrade requirements and important information about upgrading ASA and ASDM images.

2.

(Optional) In the left pane, click Security Devices.

3.

Create a change request label to identify the devices upgraded by this action in the change log.

4.

Click the Devices tab.

5.

Use the Filters on security devices, policies, and objects page to narrow down the list of devices you may want to include in your bulk upgrade.

6.

From the filtered list of devices, select the devices you want to upgrade.

7.

In the Device Actions pane, click Upgrade.

8.

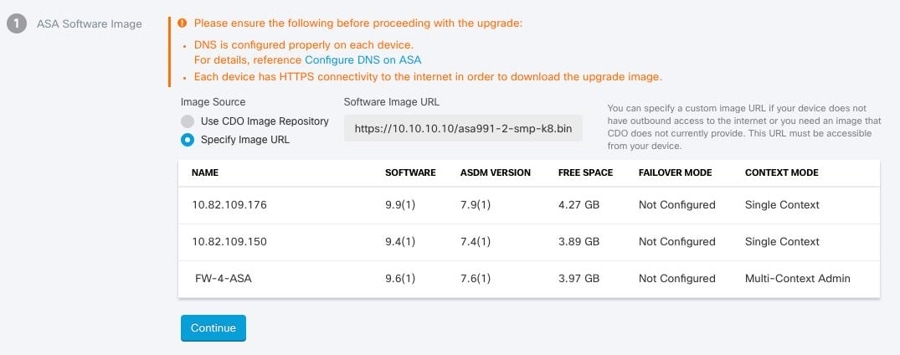
In step 1, click Specify Image URL, enter the URL to the ASA image you want to upgrade to in the In the Software Image URL field, and click Continue. See Custom URL Upgrade for URL syntax information.

Note

The picture below shows an HTTPS URL in the Software Image URL field. You can retrieve the images from your repository using any of these protocols: FTP, TFTP, HTTP, HTTPS, SCP, and SMB. See Custom URL Upgrade for URL syntax information.

9.

In step 2, click Specify Image URL, enter the URL to the ASDM image you want to upgrade to in the In the Software Image URL field, and click Continue.

10.

In step 3, confirm your choices and decide whether you only want to download the images to your ASAs or copy the images, install them, and reboot the device.

11.

Click Perform Upgrade when you are ready.

Note

If the upgrade fails, Security Cloud Control displays a message. Often the reason for a failed upgrade is a network issue preventing the ASA and ASDM images from being transferred to the ASA.

12.

Alternatively, if you want Security Cloud Control to perform the upgrade later, select the Schedule Upgrade check box. Click the field to select a date and time in the future. When you are done, click the Schedule Upgrade button.

13.

(For multi-context mode) After the admin context and the security contexts boot, you may see that the security contexts display the message, "New certificate detected." If you see that message, accept the certificate for all security contexts. Accept any other changes caused by the upgrade.

14.

Look at the notifications tab (notifications tab) for the progress of the bulk upgrade action. If you want more information about how the actions in the bulk upgrade job succeeded or failed, click the blue Review link and you will be directed to the Jobs page (Jobs page).

15.

If you created and activated a change request label, remember to clear it so that you don't inadvertently associate other configuration changes with this event.

What to do next

Upgrade Notes

  • You can also monitor the progress of the batch of upgrades by opening the Security Devices page and viewing the Configuration Status column in the table.

  • You can view the progress of a single device that was included in the bulk upgrade by selecting that device on the Security Devices page and clicking the upgrade button. Security Cloud Control takes you to the Device Upgrade page for that device.