System Security Configuration Guide for Cisco 8000 Series Routers, IOS XR Releases

PDF

System Security Configuration Guide for Cisco 8000 Series Routers, IOS XR Releases

Consent tokens

Want to summarize with AI?

Log in

Explains how Cisco-signed and customer-signed consent tokens authorize restricted router actions through time-limited, device-specific, single-use challenge-response workflows.


Summary

The Cisco-signed workflow involves these actors:

  • The router generates a challenge containing the device ID, nonce, and requested action.

  • The Cisco TAC engineer verifies the requester and signs a response.

  • The router validates the signature and matching device ID and nonce.

If you use Cisco's consent-token workflow, contact Cisco TAC for every request to enable or disable certain privileged operations.

Workflow

These are the stages used to provision a Cisco-signed consent token:

  1. Generate the challenge string on the router.

  2. Submit the challenge to Cisco TAC. After verifying device ownership and authorization, a TAC engineer returns a signed response.

  3. The router validates the signature, device ID, and nonce, then enables or disables the requested feature.

Result

The requested restricted feature is enabled or disabled after the signed response is validated.


Before you begin

  • Identify the supported security feature for which you need a consent token.

  • Have access to Cisco TAC to submit the challenge and receive the signed response.


Summary

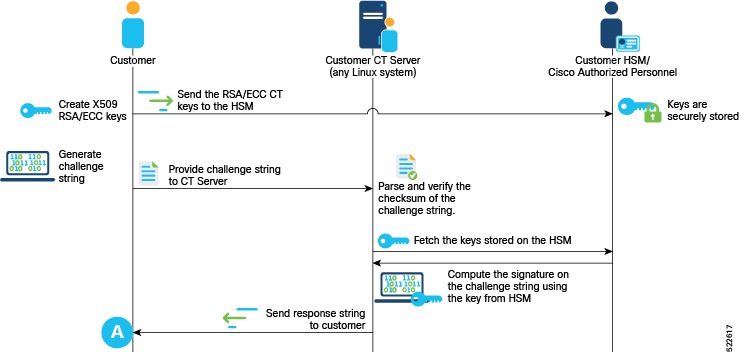
The customer workflow uses customer keys, a key package, the consent-token configuration, and a signing server.

Workflow

Figure 1. Workflow for the consent token server

These are the stages involved in provisioning customer consent tokens:

  1. Generate customer consent-token keys by using the OpenSSL commands.

  2. Onboard the customer consent-token keys on the router by using key packages.

  3. Enable the customer consent token to link the key name with the key package.

    Enter these commands on the router:

    Router# configure

    Router(config)# consent-token customer cert-name CT_KEY key-name key1 product-name prod1

    Router(config)# commit

    cert-name indicates the consent-token certificate added through a key package. key-name indicates the consent-token key, and product-name indicates the product name for the consent token.

  4. Set up the consent-token server on your premises using the sample ct_sim.py script available at GitHub.

  5. Generate the challenge for a feature that supports the customer consent-token workflow.

  6. Sign the challenge string using the consent-token signing server. The server parses the challenge, verifies the checksum, and computes the signature using the key fetched from the Hardware Security Module (HSM).

  7. Accept the response generated by the consent-token signing server.

    The requested feature is enabled or disabled.