System Security Configuration Guide for Cisco 8000 Series Routers, IOS XR Releases

PDF

System Security Configuration Guide for Cisco 8000 Series Routers, IOS XR Releases

How Cisco IOS XR and Crosswork Trust Insights integrate

Want to summarize with AI?

Log in

Introduces the key features and concepts of Crosswork Trust Insights and public-key systems, outlining their roles in securing network infrastructure, and detailing configuration, management, and verification procedures for effective deployment.


Cisco IOS XR Software provides a framework to securely enroll devices and share system integrity information with Cisco Crosswork Trust Insights, a cloud-based SaaS solution that tracks trust posture and validates network hardware and software integrity.

For more details, see:
Summary

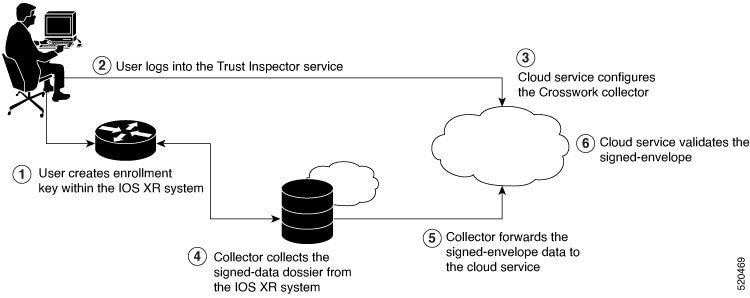
The key components involved in the process are:

  • Cisco IOS XR platform: Generates key pairs and trust roots for secure communication.

  • Trust Inspector service: Manages device enrollment and receives required credentials for integration.

  • Crosswork collector: Collects signed-data dossiers from IOS XR instances and forwards them for validation.

  • Crosswork cloud service: Validates signed-data, ensuring trust posture and certificate authority interoperability.

Integrating Cisco IOS XR and Crosswork Trust Insights helps ensure certificate authority interoperability between network hardware and cloud services by enabling secure enrollment and signed-data sharing.

Workflow

These stages describe integrating Cisco IOS XR and Crosswork Trust Insights.

  1. The Cisco IOS XR platform generates a new key pair and trust root using IOS XR commands.

  2. The user logs into Trust Inspector, initiates the enrollment workflow, and provides the device’s management IP, credentials, and certificate root.

  3. Trust Inspector configures the Crosswork collector to log in to the router and pull integration data.

  4. The Crosswork collector begins periodic polling and generates signed-information dossiers from each IOS XR instance.

  5. The collector forwards signed-envelope data to the Crosswork cloud service for validation.

  6. The cloud service validates the signed-envelope against the enrolled certificate or trust chain.

Result

The integration achieves certificate authority interoperability, allowing network devices and cloud services to securely verify system integrity and trust posture.


Configure Cisco IOS XR and Crosswork Trust Insights integration

Set up interoperability between Cisco IOS XR devices and Crosswork Trust Insights by enrolling systems, configuring authorization, and verifying data-signing.

Integration requires enrolling systems, generating key pairs, configuring certificate trustpoints, and collecting data dossiers. Proper setup enables authorized access and confirms certificate authority behavior.

Before you begin

  • Check for IOS XR Software Maintenance Updates (SMUs) related to Crosswork Trust Insights. See, Cisco Software Downloads.

  • Review Cisco IOS XR Release Notes.

  • Ensure the following configurations are present on the IOS XR device:

    • User authorization required to collect the signed-data dossier

    • SSH server configuration

    • Netconf server configuration

    • Domain name configuration, which is required for certification enrollment

Procedure

  1. Review configuration example for user authorization.

    Example:

    Router# configure
    Router(config)# taskgroup alltasks-dossier
    Router(config-tg)# task read sysmgr
    Router(config-tg)# task read system
    Router(config-tg)# task read pkg-mgmt
    Router(config-tg)# task read basic-services
    Router(config-tg)# task read config-services
    Router(config-tg)# task execute dossier
    Router(config-tg)# commit

    Example:

    Router# configure
    Router(config)# usergroup dossier-group
    Router(config-ug)# taskgroup alltasks-dossier
    Router(config-ug)# commit

    Example:

    Router# configure
    Router(config)# username dossier-user
    Router(config-un)#group dossier-group
    Router(config-un)# commit

    You must have the required user access privileges in order to collect the data dossier from the system. This is defined in terms of IOS XR Task IDs for each command.

    For the respective Task ID applicable for each data dossier option and for the signed-envelope, see the Task ID section in the Command Reference page of show platform security integrity dossier command and utility sign command.

    Note

    We recommend that you use the task execute dossierto configure a CTI (customer-define) user, who collects dossier from the system.

    Listed below are the configurations to set up a user with sufficient authorization to collect all the signed-data dossier. You can configure customized task groups, then associate those task groups with user groups, and finally associate the user groups with the user.

  2. Review configuration example for for ssh and netconf.

    Example:

    Router# configure
    Router(config)# ssh server v2
    Router(config)# ssh server vrf default
    Router(config)# ssh server netconf vrf default
    Router(config)# netconf-yang agent
    Router(config-ncy-agent)# ssh
    Router(config-ncy-agent)# exit
    Router(config)# domain name example.com
    Router(config)# commit
  3. Review the running configuration.

    Example:

    ssh server v2
    ssh server vrf default
    ssh server netconf vrf default
    !
    netconf-yang agent
     ssh
    !
    domain name example.com
  4. Configure the feature by using the source example.

    Example:

    Router# configure
    Router(config)# ssh server rate-limit 600
    Router(config)#line default
    Router(config-line)#exec-timeout 0 0
    Router(config-line)#session-timeout 0
    Router(config-line)# commit

    While the dossier is collected from a device through SSH, the SSH session might timeout. Also, multiple ssh sessions to a device can result in the denial of some SSH sessions. To avoid such occurrence, the following configuration is recommended on the device:

  5. Review the running configuration.

    Example:

    ssh server rate-limit 600
    !
    line default
     exec-timeout 0 0
     session-timeout 0
    !

Integration is successful when the device configuration and verification steps produce output matching the required certificate interoperability and user authorization as demonstrated in the configuration examples.


Configure Crosswork Trust Insights key pairs

Establish secure key pairs used for certificate authority operations within Crosswork Trust Insights.

To enroll a system running Cisco IOS XR, you need to generate keys and certificates for both the leaf and root nodes. The system supports a two-tier self-signed certificate chain for re-keying without re-enrollment, enhancing interoperability and compliance with cryptographic standards.

You can use the system-root-key and system-enroll-key options in the crypto key generate command to generate the root key and the enrollment key respectively, for all the hashing algorithms. You can do this for hashing algorithms such as RSA, DSA or ECDSA (including ECDSA nistp384 and ECDSA nistp521).

To delete the RSA keys, use the no form: no crypto key generate rsa

The details of RSA and DSA keys are displayed in the running configuration.

Starting with Cisco IOS XR Release 26.1.1, the default RSA key size is 3072 bits; any smaller key is considered weak, triggering a syslog warning during system boot. This enhancement ensures compliance with current cryptographic security standards and enhance device protection against emerging threats.

Before you begin

Review certificate authority prerequisites.

Procedure

  1. Generate the root key pair.

    Choose a key modulus of 3072 bits or higher for security.

    Example:

    Router# crypto key generate rsa system-root-key
    
    Sun Oct 20 13:05:26.657 UTC
    The name for the keys will be: system-root-key
    Choose the size of the key modulus in the range of 512 to 4096 for your General Purpose Keypair. Choosing a key modulus greater than 512 may take a few minutes.
    How many bits in the modulus 3072:
    Generating RSA keys ...
    Done w/ crypto generate keypair
    [OK]
  2. Generate the enrollment key pair.

    Select the recommended modulus (3072 bits or higher).

    Example:

    Router# crypto key generate rsa system-enroll-key
    
    Sun Oct 20 13:05:40.370 UTC
    The name for the keys will be: system-enroll-key
    Choose the size of the key modulus in the range of 512 to 4096 for your General Purpose Keypair. Choosing a key modulus greater than 512 may take a few minutes.
     How many bits in the modulus 3072:
    Generating RSA keys ...
    Done w/ crypto generate keypair
    [OK]
  3. Verify the key pairs.

    Example:

    Router# show  crypto  key mypubkey rsa | begin system-
    
    Fri Mar 27 14:00:20.954 IST
    Key label: system-root-key
    Type     : RSA General purpose
    Size     : 3072
    Created  : 01:13:10 IST Thu Feb 06 2025
    Data     :
     30820122 300D0609 2A864886 F70D0101 01050003 82010F00 3082010A 02820101
     00A93DE0 1E485EE3 0E7F0964 C48361D1 B6014BE7 A303D8D6 F7790E92 88E69C4B
     B97B7A9C D1B277E3 1569093C 82BD3258 7F67FB49 94860ECD 34498F1F 59B45757
     F32C8E8F 7CEE23EC C36A43D1 9F85C0D9 B96A14DD DD3BBD4C A1FB0888 EED210A7
     39D9A403 7ACE0F6E 39107226 CA621AD8 6E8102CA 9761B86F D33F2871 9DD16559
     AFCB4729 EFCEDBAF 83DF76E4 9A439844 EE3B1180 4022F575 99E11A2C E25BB23D
     9DD74C81 4E5C1345 D9E3CC79 1B98B1AA 6C06F004 22B901EC 36C099FE 10DE2622
     EB7CE618 9A555769 12D94C90 D9BEE5EA A664E7F6 4DF8D8D4 FE7EAB07 1EF4FEAB
     22D9E55F 62BA66A0 72153CEC 81F2639F B5F2B5C5 25E10364 19387C6B E8DB8990
     11020301 0001
    
    Key label: system-enroll-key
    Type     : RSA General purpose
    Size     : 3072
    Created  : 01:13:16 IST Thu Feb 06 2025
    Data     :
     30820122 300D0609 2A864886 F70D0101 01050003 82010F00 3082010A 02820101
     009DBC14 C83604E4 EB3D3CF8 5BA7FDDB 80F7E85B 427332D8 BBF80148 F0A9C281
     49F87D5C 0CEBA532 EBE797C5 7F174C69 0735D13A 493670CB 63B04A12 4BCA7134
     EE0031E9 047CAA1E 802030C5 6071E8C2 F8ECE002 CC3B54E7 5FD24E5C 61B7B7B0
     68FA2EFA 0B83799F 77AE4621 435D9DFF 1D713108 37B614D3 255020F9 09CD32E8
     82B07CD7 01A53896 6DD92B5D 5119597C 98D394E9 DBD1ABAF 6DE949FE 4A8BF1E7
     851EB3F4 60B1114A 1456723E 063E50C4 2D410906 BDB7590B F1D58480 F3FA911A
     6C9CD02A 58E68D04 E94C098F 0F0E81DB 76B40C55 64603499 2AC0547A D652412A
     BCBBF69F 76B351EE 9B2DF79D E490C0F6 92D1BB97 B905F33B FAB53C20 DDE2BB22
     C7020301 0001

    Example:

    Router(config)# crypto key generate rsa test
    Router(config)# commit
    Thu May 12 08:37:59.894 UTC
    Router(config)# end
    Router# show running-config
    Thu May 12 08:38:04.244 UTC
    Building configuration...
    !! IOS XR Configuration 7.3.4
    !! Last configuration change at Thu May 12 08:37:59 2025 by cisco
    !
    username cisco
     group root-lr
     group cisco-support
     secret 10 $6$8zR0nTbkA7A1n...$0Kn.YxNNmh1cXo9cEvEwLGAFf.rEOTycjsizI/TLBz9WoQX.rmxVwkNgTKAnROUGPtBVlQ/Ndew8gEREXJ7mI0
    !
    call-home
     service active
     contact smart-licensing
     profile CiscoTAC-1
      active
      destination transport-method http
     !
    !
    interface MgmtEth0/RSP0/CPU0/0
     shutdown
    !
    crypto key generate rsa test general-keys 3072 | -----BEGIN PUBLIC KEY-----
    MIIBIDANBgkqhkiG9w0BAQEFAAOCAQ0AMIIBCAKCAQEAgiXFnld/AADcil6eV38A
    AIIlxZ5XfwAAcJb6e1d/AAAA7du+AAAAAI6Qs47BQLhIVQAAAAAAAAAAWQDQVn8A
    ANyKXp5XfwAAKAAAAAAAAACaNcWeV38AANyKXp5XfwAAmjXFnld/AADcil6eV38A
    AJo1xZ5XfwAAAO3bvgAAAABVAAAAAAAAABBEANBWfwAA3Ipenld/AAAgAAAAAAAA
    AI8lxZ5XfwAA3Ipenld/AACPJcWeV38AAHhZANBWfwAAAO3bvgAAAADUTNDpQMWp
    UUUAAAAAAAAAkBcA0FZ/AADcil6eV38AABgAAAAAAAAAiSXFnld/AADcil6eV38A
    AAIBAA==
    -----END PUBLIC KEY-----
     |
    end

    You can use the show crypto key mypubkey rsa command to verify the above key pair generation.

    You can also view the RSA keys in the running configuration. The keys in the following example are in OpenSSL format:

    Note

    Only those keys that are generated in the config mode are visible in the running configuration.

Crosswork Trust Insights key pairs are configured. Verification output matches the expected certificate entries, confirming interoperability.


Configure system trustpoint certificates

Set up system trustpoint certificates to ensure certificate authority interoperability and proper cryptographic verification within your network device.

System trustpoint certificates are required for secure authentication between network devices and their certificate authority. This task generates and verifies the root and leaf certificates.

Before you begin

  • Review certificate authority requirements for your device.

  • Identify the domain name and certificate information for your specific environment.

  • Have administrative access to the network device’s CLI.

Review the related certificate authority prerequisites before you begin.

Procedure

  1. Define the domain name and create the system trustpoint.

    Example:

    Router# configure
    Router(config)# domain name domain1
    Router(config)# crypto ca trustpoint system-trustpoint
    Router(config)# keypair rsa system-enroll-key
    Router(config)# ca-keypair rsa system-root-key
    Router(config)# subject-name CN=lab1-ads,C=US,ST=CA,L=San Jose,O=cisco systems,OU=ASR
    Router(config)# subject-name ca-certificate CN=lab1-ca,C=US,ST=CA,L=San Jose,O=cisco systems,OU=ASR
    Router(config)# enrollment url self
    Router(config)# key-usage certificate digitalsignature keyagreement dataencipherment
    Router(config)# lifetime certificate 300
    Router(config)# message-digest sha256
    Router(config)# key-usage ca-certificate digitalsignature keycertsign crlsign
    Router(config)# lifetime ca-certificate 367
    Router(config)# commit
  2. Generate the root and leaf RSA keypairs.

    Example:

    Router(config)# keypair rsa system-enroll-key
    Router(config)# ca-keypair rsa system-root-key
    Router(config)# subject-name CN=lab1-ads,C=US,ST=CA,L=San Jose,O=cisco systems,OU=ASR
    Router(config)# subject-name ca-certificate CN=lab1-ca,C=US,ST=CA,L=San Jose,O=cisco systems,OU=ASR
    Router(config)# enrollment url self
    Router(config)# key-usage certificate digitalsignature keyagreement dataencipherment
    Router(config)# lifetime certificate 300
    Router(config)# message-digest sha256
    Router(config)# key-usage ca-certificate digitalsignature keycertsign crlsign
    Router(config)# lifetime ca-certificate 367
    Router(config)# commit
  3. Set certificate subject names for each.

    Example:

    Router(config)# subject-name CN=lab1-ads,C=US,ST=CA,L=San Jose,O=cisco systems,OU=ASR
    Router(config)# subject-name ca-certificate CN=lab1-ca,C=US,ST=CA,L=San Jose,O=cisco systems,OU=ASR
    Router(config)# enrollment url self
    Router(config)# key-usage certificate digitalsignature keyagreement dataencipherment
    Router(config)# lifetime certificate 300
    Router(config)# message-digest sha256
    Router(config)# key-usage ca-certificate digitalsignature keycertsign crlsign
    Router(config)# lifetime ca-certificate 367
    Router(config)# commit
  4. Configure enrollment URL and specify certificate attributes.

    Example:

    Router(config)# enrollment url self
    Router(config)# key-usage certificate digitalsignature keyagreement dataencipherment
    Router(config)# lifetime certificate 300
    Router(config)# message-digest sha256
    Router(config)# key-usage ca-certificate digitalsignature keycertsign crlsign
    Router(config)# lifetime ca-certificate 367
    Router(config)# commit
  5. Review the running configuration.

    Example:

    config
    domain name domain1
    crypto ca trustpoint system-trustpoint
    keypair rsa system-enroll-key
    ca-keypair rsa system-root-key
    subject-name CN=lab1-ads,C=US,ST=CA,L=San Jose,O=cisco systems,OU=ASR
    subject-name ca-certificate CN=lab1-ca,C=US,ST=CA,L=San Jose,O=cisco systems,OU=ASR
    enrollment url self
    key-usage certificate digitalsignature keyagreement dataencipherment
    lifetime certificate 300
    message-digest sha256
    key-usage ca-certificate digitalsignature keycertsign crlsign
    lifetime ca-certificate 367
    !

System trustpoint certificates are successfully configured when the show running-config output matches your intended settings, confirming certificate authority interoperability.


Configure root and leaf certificates

Generate and verify root and leaf certificates for secure authentication.

Root and leaf certificates are essential for enabling certificate-based authentication in network environments. The root certificate is self-signed and acts as the certificate authority, while the leaf certificate is signed by the root certificate.

The root certificate is self-signed. The root certificate signs the leaf certificate.

Before you begin

  • Review all prerequisites relevant to the certificate authority.

  • Ensure you have access to the necessary router commands and credentials.

Procedure

  1. Generate the root certificate.

    Example:

    Router# crypto ca authenticate system-trustpoint
    
    Sun Oct 20 13:07:24.136 UTC
    % The subject name in the certificate will include: CN=lab1
    ca,C=US,ST=CA,L=San Jose,O=cisco systems,OU=ASR
    % The subject name in the certificate will include: ios.cisco.com
    Serial Number  : 0B:62
    Subject:
    serialNumber=c44a11fc,unstructuredName=ios.cisco.com,OU=ASR,O=cisco systems,L=San Jose,ST=CA,C=US,CN=lab1-ca
    Issued By      :
            serialNumber=c44a11fc,unstructuredName=ios.cisco.com,OU=ASR,O=cisco systems,L=San Jose,ST=CA,C=US,CN=lab1-ca
      Validity Start : 13:07:26 UTC Sun Oct 20 2019
      Validity End   : 13:07:26 UTC Wed Oct 21 2020
      SHA1 Fingerprint:
             9DD50A6B24FEBC1DDEE40CD2B4D99A829F260967
  2. Generate the leaf certificate.

    Example:

    Router# crypto ca enroll system-trustpoint
    
    Sun Oct 20 13:07:45.593 UTC
    % The subject name in the certificate will include: CN=lab1-ads,C=US,ST=CA,L=San Jose,O=cisco systems,OU=ASR
    % The subject name in the certificate will include: ios.cisco.com
    % Include the router serial number in the subject name? [yes/no]: yes
    % The serial number in the certificate will be: c44a11fc
    % Include an IP address in the subject name? [yes/no]: no
    Certificate keypair configured Type: 1, Label: system-enroll-key.Leaf cert key usage string: critical,digitalSignature,keyEncipherment,keyAgreement.  Serial Number  : 0B:63
      Subject:
            serialNumber=c44a11fc,unstructuredName=ios.cisco.com,OU=ASR,O=cisco systems,L=San Jose,ST=CA,C=US,CN=lab1-ads
      Issued By      :
            serialNumber=c44a11fc,unstructuredName=ios.cisco.com,OU=ASR,O=cisco systems,L=San Jose,ST=CA,C=US,CN=lab1-ca
      Validity Start : 13:07:47 UTC Sun Oct 20 2019
      Validity End   : 13:07:47 UTC Sat Aug 15 2020
      SHA1 Fingerprint:
             19D4C40F9EFF8FF25B59DE0161BA6C0706DC9E3A
  3. Verify the certificates.

    Example:

    Router# show crypto ca certificates system-trustpoint
    Fri Mar 27 14:00:51.037 IST
    
    Trustpoint       : system-trustpoint
    ==================================================
    CA certificate
      Serial Number  : 10:B5
      Subject:
            serialNumber=7b20faa4,unstructuredName=test-sec1.cisco.com
      Issued By      :
            serialNumber=7b20faa4,unstructuredName=test-sec1.cisco.com
      Validity Start : 12:30:17 UTC Fri Feb 21 2020
      Validity End   : 12:30:17 UTC Sat Feb 20 2021
      SHA1 Fingerprint:
             9400A30816805219FAAA5B9C86C214E6F34CEF7B
    Router certificate
      Key usage      : General Purpose
      Status         : Available
      Serial Number  : 10:B6
      Subject:
            serialNumber=7b20faa4,unstructuredAddress=10.1.1.1,unstructuredName=test-sec1.cisco.com,CN=Anetwork,OU=IT,O=Spark Network,L=Rotterdam,ST=Zuid Holland,C=NL
      Issued By      :
            serialNumber=7b20faa4,unstructuredName=test-sec1.cisco.com
      Validity Start : 12:30:31 UTC Fri Feb 21 2020
      Validity End   : 12:30:31 UTC Sat Feb 20 2021
      SHA1 Fingerprint:
             21ACDD5EB6E6F4103E02C1BAB107AD86DDCDD1F3
    Associated Trustpoint: system-trustpoint

    You can use the show crypto ca certificates system-trustpoint [detail] command to see the details of generated root and leaf certificates:

Root and leaf certificates are correctly configured, and their output details match expected values. Certificate authority interoperability is verified.


System certificate expiry actions

Certificate expiry notification

  • IOS XR sends a notification to the syslog server when a system certificate is nearing expiry.

  • Certificate Authority (CA) clients use these notifications for timely certificate management.

Certificate regeneration actions

To regenerate a system certificate on receiving an expiry notification:

  • Clear the system trustpoint certificate

  • Authenticate the system trustpoint

  • Enroll the system trustpoint for a new certificate

Router# clear crypto ca certificates system-trustpoint
Router# crypto ca authenticate system-trustpoint
Router# crypto ca enroll system-trustpoint

Usage notes

  • Apply these actions when planning, configuring, or validating certificate authority interoperability.

  • For more information on certificate expiry alert notifications, see PKI alert notification section.

  • For detailed steps on certificate regeneration, refer to Regenerate the certificate section.


Data dossier collection

A data dossier collection is a Cisco IOS XR security-integrity capability that

  • collects data from IOS XR components in JSON format using the show platform security integrity dossier command

  • enables output signing for integrity and authenticity using the utility sign command, and

  • gathers package information, reboot and rollback history, system-integrity snapshots, system inventory, filesystem inventory, and incremental IMA data.

Signed envelopes

To verify the integrity and authenticity of data dossier output, a signature can be added to the data, which is provided in JSON format. The Secure Unique Device Identifier (SUDI) signature supplies a hardware root of trust to the dossier collected by the system.

Filesystem inventory

The metadata of the filesystem is collected through the data dossier function. The metadata includes timestamps for file creation, access, and modification. Snapshots are taken at each configured interval: the initial snapshot contains all files, and subsequent snapshots record incremental changes.

  • The snapshot-interval is specified in 15-minute blocks. The interval ranges from 1 to 96. For example, a value of 2 indicates that a snapshot interval is collected every 30 minutes.

  • The snapshots are stored in /misc/scratch/filesysinv .

  • Logs are kept at /var/log/iosxr/filesysinv/* .

Incremental integrity measurement architecture

Incremental IMA allows you to define the starting IMA sequence to include in a response, after which subsequent events are reported progressively. You can specify the start event, sequence number, and start time to selectively collect IMA events.

Feature history

Table 1. Feature History Table

Feature Name

Release Information

Description

Collect Filesystem Inventory

Release 25.4.1

Introduced in this release on: Fixed Systems (8010 [ASIC: A100])(select variants only*)

*This feature is supported on:

  • 8011-32Y8L2H2FH

  • 8011-12G12X4Y-A/D

Collect Filesystem Inventory

Release 25.1.1

Introduced in this release on: Fixed Systems (8700 [ASIC: K100], 8010 [ASIC: A100])(select variants only*)

*This feature is supported on:

  • 8712-MOD-M

  • 8011-4G24Y4H-I

Collect Filesystem Inventory

Release 24.4.1

Introduced in this release on: Fixed Systems (8200 [ASIC: P100], 8700 [ASIC: P100])(select variants only*); Modular Systems (8800 [LC ASIC: P100])(select variants only*)

*This feature is supported on:

  • 8212-48FH-M

  • 8711-32FH-M

  • 88-LC1-36EH

  • 88-LC1-12TH24FH-E

  • 88-LC1-52Y8H-EM

Collect Filesystem Inventory

Release 7.3.1

With this feature, a snapshot of the filesystem metadata such as when the file was created, modified, or accessed is collected at each configured interval.

In addition to displaying the changes that the file underwent as compared to the previous snapshot, the inventory helps in maintaining data integrity of all the files in the system.


Collect data dossier output from Cisco IOS XR components

Collect and review data dossier output from Cisco IOS XR components, including reboot-history, filesystem inventory, and incremental IMA data.

Data dossier output is presented in JSON format. For information about data dossier selectors, signed envelopes, filesystem inventory, and incremental IMA commands, see the Data dossier collection reference.

Before you begin

Review prerequisites related to certificate authority configuration.

Procedure

  1. Create a signed envelope for the data dossier output.

    Example:

    Router# show platform security integrity dossier include packages reboot-history rollback-history system-integrity-snapshot system-inventory nonce 1580 | utility sign nonce 1580 include-certificate
  2. Collect reboot-history data dossier output.

    Example:

    Router# show platform security integrity dossier nonce 1234 include reboot-history
    Thu Feb 27 22:20:57.542 IST
    {"collection-start-time":1582822257.6049321,"model-name":"http://cisco.com/ns/yang/Cisco-IOS-XR-ama","model-revision":"2019-08-05","license-udi":{"result-code": "Success", "license-udi": "UDI: PID:NCS-5501-SE,SN:FOC2107R0ZB\n"},"version":{"result-code": "Success", "version": "Cisco IOS XR Software, Version 7.0.12\nCopyright (c) 2013-2020 by Cisco Systems, Inc.\n\nBuild Information:\n Built By     : user1\n Built On     : Mon Jan 27 01:36:26 PST 2020\n Built Host   : iox-lnx-076\n Workspace    : /auto/srca
    rchive15/prod/7.0.12/cisco8000/ws\n Version      : 7.0.12\n Location     : /opt/cisco/XR/packages/\n Label        : 7.0.12\n\ncisco NCS-5500 () processor\nSystem uptime is 4 days 10 hours 12 minutes\n\n"},"platform":{"result-code": "Success", "platform": "Node              Type                       State             Config state\n--------------------------------------------------------------------------------\n0/RP0/CPU0        NCS-5501-SE(Active)        IOS XR RUN        NSHUT\n0/RP0/NPU0        Slice
                 UP                \n0/FT0             NCS-1RU-FAN-FW             OPERATIONAL       NSHUT\n0/FT1             NCS-1RU-FAN-FW             OPERATIONAL       NSHUT\n0/PM0             NCS-1100W-ACFW             FAILED            NSHUT\n0/PM1             NCS-1100W-ACFW             OPERATIONAL       NSHUT\n"},"reboot-history":{"result-code":"Success","model-name":"Cisco-IOS-XR-linux-os-reboot-history-oper","model-revision":"2019-04-05","node":[{"node-name": "0/RP0/CPU0", "reboot-history": [{"reason": "
    User initiated graceful reload", "time": "Wed Feb 19 15:25:11 2020", "cause-code": 1, "no": 1}, {"reason": "CARD_SHUTDOWN", "time": "Wed Feb 19 16:38:00 2020", "cause-code": 37, "no": 2}, {"reason": "CARD_SHUTDOWN", "time": "Wed Feb 19 19:06:27 2020", "cause-code": 37, "no": 3}, {"reason": "CARD_SHUTDOWN", "time": "Thu Feb 20 11:50:50 2020", "cause-code": 37, "no": 4}, {"reason": "CARD_SHUTDOWN", "time": "Fri Feb 21 10:54:09 2020", "cause-code": 37, "no": 5}, {"reason": "CARD_SHUTDOWN", "time": "Fri Feb 21
    19:00:10 2020", "cause-code": 37, "no": 6}, {"reason": "CARD_SHUTDOWN", "time": "Sun Feb 23 12:05:25 2020", "cause-code": 37, "no": 7}]}, {"node-name": "0/0/CPU0", "reboot-history": [{"reason": "Reboot triggered by install", "time": "Tue Feb  4 19:59:23 2020", "cause-code": 36, "no": 1}, {"reason": "CARD_SHUTDOWN", "time": "Tue Feb  4 20:12:06 2020", "cause-code": 37, "no": 2}, {"reason": "Headless SDR", "time": "Sun Feb  9 17:45:25 2020", "cause-code": 671088647, "no": 3}, {"reason": "User initiated graceful reload", "time": "Sun Feb  9 17:45:29 2020", "cause-code": 241, "no": 4}, {"reason": "CARD_SHUTDOWN", "time": "Sun Feb  9 18:28:25 2020", "cause-code": 37, "no": 5}, {"reason": "Headless SDR", "time": "Sun Feb  9 19:01:55 2020", "cause-code": 671088647, "no": 6}, {"reason": "Headless SDR", "time": "Wed Feb 19 15:25:19 2020", "cause-code": 671088647, "no": 7}, {"reason": "CARD_SHUTDOWN", "time": "Wed Feb 19 16:37:46 2020", "cause-code": 37, "no": 8}, {"reason": "CARD_SHUTDOWN", "time": "Wed Feb 19 19:06:1
    4 2020", "cause-code": 37, "no": 9}, {"reason": "CARD_SHUTDOWN", "time": "Thu Feb 20 11:50:37 2020", "cause-code": 37, "no": 10}, {"reason": "CARD_SHUTDOWN", "time": "Fri Feb 21 10:54:01 2020", "cause-code": 37, "no": 11}, {"reason": "CARD_SHUTDOWN", "time": "Fri Feb 21 18:59:57 2020", "cause-code": 37, "no": 12}, {"reason": "CARD_SHUTDOWN", "time": "Sun Feb 23 12:05:12 2020", "cause-code": 37, "no": 13}]}]},"collection-end-time":1582822260.296664}
    Router#
  3. Enable filesystem inventory collection.

    Example:

    Router(config)# filesystem-inventory
    Router(config-filesystem-inventory)# snapshot-interval 2
    Router(config-filesystem-inventory)# commit

    The snapshot-interval value is the time interval in 15-minute blocks. The interval ranges from 1 to 96. A value of 2 indicates that a snapshot is collected every 30 minutes.

  4. Retrieve filesystem inventory in JSON format.

    Example:

    show platform security integrity dossier include filesystem-inventory | file <platform>-parent.json
    
    {"collection-start-time":1610168028.380901,
    "model-name":"http://cisco.com/ns/yang/Cisco-IOS-XR-ama",
    "model-revision":"2019-08-05","license-udi":{"result-code": "Success", "license-udi":
    "UDI: PID:NCS-55A1-24H,SN:FOC2104R15R\n"},"version":{"result-code": "Success",
    "version": "Cisco IOS XR Software, Version 7.3.1
    \nCopyright (c) 2013-2020 by Cisco Systems, Inc.\n\nBuild Information:\n
    Built By     : <user>\n Built On     : Thu Jan  7 17:16:02 PST 2021\n
    Built Host   : <host>\n Workspace    : <ws>
    Version      : 7.3.1\n  Location     : /opt/cisco/XR/packages/\n Label        : 7.3.1\n\ncisco
    () processor\nSystem uptime is 8 hours 7 minutes\n\n"},"platform":{"result-code":
    "Success", "platform":
    "Node              Type                       State             Config state
    --------------------------------------------------------------------------------
    0/RP0/CPU0        <node-type>(Active)       IOS XR RUN        NSHUT\n
    0/RP0/NPU0        Slice                      UP
    0/RP0/NPU1        Slice                      UP
    0/FT0             <platform>-A1-FAN-RV       OPERATIONAL       NSHUT
    0/FT1             <platform>-A1-FAN-RV       OPERATIONAL       NSHUT
    0/FT2             <platform>-A1-FAN-RV       OPERATIONAL       NSHUT
    PM1               <platform>-1100W-ACRV      OPERATIONAL       NSHUT
    "},
    ----------------------------Output is snipped for brevity -------------------------------------
  5. Limit the number of filesystem inventory snapshots.

    Example:

    show platform security integrity dossier include filesystem-inventory filesystem-inventory-options '{\"0/RP0/CPU0\": {\"block_start\": 0, \"count\": 1}}'
  6. Start filesystem inventory collection from a new block.

    Example:

    show platform security integrity dossier include filesystem-inventory filesystem-inventory-options '{\"0/RP0/CPU0\": {\"block_start\": 5}}'
  7. Collect filesystem inventory data from a remote node.

    Example:

    show platform security integrity dossier include filesystem-inventory filesystem-inventory-options '{\"0/RP1/CPU0\": {\"block_start\": 0}}' | file harddisk:PE1_remote.json
  8. Retrieve incremental IMA data.

    Example:

    show platform security integrity dossier incremental-ima
    "{\"ima_start\":[{\"0/RP0/CPU0\":{\"start_event\":1000,\"start_time\":\"Tue Feb 16 09:15:17 2021\"}}]}"

    The system reports subsequent events from the starting IMA sequence in the response.

The task is complete when the required data dossier output is collected, signed if needed, and stored or reviewed in JSON format.


Configure key generation and data-signing tests

Set up and verify certificate interoperability by generating keys and signing data using the required procedures.

Perform this task to test key generation and data-signing with different key algorithms. Refer to the How to Integrate Cisco IOS XR and Crosswork Trust Insights section for specifics on integrating these technologies.

Before you begin

  • Review the related certificate authority prerequisites.

  • Ensure you have access to the required system trustpoint configuration details.

Review the related certificate authority prerequisites before you begin.

Procedure

  1. Unconfigure the trustpoint.

    no crypto ca trustpoint system-trustpoint

  2. Clear the certificates that were generated earlier.

    clear crypto ca certificates system-trustpoint

  3. Generate new keys.

  4. Configure the system trustpoint again.

  5. Authenticate and enroll the system trustpoint to generate the certificates.

The task is complete when the configuration and verification output matches the source example, confirming the intended certificate authority interoperability behavior.


RPM package authenticity fingerprints

A fingerprint is a unique hex value that

  • represents the state of an RPM package at install time

  • monitors changes to package files after installation, and

  • enables Cisco IOS XR to verify package authenticity against a Known Good Value (KGV).

  • Known Good Value (KGV): The KGV is a reference fingerprint generated and published for each package after it is built by Cisco. It is used to determine whether an installed package matches the software released by Cisco.

  • Install-time fingerprint: This hex value represents the software state of the package at installation. If the value matches the KGV, the RPM package is genuine and unmodified before installation. A mismatched fingerprint indicates a manipulated RPM.

  • Run-time fingerprint: This hex value represents the running state of installed package files. If it matches the install-time fingerprint, no changes have occurred since installation. If the values differ, files in the package have been modified post-installation—either inadvertently or maliciously. A value of "0" means no run-time fingerprint is available and helps monitor changes to running software over time.

In the example, both the install time and run time fingerprints are the same.

The fingerprint generation status is used to indicate how up-to-date the run time fingerprints are. This may indicate that generation is currently in progress and will complete shortly, or generation is awaiting the end of an atomic change.

Feature history

Table 2. Feature History Table

Feature Name

Release Information

Description

Verify Authenticity of RPM Packages Using Fingerprint

Release 25.4.1

Introduced in this release on: Fixed Systems (8010 [ASIC: A100])(select variants only*)

*This feature is supported on:

  • 8011-32Y8L2H2FH

  • 8011-12G12X4Y-A/D

Verify Authenticity of RPM Packages Using Fingerprint

Release 25.1.1

Introduced in this release on: Fixed Systems (8700 [ASIC: K100], 8010 [ASIC: A100])(select variants only*)

*This feature is supported on:

  • 8712-MOD-M

  • 8011-4G24Y4H-I

Verify Authenticity of RPM Packages Using Fingerprint

Release 24.4.1

Introduced in this release on: Fixed Systems (8200 [ASIC: P100], 8700 [ASIC: P100])(select variants only*); Modular Systems (8800 [LC ASIC: P100])(select variants only*)

*This feature is supported on:

  • 8212-48FH-M

  • 8711-32FH-M

  • 88-LC1-36EH

  • 88-LC1-12TH24FH-E

  • 88-LC1-52Y8H-EM

Verify Authenticity of RPM Packages Using Fingerprint

Release 7.3.1

This feature helps in verifying the authenticity of an installable package using fingerprint values. The fingerprint value of the package is compared with a point of reference called Known Good Value (KGV). The KGV for an image or package is generated after it is built by Cisco.

After installing the package, the associated install time and build time fingerprint values are compared using Yang RPC to determine whether the package is genuine. A match in the fingerprints indicates that the package published on CCO and that installed on router are the same.

Additional reference information

Cisco IOS XR, Release 7.3.1, introduced a fingerprint mechanism to verify the authenticity of packages released by Cisco. This mechanism helps determine if installed software matches what Cisco published. Cisco Crosswork applications monitor the installed software over time to flag potential issues.

Security measures like GPG and IMA signing are used for package installation, but fingerprints provide additional visibility to detect changes and anomalies.

Install-time and run-time fingerprints are reported exclusively in the YANG model output; there are no CLI commands to display these values.

Below is a typical YANG model output showing RPM package fingerprint status and values:

Received message from host
<?xml version="1.0" ?>
<rpc-reply message-id="urn:uuid:97f5bc36-0eb0-4d2f-9c6f-3d34fea14be0" xmlns="urn:ietf:params:xml:ns:netconf:base:1.0" xmlns:nc="urn:ietf:params:xml:ns:netconf:base:1.0">
<data>
    <install xmlns="http://cisco.com/ns/yang/Cisco-IOS XR-spirit-install-instmgr-oper">
      <packages>
        <active>
         <summary>
          <rpm-fingerprint-status>generation-up-to-date</rpm-fingerprint-status>
            <rpm-fingerprint-timestamp>Mon Jun 15 15:58:22 2020</rpm-fingerprint-timestamp>
            <package>
             <name>asr9k-xr</name>
              <version>7.3.1</version>
              <release>r731</release>
             <gpg-key-id>ddcead3dcb38048d</gpg-key-id>
              <rpm-fingerprint>
              <rpm-fingerprint-install-time>2871bf68d3cd764938775afc9e5a69c130f9fbde</rpm-fingerprint-install-time>
              <rpm-fingerprint-run-time>2871bf68d3cd764938775afc9e5a69c130f9fbde</rpm-fingerprint-run-time>
              </rpm-fingerprint>
            </package>

           <package>
            <name>asr9k-mcast-x64</name>
            <version>192.0.2.10</version>
            <release>r731</release>
            <gpg-key-id>ddcead3dcb38048d</gpg-key-id>
             <rpm-fingerprint>
                <rpm-fingerprint-install-time>3ddca55bc00a0ce2c2e52277919d398621616b28</rpm-fingerprint-install-time>
                <rpm-fingerprint-run-time>3ddca55bc00a0ce2c2e52277919d398621616b28</rpm-fingerprint-run-time>
              </rpm-fingerprint>
            </package>
------------------------------ Truncated for brevity ---------------------------------

In this example, both install-time and run-time fingerprints are identical, indicating the package files have not been altered since installation. The fingerprint generation status shows how current the values are and may indicate synchronization or pending changes.

Attribute Install-time fingerprint Run-time fingerprint
Represents State at installation State of running files
Comparison target Known Good Value (KGV) Install-time fingerprint
Change detection None before install Changes after install
Value when unavailable Fingerprint value present "0"
Display location YANG model output YANG model output

Counter-example

If the run-time fingerprint differs from the install-time fingerprint (or from the KGV), that signals the RPM package was modified after installation and may require further investigation.