Cisco Secure Access for Government Help

PDF

Cisco Secure Access for Government Help

Manage Private Resources

Want to summarize with AI?

Log in

Describes managing private resources. You can configure and add private resources to your organization. Private resources are applications, networks, or subnets that your organization controls. These resources are not publicly accessible from outside your network, such as:


You can configure and add private resources to your organization. Private resources are applications, networks, or subnets that your organization controls. These resources are not publicly accessible from outside your network, such as:

  • Applications and services that run on-premises in your data center

  • Resources running on private clouds hosted from your data center


Step 1 – Configure Private Resources

Configure end user connections to a private resource, and then add a private resource to a private resource group.

Procedure

  1. Understand your connection options Specify connection requirements for private resources where you want to allow access.

  2. Add Private Resources

    • Work with resource owners to gather the information needed to configure each resource. For more information, see Add Private Resources.


Optional Configuration for Private Resources

Procedure

  1. (Optional) Block zero-trust access to specified subdomains

    If you configure a Private Resource with an IP address having a leading wildcard (for example: *.example.com), you can block zero-trust connections to subdomains that you specify.
    Note
    User devices must have the Cisco Secure Client deployed. For more information, see Using Wildcards to Configure Traffic Steering for Private Destinations.
  2. (Optional) Add Private Resource Groups

    To speed creation and management of access rules, and ensure consistent handling of related private resources, create groups of private resources that you want to manage as a unit. For more information, see Add Private Resource Groups.

Step 2 — Set Up Network Connections, VPN Profiles, and Certificates

Procedure

  1. Configure network connectivity for zero-trust connections Add Network Tunnel Groups.

    To allow Secure Access to communicate with and direct traffic to your private resources. For more information, see Manage Network Connections.
  2. Add VPN profiles To allow VPN connections to private resources, add VPN profiles to your organization. VPN configurations such as VPN traffic steering rules must exist for the applicable network address spaces. For more information, see Manage Virtual Private Networks.

  3. Add and manage certificates for private resources Secure Access requires certificates in order to connect user traffic with your private resources and decrypt that traffic for inspection by the Intrusion Prevention System (IPS). You can upload the certificate for a resource when you configure the resource, or manage certificates from the certificate list. For more information, see Certificates for Private Resource Decryption.


Step 3 — Add Private Resources in Private Access Rules

Procedure

Add private access rules After you add private resources to your organization, these resources are available for you to use as destinations in your private access rules. Add private access rules that define which users and devices can access the private resource in the organization. For more information, see Add a Private Access Rule.

Step 4 — Set Up the Cisco Secure Client and Distribute URLs

Procedure

  1. Ensure that user devices are set up for client-based Zero Trust Access To configure resources for client-based zero-trust access, ensure that user devices meet the requirements for Zero Trust. You must have the Cisco Secure Client Zero Trust Access module deployed on the devices in your organization. For more information, see Requirements for Cisco Secure Access with Zero Trust.

  2. Distribute URLs for browser-based Zero Trust Access Establish a system for making users aware of the special URLs needed for browser-based Zero Trust Access.


Add a Private Resource

Private resources are the applications, networks or subnets that are internal resources hosted in your data center, including resources hosted on a private cloud in your data center, that have a login page that cannot be accessed from outside the network.

Configure a private resource to specify connection information for the resource, then configure access rules to determine which users and devices can access the resource using the connection methods you have enabled.

Configure a resource controlled by your organization.

Before you begin

  • Full Admin user role. For more information, see Manage Accounts.

  • Gather IP or CIDR addresses for your private resources.

  • If you will specify resource addresses using domain names (FQDNs), you must add at least one internal DNS server that can route traffic to your resource. For more information, see Add DNS Servers.

  • For each resource, you must choose connection options. For descriptions of the options, see the topics under Manage Connections to Private Destinations.

  • To allow client-based Zero Trust Access and inspect traffic using the Intrusion Prevention (IPS) feature, you must provide the resource's certificate to Secure Access so that Secure Access can display it to end-user devices.

    Note
    For browser-based connections, the certificate must be signed by a publicly recognized certificate authority (CA).
  • Plan your private resource configurations to avoid configuration conflicts such as duplicate or overlapping addresses.

    For example, if a resource can be reached using multiple addresses, decide in advance whether you will create a single resource with multiple addresses or multiple resources.

Procedure

  1. Navigate to Resources > Private Resources, choose Private Resources, and then click +Add.

    Page displaying private resources with Add option
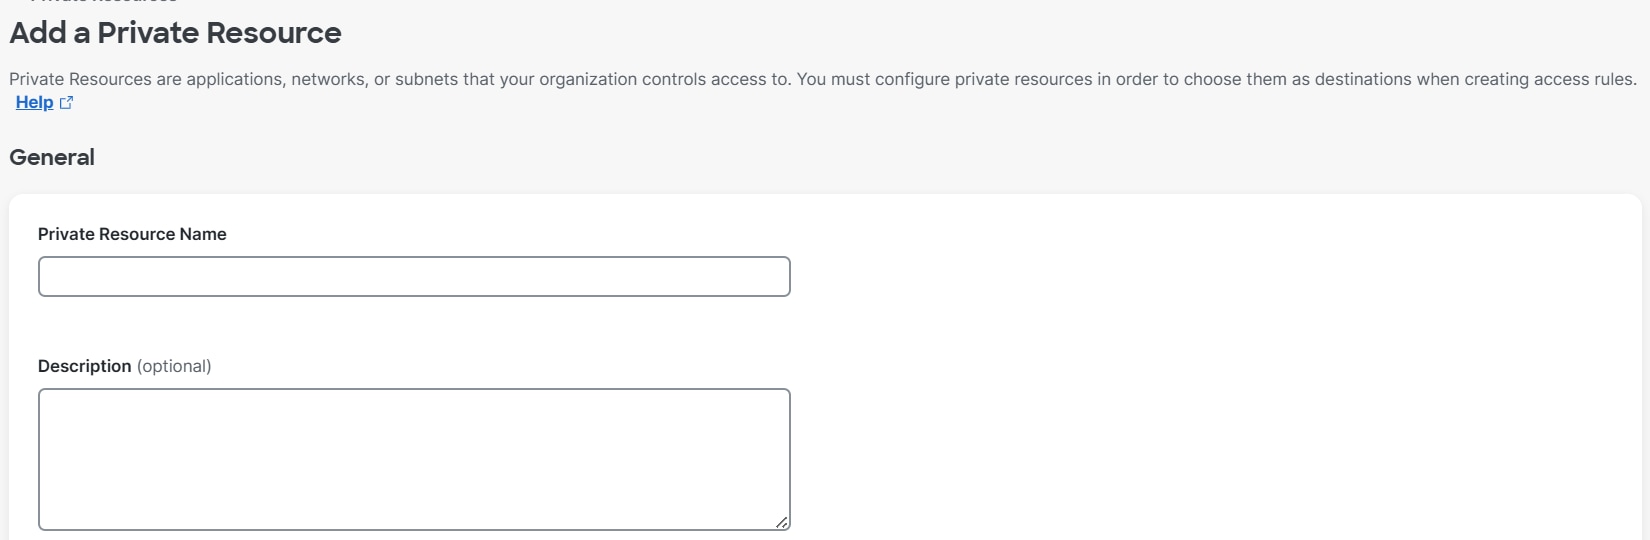
  2. For Private Resource Name, enter a meaningful name for the resource. For Description, we recommend that you provide information such as the purpose of the resource or the name of the resource owner.

    Page displaying Add Private Resource option with name and description fields
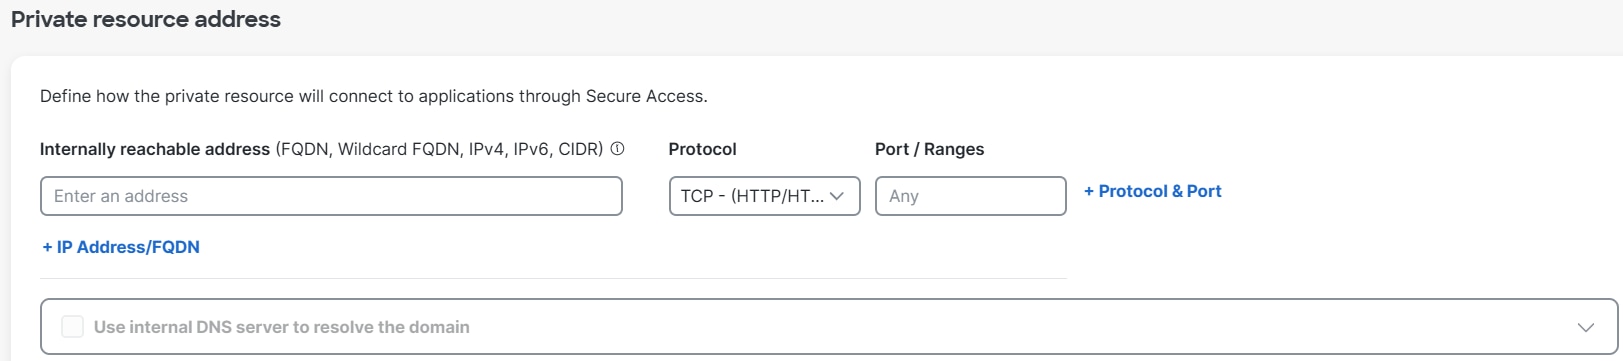
  3. Provide information for Private resource address.

    Page displaying private resource address entry field

    For Internally reachable address, enter an IP address, FQDN, wildcard FQDN (in the format *.example.com), protocol, and port or port ranges.

    The address you provide does _not _ need to be publicly accessible from outside the network.

    If you will allow browser-based access to this resource by users who do not have the Cisco Secure Client installed on their devices, the protocol you select must include HTTP/HTTPS.

    Ensure that each address you add does not duplicate or overlap with addresses in other configured private resources.

    If you will decrypt traffic to this resource:

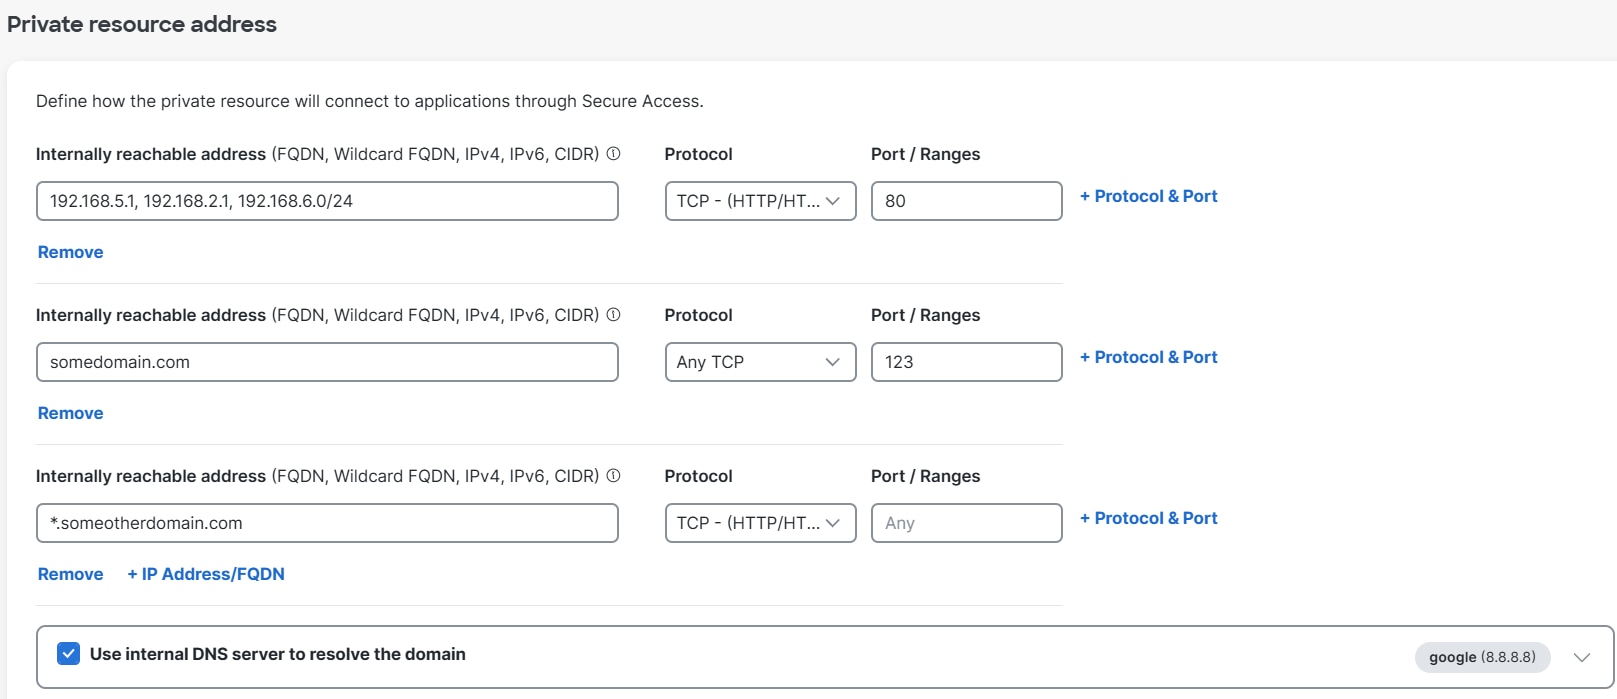
    • In each address line, you can specify a single IP address (no address ranges) or CIDR block, or a comma-separated list of addresses or CIDR blocks, or an FQDN with or without wildcard. Add addresses and FQDNs as separate lines.

    • If the address includes a wildcard FQDN, the wildcard must be the first character in the address string (*.example.com).

    • Specify a single port or "Any" port; no comma-separated port numbers, no port ranges.

    • If you need to decrypt traffic to multiple ports for the same address, click + IP Address/FQDN and add a separate address line for each port.

    • Select a protocol that includes TCP and does not include UDP.

    • Example configurations: Page displaying example configurations for private resource address

    If you have entered a domain and Secure Access will route traffic to this resource using a network tunnel:

    • Select an internal DNS server that can route traffic to the specified resource address.

    • To configure an internal DNS server, see Add DNS Servers. Page displaying private resource address with internal DNS server selection option

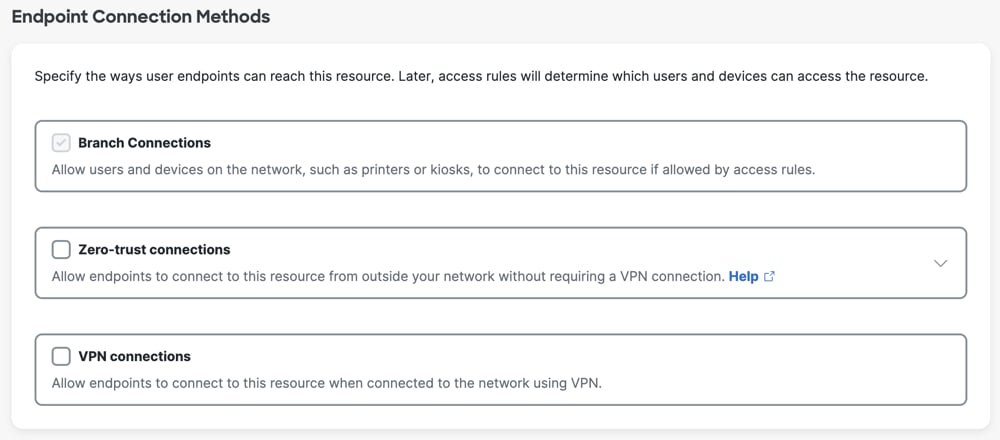
  4. Choose which Endpoint Connection Methods to allow. Branch connections are configured for all private resources. For more information, see Manage Branch Connections.

    You can allow any or all of these options:

    • Zero-trust connections

      • for devices with the Cisco Secure Client installed.

      • for devices without the Secure Client (using a browser)

    • VPN connections

    For details, see Comparison of Zero Trust Access and VPN. Page displaying endpoint connection method selection options for private resources
  5. If you allow Zero Trust Access connections, choose whether to allow connections from devices with and without the Secure Client installed. You can allow either or both of these options.

    If you want mobile devices or devices that your organization does not manage (such as contractor, vendor, or Bring-Your-Own devices) to be able to connect to this resource, you must enable browser-based access.

    Browser-based (clientless) access offers fewer controls on device security than client-based access does.

  6. If you allow Client-based Zero Trust Access connections:

    Enter the address you want users to use in order to connect to this resource.

    For best security (to keep the internal IP address of this resource private), you should provide a domain rather than an IP address. Your internal DNS server must be able to route traffic to this address. For example, you can enter mail.example.com.

    This address can be the same as the address you entered above for Secure Access to connect to the resource.

  7. If you allow Browser-based Zero Trust Access:

    • The protocol selected above for the connection to Secure Access must include HTTP/HTTPS in order to enable this option.

    • Enter the publicly accessible address that you will give to users in order to access this resource.

      Specifically, you will enter a URL prefix that uniquely identifies this resource. Secure Access will join the prefix to <your organization's tenant ID>-ztna.sse.cisco.io to form the public URL address. You will give the entire URL to end users, and Secure Access will route traffic using this address to the resource.

      If you don't provide a URL prefix, Secure Access adds one for you, based on the resource name.

    • This address will be reachable from outside your network, but the actual resource address is not exposed, offering safety if this address falls into unauthorized hands.

    • You must provide this dummy address to end users.

    • The certificate that the resource presents to end-user devices must be signed by a publicly recognized certificate authority (CA.)

    • If you enable decryption in the next step, the option to Validate application certificate will be disabled. This is expected.

  8. If you allow VPN connections:

    If you enable both Zero Trust connections and VPN connections, users will connect to the resource using zero trust.

  9. For Decryption, enable Decrypt Traffic.

    Decryption is required in order to inspect traffic for threats using the intrusion prevention (IPS) feature. For security reasons, you should enable this option. You can enable this option depending on the resource address. For details, see information about the Internally reachable address field on this page.

    Because traffic is routed through Secure Access, Secure Access must be able to display the resource's certificate to end-user devices. If you have already uploaded the applicable certificate, select the certificate. Otherwise, upload or paste the device's certificate (public and private keys) here. Include all intermediate certificates in the certificate chain.

    If you enable decryption, the option to Validate application certificate for browser-based traffic will be disabled, even if you have previously enabled it. This is expected.

    Note
    Only PEM encoding is supported.

Add a Private Resource Group

You can create private resource groups with private resources and use these components as destinations in private access rules. Private resource groups enable you to apply access rules consistently to all resources in the group.

Configure a resource group with the private resources in your organization.

Before you begin

Procedure

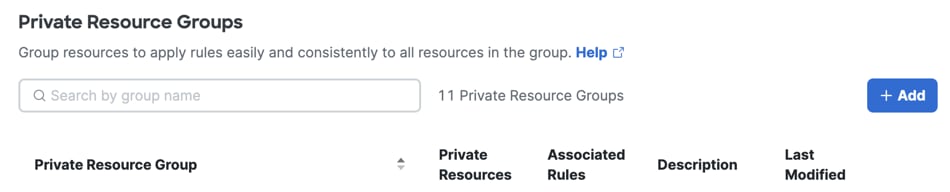
  1. Navigate to Resources > Private Resources, choose Private Resource Groups, and then click +Add.


    Page displaying private resources Groups with Add option
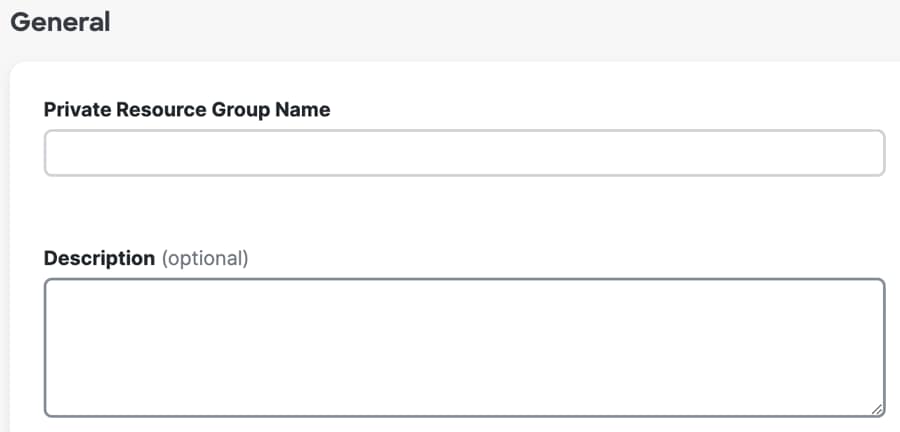
  2. For Private Resource Group Name, enter a meaningful name for the resource group. For Description, we recommend that you provide information such as the purpose of the resource group.

    Note
    The description is optional.

    Page displaying private resource group name and description entry fields
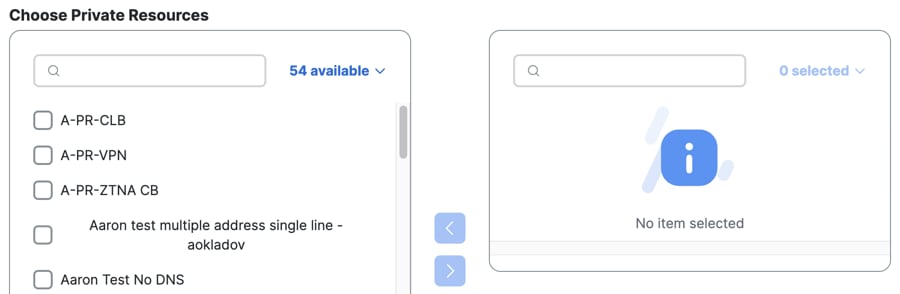
  3. For Choose Private Resources, add private resources to the group:

    1. For Copy from existing private resource group, choose a resource group name to add the resources in that group to your new resource group.

    2. For Choose Private Resources, check the resources and click the arrow (greater than sign) to add the selected resources to the group.
      Page displaying private resource group selection with add resources option
  4. Click Save.