Cisco Secure Access for Government Help

PDF

Cisco Secure Access for Government Help

Manage PAC Files

Want to summarize with AI?

Log in

Describes managing pac files. When configuring Cisco Secure Access Internet Security, you have several choices as to how you can send web traffic to Secure Access. One of those choices is to integrate a proxy auto-config (PAC) file URL for the browsers that you use to reach web resources.


When configuring Cisco Secure Access Internet Security, you have several choices as to how you can send web traffic to Secure Access. One of those choices is to integrate a proxy auto-config (PAC) file URL for the browsers that you use to reach web resources.

After you integrate a PAC file on a device, all traffic through the browser is redirected to the Secure Access secure web gateway (SWG). For a PAC file deployment on a device, Secure Access DNS-layer security is not enforced on traffic generated on the browser. Secure Access DNS-layer security applies only to browser traffic to non-web resources, which bypasses the PAC file.

What is a PAC file?

A proxy auto-config (PAC) file is used by browsers to select the correct proxy server that can fetch a requested URL.

Known Limitations

As an administrator, you can download and deploy the Secure Access PAC file only if you are on a network that has been added as a Registered Network to Secure Access. PAC files are not supported for other connection mechanisms.

Recommendations

For the most part, integrating the Secure Access PAC file into your system so that all browser-based traffic is proxied is straightforward. However, you may have to customize the PAC file before integrating it into your system.

Note
Microsoft has deprecated PAC file support for the file:// and ftp:// protocols in Windows 10 on Edge. Hosting the PAC file on the local machine will not work on this browser. For more information, see Windows 10 does not read a PAC file referenced by a file protocol.
  • ocsp.int-x3.letsencrypt.org

  • isrg.trustid.ocsp.identrust.com

  • *.cisco.com

  • *.opendns.com

  • *.secureaccessfed.cisco

  • *.umbrellagov.com

  • *.okta.com

  • *.oktacdn.com

  • *.pingidentity.com

  • secure.aadcdn.microsoftonline-p.com


Deploy the Secure Access PAC File for Windows

The Cisco Secure Access secure web gateway (SWG) requires that you deploy a proxy auto-config (PAC) file URL on a browser to successfully reach web resources. If you're behind a firewall, you may also need to deploy the Secure Access's PAC file on the browser so that it points to the correct proxy server. A PAC file is only used with Secure Access Internet Security.

After an organization's administrator adds internal domains in Secure Access, the Secure Access PAC file contains the list of configured internal domains. Web traffic to internal domains is not sent to the SWG. For more information about internal domains, see Manage Domains.


Procedure for Deploy the Secure Access PAC File for Windows

Note
We have attempted to provide you with the latest information about how to configure your operating system (OS) and browsers to use Secure Access's PAC file. However, as OS and browser functionality can change at any time, we cannot guarantee that these third-party procedures will remain accurate. For more information on deploying a PAC file URL to your browser, see your OS and browser's Help.

Prerequisites

  • Full Admin user role. For more information, see Manage Accounts.

  • To download and use the Secure Access PAC file, add your network's egress IP to Secure Access as a Registered Network. Secure Access only allows the PAC file to download from a trusted network. PAC files are not supported for other connection mechanisms. For more information, see Manage Registered Networks.


Copy the Secure Access PAC File URL

Procedure

  1. Navigate to Connect > End User Connectivity > Internet Security.

  2. Copy the Secure Access PAC file URL and save to your system.


Deploy the Secure Access PAC File URL for Chrome and Edge Browsers

Procedure

  1. In Windows, navigate to Start > Settings > Network & internet > Proxy.

  2. For Automatic proxy setup, click Set up.

  3. Set Use setup script to On.

  4. For Script Address, paste the Secure Access PAC file URL.

  5. Click Save.


Deploy the Secure Access PAC File URL for Firefox

Procedure

  1. In Firefox, navigate to Settings, scroll to Network Settings, and then click Settings.


    Page displaying network settings with Settings option
  2. Select Automatic Proxy Configuration URL and paste the Secure Access PAC file URL.

  3. Click OK.


Deploy the Secure Access PAC File for macOS

The Cisco Secure Access secure web gateway (SWG) requires that you deploy a proxy auto-config (PAC) file URL on a browser to successfully reach web resources. If you're behind a firewall, you may also need to deploy the Secure Access's PAC file on the browser so that it points to the correct proxy server. A PAC file is only used with Secure Access Internet Security.

After an organization's administrator adds internal domains in Secure Access, the Secure Access PAC file contains the list of configured internal domains. Web traffic to internal domains is not sent to the SWG. For more information about internal domains, see Manage Domains.


Procedure for Deploy the Secure Access PAC File for macOS

Note
We have attempted to provide you with the latest information about how to configure your operating system (OS) and browsers to use Secure Access's PAC file. However, as OS and browser functionality can change at any time, we cannot guarantee that these third-party procedures will remain accurate. For more information on deploying a PAC file URL to your browser, see your OS and browser's Help.
  • Full Admin user role. For more information, see Manage Accounts.

  • To download and use the Secure Access PAC file, add your network's egress IP to Secure Access as a Registered Network. Secure Access only allows the PAC file to download from a trusted network. PAC files are not supported for other connection mechanisms. For more information, see Manage Registered Networks.


Copy the Secure Access PAC File URL

Procedure

  1. Navigate to Connect > End User Connectivity > Internet Security.

  2. Copy the Secure Access PAC file URL and save to your system.


Deploy the Secure Access PAC File URL to Chrome

Procedure

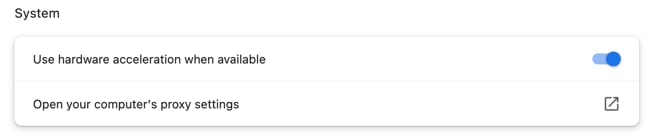
  1. In your Chrome browser, navigate to chrome://settings/system and click Open your computer's proxy settings.


    Page displaying Chrome system settings with option to open proxy settings
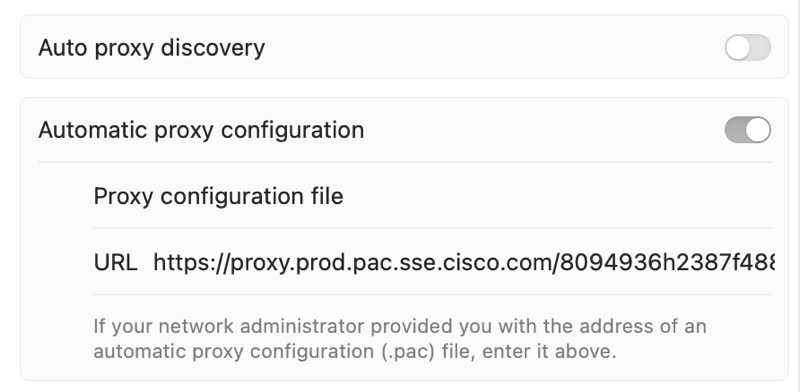
  2. Enable Automatic proxy configuration and paste the Secure Access PAC file URL.


    Page displaying automatic proxy configuration with Secure Access PAC file URL entry
  3. Click OK and then Apply.


Deploy the Secure Access PAC File URL to Firefox

Procedure

  1. Open your Firefox browser, navigate to Firefox > Preferences, scroll to Network Settings, and click Settings.


    Page displaying network settings with Settings option
  2. Check Automatic Proxy Configuration URL and paste the Secure Access PAC file URL.

  3. Click OK.


Deploy the Secure Access PAC File URL to Safari

Procedure

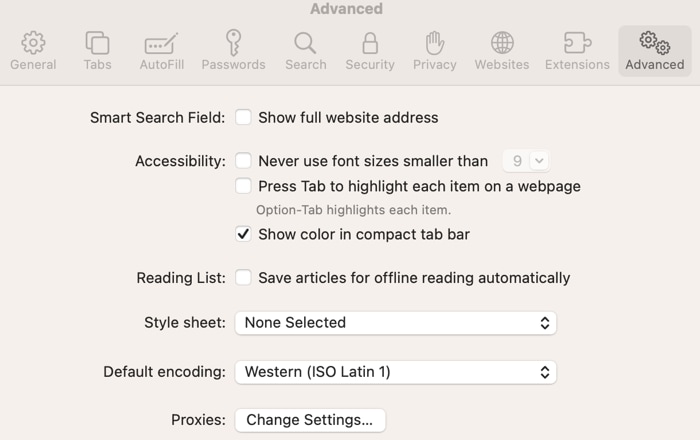
  1. Open your Safari browser, navigate to Safari > Settings > Advanced, and then click Change Settings.


    Page displaying Safari advanced settings navigation with Change Settings option
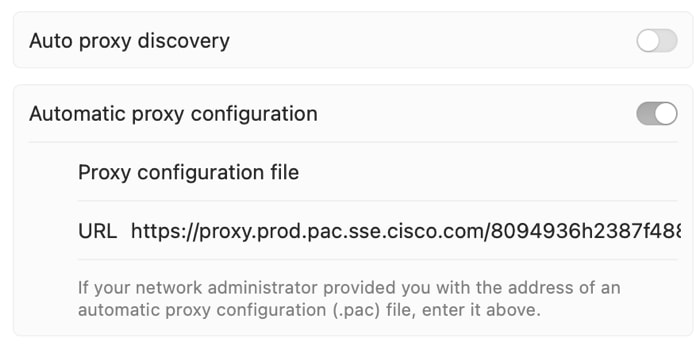
  2. Enable Automatic proxy configuration and paste the Secure Access PAC file URL.


    Page displaying automatic proxy configuration with Secure Access PAC file URL entry
  3. Click OK and then Apply.


Customize the Secure Access PAC File

After an organization's administrator adds internal domains in Cisco Secure Access, the Secure Access PAC file contains the list of configured internal domains. Web traffic to internal domains is not sent to the secure web gateway (SWG). For more information about internal domains, see Manage Domains.

To bypass additional internal domains on the SWG, you can customize the Secure Access PAC file. Using the Secure Access PAC File URL, download and edit the PAC File, and then add any other internal domains to the PAC File.

If you require any manual editing of the PAC file, you must host the PAC file on a web server in your own environment. For more information about hosting a PAC file, see your web server's documentation.

Secure Access supports IP-based domains. However, you must enter the IP in the browser's address bar as the domain portion of the URL. For example, https://1.2.3.4/URLpath/. The PAC file does not resolve a domain to IP before matching an IP-based domain for bypass.


Procedure for Customize the Secure Access PAC File

Copy the Secure Access PAC File URL, and then download and edit the PAC File.

Prerequisites

  • Full Admin user role. For more information, see Manage Accounts.

  • To download the Secure Access PAC file, add your network's egress IP to Secure Access as a Registered Network. Secure Access only allows the PAC file to download from a trusted network. For more information, see Manage Registered Networks.


Copy the Secure Access PAC File

Procedure

  1. Navigate to Connect > End User Connectivity > Internet Security.

  2. Copy the Secure Access PAC file URL.


Download the Secure Access PAC File

Procedure

Paste the copied PAC URL into a browser's address bar and then press Enter or Return to download the PAC file.

What to do next


The SSE PAC File in Browser interface.

Edit the PAC File

Procedure

  1. Open the downloaded PAC file with a text editor.

  2. Add the internal domains that should should be bypassed, and then save the PAC file.

    Note
    Provide a comma-delimited list of domain name and surround each domain name in the list with quotation marks. The wildcard character asterisk * is supported and treated as any value of any length. Use extreme caution when using this wildcard as well as periods. For example, *.example.com bypasses www.example.com, mail.example.com, and c.23.example.com. *example.com bypasses www.example.com as well as phishingexample.com.

What to do next

//------------------------Customer Section------------------------
    //Add your internal domains within quotations marks like "wwwin.acme.com"
    //after the right parenthesis below. Please remove the two examples
    //below and add your own internal domains.

    var dont_proxy_customer_list = new Array(
        "wwwin.example.org",
        "*.example.org"
    );

    //Warning to Administrators: Touching any section after this point might
    //affect your users browsing experience and lead to considerable number
    //of issues and loading your customer support.
    //---------------------End Customer Section-----------------------