Cisco APIC Layer 3 Networking Configuration Guide, Release 6.2(x)

PDF

Cisco APIC Layer 3 Networking Configuration Guide, Release 6.2(x)

Route control per BGP peer

Want to summarize with AI?

Log in

Explains how route control policies apply import and export rules to individual BGP peers and how support has changed across APIC releases.


Route control per BGP peer applies import and export policies to an individual BGP peer instead of to every node and path in an L3Out.

Route control policy support by release

Route control policy support changed in these APIC releases:

  • Before Cisco APIC release 4.2(1), route control policies were configured at the L3Out level and applied to all nodes and paths in the L3Out.

  • Beginning with Cisco APIC release 4.2(1), you can apply route import and export policies to individual BGP peers.

  • Beginning with Cisco APIC release 6.0(1), the Match AS Path parameter can match multiple AS-path access list names in one route map.


Guidelines and restrictions for route control per BGP peer

Review these guidelines and restrictions before you configure a route control profile policy for a BGP peer.

  • Create route control profile policies for BGP peers in a tenant.

  • The configuration and behavior of route-map match rules, set rules, and route control profile policies are unchanged from previous releases.

  • For route control per BGP peer, set the route control profile policy type to Match Routing Policy Only. The system uses only this global policy to generate the route map for the BGP peer. The Match Prefix and Routing Policy type is not supported for this feature.

  • A route control profile policy with the Match Prefix and Routing Policy type must include a match prefix or an external subnet.

  • To export bridge domain subnets, explicitly include them in the prefix list.

  • You can associate only one route control profile policy with a BGP peer in each direction.

  • Default policies are not supported. Apply a named route control profile policy to the BGP peer.

  • When you associate a route control profile policy with a BGP peer, the system generates the peer route map from that policy only. Route control profile policies configured on the external EPG (l3extInstP) or L3Out subnet (l3extSubnet) do not contribute to the peer route map. If the BGP peer has no route control profile policy, the policies configured under the L3Out take effect.

  • A match prefix list can include a private bridge domain subnet without additional configuration to exclude private subnets.

  • The 0.0.0.0/0 prefix in a match prefix list matches all prefixes, including bridge domain subnets.

  • Cisco APIC creates and deploys the route map on the border leaf switches. The generated name uses this format:

    tenant-name_route-profile-name_l3out-name-direction

    For example, these values generate the route-map name t1_rp1_l3out1-in:

    • Tenant name: t1

    • Route profile name: rp1

    • L3Out name: l3out1

    • Direction: import, represented by in in the generated name

  • The generated name for a per-peer route map must contain fewer than 135 characters. These values contribute to the length:

    Tenant name + L3Out name + Route Profile name + Route Profile context name + Route Profile match rule name + BGP peer IP address < 135 characters
  • Policy-element route maps support up to 20,000 entries. The entries are divided into five levels of 4,000 entries. Each level contains 10 orders of 400 entries. Each order supports up to 200 deny actions and 200 permit actions.

  • Configuring route control per BGP peer does not affect shared-service route-map behavior.

  • When you upgrade or downgrade the Cisco APIC software, consider this behavior:

    • Upgrade: Route control profile policies configured under the L3Out before the upgrade continue to operate until you configure a policy for a BGP peer. After you configure a per-peer policy, the guidelines and restrictions in this topic apply.

    • Downgrade: Before you downgrade to a release that does not support route control per BGP peer, remove each route control profile policy from its BGP peer.

  • The behavior of permit and deny entries with the same order is nondeterministic. When you associate a route control profile policy with an external EPG (l3extInstP) or a BGP peer, assign a lower order to the entry that the system must install first and a higher order to an entry that it must install later.

Configure route control per BGP peer using the GUI

Before you begin

  • Configure the node, port, functional profile, attachable access entity profile (AEP), and Layer 3 domain.

  • Configure a BGP route reflector policy to propagate routes within the fabric.

Create the tenant networking objects and route control profile policy, and then associate the policy with a BGP peer in the required direction.

Procedure

  1. Create the tenant and VRF:

    1. On the menu bar, choose Tenants > Add Tenant.

      The Create Tenant dialog box opens.

    2. In the Name field, enter the tenant name.
    3. In the VRF Name field, enter the VRF name.
    4. Click Submit.
  2. Create a bridge domain:

    1. In the navigation pane, expand tenant-name > Networking.
    2. Right-click Bridge Domains, and choose Create Bridge Domain.
    3. In the Name field, enter a name for the bridge domain.
    4. Optional: Select Advertise Host Routes to advertise host routes to all deployed border leaf switches.
    5. From the VRF drop-down list, choose the VRF that you created.
    6. Click Next.
    7. In the Subnets area, click the + icon.
    8. In the Gateway IP field, enter the bridge domain subnet.
    9. From the Scope drop-down list, choose Advertised Externally.

      Associate the L3 Out for Route Profile after you create the L3Out.

      Note

      If Advertise Host Routes is enabled, the route map also matches all host routes.

    10. Click OK.
    11. Click Next, and then click Finish.
  3. Create an application EPG:

    1. Right-click Application Profiles, and choose Create Application Profile.
    2. In the Name field, enter a name for the application profile.
    3. In the EPGs area, click the + icon.
    4. In the Name field, enter a name for the EPG.
    5. From the Bridge Domain drop-down list, choose the bridge domain that you created.
    6. Click Update.
    7. Click Submit.
  4. Create a tenant-level route control profile policy for the BGP peer:

    1. In the navigation pane, expand Tenants > tenant-name > Policies > Protocol.
    2. Right-click Route Maps for Route Control, and choose Create Route Maps for Route Control.
    3. In the Create Route Maps for Route Control dialog box, enter a route profile name in the Name field.
    4. From the Type drop-down list, choose Match Routing Policy Only.
    5. In the Contexts area, click the + icon.

      The Create Route Control Context dialog box opens.

    6. Configure the route control context as follows:
      1. Enter the required values in the Order and Name fields.

      2. In the Match Rule field, click Create Match Rule.

      3. In the Create Match Rule dialog box, enter a name in the Name field.

      4. Configure the required Match Regex Community Terms, Match Community Terms, Match AS Path Regex Terms, and Match Prefix settings, and click Submit.

      5. In the Set Rule field, click Create Set Rules for a Route Map.

      6. In the Create Set Rules for a Route Map dialog box, enter a name for the action rule profile in the Name field.

      7. Configure the required attributes, communities, criteria, tags, and preferences, and click Finish.

      8. In the Create Route Control Context dialog box, click OK.

      9. In the Create Route Maps for Route Control dialog box, click Submit.

  5. Create the L3Out and enable BGP:

    1. In the navigation pane, expand tenant-name > Networking.
    2. Right-click L3Outs, and choose Create L3Out.
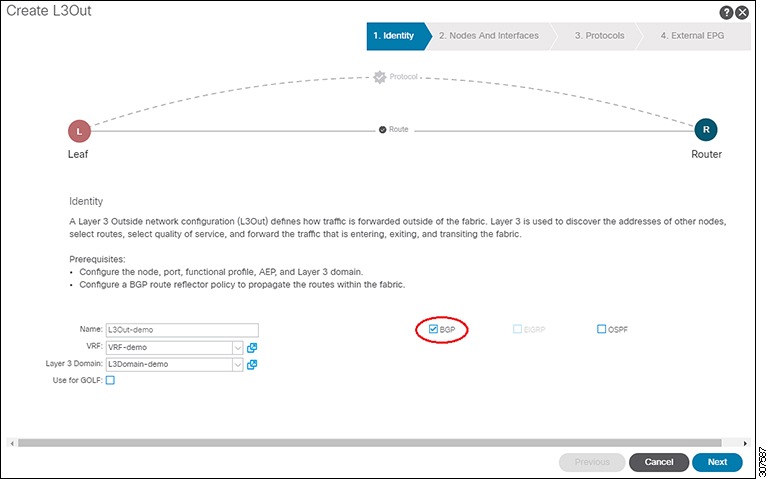
    3. On the Identity page, configure the required L3Out settings and select BGP.
      L3Out Identity page with BGP selected
    4. Complete the Nodes and Interfaces, Protocols, and External EPG pages to create the L3Out.
  6. Associate the route control profile policy with the BGP peer:

    1. Navigate to Tenants > tenant-name > Networking > L3Outs > l3out-name > Logical Node Profiles > logical-node-profile-name > Logical Interface Profiles > logical-interface-profile-name > BGP Peer Connectivity Profile ip-address.
    2. In the Route Control Profile area, click the + icon.
    3. From the Name drop-down list, choose the route control profile policy that you created in 4.
    4. From the Direction drop-down list, choose Route Import Policy or Route Export Policy.
    5. Click Update.
    6. Click Submit.

The route control profile policy is associated with the BGP peer in the selected direction.