This section provides the procedure for integrating Catalyst Centerwith ServiceNow for network and SWIM events without using the dedicated Cisco Catalyst app, including steps for bundle configuration and event settings.
This table describes how to configure Catalyst Center integration with ServiceNow without using the Cisco Catalyst app. Configure the integration for network events, SWIM events, or both types of events based on your requirements.
Note
You can also use the Basic ITSM (ServiceNow) CMDB synchronization bundle with this workflow. If you use this bundle, be sure to select Post device inventory details to a staging table as the destination type. The other destination type (Synchronize device inventory directly with CMDB) requires the Cisco Catalyst app. Additionally, the Post device inventory details to a staging table destination type only sends data to the REST API endpoint. Create a script to take any further action on the data.
Table 1. Catalyst Center-to-ServiceNow integration without the Cisco Catalyst App procedure
Step
Description
Step 1
Install or upgrade to the latest Catalyst Center release.
For information about configuring user profiles and setting up the MID Server, see the "Scope Certified Application (Cisco Catalyst) - Installation and Configuration" guide available on the ServiceNow Store website.
This bundle enables Change Management between the two systems (Catalyst Center and ITSM). Enable change Management and Incident or Problem Management workflows based on the automation or assurance use cases that you want to log tickets in ServiceNow.
Step 4
Configure network event settings in Event Settings.
The Catalyst Center platform and ITSM integration allows the user to select from a list of possible issues to create and modify the severity of events, incidents, or problems in ServiceNow to match business priorities.
Step 5
Configure the Automation events for ITSM (ServiceNow) bundle.
The Automation Events for ITSM (ServiceNow) bundle retrieves events relating to software image updates required for compliance, security or any other operational triggers from Catalyst Center. SWIM event notifications are sent from Catalyst Center to ServiceNow when they occur, not on a polling and notify schedule.
Access your ServiceNow instance and review the network and SWIM event data that has been posted using the REST APIs in this procedure. Review and manipulate this data in ServiceNow per your business or network needs.
Configure a network issue monitor and enrichment for ITSM bundle
Before you begin
Ensure you have the required permissions to complete this procedure. For information about role-based access control for the Catalyst Center platform, see the Cisco Catalyst Center Platform User Guide.
Follow these steps to monitor network assurance and maintenance issues and to publish event details to an ITSM platform.
Note
Closed loop automation is supported for assurance events between Catalyst Center and ITSM. It is not supported for other event types.
When the ITSM type is ServiceNow, closed loop automation supports only the REST API endpoint in the Network Issue Monitor and Enrichment for ITSM bundle. If you use the Event Management or Generic REST API endpoints, automatic ticket creation or resolution for assurance events is not supported. Updates for resolved or ignored assurance events are still sent to both endpoints.
When you ignore or resolve an assurance event in Catalyst Center, the system always sends an update to ServiceNow, no matter which endpoint is used in the Automation Events for ITSM (ServiceNow) Bundle
To publish event data to the Event table in ServiceNow, install the Event Management plug-in in your ServiceNow instance. Otherwise, you can configure the bundle to send the data to a REST API endpoint in the Cisco Catalyst app.
The integration with BMC Remedy ITSM system currently supports only Incident Management workflows.
When an event is resolved or ignored in Catalyst Center, this update is reflected in the ticket created in BMC Remedy. The status of the BMC Remedy ticket is sent to Catalyst Center to keep both systems (ITSM and Catalyst Center) in sync.
Procedure
1.
From the main menu, choose Platform > Manage > Bundles.
Review the bundles that are displayed and their current status.
2.
Click the Network Issue Monitor and Enrichment for ITSM bundle link for more information.
Additional information includes these details.
General information: Displays vendor, version, platform details and tags under the square icon.
Information: Displays general information (purpose of bundle and how bundle works in the network), sample schemas, configuration notes, and other data about the bundle.
Contents: Accesses the APIs and integration flows that make up the bundle, or provides information about the integration flows that make up the bundle.
Release Notes: Displays latest release information about the bundle, including its version.
3.
Click Enable and confirm your action again in the Information dialog box.
A success message appears.
4.
Click Configure to configure the settings at the bundle level.
The configuration
slide-in pane appears. You must create an instance for the destination that receives events in the configuration
slide-in pane.
5.
Select an existing instance from the drop-down menu on the page and click Next.
6.
To create a new instance, enter these details.
Instance Name: Give a name for the instance.
Description: Describe the instance.
Proceed to the next page to create the destination to receive events.
7.
Select the ITSM type from the drop-down menu on the Destination to receive events screen.
Based on the ITSM type you select, provide these details and select Next.
Option
Description
ServiceNow
For the ServiceNow ITSM type, configure these details.
Destination to receive events: Select one of these options.
Event Management: When setting up Catalyst Center integration with ServiceNow without using the Cisco Catalyst app, select the Event Management option. For using the Event Management option, you must configure the Event Management plug-in within the ServiceNow instance.
REST API Endpoint: Use the REST API Endpoint option with the Cisco Catalyst app to send data to a REST API endpoint within the Cisco Catalyst app.
Note
When a network event or issue is ignored or resolved in Catalyst Center, an event status update is sent to the Cisco Catalyst app in ServiceNow, and the ticket created for the event in ServiceNow is closed automatically.
Generic REST Endpoint in ServiceNow: Use this option to send data to a different staging table in ServiceNow.
Note
Use this destination type to send data to a REST API endpoint outside the Cisco Catalyst app. Ensure that the created staging table/import set table has a field called u_event_details. The event details from Catalyst Center are mapped to this field. With the Generic REST Endpoint in ServiceNow destination type, after data transfer, you must write custom code to use the data from the staging table and create tickets in ServiceNow.
Destination URI: Enter a destination URI (Uniform Resource Indicator) for the Generic REST Endpoint in ServiceNow option. This field is mandatory for this option.
BMC Remedy
For the BMC Remedy ITSM type, configure these details.
Destination to receive events: BMC Remedy supports only the REST API Endpoint. Use this option, to send data to a REST API endpoint in BMC Remedy that is defined in Destination URI.
Destination URI: Enter a custom endpoint. You can enter any destination URI (Uniform Resource Indicator) defined in the BMC Remedy system.
Proceed to the next page.
Based on your ITSM selection, the subsequent page will present the access settings specific to either ServiceNow or BMC Remedy.
8.
Configure the connection settings for your selected ITSM type.
The GUI description of these fields specifies the name of the ITSM you choose.
Click the radio button to configure either an existing ServiceNow or BMC Remedy connection instance or create a new instance.
To configure an existing ServiceNow or BMC Remedy connection instance, select it from the drop-down menu on the page and click Next.
To configure a new ServiceNow or BMC Remedy connection instance, enter these details.
Instance Name: Name of the instance.
Description: Description of the instance.
Host name: Enter the hostname for the ServiceNow or BMC Remedy system.
Username: Username required to access the ServiceNow or BMC Remedy system.
Password: Password required to access the ServiceNow or BMC Remedy system.
Click Check Connectivity to test whether you can connect to the server where the endpoint is located.
Note
The Check Connectivity option is available only for ServiceNow.
Click Next and review the configuration details on the Summary page.
If you want to save your settings, click Configure. A success message appears.
Click OK.
Note
If you want to change the ITSM type, you must create a new instance. The system does not allow you to change the ITSM type from the edit instance workflow on the Configurations > General Settings page.
Configure event settings
The Catalyst Center platform and ITSM integration lets you select from a list of possible issues to create and modify the severity of events, incidents, or problems in ITSM to align with your business priorities. You perform these tasks in the Events Settings window.
Note
For this release, there are no SWIM events to configure in Event Settings. You can configure only network assurance events.
The Event Settings window and its functionality is only applicable to events for an ITSM integration and not to events configured for other destinations. To configure events for a webhook or other destination, click the link at the top of the columns to access the Events window. Use the Events window to configure events for an email, webhook, or SNMP trap notifications.
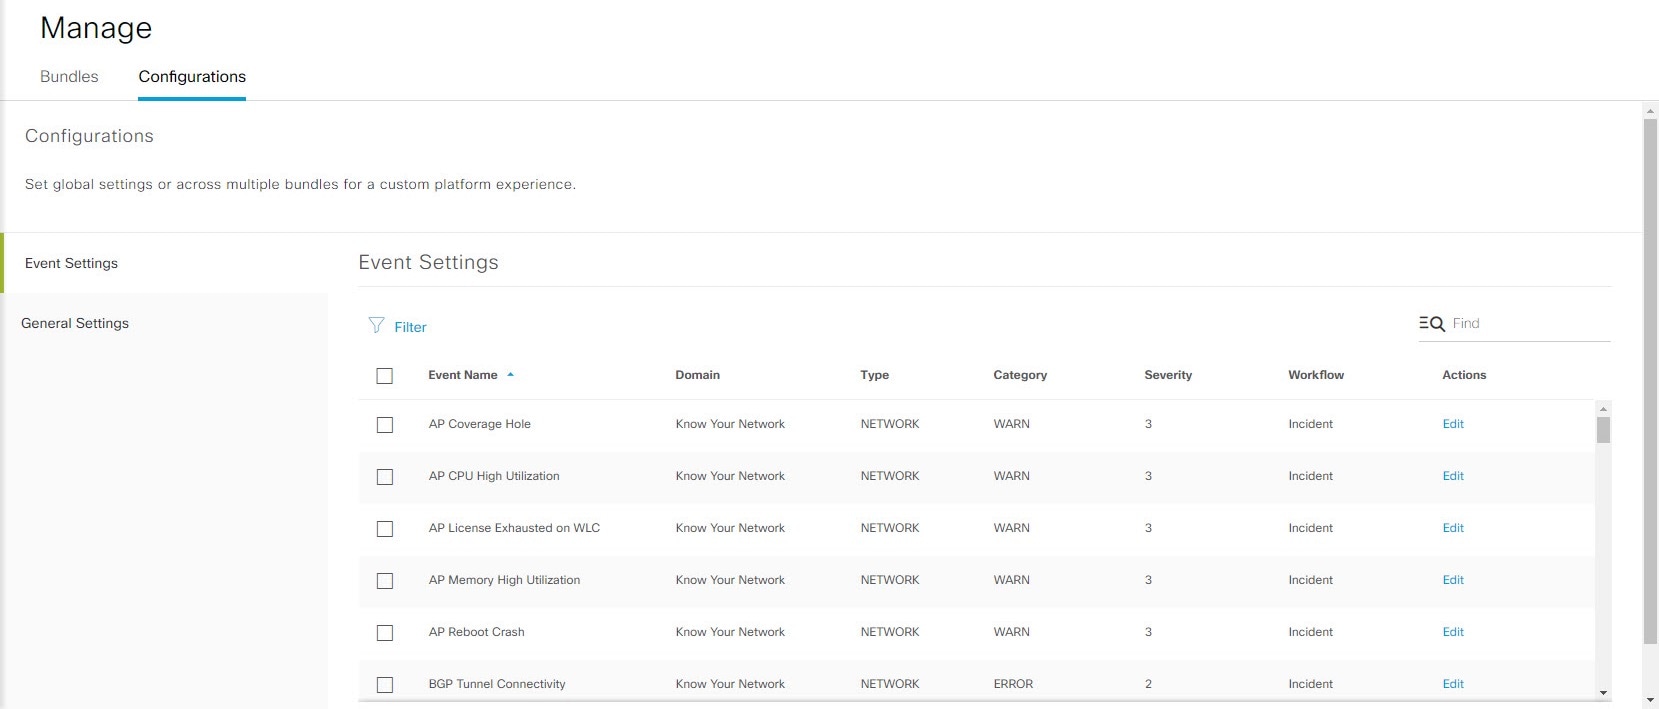
Figure 1. Events Settings window
Before you begin
You must have the appropriate permissions to perform the tasks as described in this procedure. For information about role-based access control for the Catalyst Center platform, see the Cisco Catalyst Center Platform User Guide.
Procedure
1.
From the main menu, choose Platform > Manage > Configurations.
A Configurations window opens with an Events Settings section.
2.
Review the Event Settings section, which contains this information:
Severity: P1 (Severity 1) through P5 (Severity 5).
Note
Assign Severity 1 to the most important or critical priority.
Workflow: Incident, Problem, Event, or RFC (Request for Change).
Actions: Edit.
You can adjust what is displayed in the table by clicking the Filter icon and using the filter, or by typing a keyword in the Find field. For example, to display all access point notifications, type AP in the Find field. To view all network notifications, type Network in the Find field. To view all severity notifications, type 1 in the Find field.
3.
Click Edit in the Actions column to edit an event.
To select a setting, click the downward pointing angle and adjust the value. For example, click Network to change the event type to App. This changes the event type from a network type to an application type. Click Severity and adjust the value to 1 from 5. This raises the severity level from 5 to 1.
4.
Click the box next to the event name to enable notifications.
This enables notifications through Catalyst Center when the event occurs in the future.
5.
Click Save.
Configure the automation events for ITSM (ServiceNow) bundle
Follow this procedure to monitor and publish events that require device provisioning activities, software image updates for compliance, security, or other operational triggers to a ServiceNow system.
Note
You can publish the event data to the Event table in ServiceNow if you have the Event Management plug-in in your ServiceNow instance. If not, you can configure the bundle to send the data to a REST API endpoint in the Cisco Catalyst app.
Enable ITSM in Catalyst Center to control device provisioning activities and group-based policy changes through a ServiceNow approval process. You do not need to enable ITSM for software image updates, because SWIM ignores Visibility and Control of Configurations settings. For more information about enabling ITSM approval, see the Configure System Settings chapter in the Cisco Catalyst Center Administrator Guide.
Before you begin
You must have the appropriate permissions to complete the steps described in this procedure. For information about role-based access control for the Catalyst Center platform, see the Cisco Catalyst Center Platform User Guide.
Procedure
1.
From the main menu, choose Platform > Manage > Bundles.
Review the displayed bundles and their status.
2.
Click the Automation Events for ITSM (ServiceNow) bundle link or icon (a colored square with an initial) to access more information about the bundle.
Additional information may include:
General information: Vendor, version, platform, tags displayed under the square icon.
Information: Tab that displays general information (purpose of bundle and how bundle works in the network), sample schemas, configuration notes, and other data about the bundle.
Contents: Tab that accesses the APIs and integration flows that make up the bundle, or provides information about the integration flows that make up the bundle.
Release Notes: Tab that displays latest release information about the bundle, including its version.
3.
Click each tab to review the information about the bundle.
4.
Click Enable to enable the bundle.
An Information field appears in the window.
5.
Click Enable in the Information field to confirm enabling the bundle.
After clicking Enable to confirm, a success message appears.
6.
Click OK in the success message.
7.
Click Configure to configure settings at the bundle level.
A configuration slide-in pane appears.
8.
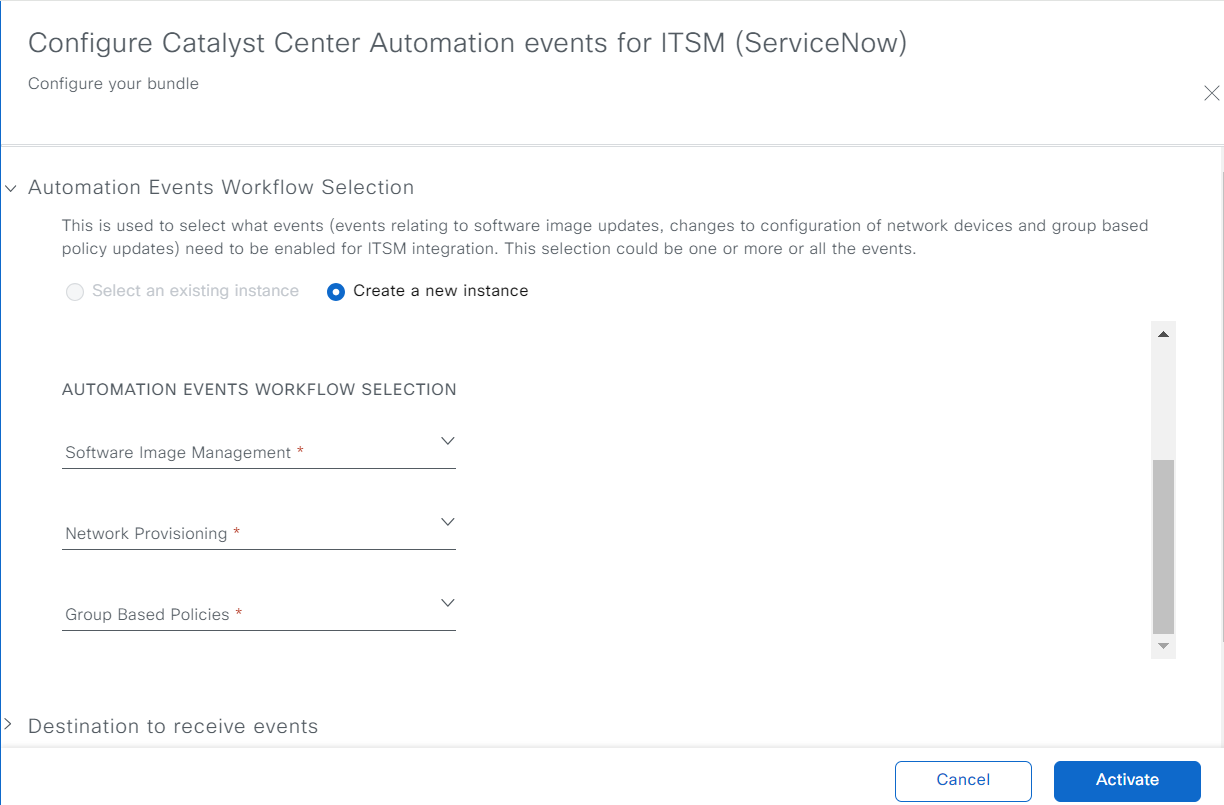
In the configuration slide-in pane, click Automation Events Workflow Selection to select events relating to software image updates, changes to configuration of network devices and group based policy updates that require ITSM integration. You can select one, several, or all available events.
9.
Click the radio button to configure an existing ServiceNow Connection instance or configure a new instance.
Figure 2. Example of Automation Events Workflow Selection configuration fields
To configure an existing ServiceNow Connection instance, select it from the drop-down list and click Activate.
10.
To configure a new ServiceNow Connection instance, enter this additional information:
Instance Name: Name of the instance.
Description: Descriptive text of the instance.
Software Image Management: Select true from the drop-down list to enable ITSM integration of events relating to software image updates.
Network Provisioning: Select true from the drop-down list to enable ITSM integration of events relating to configuration changes of network devices.
Group Based Policies: Select true from the drop-down list to enable ITSM integration of events relating to group based policy updates.
11.
In the configuration slide-in pane, click ServiceNow Access Settings to configure a ServiceNow Connection instance.
12.
Click the radio button to configure either an existing ServiceNow Connection instance or configure a new instance.
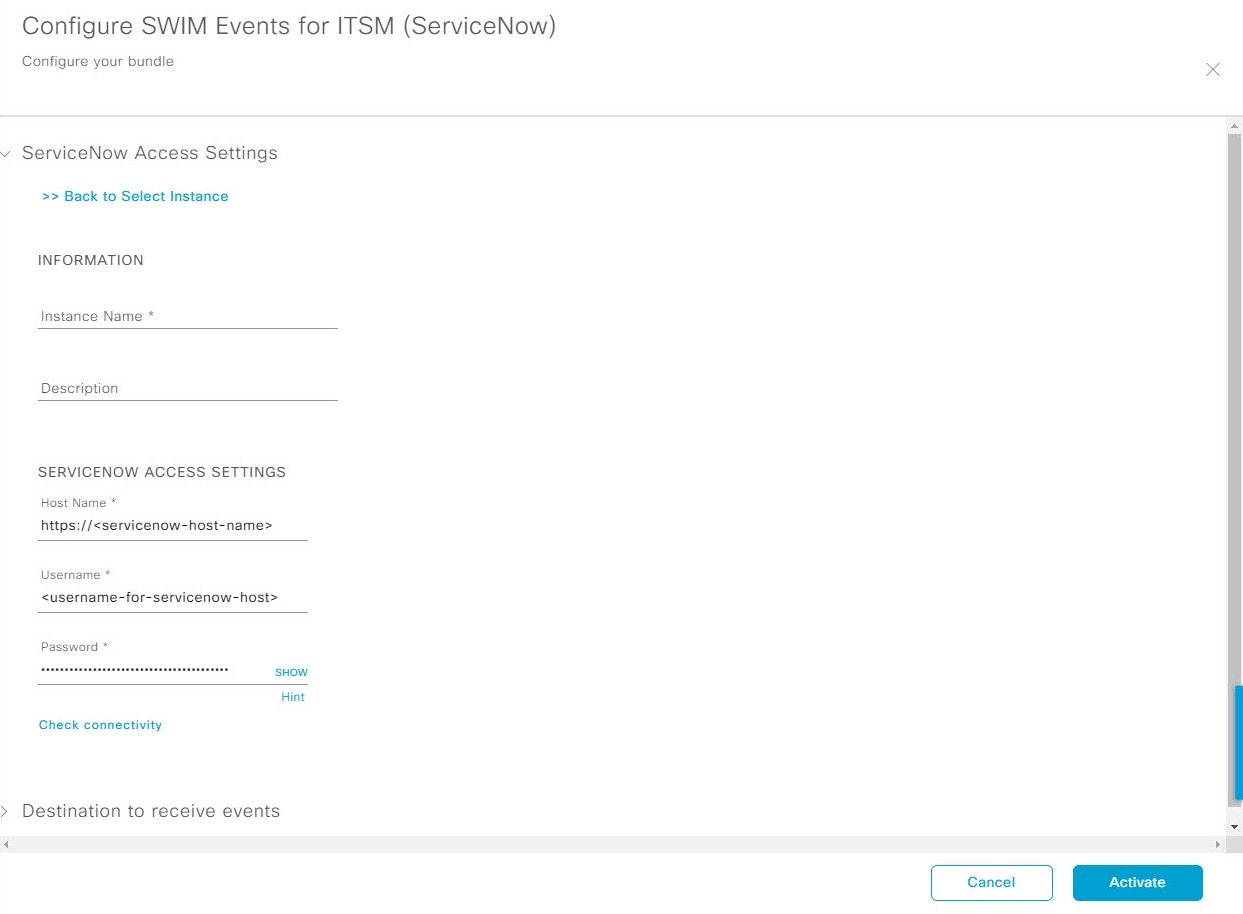
Figure 3. Example of ServiceNow instance configuration fields
To configure an existing ServiceNow Connection instance, select it from the drop-down list in the window and click Activate.
13.
To configure a new ServiceNow Connection instance, you must enter this additional information:
Instance Name: Name of the instance.
Description: Descriptive text of the instance.
Host name: Hostname for the ServiceNow system.
Username: Username required to access the ServiceNow system.
Password: Password required to access the ServiceNow system.
14.
Click Check Connectivity to test whether you can connect to the server where the endpoint is located.
Activate the bundle after successfully testing connectivity to the server.
15.
In the configuration slide-in pane, click Destination to receive events to configure a Destination Connection instance.
16.
Click the radio button to configure either an existing Destination Connection instance or configure a new instance.
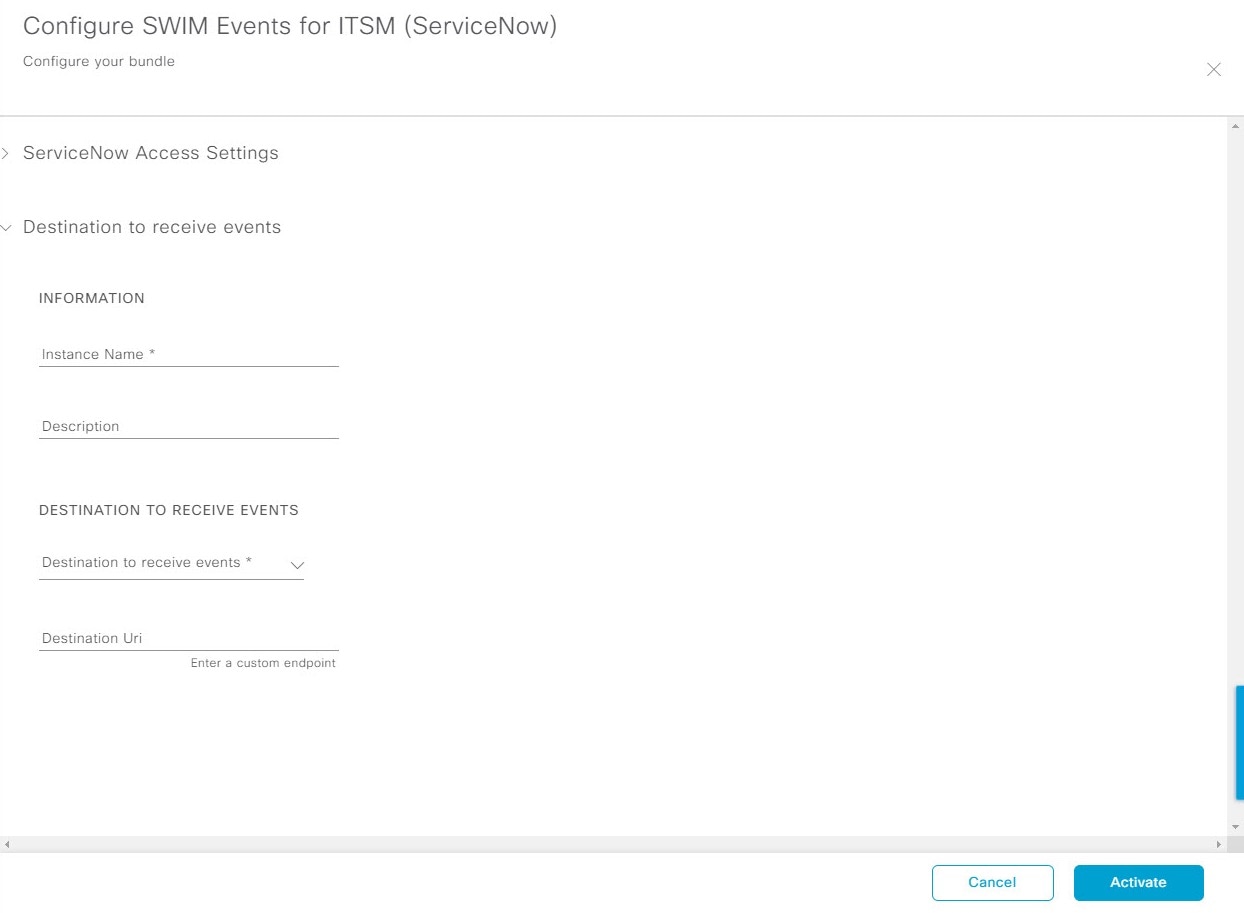
Figure 4. Example of Destination to receive events configuration fields
To configure an existing Destination Connection instance, select it from the drop-down menu in the window and click Activate.
17.
To configure a new Destination instance, you must enter this additional information:
Instance Name: Name of the instance.
Description: Descriptive text of the instance.
Destination to receive events: Select one of these options:
Event Management: When setting up Catalyst Center integration with ServiceNow without using the Cisco Catalyst app, select the Event Management option. The Event Management option requires that you have the Event Management plug-in that is configured within the ServiceNow instance.
REST API Endpoint: You can use the REST API Endpoint option with the Cisco Catalyst app. Data is sent to a REST API endpoint within the Cisco Catalyst app with the REST API Endpoint option.
Generic REST Endpoint in ServiceNow: For the Generic REST Endpoint in ServiceNow option, you can send the data to a different staging table in ServiceNow.
Note
Use this destination type to send data to a REST API endpoint outside the Cisco Catalyst app. Ensure that the created staging table/import set table has a field called u_event_details. The event details from Cisco Catalyst are mapped to this field. With the Generic REST Endpoint in ServiceNow destination type, after data transfer, you must write custom code to use the data from the staging table and create tickets in ServiceNow.
Destination URI: Enter a destination Uniform Resource Indicator (URI) for the Generic REST Endpoint in ServiceNow option. This field is mandatory for this option.
After entering this information, proceed to the next step.
18.
Click Activate to save your changes and activate the bundle, or click Cancel to cancel the configuration and close the slide-in pane.
Note
Click Activate to apply changes to the bundle immediately. The status of the bundle changes from ENABLED to ACTIVE.