Migrate Firewalls with the Migration Tool in Security Cloud Control

This chapter provides steps for migrating Cisco firewalls and third-party firewalls to Security Cloud Control using Secure Firewall migration tool.

Firewall migration tool guide audience

The Firewall Migration Tool guide is a documentation resource that assists specific users in migrating firewall configurations to Cisco Secure Firewall Threat Defense.

Target audience

This guide is for you if you use Security Cloud Control to manage your Secure Firewall ASA devices and FDM-managed threat defense devices or you use third-party firewalls such as Palo Alto Networks, Check Point, and Fortinet firewalls and you want to move into the Cisco Secure Firewall Threat Defense. You can migrate all your existing firewall configurations to a threat defense device managed by your Cloud-Delivered Firewall Management Center using the Secure Firewall migration tool in Security Cloud Control. This document describes what you need to do to migrate your configurations.

Firewall migration tool in Security Cloud Control

The Firewall Migration Tool in Security Cloud Control is a cloud-based migration service that

  • extracts device configurations from source devices or uploaded configuration files

  • migrates validated configurations to Cloud-Delivered Firewall Management Center provisioned on your Security Cloud Control tenant, and

  • eliminates the need to download and maintain the desktop version of the Secure Firewall migration tool.

Migration workflow and supported configurations

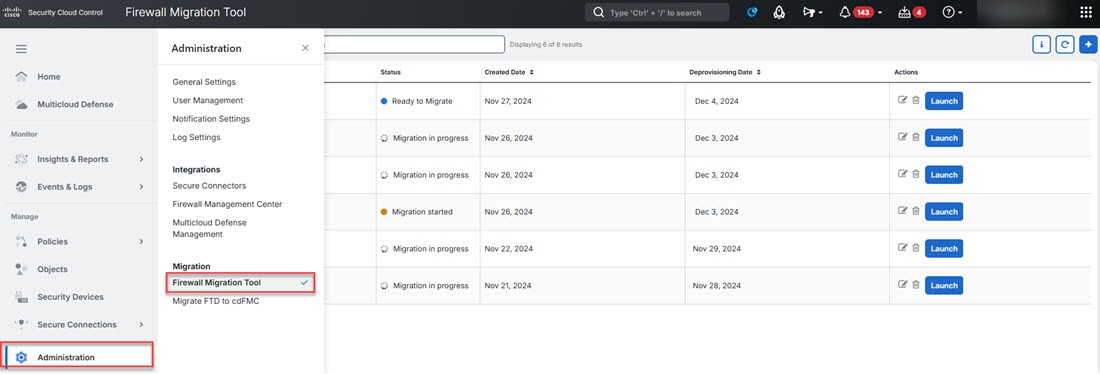
When you initialize a new migration in Tools & Services > Firewall Migration ToolAdministration > Migration > Firewall Migration Tool and Launch it, a cloud instance of the migration tool opens in a new browser tab and enables you to perform your migration tasks using a guided workflow.

The migration tool supports most configurations; unsupported configurations must be manually configured in the Cloud-Delivered Firewall Management Center. See Supported configurations.

The firewall migration tool interface displays options for migrating Cisco and third-party firewall configurations to Cisco Secure Firewall ASA, highlighting supported and unsupported configurations.

You can migrate Cisco and third-party firewall configurations to Firepower Threat Defense devices:

  • Cisco Secure Firewall ASA

  • Firepower Threat Defense managed by Firewall Device Manager

  • Check Point firewall

  • Palo Alto Networks firewall

  • Fortinet firewall


Important


You need an admin or a super admin user role in Security Cloud Control to be able to use the Firewall migration tool.


Supported configurations

The migration tool supports the configurations that enable you to migrate network objects, services, access rules, NAT configurations, routing, interfaces, VPN settings, and dynamic routing protocols from source firewalls to the management center.

The migration tool supports these configurations:

  • Network objects and groups

  • Service objects, except those configured for a source and destination

  • Referenced ACL and NAT rules

  • Service object groups


    Note


    Nested service object group contents are broken down to individual objects before being migrated, because the cloud-delivered management center does not support nesting.


  • IPv4 and IPv6 FQDN objects and groups

  • IPv6 conversion (interface, static routes, objects, ACL, and NAT)

  • Access rules applied to ingress interfaces

  • Global ACLs

  • Auto NAT, manual NAT, and object NAT

  • Static routes, equal-cost multipath (ECMP) routes, and policy-based routing (PBR)

  • Physical interfaces

  • Sub-interfaces

  • Port channels

  • Virtual tunnel interface

  • Bridge groups in transparent mode

  • IP SLA objects - the migration tool creates them, maps them with static routes, and migrates them

  • Time-based objects

  • Site-to-site VPN

    • Site-to-Site VPN—When the Firewall migration tool detects crypto-map configuration in the source ASA, FDM-managed device, Palo Alto Networks firewall, or Fortinet firewall, the Secure Firewall migration tool migrates it AS a point-to-point topology to the management center VPN

    • Crypto-map (static/dynamic)-based VPN from ASA, FDM-managed devices, Palo Alto Networks firewall, and Fortinet firewall

    • Route-based (VTI) ASA and FDM VPN

    • Certificate-based VPN migration from ASA, FDM-managed device, Palo Alto Networks firewall, Fortinet firewall


      Important


      If you have site-to-site VPN configurations in your source ASA, FDM-managed device, Palo Alto Networks firewall, or Forinet firewall, ensure that their device trustpoint or certificates are configured manually in the cloud-delivered FMC.


  • Remote-access VPN

    • SSL and IKEv2 protocols

    • Authentication methods—AAA only, client certificate only, SAML, AAA, and client certificate

    • AAA—Radius, local, LDAP, and AD

    • Connection profiles, group policy, dynamic access policy, LDAP attribute map, and certificate map

    • Standard and extended ACL

    • Custom attributes and VPN load balancing


    Important


    If you have configured remote-access VPN in your source firewall, ensure these tasks are performed:

    • Configure the ASA,FDM-managed device, Palo Alto Networks, and Fortinet firewall trustpoints manually on the management center AS PKI objects

    • Retrieve AnyConnect packages, Hostscan files (dap.XML, data.XML, hostscan package), external browser package, and AnyConnect profiles from the source ASA and FDM-managed device

    • Upload all AnyConnect packages and profiles to the management center


  • Dynamic route objects, BGP, and EIGRP

    • Policy list

    • Prefix list

    • Community list

    • Autonomous system (AS) path

    • Route map


Note


The migration tool analyzes all objects and object groups based on both their name and configuration, and reuses objects that have the same name and configuration; however, XML profiles in remote access VPN configurations are validated only using their name.


Refer to Cisco Secure Firewall Migration Tool Compatibility Guide for more information.

Licenses

The Secure Firewall migration tool does not require any additional license to be accessed from Security Cloud Control.

However, you need to have a Security Cloud Control base subscription and licenses for the Firepower Threat Defense features you want to migrate.

Initialize a new migration instance

This task creates a new migration instance that allows you to migrate firewall configurations using the Firewall migration tool.

The Firewall migration tool enables you to create up to 10 migrations and launch all of them concurrently. Each migration instance opens up in a new browser tab. If there are several users provisioned on your tenant, note that you can launch only migrations that you created.

Procedure


Step 1

Log in to your Security Cloud Control tenant.

Step 2

Choose Tools & Services > Firewall Migration ToolAdministration > Migration > Firewall Migration Tool.

Step 3

Click the blue plus The Firewall migration tool interface shows the option to initialize a new migration instance, highlighting the limit of 10 concurrent migrations and the need to delete an existing instance if the limit is reached. button to initialize a new migration instance.

Note


The Firewall migration tool enables you to create up to 10 migrations and launch all of them concurrently—each migration instance opens up in a new browser tab. However, if there are several users provisioned on your tenant, note that you can launch only migrations that you created.

If you want to initialize a new migration instance when you already have 10 migrations, delete one of the existing migration instances.

Step 4

Security Cloud Control generates a name for your migration automatically; you can use the auto-generated name or change it to suit your needs.

Step 5

Click OK and wait until you see the status change from Initializing to Ready to Migrate.

Security Cloud Control also notifies you with a new announcement on the Notifications pane when your migration is ready.

Step 6

On the new migration, click Launch.

The migration tool opens in a new browser tab and does not require any authentication.

Note


Migrations in Security Cloud Control are valid for seven days from the date of being created, after which they are automatically deprovisioned. This ensures that Security Cloud Control resources are freed up from time to time. You can check the dates in the Created Date and Deprovisioning Date columns.

Security Cloud Control displays the status of all the migrations in the Status column; you can filter out the migrations based on the their statuses. You can also select a migration to see migration details, such as date and time of creation, date and time of start, source and destination device names, and created by on the right pane. Note that when several users are provisioned on your Security Cloud Control tenant, you can only launch migrations you created.


The Firewall migration tool opens in a new browser tab and is ready for use. The migration instance is now initialized and you can begin configuring your firewall migration.

Delete a migration instance

Delete a migration instance when you want to manually deprovision your migration before Security Cloud Control automatically deprovisions it, such as after your migration tasks are finished.

You can delete a migration instance to manually control the deprovisioning process rather than waiting for automatic deprovisioning.

Procedure


Step 1

Choose Tools & Services > Firewall Migration ToolAdministration > Migration > Firewall Migration Tool.

Step 2

On the migration you want to delete, click Delete under the Actions pane.

Step 3

Confirm your action by clicking Delete.


The migration instance is deleted and deprovisioned.

Demo mode in secure firewall migration tool

Demo mode is a Secure Firewall Migration Tool feature that

  • provides an opportunity to perform a demo migration using dummy devices and visualize how an actual migration flow would look like

  • allows leveraging the whole feature set of the Secure Firewall Migration Tool, except pushing of configurations, and

  • enables a trial run of the end-to-end migration procedure before performing your actual migration.

Demo mode access and workflow

When you launch the Secure Firewall Migration tool and are on the Select Source Configuration page, you can choose to start performing a migration using Start Migration or enter the Demo Mode.

The migration tool triggers the demo mode based on the selection you make in the Source Firewall Vendor drop-down; you can also upload a configuration file or connect to a live device and continue with the migration. You can proceed performing the demo migration by selecting demo source and target devices such as demo FMC, demo FTD devices, or Multicloud Defense.


Caution


Choosing Demo Mode erases existing migration workflows, if any. If you use the demo mode while you have an active migration in Resume Migration, your active migration is lost and needs to be restarted from first, after you use the demo mode.


Migrate Secure Firewall ASA to Secure Firewall Threat Defense with the Firewall Migration Tool in Security Cloud Control

The Secure Firewall migration tool in Security Cloud Control lets you to migrate configurations from live ASA devices that are managed by Security Cloud Control or using a configuration file extracted from an ASA device. To read more about the Secure Firewall ASA configurations supported for migration, see ASA Configuration Support in the Migrating Cisco Secure Firewall ASA to Cisco Secure Firewall Threat Defense with the Migration Tool book.

Select Source Configuration

After launching your migration instance from Security Cloud Control, choose Cisco ASA in Select Source Configuration and click Start Migration. You can either manually upload an ASA configuration file or choose any one of the Security Cloud Control-managed ASA devices listed on the Connect to ASA pane. If you are trying to select a Security Cloud Control-managed device, note that devices having Configuration Status as Synced are only listed by the migration tool; if you do not see the device you want to migrate in the list, check if the device configuration changes are up-to-date and synced with Security Cloud Control. Note that one ASA device can be selected as the source device by more than one user at the same time and the confuguration extraction takes place seamlessly. If you have one or more security contexts configured on your ASA device, the migration tool allows you to choose which context you want to migrate; you can also merge all your contexts to a single instance and then migrate them. Refer Select the ASA Primary Security Context for more information.

The migration tool parses the device configuration and displays a summary containing the parsed configurations. Click Next.

Select Target

In the Select Target page, the Cloud-Delivered Firewall Management Center provisioned on your Security Cloud Control tenant is selected by default, and the Firepower Threat Defense devices managed by that management center are listed. You can choose the Firepower Threat Defense device you wish to migrate your ASA configuration to or choose to Proceed without FTD. Note that the devices listed are displayed either as In Use or Available based on whether the device is being used in another migration instance. However, you can perform an override by clicking Change Device Status, selecting the device from the In Use list, and clicking Continue, which will make the device available for being selected as the target.


Caution


Changing the device status from In Use to Available impacts the ongoing migration instance that is using the device already. We recommend that you exercise caution when doing this.


Choosing Proceed without FTD pushes only NAT objects, ACLs, and port objects to the Cloud-Delivered Firewall Management Center. For more information about the commonly used ASA features and their equivalent threat defense features, see Cisco Secure Firewall ASA to Threat Defense Feature Mapping guide.

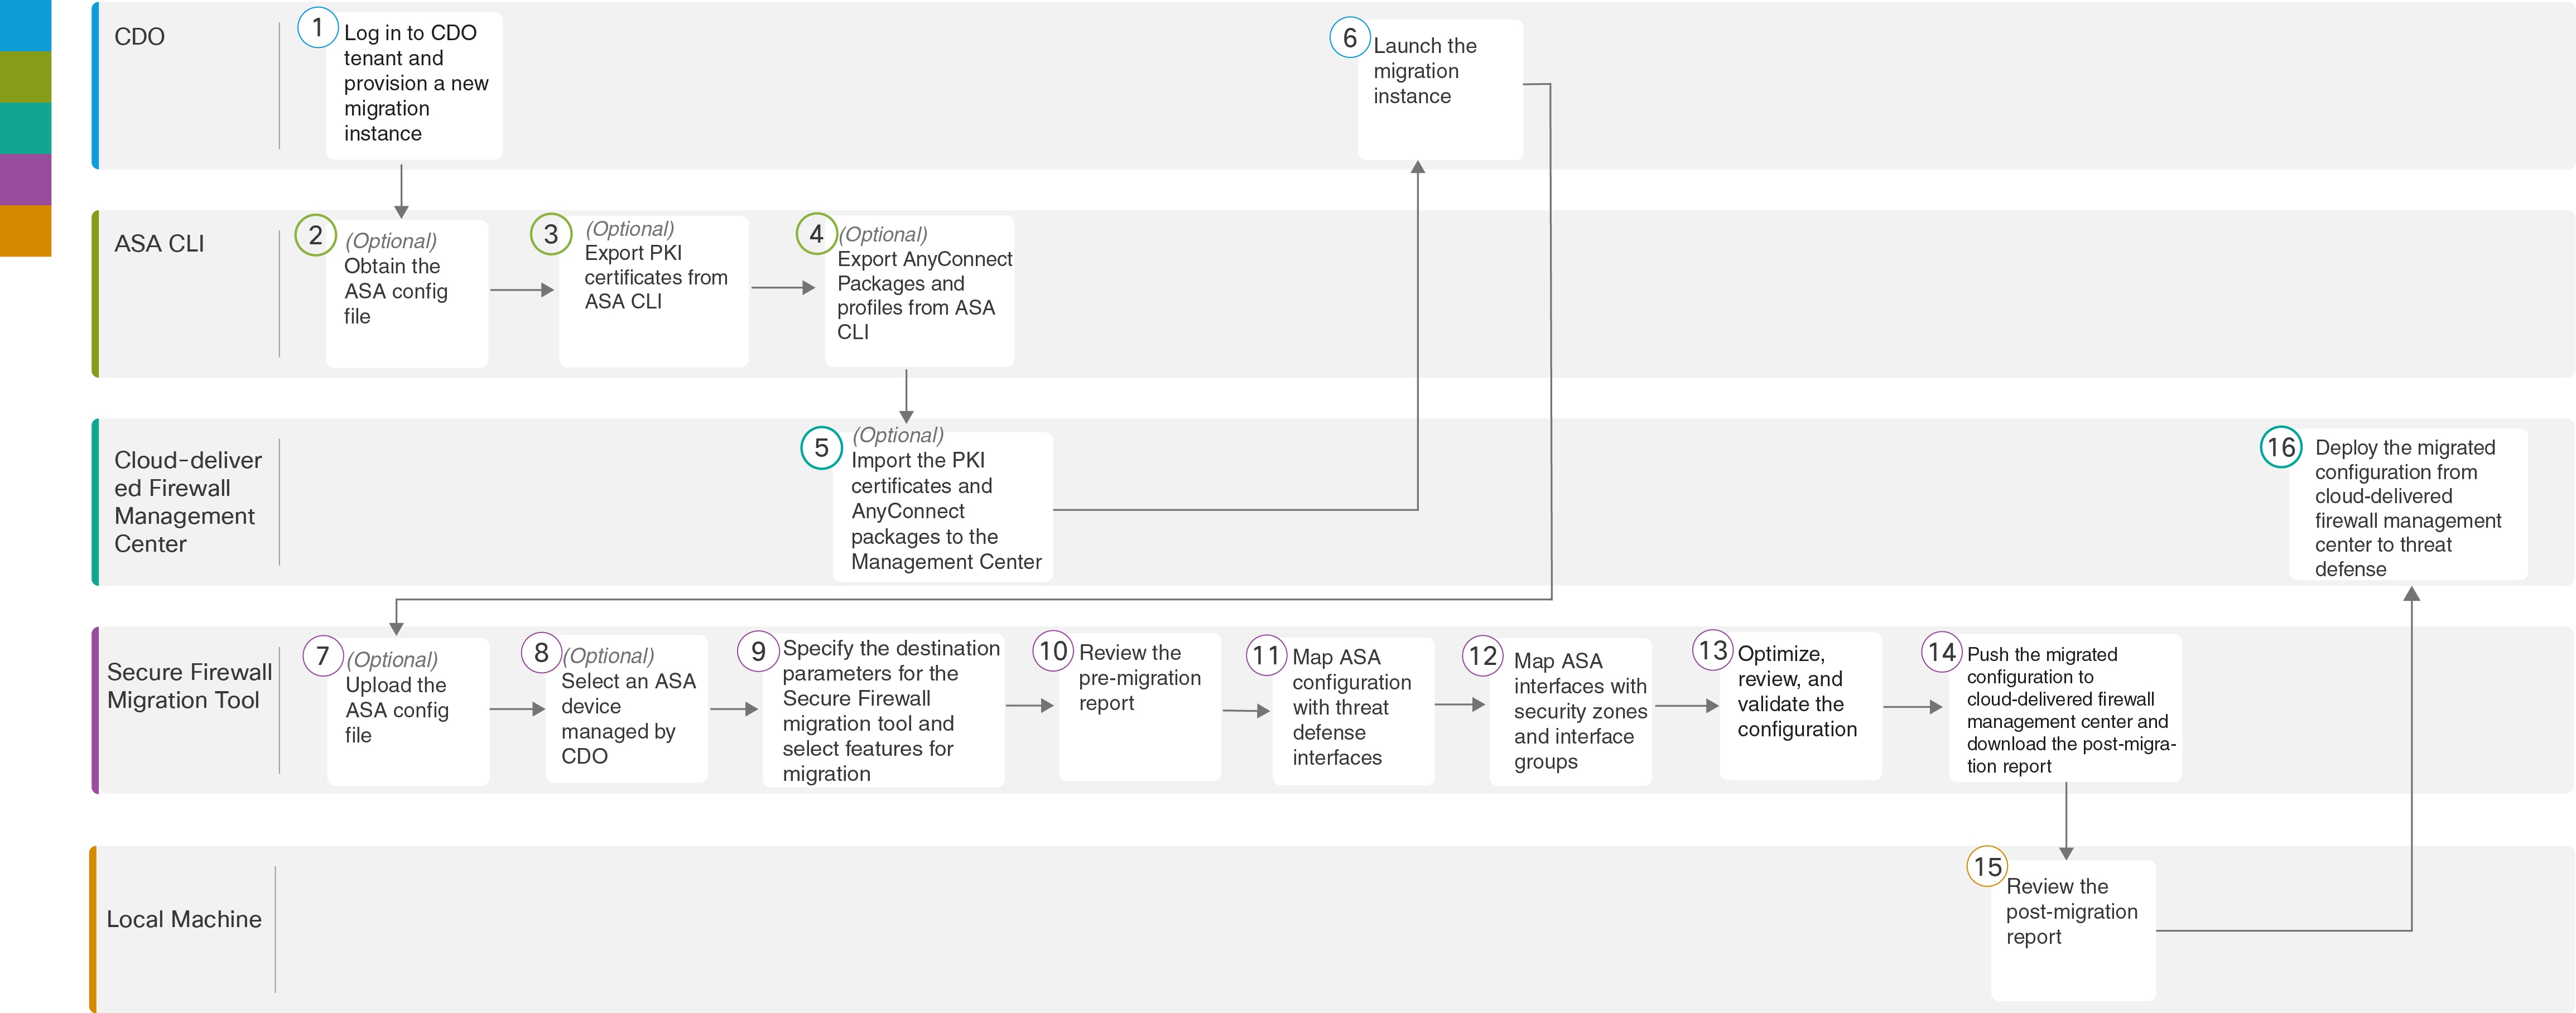
The flowchart that follows illustrates the step-by-step procedure for migrating an ASA to Firepower Threat Defense using the Firewall migration tool in Security Cloud Control.
Figure 1. End-to-End Procedure for ASA to FTD Migration with Firewall Migration Tool in Security Cloud Control

To perform the procedure with more detailed steps, continue to Obtain the ASA Configuration File in the Migrating Cisco Secure Firewall ASA to Threat Defense with the Migration Tool guide.

Workspace

Steps

Security Cloud Control

Log in to your Security Cloud Control tenant, navigate Tools & Services > Firewall Migration ToolAdministration > Migration > Firewall Migration Tool, and click the blue plus button to start provisioning a new migration instance.

ASA CLI

(Optional) Obtain the ASA configuration file: To obtain the ASA config file from ASA CLI, see Obtain the ASA Configuration File. If you intend to select a Security Cloud Control-managed ASA device in the Select Source Configuration, skip to Step 3.

ASA CLI

(Optional) Export public key infrastructure (PKI) certificates from ASA CLI: This step is required only if you are planning to migrate site-to site VPN and RAVPN configurations from ASA to threat defense. To export the PKI certificates from ASA CLI, see Export PKI Certificate from ASA and Import into Management Center. If you do not have remote-access VPN configurations on your device or you are not planning to migrate site-to-site VPN and remote-access VPN, skip to Step 7.

ASA CLI

(Optional) Export AnyConnect packages and profiles from ASA CLI: This step is required only if you are planning to migrate remote-access VPN features from ASA to threat defense. To export AnyConnect packages and profiles from ASA CLI, see Retrieve AnyConnect Packages and Profiles.

Cloud-Delivered Firewall Management Center

(Optional) Import the PKI certificates and AnyConnect packages to the management center: To import the PKI certificates to management center, see Step 2 in Export PKI Certificate from ASA and Import into Management Center and Retrieve AnyConnect Packages and Profiles.

Security Cloud Control

Ensure that the status of the migration instance you created is Ready to Migrate and click Launch; the Secure Firewall Migration Tool opens in a new browser tab.

Secure Firewall Migration Tool

(Optional) Upload the ASA config file obtained from ASA CLI, see Upload the ASA Configuration File. If you are planning to migrate configuration from an ASA device managed by Security Cloud Control, skip to Step 8.

Secure Firewall Migration Tool

From the list of ASA devices shown, that are managed by your Security Cloud Control tenant, select the device whose configuration you want to migrate. If you have configured more than one security context on your ASA device, select the context you wish to migrate or choose to merge all the contexts to a singe instance in the Primary Context Selectiondrop-down. See Select the ASA Primary Security Context for more information.

Secure Firewall Migration Tool

On the Select Target page, the Cloud-Delivered Firewall Management Center provisioned on your Security Cloud Control tenant is selected by default.

Secure Firewall Migration Tool

Select a target device from the list of threat defense devices managed by your Cloud-Delivered Firewall Management Center or choose Proceed without FTD and proceed.

Secure Firewall Migration Tool

Download the pre-migration report and review it for a detailed summary of the parsed configuration. For detailed steps, see Review the Pre-Migration Report.

Secure Firewall Migration Tool

Map FTD Interface with the ASA configuration.

Because the names of physical and port channel interfaces on your ASA and threat defense devices are not always the same, you can select to which interface in the target threat defense device you want an ASA interface to get mapped. For more information, see Map ASA Configurations with Secure Firewall Device Manager Threat Defense Interfaces.

Secure Firewall Migration Tool

Map ASA interfaces to existing threat defense security zones and interface groups. See Map ASA Interfaces to Security Zones and Interface Groups for detailed steps.

Secure Firewall Migration Tool

Optimize, Review and Validate Configuration with caution and ensure ACLs, objects, NAT, interfaces, routes, site-to-site VPN, and remote-access VPN rules are configured as intended for the destination threat defense device. See Optimize, Review and Validate the Configuration.

Secure Firewall Migration Tool

Once your configuration validation is a success, Push Configuration to the Cloud-Delivered Firewall Management Center. For more information, see Push the Migrated Configuration to Management Center.

Local Machine

Download the post-migration report and review it. To know more on what information the post-migration report contains, see Review the Post-Migration Report and Complete the Migration.

Cloud-Delivered Firewall Management Center

Deploy the newly migrated configuration to the threat defense device.

Migrate FDM-Managed Device to Secure Firewall Threat Defense with the Firewall Migration Tool in Security Cloud Control

You can migrate FDM-managed device configurations using configuration files or by simply selecting the FDM-managed devices that are onboarded to Security Cloud Control . To read more about the FDM-managed device configurations supported for migration, see FDM-Managed Device Configuration Support in Migrating an FDM-Managed Device to Secure Firewall Threat Defense with the Migration Tool book.

Select Source Configuration

After launching your migration instance from Security Cloud Control , choose Cisco Secure Firewall Device Manager in Select Source Configuration and choose from of the following options:

  • Migrate Firepower Device Manager (Shared Configurations Only)

  • Migrate Firepower Device Manager (Includes Device & Shared Configurations)

  • Migrate Firepower Device Manager (Includes Device & Shared Configurations) to FTD Device (New Hardware)

On clicking Continue , the migration tool enables you to either manually upload an FDM-managed device configuration file or choose any one of the FDM-managed devices onboarded to Security Cloud Control , which are listed on the Connect to FDM pane and click Next .

Select Target

In the Select Target page, the Cloud-Delivered Firewall Management Center provisioned on your Security Cloud Control tenant is selected by default, and the Firepower Threat Defense devices managed by that management center are listed. You can choose the Firepower Threat Defense device you wish to migrate the configuration to, and proceed with the migration.

Note that the devices listed are displayed either as In Use or Available based on whether the device is being used in another migration instance. However, you can perform an override by clicking Change Device Status , selecting the device from the In Use list, and clicking Continue , which will make the device available for being selected as the target.


Caution


Changing the device status from In Use to Available impacts the ongoing migration instance that is using the device already. We recommend that you exercise caution when doing this.


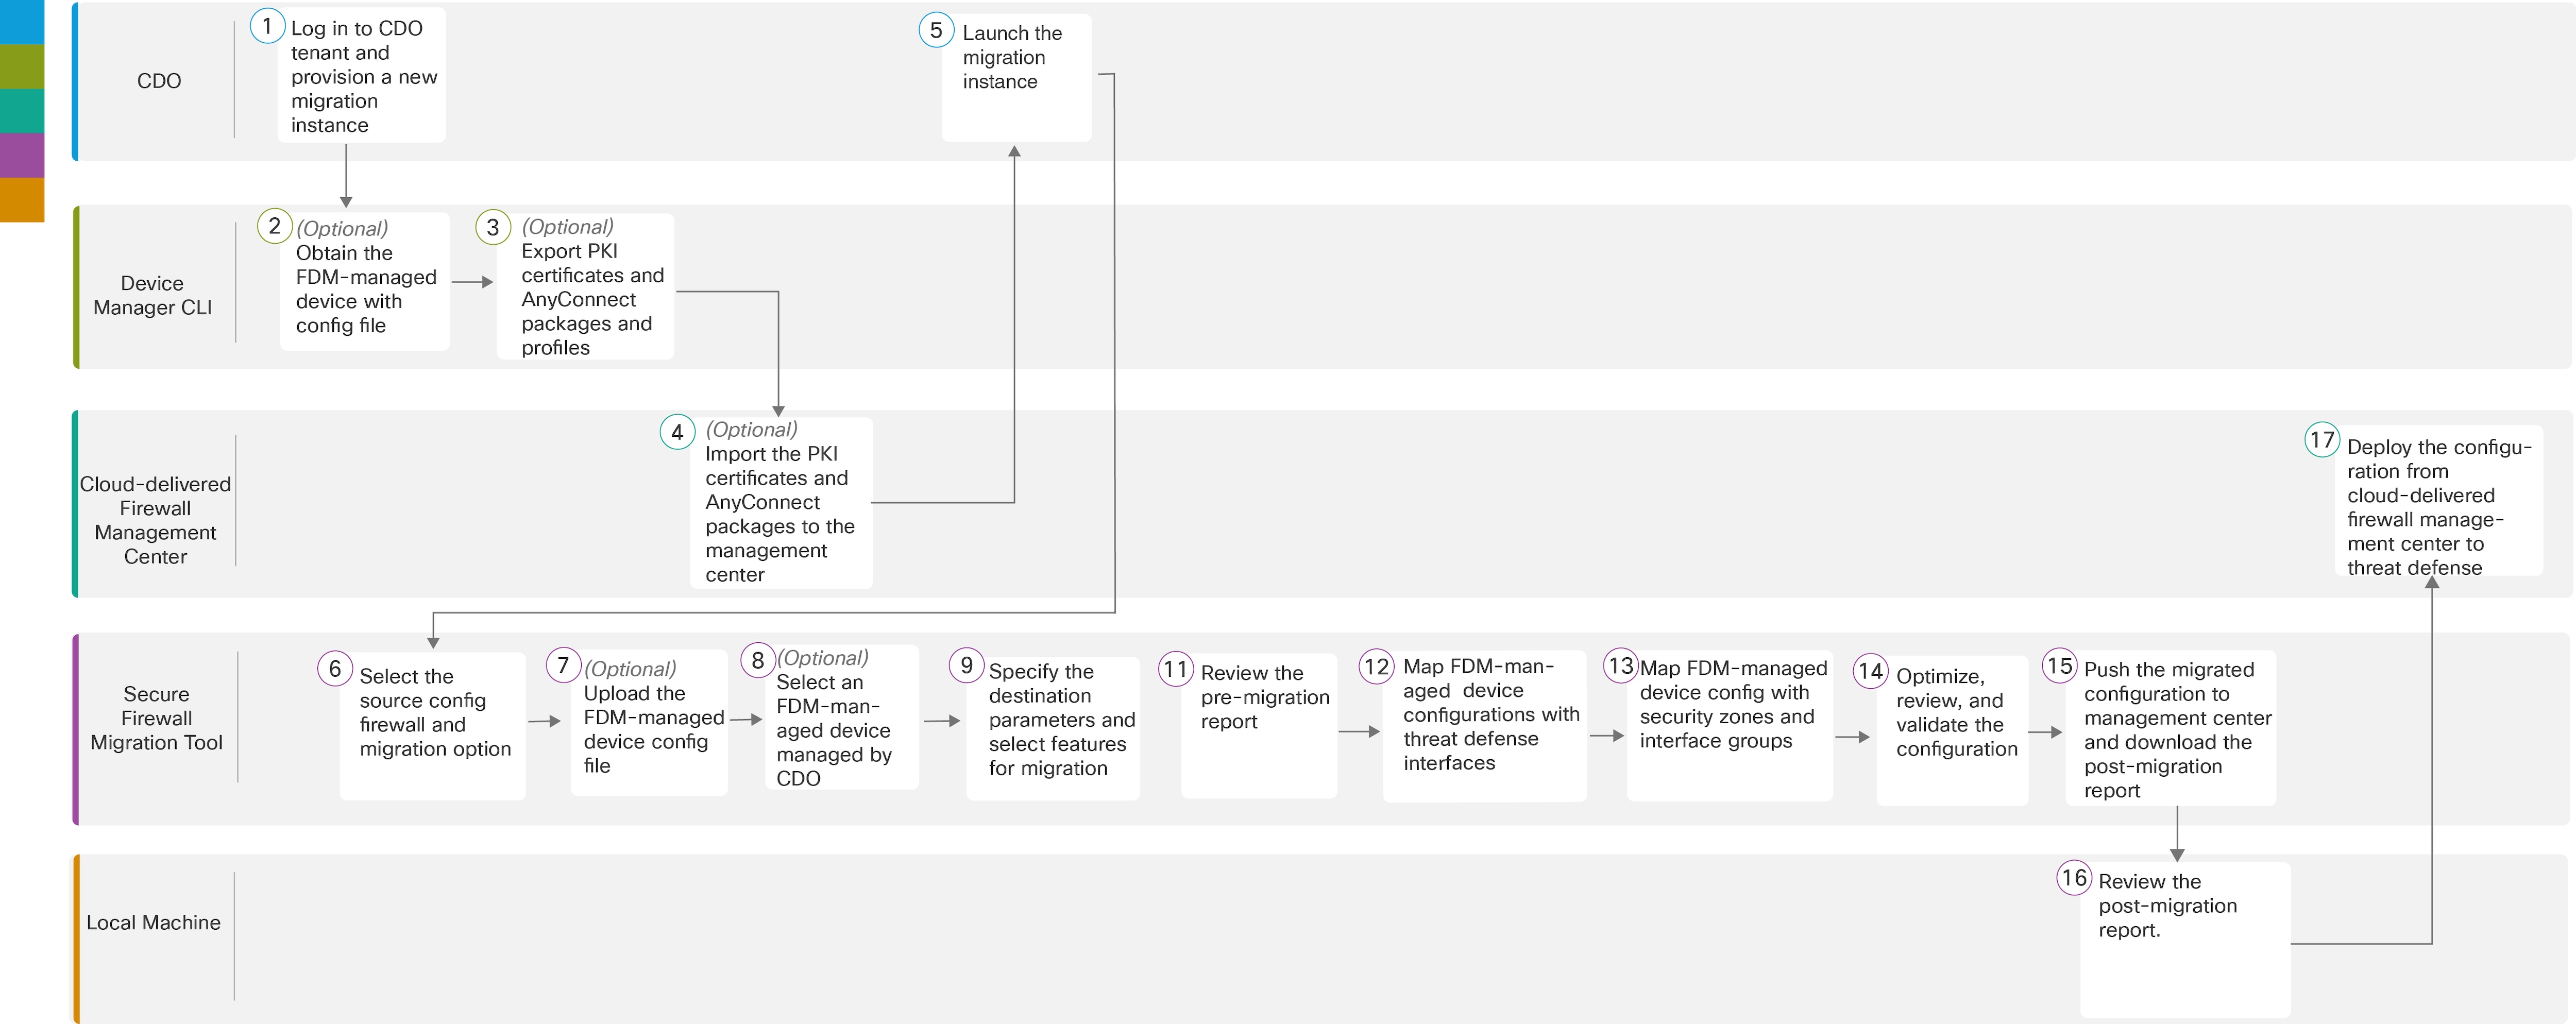
The flowchart that follows illustrates the step-by-step procedure for migrating an FDM-managed device using the Firewall migration tool in Security Cloud Control .

Figure 2. End-to-End Procedure for FDM-Managed Devices to FTD Migration with the Firewall Migration Tool in Security Cloud Control
The flowchart outlines the step-by-step procedure for migrating an FDM-managed device to a Secure Firewall Threat Defense using the Firewall Migration Tool.

To perform the procedure with more detailed steps, continue to Obtain the FDM-managed Device Configuration File in the Migrating an FDM-managed Device to Secure Firewall Threat Defense with the Migration Tool guide.

Workspace

Steps

The Firewall Migration Tool interface displays the steps required to migrate an FDM-managed device to Secure Firewall Threat Defense, highlighting key options and settings for a successful transition.

Security Cloud Control

Log in to your Security Cloud Control tenant, and in the left pane, click Tools & Services > Firewall Migration Tool Administration > Migration > Firewall Migration Tool , and click the blue plus The Firewall Migration Tool interface displays options for migrating FDM-managed devices to Secure Firewall Threat Defense, highlighting key settings and configurations. button to start provisioning a new migration instance.

The Device Manager CLI interface displays options for migrating FDM-managed devices to Secure Firewall Threat Defense using the Firewall Migration Tool.

Device Manager CLI

(Optional) Obtain the FDM-managed device configuration file: To obtain the FDM-managed device config file from device manager CLI, see Obtain the FDM-Managed Device Configuration File . If you intend to select a Security Cloud Control -managed FDM device in the Select Source Configuration , skip to Step 3.

The Device Manager CLI interface displays options for migrating FDM-managed devices to Secure Firewall Threat Defense using the Firewall Migration Tool.

Device Manager CLI

(Optional) Export PKI certificates and AnyConnect packages and profiles: This step is required only if you are planning to migrate site-to site VPN and remote-access VPN features from an FDM-managed device to threat defense. To export the PKI certificates from device manager CLI, see Step 1 in Export PKI Certificate from and Import into Firewall Management Center . To export AnyConnect packages and profiles from device manager CLI, see Step 1 in Retrieve AnyConnect Packages and Profiles . If you are not planning to migrate site-to-site VPN and remote-access VPN configurations, skip to Step 7.

The Firewall Migration Tool interface displays options for migrating FDM-managed devices to Secure Firewall Threat Defense, highlighting key settings and configurations necessary for a successful transition.

Cloud-Delivered Firewall Management Center

(Optional) Import the PKI certificates and AnyConnect packages to management center: To import the PKI certificates to management center, see Step 2 in Export PKI Certificate from and Import into Firewall Management Center and Retrieve AnyConnect Packages and Profiles .

The Firewall Migration Tool interface displays options for migrating FDM-managed devices to Secure Firewall Threat Defense, highlighting key settings and configurations necessary for a successful transition.

Security Cloud Control

Ensure that the status of the migration instance you created is Ready and click Launch ; the Secure Firewall Migration Tool opens in a new browser tab.

The Secure Firewall Migration Tool interface displays the migration instance status as "Ready" and includes a "Launch" button to initiate the migration process.

Secure Firewall Migration Tool

To select the source configuration firewall and migration option, see Select the Source Configuration Firewall and Migration .

The Secure Firewall Migration Tool interface displays options for selecting the source configuration firewall and migration settings for FDM-managed devices.

Secure Firewall Migration Tool

(Optional) Upload the FDM-managed device config file obtained from device manager CLI, see Upload the FDM-Managed Device Configuration File . If you are migrating configuration from an FDM-managed device onboarded to Security Cloud Control , skip to Step 8.

The Secure Firewall Migration Tool interface displays options for migrating FDM-managed devices to Secure Firewall Threat Defense, highlighting key settings and configurations necessary for a successful migration.

Secure Firewall Migration Tool

From the list of FDM-managed devices shown, that are managed by your Security Cloud Control tenant, select the device whose configuration you want to migrate.

Select the FDM-managed device from the list for configuration migration using the Secure Firewall Migration Tool.

Secure Firewall Migration Tool

On the Select Target page, the Cloud-Delivered Firewall Management Center provisioned on your Security Cloud Control tenant is selected by default.

The Secure Firewall Migration Tool interface displays options for migrating FDM-managed devices to Secure Firewall Threat Defense, highlighting key steps and configurations required for a successful migration.

Secure Firewall Migration Tool

Select a target device from the list of threat defense devices managed by your Cloud-Delivered Firewall Management Center or choose Proceed without FTD and proceed.

Select a target device from the list of threat defense devices managed by your Secure Firewall Migration Tool.

Secure Firewall Migration Tool

Download the pre-migration report and review it for a detailed summary of the parsed configuration. For detailed steps, see Review the Pre-Migration Report .

The pre-migration report summarizes the parsed configuration for migrating an FDM-managed device to Secure Firewall Threat Defense using the Firewall Migration Tool.

Secure Firewall Migration Tool

Map FTD Interface with the FDM-managed device configuration.

Because the names of physical and port channel interfaces on your FDM and threat defense devices are not always the same, you can select to which interface in the target threat defense device you want an FDM-managed device interface to get mapped. For more information, see Map FDM-managed Device Configurations with Secure Firewall Device Manager Threat Defense Interfaces .

The Secure Firewall Migration Tool interface displays options for migrating FDM-managed devices to Secure Firewall Threat Defense, highlighting key settings and configurations.

Secure Firewall Migration Tool

Map FDM-managed device interfaces to existing threat defense security zones and interface groups. See Map FDM-managed Interfaces to Security Zones and Interface Groups for detailed steps.

The diagram illustrates the process of mapping FDM-managed device interfaces to existing threat defense security zones and interface groups using the Secure Firewall Migration Tool.

Secure Firewall Migration Tool

Optimize, Review and Validate Configuration with caution and ensure ACLs, objects, NAT, interfaces, routes, site-to-site VPN, and remote-access VPN rules are configured as intended for the destination threat defense device. See Optimize, Review and Validate the Configuration .

The Secure Firewall Migration Tool interface displays options for migrating FDM-managed devices to Secure Firewall Threat Defense, highlighting key features and steps in the migration process.

Secure Firewall Migration Tool

Once your configuration validation is a success, Push Configuration to the Cloud-Delivered Firewall Management Center . For more information, see Push the Migrated Configuration to Management Center .

The local machine interface displays the configuration settings and status for the FDM-managed device during the migration process to Secure Firewall Threat Defense using the Firewall Migration Tool.

Local Machine

Download the post-migration report and review it. To know more on what information the post-migration report contains, see Review the Post-Migration Report and Complete the Migration .

The post-migration report provides essential information about the migration process and configuration details for the secure firewall threat defense device.

Cloud-Delivered Firewall Management Center

Deploy the newly migrated configuration to the threat defense device.

Troubleshoot FDM-managed Migration Issues

If you encounter a migration-blocking error when trying to migrate an FDM-managed device, try the following troubleshooting steps:

  • Ensure that your target on-premises Firewall Management Center 's network connectivity is up.

  • Ensure that the FDM-managed that you are trying to migrate is not manage by the target on-premises Firewall Management Center already.

Resume Migration

If you have started a migration from Security Cloud Control and wish to continue later, you can simply close the Firewall migration tool tab. When you want to continue with the migration, you can log in to Security Cloud Control and in Firewall Migration Tool click Launch on the migration you want to continue. The migration tool detects that you were migrating and lets you continue from where you left off. However, for the migration tool to detect that you have an ongoing migration, you must at least perform up to parsing of the source configuration. If you leave off a migration before performing this step, you can still launch the same migration from Security Cloud Control but you must start the migration from the first.

A Firewall Migration Tool is a tool that migrates FDM-managed device configurations, supports configuration file uploads, and facilitates source and target device selection.

  • migrates FDM-managed device configurations

  • supports configuration file uploads, and, and

  • facilitates source and target device selection.

Migrate Check Point Firewall to Secure Firewall Threat Defense with the Firewall Migration Tool in Security Cloud Control

You can migrate your Check Point Firewall configurations to threat defense either by manually extracting the configuration from your firewall or using the configuration extractor that comes inbuilt with the migration tool. To know the Check Point configurations that are supported, see Check Point Configuration Support .

Select Source Configuration

In the Source Firewall Vendor drop-down, choose Check Point (r80-r81) or Check Point (r75-r77) based on the firewall version you want to migrate. You can manually upload an extracted firewall configuration using Manual Configuration Upload or use the Live Connect option to connect to the Check Point Security Gateway to export the configuration file.


Note


You can use Live Connect only when you have selected Check Point (r80-81) and Configuration Extractor only when you have selected Check Point (r75-r77).


Select Target

In the Select Target page, the Cloud-Delivered Firewall Management Center provisioned on your Security Cloud Control tenant is selected by default, and the Firepower Threat Defense devices managed by that management center are listed. You can choose the Firepower Threat Defense device you wish to migrate the configuration to, and proceed with the migration.

Note that the devices listed are displayed either as In Use or Available based on whether the device is being used in another migration instance. However, you can perform an override by clicking Change Device Status , selecting the device from the In Use list, and clicking Continue , which will make the device available for being selected as the target. Choosing Proceed without FTD pushes only NAT objects, ACLs, and port objects to the Cloud-Delivered Firewall Management Center . For more information about the commonly used ASA features and their equivalent threat defense features, see Cisco Secure Firewall ASA to Threat Defense Feature Mapping guide.


Caution


Changing the device status from In Use to Available impacts the ongoing migration instance that is using the device already. We recommend that you exercise caution when doing this.


Changing the device status from In Use to Available may affect the ongoing migration instance. Caution is advised during this process.

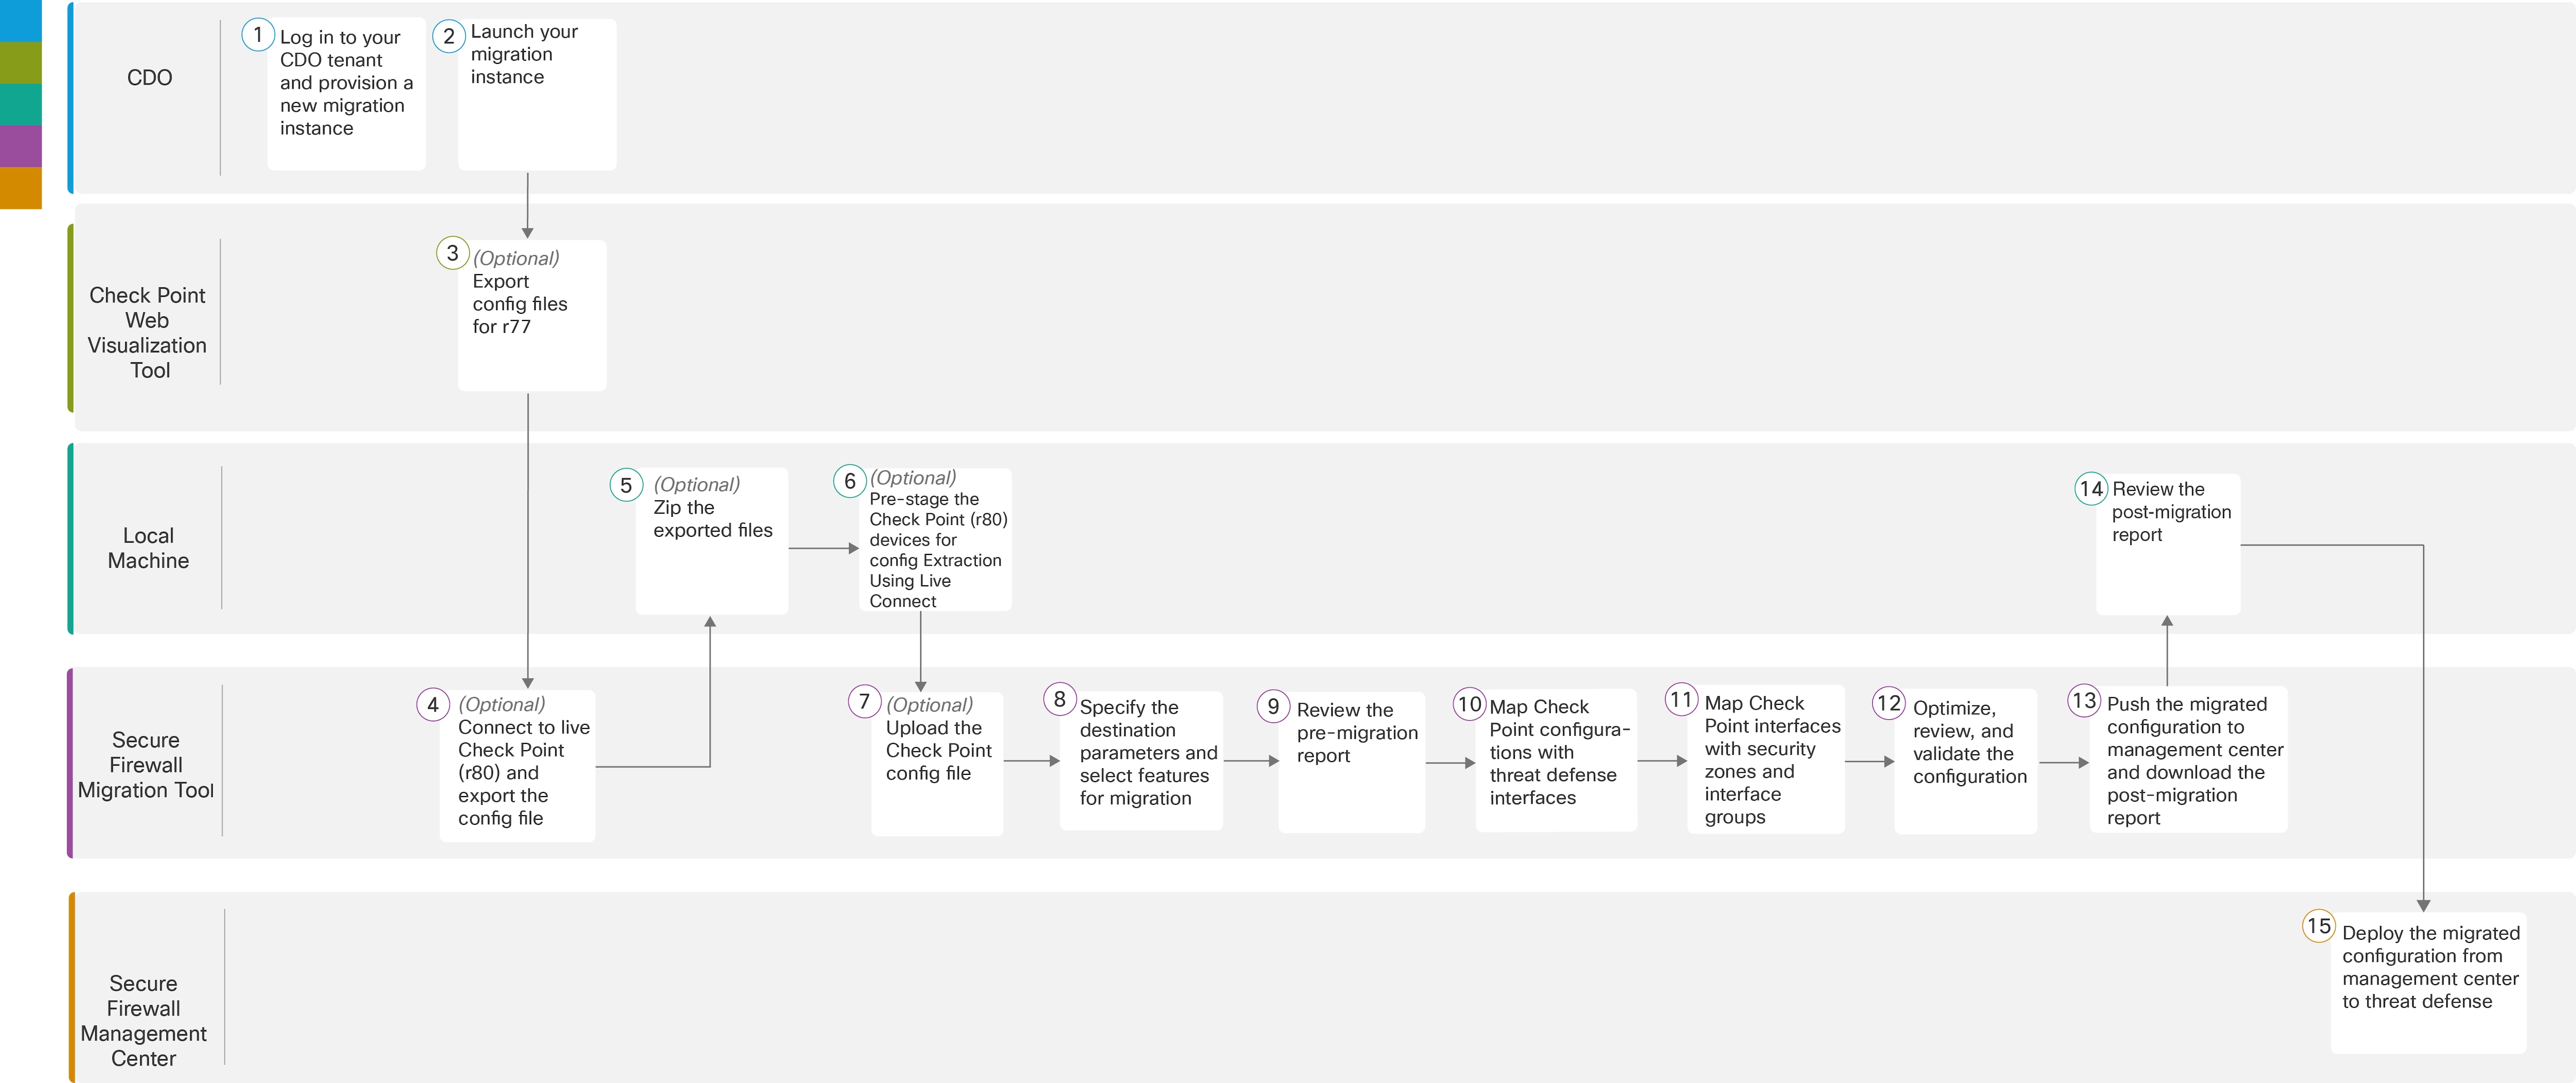
To perform the migration with more detailed steps, continue to Export the Check Point Configuration Files in Migrating Check Point Firewall to Secure Firewall Threat Defense with the Migration Tool book.

Workspace

Steps

The Firewall Migration Tool interface displays the steps required to migrate a Check Point Firewall to Secure Firewall Threat Defense, highlighting key options and configurations.

Security Cloud Control

Log in to your Security Cloud Control tenant, and in the left pane, click Tools & Services > Firewall Migration Tool Administration > Migration > Firewall Migration Tool and click the blue plus The Firewall Migration Tool interface displays options for migrating configurations from Check Point Firewall to Secure Firewall Threat Defense, highlighting key features and steps in the migration process. button to start provisioning a new migration instance.

The Firewall Migration Tool interface displays options for migrating configurations from Check Point Firewall to Secure Firewall Threat Defense, highlighting key features and steps in the migration process.

Security Cloud Control

Launch your migration instance from Security Cloud Control and choose Check Point (r75–r77) or Check Point (r80–r81) in the Source Firewall Vendor drop-down, based on your requirement.

The Check Point Web Visualization Tool displays the migration process from Check Point Firewall to Secure Firewall Threat Defense, highlighting key steps and configurations.

Check Point Web Visualization Tool

(Optional) Export the Check Point configuration file for r77: To export the Check Point configuration files for r77, see Export the Check Point Configuration Files for r77 . If you intend to export configuration files for r80 using Secure Firewall migration tool live connect feature, skip to step 6.

The Secure Firewall Migration Tool facilitates the transition from Check Point Firewall to Secure Firewall Threat Defense, streamlining the migration process and ensuring compatibility.

Secure Firewall Migration Tool

(Optional) Connect to live Check Point (r80) and export the config file: To export the Check Point configuration files for r80 using live connect feature, see Export the Check Point Configuration Files for r80 .

The local machine interface displays the configuration settings and options available for migrating a Check Point Firewall to Secure Firewall Threat Defense using the Firewall Migration Tool.

Local Machine

(Optional) Zip the exported files: select all the exported configuration files for r77 and compress them to a zip file. For detailed steps, see Zip the Exported Files .

The Firewall Migration Tool interface displays options for migrating configurations from Check Point Firewall to Secure Firewall Threat Defense, highlighting key settings and features for a successful transition.

Local Machine

Pre-stage the Check Point (r80) devices for config extraction: You must configure the credentials on Check Point (r80) devices before using Live Connect. For pre-staging credentials on Check Point (r80) devices, see Pre-Stage the Check Point Devices for Configuration Extraction Using Live Connect . This step is required only if you are planning to migrate configuration files for r80 devices.

The Secure Firewall Migration Tool interface displays options for migrating configurations from Check Point Firewall to Secure Firewall Threat Defense, highlighting key features and steps in the migration process.

Secure Firewall Migration Tool

(Optional) Upload the Check Point config file .

The Secure Firewall Migration Tool interface allows users to upload a Check Point configuration file and specify destination parameters for the migration process.

Secure Firewall Migration Tool

Specify the destination parameters for the Secure Firewall Migration Tool.

The Secure Firewall Migration Tool interface allows users to specify destination parameters and review the pre-migration report for migrating to Secure Firewall Threat Defense.

Secure Firewall Migration Tool

Navigate to where you downloaded the pre-migration report and review the report.

The Secure Firewall Migration Tool interface displays options for reviewing the pre-migration report and initiating the migration process for Check Point Firewall to Secure Firewall Threat Defense.

Secure Firewall Migration Tool

The Secure Firewall migration tool allows you to map the Check Point configuration with threat defense interfaces. For detailed steps, see Map Check Point Configurations with Secure Firewall Device Manager Threat Defense Interfaces .

The Secure Firewall Migration Tool interface displays options for migrating configurations from Check Point Firewall to Secure Firewall Threat Defense, highlighting key features and steps in the migration process.

Secure Firewall Migration Tool

To ensure that the Check Point configuration is migrated correctly, map the Check Point interfaces to the appropriate threat defense interface objects, security zones, and interface groups. For more information, see Map Check Point Interfaces to Security Zones and Interface Groups .

The Secure Firewall Migration Tool interface displays options for migrating configurations from Check Point Firewall to Secure Firewall Threat Defense, highlighting key features and steps in the migration process.

Secure Firewall Migration Tool

Optimize and review the configuration carefully and validate that it is correct and matches how you want to configure the threat defense device. For detailed steps, see Optimize, Review and Validate the Configuration to be Migrated .

The Secure Firewall Migration Tool interface displays options for migrating configurations from Check Point Firewall to Secure Firewall Threat Defense, highlighting key features and steps in the migration process.

Secure Firewall Migration Tool

This step in the migration process sends the migrated configuration to the Cloud-Delivered Firewall Management Center and allows you to download the post-migration report.

The migration process sends the migrated configuration to the local machine and allows for the download of the post-migration report.

Local Machine

Navigate to where you downloaded the post migration report and review the report. For detailed steps, see Review the Post-Migration Report and Complete the Migration .

The post-migration report provides an overview of the migration process from Check Point Firewall to Secure Firewall Threat Defense, highlighting any issues encountered and confirming successful configurations.

Cloud-Delivered Firewall Management Center

Deploy the migrated configuration from the Cloud-Delivered Firewall Management Center to threat defense.

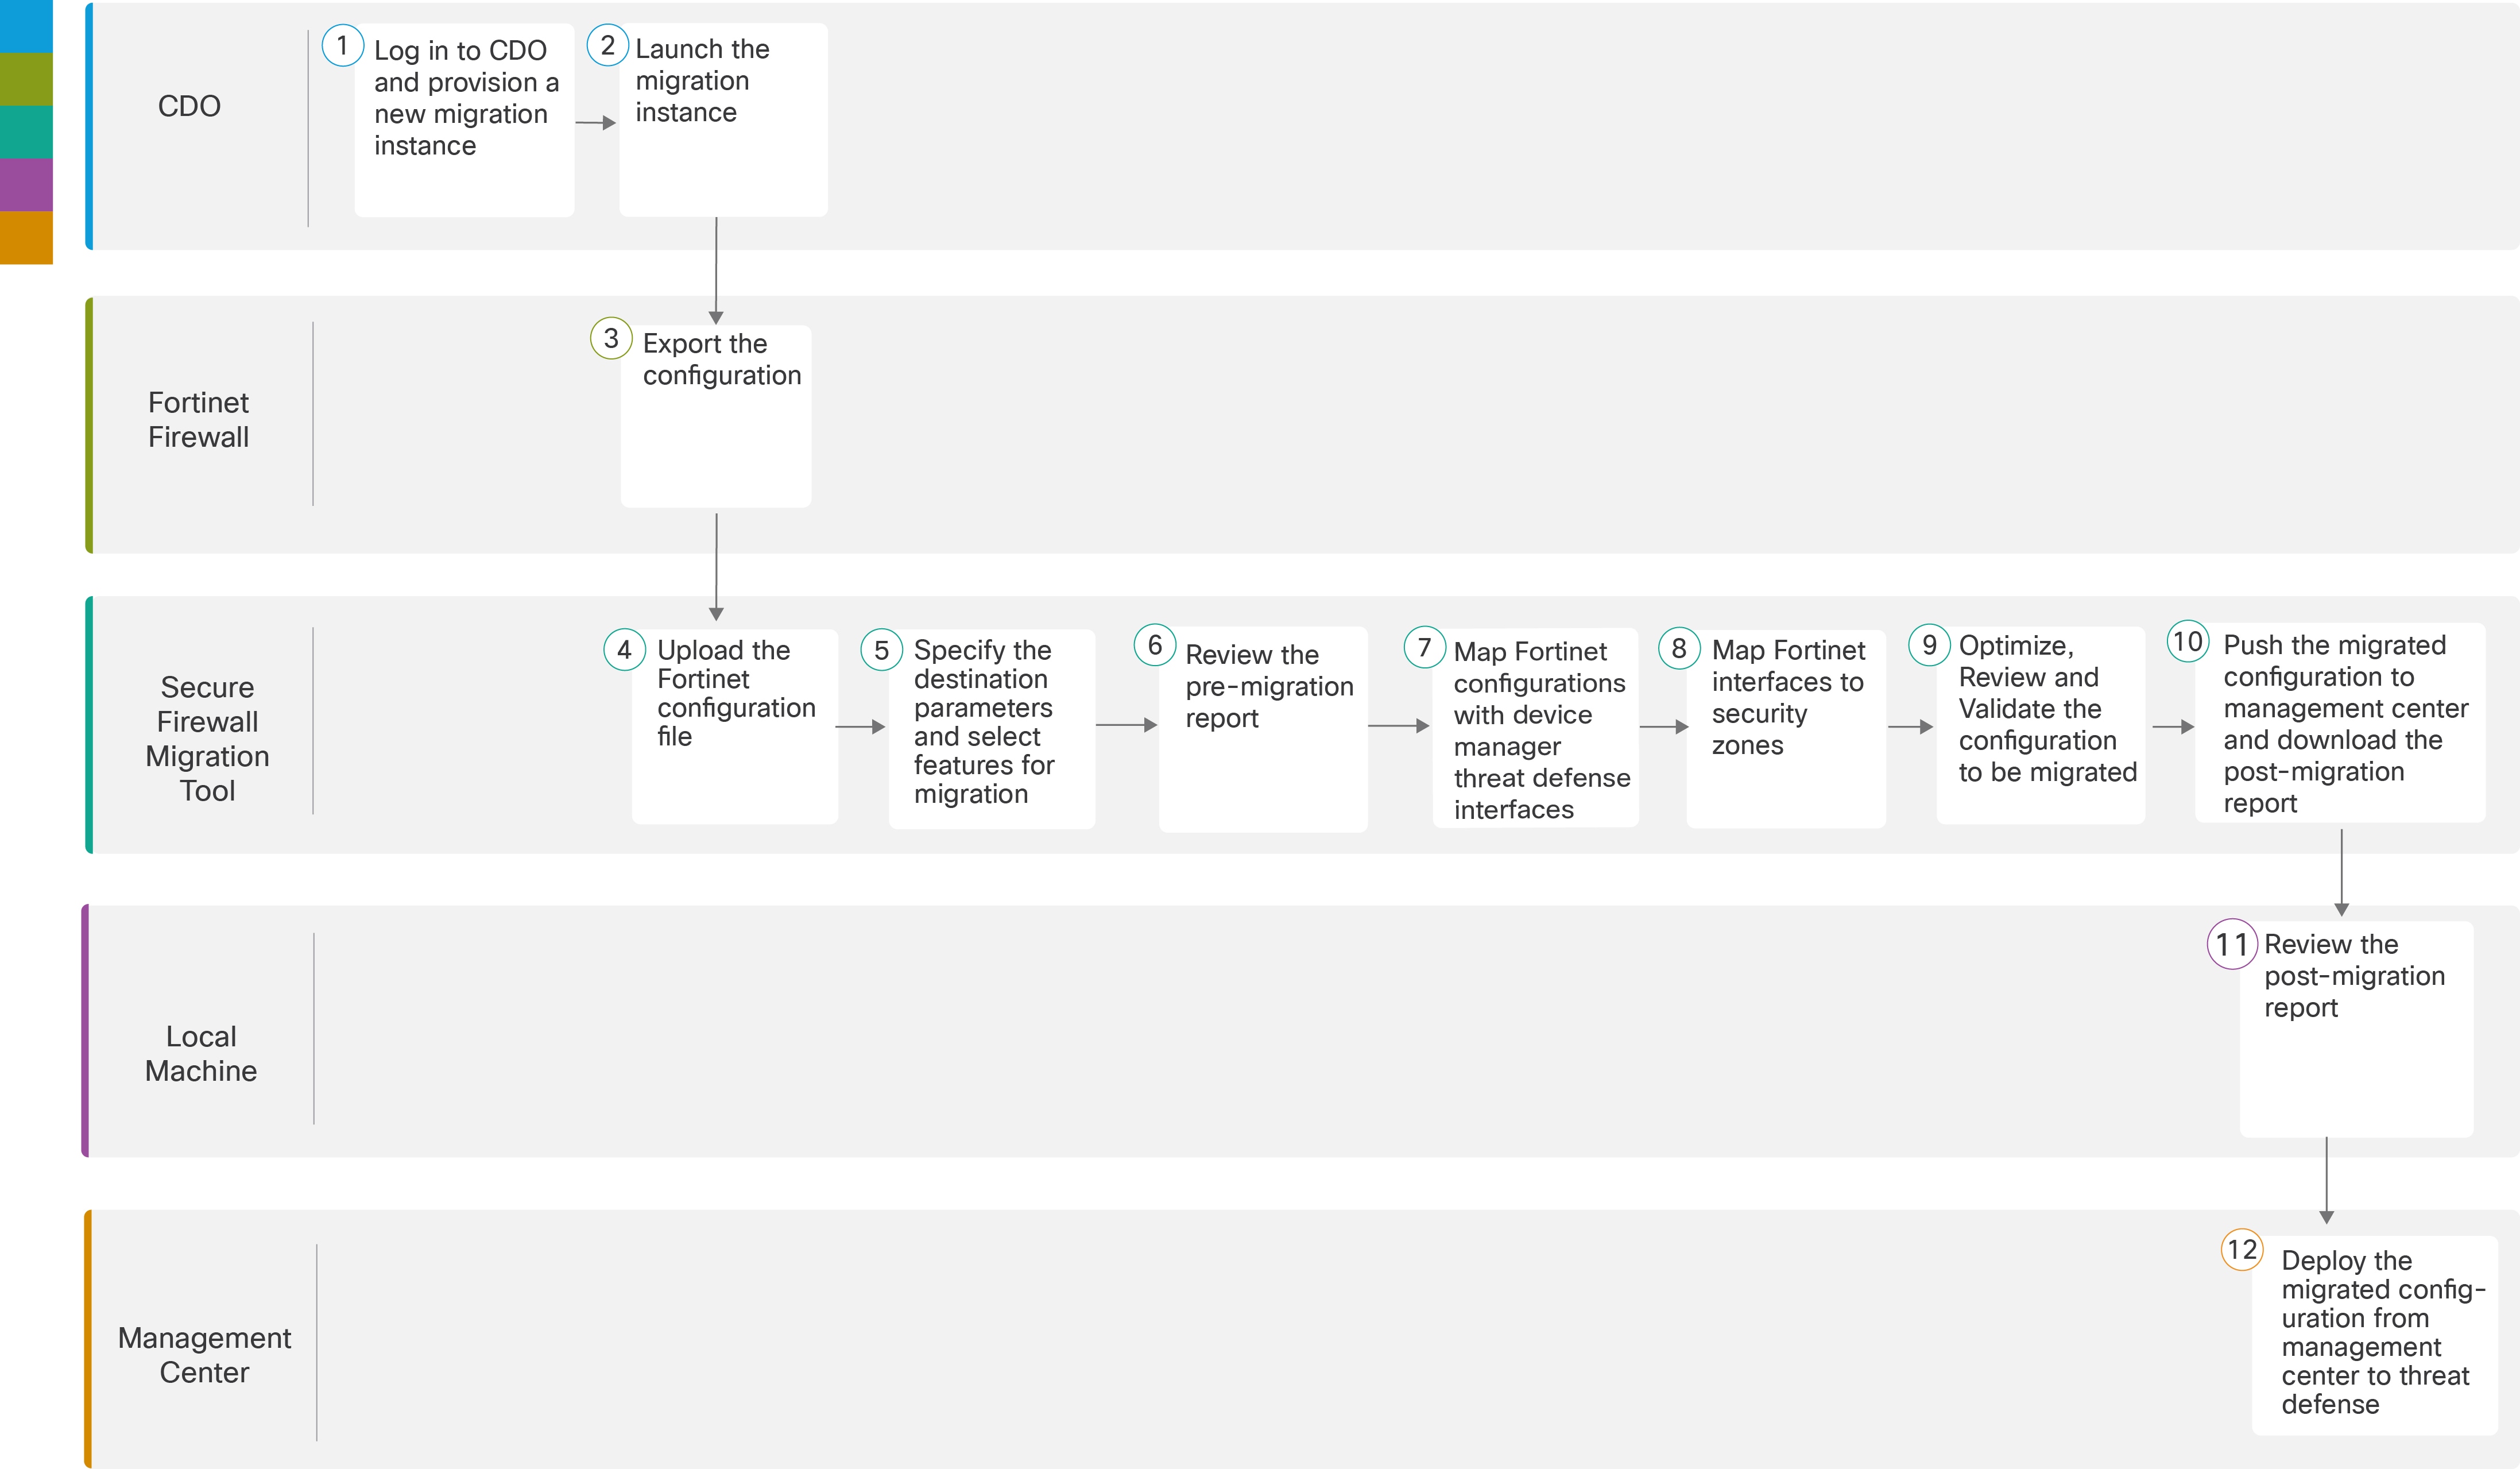
Migrate Fortinet Firewall with the Firewall Migration Tool in Security Cloud Control

The Firewall migration tool allows migrating configurations from Fortinet firewall to threat defense devices managed by your Cloud-Delivered Firewall Management Center.

You can manually derive the configuration file from your Fortinet firewall and upload it to the migration tool to begin with your migration. To learn about supported Fortinet firewall configurations, see Fortinet Configuration Support.

Procedure


Step 1

On the Select Source Configuration page, choose Fortinet (5.0+) and click Start Migration.

Step 2

Click Upload to choose the Fortinet configuration file and click Next.

Step 3

In the Select Target page, choose the device you wish to migrate the configuration to.

The Cloud-Delivered Firewall Management Center provisioned on your Security Cloud Control tenant is selected by default, and the Firepower Threat Defense devices managed by that management center are listed.

The devices listed are displayed either as In Use or Available based on whether the device is being used in another migration instance. However, you can perform an override by clicking Change Device Status, selecting the device from the In Use list, and clicking Continue, which will make the device available for being selected as the target.

Choosing Proceed without FTD pushes only NAT objects, ACLs, and port objects to the Cloud-Delivered Firewall Management Center. For more information about the commonly used ASA features and their equivalent threat defense features, see Cisco Secure Firewall ASA to Threat Defense Feature Mapping guide.

Caution


Changing the device status from In Use to Available impacts the ongoing migration instance that is using the device already. We recommend that you exercise caution when doing this.

Step 4

Follow the migration workflow using the table and flowchart provided.

The flowchart that follows illustrates the step-by-step procedure for migration Fortinet firewall configurations to threat defense devices:

To perform the procedure with more detailed steps, continue to Export Fortinet Firewall Configuration from Fortinet Firewall GUI in Migrating Fortinet Firewall to Secure Firewall Threat Defense with the Migration Tool guide.

The image illustrates the Firewall Migration Tool interface, highlighting key features and options for exporting the Fortinet firewall configuration.

Workspace

Steps

The Firewall Migration Tool interface displays the steps required to migrate a Fortinet firewall configuration, including options for importing existing settings and validating the migration process. Security Cloud Control

Log in to your Security Cloud Control tenant, and in the left pane, click Tools & Services > Firewall Migration ToolAdministration > Migration > Firewall Migration Tool, and click the blue plus The Firewall Migration Tool interface displays options for provisioning a new migration instance, including a blue plus button for initiating the process. button to start provisioning a new migration instance.

The Firewall Migration Tool interface displays options for launching the migration process for Fortinet firewalls, including a selection for Fortinet versions 5.0 and above.

Security Cloud Control

After your migration instance is ready, click Launch and choose Fortinet (5.0+).

The Firewall Migration Tool interface displays options for launching a migration instance for Fortinet Firewalls, including the selection of version 5.0 or higher.

Fortinet Firewall

Export the Fortinet configuration to the local system. To export the configuration from Fortinet firewall, see Export the Configuration from Fortinet Firewall.

The Secure Firewall Migration Tool interface displays options for uploading the exported Fortinet configuration file, facilitating the migration process.

Secure Firewall Migration Tool

Upload the Fortinet config file exported from Fortinet firewall, see Upload the Fortinet Configuration File.

The Secure Firewall Migration Tool interface allows users to upload the exported configuration file from a Fortinet firewall for migration purposes.

Secure Firewall Migration Tool

In this step, you can specify the destination parameters for the migration. For detailed steps, see Specify Destination Parameters for the Secure Firewall Migration Tool.

.

The image illustrates the interface of the Secure Firewall Migration Tool, highlighting the fields for entering destination parameters during the migration process.

Secure Firewall Migration Tool

Navigate to where you downloaded the pre migration report and review the report. For detailed steps, see Review the Pre-Migration Report.

The Secure Firewall Migration Tool interface displays options for reviewing the pre-migration report, including navigation instructions and links to detailed steps.

Secure Firewall Migration Tool

To ensure that the Fortinet configuration is migrated correctly, map the Fortinet interfaces to the appropriate threat defense interface objects, security zones, and interface groups. For detailed steps, see Map Fortinet Firewall Configurations with Secure Firewall Device Manager Threat Defense Interfaces.

The diagram illustrates the mapping process of Fortinet interfaces to threat defense interface objects, security zones, and interface groups during the migration using the Secure Firewall Migration Tool.

Secure Firewall Migration Tool

Map the Fortinet interfaces to the appropriate security zones, see Map Fortinet Interfaces to Security Zones for detailed steps.

The Secure Firewall Migration Tool illustrates the mapping of Fortinet interfaces to their corresponding security zones, providing a visual guide for the migration process.

Secure Firewall Migration Tool

Optimize and review the configuration carefully and validate that it is correct and matches how you want to configure the threat defense device. For detailed steps, see Optimize, Review and Validate the Configuration to be migrated.

The image illustrates the process of optimizing and reviewing the configuration for migrating a Fortinet firewall using the Firewall Migration Tool, emphasizing the importance of validating the configuration before implementation.

Secure Firewall Migration Tool

This step in the migration process sends the migrated configuration to the Cloud-Delivered Firewall Management Center and allows you to download the post-migration report. For detailed steps, see Push the Migrated Configuration to Management Center.

The Firewall Migration Tool interface displays options for migrating configurations from a Fortinet firewall, including source and destination settings.

Local Machine

Navigate to where you downloaded the post migration report and review the report. For detailed steps, see Review the Post-Migration Report and Complete the Migration.

The post-migration report outlines the changes made during the migration of the Fortinet firewall, highlighting key configurations and potential issues to address.

Management Center

Deploy the migrated configuration from the Cloud-Delivered Firewall Management Centerto threat defense.


The Fortinet firewall configuration is successfully migrated to the Secure Firewall Threat Defense device through the management center.

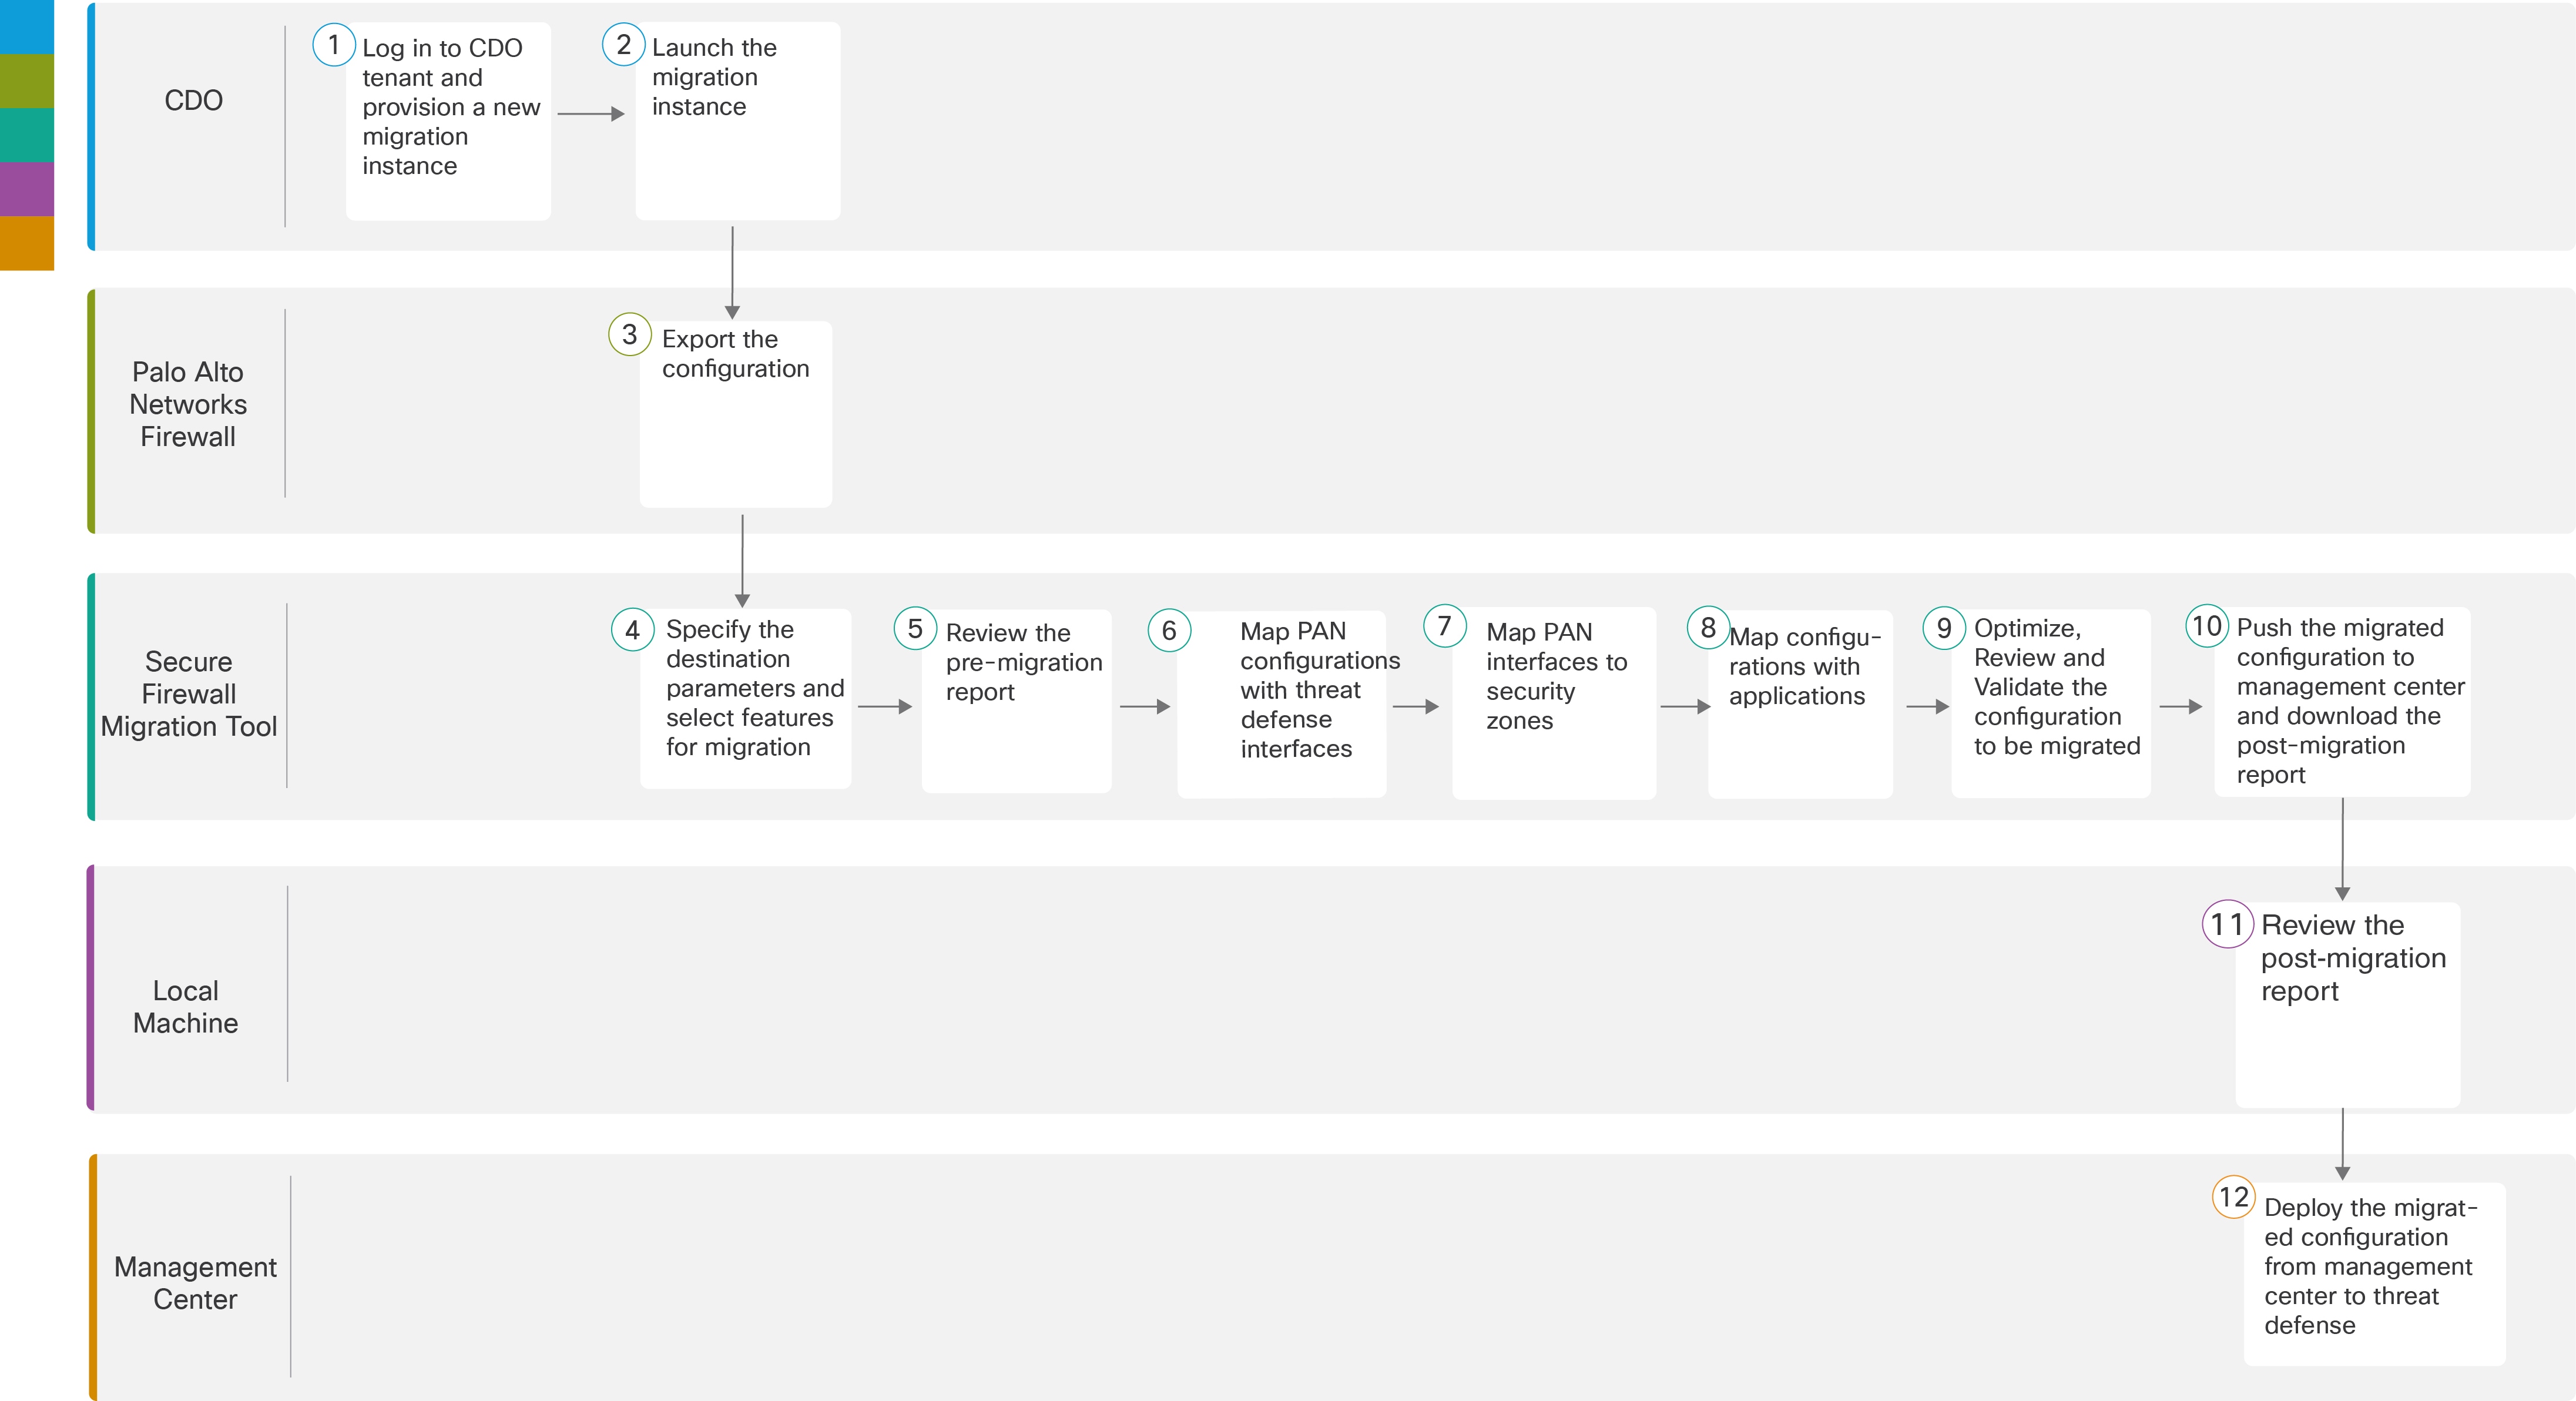
Migrate Palo Alto Networks Firewall to Secure Firewall Threat Defense with the Firewall Migration Tool in Security Cloud Control

This task enables you to migrate Palo Alto Networks firewall configurations to Secure Firewall Threat Defense using the Firewall Migration Tool, preserving your security policies while transitioning to Cisco's threat defense platform.

You can migrate configurations from your Palo Alto Networks firewall by choosing Palo Alto Networks (6.1+) in the Source Firewall Vendor drop-down and manually uploading the derived configuration file to Firewall Migration Tool. To read about the Palo Alto Networks firewall configurations that are supported for migration and the limitations around them, see Guidelines and Limitations in the Migrating Palo Alto Networks Firewall to Secure Firewall Threat Defense with the Migration Tool book.

Procedure


Step 1

Log in to your Security Cloud Control tenant, and in the left pane, click Tools & Services > Firewall Migration ToolAdministration > Migration > Firewall Migration Tool, and click the blue plus The Firewall Migration Tool interface displays options for migrating configurations from Palo Alto Networks Firewall to Secure Firewall Threat Defense, highlighting key features and steps in the migration process. button to start provisioning a new migration instance.

Step 2

Launch the migration instance from Security Cloud Control and choose Palo Alto Networks (6.1+).

Step 3

Export the Configuration File from your Palo Alto Networks Firewall.

To export the configuration from Palo Alto Networks Firewall, see Export the Configuration from Palo Alto Networks.

Step 4

Select the target device for migration.

In the Select Target page, the Cloud-Delivered Firewall Management Center provisioned on your Security Cloud Control tenant is selected by default, and the Firepower Threat Defense devices managed by that management center are listed. You can choose the Firepower Threat Defense device you wish to migrate the configuration to, and proceed with the migration.

Note that the devices listed are displayed either as In Use or Available based on whether the device is being used in another migration instance. However, you can perform an override by clicking Change Device Status, selecting the device from the In Use list, and clicking Continue, which will make the device available for being selected as the target. Choosing Proceed without FTD pushes only NAT objects, ACLs, and port objects to the Cloud-Delivered Firewall Management Center. For more information about the commonly used ASA features and their equivalent threat defense features, see Cisco Secure Firewall ASA to Threat Defense Feature Mapping guide.

Caution


Changing the device status from In Use to Available impacts the ongoing migration instance that is using the device already. We recommend that you exercise caution when doing this.

Changing the device status from In Use to Available affects the ongoing migration instance using the device. This diagram illustrates the impact of this status change on the migration process.

Step 5

Specify the destination parameters for the migration.

For detailed steps, see Specify the destination parameters for the migration.

Step 6

Review the pre-migration report.

Navigate to where you downloaded the pre migration report and review the report. For detailed steps, see Review the Pre-Migration Report.

Step 7

Map PAN interfaces to threat defense interface objects, security zones, and interface groups.

To ensure that the PAN configuration is migrated correctly, map the PAN interfaces to the appropriate threat defense interface objects, security zones, and interface groups. For detailed steps, see Map PAN Firewall Configurations with Secure Firewall Management Center Threat Defense Interfaces.

Step 8

Map PAN interfaces to security zones.

For detailed steps, see Map PAN interfaces to security zones.

Step 9

Map PAN configuration to corresponding target applications.

For detailed steps, see Map Configurations with Applications.

Step 10

Optimize, review, and validate the configuration.

Optimize and review the configuration carefully and validate that it is correct and matches how you want to configure the threat defense device. For detailed steps, see Optimize, Review and Validate the Configuration to be Migrated.

Step 11

Push the migrated configuration to Cloud-Delivered Firewall Management Center.

This step in the migration process sends the migrated configuration to management center and allows you to download the post-migration report. For detailed steps, see Push the Migrated Configuration to Cloud-Delivered Firewall Management Center.

Step 12

Review the post-migration report.

Navigate to where you downloaded the post migration report and review the report. For detailed steps, see Review the Post-Migration Report and Complete the Migration.

Step 13

Deploy the migrated configuration from the Cloud-Delivered Firewall Management Center to threat defense.


Your Palo Alto Networks firewall configuration has been successfully migrated to Secure Firewall Threat Defense. The migrated configuration is now deployed and active on your target threat defense device.

Related documentation

To know more about migrating third-party firewalls using the Secure Firewall migration tool in Security Cloud Control, see the following documents based on your requirement:


Important


Unlike ASA and FDM-managed device migrations, you can only upload a manually extracted configuration file for migrating a third-party firewall configuration to threat defense.


If you wish to read overall information about the Secure Firewall migration tool and all related documentation, see Cisco Secure Firewall Migration Tool.