Onboard a Firewall Threat Defense Device to Cloud-Delivered Firewall Management Center
Onboarding Overview
Review the following use cases and supported sofware versions that are compatible with Cloud-Delivered Firewall Management Center management.
 Note |
You must ensure that the Firewall Threat Defense device ports have external and outbound access for the Cloud-Delivered Firewall Management Center to onboard them. There is no requirement for an on-premises or cloud-based Security Device Controller (SDC) for this operation. For more information, see Network Requirements. To send Firewall Threat Defense Syslog events to the Cisco cloud, you can set up the Secure Event Connector (SEC). For more information, see Installing Secure Event Connectors. |
Firewall Threat Defense Devices Currently Managed by Cloud-Delivered Firewall Management Center
The following scenarios occur when you either move or migrate a device to the Cloud-Delivered Firewall Management Center:
-
If you delete a device from an on-premises Firewall Management Center or Secure Firewall Threat Defense Firewall Device Manager to onboard to the Cloud-Delivered Firewall Management Center, the change of managers wipes any policies configured through the on-premises Firewall Management Center.
-
If you migrate a device from an on-premises Firewall Management Center to the Cloud-Delivered Firewall Management Center, the device retains the majority of your previously configured policies.
Note |
If you do not know if your device is already managed by an alternative manager, use the |
Onboarding Methods
Cloud-Delivered Firewall Management Center supports the following onboarding methods:
-
Registration Key - Onboard a device with a registration key. The initial device setup wizard is complete on the device.
-
Zero-Touch Provisioning - Onboard a new factory-shipped device with its serial number. Note that this method only supports Firepower 1000, Firepower 2100, or Secure Firewall 3100 devices.
-
Zero-Touch Provisioning using a device template - Onboard new factory-shipped devices using serial numbers and a device template. Note that this method only supports Firepower 1000, Firepower 2100, Secure Firewall 1200 or Secure Firewall 3100 devices.
Prerequisites to Onboard a Device to Cloud-Delivered Firewall Management Center
Onboard Limitations and Requirements
Be aware of the following limitations when onboarding a device to the Cloud-Delivered Firewall Management Center:
-
Devices must be running version 7.2 and later.
-
You can migrate an HA pair that is managed by an On-Premises Firewall Management Center by following the Migrate FTD to Cloud-Delivered Firewall Management Center process. Confirm both peers are in a healthy state prior to migrating.
-
Devices managed locally by Firewall Device Manager can be onboarded using the serial number.
-
Firewall Threat Defense devices can be onboarded to Cloud-Delivered Firewall Management Center using zero-touch provisioning if they are new (just unboxed) or have undergone a factory reset.
-
If the device is managed by an on-premises Firewall Management Center, you can either onboard the device to Cloud-Delivered Firewall Management Center or migrate the device. Migrating retains any existing policies and objects, whereas onboarding the device removes most policies and all objects. See Migrate FTD to Cloud-Delivered Firewall Management Center for more information.
-
If your device is currently managed by a Firewall Device Manager, unregister all your smart licenses before you onboard the device. Even if you switch device management, the Cisco Smart Software Manager will retain the smart licenses.
-
If you have previously onboarded a device that was managed by a Firewall Device Manager and deleted the device from Security Cloud Control with the intention of re-onboarding for cloud management, you must register the Firewall Device Manager to the Security Services Exchange cloud after deleting the device. See the "Access Security Services Exchange" chapter in the Firepower and Cisco SecureX Threat Response Integration Guide.
 Tip |
Onboarding a device to the Cloud-Delivered Firewall Management Center removes any policies and most objects configured through the previous manager. If your device is currently managed by an on-premises Firewall Management Center, it is possible to migrate the device and retain your policies and objects. See Migrate FTD to Cloud-Delivered Firewall Management Center for more information. |
Network Requirements
Before you onboard a device, ensure the following ports have external and outbound access. Confirm the following ports on the device are allowed. If communication ports are blocked behind a firewall, onboarding the device may fail.
Note |
You cannot configure these ports in the Security Cloud Control UI. You must enable these ports through the device's SSH. |
|
Port |
Protocol / Feature |
Details |
|---|---|---|
|
443/tcp |
HTTPS |
Send and receive data from the internet. |
|
443 |
HTTPS |
Communicate with the AMP cloud (public or private) |
|
8305/tcp |
Appliance communications |
Securely communicate between appliances in a deployment. |
Management and Data Interfaces
Make sure your device is correctly configured with either a management or data interface.
To configure a management or data interface on your device, see Complete the initial configuration of a Secure Firewall Threat Defense device using the CLI.
Onboard a Device with a CLI Registration Key
Use the procedure below to onboard a device for Cloud-Delivered Firewall Management Center with a CLI registration key.
Note |
If your device is currently managed by an on-premises Firewall Management Center, onboarding the device will fail. You can either delete the device from the on-premises Firewall Management Center and onboard as a fresh, new device with no policies or objects, or you can migrate the device and retain the existing policies and objects. See Migrate FTD to Cloud-Delivered Firewall Managmenet Center for more information. |
Important |
You can create a Security Cloud Control-managed, standalone logical Firewall Threat Defense device using the Secure Firewall chassis manager or the FXOS CLI. |
Before you begin
Before you onboard a device, be sure to complete the following tasks:
-
Cloud-Delivered Firewall Management Center is enabled for your tenant.
-
Confirm the device's CLI configuration is successfully completed. See Complete the initial configuration of a Secure Firewall Threat Defense device using the CLI for more information.
-
Review the prerequesites and limitations before you onboard the device. See "Prerequisites to Onboard a Device to Cloud-Delivered Firewall Management Center" in Managing Firewall Threat Defense with Cloud-Delivered Firewall Management Center in Security Cloud Control for more information.
-
The device can be configured for either local management with Secure Firewall Device Manager or remote management with Secure Firewall Management Center.
Note
If you want the device to maintain management from the Secure Firewall Device Manager, select FDM and see for more information.
-
Device must be running version 7.2.0 and later.
-
You have reset the device's SSH password as part of the bootstrap process. If you have you not reset the SSH password, Security Cloud Control recommends using the Onboard a Firewall Threat Defense Device to Cloud-Delivered Firewall Management Center using Zero-Touch Provisioning method
Procedure
|
Step 1 |
In the left pane, click . |
||
|
Step 2 |
Click Onboard device or service ( |
||
|
Step 3 |
Click the FTD tile. |
||
|
Step 4 |
Under Management Mode, select FTD. By selecting FTD under Management Mode, you will not be able to manage the device using the previous management platform. All existing policy configurations except for interface configurations will be reset. You must re-configure policies after you onboard the device.
|
||
|
Step 5 |
Select Use CLI Registration Key as the onboarding method. |
||
|
Step 6 |
Enter the device name in the Device Name field and click Next. |
||
|
Step 7 |
In the Policy Assignment step, use the drop-down menu to select an access control policy to deploy once the device is onboarded. If you have no policies configured, select the Default Access Control Policy. |
||
|
Step 8 |
Specify whether the device you are onboarding is a physical or virtual device. If you are onboarding a virtual device, you must select the device's performance tier from the drop-down menu. |
||
|
Step 9 |
Select the subscription licenses you want to apply to the device. Click Next. |
||
|
Step 10 |
Security Cloud Control generates a command with the registration key. Connect to the device you are onboarding using SSH. Log in as "admin" or a user with equivalent admin privileges and paste the entire registration key as is into the device's CLI. Note: For Firepower 1000, Firepower 2100, ISA 3000, and Firewall Threat Defense Virtual devices, open an SSH connection to the device and log in as |
||
|
Step 11 |
Click Next in the Security Cloud Control onboarding wizard. |
||
|
Step 12 |
(Optional) Add labels to your device to help sort and filter the Security Devices page. Enter a label and select the blue plus button. Labels are applied to the device after it's onboarded to Security Cloud Control. |
 ) icon.
What to do next
-
If you did not already, create a custom access control policy to customize the security for your environment. See Access Control Overview in Managing Firewall Threat Defense with Cloud-Delivered Firewall Management Center in Security Cloud Control for more information.
-
Enable Cisco Security Analytics and Logging (SAL) to view events in the Security Cloud Control dashboard or register the device to an Secure Firewall Management Center for security analytics. See Cisco Security Analytics and Logging in Managing Firewall Threat Defense with Cloud-Delivered Firewall Management Center in Security Cloud Control for more information.
Onboard a Firewall Threat Defense Device to Cloud-Delivered Firewall Management Center using Zero-Touch Provisioning
Only the Firepower 1000, Firepower 2100, Secure Firewall 1200, and Secure Firewall 3100 devices can be onboarded with the zero-touch provisioning method.
Before you begin
Confirm that the following is completed before onboarding:
-
You have a Security Cloud Control tenant. If you do not, see Request a Security Cloud Control Tenant for more information.
-
Cloud-Delivered Firewall Management Center is enabled for your tenant.
-
The device is freshly installed but has never been logged into by either the device CLI, a Firewall Management Center, or the Firewall Device Manager.
-
The device is running version 7.2 or later.
-
The device's outside or management interface should be able to access the Security Services Exchange domain registration.us.sse.itd.cisco.com.
Procedure
|
Step 1 |
In the left pane, click . |
||
|
Step 2 |
Click Onboard device or service ( |
||
|
Step 3 |
Click the FTD tile. |
||
|
Step 4 |
Under Management Mode, select FTD. By selecting FTD under Management Mode, you will not be able to manage the device using the previous management platform. All existing policy configurations except for interface configurations will be reset. You must re-configure policies after you onboard the device.
|
||
|
Step 5 |
Click the Use Serial Number tile. |
||
|
Step 6 |
Select Cloud-Delivered Firewall Management Center from the drop-down list. Click Next. For information on onboarding a threat defense device to On-Prem Firewall Management Center, see Onboard a Threat Defense Device to On-Prem Firewall Management Center using Zero-Touch Provisioning. |
||
|
Step 7 |
Enter the Device Serial Number and the Device Name. Select Next. |
||
|
Step 8 |
Choose an option depending on whether the device is logged into and configured for a manager:
|
||
|
Step 9 |
Click Next. |
||
|
Step 10 |
In the Policy Assignment step, use the drop-down menu to select an access control policy to deploy once the device is onboarded. If you have no policies configured, select the Default Access Control Policy. |
||
|
Step 11 |
Select the subscription licenses you want to apply to the device. Click Next. |
What to do next
-
If you did not already, create a custom access control policy to customize the security for your environment. See Access Control Overview in Managing Firewall Threat Defense with Cloud-Delivered Firewall Management Center in Security Cloud Control for more information.
-
Enable Cisco Security Analytics and Logging (SAL) to view events in the Security Cloud Control dashboard or register the device to an Secure Firewall Management Center for security analytics. See Cisco Security Analytics and Logging in Managing Firewall Threat Defense with Cloud-Delivered Firewall Management Center in Security Cloud Control for more information.
Onboard a Secure Firewall Threat Defense Cluster
The following table provides information about device models that support cluster onboarding and creation on the Cloud-Delivered Firewall Management Center:
|
Secure Firewall Threat Defense Platforms |
Minimum Secure Firewall Threat Defense Version for Cluster Management |
Support cluster creation from Cloud-Delivered Firewall Management Center? |
|---|---|---|
|
VMware, KVM |
7.2.1 |
Yes |
|
AWS, GCP |
7.2.1 |
No |
|
Azure |
7.3 |
No |
|
Secure Firewall 3100 |
7.2.1 |
Yes |
|
Firepower 4100 |
7.2.x |
No |
|
Secure Firewall 4200 |
7.4 |
Yes |
|
Firepower 9300 |
7.2.x |
No |
Before you begin
Read through the following limitations:
-
Firepower 4100 and Firepower 9300 devices must be clustered through the device's Firewall Chassis Manager.
-
Secure Firewall 3100 devices, Secure Firewall 4200 devices, KVM, and VMware environments must be clustered through the Secure Firewall Management Center UI.
-
Azure, AWS, and GCP environment clusters must be created through their own environment and onboarded to Secure Firewall Management Center.
Procedure
|
Step 1 |
In the left pane, click . |
||
|
Step 2 |
Click Onboard device or service ( |
||
|
Step 3 |
Click the FTD tile. |
||
|
Step 4 |
Under Management Mode, select FTD. By selecting FTD under Management Mode, you will not be able to manage the device using the previous management platform. All existing policy configurations except for interface configurations will be reset. You must re-configure policies after you onboard the device.
|
||
|
Step 5 |
Select Use CLI Registration Key. |
||
|
Step 6 |
Enter the device name in the Device Name field and click Next. |
||
|
Step 7 |
In the Policy Assignment step, use the drop-down menu to select an access control policy to deploy once the device is onboarded. If you have no policies configured, select the Default Access Control Policy. |
||
|
Step 8 |
Specify whether the device you are onboarding is a physical or virtual device. If you are onboarding a virtual device, you must select the device's performance tier from the drop-down menu. |
||
|
Step 9 |
Select the subscription licenses you want to apply to the device. Click Next. |
||
|
Step 10 |
Security Cloud Control generates a command with the registration key. Paste the entire registration key as is into the device's CLI. |
||
|
Step 11 |
(Optional) Add labels to your device to help sort and filter the Security Devices page. Enter a label and select the blue plus button. Labels are applied to the device after it's onboarded to Security Cloud Control. |
What to do next
-
If you did not already, create a custom access control policy to customize the security for your environment. See Access Control Overview in Managing Firewall Threat Defense with Cloud-Delivered Firewall Management Center in Security Cloud Control for more information.
-
Enable Cisco Security Analytics and Logging (SAL) to view events in the Security Cloud Control dashboard or register the device to an Secure Firewall Management Center for security analytics. See Cisco Security Analytics and Logging in Managing Firewall Threat Defense with Cloud-Delivered Firewall Management Center in Security Cloud Control for more information.
Onboard a Chassis
You can add a Firepower 4100/9300 chassis to the Cloud-Delivered Firewall Management Center. The management center and the chassis share a separate management connection using the chassis MGMT interface. The Firewall Management Center offers chassis-level health alerts. For configuration, you still need to use the Firewall Chassis Manager or FXOS CLI.
Security Cloud Control does not record the processes on the Workflow page when you onboard a chassis or provision a multi-instance Firewall Management CenterFirewall Threat Defense device from the Cloud-Delivered Firewall Management Center chassis manager page.
Note |
To onboard the Secure Firewall 3100/4200 multi-instance chassis, see the multi-instance chapter. |
Procedure
|
Step 1 |
Connect to the chassis FXOS CLI, either using the console port or SSH. |
|
Step 2 |
In the left pane, click . |
|
Step 3 |
Click Onboard device or service ( |
|
Step 4 |
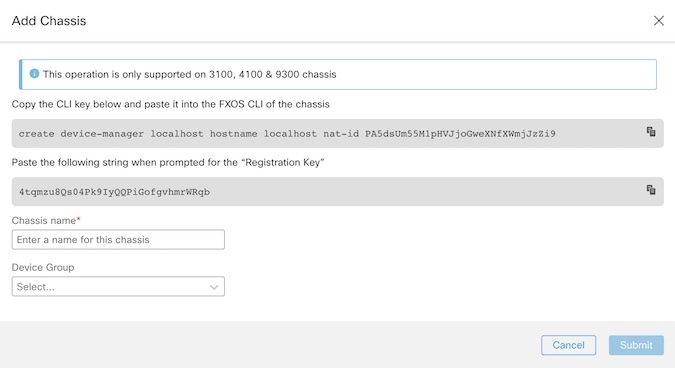
Click the FTD Chassis tile to open the Add Chassis dialog box. 
|
|
Step 5 |
Click Copy ( |
|
Step 6 |
When prompted for the Registration Key at the FXOS CLI, click Copy ( You can disconnect from the FXOS CLI at this point. |
|
Step 7 |
In the Cloud-Delivered Firewall Management Center Chassis Name field, enter a name for the chassis as you want it to display in the Firewall Management Center. |
|
Step 8 |
(Optional) Add the chassis to a Device Group. |
|
Step 9 |
Click Submit. The chassis is added to the page. |

Troubleshooting
Use the following scenarios to troubleshoot any onboarding issues.
Troubleshoot Onboarding a Device to the Cloud-Delivered Firewall Management Center Using the CLI Registration Key
Error: Device Remains in Pending Setup State After Onboarding
When a device fails to register, the device's connectivity status is displayed as Pending Setup. In the panel located to the right, Security Cloud Control displays a Registration Failed message as well as a Retry Onboarding button to immediately allow you to reattempt onboarding the device.
If you fail to execute the configuration manager command in the
device CLI within 3 mins after onboarding it to Security Cloud Control, the device's registration attempt expires and results in a registrationg
failure. Use the following procedure to resolve the issue:
Procedure
|
Step 1 |
Log into Security Cloud Control and navigate to the Security Devices page. Locate the device that failed to register. |
|
Step 2 |
In the panel located to the right, locate the Registration Failed window. Beside the device's CLI registration key, click Copy. This actions copies the CLI key to a local clipboard. |
|
Step 3 |
Open an SSH connection to the device and log in as
|
|
Step 4 |
Paste the CLI registration key into the device's CLI interface. In the CLI, enter Y to complete the registration. If your device was previously managed by Firewall Device Manager, enter Yes to confirm the submission. |
Troubleshoot Onboarding a Device to Cloud-Delivered Firewall Management Center Using the Serial Number
Device is Offline or Unreachable
If the device is unreachable during the onboarding proess, or at any point post-onboarding, Security Cloud Control displays an Unreachable connectivity status. The device will not be able to fully onboard to Security Cloud Control until the device is able to connect. The following scenarios might be the cause:
-
The device is cabled incorrectly.
-
Your network may require a static IP address for the device.
-
Your network uses custom DNS, or there is external DNS blocking the network.
-
If your device is associated with the European region (https://defenseorchestrator.eu/), you may need to enable PPPoE authentication.For other domains, review the domain requirements.
-
The device may be blocked by a firewall, or is incorrectly blocking a port for connectivity. Review the device Network Requirements and confirm the correct outgoing ports are enabled.
Error: Serial Number Already Claimed
The Device was Purchased From an External Vendor
If the device was purchased from an external vendor and fails to onboard with a Serial Number Already Claimed error, it's possible the device is still associated to the vendor's tenant. Use the following steps to claim the device and its serial number:
-
Delete the device from your Security Cloud Control tenant.
-
Install the FXOS image on the device. For more information, see the "Reimage Procedures" chapter of the Cisco FXOS Troubleshooting Guide for the Firepower 1000/21000 and Secure Firewall 3100 Firepower Threat Defense guide.
-
Connect a laptop to the device's console port.
-
Connect to the FXOS CLI and log in as admin.
-
In the FXOS CLI, connect to local-mgmt with the
firepower #
                                                connect local-mgmt
command. -
Execute the
firepower(local-mgmt) # cloud deregistercommand to deregister the device from the cloud tenancy. -
Once the device is successfully unregistered, the CLI interface returns a success message. An example of the message: Example: firepower(local-mgmt) # cloud deregister Release Image Detected RESULT=success MESSAGE=SUCCESS 10, X-Flow-Id: 2b3c9e8b-76c3-4764-91e4-cfd9828e73f9Note
If the device was never registered to another Security Cloud Control tenant, the message above states
 RESULT=success
                                                            MESSAGE=DEVICE_NOT_FOUND
.
-
Onboard the device to your Security Cloud Control tenant with its serial number. See Onboard a Firewall Threat Defense Device to Cloud-Delivered Firewall Management Center using Zero-Touch Provisioning for more information.
The Device is Claimed By a Security Cloud Control Tenant in Another Region
The device may have been previously managed by another Security Cloud Control instance in a different region and is still registered to that tenant.
If you do have access to the tenant the device is currently registered to, use the following procedure:
-
Delete the device from the incorrect Security Cloud Control tenant.
-
Log into the device's Firewall Device Manager UI.
-
Navigate to .
-
Click Cloud Services and select Unregister Cloud Services from the drop-down list.
-
Confirm the action and click Unregister. This action generates a warning to indicate that the device has been removed from Security Cloud Control. This is expected behavior.
-
Log into Security Cloud Control tenant in the correct region and onboard the device. See Onboard a Firewall Threat Defense Device to Cloud-Delivered Firewall Management Center using Zero-Touch Provisioning for more information.
-
Navigate to .
-
Click Cloud Services and select Unregister Cloud Services from the drop-down list.
-
Select the Auto-enroll with Tenancy from Security Cloud Control and click Register. The device maps to the new tenant that belongs to the new region and Security Cloud Control onboards the device.
If you do not have access to the tenant, use the procedure below:
-
Connect to the FXOS CLI from the console port and log in as admin. For information on how to log into the FXOS CLI, see Accessing the FXOS CLI.
-
In the FXOS CLI, connect to local-mgmt with the
firepower #
                                                connect local-mgmt
command. -
Execute the
firepower(local-mgmt) # cloud deregistercommand to deregister the device from the cloud tenancy. -
Once the device is successfully unregistered, the CLI interface returns a success message. An example of the message: Example: firepower(local-mgmt) # cloud deregister Release Image Detected RESULT=success MESSAGE=SUCCESS 10, X-Flow-Id: 2b3c9e8b-76c3-4764-91e4-cfd9828e73f9Note
If the device was never registered to another Security Cloud Control tenant, the message above states
 RESULT=success
                                                            MESSAGE=DEVICE_NOT_FOUND
.
-
In your Security Cloud Control tenant in the correct domain, onboard the device. See Onboard a Firewall Threat Defense Device to Cloud-Delivered Firewall Management Center using Zero-Touch Provisioning for more information.
-
In the device's Firewall Device Manager UI, navigate to .
-
Select the Auto-enroll with Tenancy from Security Cloud Control and click Register. The device maps to the new tenant that belongs to the new region and Security Cloud Control onboards the device.
Error: Claim Error
If you enter the wrong serial number when onboarding a device, Security Cloud Control generates a Claim Error status.
Note |
Confirm that the device is claimed in the correct region within Security Cloud Control. |
Resolve this issue with the provedure below:
Procedure
|
Step 1 |
Log into Security Cloud Control and navigate to the Security Devices page. Locate the device with the error. |
|
Step 2 |
Select the device so it is highlighted and Remove the device from Security Cloud Control. |
|
Step 3 |
Confirm the following:
|
|
Step 4 |
Locate the device's serial number. You can use one of the following methods:
|
|
Step 5 |
In Security Cloud Control, onboard the device with the correct serial number. See Onboard a Firewall Threat Defense Device to Cloud-Delivered Firewall Management Center using Zero-Touch Provisioning for more information. |
Error: Failed to Claim
If you see an Error: Failed to Claim connectivity status or error message after attempting to onboard a device, the following might be the cause:
-
The Security Services Exchange platform may have temporary issues that result in no connectivity.
-
The Security Cloud Control server may be down.
Follow the procedure below to resolve this issue:
Procedure
|
Step 1 |
Log into Security Cloud Control and navigate to the Security Devices page. Locate the device that failed to register. |
|
Step 2 |
Select the device so it is highlighted and Remove the device from your Security Cloud Control tenant. |
|
Step 3 |
Wait at least 10 minutes before attempting to onboard the device back to your Security Cloud Control tenant. See Onboard a Firewall Threat Defense Device to Cloud-Delivered Firewall Management Center using Zero-Touch Provisioning for more information. |
What to do next
If you are still unable to claim the device, review the device's workflow to see is there is an error message. If there is,Export the Workflow and open a support case to further troubleshoot the issue.
Error: Provisional Error
Device Password Has Not Been Changed
If you did not change the default password of the device when configuring the device for remote management and selected the No, this device has been logged into and configured for a manager option when onboarding the device to Security Cloud Control, the device will generate an UnProvisioned connectivity status in the Security Devices page.
Use the following procedure to resolve this issue:
-
Log into Security Cloud Control and navigate to the Security Devices page.
-
Locate and select the device with the UnProvisioned connectivity status so it is highlighted.
-
In the pane located to the right, locate the Change Password window.
-
Click Change Password and enter a new password for your device. This overwrites the default password.
It may take a few minutes for the device to onboard and fully synchronize to Security Cloud Control.
Device Password Has Already Been Changed
If you did change the default password of the device when configuring the device for remote management and selected the Is this a new device that has never been logged into or configured before? option when onboarding the device to Security Cloud Control, Security Cloud Control generates an UnProvisioned connectivity status in the Security Devices page.
Use the following procedure to resolve this issue:
-
Log into Security Cloud Control and navigate to the Security Devices page.
-
Locate and select the device with the UnProvisioned connectivity status so it is highlighted.
-
In the pane located to the right, locate the Confirm and Proceed window.
-
Click Confirm and Proceed. This action ignores the password that was provided in the onboarding wizard and reinstates the default password for the device. Security Cloud Control then continues to onboard the device.
Other Provisional Error Scenarios
Regardless of the default password configuration of the device, it is still possible for a device to result in an UnProvisioned conectivity status during the onboarding process. If you confirm the password selection in the onboarding wizard is accurate for the state of the device, consider the following options to resolve the issue:
-
Select the device so it is highlighted. In the window located on the right pane of the screen, click Retry to force Security Cloud Control to re-onboard the device with existing provisional parameters.
-
Delete the device from the Security Devices page and attempt to re-onboard the device.
-
In the device's Firewall Device Manager UI, navigate to . Select the Auto-enroll with Tenancy from Security Cloud Control and click Register.
If you are still unable to claim the device, review the device's workflow to see is there is an error message. If there is,Export the Workflow and open a support case to further troubleshoot the issue.
 Feedback