Manage a Security Cloud Control Tenant
Security Cloud Control gives you the ability to customize certain aspects of your tenant, users, and notification preferences. Review the following settings available for customized configuration:
Configure User Preferences
See the following topics regarding general Security Cloud Control Settings:
General Preferences
Select the desired language and theme for the Security Cloud Control UI to display in. This selection only affects the user who makes this change.
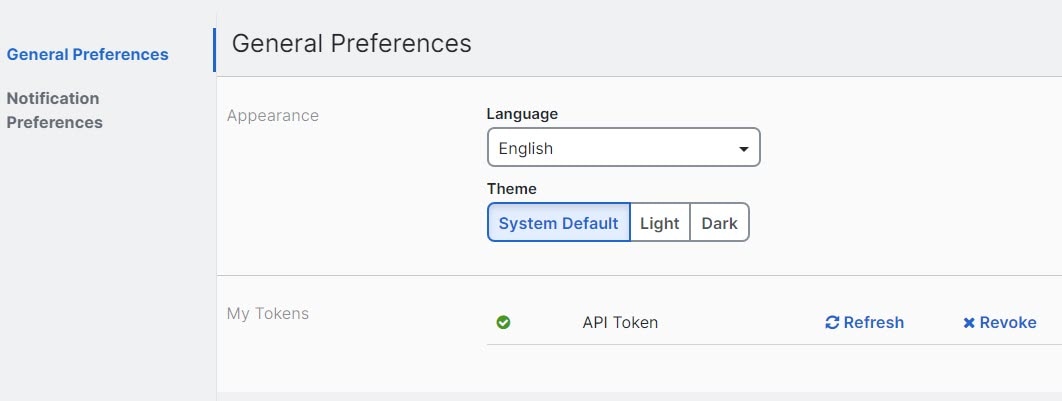
Change the Security Cloud Control Web Interface Appearance
You can change the way the web interface appears.
Procedure
|
Step 1 |
From the drop-down list under your username, choose Preferences. |
|
Step 2 |
In the General Preferences area, select a Theme:
|
Manage user notification preferences
Security Cloud Control Firewall Management generates notifications whenever a device linked to your tenant encounters a specific event. This includes actions taken by the device, expiring or expired device certificates, or the start, completion, or failure of a report generation task. By default, these notifications are enabled and visible to all users associated with the tenant, regardless of their role. You have the option to customize your personal notification preferences to display only the alerts that interest you. These preferences are unique to you and do not impact other users connected to the tenant.
 Note |
Changes made to the notifications listed below are automatically updated in real time and do not require deployment. |
View your personal preferences in the page. Your Username ID is always located in the upper right corner of Security Cloud Control across all pages. From this page you can configure the following "Notify Me in Security Cloud Control When" alerts.
Device workflow alerts
-
Deployments - This action does not include integration instances for SSH or IOS devices.
-
Backups - This action is only applicable for FDM-managed devices.
-
Upgrades - This action is only applicable for ASA and FDM-managed devices.
-
Migrate Firewall Threat Defense to cloud - This action is applicable when changing the Firewall Threat Defense
device manager from Firewall Management Center to Security Cloud Control.
Device event alerts
-
Went offline - Applies to all devices associated with your tenant.
-
Back online - Applies to all the devices associated with your tenant.
-
Conflict detected - Applies to all the devices associated with your tenant.
-
HA state changed - Indicates the device within an HA or failover pair, the current state, and the state it changed from. This action applies to all HA and failover configurations associated with your tenant.
-
Site-to-Site session disconnected - Applies to all site-to-site VPN configurations configured in your tenant.
Event search report alerts
-
Report generation started: Notifies you when a report generation task starts. This applies to both immediate and scheduled search reports.
-
Report generation completed: Notifies you when a report generation task ends. This applies to both immediate and scheduled search reports.
-
Report generation failed: Notifies you when a report generation task fails. This applies to both immediate and scheduled search reports. Check the parameters or query and try again.
Application insights alerts
-
Application available: Notifies you when a monitored application becomes available.
-
Application unavailable: Notifies you when a monitored application becomes unavailable.
Opt out of notifications
By default, all notification types are enabled. To stop receiving a notification type, clear that notification and click Save.
Manage email notifications
Enable the `Email notifications` toggle button to receive email for the alerts that you select.
By default, Use Security Cloud Control notification settings above is selected. When this option is selected, email notifications match the same notifications and events that you selected in the Notify Me in Security Cloud Control When sections.
If you want email notifications for only some alerts, clear Use Security Cloud Control notification settings above, select the alert types that you want to receive by email, and then click Save.
View Security Cloud Control notifications
Click the notifications icon  to view the most recent alerts that have occurred or affected the devices that you onboarded to your tenant. The settings
that you choose on the Notification Settings page determine the notification types that appear in Security Cloud Control Firewall
Management.
to view the most recent alerts that have occurred or affected the devices that you onboarded to your tenant. The settings
that you choose on the Notification Settings page determine the notification types that appear in Security Cloud Control Firewall
Management.
This drop-down page is grouped into three tabs: Overview, All, and Dismissed.
Overview tab
The Overview tab displays a combination of the most recent high-priority alerts and events to which you are subscribed. High priority events are the following:
-
Deployment Failed
-
Backup Failed
-
Upgrade Failed
-
Migrate FTD to Cloud-Delivered Firewall Management Center Failed
-
Device went offline
-
Device HA state changed
-
Device certificates expiring
You can configure which alerts you want to receive by clicking the Notification Settings in the Notifications window or by selecting User Preferences page. The User ID button in the upper right corner of the dashboard.
All tab
Displays all notifications, regardless of priority, including email subscription notifications and all high-priority items.
Dismissed tab
Displays notifications that you dismissed. You can dismiss individual notifications by clicking the "x" of the notification.
Opting to Dismiss notifications from the drop-down menu dismisses notifications from both the "Overview" and "All" tabs. They will remain in the Dismiss tab for 30 days, after which they will be removed from Security Cloud Control.
Search notifications
When viewing the notifications drop-down window, for any of the tabs mentioned above, you can use the search bar at the top of the drop-down to query for key words or alerts.
Configure general settings
Use to manage organization-wide settings that affect multiple managed devices and users in your managed organization.
Note |
You do not see toggle buttons for features that are not enabled for your managed organization. |
Enable the option to auto-accept device changes
When this setting is enabled, Security Cloud Control Firewall Management automatically accepts changes that users make directly on the device. If you leave this setting disabled, or disable it later, you must review each device conflict before you accept it.
Follow these steps to enable automatic acceptance of device changes:
Procedure
|
Step 1 |
Choose Settings > General Settings. |
|
Step 2 |
Choose . |
|
Step 3 |
Turn on the Enable the option to auto-accept device changes toggle button. |
Enable object sharing with Multicloud Defense
Enable this setting to share Multicloud Defense network objects from Security Cloud Control Firewall Management.
Follow these steps to enable object sharing with Multicloud Defense:
Procedure
|
Step 1 |
Choose . |
|
Step 2 |
Turn on the Enable object sharing with Multicloud Defense toggle button. |
Set the default conflict detection interval
This interval determines the frequency at which Security Cloud Control polls onboarded devices for changes. The selection applies to all devices managed in this tenant. You can change this option at any time.
Note |
This selection can be overridden via the Conflict Detection option available from the Security Devices page after you have selected one or multiple devices. |
Follow these steps to set the default conflict detection interval:
Procedure
|
Step 1 |
Choose Settings > General Settings. |
|
Step 2 |
Choose . |
|
Step 3 |
From the Default conflict detection interval drop-down list, select a time value. |
Enable scheduled automatic deployments
Enabling the option to schedule automatic deployments allows you to schedule future deployments at a date and time when it is convenient. Once you enable this option, you can schedule a single automatic deployment or set up recurring automatic deployments. To schedule an automatic deployment, see Schedule an Automatic Deployment.
Changes you make on Security Cloud Control for a device are not automatically deployed to the device if it has pending changes  . If a device is not in the Synced state, such as Conflict Detected or Not Synced, scheduled deployments are not executed. The jobs page lists any instance where a scheduled deployment fails.
If you turn off Enable the Option to Schedule Automatic Deployments, all scheduled deployments are deleted.
Important |
If you use Security Cloud Control to create more than one scheduled deployment for a device, the new deployment overwrites the existing deployment. If you create more than one scheduled deployment for a device using the API, you must delete the existing deployment before scheduling the new deployment. |
Follow these steps to enable scheduled automatic deployments:
Procedure
|
Step 1 |
Choose Settings > General Settings. |
|
Step 2 |
Choose . |
|
Step 3 |
Turn on the Enable the option to schedule automatic deployments toggle button to enable it. |
Manage web analytics
Web analytics provides anonymous product usage information to Cisco based on page hits. The information includes pages viewed, the time spent on a page, browser versions, product version, and device hostname. This data helps Cisco determine feature usage patterns and improve the product. All usage data is anonymous and no sensitive data is transmitted.
Web analytics is enabled by default. To disable web analytics or re-enable it in the future, complete these steps:
Procedure
|
Step 1 |
Choose Settings > General Settings. |
|
Step 2 |
Choose . |
|
Step 3 |
Turn on the Web Analytics toggle button to enable it. |
Enable event data sharing with Talos
Share malicious event data from your device with Talos, Cisco's threat intelligence organization. Sharing event data allows Talos to improve threat detection and response capabilities, provide more targeted security updates for your network, and deliver better protection against emerging threats.
For more information about Talos, see the Cisco Talos product page.
Enabling the Enable event data sharing with Talos toggle button does not automatically activate the Talos Threat Hunting Telemetry feature in Cloud-Delivered Firewall Management Center. For the best results with this feature, also enable the Talos Threat Hunting Telemetry in Cloud-Delivered Firewall Management Center. For more information, see Set Intrusion Policy Preferences.
Sharing event data with Talos is enabled by default. To opt out, follow this procedure:
Procedure
|
Step 1 |
Choose Settings > General Settings. |
||
|
Step 2 |
Choose . |
||
|
Step 3 |
Turn off the Enable event data sharing with Talos toggle button to disable this setting.
|
Set the FDM Default recurring backup schedule
Use this setting to configure a default recurring backup schedule for your devices. When you schedule a backup for a device, you can use the default values or customize them. If you change the default recurring backup schedule, existing scheduled backups keep their current recurring settings.
Follow these steps to set the FDM default recurring backup schedule:
Procedure
|
Step 1 |
Choose Settings > General Settings. |
|
Step 2 |
Choose . |
|
Step 3 |
Under the FDM Default Recurring Backup Schedule section, from the Frequency drop-down, select daily, weekly, or monthly backup. |
|
Step 4 |
Select the time of day for the backup. Enter the time using the 24-hour format in Coordinated Universal Time (UTC); for example, 22:00 (10:00 PM UTC). |
|
Step 5 |
For weekly backups, select the days of the week for the backup. For monthly backups, select the Days of Month field and add the days when the backup should run. If you enter day 31 for a month with fewer than 31 days, the backup will not run for that month. Enter a name and description for the backup schedule. |
|
Step 6 |
Click Save. |
View firewall management instance details
Firewall Management Instance Details are helpful if you need to contact the Cisco Technical Assistance Center (TAC). You can copy these tenant details by clicking the copy icon.
-
Firewall Management Instance Name: The display name of the firewall management instance.
-
Firewall Management Instance ID: The system-generated unique identifier for the firewall management instance in Cisco Security Cloud Control.
-
Secure Services Exchange ID: The unique identifier for the firewall management instance in the Secure Services Exchange environment. Cisco uses this value for service integration and backend correlation across cloud services.
-
Security Cloud Control Organization ID: The unique identifier of the Security Cloud Control organization associated with the firewall management instance.
Tenant Name
Your tenant name also identifies your tenant. Note that the tenant name is not the organization name. This information will be helpful if you need to contact the Cisco Technical Assistance Center (TAC).
Use the Security Cloud Control Firewall Management platform navigator
The platform navigator is a nine-block applications cross-launcher (![]() ) that appears on the top-right corner of Security Cloud Control. You can readily cross-launch to these Cisco networking and security applications:
) that appears on the top-right corner of Security Cloud Control. You can readily cross-launch to these Cisco networking and security applications:
Tenant Notification Settings
On the Security Cloud Control toolbar, click the notification button ![]() .
.
All users associated with your tenant will automatically see these alerts. In addition, some or all of these alerts can be emailed to you.
Note |
You must have an Super Administrator user role to change these settings. See User Roles for more information. |
Email Subscribers
Add or modify the emails that receive alerts from your Security Cloud Control tenant. See Enable Email Subscribers for more information.
Service Integrations
Enable Incoming Webhooks on your messaging app and receive Security Cloud Control notifications directly to your app dashboard. See Enable Service Integrations for Security Cloud Control Notifications for more information.
Enable Email Subscribers
An email notification from Security Cloud Control denotes the type of action and the affected devices.
 Warning |
Be sure to enter the correct email if you are adding a mailer. Security Cloud Control does not check email addresses against known users associated with your tenant. |
Add an Email Subscription
Before you begin
You must be an Admin to view the email subscription list, and a SuperAdmin to add, remove, or edit email subscriptions.
Procedure
|
Step 1 |
Log into Security Cloud Control. |
|
Step 2 |
Navigate to . |
|
Step 3 |
In the left pane, click . |
|
Step 4 |
Click the + icon in the upper right corner of the page. |
|
Step 5 |
Enter a valid email address in the text field. |
|
Step 6 |
Check and uncheck the appropriate checkboxes for events and alerts you want the subscriber to be notified about. |
|
Step 7 |
Click Save. At any point, click Cancel to create the new email subscription for the tenant. |
Edit Email Subscriptions
Before you begin
You must be an Admin to view the email subscription list, and a SuperAdmin to add, remove, or edit email subscriptions.
Procedure
|
Step 1 |
Log into Security Cloud Control. |
|
Step 2 |
Navigate to . |
|
Step 3 |
In the left pane, click . |
|
Step 4 |
Locate the email address you want to enable to edit for email subscriptions. |
|
Step 5 |
Click the Edit icon. |
|
Step 6 |
Edit the following attributes for Security Cloud Control to send alerts to the configured email address:
|
|
Step 7 |
Click Ok. At any point, click Cancel to negate any changes made to the email subscription. |
Delete an Email Subscription
Use the following procedure to delete a mailer from the email subscription list.:
Before you begin
You must be an Admin to view the email subscription list, and a SuperAdmin to add, remove, or edit email subscriptions.
Procedure
|
Step 1 |
Log into Security Cloud Control. |
|
Step 2 |
Navigate to . |
|
Step 3 |
In the left pane, click . |
|
Step 4 |
Locate the user you want to remove from email subscriptions for the tenant. |
|
Step 5 |
Click the Remove icon for the user you want to remove. |
|
Step 6 |
Confirm you want to remove the user from the subscription list. Note that this does not affect the user functionality in any way. |
Enable Service Integrations for Security Cloud Control Notifications
Enable service integration to forward Security Cloud Control notifications through a specified messaging application or service. You need to generate a webhook URL from your messaging application and point Security Cloud Control to that webhook in Security Cloud Control's Notification Settings page to receive notifications.
Security Cloud Control natively supports Cisco Webex, Microsoft Teams, and Slack as service integrations. Messages sent to these services are specially formatted for channels and automated bots.
Note |
You must check the appropriate boxes for the notifications you want to receive per webhook. |
Incoming Webhooks for Webex Teams
Before you begin
Security Cloud Control notifications appear in a designated workspace or as an automated bot in a private message. You must have the following before completing this procedure:
-
A Webex account.
-
A Security Cloud Control account and tenant.
Use the following procedure to allow incoming webhooks for Webex Teams:
Procedure
|
Step 1 |
Open the Webex apphub. |
||
|
Step 2 |
Click Connect at the top of the page. |
||
|
Step 3 |
Scroll to the bottom of the page and configure the following:
|
||
|
Step 4 |
Select Add. The Webex Space you chose will receive a notification that the application is added. |
||
|
Step 5 |
Copy the Webhook URL. |
||
|
Step 6 |
Log into Security Cloud Control. |
||
|
Step 7 |
From the navigation bar to the left, click . |
||
|
Step 8 |
In the left pane, click . |
||
|
Step 9 |
Examine and confirm the notifications that are checked are correct. If they are not, we strongly recommend modifying the notification selection before you connect to a service integration. |
||
|
Step 10 |
Scroll to Service Integrations. |
||
|
Step 11 |
Click the blue plus button. |
||
|
Step 12 |
Enter a Name. This name appears in Security Cloud Control as a configured service integration. It does not appear in any events forwarded to the configured service. |
||
|
Step 13 |
Expand the drop-down menu and select Webex as the Service Type. |
||
|
Step 14 |
Paste the webhook URL that you generated from the service. |
||
|
Step 15 |
Click OK. |
Incoming Webhooks for Microsoft Teams
Security Cloud Control can forward notifications to Microsoft Teams. These messages are displayed either in a designated channel or as an automated bot in a private chat message in Microsoft Teams. To enable this functionality, you must generate a webhook URL from Microsoft Teams and point Security Cloud Control to that webhook. For more information about adding incoming webhooks to a Microsoft Teams channel, see Create incoming webhooks with Workflows for Microsoft Teams.
Prerequisites
These are the prerequisites to allow Security Cloud Control notifications in Microsoft Teams:
-
A Microsoft Teams account.
-
A Security Cloud Control account and tenant.
Use this procedure to generate a webhook URL in Microsoft Teams and enable notifications from Security Cloud Control:
Procedure
|
Step 1 |
Log in to your Microsoft Teams account. |
|
Step 2 |
In the New Teams client, click Teams and navigate to the channel in which you want to add an incoming webhook. |
|
Step 3 |
Click More options ••• next to the channel name. |
|
Step 4 |
Click Workflows. |
|
Step 5 |
Click Post to a channel when a webhook request is received. |
|
Step 6 |
Provide a name for the webhook and click Next. |
|
Step 7 |
Choose the channel where notifications must be posted. If you use this workflow from a Microsoft Teams chat or channel, these fields get populated automatically. |
|
Step 8 |
After you enter the required details, click Add workflow. |
|
Step 9 |
Copy the unique webhook URL from the dialog box that is displayed. The URL maps to the channel. You can use it to send information to Teams. |
|
Step 10 |
Log into Security Cloud Control. |
|
Step 11 |
From the left pane, click . |
|
Step 12 |
In the left pane, click . |
|
Step 13 |
Scroll to Service Integrations. |
|
Step 14 |
Click the blue plus button. |
|
Step 15 |
Enter a Name. This name is displayed in Security Cloud Control as a configured service integration. However, it does not appear in any of the events forwarded to the configured service. |
|
Step 16 |
Expand the drop-down list, and select Microsoft Teams as the Service Type. |
|
Step 17 |
Paste the webhook URL generated from Microsoft Teams into URL. |
|
Step 18 |
Under Send Alerts When, examine and confirm that the selected notifications are correct. If not, modify the notification selection before proceeding. |
|
Step 19 |
Click Save. |
Incoming Webhooks for Slack
Security Cloud Control notifications appear in a designated channel or as an automated bot in a private message. For more information on how Slack handles incoming webhooks, see Slack Apps for more information.
Use the following procedure to allow incoming webhooks for Slack:
Procedure
|
Step 1 |
Log into your Slack account. |
|
Step 2 |
In the panel to the left, scroll to the bottom and select Add Apps. |
|
Step 3 |
Search application directory for Incoming Webhooks and locate the app. Select Add. |
|
Step 4 |
If you are not the admin of your Slack workspace, you must send a request to the admin of your org and wait for the app to be added to your account. Select Request Configuration. Enter an optional message and select Submit Request. |
|
Step 5 |
Once the Incoming Webhooks app is enabled for your workspace, refresh the Slack settings page and select Add New Webhook to Workspace. |
|
Step 6 |
Use the drop-down menu to select the Slack channel you want the Security Cloud Control notifications to appear in. Select Authorize. If you navigate away from this page while waiting for the request to get enabled, simply log into Slack and select the workspace name in the upper left corner. From the drop-down menu, select Customize Workspace and select Configure Apps. Navigate to . Select Incoming Webhooks to open app's landing page and then select Configuration from the tabs. This lists all the users within your workspace that has this app enabled. You can only see and edit your account's configuration. Select your workspace name to edit the configuration and move forward. |
|
Step 7 |
The Slack settings page redirects you to the configuration page for the app. Locate and copy the webhook URL. |
|
Step 8 |
Log into Security Cloud Control. |
|
Step 9 |
From the navigation bar to the left, click . |
|
Step 10 |
In the left pane, click . |
|
Step 11 |
Examine and confirm the notifications that are checked are correct. If they are not, we strongly recommend modifying the notification selection before you connect to a service integration. |
|
Step 12 |
Scroll to Service Integrations. |
|
Step 13 |
Click the blue plus button. |
|
Step 14 |
Enter a Name. This name appears in Security Cloud Control as a configured service integration. It does not appear in any events forwarded to the configured service. |
|
Step 15 |
Expand the drop-down menu and select Slack as the Service Type. |
|
Step 16 |
Paste the webhook URL that you generated from the service. |
|
Step 17 |
Click OK. |
Incoming Webhooks for a Custom Integration
Before you begin
Security Cloud Control does not format messages for custom integration. If you opt to integrate a custom service or application, Security Cloud Control sends a JSON message.
Refer to the service's documentation on how to enable incoming webhooks and generate a webhook URL. Once you have a webhook URL, use the procedure below to enable webhooks:
Procedure
|
Step 1 |
Generate and copy the webhook URL from the custom service or application of your choice. |
|
Step 2 |
Log into Security Cloud Control. |
|
Step 3 |
From the navigation bar to the left, click . |
|
Step 4 |
In the left pane, click . |
|
Step 5 |
Examine and confirm the notifications that are checked are correct. If they are not, we strongly recommend modifying the notification selection before you connect to a service integration. |
|
Step 6 |
Scroll to Service Integrations. |
|
Step 7 |
Click the blue plus button. |
|
Step 8 |
Enter a Name. This name appears in Security Cloud Control as a configured service integration. It does not appear in any events forwarded to the configured service. |
|
Step 9 |
Expand the drop-down menu and select Custom as the Service Type. |
|
Step 10 |
Paste the webhook URL that you generated from the service. |
|
Step 11 |
Click OK. |
View logging settings
Use Logging Settings to check current logging usage for your tenant.
The page shows:
-
Your monthly event logging limit.
-
The number of days until the limit resets.
-
Stored logging usage, which represents the compressed event data that the Cisco cloud received.
Click View Historical Usage to review the logs that your tenant received during the last 12 months.
The page also includes links that you can use to request additional storage.
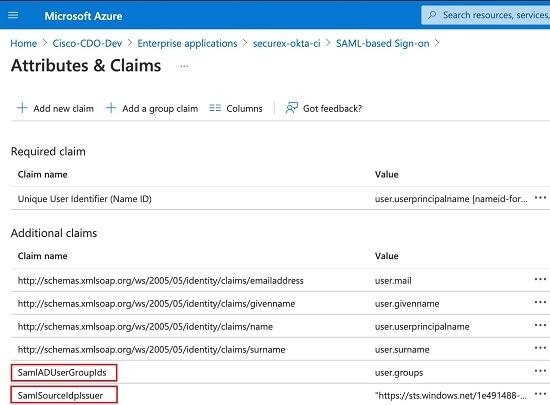
Integrate Your SAML Single Sign-On with Security Cloud Control
Security Cloud Control uses Cisco Secure Sign-On as its SAML single sign-on identity provider (IdP) and Duo Security for multifactor authentication (MFA). This is Security Cloud Control's preferred authentication method.
If, however, customers want to integrate their own SAML single sign-on IdP solution with Security Cloud Control, they can as long as their IdP supports SAML 2.0 and identity provider-initiated workflow.
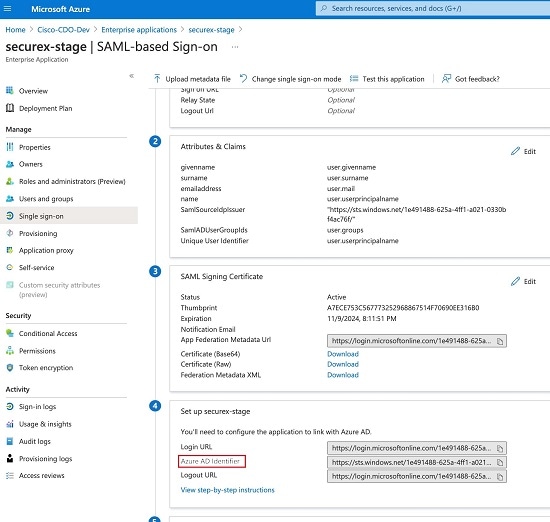
To integrate your own or third-party identity provider (IdP) with Cisco Security Cloud Sign On, see Cisco Security Cloud Sign On Identity Provider Integration Guide.
If you need more support to integrate your own SAML solution with Security Cloud Control, contact support and create a case.
Attention |
When you open a case, ensure that you choose Manually Select A Technology and select SecureX - Sign-on and Administration for your request to reach the right team. |
Renew SSO Certificate
Your Identity Provider (IdP) is usually integrated with SecureX SSO. Open a Cisco TAC case and provide the metadata.xml file. For more information, see Cisco SecureX Sign-On Third-Party Identity Provider Integration Guide.
Attention |
When you open a case, ensure that you choose Manually Select A Technology and select SecureX - Sign-on and Administration for your request to reach the right team. |
(legacy only) If your Identity Provider (IdP) integration is directly with Security Cloud Control, open a support ticket with Security Cloud Control TAC and provide the metadata.xml file.
My Tokens
See API Tokens for more information.
API Tokens
Developers use Security Cloud Control API tokens when making Security Cloud Control REST API calls. The API token must be included in the REST API authorization header for a successful call. Although API tokens serve as "long-lived" access tokens and do not expire, they can be renewed or revoked.
To generate an API token in Security Cloud Control, you must first create an API Only User if one does not already exist. This user is specifically designated for API token generation and usage.
Once the API Only User is created, you can generate a new API token for that user. The token is visible only immediately after it is generated and remains visible as long as you stay on the General Settings page. If you navigate away and then return to the General Settings page, the token will no longer be displayed, although it is clear that a token has been issued.
Note |
API Only Users can generate API tokens; individual users cannot create API tokens for themselves or others. |
API Token Format and Claims
The API token is a JSON Web Token (JWT). To learn more about the JWT token format, read the Introduction to JSON Web Tokens.
The Security Cloud Control API token provides the following set of claims:
-
id - user/device uid
-
parentId - tenant uid
-
ver - the version of the public key (initial version is 0, for example, cdo_jwt_sig_pub_key.0)
-
subscriptions - Security Services Exchange subscriptions (optional)
-
client_id - "api-client"
-
jti - token id
Token Management
Create API Only Users
Procedure
|
Step 1 |
Log in to Security Cloud Control. |
||
|
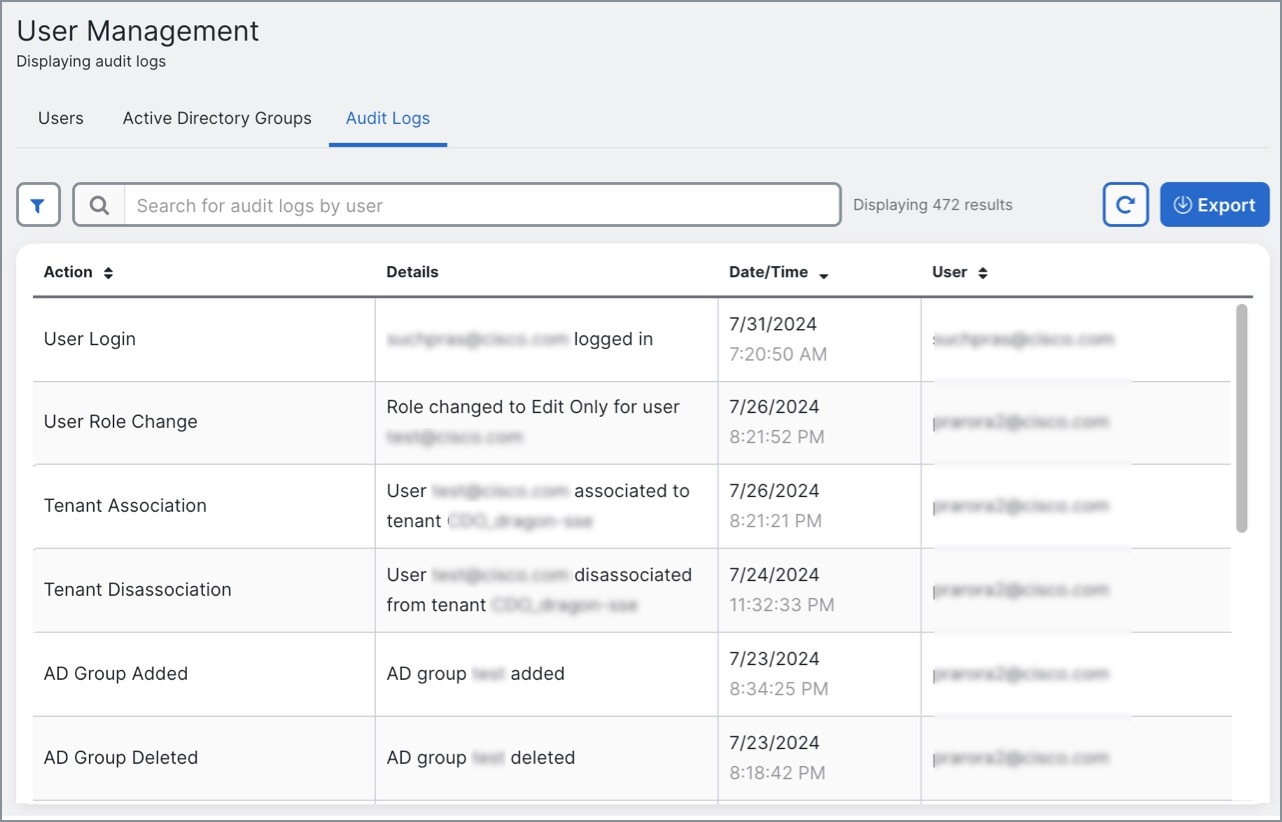
Step 2 |
From the Security Cloud Control navigation bar, click Settings > User Management. |
||
|
Step 3 |
In the left pane, click . |
||
|
Step 4 |
Click the Add a new user ( |
||
|
Step 5 |
Select the API Only User checkbox. |
||
|
Step 6 |
In the Username field, enter a name for the user and click OK.
|
||
|
Step 7 |
Select the user's role from the drop-down menu. |
||
|
Step 8 |
Click OK. |
Generate an API Token
To use the Security Cloud Control API, you must have an API token. We recommend creating an API-only user in your Security Cloud Control tenant and generating a token for it.
The token is a long-lived bearer token used in the authorization header of REST API calls. The same token is used for both Security Cloud Control API and the Cloud-Delivered Firewall Management Center API.
Procedure
|
Step 1 |
Log in to Security Cloud Control. |
|
Step 2 |
From the Security Cloud Control navigation bar, click Settings > User Management. |
|
Step 3 |
In the left pane, click . |
|
Step 4 |
Click Generate API Token under the Token column.
|
|
Step 5 |
Save the token in a secure location that aligns with your enterprise's best practices for handling sensitive data. |

What to do next
Refresh an API Token
The API token does not expire. However, you may choose to refresh your API token, which renews the existing token, if the token is lost, compromised, or to conform to your enterprise's security guidelines.
Procedure
|
Step 1 |
Log in to Security Cloud Control. |
||
|
Step 2 |
From the Security Cloud Control navigation bar, click Settings > User Management. |
||
|
Step 3 |
In the left pane, click . |
||
|
Step 4 |
Click Refresh under the Token column. Security Cloud Control generates a new API token.
|
||
|
Step 5 |
Save the new token in a secure location in accordance with your enterprise's best practices for maintaining sensitive data.
|

Revoke an API Token
Procedure
|
Step 1 |
Log in to Security Cloud Control. |
||
|
Step 2 |
From the Security Cloud Control navigation bar, click Settings > User Management. |
||
|
Step 3 |
In the left pane, click . |
||
|
Step 4 |
Under the Token column, click Revoke for the user you want to generate the API token.
|

Relationship Between the Identity Provider Accounts and Security Cloud Control User Records
To log in to Security Cloud Control, a customer needs an account with a SAML 2.0-compliant identity provider (IdP), a multi-factor authentication provider, and a user record in Security Cloud Control. The IdP account contains the user's credentials and the IdP authenticates the user based on those credentials. Multi-factor authentication provides an added layer of identity security. The Security Cloud Control user record primarily contains the username, the Security Cloud Control tenant with which they are associated, and the user's role. When a user logs in, Security Cloud Control tries to map the IdP's user ID to an existing user record on a tenant in Security Cloud Control. When Security Cloud Control finds a match, the user is logged in to that tenant.
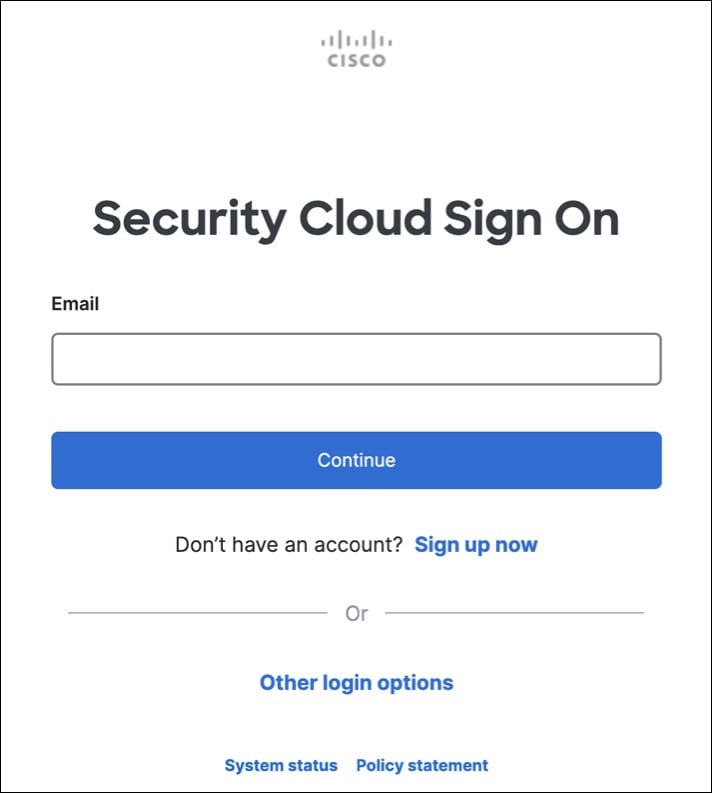
Unless your enterprise has its own single sign-on identity provider, your identity provider is Cisco Security Cloud Sign On. Cisco Security Cloud Sign On uses Duo for mutli-factor authentication. Customers can integrate their own IdP with Security Cloud Control if they choose.
Login Workflow
This is a simplified description of how the IdP account interacts with the Security Cloud Control user record to log in a Security Cloud Control user:
Procedure
|
Step 1 |
The user requests access to Security Cloud Control by logging in to a SAML 2.0-compliant identity provider (IdP) such as Cisco Security Cloud Sign On (https://sign-on.security.cisco.com) for authentication. |
|
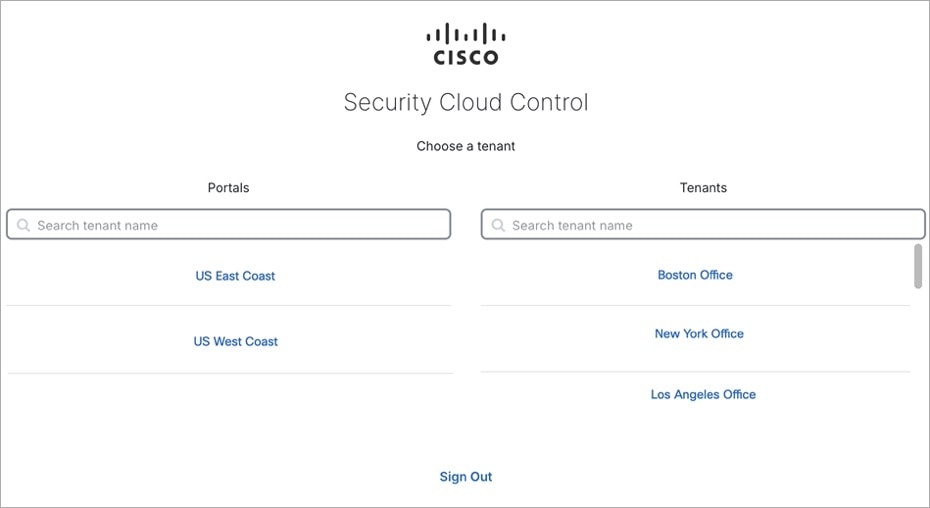
Step 2 |
The IdP issues a SAML assertion that the user is authentic, and a portal displays the applications the user can access. One of the tiles represents Security Cloud Control. |
|
Step 3 |
Security Cloud Control validates the SAML assertion, extracts the username and attempts to find a user record among its tenants that corresponding to that username.
Creating a user record in Security Cloud Control does not create an account in the IdP and creating an account in the IdP does not create a user record in Security Cloud Control. Similarly, deleting an account on the IdP does not mean you have deleted the user record from Security Cloud Control; although, without the IdP account, there is no way to authenticate a user to Security Cloud Control. Deleting the Security Cloud Control user record does not mean you have deleted the IdP account; although, without the Security Cloud Control user record, there will be no way for an authenticated user to access a Security Cloud Control tenant. |
Implications of this Architecture
Customers Who Use Cisco Security Cloud Sign On
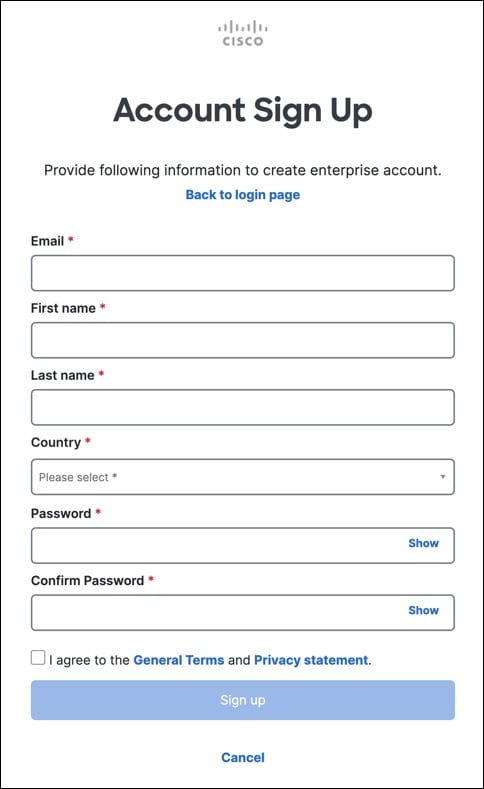
For customers who use Security Cloud Control's Cisco Security Cloud Sign On identity provider, a Super Admin can create a user record in Security Cloud Control and a user can self-register themselves with Security Cloud Control. If the two usernames match, and the user is properly authenticated, the user can log in to Security Cloud Control.
Should the Super Admin ever need to prevent a user from accessing Security Cloud Control, they can simply delete the Security Cloud Control user's user record. The Cisco Security Cloud Sign On account will still exist and if the Super Admin ever wants to restore the user, they can by creating a new Security Cloud Control user record with the same username as the one used for Cisco Security Cloud Sign On.
Should a customer ever run into a problem with Security Cloud Control that requires a call to our Technical Assistance Center (TAC), the customer could create a user record for the TAC engineer so they could investigate the tenant and report back to the customer with information and suggestions.
Customers Who Have Their Own Identity Provider
For customers who have their own identity provider, they control both the identity provider accounts and the Security Cloud Control tenants. These customers can create and manage identity provider accounts and user records in Security Cloud Control.
Should they ever need to prevent a user from accessing Security Cloud Control, they can delete the IdP account, the Security Cloud Control user record, or both.
If they ever need help from Cisco TAC, they can create both the identity provider account and a Security Cloud Control user record, with a read-only role, for their TAC engineer. The TAC engineer would then be able to access the customer's Security Cloud Control tenant, investigate, and report back the customer with information and suggestions.
Cisco Managed Service Providers
If Cisco Managed Service Providers (MSPs) use Security Cloud Control's Cisco Security Cloud Sign On IdP, they can self-register for Cisco Security Cloud Sign On and their customers can create a user record for them in Security Cloud Control so that the MSP can manage the customer's tenant. Of course, the customer has full control to delete the MSP's record when they choose to.
Related Topics
The Cisco Success Network
Cisco Success Network is a user-enabled cloud service. When you enable Cisco Success Network, a secure connection is established between the device and the Cisco cloud to stream usage information and statistics. Streaming telemetry provides a mechanism to select data of interest from the device and to transmit it in a structured format to remote management stations for the following benefits:
-
To inform you of available unused features that can improve the effectiveness of the product in your network.
-
To inform you of additional technical support services and monitoring that might be available for your product.
-
To help Cisco improve our products.
The device establishes and maintains the secure connection at all times, and allows you to enroll in the Cisco Success Network. After you have registered the device, you can change the Cisco Success Network setting.
Note |
|
Enable or Disable the Cisco Success Network
During initial system setup, you are prompted to register the device with Cisco Smart Software Manager. If you instead elected to use the 90-day evaluation license, you must register the device before the end of the evaluation period. To enroll the device, either register the device with Cisco Smart Software Manager (on the Smart Licensing page) or enroll with Security Cloud Control by entering a registration key.
When you register the device, your virtual account allocates the license to the device. Registering the device also registers any optional licenses that you have enabled.
You can turn off this connection at any time by disabling Cisco Success Network, although you can only disable this option through the Firewall Device Manager UI. Disabling will disconnect the device from the cloud. Disconnection does not impact the receipt of updates or the operation of the Smart Licensing capabilities, which continue to operate normally. See the Connecting to the Cisco Success Network section of the System Administration chapter of the Firepower Device Manager configuration Guide, Version 6.4.0 or later for more information.
 ) button.


 in the row of the user you want to delete.
 Feedback