Configure the Dynamic Attributes Connector

Dashboard

Dashboard capabilities include:

  • Add, edit, and delete connectors,dynamic attributes filters, and adapters.

  • See how connectors,dynamic attributes filters, and adapters are related to each other.

  • View warnings and errors.

Dashboard access and functionality

If the dynamic attributes connector is not enabled, move the slider to enable it. This process could take several minutes to complete.

The dynamic attributes connector Dashboard page displays an example of an unconfigured system:

Dashboard of an unconfigured system

This sample dynamic attributes connector Dashboard page shows how an unconfigured system appears initially.

The Dashboard initially displays all the types of connectors and adapters you can configure for your system. You can do any interaction:

  • Hover the mouse pointer over a connector or adapter and click The Dashboard shows the available connectors and adapters for configuration in the system, allowing users to interact by hovering and clicking to create or manage them. to create a new one.
  • Click Go to Connectors to add, edit, or delete connectors (good for creating, editing, or deleting multiple connectors at the same time).

    For more information, see Connectors.

  • Click Go to Adapters to add, edit, or delete adapters (good for creating, editing, or deleting multiple adapters at the same time).

    For more information, see Create an adapter.

Related Topics:

Dashboard of a configured system

Sample dynamic attributes connector Dashboard page of a configured system displays at-a-glance information about configured connectors, filters, and adapters.

The Dashboard shows the following (from left to right):


Note


Some connectors, such as Outlook 365 and Azure Service tags, automatically pull available dynamic objects without the need for a dynamic attributes filters. Those connectors display Auto in the column.


The Dashboard indicates whether or not an object is available. The Dashboard page is refreshed every 15 seconds but you can click Refresh (refresh icon) at the top of the page at any time to refresh immediately. If issues persist, check your network connection.

Add, edit, or delete connectors

The Dashboard enables you to manage connectors by viewing, adding, editing, or deleting them. You can also view error information for connectors and troubleshoot issues.

Use the dynamic attributes connector dashboard when you need to manage connectors for your network security infrastructure. The dashboard provides comprehensive options for connector management and troubleshooting.

Procedure


Step 1

Access the connector dashboard and select your desired action.

The Dashboard enables you to view or edit connectors. You can click the name of a connector to view all instances of that connector or you can click The dynamic attributes connector dashboard displays options for managing and troubleshooting connectors in a network security infrastructure. Users can view, edit, add, or delete connectors directly from this interface. for the following additional options:

  • Go to Connectors to view all connectors at the same time; you can add, edit, and delete connectors from there.

  • Add Connector > type to add a connector of the indicated type.

Step 2

Click any connector in the connectors column (The image illustrates the process of adding, editing, or deleting connectors within the Connectors interface, highlighting the available options for managing connector types.) to display more information about it.
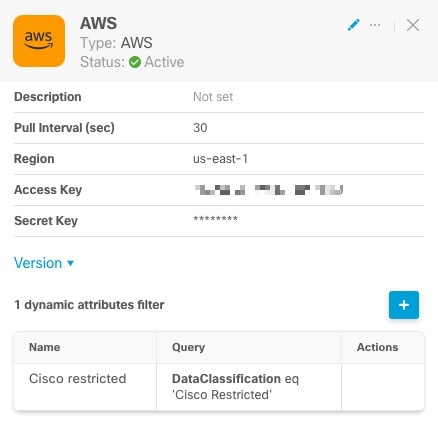
An example follows:

Displaying more information about connectors from the dashboard

Step 3

Choose from the following management options.

  • Click the Edit icon (edit icon) to edit this connector.

  • Click the More icon (more icon) for additional options.

  • Click The image illustrates the user interface options for managing connectors, including buttons for editing, accessing additional options, closing the panel, and displaying the version information. to close the panel.

  • Click Version to display the version of the . You can optionally copy the version to the clipboard if necessary for Cisco TAC.

Step 4

Use the table at the bottom of the panel to add dynamic attributes filters or to edit or delete connectors.

A sample follows:

At the bottom of the page you can add, edit, or delete dynamic attributes filters

Click the Add icon (add icon) to add a dynamic attributes filter for this connector. For more information, see Create dynamic attributes filters.

Hover the mouse pointer over the Actions column to either edit or delete the indicated connector.

Step 5

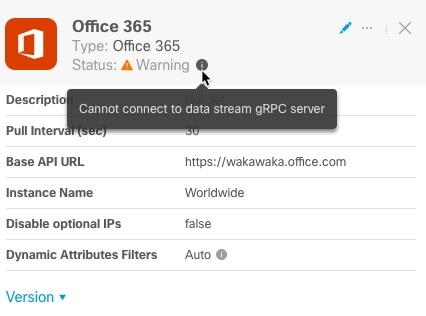
To view error information for a connector, click the name of the connector that is displaying the error.

Step 6

In the right pane, click Information (information icon).

An example follows.

Click the "I" button to view warnings about a connector

Step 7

To resolve this issue, edit the connector settings as discussed in Create an office 365 connector.

Step 8

If you cannot resolve the issue, click Version and copy the version to a text file.

Step 9

Get your Security Cloud Control tenant ID as discussed in Get your tenant ID.


What to do next

Provide all of this information to Cisco TAC.

Add, edit, or delete dynamic attributes filters

The dashboard enables you to add, edit, or delete dynamic attributes filters. You can click the name of a filter to view all instances of that filter or you can click The dynamic attributes connector dashboard displays options for managing dynamic attributes filters, including adding, editing, and deleting filters. for additional options.

You can click the name of a filter to view all instances of that filter or you can click The dynamic attributes connector dashboard displays options for managing dynamic attributes filters, including adding, editing, and deleting filters. for the following additional options:

  • Go to Dynamic Attributes Filters to view all configured dynamic attributes filters. You can add, edit, or delete dynamic attributes filters from there.

  • Add Dynamic Attributes Filters to add a filter.

For more information about adding dynamic attributes filters, see Create dynamic attributes filters.

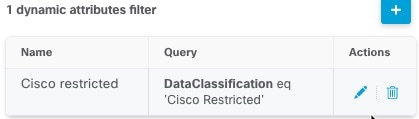
Click any adapter in the filters column (The dynamic attributes filters interface shows options to add, edit, or delete filters, with an example displayed for reference.) to display more information about it; an example follows:
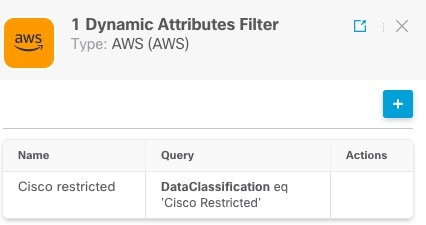
Displaying information about a dynamic attributes filter from the dashboard


Note


Some connectors, such as Outlook 365 and Azure Service tags, automatically pull available dynamic objects without the need for a dynamic attributes filters. Those connectors display Auto in the column.


You have these options:

  • Click a filter instance to view summary information about dynamic attributes filters associated with a connector.

  • Click the Add icon (add icon) to add a new dynamic attributes filter.

    For more information, see Create dynamic attributes filters.

  • Click The interface displays options for managing dynamic attributes filters, including viewing summaries, adding new filters, and indicating connectors without associated filters. in the filters column (The image illustrates the interface for managing dynamic attributes filters, showing options to add, edit, or delete filters associated with a connector.) indicates the indicated connector has no associated dynamic attributes filters. Without associated filters, the connector can send nothing to Firewall Management Center.

    One way to resolve the issue is to click The image illustrates a sample interface for adding, editing, or deleting dynamic attributes filters in a management center, highlighting the filters column and the action buttons available for managing filters. in the filters column and click Add Dynamic Attributes Filter. A sample follows.
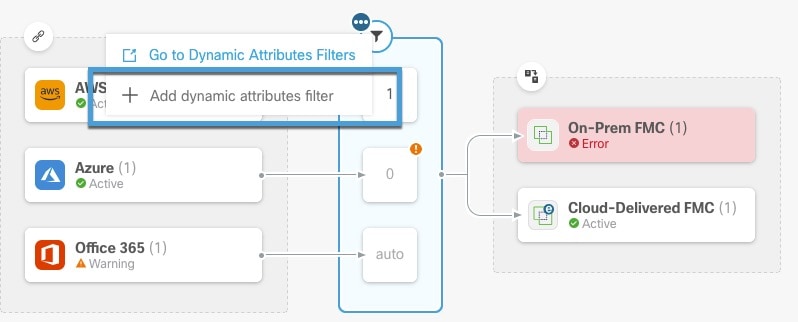
    Add a dynamic attributes filter so the management center can start receiving dynamic objects

  • Click The image illustrates a user interface for adding, editing, or deleting dynamic attributes filters in a management center, highlighting the relevant buttons and options available in the filters column. to add, edit, or delete filters.

  • Click The image illustrates a sample interface for adding, editing, or deleting dynamic attributes filters in a management center, highlighting the filters column and the relevant action buttons. to close the panel.

Add, edit, or delete adapters

The Dashboard enables you to view or edit adapters. You can click the name of an adapter to view all instances of that adapter or you can click for the following additional options:
  • Go to Adapters to view all adapters at the same time; you can add, edit, and delete adapters from there.

  • Add Adapter > type to add an adapter of the indicated type.

Click any adapter in the adapters column () to display more information about it; an example follows:
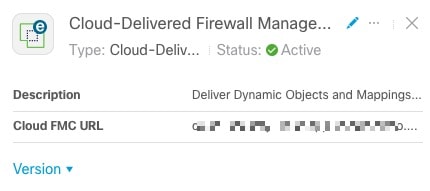
Displaying more information about adapters from the dashboard

You have the following options:

  • Click the Edit icon (edit icon) to edit this connector.

  • Click the More icon (more icon) for additional options.

  • Click Version to display the version of the dynamic attributes connector. You can optionally copy the version to the clipboard if necessary for Cisco TAC.

  • Click to add, edit, or delete adapters. You can also view error details on the resulting page.

  • Click to close the panel.

View error information

To view error information for an adapter:

  1. On the Dashboard, click the name of the adapter that is displaying the error.

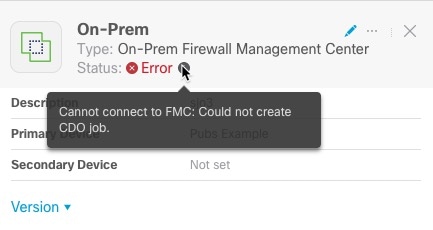
  2. In the right pane, click Information (information icon) .

    An example follows.

    Click the "I" button next to an adapter to view error information

  3. To resolve this error, make sure the is onboarded correctly. For more information, see Onboard an FMC in Managing FMC with Security Cloud Control (link to topic).

  4. If you cannot resolve the issue, click Version and copy the version to a text file.

  5. Get your Security Cloud Control tenant ID as discussed in Get your tenant ID

  6. Provide all of this information to Cisco TAC.

Related Topics
Connectors

A connector is an interface with a cloud service. It retrieves network information from the cloud service to enable the network information to be used in policies on the . It supports both air gap mode and network download mode configurations.

Supported connectors

We support these connectors:

Amazon Web Services connector user permissions and imported data

The dynamic attributes connector imports dynamic attributes from Amazon Web Services (AWS) to for use in policies.

Dynamic attributes imported

The connector imports these dynamic attributes from AWS:

  • Tags, user-defined key-value pairs you can use to organize your AWS EC2 resources.

    For more information, see Tag your EC2 Resources in the AWS documentation

  • IP addresses of virtual machines in AWS.

Minimum permissions required

The dynamic attributes connector requires a user at minimum with a policy that permits ec2:DescribeTags, ec2:DescribeVpcs, and ec2:DescribeInstances to be able to import dynamic attributes.

Create an AWS user with minimal permissions for the dynamic attributes connector

This task creates a service account with minimum permissions to send dynamic attributes to .

For a list of the dynamic attributes that can be sent, refer to Amazon Web Services connector user permissions and imported data.

Before you begin

You must already have set up your Amazon Web Services (AWS) account. For more information about doing that, see this article in the AWS documentation.

Follow these steps to create an AWS user with minimal permissions for the dynamic attributes connector:

Procedure

Step 1

Log in to the AWS console as a user with the admin role.

Step 2

From the Dashboard, click Security, Identity & Compliance > IAM.

Step 3

Click Access Management > Users.

Step 4

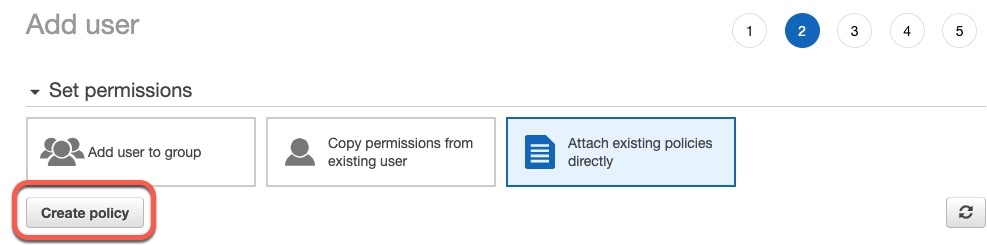
Click Add Users.

  1. In the User Name field, enter a name to identify the user.

  2. Click Access Key - Programmatic Access.

  3. At the Set permissions page, click Next without granting the user access to anything. You can grant user access later.

  4. Add tags to the user if desired.

  5. Click Create User.

  6. Click Download .csv to download the user's key to your computer.

    Note


    This is the only opportunity you have to retrieve the user's key.

  7. Click Close.

Step 5

At the Identity and Access Management (IAM) page in the left column, click Access Management > Policies.

Step 6

Click Create Policy.

  1. On the Create Policy page, click JSON.

    Create a JSON policy

  2. Enter the following policy in the field:

    {
    	"Version": "2012-10-17",
    	"Statement": [
    		{
    			"Effect": "Allow",
    			"Action": [
    				"ec2:DescribeTags",
    				"ec2:DescribeInstances",
    				"ec2:DescribeVpcs"
    			],
    			"Resource": "*"
    		}
    	]
    }
    
  3. Click Next.

Step 7

Click Review.

On the Review Policy page, enter the requested information and click Create Policy.

Step 8

Attach your policy

  1. On the Policies page, enter all or part of the policy name in the search field and press Enter.

  2. Click the policy you just created.

  3. Click Actions > Attach.

  4. If necessary, enter all or part of the user name in the search field and press Enter.

  5. Click Attach Policy.


What to do next

Create an AWS connector.

Create an AWS connector

Create a connector to send dynamic objects from AWS to the firewall for use in security policies.

This task discusses how to configure a connector that sends data from AWS to the for use in policies.

Before you begin

Create a user with at least the privileges discussed in Create an AWS user with minimal permissions for the dynamic attributes connector.

Follow these steps to create an AWS connector:

Procedure

Step 1

Do any of these actions:

Step 2

Enter the required information.

Value

Description

Name

(Required.) Enter a name to uniquely identify this connector.

Description

Optional description.

Pull Interval

(Default 30 seconds.) Interval at which IP mappings are retrieved from AWS.

Region

(Required.) Enter your AWS region code.

Access Key

(Required.) Enter your access key.

Secret Key

(Required.) Enter your secret key.

  1. Click Save.

    The Status column displays Ok.


What to do next

Create an adapter

Amazon Web Services security groups connector—About user permissions

The dynamic attributes connector imports dynamic attributes from AWS to for use in policies.

Minimum permissions required

The dynamic attributes connector requires a user at minimum with a policy that permits ec2:DescribeTags, ec2:DescribeVpcs, and ec2:DescribeInstances to be able to import dynamic attributes.

Create an AWS security groups connector

This task creates a connector that sends AWS security groups data to the for use in policies.

This task discusses how to configure a connector that sends AWS security groups data to the for use in policies.

Before you begin

Complete these steps:

Follow these steps to create an AWS Security Groups connector:

Procedure

Step 1

Do any of the following:

Step 2

Enter the following information.

Value

Description

Name

(Required.) Enter a name to uniquely identify this connector.

Description

Optional description.

Pull Interval

(Default 30 seconds.) Interval at which IP mappings are retrieved from AWS.

The minimum value for Pull Interval is 1 second. You can set the maximum to any value you want. We recommend against setting the minimum to a low value because it can generate a lot of traffic, and, when applicable, can result in your being billed for the traffic.

Region

(Required.) Enter your AWS region code.

AWS Access Key

(Required.) Enter your access key.

AWS Secret Key

(Required.) Enter your secret key.

  1. Click Save.

    The Status column displays Ok.


What to do next

Create an adapter

Create an AWS service tags connector

Create a connector for Amazon Web Services (AWS) service tags to the for use in policies.

For more information, see resources like the following on the AWS documentation site:

Procedure


Step 1

Do any of the following:

Step 2

Enter the necessary information.

Value

Description

Name

(Required.) Enter a name to uniquely identify this connector.

Description

Optional description.

URL

(Required.) Do not change the URL unless advised to do so.

  1. Click Save.

    The Status column displays Ok.


What to do next

Create an adapter

Azure connector—About user permissions and imported data

The dynamic attributes connector imports dynamic attributes from Azure to for use in policies.

Dynamic attributes imported

We import these dynamic attributes from Azure:

  • Tags, key-value pairs associated with resources, resource groups, and subscriptions.

    For more information, see this page in the Microsoft documentation.

  • IP addresses of virtual machines in Azure.

Minimum permissions required

The dynamic attributes connector requires a user at minimum with the Reader permission to be able to import dynamic attributes.

Create an Azure user with minimal permissions for the dynamic attributes connector

Create an Azure service account with minimal permissions to send dynamic attributes to .

This task discusses how to set up a service account with minimum permissions to send dynamic attributes to . For a list of these attributes, see Azure connector—About user permissions and imported data.

Before you begin

You must already have a Microsoft Azure account. To set one up, see this page on the Azure documentation site.

Follow these steps to create an Azure user with minimal permissions for the dynamic attributes connector:

Procedure

Step 1

Log in to the Azure Portal as the owner of the subscription.

Step 2

Click Azure Active Directory.

Find the instance of Azure Active Directory for the application you want to set up.

Step 3

Click Add > App registration.

  1. In the Name field, enter a name to identify this application.

  2. Enter other information on this page as required by your organization.

  3. Click Register.

Step 4

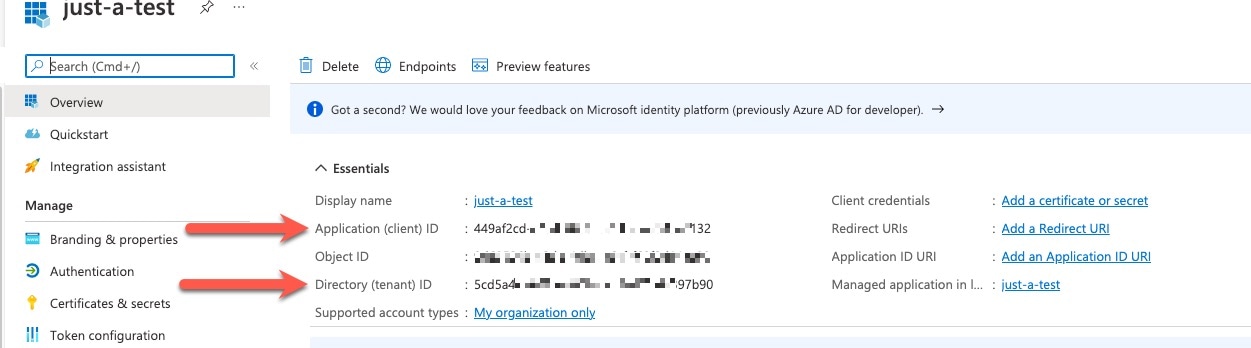
On the next page, write down or copy the Client ID (also referred to as application ID) and the tenant ID (also referred to as the directory ID).

Here is a sample:

Make note of the application and tenant ID

Step 5

Next to Client Credentials, click Add a certificate or secret.

Step 6

Click New Client Secret.

  1. Enter the requested information and click Add.

  2. Copy the value of the Value field to the clipboard. This value, and not the Secret ID, is the client secret.

    Copy the client secret to the clipboard now because you will not see it again

Step 7

Go back to the main Azure Portal page and click Subscriptions.

  1. Click the name of your subscription.

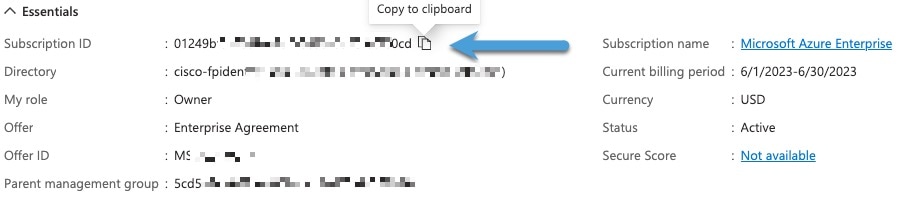
  2. Copy the subscription ID to the clipboard.

    Copy the subscription ID to the keyboard

Step 8

Click Access Control (IAM).

  1. Click Add > Add role assignment.

  2. Click Reader and click Next.

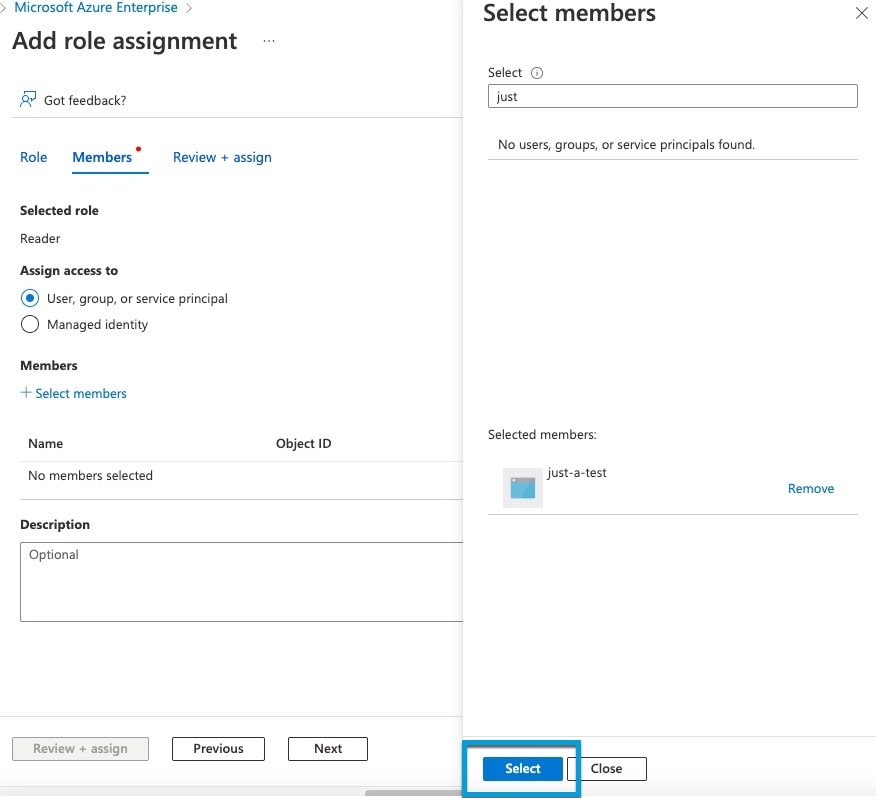
  3. Click Select Members.

  4. On the right side of the page, click the name of the app you registered and click Select.

    Associate the role with your app

  5. Click Review + Assign and follow the prompts to complete the action.

    Also see Create an Azure connector.


Create an Azure connector

Create a connector to send data from Azure to for use in policies.

This connector enables integration between Azure and your security management platform to retrieve dynamic object information for policy implementation.

Before you begin

Create an Azure user with at least the privileges discussed in Create an Azure user with minimal permissions for the dynamic attributes connector.

Procedure

Step 1

Do any of the following:

Step 2

Enter the following information.

Value

Description

Name

(Required.) Enter a name to uniquely identify this connector.

Description

Optional description.

Pull Interval

(Default 30 seconds.) Interval at which IP mappings are retrieved from Azure.

The minimum value for Pull Interval is 1 second. You can set the maximum to any value you want. We recommend against setting the minimum to a low value because it can generate a lot of traffic, and, when applicable, can result in your being billed for the traffic.

Subscription ID

(Required.) Enter your Azure subscription ID.

Tenant ID

(Required.) Enter your tenant ID.

Client ID

(Required.) Enter your client ID.

Client Secret

(Required.) Enter your client secret.

  1. Click Save.

    The Status column displays Ok.


What to do next

Create an adapter

Create an Azure service tags connector

Create a connector for Azure service tags to enable use in policies with automatically updated IP addresses from Microsoft.

This topic discusses how to create a connector for Azure service tags to the for use in policies. The IP addresses associated with these tags are updated every week by Microsoft.

For more information, see Virtual network service tags on Microsoft TechNet.

Procedure


Step 1

Do any of the following:

Step 2

Enter the required information.

Value

Description

Name

(Required.) Enter a name to uniquely identify this connector.

Description

Optional description.

Pull Interval

(Default 30 seconds.) Interval at which IP mappings are retrieved from Azure.

The minimum value for Pull Interval is 1 second. You can set the maximum to any value you want. We recommend against setting the minimum to a low value because it can generate a lot of traffic, and, when applicable, can result in your being billed for the traffic.

Subscription ID

(Required.) Enter your Azure subscription ID.

Tenant ID

(Required.) Enter your tenant ID.

Client ID

(Required.) Enter your client ID.

Client Secret

(Required.) Enter your client secret.

  1. Click Save.

    The Status column displays Ok.


What to do next

Create an adapter

Create a Multicloud Defense connector

This topic discusses how to create a connector for Cisco Multicloud Defense. The connector sends dynamic application address objects to the configured Cloud-Delivered Firewall Management Center.

For more information, see the Address Objects chapter in the Cisco Multicloud Defense User Guide and address object API documentation.

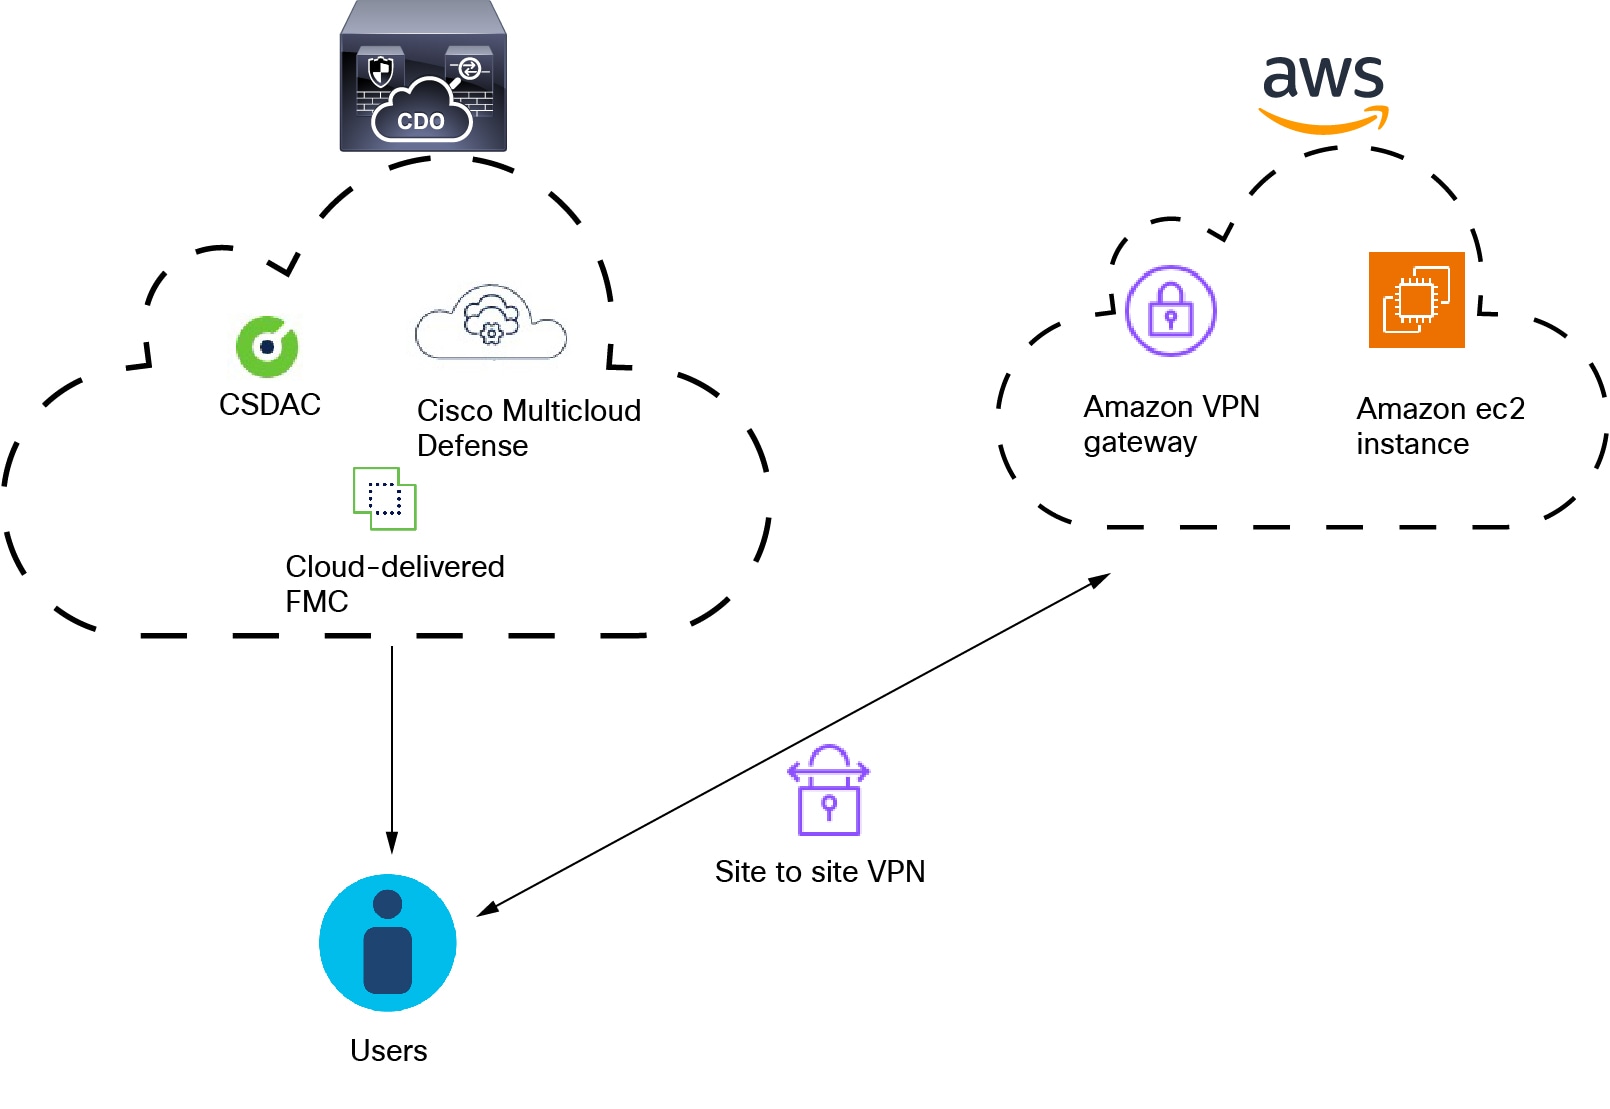
The following figure shows how the Cisco Multicloud Defense connector works.

The Cisco Multicloud Defense connector sends IP addresses from AWS to the Cloud-Delivered Firewall Management Center

As the figure shows:

  • Users logging in and out of AWS create activity monitored by Multicloud Defense.

  • The dynamic attributes connector and Multicloud Defense, both included in Security Cloud Control, send IP addresses from that activity to the Cloud-Delivered Firewall Management Center.

  • These IP addresses can then be used in access control rules by the Cloud-Delivered Firewall Management Center.

Procedure


Step 1

Do any of the following:

Step 2

Enter a Name and optional Description to identify the connector.

Step 3

Enter a Pull Interval. (Default 30 seconds.) Interval at which objects are retrieved from the Multicloud Defense Connector.

Step 4

Click Test and make sure the test succeeds before you save the connector.

Step 5

Click Save.

Step 6

Make sure Ok is displayed in the Status column.

You must create a Cloud-Delivered Firewall Management Center adapter as discussed in Create an adapter.


Create a Cisco cyber vision connector

This task creates a connector to send data from Cisco Cyber Vision to the firewall, enabling dynamic attribute integration between these systems.

This task discusses how to send data from Cisco Cyber Vision to the .

Before you begin

Cisco Cyber Vision must be reachable from the machine on which the dynamic attributes connector is running. You must know its IP address, port, and API key.

To find the API key in the Cyber Vision management console, click Admin > API > Token, then click Show to display the token and The Cisco Cyber Vision management console interface displays the steps to access the API key, including navigation to the Admin section and the option to show and copy the token. to copy the token to the clipboard.
Follow these steps to create a Cisco Cyber Vision connector:

Procedure


Step 1

Do any of the following:

Step 2

Enter the required information.

Value

Description

Name

(Required) Enter a name to uniquely identify this connector.

Description

Optional description.

Cyber Vision Prefix

Enter an alphanumeric string to identify dynamic objects from this Cyber Vision's IP address when objects are sent to .

If you have one Cyber Vision IP address, you can enter any value such as 1 .

Pull Interval

(Default 60 seconds) Interval at which data mappings are retrieved from Cyber Vision.

The minimum value for Pull Interval is 1 second. You can set the maximum to any value you want. We recommend against setting the minimum to a low value because it can generate a lot of traffic, and, when applicable, can result in your being billed for the traffic.

Host

(Required) Enter the Cyber Vision fully qualified host name or IP address.

Port

(Required) Enter the Cyber Vision listen port.

Token

(Required) Enter the API token.

  1. Click Test and make sure the test succeeds before you save the connector.

  2. Click Save.

    Status column displays Ok.


Create a generic text connector

Use this task to create a connector that retrieves IP addresses from text files and sends them to the firewall for use in access control rules.

This task discusses how to create an ad hoc list of IP addresses you maintain manually and retrieve at an interval you select (30 seconds by default). You can update the list of addresses anytime you want.

For example, you might have a list of IP addresses for an "allow list" in access control rules and another list of IP addresses for a "block list" in access control rules.

Before you begin

Create text files with IP addresses and put it on a web server that is accessible from the . IP addresses can include CIDR notation. The text file must have only one IP address per line.

You can specify up to 10,000 IP addresses per text file.

Follow these steps to create a generic text connector:

Procedure


Step 1

Do any of the following:

Step 2

Enter the following information:

Item

Description

Name

Enter a name to identify the connector.

Description

(Optional.) Enter a description

Pull Interval

Change the frequency, in seconds, at which the dynamic attributes connector retrieves IP addresses from the text file. The default is 30 seconds.

The minimum value for Pull Interval is 1 second. You can set the maximum to any value you want. We recommend against setting the minimum to a low value because it can generate a lot of traffic, and, when applicable, can result in your being billed for the traffic.

URLs

Enter a URL from which to retrieve IP addresses.

Add another URL

(Optional.) Click the link to add more URLs to an existing list.

Certificate

(Optional.) If a certificate chain is required for a secure connection to the web server, you have these options:

  • Click Get Certificate > Fetch to automatically fetch the certificate or, if that is not possible, get the certificate manually as discussed in Manually get a certificate authority (CA) chain.

  • Click Get Certificate > Browse from file to upload a certificate chain you downloaded previously.

  1. Click Test and make sure the test succeeds before you save the connector.

  2. Click Save.

  3. Status column displays Ok


What to do next

Create an adapter

Manually get a certificate authority (CA) chain

If the certificate authority chain is not fetched automatically, use one of these browser-specific procedures to get a certificate chain to securely connect to vCenter or Firewall Management Center .

The certificate chain is the root certificate and all subordinate certificates.

Procedure
  Command or Action Purpose

Step 1

Get a Certificate Chain—Mac (Chrome and Firefox)

  1. Open a Terminal window.

  2. Enter this command:

    
              security verify-cert -P 
              url[:port]
    

    where url is the URL (including scheme) to vCenter or Firewall Management Center . For example:

    security verify-cert -P https://myvcenter.example.com

    If you access vCenter or Firewall Management Center using NAT or PAT, you can add a port as follows:

    security verify-cert -P https://myvcenter.example.com:12345
  3. Save the entire certificate chain to a plaintext file.

    • Include all -----BEGIN CERTIFICATE----- and -----END CERTIFICATE----- delimiters.

    • Exclude any extraneous text (for example, the name of the certificate and any text contained in angle brackets ( < and > ) as well as the angle brackets themselves.

  4. Repeat these tasks for vCenter Firewall Management Center .

Step 2

Get a Certificate Chain—Windows Chrome

  1. Log in to vCenter or Firewall Management Center using Chrome.

  2. In the browser address bar, click the lock to the left of the host name.

  3. Click Certificate.

  4. Click the Certification Path tab.

  5. Click the top (that is, first) certificate in the chain.

  6. Click View Certificate.

  7. Click the Details tab.

  8. Click Copy to File.

  9. Follow the prompts to create a CER-formatted certificate file that includes the entire certificate chain.

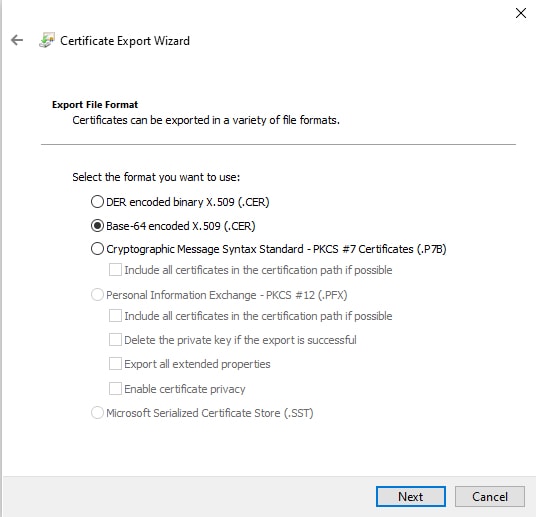
    When you're prompted to choose an export file format, click Base 64-Encoded X.509 (.CER).

    In the Certificate Export Wizard, select Base 64 encoded X.509 and export the certificate

    Follow the prompts to complete the export.

    Open the certificate in a text editor.

    Repeat the process for all certificates in the chain.

    You must paste each certificate in the text editor in order, first to last.

    Repeat these tasks for vCenter or Firewall Management Center .

Step 3

Get a Certificate Chain—Windows Firefox

  1. Log in to vCenter or Firewall Management Center using Firefox.

  2. Click the lock to the left of the host name.

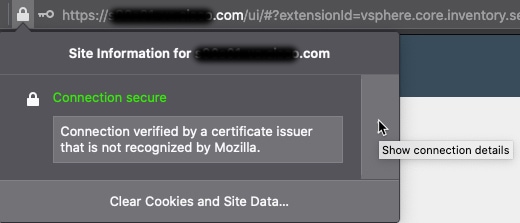
  3. Click the right arrow (Show connection details).

    In Firefox, show the connection details to see the certificate being used to connect to the FMC
  4. Click More Information.

  5. Click View Certificate.

  6. If the resulting dialog box has tab pages, click the tab page corresponding to the top-level CA.

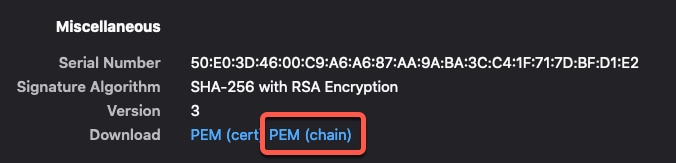
  7. Scroll to the Miscellaneous section.

  8. Click PEM (chain) in the Download row.

    Get the PEM chain to configure the FMC adapter
  9. Save the file.

    Repeat these tasks for vCenter or Firewall Management Center .

Create a GitHub connector

Create a GitHub connector that sends data to the for use in policies. The IP addresses associated with these tags are maintained by GitHub.

For more information, see About GitHub's IP addresses.


Note


Do not change the URL because doing so will fail to retrieve any IP addresses.


Before you begin

You do not have to create a dynamic attributes filters.

Procedure


Step 1

Do any of the following:

Step 2

Enter a Name and an optional description.

  1. (Optional) In the Pull Interval field, change the frequency, in seconds, at which the dynamic attributes connector retrieves IP addresses from GitHub. The default is 21,600 seconds (6 hours).

  2. Click Save.

    The Status column displays Ok.


What to do next

Create an adapter

Google cloud connector user permissions and imported data

A Google Cloud connector imports dynamic attributes from Google Cloud to for use in policies.

Dynamic attributes imported

The connector imports these dynamic attributes from Google Cloud:

  • Labels: Key-value pairs you can use to organize your Google Cloud resources. For more information, see Creating and Managing Labels in the Google Cloud documentation.

  • Network tags: Key-value pairs associated with an organization, folder, or project. For more information, see Creating and Managing Tags in the Google Cloud documentation.

  • IP addresses: Virtual machine addresses in Google Cloud.

The dynamic attributes connector requires a user at minimum with the Basic > Viewer permission to be able to import dynamic attributes.

Create a Google Cloud user with minimal permissions for the dynamic attributes connector

Create a service account with minimum permissions to send dynamic attributes to .

This task sets up a service account that provides the minimum permissions necessary for the dynamic attributes connector. For a list of these attributes, see Google cloud connector user permissions and imported data.

Before you begin

You must already have set up your Google Cloud account. For more information about doing that, see Setting Up Your Environment in the Google Cloud documentation.

Procedure

Step 1

Log in to your Google Cloud account as a user with the owner role.

Step 2

Click IAM & Admin > Service Accounts > Create Service Account.

Step 3

Enter the following information:

  • Service account name: A name to identify this account; for example, CSDAC.

  • Service account ID: Should be populated with a unique value after you enter the service account name.

  • Service account description: Enter an optional description.

For more information about service accounts, see Understanding Service Accounts in the Google Cloud documentation.

Click Create and Continue.

Step 4

Follow the prompts on your screen until the Grant users access to this service account section is displayed.

Grant the user the Basic > Viewer role.

Click Done.

A list of service accounts is displayed.

Step 5

Click More (more icon) at the end of the row of the service account you created.

Step 6

Click Manage Keys.

Step 7

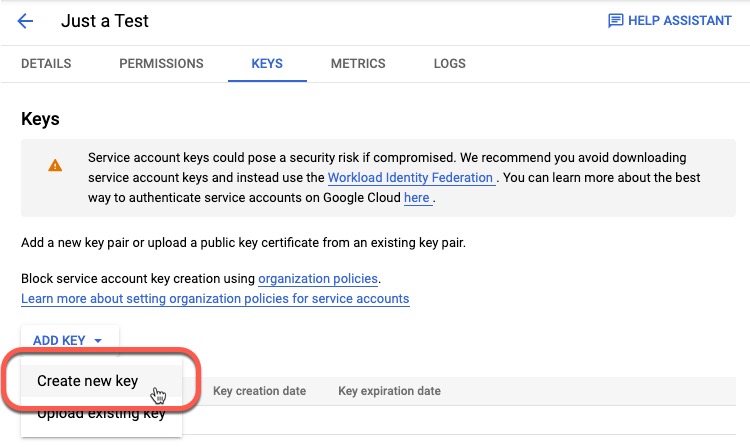
Click Add Key > Create New Key.

Create a new key for your user

Step 8

Click JSON.

Step 9

Click Create.

The JSON key is downloaded to your computer.

Keep the key handy when you configure the GCP connector.

See Create a google cloud connector.


Create a google cloud connector

Create a Google Cloud connector to enable data transmission from your Google Cloud environment to the firewall for dynamic security attribute monitoring and management.

The Google Cloud connector allows the firewall to receive real-time data from your Google Cloud infrastructure, enabling dynamic security policies based on cloud resource attributes.

Before you begin

Have your Google Cloud JSON-formatted service account data ready; it's required to set up the connector.

Follow these steps to create a Google Cloud connector:

Procedure

Step 1

Do any of the following:

Step 2

Enter the following information.

Value

Description

Name

(Required.) Enter a name to uniquely identify this connector.

Description

Optional description.

Pull Interval

(Default 30 seconds.) Interval at which IP mappings are retrieved from AWS.

The minimum value for Pull Interval is 1 second. You can set the maximum to any value you want. We recommend against setting the minimum to a low value because it can generate a lot of traffic, and, when applicable, can result in your being billed for the traffic.

GCP region

(Required.) Enter the GCP region in which your Google Cloud is located. For more information, see Regions and Zones in the Google Cloud documentation.

Service account

Paste the JSON code for your Google Cloud service account.

  1. Click Save.

    The Status column displays Ok.


What to do next

Create an adapter

Create an office 365 connector

Create a connector for Office 365 tags to send data to the for use in policies.

The IP addresses associated with these tags are updated every week by Microsoft. You do not have to create a dynamic attributes filter to use the data.

For more information, refer to Office 365 URLs and IP address ranges on docs.microsoft.com.

Procedure


Step 1

Do any of the following:

Step 2

Enter the following information.

Value

Description

Name

(Required.) Enter a name to uniquely identify this connector.

Description

Optional description.

Pull Interval

(Default 30 seconds.) Interval at which IP mappings are retrieved from Azure.

The minimum value for Pull Interval is 1 second. You can set the maximum to any value you want. We recommend against setting the minimum to a low value because it can generate a lot of traffic, and, when applicable, can result in your being billed for the traffic.

Base API URL

(Required.) Enter the URL from which to retrieve Office 365 information, if it's different from the default. For more information, see Office 365 IP Address and URL web service on the Microsoft documentation site.

Instance name

(Required.) From the list, click an instance name. For more information, see Office 365 IP Address and URL web service on the Microsoft documentation site.

Disable optional IPs

(Required.) Enter true or false .

Step 3

Click Save.

The Status column displays Ok.


Create a Webex connector

This task creates a Webex connector that sends IP addresses to the management system for use in policies. The IP addresses associated with these tags are maintained by Webex.

This section discusses how to create a Webex connector that sends data to the for use in policies. The IP addresses associated with these tags are maintained by Webex. You do not have to create a dynamic attributes filters.

For more information, see Port Reference for Webex Calling.

Procedure


Step 1

Do any of the following:

Step 2

Enter the following information.

Value

Description

Name

(Required.) Enter a name to uniquely identify this connector.

Description

Optional description.

Pull Interval

(Default 30 seconds.) Interval at which IP mappings are retrieved from Webex.

The minimum value for Pull Interval is 1 second. You can set the maximum to any value you want. We recommend against setting the minimum to a low value because it can generate a lot of traffic, and, when applicable, can result in your being billed for the traffic.

Provider Reserved IPs

(Required.) (Required.) Slide to enabled to retrieve any reserved IP addresses.

  1. Click Test and make sure the test succeeds before you save the connector.

  2. Click Save.

  3. The Status column displays Ok.


What to do next

Create an adapter

Create a Zoom connector

Create a Zoom connector that sends data to the for use in policies.

The IP addresses associated with these tags are maintained by Zoom. You do not have to create a dynamic attributes filters.

For more information, see Zoom network firewall or proxy server settings.

Procedure


Step 1

Do any of the following:

Step 2

Enter this information.

Value

Description

Name

(Required.) Enter a name to uniquely identify this connector.

Description

Optional description.

Pull Interval

(Default 30 seconds.) Interval at which IP mappings are retrieved from Zoom.

The minimum value for Pull Interval is 1 second. You can set the maximum to any value you want. We recommend against setting the minimum to a low value because it can generate a lot of traffic, and, when applicable, can result in your being billed for the traffic.

Provider Reserved IPs

(Required.) Slide to enabled to retrieve any reserved IP addresses.

  1. Click Test and make sure the test succeeds before you save the connector.

  2. Click Save.

    The Status column displays Ok.


What to do next

Create an adapter

Create an adapter

An adapter is a secure connection to Cloud-Delivered Firewall Management Center or an to which you push network information from cloud objects for use in access control policies.

You can create the following adapters:


Note


You must have a Super Admin user role to create the first adapter. To view or modify existing adapters, you must have an Admin or Super Admin user role.


How to create an adapter

This topic discusses how to create an adapter to push dynamic objects from the dynamic attributes connector to Cisco Security Cloud.

Before you begin

Onboard the firewall manager to Cisco Security Cloud as discussed in Onboard a Management Center in the Managing Security and Network Devices with Security Cloud Control online help.

Required User Role: Super Admin

Procedure


Step 1

Log in to Secure Firewall Management Center as a user with the Super Admin role.

Step 2

Click Administration > Dynamic Attributes Connector > AdaptersAdministration > Dynamic Attributes Connector > Adapters.

Step 3

To add an adapter, click Add icon (add icon) > .

Step 4

To edit or delete an adapter, click Edit icon (edit icon), or Delete icon (delete icon).

Step 5

Add or edit this information.

Value

Description

Name

(Required.) Enter a unique name to identify this adapter.

Description

(Optional) Enter a description of the adapter.

Primary Device

Click the IP address of a management center associated with your tenant.

Secondary Device

(Optional) If you have a secondary , click its name.

Step 6

Click OK.


How to create a Cloud-Delivered Firewall Management Center adapter

This topic discusses how to create an adapter to push dynamic objects from the dynamic attributes connector to Cisco Security Cloud.

Before you begin

Required User Role:

  • Super Admin

Procedure


Step 1

Log in to Secure Firewall Management CenterCisco Security Cloud as a user with the Super Admin role.

Step 2

Click Firewall.

Step 3

Click Administration > Dynamic Attributes Connector > AdaptersAdministration > Dynamic Attributes Connector > Adapters.

Step 4

To add an adapter, click Add icon (add icon) > Cloud-Delivered Firewall Management Center.

Step 5

To edit or delete an adapter, click Edit icon (edit icon), or Delete icon (delete icon).

Step 6

Edit the following information.

Value

Description

Name

(Required.) Enter a unique name to identify this adapter.

Description

Optional description of the adapter.

Cloud FMC URL

From the list, click the URL for your Cloud-Delivered Firewall Management Center.

Step 7

Click Save.


Create dynamic attributes filters

Create dynamic attributes filters to expose them as dynamic objects in for use in access control policies.

Dynamic attributes filters that you define using the Dynamic Attributes Connector are exposed in the as dynamic objects that can be used in access control policies. For example, restrict access to an AWS server for the Finance Department to only members of the Finance group defined in Microsoft Active Directory.

Before you begin

Complete all of the following tasks:

Procedure


Step 1

Do any of the following:

  • Add a new filter: click Add (add icon).

  • Edit or delete a filter: Click More (more icon), then click Edit or Delete at the end of the row.

Step 2

Enter the following information.

Item

Description

Name

Unique name to identify the dynamic filter (as a dynamic object) in a policy and in the Object Manager (External Attributes > Dynamic Object).

Connector

From the list, click the name of a connector to use.

Query

Click Add add icon.

Step 3

To add or edit a query, enter the following information.

Item Description

Key

Click a key from the list. Keys are fetched from the connector.

Operation

Click one of the following:
  • Equals to exactly match the key to the value.

  • Contains to match the key to the value if any part of the value matches.

Values

Click either Any or All and click one or more values from the list. Click Add another value to add values to your query.

Step 4

Click Show Preview to display a list of networks or IP addresses returned by your query.

Step 5

When you're finished, click Save.

Step 6

(Optional.) Verify the dynamic object in the .

  1. Log in to the .

  2. Click Policies > Firewall Threat Defense.

  3. Click Objects > Object Management > External Attributes > Dynamic Object.

    The dynamic attribute query you created should be displayed as a dynamic object.


Dynamic attribute filter examples

This topic provides some examples of setting up dynamic attribute filters.

Examples: vCenter

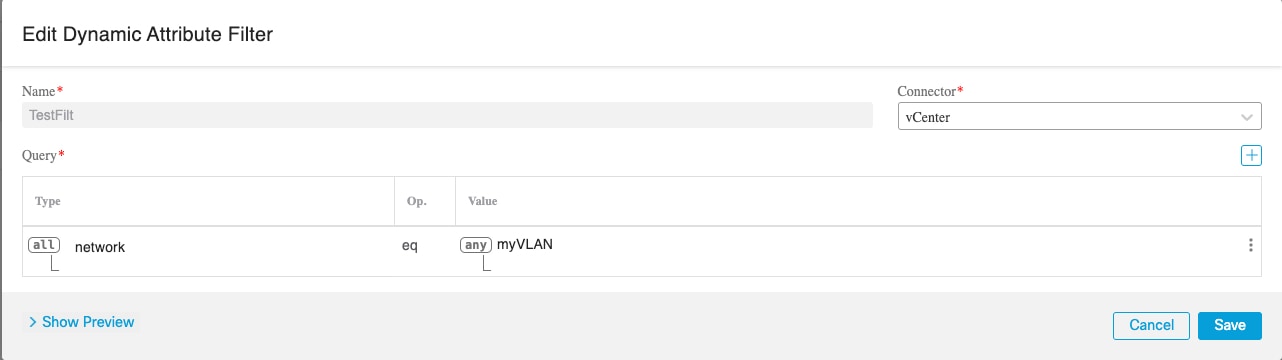
This example shows one criterion: a VLAN.

This sample shows a simple vCenter dynamic attributes filter that finds a VLAN

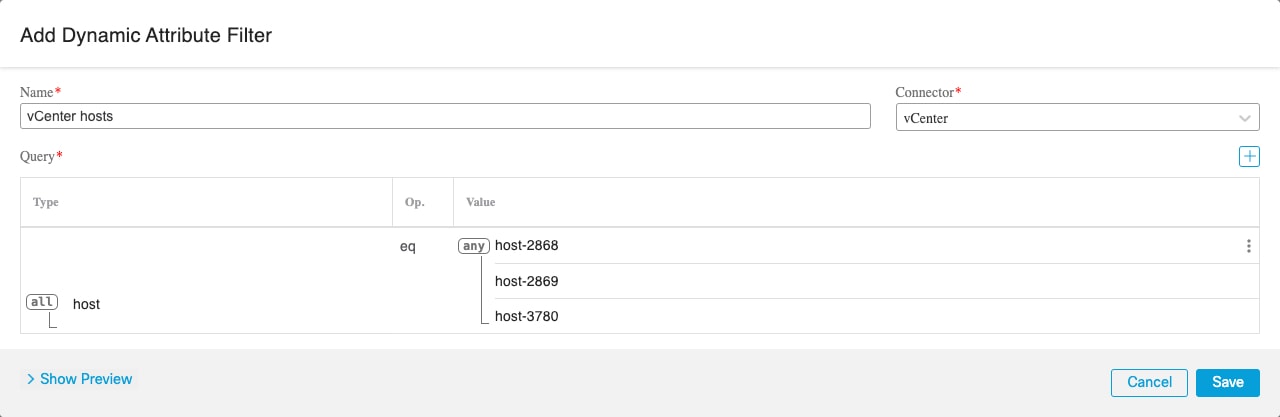
This example shows three criteria that are joined with OR: the query matches any of three hosts.

Another sample vCenter dynamic attributes filter that finds any of three hosts; the query is joined by OR

Example: azure

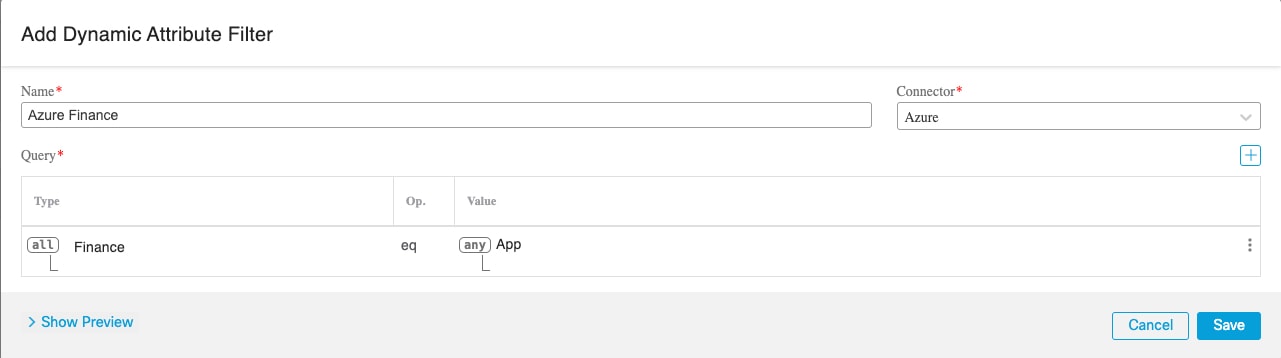
This example shows one criterion: a server tagged as a Finance app.

Sample Azure dynamic attributes filter that finds the Finance app tag

Example: AWS

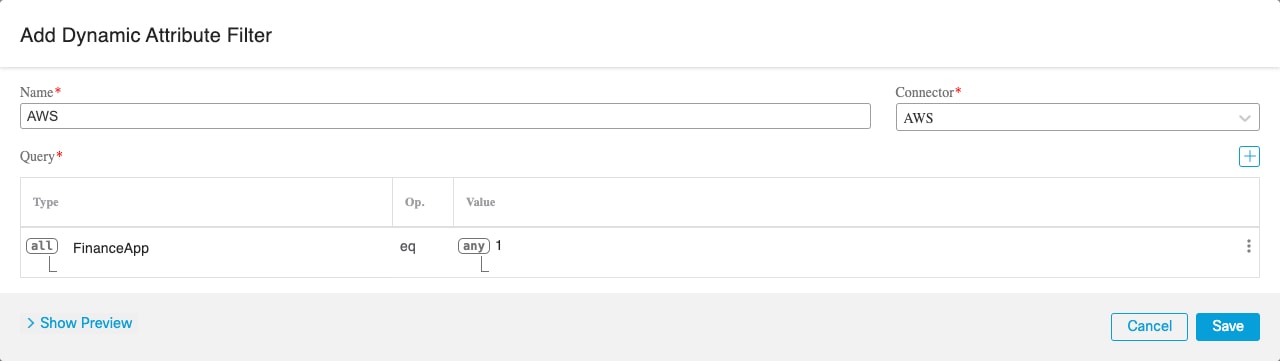
This example shows one criterion: a FinanceApp with a value of 1.

Sample Amazon Web Services dynamic attributes filter that finds a tag FinanceApp with a value of 1