- About this Guide
- ASR 5000 Hardware Platform Overview
- Installation Procedure Overview
- Chassis Installation
- Application Card Installation
- Line Card Installation
- Cabling the Switch Processor Input/Output Line Card
- Cabling the Fast Ethernet (10/100) Line Card
- Cabling the Gigabit Ethernet Line Cards
- Cabling the Optical (ATM) Line Cards
- Cabling the Channelized Line Cards
- Cabling the Power Filter Units
- Applying Power and Verifying the Installation
- System Monitoring
- Adding Application and Line Cards to an Existing Installation
- Removing and Installing SMC PC Cards
- Replacing the Chassis Air Filter
- Replacing a Power Filter Unit
- Replacing Upper or Lower Fan Tray
- Replacing Application Cards
- Replacing Line Cards
- Technical Specifications
- Safety, Electrical and EMC Certifications
- Environmental Specifications
- Hardware Product Support Matrix
- Preparing a Full-Height Line Card Slot
- RMA Shipping Procedures
- Spare Component Recommendations
Replacing the Chassis Air Filter
The lower fan tray draws air into the chassis. It is equipped with a particulate air filter to prevent dust and debris from entering the system. The air filter must be changed periodically to ensure proper ventilation and air flow through the chassis.
The air filter (ASR5K-FLTR-AIR=) should be replaced at least every six months. Keep a minimum of one replacement air filter on site for each deployed chassis. This ensures that qualified service personnel can quickly replace the filter when needed. The filter should be replaced during a maintenance window.
 Caution | During installation, maintenance, and/or removal, wear a grounding wrist strap to avoid ESD damage to the components. Failure to do so could result in damage to sensitive electronic components and potentially void your warranty. |
This chapter includes the following sections:
Determining When an Air Filter Needs Replacing
If the air filter is replaced at least every six months as preventive maintenance, there should be no need for out-of-cycle replacement. However, under certain conditions the air filter may need replacement between maintenance periods.
One possible indication that an air filter needs to be replaced is if the chassis temperature remains high for extended periods of time. This condition causes the dual-speed fans to run at high speed. A clogged and dirty air filter hinders air flow through the chassis resulting in higher operating temperatures.
To monitor chassis temperature and fan speed, issue the following CLI command in the Exec mode:
show fans
The following is a sample output for this command:
Upper Fan Controller: State=All Running Speed=Normal Temp=20 (C)
Lower Fan Controller: State=All Running Speed=Normal Temp=20 (C)
To monitor the temperature of individual cards, enter the following CLI command in the Exec mode. [Enter the upper slot number for an XGLC.]
show card info slot_#
This command displays operational information, including the temperature for the card installed in chassis slot_#, which can be any integer value between 1 and 48.
| SNMP Trap | Description |
|---|---|
|
starFanSpeed |
The speed of the fans controlled by this fan controller. The value normal(1) indicates the normal operating speed of the fans. The value high(2) indicates that the fans are running at a higher rate of speed. Fans running at a higher temperature may be the result of a dirty air filter. |
|
showCardTemperature |
The temperature, in degrees Celsius, as measured on the card. A value of 0 indicates that the temperature cannot be read or that the card is not present. The maximum measurable temperature is 70°C. The safe operating temperature range for the chassis and its sub-components is between 0 and 55°C. |
|
starCardTempOverheat |
The card has reached a temperature beyond its safe operating range. The safe operating temperature range for the chassis and its sub-components is between 0 and 55°C. |
|
starCardTempOK |
The temperature of the card is currently within its safe operating range. This notification is only generated if the card has previously generated a starCardTempOverheat notification. |
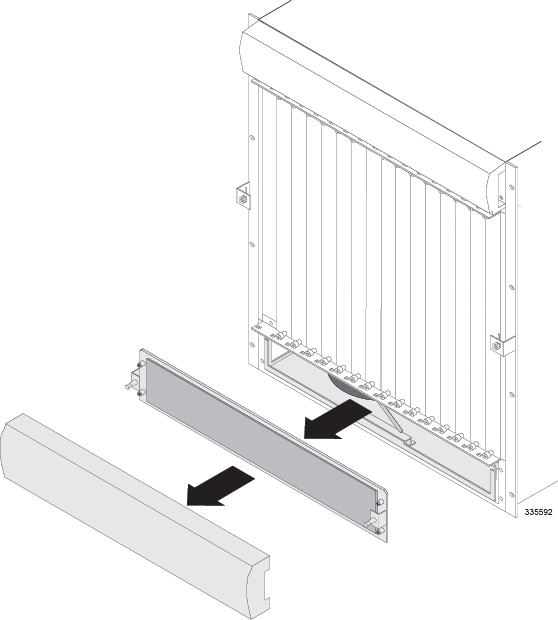
Removing the Air Filter
Follow the instructions below to remove the air filter.
| Step 1 | Access the
chassis' lower fan tray assembly.
| ||
| Step 2 | Raise the
plastic tab above the face of the fan tray assembly and gently pull it toward
you until the air filter is free from the fan tray assembly.
| ||
| Step 3 | Discard the used air filter. | ||
| Step 4 | Proceed to Installing the Air Filter. |
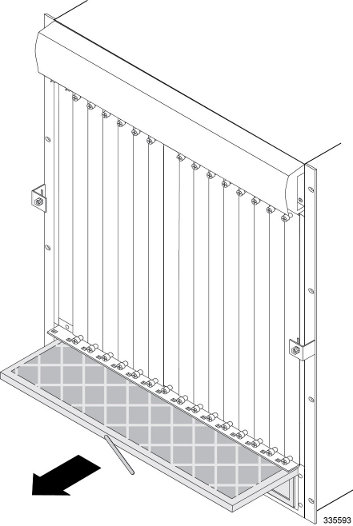
Installing the Air Filter
Follow the instructions below to install an air filter.
| Step 1 | Verify that the arrows
located on the sides of the air filter point upwards. The
arrows indicate the direction of the airflow into the chassis through
the filter.
| ||
| Step 2 | Slide the air filter into the lower fan tray assembly along the guides located on the lower fan tray until the front of the air filter is flush with the front of the assembly. | ||
| Step 3 | Lower the plastic tab over the front of the fan tray assembly to secure it in place. | ||
| Step 4 | Remove any dust build-up that may have accumulated on the chassis front air intake. This should be done as part of routine maintenance to continue optimum airflow into the chassis. The front air intake is located on the lower fan tray cover. | ||
| Step 5 | Replace the fan tray
bay cover and tighten each of the four screws to secure it to the
chassis. The fan tray cover is keyed and can only be installed in one direction. | ||
| Step 6 | Replace the plastic
bezel over the fan tray bay.
|
 Feedback