Cisco Optical Automation Solution for NCS 2000 Networks, Release 26.1.1

PDF

Cisco Optical Automation Solution for NCS 2000 Networks, Release 26.1.1

Recover Cisco Optical Site Manager

Want to summarize with AI?

Log in

This section describes recovery options for Cisco Optical Site Manager, including rollback, re-creation, device re-onboarding, and database restore planning considerations.


Use this topic to recover Cisco Optical Site Manager when rollback, re-creation, re-onboarding, or database restore activities are required. Review the available recovery paths before performing maintenance tasks.

Roll back Cisco Optical Site Manager from 26.x to 25.x

Restore the system to release 25.1.1 by rolling back Cisco Optical Site Manager instances and related components.
  • Temporary inconsistencies may appear in Cisco Optical Network Controller during the rollback. A manual synchronization may be required.

  • Do not attempt to activate Cisco Optical Site Manager 25.1.1 on an instance that is already running 26.x. The operation may fail and leave the system in an inconsistent state.

  • Perform this procedure only in controlled conditions, such as lab or recovery scenarios.

Before you begin

  • A valid backup of the Cisco Optical Site Manager database from release 25.1.1 is available.

  • Valid Cisco Optical Site Manager XML configuration files for releases 25.1.1 and 26.x are available.

  • The 25.1.1 package is available in the Software Package section.

  • The 26.1.1 package is available in the Software Package section. This package is required before you activate the card controller to release 25.1.1.

Follow these steps to roll back Cisco Optical Site Manager from 26.x to 25.x.

Procedure

  1. (Optional) Access the Cisco Optical Site Manager web UI and activate the Admin Plane to release 25.1.1.

  2. (Optional) Activate the Card Controller to release 25.1.1.

    Cisco documents the workflow in: Activate Cisco Optical Site Manager and Admin Plane image for the SVO-LC.

    This step to be done in the container with SVO card plugged in.

  3. Open https://<ADMIN_PLANE_IP> in a browser to access the Admin Plane web UI.

  4. Delete existing Cisco Optical Site Manager instance(s).

    Use the related Cisco task: Delete a Cisco Optical Site Manager instance.

  5. Create new Cisco Optical Site Manager instance(s) using release 25.1.1.

    See the Cisco documentation section: Create a Cisco Optical Site Manager instance.

  6. Open https://<COSM_IP> in a browser to access the Cisco Optical Site Manager web UI.

  7. Upload the XML configuration file (Devices and UID mapping).

    The product workflow is documented in: Import a Cisco Optical Network Planner configuration file.

  8. Restore the Cisco Optical Site Manager database backup.

    Use this reference section for the task: Upload database and Restore database.

Cisco Optical Site Manager instances are restored to release 25.1.1 and all NCS 2000 and NCS 1000 devices are reachable and in "sync-completed" state.

What to do next

Verify that all devices are synchronized after the restore operation.


Re-create Cisco Optical Site Manager in 26.x

Re-create Cisco Optical Site Manager instance(s) in release 26.1.1 in case of corruption, misconfiguration, or recovery scenarios.
Note
  • This procedure does not change the software release. The Cisco Optical Site Manager instance remains at release 26.1.1.

  • Temporary inconsistencies may appear in Cisco Optical Network Controller. A manual synchronization may be required.

  • Perform this procedure only in controlled conditions.

Before you begin

  • A valid backup of the Cisco Optical Site Manager database from release 26.1.1 is available.

  • XML configuration files for devices and UID mapping are available for the target deployment.

Follow these steps to re-create Cisco Optical Site Manager in 26.x.

Procedure

  1. Open https://<ADMIN_PLANE_IP> in a browser to access the Admin Plane web UI.

  2. Delete the existing Cisco Optical Site Manager instance(s).

    The product workflow is documented in: Delete a Cisco Optical Site Manager instance.

  3. Create new Cisco Optical Site Manager instance(s) using release 26.1.1.

    Use this reference section for the task: Create a Cisco Optical Site Manager instance.

  4. Open https://<COSM_IP> in a browser to access the Cisco Optical Site Manager web UI.

  5. Upload the XML configuration file (devices and UID mapping).

  6. Restore the Cisco Optical Site Manager database backup.

    Use this Cisco procedure for the complete workflow: Upload database and Restore database.

Cisco Optical Site Manager instance(s) are successfully re-created and all devices are reachable and in "sync-completed" state.

What to do next

Re-synchronize all devices after the restore operation.


Delete and re-onboard NCS 2000 devices

Delete and re-onboard an NCS 2000 device in Cisco Optical Site Manager in case of configuration errors or synchronization issues.
Note

Device deletion removes the device from Cisco Optical Site Manager but does not affect the physical node. Device name, device flavor, and UID cannot be modified after creation.

Before you begin

  • Cisco Optical Site Manager instance is reachable

  • Device credentials and IP address are available

  • XML configuration file (if used) is available

Follow these steps to delete and re-onboard NCS 2000 devices.

Procedure

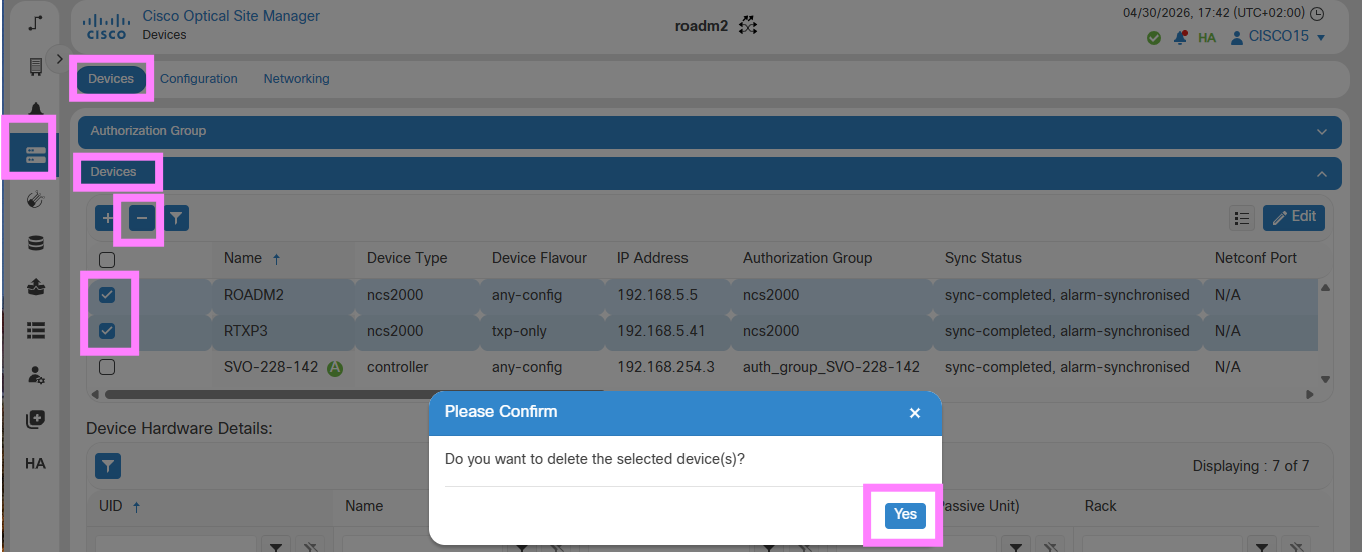
  1. Follow these steps to delete a device:

    1. Open https://<COSM_IP> in a browser to access the Cisco Optical Site Manager web UI.
    2. Choose Devices > Devices.
    3. Select the device to be deleted.
    4. Click the - icon.
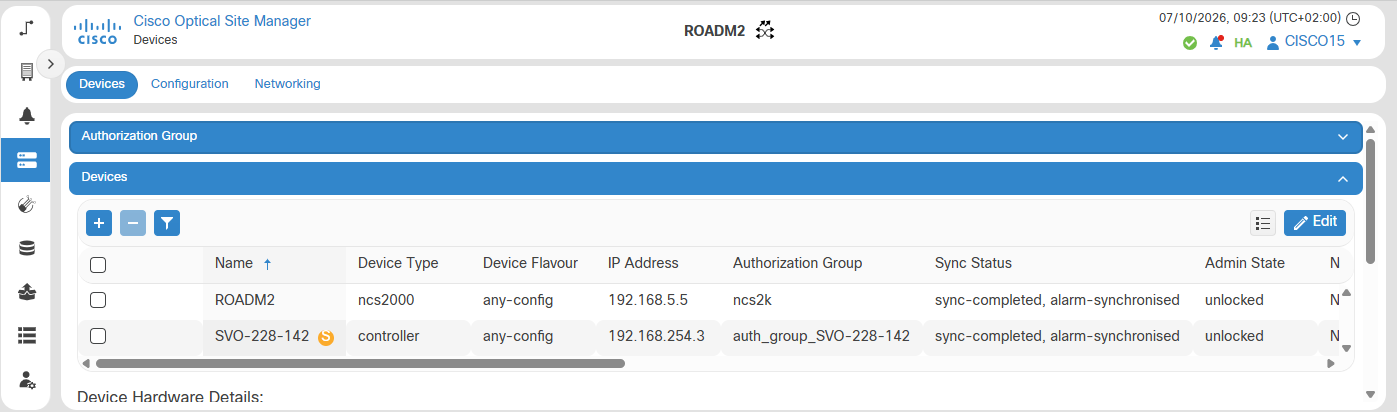
    5. Confirm the deletion and verify that Cisco Optical Site Manager Instance is successfully deleted.
      Figure 1. Cisco Optical Site Manager web UI - delete device
      Figure 2. Devices are removed from the Cisco Optical Site Manager instance
  2. Follow these steps for device onboarding:

    1. Re-add the device using the applicable device onboarding procedure.
    2. Restore the Cisco Optical Site Manager database backup.

      Cisco documents the workflow in: Upload database and Restore database.

The device is successfully re-added and appears in the Cisco Optical Site Manager instance with status "sync-completed, alarm-synchronized".

What to do next

  • Delete all associated devices together when a Cisco Optical Site Manager instance contains multiple devices, such as a ROADM with a remote transponder or NCS 1000 device.

  • Delete and add the device again if the device name, device flavor, or UID is incorrect.

  • Synchronize Cisco Optical Network Controller manually if temporary inconsistencies appear.


Lock and unlock NCS 2000 devices

Restore the synchronized, alarm-synchronized state of an NCS 2000 device by locking and then unlocking the device in Cisco Optical Site Manager.

Before you begin

  • Ensure that the Cisco Optical Site Manager instance is reachable.

  • Ensure that the device is in the unlocked state before you begin.

Procedure

  1. Lock the device.

    1. Access the Cisco Optical Site Manager web UI at https://<COSM_IP>.
    2. Choose Device > Devices > Devices.
    3. Choose Edit > Lock.
    4. Click Apply.
    5. Confirm the lock operation.
  2. Unlock the device.

    1. Access the Cisco Optical Site Manager web UI at https://<COSM_IP>.
    2. Choose Device > Devices.
    3. Choose Edit > Unlock.
    4. Click Apply.
    5. Confirm the unlock operation.

After you complete the lock and unlock procedure, the device returns to the Sync Completed and Alarm Synchronized states.

No critical alarms are present.

Figure 3. Cisco Optical Site Manager web UI - device sync-completed after lock and unlock