- About This Book
-
- Getting Started
- Setting Up the Prime Fulfillment Services for L2VPN
- Creating a FlexUNI/EVC Ethernet Policy
- Creating a FlexUNI/EVC Ethernet Service Request
- Creating a FlexUNI/EVC ATM-Ethernet Interworking Policy
- Creating a FlexUNI/EVC ATM-Ethernet Interworking Service Request
- Creating an L2VPN Policy
- Creating an L2VPN Service Request
- Creating a VPLS Policy
- Creating a VPLS Service Request
- Deploying, Monitoring, and Auditing Service Requests
- Using Auto Discovery for L2 Services
- Sample Configlets
- Setting Up VLAN Translation
-
- Getting Started with MPLS VPN
- Setting Up the Prime Fulfillment Services
- Independent VRF Management
- IPv6 and 6VPE Support in MPLS VPN
- MPLS VPN Service Policies
- MPLS VPN Service Requests
- Provisioning Regular PE-CE Links
- Provisioning Multi-VRFCE PE-CE Links
- Provisioning Management VPN
- Provisioning Cable Services
- Provisioning Carrier Supporting Carrier
- Provisioning Multiple Devices
- Spanning Multiple Autonomous Systems
- Sample Configlets
- Troubleshooting MPLS VPNs
Cisco Prime Fulfillment User Guide 6.1
Bias-Free Language
The documentation set for this product strives to use bias-free language. For the purposes of this documentation set, bias-free is defined as language that does not imply discrimination based on age, disability, gender, racial identity, ethnic identity, sexual orientation, socioeconomic status, and intersectionality. Exceptions may be present in the documentation due to language that is hardcoded in the user interfaces of the product software, language used based on RFP documentation, or language that is used by a referenced third-party product. Learn more about how Cisco is using Inclusive Language.
- Updated:
- March 20, 2015
Chapter: TE Network Discovery
TE Network Discovery
After completing the preconfiguration process and creating a seed router, you can discover the TE network for a particular TE provider. This populates the repository with the network topology. Also, you might need to set up the management interfaces. The necessary steps are described in this chapter.
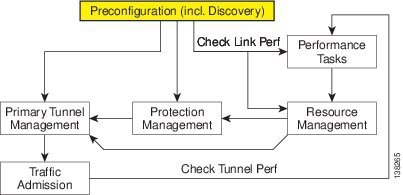
The highlighted box in Figure 36-1 shows where in Prime Fulfillment the preconfiguration steps takes place.
Figure 36-1 Prime Fulfillment Process Diagram - Preconfiguration
This chapter includes the following sections:
•![]() TE Discovery Prerequisites and Limitations
TE Discovery Prerequisites and Limitations
–![]() Accessing TE Routers for TE Discovery
Accessing TE Routers for TE Discovery
–![]() Memory Shortage on Large Networks
Memory Shortage on Large Networks
–![]() Performing a Per Area TE Discovery
Performing a Per Area TE Discovery
–![]() Running a Per Area TE Discovery Through an ABR
Running a Per Area TE Discovery Through an ABR
•![]() Verifying a TE Discovery Task
Verifying a TE Discovery Task
•![]() Setting Up Management Interfaces
Setting Up Management Interfaces
Overview
The purpose of the TE discovery process is to populate the repository with the TE topology, TE tunnels, explicit paths, and static routes to tunnels present in the live network.
The TE discovery process uses a seed device to discover the MPLS TE network topology using either Telnet or SSH. All the Traffic Engineering routers in the network should be accessible via their TE ID.
TE Discovery is a schedulable task that can be run once or on a periodic basis. Any inconsistencies between the repository and the network are reported in the Discovery log. The service state information is updated incrementally by logging tunnel in-use Label Switched Paths (LSPs) and updating the service request (SR) state.
TE Discovery Prerequisites and Limitations
The following prequisites apply mainly to TE discovery.
For an overview of the general Prime Fulfillment prerequisites and limitations, see Prerequisites and Limitations, page 35-3.
Accessing TE Routers for TE Discovery
To successfully run a TE discovery task, the seed router must be directly accessible from the management station.
All TE routers must be accessible from the Prime Fulfillment machine via their TE router ID. This is often the loopback IP address, but not always.
For Telnet/SSH, there must be direct Telnet/SSH access from the Cisco Prime Fulfillment Traffic Engineering Management (TEM) management station to each device.
See Preconfiguration Process Overview, page 35-5 for instructions on how to select Telnet or SSH when setting up a seed router.

Note ![]() After performing a TE discovery, it is recommended that you do not manually reconfigure RSVP graceful restart on the device. This affects the synchronization with the database and can cause deployment failure, in which case a new TE discovery needs to be performed.
After performing a TE discovery, it is recommended that you do not manually reconfigure RSVP graceful restart on the device. This affects the synchronization with the database and can cause deployment failure, in which case a new TE discovery needs to be performed.
Memory Shortage on Large Networks
When running TE Discovery on a large network (250+ devices or 5000+ tunnels, for example) or an OutOfMemoryException is encountered, it is recommended that the memory setting be changed.
To do this, use the following steps:
Step 1 ![]() Choose Administration > Hosts.
Choose Administration > Hosts.
Step 2 ![]() Select a host and click the Config button.
Select a host and click the Config button.
Step 3 ![]() Select watchdog > server > worker > java > flags.
Select watchdog > server > worker > java > flags.
Step 4 ![]() Change the first part of the property string, for example to -Xmx1024m instead of the default value -Xmx512m.
Change the first part of the property string, for example to -Xmx1024m instead of the default value -Xmx512m.
This increases the heap size of the TE Discovery task, which will clear up the OutOfMemoryException problem.
Step 5 ![]() Revert the watchdog.server.worker.java.flags property back to its original value to reduce the resource usage when no longer needed.
Revert the watchdog.server.worker.java.flags property back to its original value to reduce the resource usage when no longer needed.

Note ![]() Alternatively, the same memory increase can be achieved by editing the watchdog.server.worker.java.flags property in the vpnsc.properties file.
Alternatively, the same memory increase can be achieved by editing the watchdog.server.worker.java.flags property in the vpnsc.properties file.
IOS XR and Enable Passwords
If an IOS XR device is to be used as a seed device, the enable password should be set in its device record even though IOS XR does not require an enable password, for itself. That way IOS devices in the network, which do require an enable password, can be fully discovered.
When creating an IOS XR device through the Devices tab (Inventory > Devices) to act as a seed device for an initial discovery, it is not necessary to specify the enable password - TEM will be able to log in and get all the data it needs.
However, if there are other IOS devices in the same network, TEM will not be able to enter enable mode for those devices. As a result, these are not fully discovered in the sense that the inability to enter enable mode stops TEM from gathering all the relevant data. These other IOS routers will show up as 'unknown' devices in the Devices window.
Limitations
Simultaneous TE Discovery in the same TE Provider is not supported. Only one user can run a TE Discovery per TE Provider at a time.
Creating a TE Discovery Task
In the Task Manager, you can run two types of TE Discovery tasks:
TE Incremental Discovery
This rediscovery process can take a long time to complete for a larger OSPF area.
In TE Incremental Discovery, the discovery tasks are run in increments whenever changes occur in the network, such as when a new device or link is added, causing a much smaller memory overhead than a TE Full Discovery.
To create a TE Discovery task on the TE network, use the following steps:
Step 1 ![]() Choose Operate > Task Manager.
Choose Operate > Task Manager.
The Task Manager window appears.
Step 2 ![]() Choose Create > TE Incremental Discovery.
Choose Create > TE Incremental Discovery.
The Task Creation wizard appears.
Step 3 ![]() Optionally, alter the Name and/or Description fields and click Next.
Optionally, alter the Name and/or Description fields and click Next.
The TE Provider window appears.
Step 4 ![]() Select a TE provider and click Next.
Select a TE provider and click Next.
The Device/Link Discovery Information window appears.
You can perform either of the following:
•![]() Device discovery—A new device added to the network can be discovered using Device Discovery. For device discovery, non-Cisco devices, if any, are excluded from the list.
Device discovery—A new device added to the network can be discovered using Device Discovery. For device discovery, non-Cisco devices, if any, are excluded from the list.
A device can be selected by clicking the Select button which shows the list of devices added in Inventory.
The prerequisite here is that the device which needs to be discovered needs to be added with its management IP address. The credentials of the device need not be the same as the credentials of other devices already populated in the repository. The device is successfully discovered only if it falls under the same OSPF area that is mentioned for the TE provider.
•![]() Link discovery—A new link added to the network can be discovered using Link Discovery. Any explicit paths, primary, and backup tunnels traversing through that link will also be discovered.
Link discovery—A new link added to the network can be discovered using Link Discovery. Any explicit paths, primary, and backup tunnels traversing through that link will also be discovered.
End Device A and End Device B can be selected from the list of devices which have already been (TE Nodes). You must specify Interface A and Interface B.
Step 5 ![]() Select the seed device for discovering the network and click Next.
Select the seed device for discovering the network and click Next.
The Task Schedules window appears.
Step 6 ![]() Create a task schedule in one of two ways:
Create a task schedule in one of two ways:
•![]() Click Now to schedule the task to run immediately, in which case the schedule information is automatically filled into the Task Schedules list.
Click Now to schedule the task to run immediately, in which case the schedule information is automatically filled into the Task Schedules list.
•![]() Click Create to create a scheduler for this task, in which case the Task Schedule window appears.
Click Create to create a scheduler for this task, in which case the Task Schedule window appears.
Step 7 ![]() In the Task Schedule window, make your selections to define when and how often the task should be run.
In the Task Schedule window, make your selections to define when and how often the task should be run.

Note ![]() The default setting is to schedule a single TE Discovery task to take place immediately ("Now").
The default setting is to schedule a single TE Discovery task to take place immediately ("Now").
Step 8 ![]() Click OK.
Click OK.
The scheduled task should now appear in the Task Schedules table.
Step 9 ![]() Click Next.
Click Next.
A summary of the scheduled task appears.
Step 10 ![]() Click Finish.
Click Finish.
This will add the task to the list of created tasks in the Tasks window.
TE Full Discovery
In a TE Full Discovery, the discovery task runs without stopping until all devices have been discovered.
To create a TE Discovery task on the TE network, use the following steps:
Step 1 ![]() Choose Operate > Task Manager.
Choose Operate > Task Manager.
The Task Manager window appears.
Step 2 ![]() Create a new task by selecting Create > TE Full Discovery.
Create a new task by selecting Create > TE Full Discovery.
The Create Task window appears.
Step 3 ![]() Optionally, alter the Name and/or Description fields and click Next.
Optionally, alter the Name and/or Description fields and click Next.
The Select TE Provider window appears.
Step 4 ![]() Select a TE provider and click Next.
Select a TE provider and click Next.
The Select Seed Device window appears. Non-Cisco devices, if any, are excluded from the list.
Step 5 ![]() Select the seed device for discovering the network and click Next.
Select the seed device for discovering the network and click Next.
The Task Schedules window appears.
Step 6 ![]() Create a task schedule in one of two ways:
Create a task schedule in one of two ways:
•![]() Click Now to schedule the task to run immediately, in which case the schedule information is automatically filled into the Task Schedules list.
Click Now to schedule the task to run immediately, in which case the schedule information is automatically filled into the Task Schedules list.
•![]() Click Create to create a scheduler for this task, in which case the Task Schedule window appears.
Click Create to create a scheduler for this task, in which case the Task Schedule window appears.
Step 7 ![]() In the Task Schedule window, make your selections to define when and how often the task should be run.
In the Task Schedule window, make your selections to define when and how often the task should be run.

Note ![]() The default setting is to schedule a single TE Discovery task to take place immediately ("Now").
The default setting is to schedule a single TE Discovery task to take place immediately ("Now").
Step 8 ![]() Click OK.
Click OK.
The scheduled task should now appear in the Task Schedules table.
Step 9 ![]() Click Next.
Click Next.
A summary of the scheduled task appears.
Step 10 ![]() Click Finish.
Click Finish.
This will add the task to the list of created tasks in the Tasks window.
Managing Per Area Discovery
Before running a per area TE discovery, it is helpful to understand how multiple OSPF areas are managed by Prime Fulfillment.
For background information on this topic, see the section Multiple OSPF Areas in the Cisco Prime Fulfillment Theory of Operations Guide 6.1.
This section describes the following:
•![]() Performing a Per Area TE Discovery
Performing a Per Area TE Discovery
•![]() Running a Per Area TE Discovery Through an ABR.
Running a Per Area TE Discovery Through an ABR.
Performing a Per Area TE Discovery
When a TE Discovery is run against an area with a selected TE provider, all tunnels and explicit paths associated with that area will be imported into the Prime Fulfillment database.
To initiate a per area TE discovery, use the following steps:
Step 1 ![]() Create an Provider.
Create an Provider.
Step 2 ![]() Create an Region.
Create an Region.
Step 3 ![]() Create a TE Provider.
Create a TE Provider.
Step 4 ![]() Create a seed device from the Devices window.
Create a seed device from the Devices window.
Step 5 ![]() Choose Operate > Task Manager > Create > TE Full Discovery.
Choose Operate > Task Manager > Create > TE Full Discovery.
Specify a name for the TE Discovery task or accept the default and click Next.
Step 6 ![]() Select a TE Provider and click Next.
Select a TE Provider and click Next.
Step 7 ![]() Select a seed device and click Next.
Select a seed device and click Next.
Step 8 ![]() Select a schedule for the TE Discovery and click Next.
Select a schedule for the TE Discovery and click Next.
Step 9 ![]() Review the summary of the discovery task.
Review the summary of the discovery task.
If it is acceptable, click Finish to start the TE Discovery process.
Running a Per Area TE Discovery Through an ABR
If no area identifier is specified in the TE provider configuration and the seed device is an ABR, TE Discovery will abort with the warning message shown in Figure 36-2 informing you to either specify an area identifier for the TE provider or use a non-ABR device as the seed.
Figure 36-2 TE Discovery Through an ABR with no TE Area Identifier Specified

Verifying a TE Discovery Task
The result of running the TE Discovery task can be assessed in four ways:
•![]() Task Logs—View a summary log of any changes that have occured in the network.
Task Logs—View a summary log of any changes that have occured in the network.
•![]() TE Topology—Display the latest TE Topology from the repository.
TE Topology—Display the latest TE Topology from the repository.
•![]() View Network Element Types—In the Traffic Engineering Management GUI, go to TE Nodes, TE Links, TE Primary Tunnels, and so on to verify the state of specific network element types.
View Network Element Types—In the Traffic Engineering Management GUI, go to TE Nodes, TE Links, TE Primary Tunnels, and so on to verify the state of specific network element types.
•![]() Viewing the state of discovered devices—Go to the Service Requests window to examine whether the state of the discovered devices is as expected.
Viewing the state of discovered devices—Go to the Service Requests window to examine whether the state of the discovered devices is as expected.
Task Logs
The TE Discovery log captures the state of the network and compares it with the most recent snapshot of the repository.
To view the task log for a TE Discovery task, use the following steps:
Step 1 ![]() Choose Operate > Task Logs.
Choose Operate > Task Logs.
The Task Logs window appears.
The status of the task is shown in the Status column. This updates automatically and indicates when the TE Discovery process is complete.
If the task is not completed and Auto Refresh is selected, the table continues to update periodically until it is completed.
Step 2 ![]() To view the log for a particular task, go to Operate > Task Manager, select the desired task, and then click the View Log button.
To view the log for a particular task, go to Operate > Task Manager, select the desired task, and then click the View Log button.
A copy of a TE Discovery log is shown in the following screenshots, starting with Figure 36-3.

Note ![]() To find the summary of changes in the network depicted in the following screenshots, scroll to the bottom of the log.
To find the summary of changes in the network depicted in the following screenshots, scroll to the bottom of the log.
Figure 36-3 TE Discovery Task Log - Devices/Interfaces
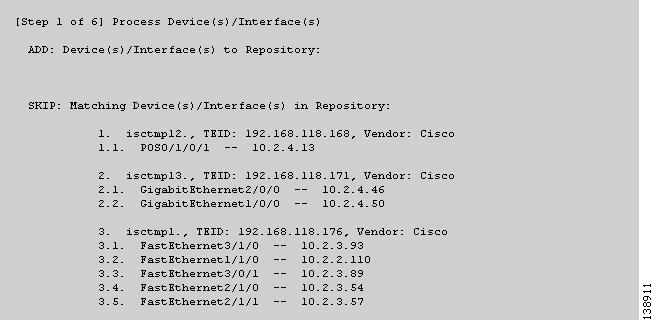
Figure 36-4 TE Discovery Task Log - Links
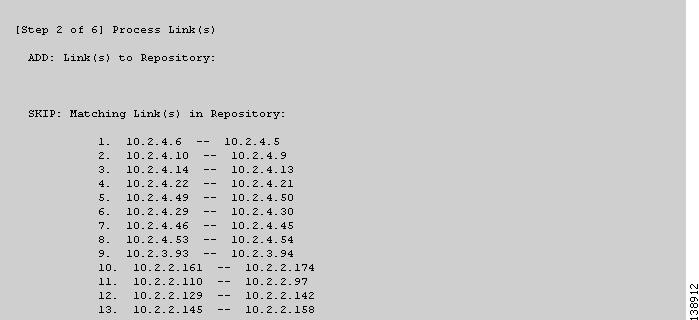
Figure 36-5 TE Discovery Task Log - Explicit Paths

Figure 36-6 TE Discovery Task Log - Primary Tunnels
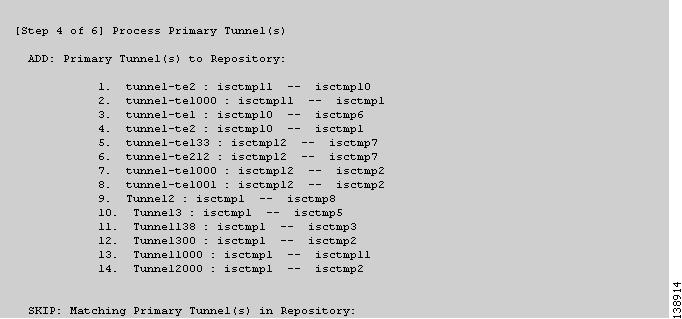
Figure 36-7 TE Discovery Task Log - Backup Tunnels
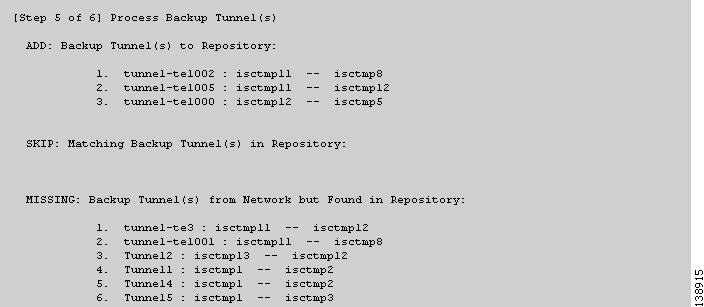
Figure 36-8 TE Discovery Task Log - Static Routes

The TE Discovery task log window is organized into sections that each describes particular events in the TE network:
•![]() either the state of the network as recorded in the repository the first time a TE Discovery task is run
either the state of the network as recorded in the repository the first time a TE Discovery task is run
•![]() or changes in the network since the last time the TE Discovery task was run (repository delta).
or changes in the network since the last time the TE Discovery task was run (repository delta).
The summary of changes in the network is reported in six steps:
1. ![]() Devices/Interfaces (Figure 36-3).
Devices/Interfaces (Figure 36-3).
2. ![]() Links (Figure 36-4).
Links (Figure 36-4).
3. ![]() Explicit paths (Figure 36-5).
Explicit paths (Figure 36-5).
4. ![]() Primary tunnels (Figure 36-6).
Primary tunnels (Figure 36-6).
5. ![]() Backup tunnels (Figure 36-7).
Backup tunnels (Figure 36-7).
6. ![]() Static routes (Figure 36-8).
Static routes (Figure 36-8).
As seen in the figures, in each step a log table reports the changes in the following reporting categories:
•![]() ADD—This section lists those elements that the TE Discovery task added to the repository. At the initial discovery, all elements should be in the ADD section as nothing existed in the repository beforehand. With every subsequent discovery, the ADD section will list elements that have been added to the network since the discovery independent of TEM. Thus, the ADD function is synchronizing the repository with the network by adding these elements.
ADD—This section lists those elements that the TE Discovery task added to the repository. At the initial discovery, all elements should be in the ADD section as nothing existed in the repository beforehand. With every subsequent discovery, the ADD section will list elements that have been added to the network since the discovery independent of TEM. Thus, the ADD function is synchronizing the repository with the network by adding these elements.
•![]() SKIP—This section lists those elements that exist both in the network and in the repository and have all attributes equal. This shows that these elements have not been deleted or modified independently of TEM.
SKIP—This section lists those elements that exist both in the network and in the repository and have all attributes equal. This shows that these elements have not been deleted or modified independently of TEM.
•![]() MISSING—This section lists those elements that exist in the repository but do not exist in the network, implying that they have been deleted independently of TEM. This indicates that more investigation is required to correct the discrepancy.
MISSING—This section lists those elements that exist in the repository but do not exist in the network, implying that they have been deleted independently of TEM. This indicates that more investigation is required to correct the discrepancy.
•![]() MISMATCH—This section lists those elements that exist both in the network and in the repository, but have one or more attributes that are not equal. This implies that these elements have been modified independently of TEM and that you need to investigate and correct the problem.
MISMATCH—This section lists those elements that exist both in the network and in the repository, but have one or more attributes that are not equal. This implies that these elements have been modified independently of TEM and that you need to investigate and correct the problem.
•![]() MODIFY—This section lists any network elements that have had attributes in the repository modified since the previous run of the TE Discovery task to synchronize with the network. These are usually dynamic attributes, such as the time when a tunnel was set up.
MODIFY—This section lists any network elements that have had attributes in the repository modified since the previous run of the TE Discovery task to synchronize with the network. These are usually dynamic attributes, such as the time when a tunnel was set up.
Step 3 ![]() Click Return to Logs to quit the current log with the option to open another log.
Click Return to Logs to quit the current log with the option to open another log.
TE Topology
The TE Topology tool provides a visual snapshot of the current state of the network. It cannot be used to determine changes that have taken place in the network.
The steps required to generate a topology graph of the network are described in Chapter 43, "TE Topology."
View Network Element Types
Another way to check the state of the network after running TE discovery is to go to the Traffic Engineering menu options and select the type of elements you want to verify.
For example, to check the status of the nodes after running TE discovery, choose Traffic Engineering > Nodes. Look at the updated list of TE nodes to assess which nodes are in the network.
Do the same for TE Links, TE Primary Tunnels, TE Backup Tunnels, and so on.
Setting Up Management Interfaces
Before commencing tunnel management operations, you need to set up management interfaces. However, this step is only necessary if the network devices are not accessible by the hostname from the management station.
For a detailed description of how to set up management interfaces on specific devices, see Devices, page 4-1.
MPLS-TE Management Process
The MPLS-TE management process involves the following steps:
1. ![]() Enable MPLS-TE on the network devices and make sure that the IP addresses used as the devices TE IDs are accessible from the management station (this step is not supported by TEM).
Enable MPLS-TE on the network devices and make sure that the IP addresses used as the devices TE IDs are accessible from the management station (this step is not supported by TEM).
2. ![]() Prepare the repository for discovering MPLS-TE network.
Prepare the repository for discovering MPLS-TE network.
3. ![]() Set up management interfaces for the discovered devices or update the server host file with resolution for all discovered devices. Again, this is not needed if the hostnames are already accessible from the management station.
Set up management interfaces for the discovered devices or update the server host file with resolution for all discovered devices. Again, this is not needed if the hostnames are already accessible from the management station.
4. ![]() Discover the MPLS-TE network.
Discover the MPLS-TE network.
You will then be in a position to run the other MPLS-TE functions available in TEM.

Note ![]() When the repository is empty, or when the management IP addresses are not configured for current devices in the TE network, make sure that the router MPLS TE ID can be reached from the management station. In other words, the TE discovery process does not support seed passthrough.
When the repository is empty, or when the management IP addresses are not configured for current devices in the TE network, make sure that the router MPLS TE ID can be reached from the management station. In other words, the TE discovery process does not support seed passthrough.
Configuring Ethernet Links
Only point-to-point links are supported in TEM. POS links are point-to-point by default but otherwise Ethernet links need to be configured as point-to-point.
For IOS, enter the following command:
(config-if)# ip ospf network point-to-point
For IOS XR, enter the following command:
# router ospf <id> area <area identifier> interface <name> network point-to-point
 Feedback