Secure Firewall 1210/20 Threat Defense Getting Started: Firewall Management Center at a Central Headquarters

PDF

Register the firewall with the Firewall Management Center

Updated: February 5, 2026

Overview

Register the firewall with the Firewall Management Center.

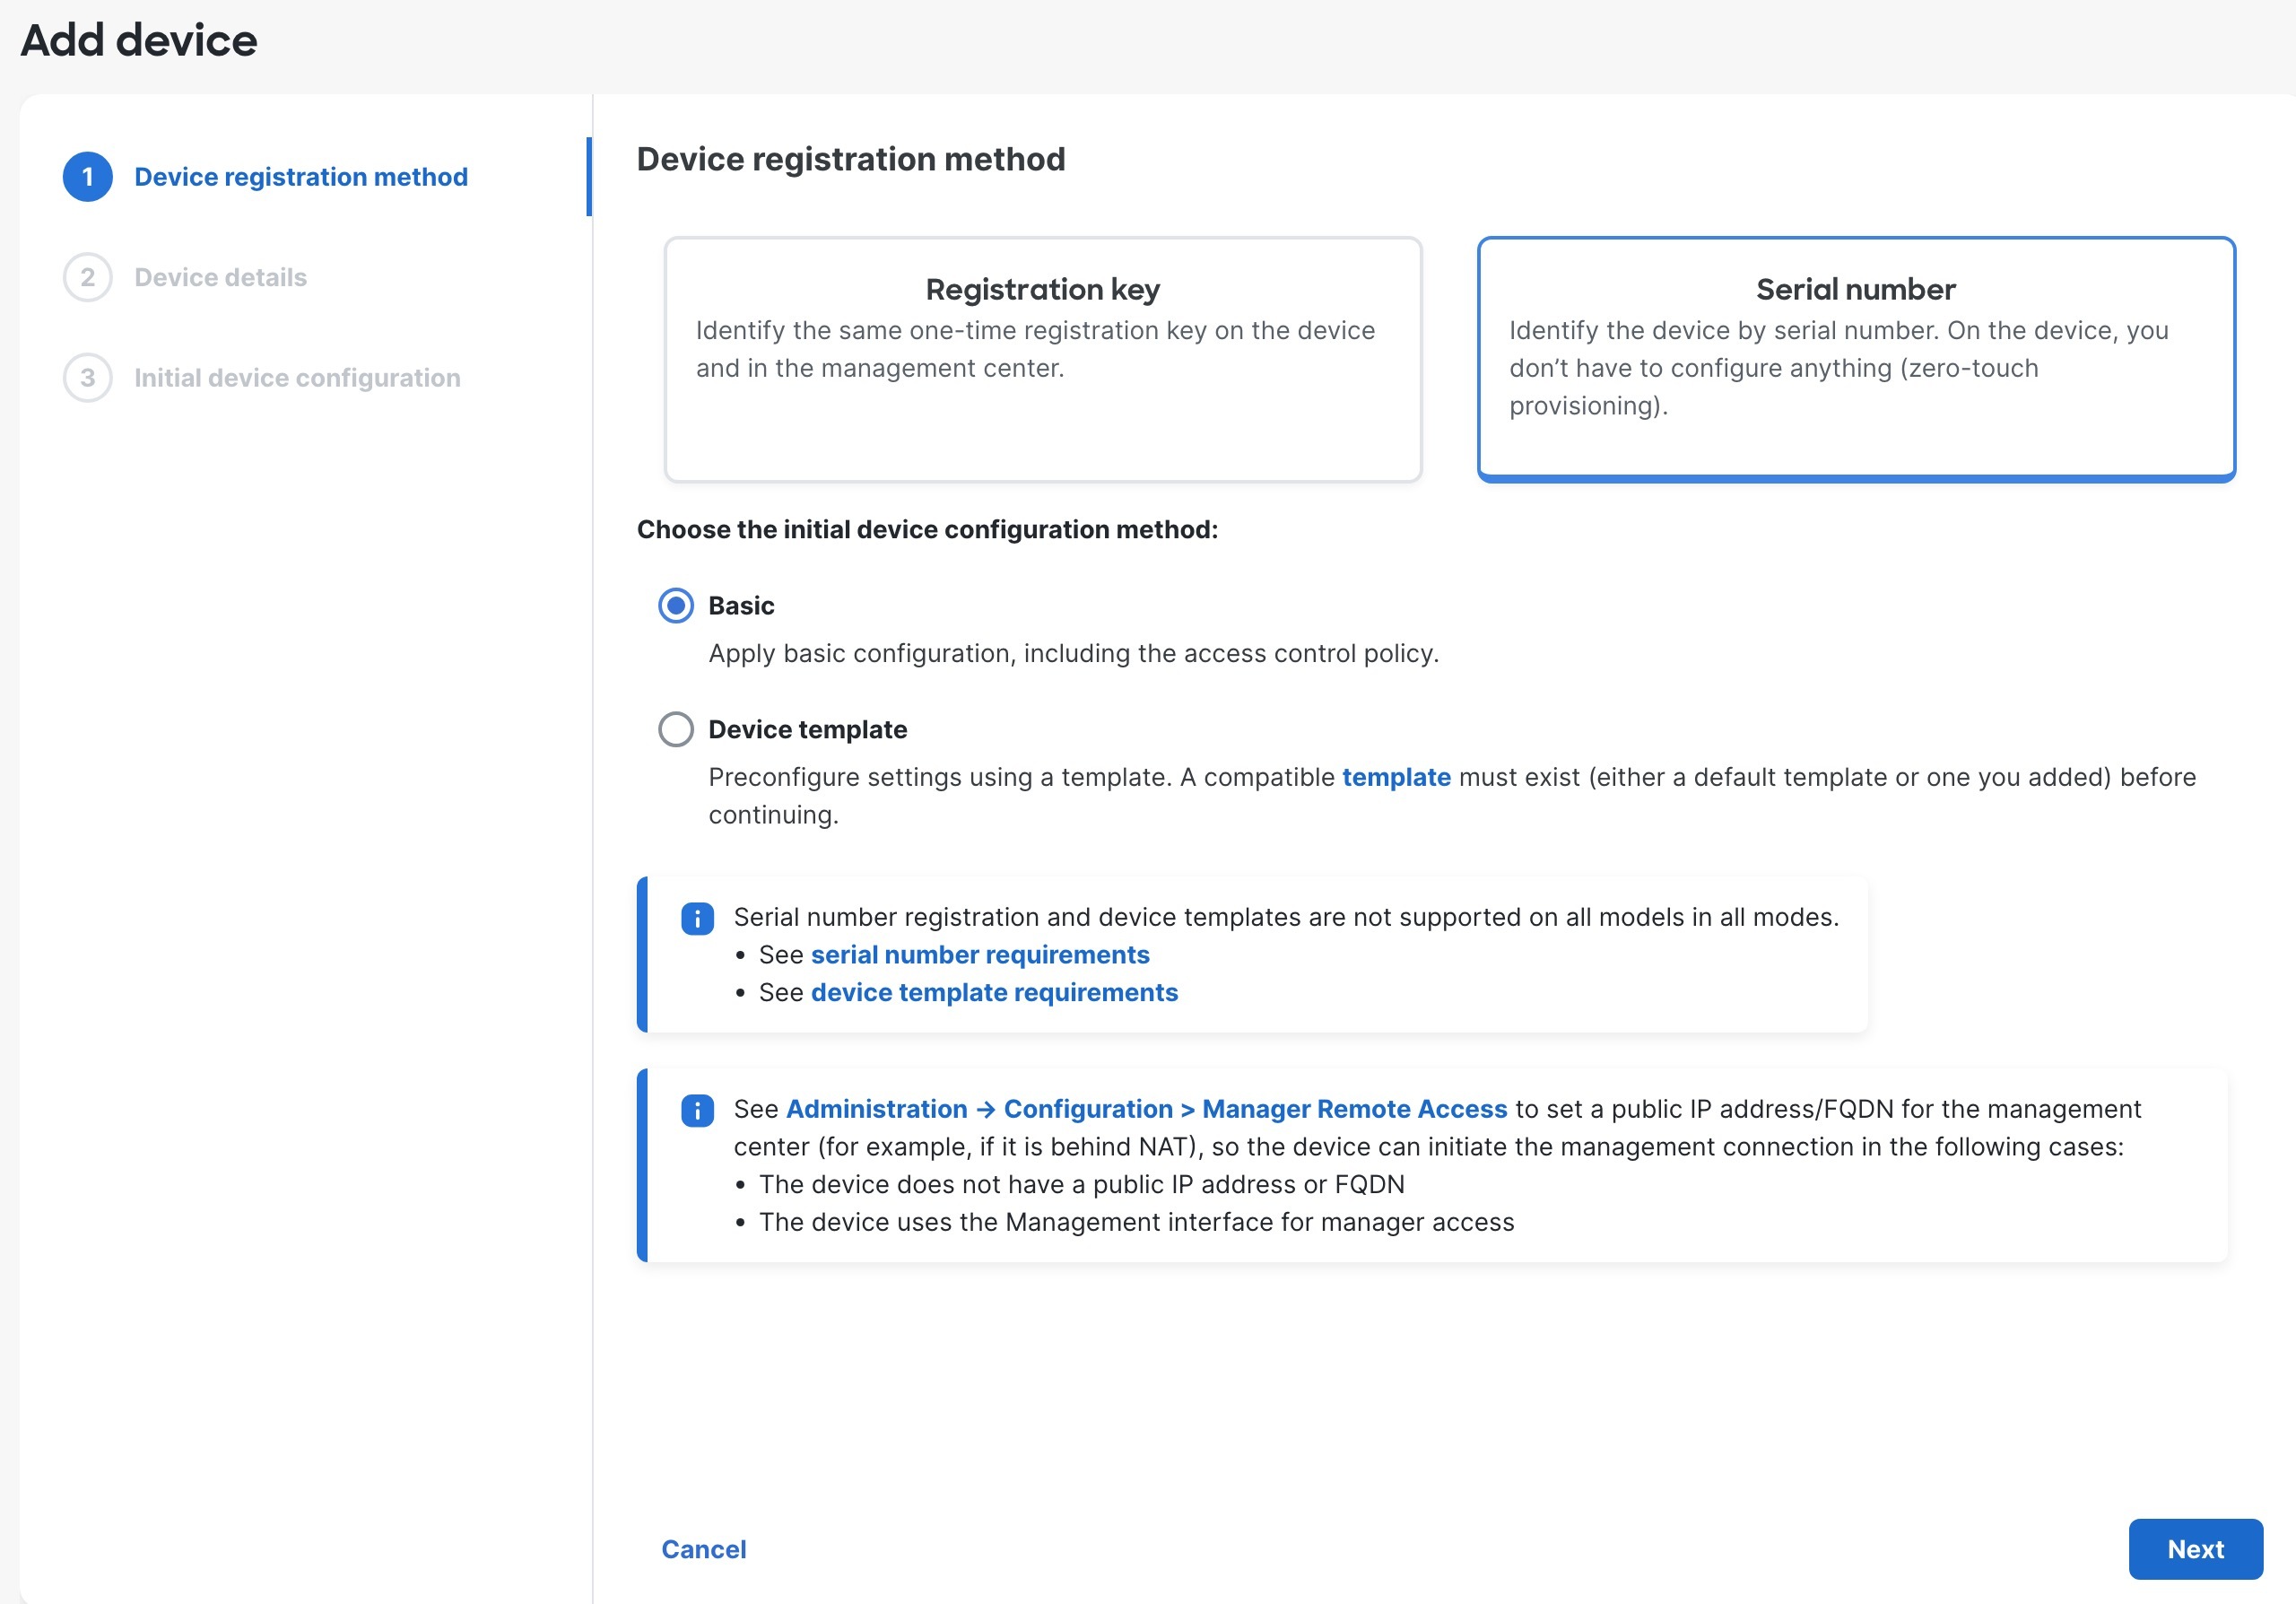
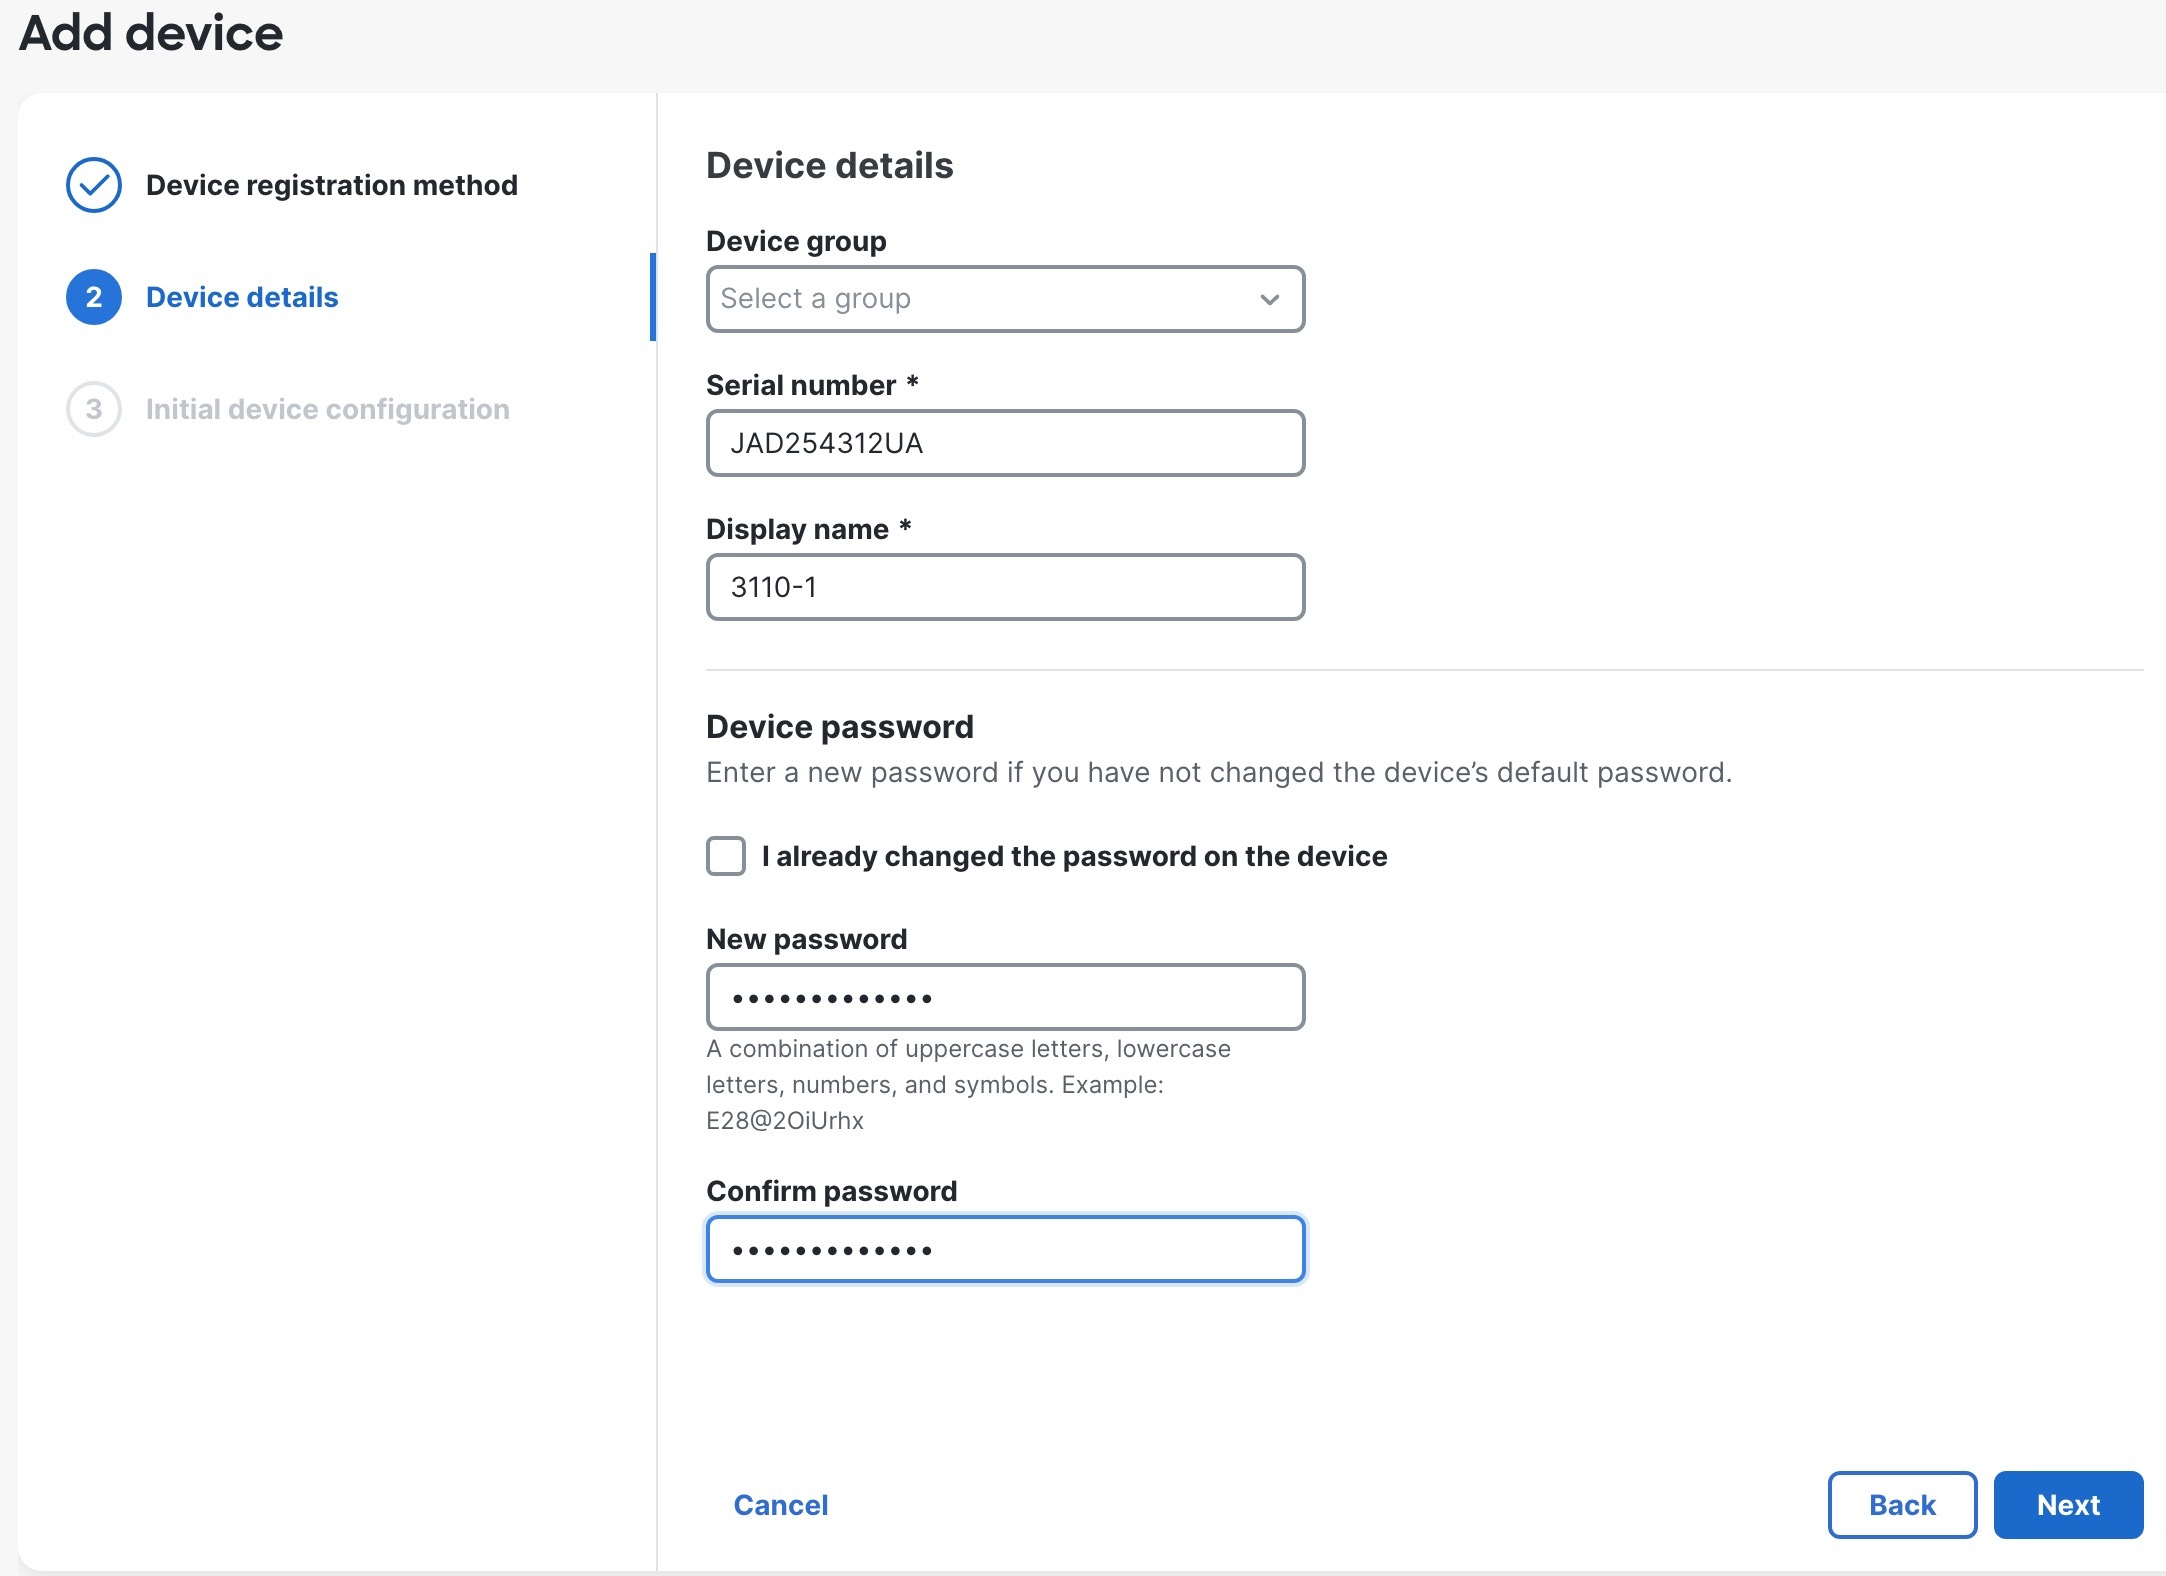
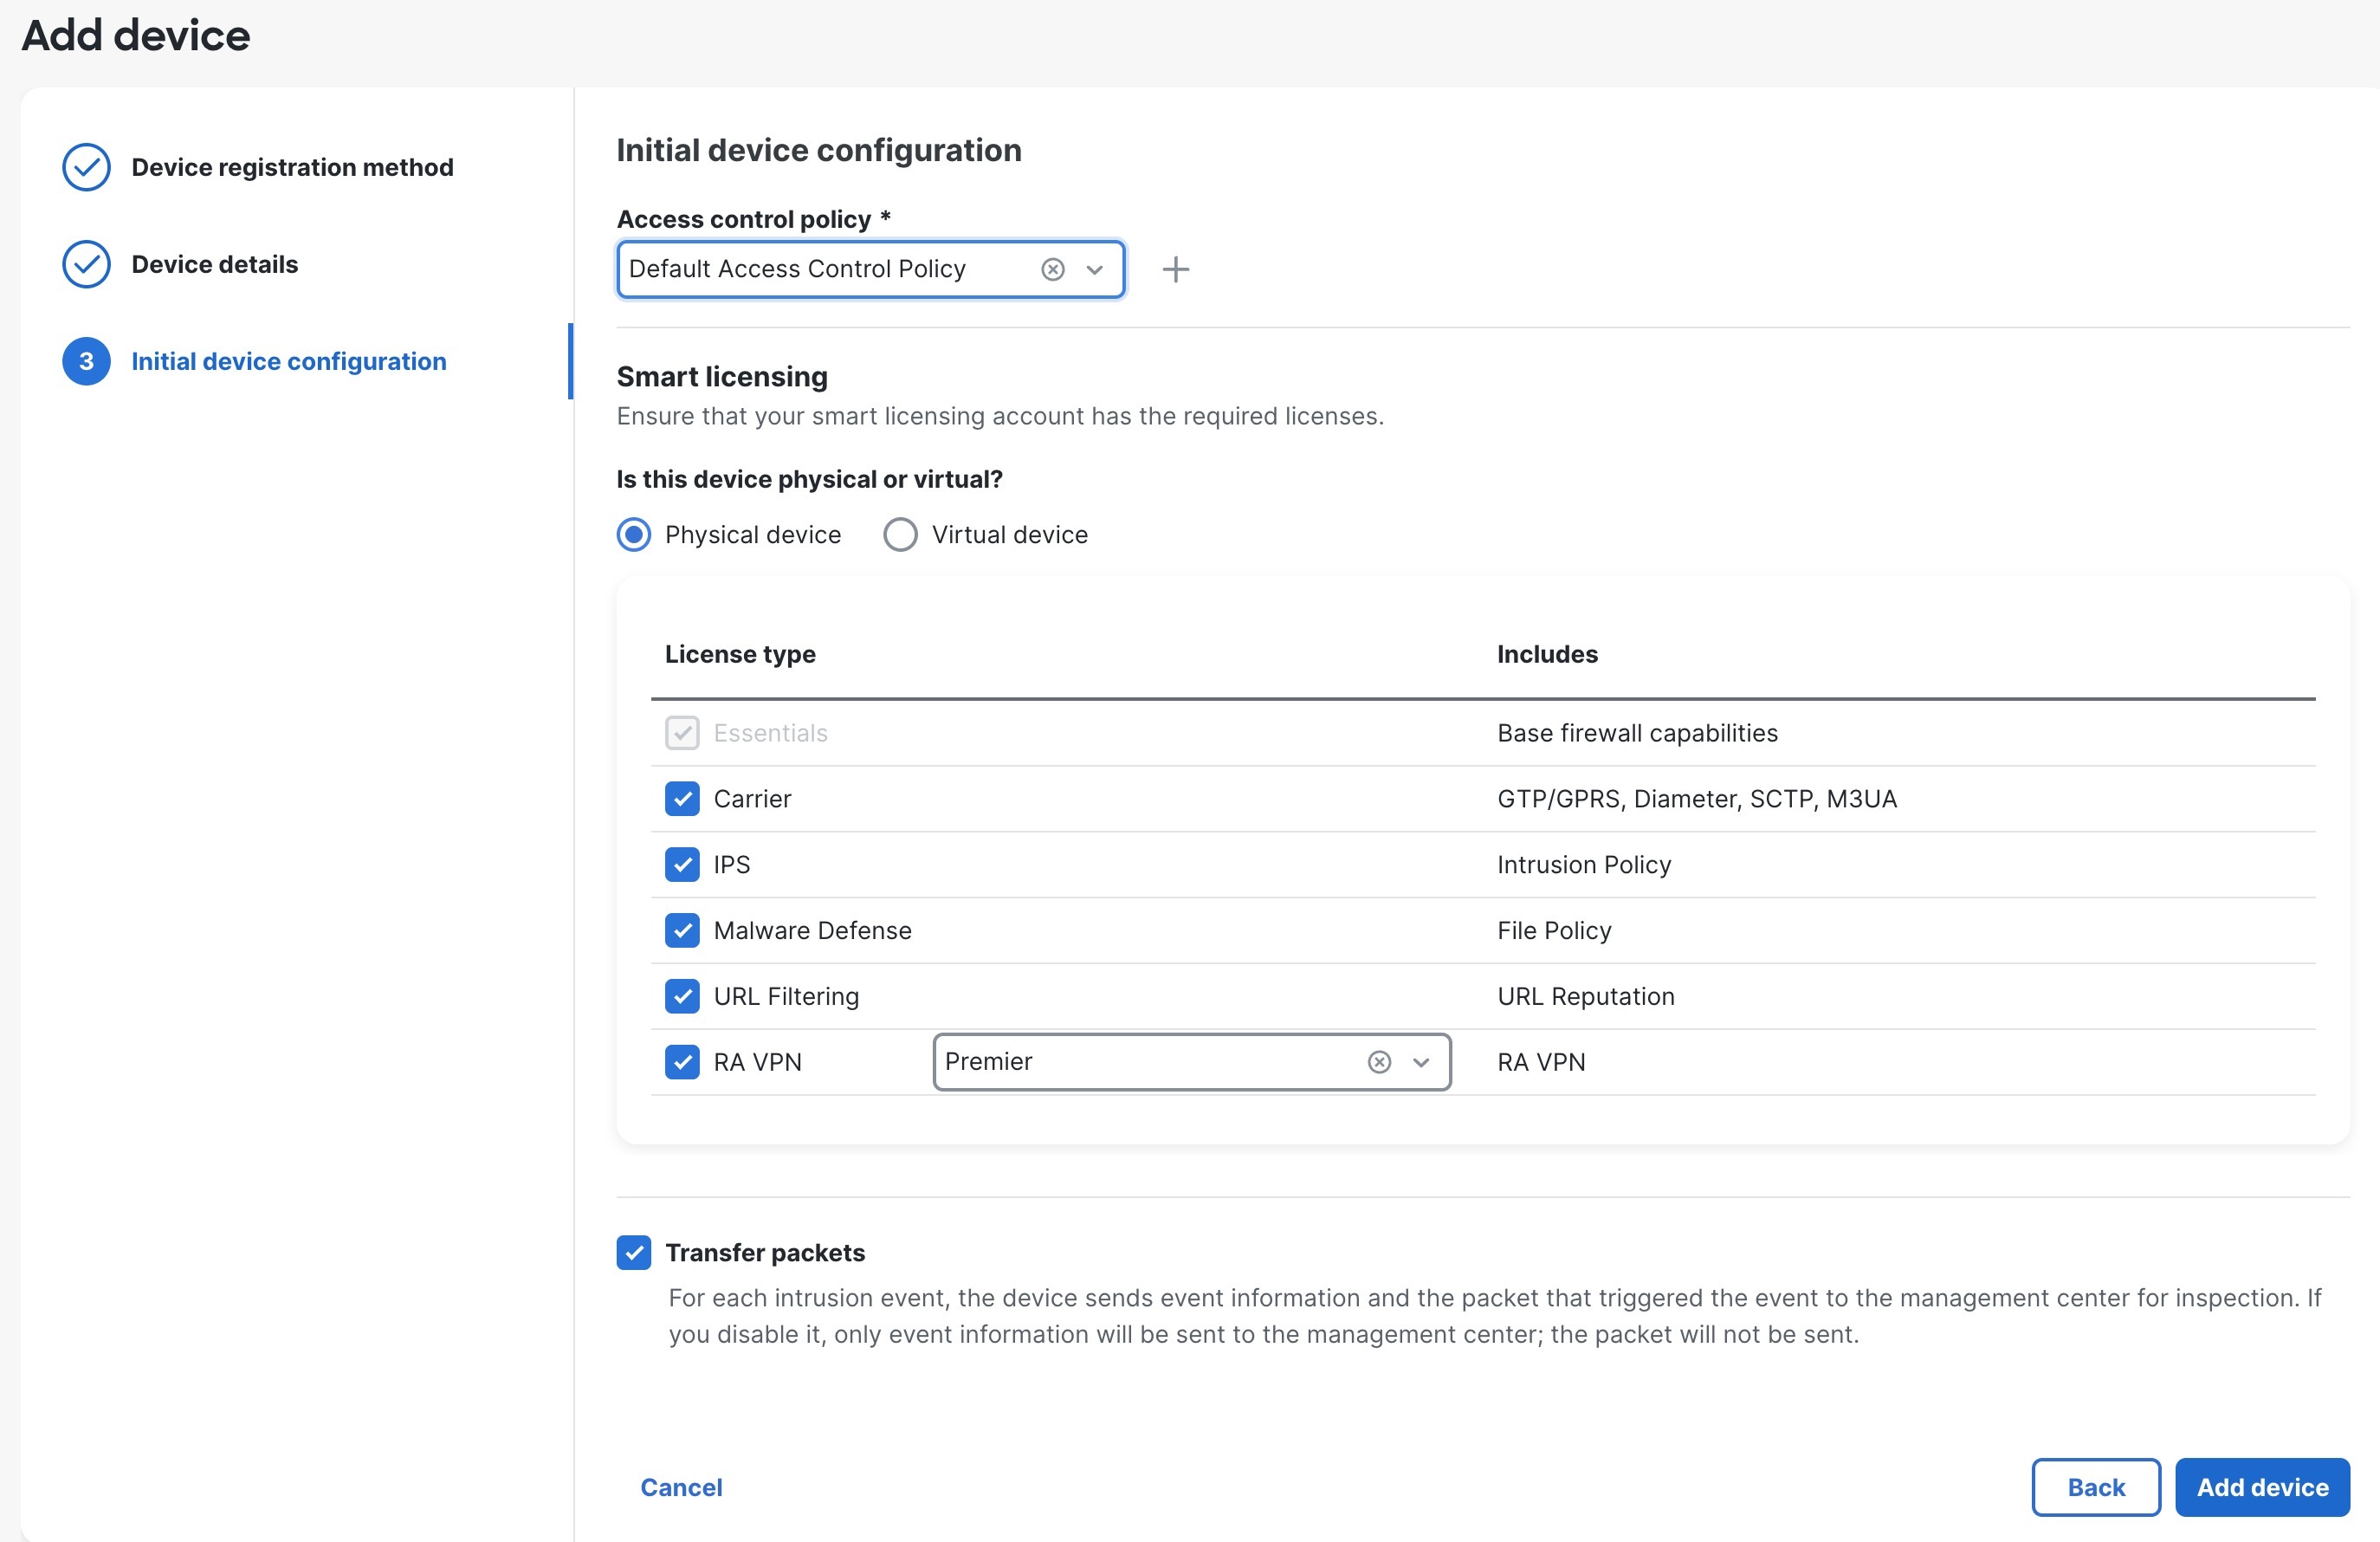
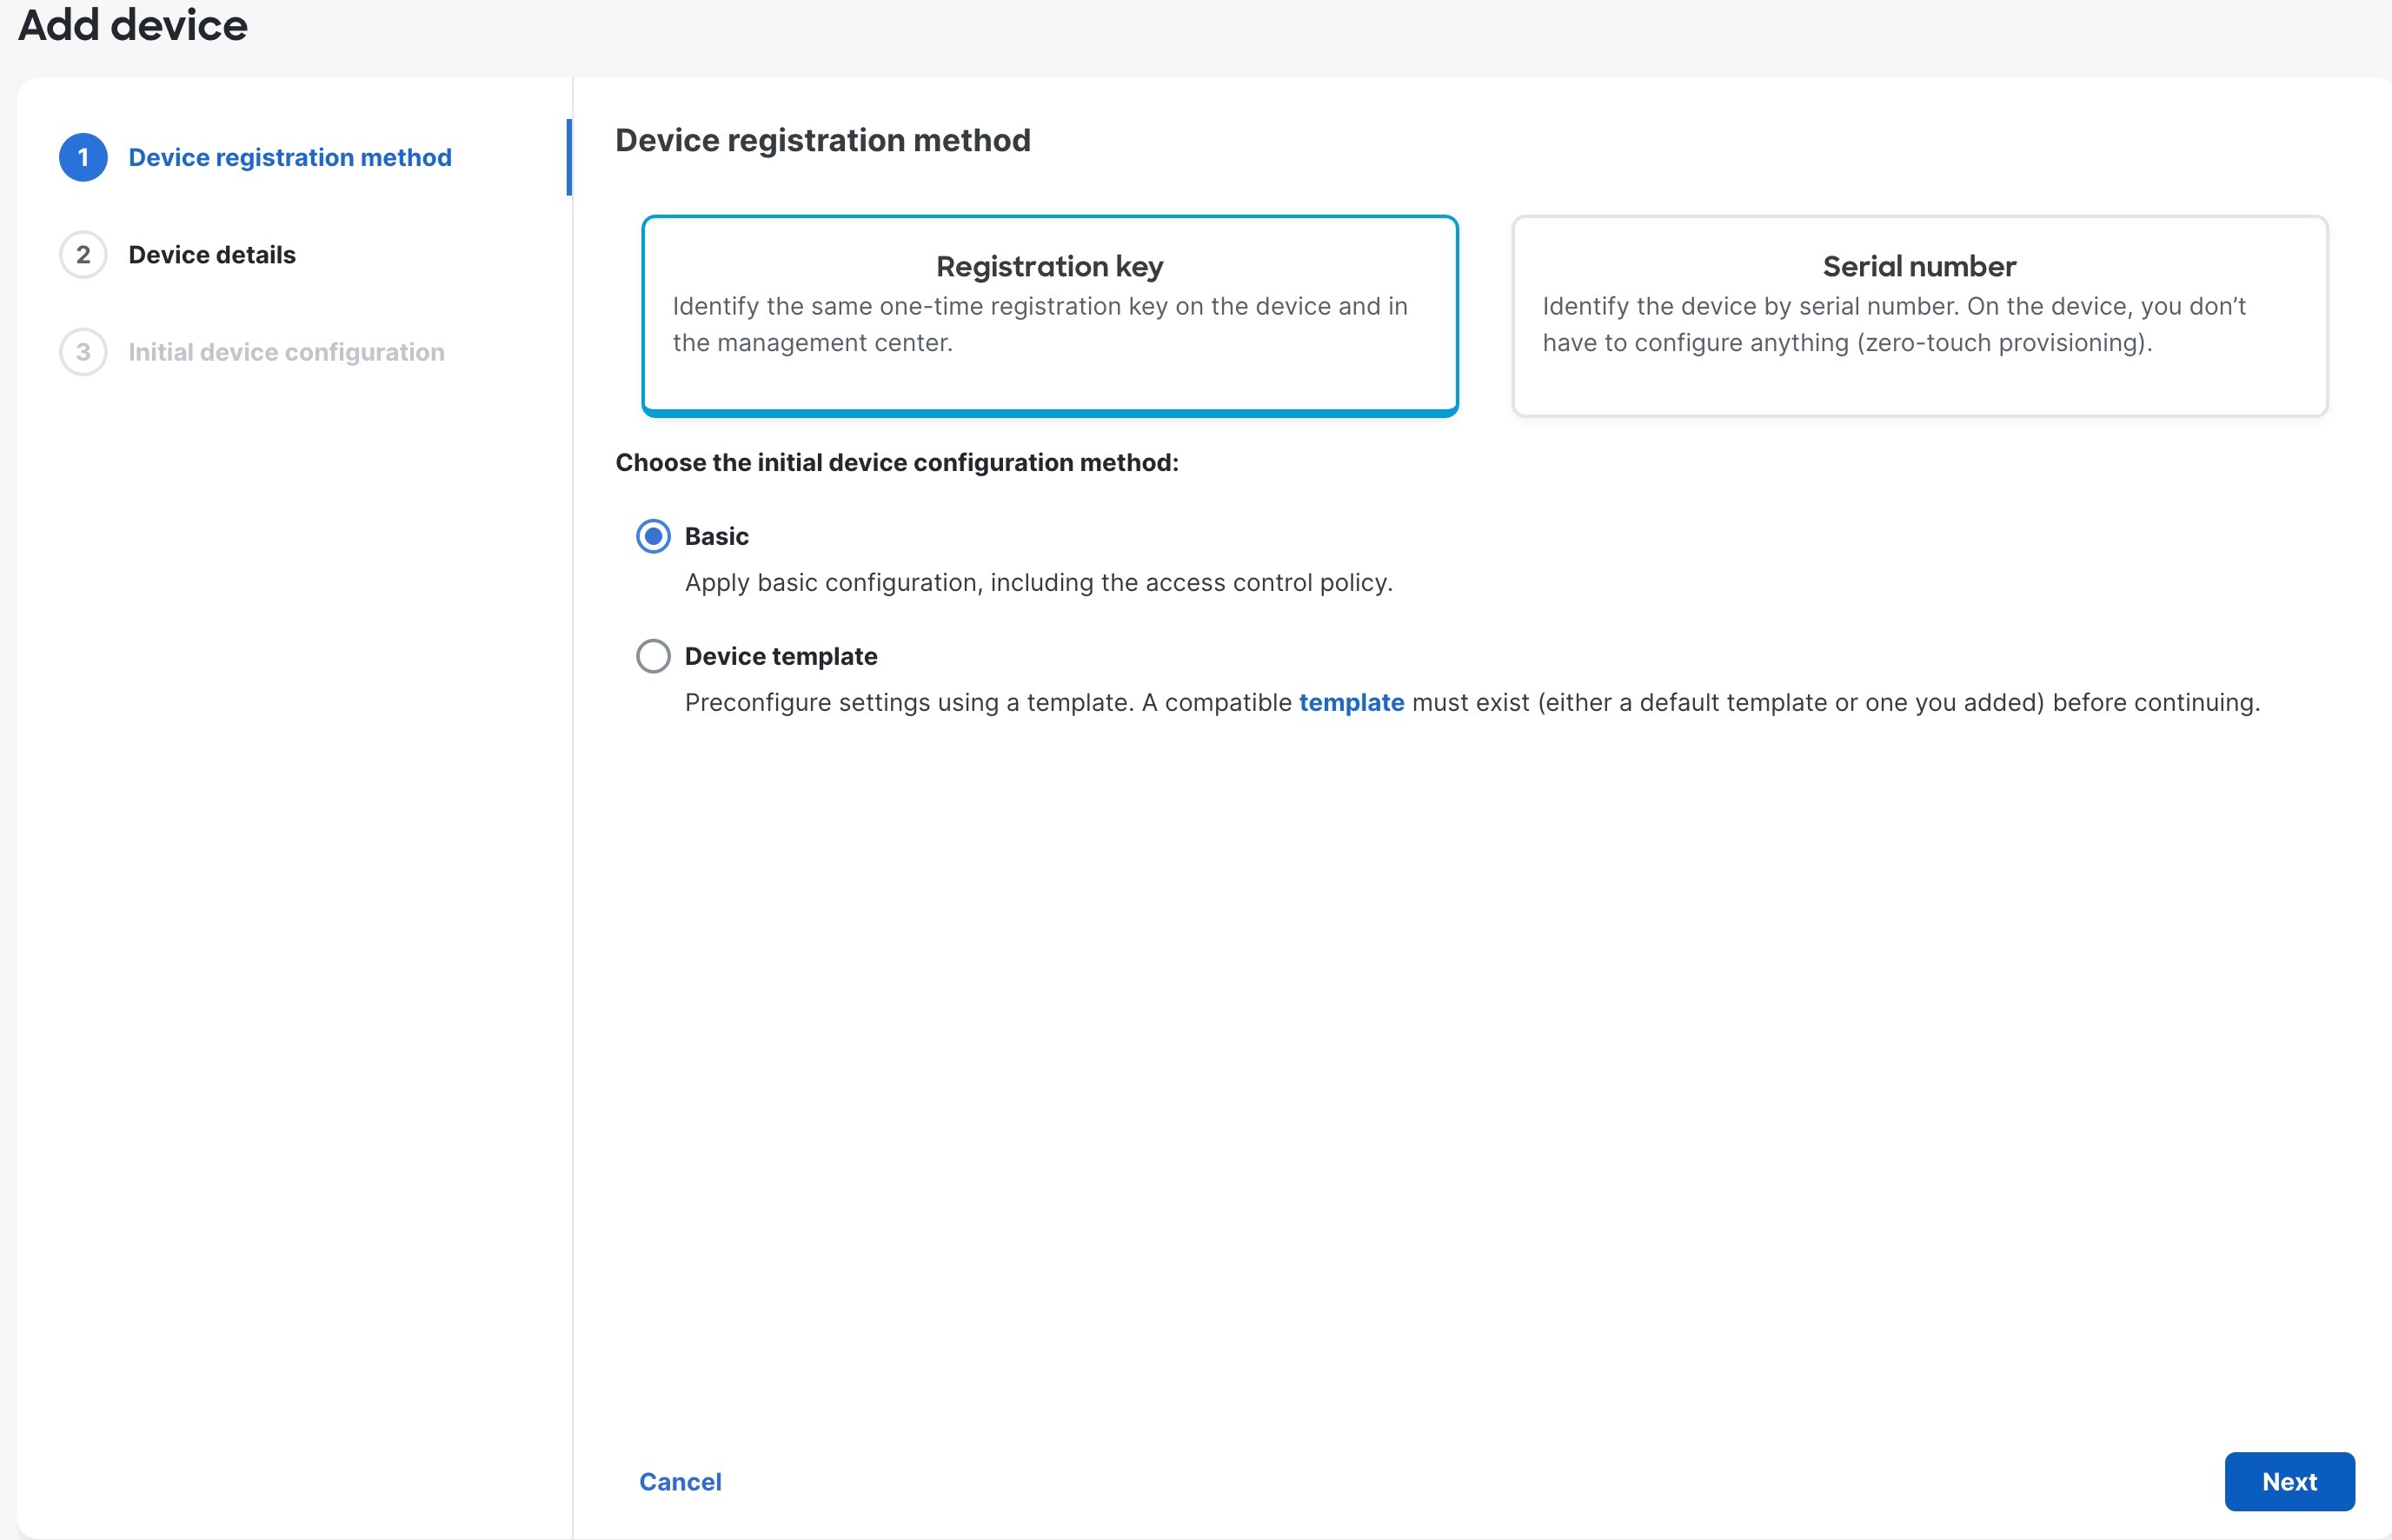
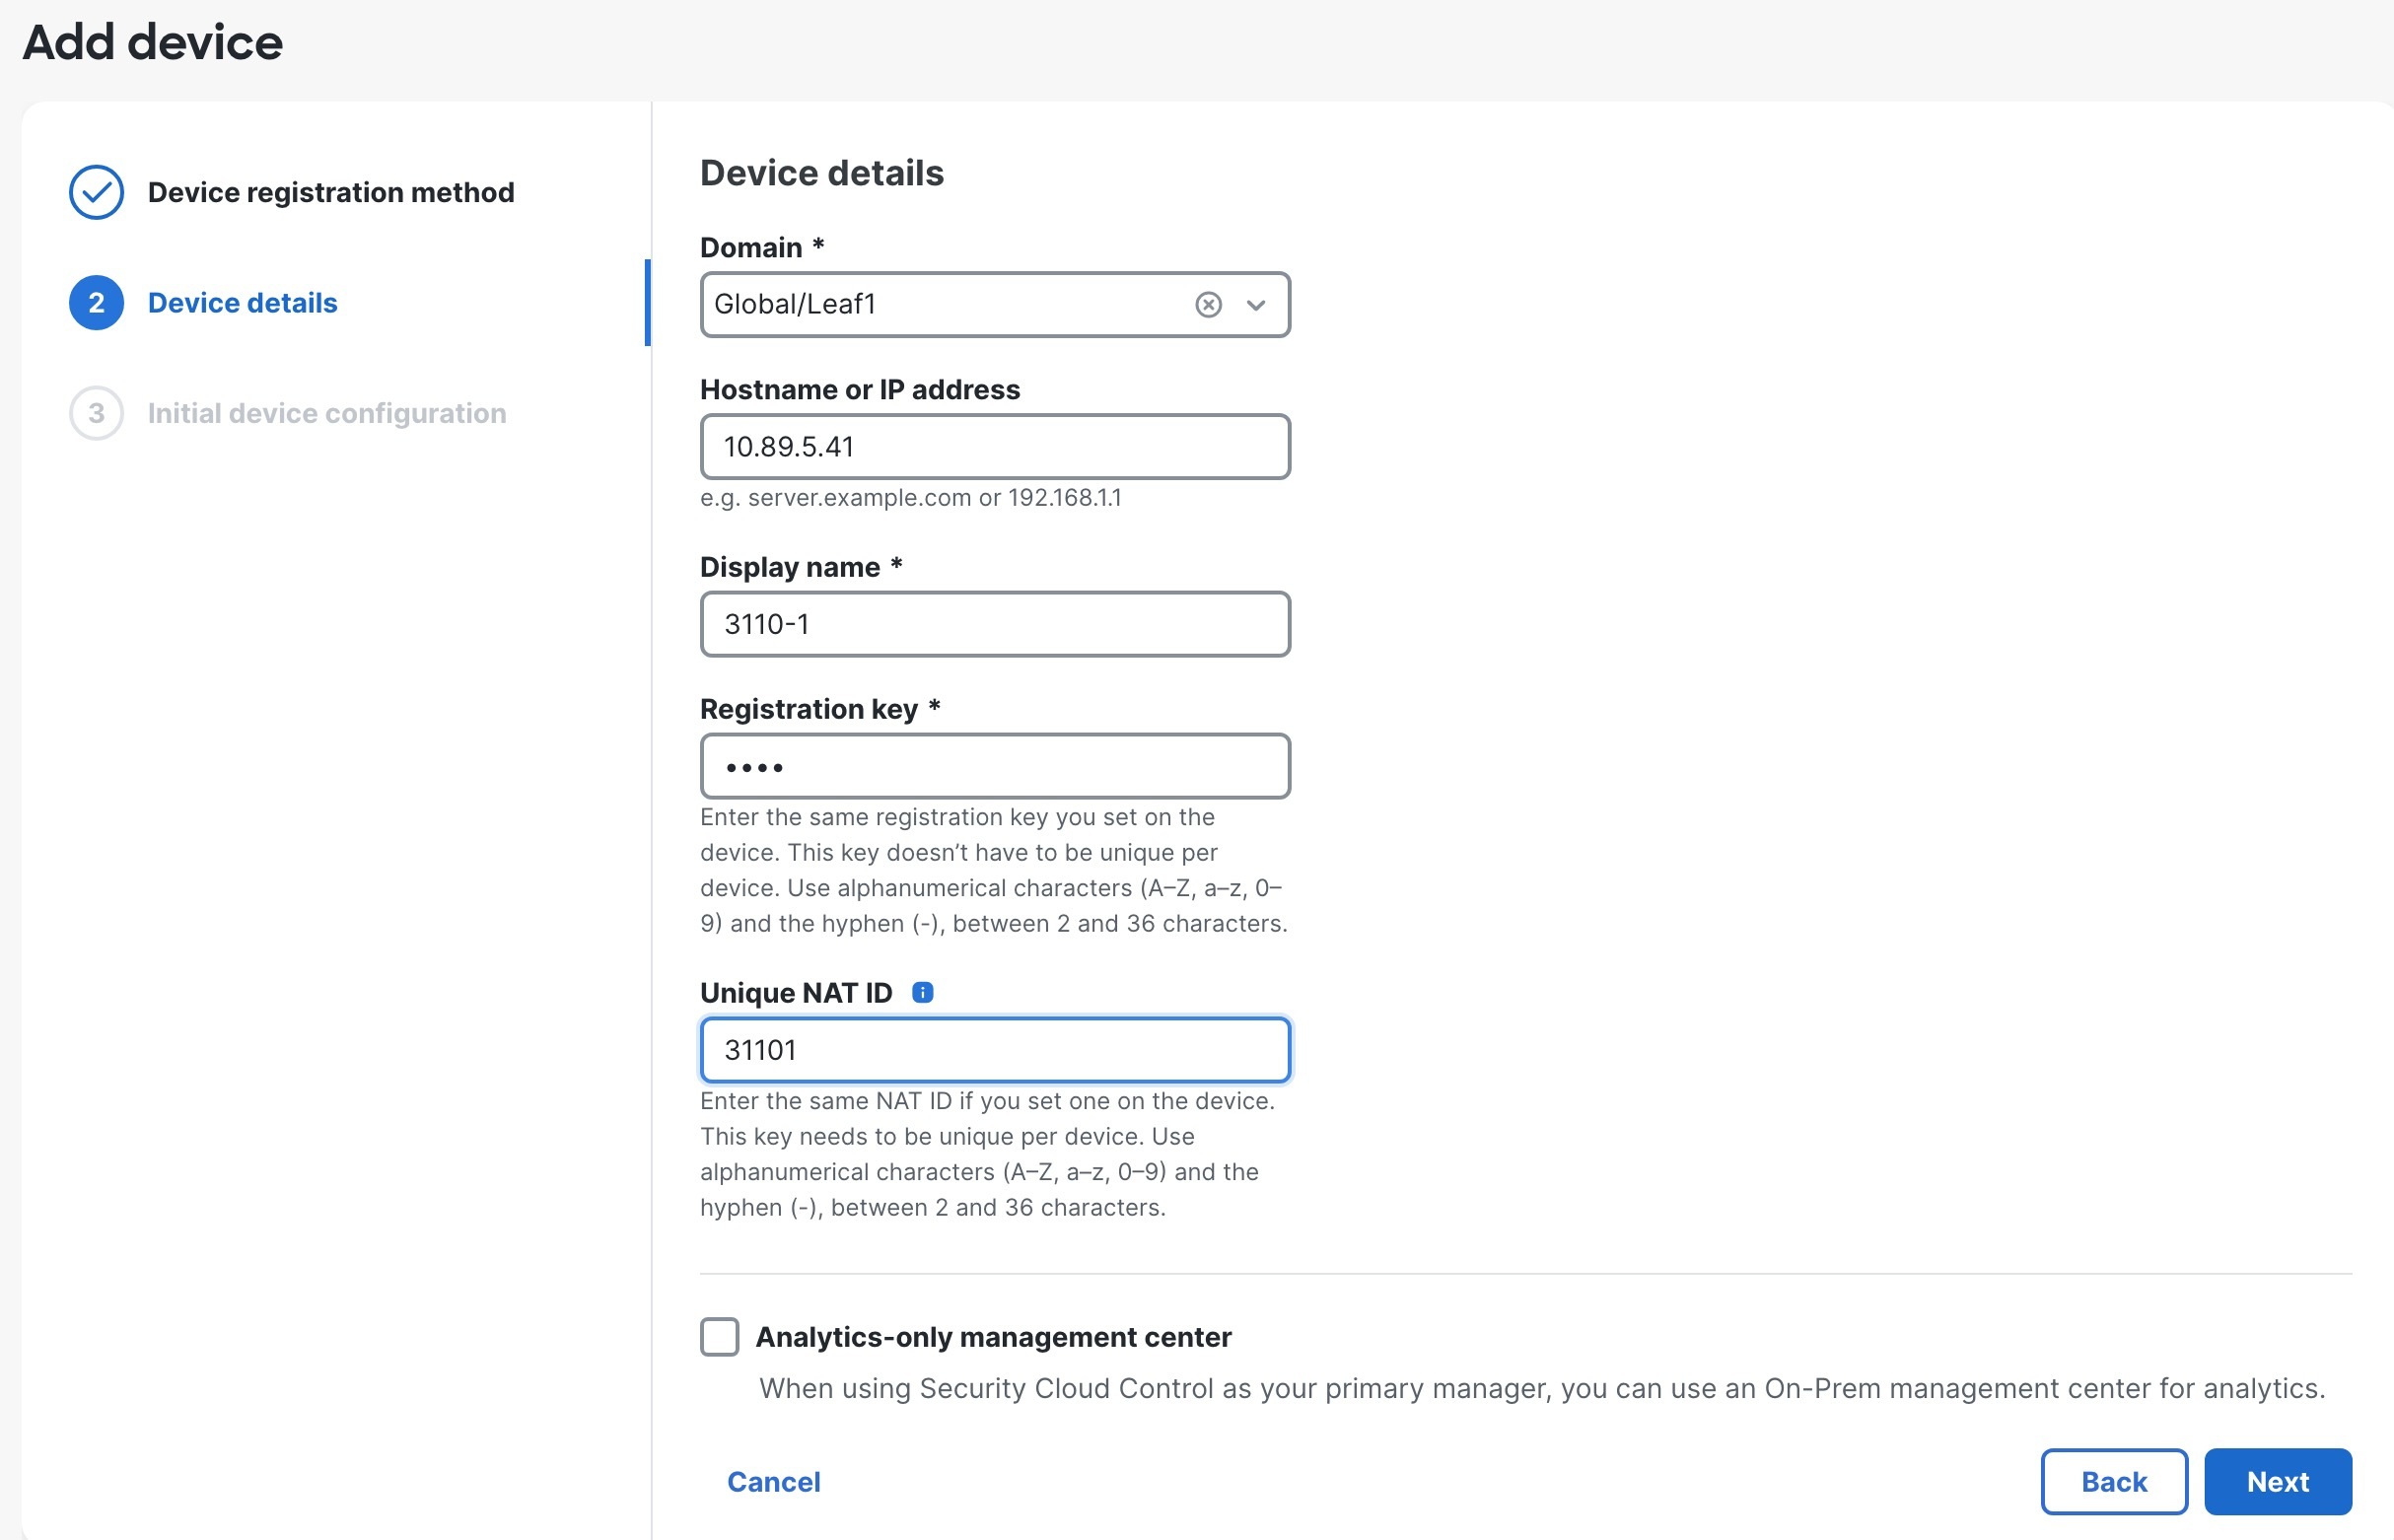
Register the firewall with the Firewall Management Center depending on which deployment method you are using.


Add a firewall using the serial number (zero-touch provisioning)

Zero-Touch Provisioning lets you register devices to the Firewall Management Center by serial number without having to perform any initial setup on the device. The Firewall Management Center integrates with Security Cloud Control for this functionality.

Note

For Firewall Management Center version 7.4, you need to add the device using Security Cloud Control; see the 7.4 guide for more information. The native Firewall Management Center workflow was added in 7.6. Also, for cloud integration in 7.4, see the SecureX Integration page in the Firewall Management Center.

Default Configuration After Registration

When you use zero-touch provisioning, the following interfaces are preconfigured. Note that other settings, such as the DHCP server on inside, access control policy, or security zones, are not configured.

  • Ethernet 1/1—"outside", IP address from DHCP, IPv6 autoconfiguration

  • Ethernet 1/2 (or for the 1210// 1220, the VLAN1 interface)— "inside", 192.168.95.1/24

  • Default route—Obtained through DHCP on the outside interface

Requirements

When you use the outside interface for manager access, it uses DHCP by default. Before you can enable high availability, you need to change the IP address to a static address. Alternatively, you can use the Management interface instead; DHCP is supported on Management with high availability.

Before you begin

  • If the device does not have a public IP address or FQDN, set a public IP address/FQDN for the Firewall Management Center (for example, if it is behind NAT), so the device can initiate the management connection. See Administration > Configuration > Manager Remote Access.

  • DHCP server for either Management or Ethernet 1/1 that provides an IP address and default gateway.

  • Network access to the OpenDNS public DNS servers. IPv4: 208.67.220.220 and 208.67.222.222; IPv6: 2620:119:35::35. DNS servers obtained from DHCP are never used.

    The following names need to be resolved:

    Table 1. FQDNs for zero-touch provisioning

    FQDNs

    *.cisco.com (many FQDNs)

    *.defenseorchestrator.com (many FQDNs)

    *.defenseorchestrator.eu (for the EU, many FQDNs)

    0.sourcefire.pool.ntp.org, 1.sourcefire.pool.ntp.org, 2.sourcefire.pool.ntp.org

    1.200.159.162.in-addr.arpa

    60.19.239.178.in-addr.arpa

    connected.by.freedominter.net

    time.cloudflare.com

    udc.neo4j.org

Procedure

1.

The first time you add a device using a serial number, integrate the Firewall Management Center with Security Cloud Control.

Note

For a Firewall Management Center high-availability pair, you also need to integrate the secondary Firewall Management Center with Security Cloud Control.

  1. Choose Integrations > Security Cloud Control.

  2. Click Enable Security Cloud Control to open a separate browser tab to log you into your Security Cloud Control account and confirm the displayed code.

    Make sure this page is not blocked by a pop-up blocker. If you do not already have a Security Cloud Control account, you can add one during this procedure.

    For detailed information about this integration, see the "System Configuration" chapter in the Cisco Secure Firewall Management Center Administration Guide.

    Security Cloud Control onboards the on-prem Firewall Management Center after you integrate the Firewall Management Center with Security Cloud Control. Security Cloud Control needs the Firewall Management Center in its inventory for zero-touch provisioning to operate. However, you do not need to use Security Cloud Control directly. If you do use Security Cloud Control, its Firewall Management Center support is limited to device onboarding, viewing its managed devices, viewing objects associated with the Firewall Management Center, and cross-launching the Firewall Management Center.

  3. Make sure Enable Zero-Touch Provisioning is checked.

  4. Click Save.

2.

Obtain your device's serial number.

The device includes two serial numbers: the chassis serial number and the PCB (circuit board) serial number. Either serial number should work.

  • If you have the shipping box, you can see the chassis serial number on the label.

  • The chassis serial number is on the compliance label on the back.

  • The PCB serial number is on a label on the chassis called "S/N."

  • You can view the serial numbers using the following CLI commands:

    • FXOS—show chassis detail shows both serial numbers.

    • Firewall Threat Defenseshow inventory shows the chassis serial number. show serial-number shows the PCB serial number.

3.

Check your LEDs to make sure the firewall is ready for registration.

Table 2. Zero-Touch Provisioning: Managed (M) LED behavior

M LED

Description

Time after firewall powered on (minutes:seconds)

Slow flashing green

Connected to the Cisco cloud and ready for onboarding

15:00 - 30:00

Alternating green and amber

(error condition)

Failed to connect to the Cisco cloud

15:00 - 30:00

Solid green

Onboarded

20:00 - 45:00

4.

Choose Devices > Device Management.

5.

From the Add drop-down menu, choose Device.

6.

Click Serial Number, click Basic, and then click Next.

Figure 1. Device Registration Method
Device Registration Method
7.

Configure the device details and click Next.

Figure 2. Device Details
Domain
  • Domain—In a multidomain environment, choose the leaf domain.

  • Device group—In a single domain environment, add the device to a Device group.

  • Serial number—Enter the IP address or the hostname of the device you want to add. Leave this field blank if you don't know the device IP address (for example, it's behind NAT).

  • Display name—Enter a name for the device as you want it to display in the Firewall Management Center. You cannot change this name later.

  • Device password—If this device is unconfigured or a fresh install, then you need to set a New Password and confirm the password.

    Check I already changed the password on the device only if you already logged in and changed the password. Otherwise, registration will fail.

8.

Configure the initial device configuration.

Figure 3. Initial Device Configuration
Initial Device Configuration
  • Access control policy—Choose an initial policy to deploy to the device at registration, or create a new policy. Unless you already have a customized policy you know you need to use, choose Add (add icon), and choose Block all traffic. You can change this later to allow traffic.

  • Smart licensing—Choose your licenses.

    • Is this device physical or virtual?—Choose Physical device

    • License type—Check each license type to assign to the device.

    You can also apply licenses after you add the device.

  • Transfer packets—Enable this option so that for each intrusion event, the device transfers the packet to the Firewall Management Center for inspection.

    For each intrusion event, the device sends event information and the packet that triggered the event to the Firewall Management Center for inspection. If you disable it, only event information will be sent to the Firewall Management Center; the packet will not be sent.

9.

Click Add device.

It may take up to two minutes for the Firewall Management Center to verify the device’s heartbeat and establish communication.

When using zero-touch provisioning on the outside interface, Security Cloud Control acts as a DDNS provider and does the following:

  • Enables DDNS on outside using the FMC Only method. This method is only supported for zero-touch provisioning devices.

  • Maps the outside IP address with the following hostname: serial-number.local.

  • Provides the IP address/hostname mapping to the Firewall Management Center so it can resolve the hostname to the correct IP address.

  • Informs the Firewall Management Center if the IP address ever changes, for example, if the DHCP lease renews.

If you use zero-touch provisioning on the Management interface, DDNS is not supported. The Firewall Management Center must be publicly reachable so the device can initiate the management connection.

You can continue to use Security Cloud Control as the DDNS provider, or you can later change the DDNS configuration in the Firewall Management Center to a different method.


Add a firewall using manual provisioning

Register the firewall to the Firewall Management Center manually using the device IP address or hostname and a registration key.

Procedure

1.

Log into the Firewall Management Center.

  1. Enter the following URL.

    https://fmc_ip_address

  2. Enter your username and password.

  3. Click Log In.

2.

Choose Devices > Device Management.

3.

From the Add drop-down menu, choose Device.

4.

Click Registration Key, click Basic, and then click Next.

Figure 1. Device Registration Method
Device Registration Method
5.

Configure the device details and click Next.

Figure 2. Device Details
Domain
  • Domain—In a multidomain environment, choose the leaf domain.

  • Device group—In a single domain environment, add the device to a Device group.

  • Hostname or IP address—Enter the IP address or the hostname of the device you want to add. Leave this field blank if you don't know the device IP address (for example, it's behind NAT).

  • Display name—Enter a name for the device as you want it to display in the Firewall Management Center. You cannot change this name later.

  • Registration key—Enter the same registration key from your initial configuration.

  • Unique NAT ID—Enter the same ID from your initial configuration.

  • Analytics-only management centerLeave this unchecked.

6.

Configure the initial device configuration.

Figure 3. Initial Device Configuration
Initial Device Configuration
  • Access control policy—Choose an initial policy to deploy to the device at registration, or create a new policy. Unless you already have a customized policy you know you need to use, choose Add (add icon), and choose Block all traffic. You can change this later to allow traffic.

  • Smart licensing—Choose your licenses.

    • Is this device physical or virtual?—Choose Physical device

    • License type—Check each license type to assign to the device.

    You can also apply licenses after you add the device.

  • Transfer packets—Enable this option so that for each intrusion event, the device transfers the packet to the Firewall Management Center for inspection.

    For each intrusion event, the device sends event information and the packet that triggered the event to the Firewall Management Center for inspection. If you disable it, only event information will be sent to the Firewall Management Center; the packet will not be sent.

7.

Click Add device.

It may take up to two minutes for the Firewall Management Center to verify the device’s heartbeat and establish communication. If the registration succeeds, the device is added to the list. If it fails, you will see an error message. If the device fails to register, check the following items:

  • Ping—Access the device CLI, and ping the Firewall Management Center IP address using the following command:

    ping system ip_address

    If the ping is not successful, check your network settings using the show network command. If you need to change the device IP address, use the configure network {ipv4 | ipv6} manual command.

  • Registration key, NAT ID, and Firewall Management Center IP address—Make sure you are using the same registration key, and if used, NAT ID, on both devices. You can set the registration key and NAT ID on the device using the configure manager add command.

For more troubleshooting information, see https://cisco.com/go/fmc-reg-error.