How to replace a fan in run time.
All fan and power supply modules must have the same airflow direction or else an error can occur with the switch overheating and shutting down. You can determine the airflow direction of a fan module by the color of the stripe on the front of the module. If the fan module has a red stripe for port-side intake airflow, the power supplies must have red coloring for the same airflow direction. To avoid over heating the switch, make sure that the fan modules are positioned this way:
-
For port-side intake airflow with red coloring, position the fans in a cold aisle.
-
For port-side exhaust airflow with blue coloring, position the fans in a cold aisle.
Before you begin
Before you can replace a fan module, ensure that
-
there are three functioning fan modules in the other fan slots. In order to replace a fan module during operations, there must be two fan modules circulating air in the chassis at all times. The other fan module is redundant and can be replaced, and
-
the replacement fan module must have the same airflow direction as the other modules in the chassis.
If you must replace the fan module during operations and the above conditions are not met, leave the fan module that you need to replace in the chassis to preserve the designed airflow until you have the required module.
Procedure
|
1. |
Remove the fan module that you need to replace.
-
Press the two colored sides of the fan module handle towards each other and pull the handle to slide the module out of the chassis.
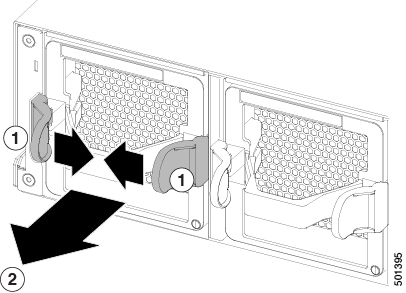
| 1 |
Press inward on both colored slides of the handle. |
2 |
While holding the sides inward, pull on the handle to remove the module from the chassis. |
-
Place the removed module on an antistatic surface or in an antistatic bag. If possible, repack the module in its packing materials for safe shipping or storage.
-
As you press the latches, pull the fan module fully out of the chassis.
-
Place the removed module on an antistatic surface or in an antistatic bag. If possible, repack the module in its packing materials for safe shipping or storage.
|
|
2. |
Use these steps to replace the missing fan module within two minutes to avoid a shutdown.
-
Remove the replacement fan module from its packing materials and place it on an antistatic surface.
Hold the module by its handle and do not touch the electrical connectors on its backside. Also, to protect the electrical connectors, avoid letting them come in contact with anything other than the electrical connectors inside the chassis.
-
Verify that you have the right fan module for the chassis. The correct fan module has one of these part numbers:
Note
Be sure that the airflow direction of the new fan module matches the airflow direction of the other fan and AC power supply modules already installed in the chassis. Port-side intake airflow is indicated with red coloring, and port-side exhaust airflow is indicated with blue coloring. Power supplies with dual-direction airflow (airflow direction is set by the fan modules) have white coloring.
-
Position the fan module in front of the open fan slot (be sure that the backside of the module with the electrical connectors is positioned to enter the slot first) and slide the module all the way into the chassis until its front side comes in contact with the chassis. For the last 0.2 inches (0.5 cm), carefully mount the module onto the chassis connectors by pushing more firmly, but do not force the module if it does not move further (excessive force can damage the connectors).
Note
If you are not able to push the module all the way into the slot, carefully slide the module out of the slot and check its electrical connectors for damage. If damaged, contact Cisco Technical Assistance for help. If undamaged, repeat this step to reinstall the module.
-
Verify that the STS LED turns on and becomes green.
If the STS LED does not turn on, slide the module out of the chassis, and visually check the electrical connectors on the back side of the chassis for damage. If damaged, contact Cisco Technical Assistance for help. If undamaged, repeat the previous step to reinstall the module.
|