Migrate On-Premises Firewall Management Center Managed Secure Firewall Threat Defense to Cloud-delivered Firewall Management Center

Firewall Threat Defense migration to Cloud-Delivered Firewall Management Center

Firewall Threat Defense migration to Cloud-Delivered Firewall Management Center is a feature that

  • enables organizations to move device management from on-premises infrastructure to Cisco's cloud-based management through Security Cloud Control Firewall Management,

  • migrates Firewall Threat Defense devices from On-Premises Firewall Management Center to Cloud-Delivered Firewall Management Center, and

  • preserves existing policies, objects, and configurations during the migration process.

Customer benefits

This migration provides these benefits:

  • Preserves existing policies and configuration

  • Imports device-specific configuration, including interfaces, routing, and related settings

  • Handles duplicate policy and object names according to defined conflict-resolution rules

  • Transfers feature licenses automatically

  • Supports high availability pairs and clusters

  • Provides 14-day evaluation window before permanent commit

  • Allows analytics to remain on-prem or move to cloud

  • Provides an intuitive troubleshooting page with status summaries and step‑by‑step progress to pinpoint issues.

  • Provides migration reports for validation and audit

The user roles of the On-Premises Firewall Management Center are no longer applicable in Security Cloud Control Firewall Management after migration. Your authorization to perform tasks on the migrated device is based on your user role in Security Cloud Control Firewall Management. See the Users topic to understand the On-Premises Firewall Management Center Center and Cloud-Delivered Firewall Management Center user role mapping.

Evaluation period and manager changes

An evaluation period is a migration assessment phase that

  • provides 14 days to test and assess migration changes using Security Cloud Control

  • allows you to undo changes and continue managing the device with On-Premises Firewall Management Center or commit migration changes manually, and

  • automatically commits changes after the evaluation period expires if no manual action is taken.

Evaluation period phases

The evaluation period consists of three distinct phases with specific capabilities and restrictions.

After successful migration, you have these options:

  • Evaluate configuration for 14 days.

  • Undo the changes and continue managing the device with On-Premises Firewall Management Center.

  • Commit migration changes to Cloud-Delivered Firewall Management Center.

During the evaluation window, these restrictions apply:

  • High availability break may not be supported (depending on onboarding method).

  • Advanced high availability or cluster operations can cause commit failure. Commit before changing HA or cluster configuration.

  • Deleting devices is not allowed.

  • Changes made in Cloud-Delivered Firewall Management Center are lost, if reverted.

  • Do not create or modify domains or subdomains on the On-Premises Firewall Management Center if the domain change includes a Firewall Threat Defense device that was migrated to Security Cloud Control. Commit the migration changes in Security Cloud Control, or revert device management to the on-premises On-Premises Firewall Management Center, before you make domain changes that include the migrated device.

If you create or modify a domain before the migration job is committed, deployment of the device and domain configuration can fail. You can continue to create or modify domains on the On-Premises Firewall Management Center for devices that remain managed by that On-Premises Firewall Management Center and are not part of an uncommitted migration job.

After the evaluation period expires, these conditions apply:

  • Changes are automatically committed.

  • Selected commit actions cannot be revoked.ß

How Firewall Threat Defense licenses are handled during migration

Firewall Threat Defense license handling during migration is a process that

  • transfers all feature licenses associated with the device to Security Cloud Control and releases them from the Firewall Management Center to the Smart License pool

  • enables the device to reclaim device-specific licenses during its registration with Security Cloud Control, and

  • does not require device-specific licenses if devices remain in the Firewall Management Center for analytics only.

License handling details

You need not apply license on the device again after migration, as the license reclamation process occurs automatically during registration.

End-to-end Firewall Threat Defense migration workflow

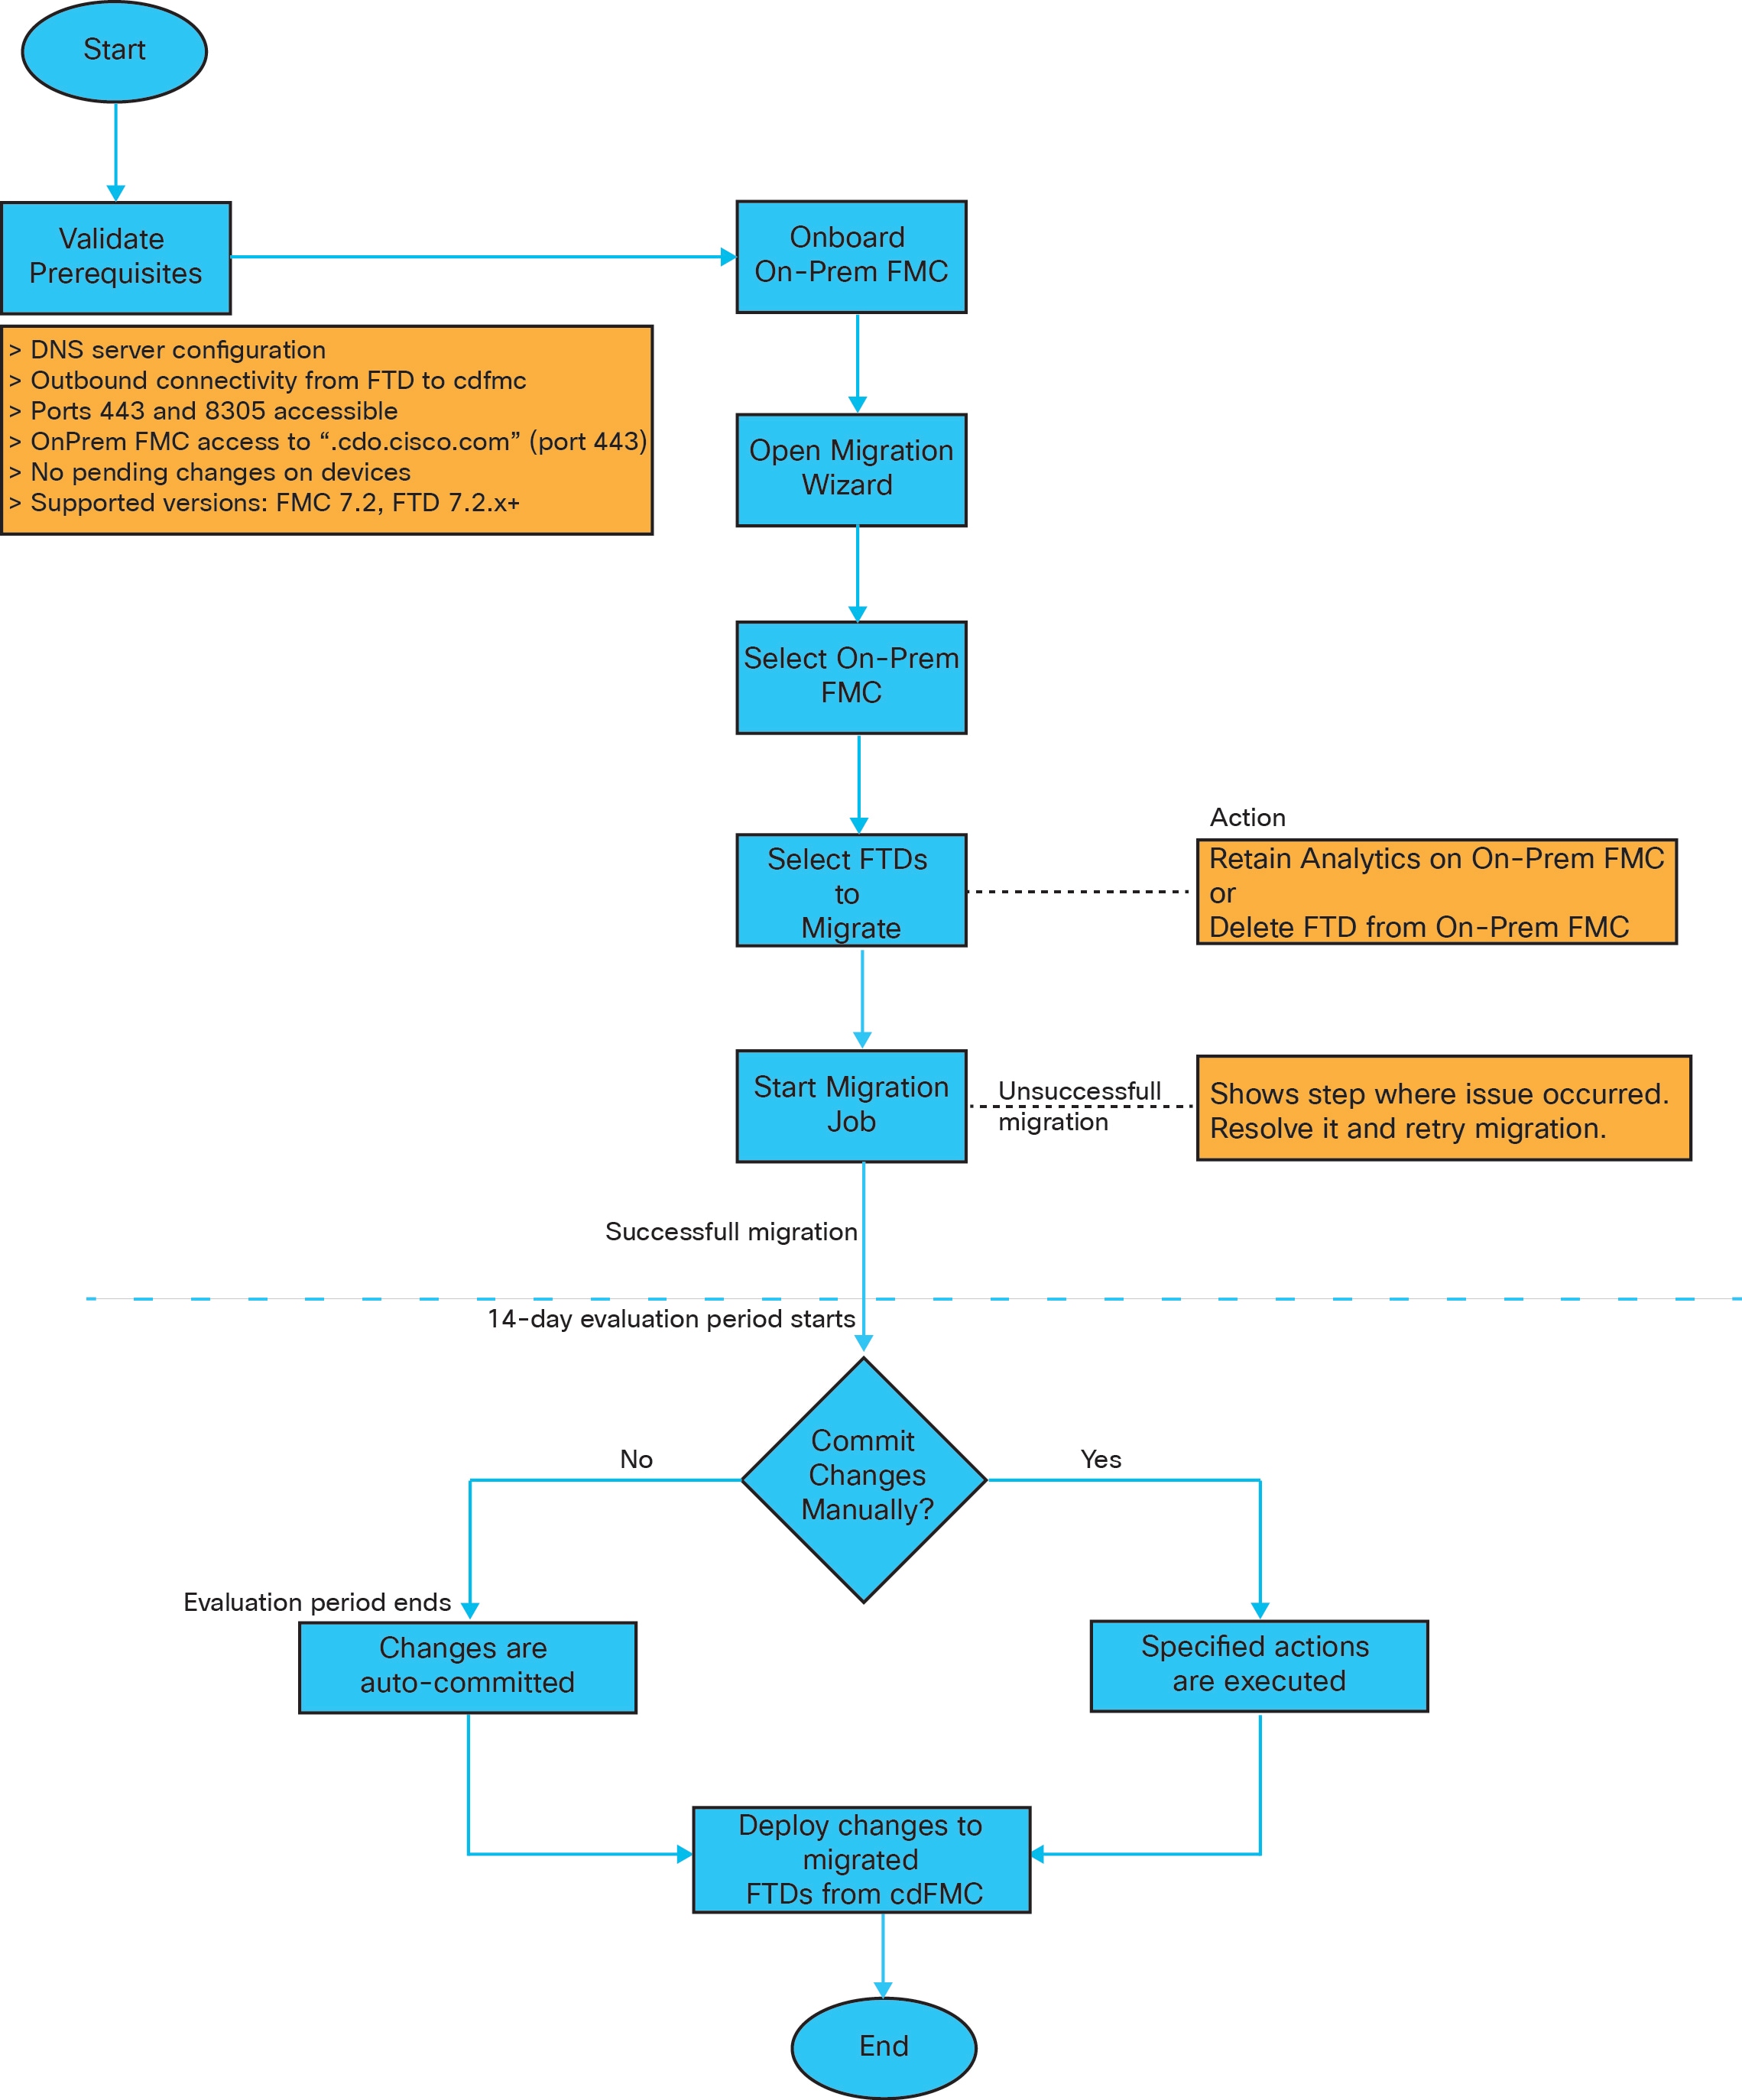
The following flowchart illustrates the high-level workflow for migrating Firewall Threat Defense to Security Cloud Control.

End-to-end workflow diagram for migrating FTD to cdFMC

How Firewall Threat Defense migration to Cloud-Delivered Firewall Management Center works

Summary

The key components involved in the Firewall Threat Defense migration to Cloud-Delivered Firewall Management Center are:

  • Security Cloud Control Firewall Management: Performs the migration sequence and manages the process workflow

  • On-Premises Firewall Management Center: Source management center that exports configurations and manages analytics

  • Firewall Threat Defense devices: Target devices to be migrated and managed

  • Security Cloud Control: Cloud management platform that imports configurations and manages migrated devices

Workflow

The Firewall Threat Defense migration to Cloud-Delivered Firewall Management Center involves these stages:

  1. Check readiness Confirm that the On-Premises Firewall Management Center and Firewall Threat Defense versions are supported, the On-Premises Firewall Management Center is onboarded with no pending changes, and the required DNS and outbound access are available, including TCP ports 443 and 8305.
  2. Connect the source FMC Onboard the On-Premises Firewall Management Center to Security Cloud Control, then open the migration wizard.
  3. Choose devices and actions Select the source On-Premises Firewall Management Center and Firewall Threat Defense devices to migrate. Choose whether to retain analytics on the On-Premises Firewall Management Center or delete the Firewall Threat Defenses from that On-Premises Firewall Management Center.
  4. Start migration. The On-Premises Firewall Management Center exports the supported configuration. Security Cloud Control imports the network and remote-access VPN policies and objects, registers the Firewall Threat Defenses, and imports site-to-site VPN policies.
  5. Resolve migration failures. If migration fails, address the issue reported at the failed step and retry the migration.
  6. Evaluate the migration. After a successful migration, review the configuration during the 14-day evaluation period.
  7. Commit the changes. Commit manually to execute the selected actions, or allow the changes to be committed automatically when the evaluation period ends.
  8. Deploy and manage devices. Deploy the intended changes to the migrated Firewall Threat Defenses from Security Cloud Control. After migration, Security Cloud Control manages device configuration; analytics are handled by the On-Premises Firewall Management Center in analytics-only mode or by Security Cloud Control, depending on the selected actions.

Result

After migration:

  • Security Cloud Control manages devices and their configuration.

  • Events and analytics can be handled by either the On-Premises Firewall Management Center (analytics-only mode) or Security Cloud Control.

  • Migrated devices appear on the Security Cloud Control Security Devices page.

Event and Analytics Management options during Firewall Threat Defense migration

Event and Analytics Management options during Firewall Threat Defense migration are configuration choices that

  • determine where device events and analytics are sent during the migration process

  • allow selection between retaining analytics on the On-Premises Firewall Management Center or transferring to Security Cloud Control Firewall Management, and

  • vary by device model and analytics destination requirements.

Analytics destination options

The events and analytics management can be retained in the On-Premises Firewall Management Center or transferred to Security Cloud Control Firewall Management, where the devices must be configured to send events to Security Cloud Control Firewall Management.

While initiating the migration process, you are allowed to choose the manager where the device events must be sent for analytics:

  • Retain analytics on the On-Premises Firewall Management Center

    Cloud-Delivered Firewall Management Center manages configuration. Source On-Premises Firewall Management Center remains connected in analytics-only mode and receives events.

  • Transfer analytics to Security Cloud Control Firewall Management

    Cloud-Delivered Firewall Management Center manages configuration and analytics. The device sends events to Cisco cloud analytics through SSE or SEC.

Choose an analytics destination for each selected device. Configuration management moves to Cloud-Delivered Firewall Management Center in either case

Special requirement for FMC 1000/2500/4500

If you are migrating from an On-Premises Firewall Management Center 1000/2500/4500, you cannot retain analytics on the On-Premises Firewall Management Center due to limited availability.

In this case, devices must send events to:

  • Security Analytics and Logging (On-Prem), or

  • Security Analytics and Logging (SaaS).

See Cisco Security Analytics and Logging.

If you retain On-Premises Firewall Management Center for analytics

  • Security Cloud Control Firewall Management becomes the configuration manager.

  • The devices remain on the On-Premises Firewall Management Center in analytics-only mode.

  • Devices continue sending events to the On-Premises Firewall Management Center.

  • Security Cloud Control Firewall Management manages configuration changes only.


Note


The maximum number of supported Secure Firewall Threat Defense devices in Cloud-Delivered Firewall Management Center includes devices that are deployed for analytics on Firewall Management Center and onboarded to Cloud-Delivered Firewall Management Center for management. These devices count toward the platform device capacity limit and must be included in your capacity planning to ensure proper sizing and performance.


If you select Security Cloud Control Firewall Management for analytics

  • Secure Firewall Management Center becomes both:

    • Configuration manager, and

    • Analytics manager.

  • The devices are removed from the On-Premises Firewall Management Center.

  • You must configure the devices to send events to the Cisco cloud.

  • Events can be sent using:

    • Security Services Exchange (SSE), or

    • Secure Event Connector (SEC)

  • Events are processed by Cisco Secure Analytics and Logging (SAL) in the cloud.


Note


If you initially select On-Premises Firewall Management Center for analytics, you have a 14-day evaluation period during which you can change the analytics destination to Secure Firewall Management Center.

After either:

  • Manually committing the migration, or

  • The 14-day evaluation period expires, the analytics selection becomes permanent. Events will continue to be sent to the selected destination, and the setting cannot be changed.

To modify analytics settings after the evaluation period or after commit, refer to the migration troubleshooting procedures. see Troubleshoot Firewall Threat Defense migration failures


eStreamer Server Streaming

When you manage a Firewall Threat Defense device with Cloud-Delivered Firewall Management Center, the device supports sending only fully-qualified events (FQE) to eStreamer clients. If you have configured eStreamer clients in the On-Premises Firewall Management Center, ensure that the clients support the detailed data formats used by FQE when you migrate the device management to Cloud-Delivered Firewall Management Center. Any legacy clients, security information and event management (SIEM) systems, or log management solutions that do not support the data format of FQE or lack the necessary storage to handle the larger volume of FQE data will not work when you migrate.

Supported features

Security Cloud Control imports shared policies and device configurations from On-Premises Firewall Management Center, including supported policy types and duplicate policy or object name handling.

Shared policies imported

These policies are imported first and then followed by the device configuration:

  • Access control

  • IPS

  • SSL

  • Prefilter

  • NAT

  • QoS

  • Identity

  • Platform settings

  • Flex config

  • Network analysis

  • DNS

  • Malware & file

  • Health

  • Remote Access VPN

  • Site-to-Site VPN

Handling duplicate names

If a policy or object name in Security Cloud Control Firewall Management matches one imported from the On-Premises Firewall Management Center, Security Cloud Control Firewall Management will take these actions after a successful management change.

Policies, Objects

Condition

Action

Access control, SSL, IPS, Prefilter, NAT, QoS, Identity, Platform settings, Network analysis, DNS, Malware & File policies.

Name of the Cloud-Delivered Firewall Management Center policy matches the On-Premises Firewall Management Center policy.

Cloud-Delivered Firewall Management Center policy is used.

RA VPN Default group policy DfltGrpPolicy

The default group policyDfltGrpPolicy from the On-Premises Firewall Management Center is ignored.

Existing Cloud-Delivered Firewall Management Center default group policy DfltGrpPolicy is used.

Network, Port objects

Name and content of network and port objects in the Cloud-Delivered Firewall Management Center match the ones in the On-Premises Firewall Management Center.

Existing Cloud-Delivered Firewall Management Center network and port objects with the same name and content are used.

If the object has the same name but different content, an object override is created.

All other objects

Existing Cloud-Delivered Firewall Management Center object is used.


Note


Syslog alert objects used by access control policies are imported. If Security Cloud Control has an SNMP or email alert object with the same name as a source-On-Premises Firewall Management Center syslog alert object, the existing object is reused. Check for name collisions and rename the source syslog object before migration when necessary.


Restriction: unsupported features in firewall threat defense migration

Migration of a Firewall Threat Defense device registered only for analytics-only with the Firewall Management Center feature is not currently supported.

  • Custom Widgets, Application Detectors, Correlation, SNMP and Email Alerts, Scanners, Groups, Dynamic Access Policy, Custom AMP Configuration, Users, Domains, Scheduled Deployment Tasks, ISE configuration, Scheduled GeoDB Updates, Threat Intelligence Director configuration, Dynamic Analysis Connections.

  • ISE internal certificate object is not imported as part of the migration. You must export a new system certificate or a certificate and its associated private key from ISE and import it into Security Cloud Control.

  • Custom Network Analysis Policies (NAPs). Remove them from source access control policies before migration; create a supported NAP in Security Cloud Control afterward if needed.

  • New or updated intrusion rule recommendations. Migrated recommendations remain linked to the intrusion policy, but Security Cloud Control does not generate new ones or automatically update imported ones.

Encrypted Visibility Engine exception rules not migrated from On-Premises Firewall Management Center running Version 7.6 or 7.7

When migrating a Firewall Threat Defense device, which is managed by an On-Premises Firewall Management Center running Version 7.6 or 7.7, to Cloud-Delivered Firewall Management Center, Encrypted Visibility Engine (EVE) exception rules configured on the On-Premises Firewall Management Center are not migrated. This results in the loss of exception rules.

The Cisco support team will reach out to assist you in re-creating the EVE exception rules.

Alternatively, you can do this after the migration:

  1. Identify exception rules in On-Premises Firewall Management Center: Access your On-Premises Firewall Management Center to identify all the EVE exception rules that were configured in the Exception list. For details, refer to the "Encrypted Visibility Engine" chapter in the Cisco Secure Firewall Management Center Device Configuration Guide, 7.7/7.6.

  2. Reconfigure rules in Cloud-Delivered Firewall Management Center: In Cloud-Delivered Firewall Management Center, navigate to Manage > Objects > EVE Exception List. Manually reconfigure the identified EVE exception rules into the global EVE exception list object. For details, refer to "Encrypted Visibility Engine Exception List" topic in the "Object Management" chapter of the Cloud-Delivered Firewall Management Center guide.

Secure firewall recommended rules

Migrating Firewall Threat Defense to the cloud migrates existing rule recommendations linked to intrusion policies. However, the Cloud-Delivered Firewall Management Center does not generate new rule recommendations or auto-update migrated ones post-migration, as it does not support rule recommendations. See Auto Cisco Recommended Rules.

Remove custom network analysis policies

Before migration, Custom Network Analysis policies must be removed from the On-Premises Firewall Management Center.

  1. Log on to the On-Premises Firewall Management Center.

  2. Choose Policies > Access Control.

  3. Click the edit icon on the access control policy you want to disassociate the custom NAP and then click the Advanced tab.

  4. In the Network Analysis and Intrusion Policies area, click the edit icon.

  5. In the Default Network Analysis Policy list, select a system-provided policy.

  6. Click OK.

  7. Click Save to save the changes and then click Deploy to download the changes to the device.

After migration, you can manually create the Network Analysis Policy in Security Cloud Control Firewall Management.

Best practice: migration guidelines and limitations for user identity

Before you migrate an on-premises Firewall Threat Defense to Cloud-Delivered Firewall Management Center, you must prepare and also deploy as soon as possible after the migration if any access control policies reference identity objects discussed in this topic. To confirm, click Policies > Security policies > Access Control and examine your access control policies and rules.

If none of your access control policies reference identity objects (in particular, users and groups), you can ignore these guidelines.

Before migrating

Before migrating, on the On-Prem Firewall Management Center, click Integrations > Identity > Identity Sources and see if you have any Cisco ISE/ISE-PIC or Passive Identity Agent identity sources defined.

  • If you have Cisco ISE/ISE-PIC or Passive Identity Agent identity sources defined, create the Cisco ISE/ISE-PIC identity sources on Cloud-Delivered Firewall Management Center then migrate the device as discussed in the paragraphs that follow.

  • If no Cisco ISE/ISE-PIC or Passive Identity Agent identity sources are defined, migrate the device as discussed in the paragraphs that follow.

Migrate the device

Migration is discussed in Firewall Threat Defense migration to Cloud-Delivered Firewall Management Center. To avoid traffic disruption, when you migrate the device, we strongly recommend you either:

  • Check the Auto deploy to FTDs after successful migration check box.

  • Deploy policies immediately after migration is complete.

Recommendation: migration guidelines and limitations for VPN configuration

Migration guidelines for remote access VPN

Keep the following in mind when you migrate a device with VPN configuration. Security Cloud Control Firewall Management imports all remote access VPN policy settings, with the following exceptions:

  • Object overrides are not migrated. If overrides are used in the address pool object, manually add them to the imported object in Security Cloud Control Firewall Management after migration.

  • Local users. If the authentication server uses a local database, the associated local realm object is imported into Security Cloud Control Firewall Management. However, you must manually add the local users to the imported local realm object after migration. See Create a Realm and Realm Directory.

  • Load-balancing configuration is not migrated.

  • Certificate enrollment with domain configuration. Perform the following after migration to enroll the certificate with domain configuration:

Perform the following after migration to enroll the certificate with domain configuration:

  1. Choose Security Devices.

  2. Select the migrated FTD and in the Device Management on the right, click Device Overview.

  3. Choose Devices > Certificates. Perform one of the following tasks:

    • If the certificates are imported in an Error state, click the Refresh certificate status icon to synchronize the certificate status with the device. The certificate status turns green.

    • If the certificates are not imported, you must manually add the certificates defined in the Remote Access VPN policy that is configured in the Firewall Management Center.

Migration guidelines for Site-to-Site VPN

Selecting one device automatically selects its peers from associated topologies, as all devices within a topology must migrate together. Migration wizard doesn't list the extranet devices that are associated with them, but they will still be automatically included during the migration process. All settings will be migrated, with the following exceptions:

  • Network object overrides are not migrated. They must be manually added to the imported object in Security Cloud Control Firewall Management after migration.

  • If the authentication type configured as Preshared Automatic Key in the On-Premises Firewall Management Center:

    • Cloud-Delivered Firewall Management Center generates new pre-shared key post-deployment.

    • Existing tunnels remain active.

    • New tunnels use newly generated key.

  • If devices are moved to Security Cloud Control Firewall Management but the changes are not yet committed, the associated site-to-site VPN policy can still be modified in the On-Premises Firewall Management Center, however, it those changes do not update the device configuration in Security Cloud Control Firewall Management.

  • Devices configured for SASE tunnels on Cisco Umbrella are not migrated.

Supported On-Premises Firewall Management Center and Firewall Threat Defense software versions for migration

This reference provides the minimum supported versions for On-Premises Firewall Management Center and Firewall Threat Defense migration. It covers migration requirements for physical On-Premises Firewall Management Center models, high availability configurations, cluster deployments, and multi-instance devices.

Minimum supported versions

  • Minimum On-Premises Firewall Management Center: 7.2

  • Minimum Firewall Threat Defense: 7.2.x (not supported for Version 7.1)

Physical On-Premises Firewall Management Center 1000/2500/4500 Model-Managed Firewall Threat Defense

  • Migration is supported from physical FMC 1000/2500/4500 models.

  • Temporary upgrade from 7.0 to 7.4 is supported for migration purposes only. The On-Premises Firewall Management Center Version 7.4 is "unsupported for general operations," but allowed as an interim step until migration completes. You can download the upgrade package here.

  • After migration, do these tasks:

    1. Return to On-Premises Firewall Management Center to a supported version after migration.

    2. Remove re-migrated devices.

    3. Reimage back to 7.2.x.

    4. Re-register the devices.


    Note


    Unzip (but do not untar) the upgrade package before uploading it to the On-Premises Firewall Management Center. To upgrade to Version 7.4, see Cisco Secure Firewall Management Center Upgrade Guide, Version 6.0-7.0.


We recommend upgrading the devices to Version 7.2.x before upgrading the On-Premises Firewall Management Center to Version 7.4.


Important


An upgrade is necessary because Version 7.0 On-Premises Firewall Management Centers do not support cloud device migration. Only Version 7.4 is supported during the migration and evaluation process. These On-Premises Firewall Management Centers cannot run intermediate versions. Only standalone and high availability Firewall Threat Defense devices running Version 7.0.3+ (7.0.5 recommended) are eligible for migration.


Firewall Threat Defense in a High Availability Pair

  • High availability pairs migrate as a single node.

  • Both active and standby Firewall Threat Defense devices migrate together.


Important


We highly recommend committing manager changes before performing advanced operations, like creating or breaking high availability configurations from the On-Premises Firewall Management Center on the devices being migrated. Carrying out these tasks during the evaluation period is unsupported and may lead to migration commit failure.


Firewall Management Center in a High Availability Pair

  • Onboard the active On-Premises Firewall Management Center and not the standby.

  • Use either the auto-onboarding method or the credentials method for onboarding the On-Premises Firewall Management Center.


Note


If you have already onboarded a standalone On-Premises Firewall Management Center and later configured it as a standby, delete the standby On-Premises Firewall Management Center and onboard the active one.


Points to Remember:

  • Auto-onboarding On-Premises Firewall Management Center Method

    • High availability break is not supported during the 14 days evaluation period.

      You can break high availability after changes are committed, manually or automatically, after the evaluation period.

    • High availability switchover is supported during the 14 days evaluation period.

  • Onboarding On-Premises Firewall Management Center Method Using Credentials

    • High availability break and high availability switchover are not supported during the 14 days evaluation period. You can perform these operations after committing the changes manually or automatically after the evaluation period.

    • After a switchover, onboard the new active unit, which was previously in standby mode, and then start a migration job on the devices.


Note


During the 14-day evaluation period after migrating a Firewall Threat Defense device, if you have performed advanced operations on the device, such as converting it to a multi-instance chassis, note that the evaluation period becomes nullified, and you will not be able to revert the device management back to the On-Premises Firewall Management Center.

If you want to manage a multi-instance chassis using Cloud-Delivered Firewall Management Center, onboard the chassis manually to Security Cloud Control.


Firewall Threat Defense cluster

Firewall Threat Defense cluster migration is supported on these platforms with minimum versions:

Platforms

Minimum Firewall Threat Defense

Minimum On-Premises Firewall Management Center Version

VMware, KVM

7.2.1

7.4.1

AWS, GCP

7.2.1

7.4.1

Azure

7.3

7.4.1

Secure Firewall 3100

7.2.1

7.4.1

Firepower 4100

7.2.x

7.4.1

Secure Firewall 4200

7.4

7.4.1

Firepower 9300

7.2.x

7.4.1


Important


Before migrating the Firewall Threat Defense cluster, remember these points:

  • Do not migrate the Firewall Threat Defense cluster during clustering-related operations from the On-Premises Firewall Management Center.

  • After migration, manually commit manager changes before performing advanced operations, such as adding a node, breaking a node, breaking a cluster, or converting a device from native mode to multi-instance (container) mode from the On-Premises Firewall Management Center. Performing such tasks during the evaluation period may result in migration commit failure.


Migration Support for Multi-instance Firewall Threat Defense Devices

You can migrate a multi-instance Firewall Threat Defense device that is part of a chassis (Secure Firewall 3100/4200). The multi-instance device gets listed as one of the devices in the Select Devices page, and you can choose it to proceed with the migration. This migration is supported in Firewall Threat Defense device versions 7.6 or later.

If you decide to do such a multi-instance Firewall Threat Defense device migration, it is strongly recommended that you unregister the corresponding chassis device manually from the On-Premises Firewall Management Center and onboard it to Security Cloud Control, by navigating to the Security Devices page.

Prerequisites for migrating Firewall Threat Defense to Cloud-Delivered Firewall Management Center

DNS and network configuration requirements

Ensure that the following network prerequisites are met before you begin the migration process.

  • DNS Server Configuration: The Firewall Threat Defenses must have the correct DNS server configuration to resolve Cloud-Delivered Firewall Management Center hostnames. For details about checking connectivity with Cloud-Delivered Firewall Management Center, see Check device connectivity with Cloud-Delivered Firewall Management Center.

  • Network Access: The required network access must be enabled for Firewall Threat Defenses to reach Cloud-Delivered Firewall Management Center through the TCP port 8305. Note that outbound connectivity from the Firewall Threat Defenses to Cloud-Delivered Firewall Management Center is sufficient.

  • Firewall Threat Defense Outbound Port 443: The Firewall Threat Defenses must be able to access port 443 and 8305 of Cloud-Delivered Firewall Management Center.

  • On-Premises Firewall Management Center Outbound Port 443: The On-Premises Firewall Management Center must have access to outbound port 443 open to reach "*.cdo.cisco.com" domain.

  • On-Premises Firewall Management Center should allow outbound HTTP/HTTPS to upload configurations to Amazon S3.

On-Premises FMC onboarding and version requirements

Verify that the On-Premises Firewall Management Center is onboarded to Security Cloud Control. Onboarding the On-Premises Firewall Management Center also onboards all the Firewall Threat Defense devices registered to that On-Premises Firewall Management Center. See Onboard an On-Prem FMC.

  • For the On-Premises Firewall Management Center 1000/2500/4500 migration: Run Version 7.4 (available for these models on a temporary basis). We recommend devices be running Version 7.0.5.

  • We recommend that you create a backup of On-Premises Firewall Management Center. For versions On-Premises Firewall Management Center Version 6.5 to 7.1, see the Back up the FMC topic in the Firepower Management Center Configuration Guide. For On-Premises Firewall Management Center Version 7.2 and later, see the Back up the Management Center topic in the Cisco Secure Firewall Management Center Administration Guide.

User account and permission requirements

Create a new user in the On-Premises Firewall Management Center with Administrator role or a custom user role with "Devices" and "System" permissions for onboarding purposes.

If you onboard an On-Premises Firewall Management Center to Security Cloud Control and simultaneously sign in to that On-Premises Firewall Management Center with the same user name, the onboarding fails.

Device synchronization and VPN requirements

Ensure proper device and VPN configuration before initiating migration.

  • The Firewall Threat Defense devices must be synchronized and not have pending changes on them. The migration fails on a device if Security Cloud Control identifies pending changes on that device.

  • All peer devices in a site-to-site VPN topology must be online and have no pending deployment.

Object conflict and FlexConfig considerations

Verify and resolve potential object conflicts and FlexConfig issues before migration.

  • Security Cloud Control imports Syslog alert object used in the access control policy from the On-Premises Firewall Management Center. If Security Cloud Control already contains an alert object with the same name but a different type (SNMP, Email), it is reused during configuration import. The user must check whether the Syslog object name matches the existing SNMP or Email alert object in Security Cloud Control. If the name matches, you must rename the Syslog object in the On-Premises Firewall Management Center before starting the migration process.

  • If you attempt to migrate firewalls with modified system defined FlexConfig text objects from an On-Premises Firewall Management Center to the Cloud-Delivered Firewall Management Center, the values of the modified system defined FlexConfig text objects are not migrated to the Cloud-Delivered Firewall Management Center, and the deployment will fail. To avoid this, copy the modified system defined FlexConfig text object values from the On-Premises Firewall Management Center to Cloud-Delivered Firewall Management Center before migration and initiate migration from On-Premises Firewall Management Center to Cloud-Delivered Firewall Management Center after verifying the predefined FlexConfig text objects.

Policy and object name conflicts

If a policy in Cloud-Delivered Firewall Management Center shares the same name as one in On-Premises Firewall Management Center (excluding network, port, URL, and VLAN objects), the Cloud-Delivered Firewall Management Centerversion will be retained. See Handling Shared Policies and Objects.

After migration, policies and objects aren't auto-synced between On-Premises Firewall Management Center and Cloud-Delivered Firewall Management Center. For phased migrations, you must update them manually.

You can revert to On-Premises Firewall Management Center within 14 days of migration. After that, changes are finalized automatically. See Revert the Threat Defense Management to On-Prem Firewall Management Center.

Requirement: high availability failover link must be up

The high availability failover link should be up for a successful migration. Before initiating the migration process on Security Cloud Control, determine the health status of the failover link on the On-Premises Firewall Management Center.

To identify the failover interfaces of all HA pairs you want to migrate to Cloud-Delivered Firewall Management Center, choose Devices > Device Management, click Edit , click the High Availability tab, and view the Interface field in the High Availability Link area. To check the health status of the failover interfaces, choose Devices > Device Management, click Health Monitor, expand the high availability pair, click the device with the exclamation mark, click the Critical button, and check the Interface Status for errors. If the failover interface is down, the Interface 'failover_interfacename' has no link message is displayed. Rectify the issue and click Sync from onprem FMC now to obtain the latest changes on the device.

Migrate Firewall Threat Defense to Cloud-Delivered Firewall Management Center

This task migrates Firewall Threat Defense devices from an on-premises Firewall Management Center to cloud management, enabling centralized cloud-based device management and policy deployment.

Migration transfers device management from on-premises infrastructure to cloud services while preserving existing configurations and policies. The process includes automatic VPN peer device selection and provides options for policy review and deployment timing.

Before you begin

Confirm FMC and FTD versions, disk space, DNS, outbound access, device synchronization, topology peers, and backup. See prerequisites for migrating and supported software versions.

Follow these steps to migrate Firewall Threat Defense devices to cloud management:

Procedure


Step 1

In the navigation bar on the left, click Administration > Migration > Migrate FTD to cdFMC.

Step 2

Click The image illustrates the steps involved in migrating Firewall Threat Defense devices to cloud management, emphasizing the requirement to initiate only one migration job at a time. and choose On-Prem FMC-managed FTD to Cloud-Delivered Firewall Management Center.


Note


You can initiate only one migration job at one time.

Step 3

In the Select On-Prem FMC area, perform these actions:

  1. You can click the Onboard an FMC link to onboard the On-Premises Firewall Management Center if you have not done already. See Onboard an FMC.

  2. Select the On-Premises Firewall Management Center from the available list and click Next.

In the Select Devices step, you will see the Firewall Threat Defense devices that the selected On-Premises Firewall Management Center manages. If a high-availability pair is set up on the on-premise On-Premises Firewall Management Center, the high availability node will be shown instead of the active and standby devices.

The Last Synced time field indicates the time that is elapsed since the device configuration is synchronized into the On-Premises Firewall Management Center. You can click Sync from OnPrem FMC now to fetch the latest device changes.

Step 4

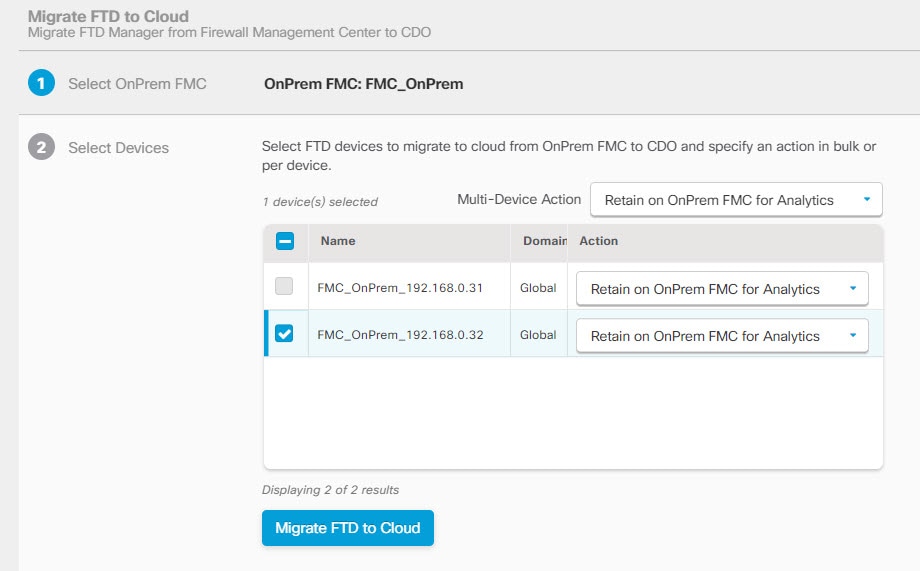
In the Select Devices step, configure device selection and commit actions:

  1. Select the devices that you want to migrate.

    These devices can include standalone, high-availability pairs, or clusters. If you have a high-availability pair or a cluster, select the node that represents it. Also, you can hover your mouse pointer over the cluster to view more details about the control node.

    The image illustrates the selection process for devices in a migration setup, highlighting options for standalone, high-availability pairs, and clusters, along with details on unsupported versions and devices registered for analytics.

    Note


    • The devices running on unsupported versions are not available for selection.

    • The devices that are registered for analytics only with the On-Premises Firewall Management Center or have pending changes to be deployed are not eligible for migration.

    • When you select a device that is associated with a site-to-site VPN topology, Security Cloud Control automatically selects its peer devices belonging to either the same topology or a different topology, because all devices in the site-to-site VPN topology must be migrated together for a successful migration to take place. The wizard does not list the extranet devices, if any. However, Security Cloud Control migrates extranet devices.

      The S2S VPN Topology column indicates the number of site-to-site VPN topologies in which a selected device participates. You click the topology link to view the topologies and devices that are migrated along with the selected device. This field is not applicable to devices that are not part of the site-to-site VPN topology.

    • A high availability pair is presented as a single node. You must select this node to include active and standby devices in the migration.


  2. In the Multi-Device Action list, you can choose a common action to apply on all devices.

  3. In the Commit Action column, you can choose one of these actions for the selected device:

    • Retain on OnPrem FMC for Analytics: After the migration process is completed, the analytics management for selected Firewall Threat Defense devices is retained on the On-Premises Firewall Management Center.

    • Delete FTD from OnPrem FMC: After the migration process is completed, the selected devices are removed from the On-Premises Firewall Management Center and are available for Security Cloud Control to handle the analytics. You must configure the devices to send events to Security Cloud Control for managing analytics. When the devices are deleted from the On-Premises Firewall Management Center, they cannot be revoked.


      Note


      For the On-Premises Firewall Management Center 1000/2500/4500, when you select devices to migrate, make sure you choose Delete FTD from OnPrem FMC. Note that the device is not fully deleted unless you commit the changes or 14 days pass.


Note


The actions that are specified here are committed automatically after the 14 days evaluation period or after the changes are committed manually.


Step 5

(Optional) Check the Pause migration to review imported shared policies check box.

When you enable this option, the migration process will pause after the shared access policies like Access Control and NAT policies are staged in the Cloud-Delivered Firewall Management Center. This pause ensures that the evaluation doesn't start and that the device's current state and manager remain unaffected. It gives you ample time to review the imported configuration for accuracy. After you've assessed everything, you can resume the migration during the planned migration interval, which will then kick off the 15-day evaluation period.

Step 6

Check the Auto deploy to FTDs after successful migration check box to deploy the migrated configuration automatically to the device after successfully migrating and registering the device with the Cloud-Delivered Firewall Management Center.

However, if you prefer to review and manually deploy the configuration from the Cloud-Delivered Firewall Management Center after successful migration, you can uncheck this option and proceed to the next step.


Note


Perform the migration during a maintenance window. If you check Auto deploy to FTDs after successful migration, the migrated policies are deployed to the devices as soon as migration succeeds, which can disrupt traffic.

If you leave this option unchecked, deploy the policies manually during the maintenance window. Do not perform any modification until you finish successful first deployment after migration. Deploying the migrated policies promptly also helps reduce the risk that configuration operations during the evaluation period will cause later commits to fail.


Step 7

Click Migrate FTD to cdFMC.

Step 8

Click View Migration to Cloud Progress to see the progress.

What to do next:

If you selected Pause migration to review imported shared policies, Security Cloud Control pauses after staging shared policies such as access control and NAT. The job does not start evaluation or change the device manager at that point. You must manually click Proceed Migration to import the remaining configuration. See Proceed migration process.

You can view the overall and individual status of migration jobs and generate a report when a job is completed successfully. See Review and manage Firewall Threat Defense migration job.


The migration job begins and transfers device management from the on-premises FMC to cloud management. You can monitor progress through the migration status interface and receive notifications when the process completes successfully.

Review and manage Firewall Threat Defense migration job

Use this task to effectively monitor and manage Firewall Threat Defense migration jobs, track device migration progress, handle evaluation period activities, and resolve deployment or identity policy issues that may arise during the migration process.

The migration dashboard provides the status of all migration jobs initiated from the Security Cloud Control. You can expand a specific job to see the status of individual devices associated with that tenant. This helps you keep track of the progress of your migration and identify issues, if any, that need to be addressed.

When a migration job is successful, you have 14 days to test and assess migration changes. If you are convinced about the migration changes, we recommend that you commit the devices manually, and not wait for Security Cloud Control to automatically commit the migration changes.

Procedure


Step 1

Check migration job status in the migration dashboard.

If you have set up alerts for device workflows, click the notifications icon The migration job summary displays the status and details of the migration process, including alerts and notifications related to the job. to see the alerts that have been triggered during the migration process. Additionally, if you have opted to receive email notifications from Security Cloud Control, you will also receive an email notification regarding alerts, if any.

Review the following information for each migration job:

  • Name: Represents the job name that shows the On-Premises Firewall Management Center name and the date and time when the job was initiated.

  • Number of FTDs: Shows the total number of devices that are being migrated to the cloud.

  • Status: Shows the status of the job. Expand the job to see the status of individual devices.

  • Last Update: Shows the date and time that are updated only when a change is made to the device.

Step 2

Manage migration job actions using the Actions menu.

Click The migration job overview displays the total number of devices being migrated, their current status, and the last update timestamp, along with options to access workflows and download a report of completed jobs. to execute the following actions:

Step 3

Monitor deployment status and address validation issues.

After a successful migration, Security Cloud Control deploys the configuration to the device. If the system identifies errors or warnings in the changes to be deployed, it displays them in the Validation Messages window. To view complete details, click the arrow icon before the warnings or errors. If the deployment fails, see the Best Practices for Deploying Configuration Changes section of Firepower Management Center Device Configuration Guide X.Y.

Step 4

Configure realm sequence for identity policy if required.

If the device contains an identity policy with a Realm or ISE configuration, configure your device as a proxy for Security Cloud Control to communicate with the identity source. The identity policies don't function if Security Cloud Control fails to connect to the Identity Realms.

A tooltip appears in the Status column for a device that requires additional configuration.

The image illustrates the configuration interface for managing migration jobs, highlighting the Status column where tooltips indicate devices needing additional configuration.

  1. Click the tooltip icon and then click Learn more.

  2. In the Configure Proxy window, click Configure my realms.

    To add a proxy sequence, see the Create a Proxy Sequence section in the Firepower Management Center Device Configuration Guide, 7.2.

Step 5

Commit migration changes if satisfied with the evaluation.

When a job is completed successfully, the FTD Migration job is successful message appears in the Status column. You can click the tooltip to see the number of days remaining for evaluating the manager.

You can click Commit Migration Changes to commit the changes manually before the 14 days evaluation period ends.


Note


  • You cannot revoke the actions that are specified in the migration commit window after committing the changes.

  • You can cancel the migration during the evaluation period and return the device to the On-Premises Firewall Management Center.

  • You cannot delete a device from either the On-Premises Firewall Management Center or Cloud-Delivered Firewall Management Center during the evaluation period.


Important


Changes can be made and deployed to the device using Security Cloud Control during the evaluation period. If you switch device management back to the On-Premises Firewall Management Center, Security Cloud Control-specific changes made during the evaluation period is not saved on the device once it is reverted to the source Security Cloud Control tenant. You must deploy the changes from the On-Premises Firewall Management Center to the device after reverting the device's manager.


You have successfully reviewed and managed the Firewall Threat Defense migration job. The migration status is monitored, any deployment issues are addressed, identity policy configurations are updated as needed, and migration changes are committed or cancelled based on your evaluation.

Note that for the On-Premises Firewall Management Center 1000/2500/4500, you would have migrated devices from Version 7.4, which is unsupported for general operations. To return the On-Premises Firewall Management Center to a supported version you must remove the re-migrated devices, reimage back to Version 7.2.x, restore from backup, and re-register the devices.

Proceed migration process

This task resumes a paused migration process to complete the import of device-specific configurations and register devices with Security Cloud Control.

If the Pause migration to review imported shared policies option was checked during the migration setup, the migration process will pause after the shared access policies were staged in the Security Cloud Control. After you've reviewed the staged configurations, you must manually instruct Security Cloud Control to resume the migration, which will then import device-specific configurations such as routing and interfaces, as well as register the Firewall Threat Defense with the Security Cloud Control. Completion of the migration triggers a 14-day evaluation period.

Procedure


Go to the migration job page and click Proceed with migration for the relevant job.


The migration process resumes and completes the import of device-specific configurations and registration with Security Cloud Control. A 14-day evaluation period begins upon completion.

What to do next

Remember that deployment from the Security Cloud Control must be done after a successful migration.

Commit migration changes manually to Security Cloud Control

This task enables you to manually commit Firewall Threat Defense migration changes to Security Cloud Control when you are confident in your changes and do not want to wait for automatic commit.

We recommend that you commit migration changes manually if you are convinced with your changes and not waiting for Security Cloud Control to auto commit changes. The Commit Migration Changes window shows the remaining days to commit the migration to Security Cloud Control or revert the device to On-Premises Firewall Management Center. During the evaluation period, you can modify the actions for selected threat defense devices before committing the changes. Once the changes are committed, you can't revoke the actions.


Note


The commit manager changes actions are disabled in the following conditions:


  • The 14-day evaluation period has passed.

  • The Firewall Threat Defense devices have either been reverted to the On-Premises Firewall Management Center or deleted from On-Premises Firewall Management Center, in which case, no further actions can be taken.

Procedure


Step 1

In the migration jobs page, click the The image illustrates the process of manually committing migration changes, highlighting the necessary steps and options available after a job completion. under the Actions column of a completed job.

Step 2

Click Commit Migration Changes.

This link is available only after a job is completed successfully.

Step 3

Select a device and in the Commit Actions list, choose one of the following actions:

  • Retain on OnPrem FMC for Analytics: After committing the changes, analytics management for selected Firewall Threat Defense devices is retained on the management center.
  • Delete Firewall Threat Defense from OnPrem FMC: After committing the changes, the selected devices are removed from the On-Premises Firewall Management Center and are available for Security Cloud Control to handle the analytics. You must configure the Firewall Threat Defense to send events to Security Cloud Control for managing analytics. After the Firewall Threat Defense devices are deleted from the On-Premises Firewall Management Center, they cannot be revoked.

Note


If you want to revert the device management to On-Premises Firewall Management Center, refer to Revert manager ownership to On-Premises Firewall Management Center.


Step 4

Click Commit executes your specified actions immediately without further confirmation.

On the migration jobs screen, you can expand the job to check the progress of the actions specified.

The migrated devices appear on Security Cloud Control's Security Devices page. These devices can be managed using the Cloud-Delivered Firewall Management Center portal that is linked to Security Cloud Control. Ensure you deploy the changes to the devices from Cloud-Delivered Firewall Management Center.


Migration changes are committed to Security Cloud Control with the selected analytics ownership actions applied. The migrated devices become available for management through Security Cloud Control.

Revert manager ownership to On-Premises Firewall Management Center

This task reverts Firewall Threat Defense device management to the original On-Premises Firewall Management Center during the evaluation period, allowing you to discontinue management through the Security Cloud Control platform.

You can revert the device management to the On-Premises Firewall Management Center during the evaluation period. This means that the devices will no longer be managed through the Security Cloud Control platform. However, it is important to note that any changes made during the migration process in the Security Cloud Control will not be reflected in the On-Premises Firewall Management Center after reverting Firewall Threat Defense management.


Note


When the Firewall Threat Defense management has been returned to the On-Premises Firewall Management Center, you can begin the migration job again to switch the Firewall Threat Defense management to Security Cloud Control.


Procedure


Step 1

In the migration jobs page, click the The image illustrates the process of reverting manager ownership to a previous state after a job completion, highlighting the necessary steps and options available in the user interface. under the Actions column of a completed job.

Step 2

Click Commit Migration Changes.

This link is available only after a job is completed successfully.

Step 3

Select a device and in the Commit Actions list, choose Revert Manager to OnPrem FMC.

Step 4

Click Commit executes your specified actions immediately without further confirmation.

Step 5

Deploy the changes to the device from the On-Premises Firewall Management Center.


The device management is reverted to the On-Premises Firewall Management Center and the device is no longer managed through the Security Cloud Control platform.

View migrated devices and analytics-only entries

This task allows you to view and distinguish between configuration-managed and analytics-managed device instances after migration.

The migrated devices appear on the Security Devices page in Security Cloud Control. You can cross-launch and configure the required feature on the Cloud-Delivered Firewall Management Center.


Note


The devices on the Cloud-Delivered Firewall Management Center device listing page may show No-IP instead of the device's management IP address. Because the device registration uses the NAT ID, the device initiates the process, and therefore, the management IPs aren't discovered or used for the connection. Note that this applies to newly onboarded devices and devices migrated from the On-Premises Firewall Management Center.


Procedure


Step 1

Navigate to the Security Devices page to view migrated devices.

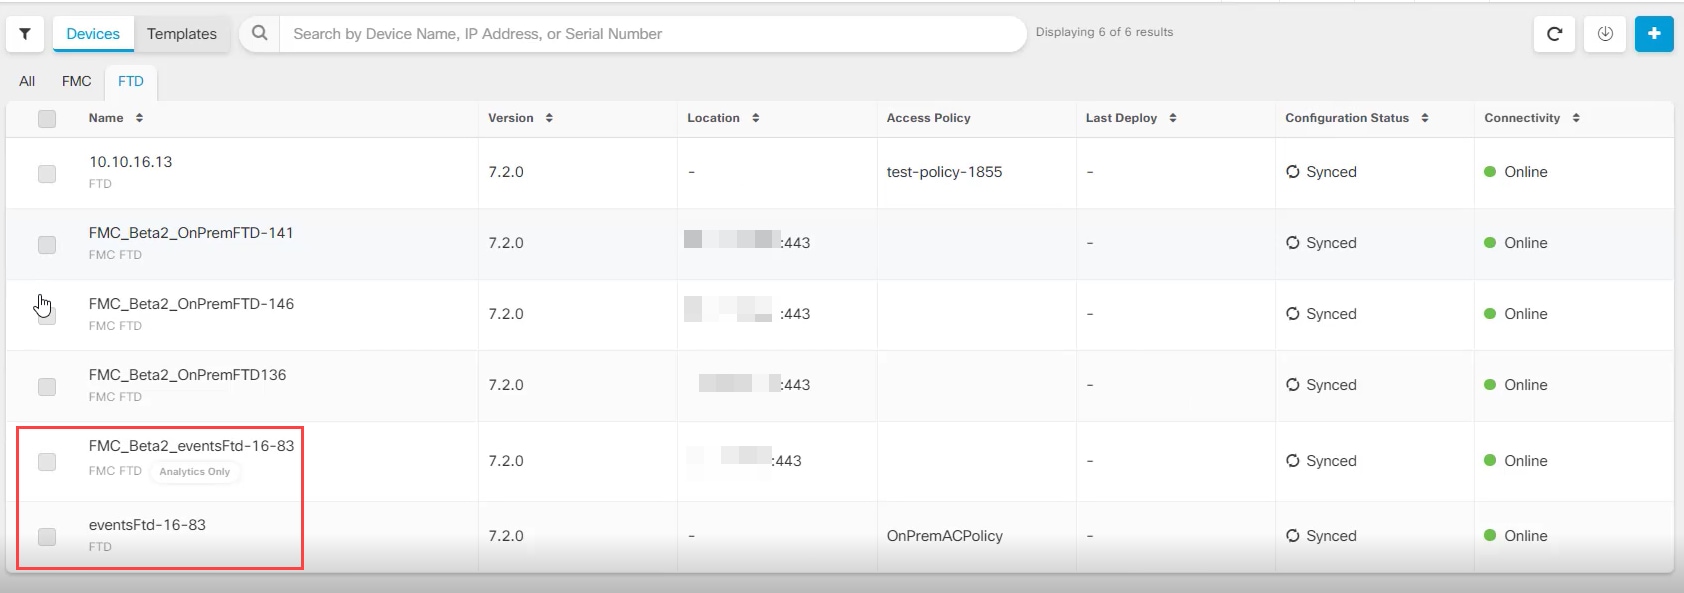
Security Cloud Control creates two instances of the same device that is configured to retain on the Firewall Management Center for analytics.

The image illustrates two instances of a device configured for analytics, highlighting the roles of the FMC FTD and Analytics Only labels in managing analytics and configuration.

The device instance with FMC FTD and Analytics Only labels shows that the Firewall Management Center handles the analytics. The device instance with the FTD label indicates that Security Cloud Control manages its configuration.

Step 2

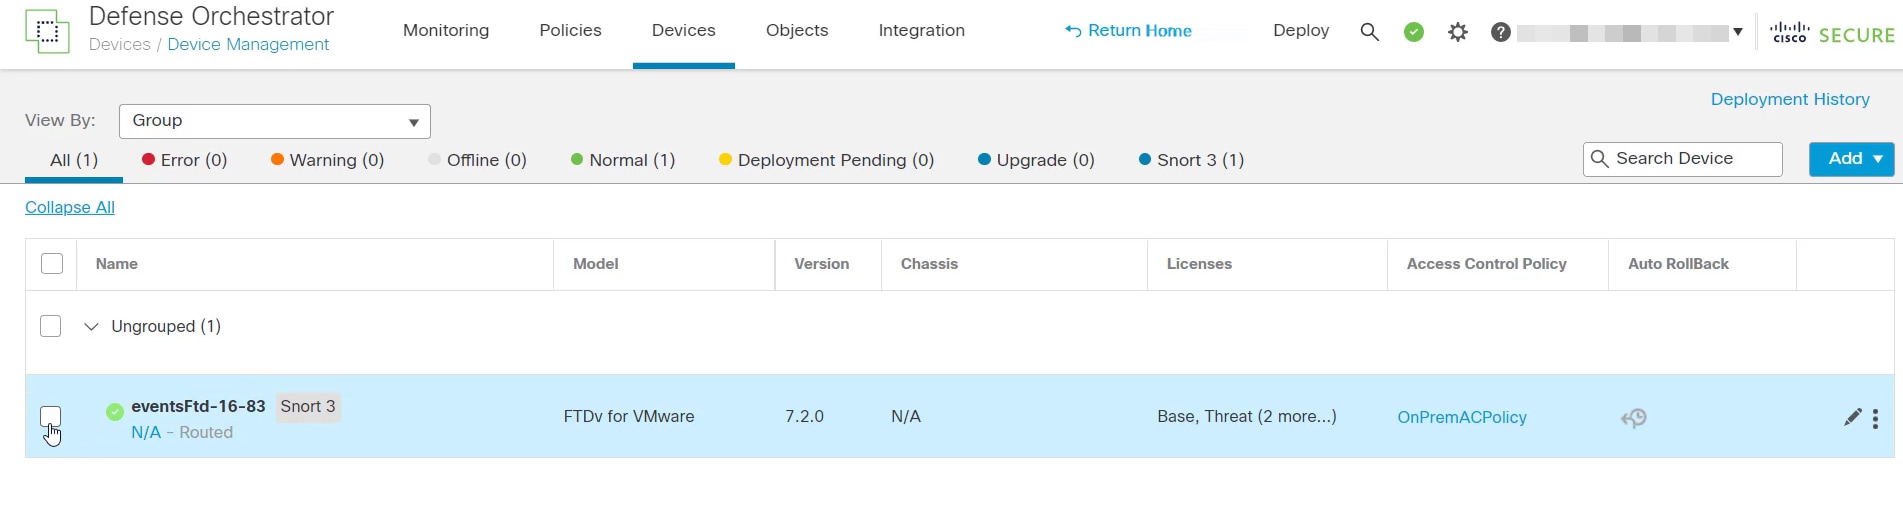
Select the device having FTD label and in the Management pane on the right, click Device Summary.

You can manage the configuration of the device using Security Cloud Control. This will show the device in the Cloud-Delivered Firewall Management Center.

The image displays a user interface for managing migrated devices and analytics-only entries, highlighting key configuration options available for the selected device.

Step 3

To view events from the device, select the device having FMC FTD and Analytics Only labels and on the right, click the Manage Devices link.

Step 4

Log on to the on premise Firewall Management Center.

Step 5

Choose Device > Device Management.

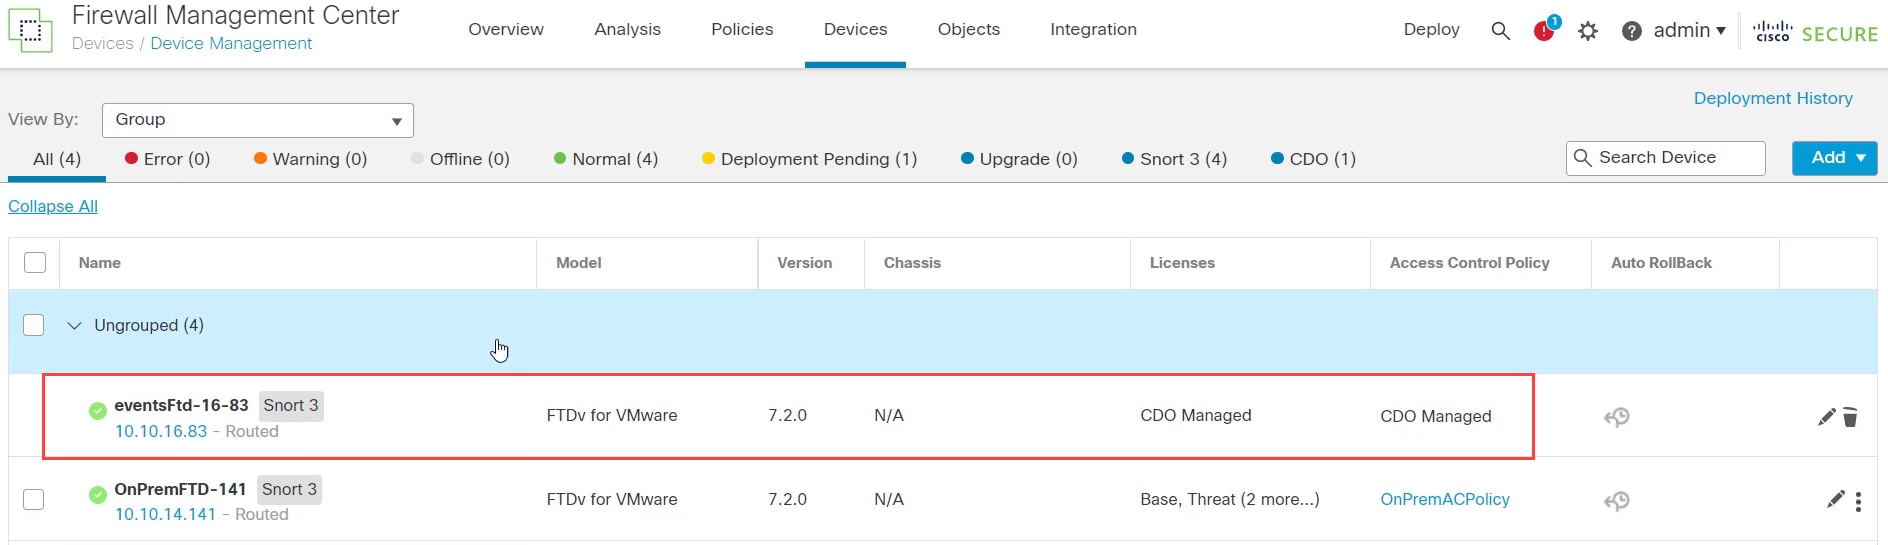
The image illustrates a device management interface, highlighting the Managed label for a specific device that cannot be selected for configuration.

You can't select this device as Security Cloud Control manages the configuration. The Firewall Management Center shows the Security Cloud Control Managed label for this device.

Step 6

To see the live events in the Firewall Management Center, click Analysis > Events.


You can now view and distinguish between migrated devices and analytics-only entries, access device summaries for configuration-managed instances, and view live events from analytics-only instances.

Generate a migration report

Generate and download a PDF migration report to review imported settings after a successful migration job. The report provides comprehensive details about device configurations, shared-policy values, objects, routing, interfaces, network settings, and other imported parameters.

After completing a migration job from On-Premises Firewall Management Center to Security Cloud Control, you can access a detailed report that documents all imported configurations. This report is available for download within one year of job completion and serves as a reference for reviewing the migration results.

Procedure


Step 1

On the migration jobs page, click the The migration report displays a summary of imported settings, including device configurations, shared-policy values, and network settings after a successful migration job. under the Actions column of a completed job.

Step 2

Click Download Report.

You must download the report within a year after the job starts.


A PDF report downloads containing device details, shared-policy values, objects, routing, interfaces, network settings, and other imported parameters from the migration job.

Remove a completed migration job

Remove a completed migration job to clean up the migration page and make it easier to navigate when the job is no longer needed.

Remove a job only after it is no longer needed. This cleans up the migration page and make it easier to navigate.


Attention


If you want to delete a migration job during the evaluation period, you must first commit the migration changes or revert the manager to the on-prem management center. Failing to do so may result in an inconsistent state of the on-prem management center, which could be unrecoverable. See Commit Migration Changes Manually.

If you don't have access to your On-Premises Firewall Management Center or if it is no longer available and you are blocked from performing a commit or revert, you can delete the job.


Procedure


Step 1

Click Administration > Migration > Migrate FTD to cdFMC.

Step 2

Click the The migration job is successfully removed from the migration page, resulting in a cleaner and more navigable job list. under the Actions column and then click Remove Migration Job.

Step 3

Click Delete to confirm your action.


The migration job is removed from the migration page, making the job list cleaner and easier to navigate.

Configure migration notifications

You can subscribe to get email notifications from Security Cloud Control whenever a device associated with your tenant experiences a specific action when migrating a Firewall Threat Defense device to Security Cloud Control.

Security Cloud Control sends an email if you enable to receive a notification for these states during migration:

  • Failed: When a migration job fails.

  • Started: When a migration job is initiated.

  • Succeeded: When a migration job is completed successfully.

  • Commit Pending: When the manager changes have to be committed.

To enable notification settings, see Notification Settings.

Verify Firewall Threat Defense connectivity with Security Cloud Control

This section provides the commands to determine the Firewall Threat Defense connectivity with the Security Cloud Control.

Test internet reachability from the device

Execute the ping system <any OpenDNS server address> command to check whether the device can reach the internet.

  1. Connect to the CLI of the device, either from the console port or using SSH.

  2. Log in with the Admin username and password.

  3. Enter ping system <OpenDNS IPAddress>.

ping system 208.67.222.222
PING 208.67.222.222 (208.67.222.222) 56(84) bytes of data.
64 bytes from 208.67.222.222: icmp_seq=1 ttl=48 time=22.10 ms
64 bytes from 208.67.222.222: icmp_seq=2 ttl=48 time=22.10 ms
64 bytes from 208.67.222.222: icmp_seq=3 ttl=48 time=22.8 ms
64 bytes from 208.67.222.222: icmp_seq=4 ttl=48 time=22.6 ms
^C
--- 208.67.222.222 ping statistics ---
4 packets transmitted, 4 received, 0% packet loss, time 7ms
rtt min/avg/max/mdev = 22.588/22.841/22.995/0.223 ms

The above example shows that the device can connect to the internet using the OpenDNS Server IP address. Also, the number of packets transmitted is the same as received, indicating that internet connectivity is available on the device. This shows that the device can reach the internet.


Note


If your results don't match, check the internet connection manually.


Check hostname resolution

  1. Obtain the host name of the Cloud-Delivered Firewall Management Center.

    1. In the Security Cloud Control left pane, click Administration > Integrations > Firewall Management Center.

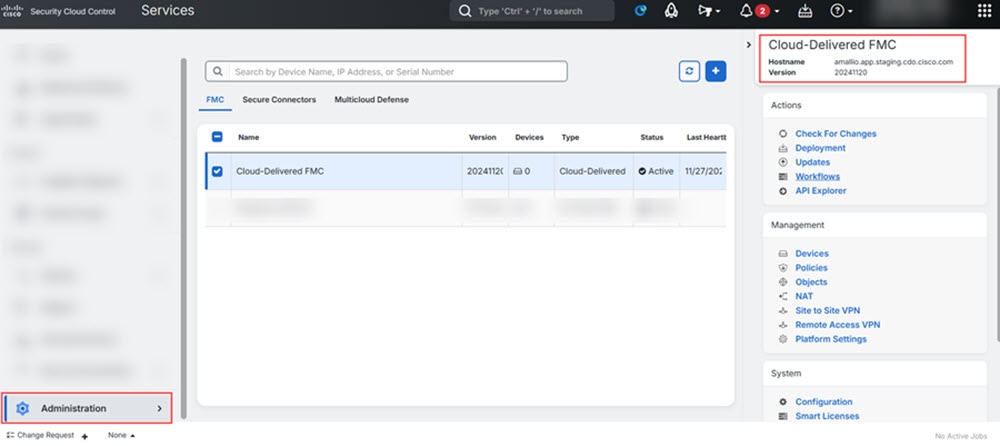
    2. Choose Cloud-Delivered FMC to see the Cloud-Delivered Firewall Management Center details on the right pane.

    3. In the Hostname field, copy only the hostname shown in this example image.

      The image displays an example of a hostname in the Cloud-Delivered FMC interface, highlighting the specific text (-acc10.app.us..cisco.com) that users need to copy.

      In the above figure, the highlighted text is the hostname (Security Cloud Control-acc10.app.us.Security Cloud Control.cisco.com) of the FMC to be copied.

  2. Connect to the CLI of the device, either from the console port or using SSH.

  3. Enter ping system <hostname of the FMC>.

ping system cdo-acc10.app.us.cdo.cisco.com
PING cdo-acc10.app.us.cdo.cisco.com (54.187.125.161) 56(84) bytes of data.
^C
--- cdo-acc10.app.us.cdo.cisco.com ping statistics ---
2 packets transmitted, 0 received, 100% packet loss, time 64ms

In the above example, the hostname is resolved with the IP address, indicating your connection is successful. Ignore the "100% packet loss" message shown in the response.


Note


If you can't connect to the host, you can rectify the DNS configuration in the CLI using configure network DNS <address>.


Use the troubleshoot feature for failed migrations

Use the Troubleshoot feature to identify and resolve issues with failed or partially successful migrations by providing a summary and detailed progress of migration steps.

There might be a few instances where, owing to some issues, the migration fails or is not thoroughly successful. To help resolve issues around such failed or partially successful migrations, you can use the inbuilt Troubleshoot feature.

Procedure


Step 1

On the migration jobs page, click the The Troubleshoot feature displays a summary and detailed progress of migration steps to help identify and resolve issues with failed or partially successful migrations. under the Actions column of a failed or a partially migrated job.

Step 2

Click Troubleshoot.

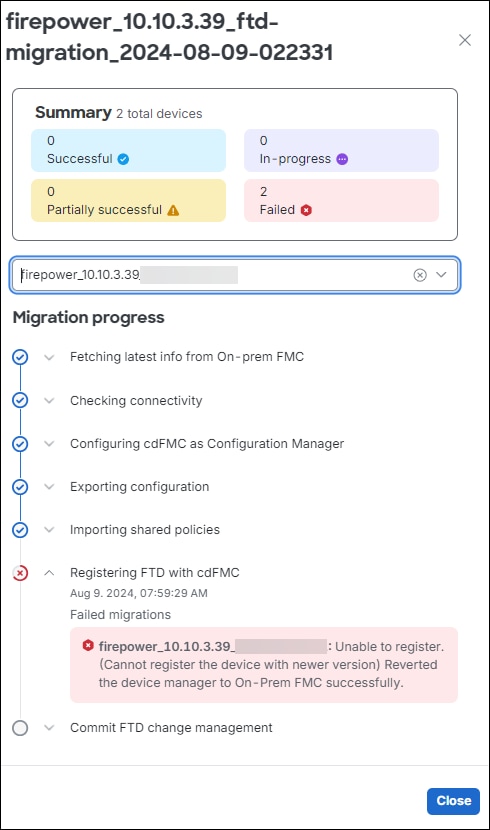
This opens up a sliding window that contains the following information:

  • A Summary containing additional details about the status of the migration.

  • A detailed Migration progess listing all the steps in the migration and also indicating the step at which the migration has failed.

Migration summary showing 2 failed devices and migration progress with a registration error at the FMC step.

Step 3

Based on the stage at which the migration seems to have failed, refer Troubleshoot Firewall Threat Defense Migration to Cloud-Delivered Firewall Management Center for information on how to troubleshoot.


The troubleshoot feature provides detailed information about the migration status and identifies the specific step where the migration failed, enabling you to resolve the issue.

Troubleshoot Firewall Threat Defense migration failures

This section details how to troubleshoot specific errors that may occur when migrating Firewall Threat Defense devices to Cloud-Delivered Firewall Management Center.

Migration of Firewall Threat Defense cluster fails

The migration of a Firewall Threat Defense cluster to the Cloud-Delivered Firewall Management Center fails during the migration process. When the failure occurs, Cloud-Delivered Firewall Management Center automatically performs a rollback, returning device management to the original On-Premises Firewall Management Center to maintain configuration integrity and service continuity.

Cause :

The migration failure may occur due to temporary service latency, transient connectivity issues, or other temporary conditions that interrupt the migration process.

Workaround :

  • Retry migration : Wait for some time and then initiate the migration again from the Secure Firewall Management Center .

  • Contact support : If the migration continues to fail after multiple attempts, contact Cisco Technical Support and provide the relevant error messages and migration details to assist with troubleshooting.

Configuration export from On-Premises Firewall Management Center failed

Cause :

  • Disk space is full or nearly full, preventing the export process from being completed.

  • Concurrent operations such as device upgrade, upgrade revert, moving a device between domains, device import and export, device template import and export, or policy analysis are running in On-Premises Firewall Management Center .

  • Connectivity issues exist between the On-Premises Firewall Management Center and Security Cloud Control .

Workaround:

  1. Perform these actions according to your requirements:

    • Ensure that at least 10% of disk space is available to accommodate the creation of necessary export files.

    • Ensure that no parallel operations are running during the migration.

    • Ensure that the network connection between On-Premises Firewall Management Center and Security Cloud Control is stable and reliable.

  2. Retry the migration.

  3. If the issue persists, contact Cisco TAC.

Failed to initiate import in Security Cloud Control

Cause:

Import can fail if:

  • Disk space is full or nearly full, preventing the import process from being completed.

  • Concurrent operations such as device upgrade, upgrade revert, moving a device between domains, device import and export, device template import and export, or policy analysis are running in Cloud-Delivered Firewall Management Center .

Workaround:

  1. Ensure that no other operations are running during import and retry migration.

  2. If the issue persists, contact Cisco TAC.

Failed to retrieve the most recent device information from On-Premises Firewall Management Center

Cause:

  • Network connectivity issues.

  • DNS settings.

  • Device synchronization issues.

Workaround:

  1. Perform these actions according to your requirements:

    • Ensure that the network connection between Security Cloud Control and On-Premises Firewall Management Center is stable.

    • Ensure that DNS settings for resolving Firewall Management Center hostnames are correct.

    • Ensure network access for Firewall Threat Defense devices through TCP ports 8305 and 443.

    • Ensure outbound connectivity to port 443 to Security Cloud Control and Cloud-Delivered Firewall Management Center hosts.

    • Ensure that the devices are synchronized without any pending changes.

  2. Retry migration.

  3. If the issue persists, contact Cisco TAC.

Failed to select Security Cloud Control as the manager for events and analytics

Cause:

Selected On-Premises Firewall Management Center for analytics during Firewall Threat Defense migration and committed it or the Security Cloud Control automatically committed it after the 14-day evaluation period.

Workaround:

  1. Log in to the On-Premises Firewall Management Center and remove the Firewall Threat Defense device from the On-Premises Firewall Management Center .

  2. Enable the Firewall Threat Defense device to send events to Security Analytics and Logging (SaaS) directly. For more information, see Send Cloud-delivered Firewall Management Center-Managed Event Logs to SAL (SaaS) Using a Direct Connection .

  3. Verify if the SSE Connector is running in the Firewall Threat Defense device. To verify, access Firewall Threat Defense CLI and do the following:

    
    # more /ngfw/etc/sf/connector.properties
    registration_interval=180
    connector_port=8989
    connector_fqdn=api-sse.cisco.com
  4. Verify the connectivity between Firewall Threat Defense and the SSE portal. The following URLs need to be allowed as IPs can change:

    • api.apj.sse.itd.cisco.com (primary SSE cloud API endpoint)

    • est.sco.cisco.com (common endpoint across geographies)

    • mx.apj.sse.itd.cisco.com

    • dex.apj.sse.itd.cisco.com (for customer success services)

    • eventing-ingest.apj.sse.itd.cisco.com (for Cisco XDR and Security Cloud Control services)

    • registration.apj.sse.itd.cisco.com (enables Firewall Threat Defense device registration to the regional Cisco cloud)

  5. access Firewall Threat Defense CLI and perform a CURL request to validate tenant details using the following command:

    root@firepower:/home/admin# curl localhost:8989/v1/contexts/default/tenant
  6. Verify that the event logs are appearing in Security Cloud Control .

Failed to import configuration from On-Premises Firewall Management Center

Cause:

The On-Premises Firewall Management Center configuration may include policies or object configurations that are unsupported or are conflicting, leading to migration failure.

Workaround:

  1. Check the On-Premises Firewall Management Center configuration for unsupported policies or object configurations to ensure compatibility.

  2. Retry migration.

  3. If the issue persists, contact Cisco TAC.

Failed to complete device discovery

Cause:

Conflicts or unhandled scenarios exist in the device configuration or within Security Cloud Control 's internal operations, such as incompatible settings or unsupported conditions that Security Cloud Control does not support.

Workaround:

  1. Perform these actions according to your requirements:

    • Inspect the device configuration in On-Premises Firewall Management Center for incompatible settings or unsupported scenarios that Security Cloud Control does not support and make necessary updates.

    • Check system logs for errors and confirm that both the On-Premises Firewall Management Center and the device are functioning properly.

  2. Retry migration.

  3. If the issue persists, contact Cisco TAC.

Failed to connect the device to Security Cloud Control

Cause:

Possible causes include the device being powered off, network connectivity issues, or a firewall blocking the necessary ports.

Workaround:

  1. Perform these actions according to your requirements:

    • Confirm that the device is powered on, and network connection is stable. Look for Firewall issues, blocked ports, and incorrect cabling.

    • Ensure that your device has the correct DNS server configuration for resolving Security Cloud Control hostnames.

  2. Retry migration.

  3. If the issue persists, contact Cisco TAC.

Failed to register the device, causing the manager to revert to On-Premises Firewall Management Center

Cause:

The device failed to register with Cloud-Delivered Firewall Management Center during migration, causing the system to revert the device manager to On-Premises Firewall Management Center . This may be because of connectivity issues.

Workaround:

  1. Perform these actions according to your requirements:

    • Verify DNS settings for resolving Security Cloud Control hostnames.

    • Ensure that network access is enabled for TCP port 8305, allowing the Firewall Threat Defense devices to connect to the Cloud-Delivered Firewall Management Center .

    • Allow outbound HTTPS connections on Firewall Threat Defense devices to reach the Cloud-Delivered Firewall Management Center and upload configurations to Security Cloud Control .

  2. Retry migration.

  3. If the issue persists, contact Cisco TAC.

Failed to unregister the device due to an ongoing deployment

Cause:

Migration failed because a deployment is in progress on the device.

Workaround:

  1. Perform these actions according to your requirements:

    • Wait for the ongoing deployment to finish.

    • Confirm that the device is stable, with no pending tasks.

  2. Retry migration.

  3. If the issue persists, contact Cisco TAC for support.

Report generation failed after successful FTD migration to Cloud-Delivered Firewall Management Center

Cause:

The report generation failure may be because of temporary system glitches.

Workaround:

  • Generate the report after some time to overcome the temporary system issues that might have caused the initial failure.

  • If the issue persists, contact Cisco TAC.

Failed to initiate FTD migration to Cloud-Delivered Firewall Management Center

Cause:

  • Ongoing migration in the source manager.

  • Unsupported device version.

  • Incorrect DNS and network configuration.

Workaround:

  1. Perform these actions according to your requirements:

    • Confirm that no other migration jobs are active in the same source manager.

    • Verify that the devices are on supported versions, have no pending changes to be deployed, and are active.

    • Ensure that the DNS settings are correct, and network access is available to communicate with Cloud-Delivered Firewall Management Center .

  2. If the issue persists, contact Cisco TAC.

Failed to deploy changes from Security Cloud Control

Cause:

Device migration to Cloud-Delivered Firewall Management Center failed during deployment.

Workaround:

  1. Perform these actions according to your requirements:

    • Attempt the deployment again from the Deployment page on Cloud-Delivered Firewall Management Center .

    • Check for out-of-band changes, which are changes made directly in the device, and not through Security Cloud Control . If out-of-band changes exist, they may interfere with the deployment. Use Security Cloud Control 's Check for changes functionality to identify and address out-of-band changes.

    • Ensure that all the configurations are supported and do not conflict with the current device settings.

    • Verify that the device is onboarded and reachable by both the Security Cloud Control and management center, with the necessary internet access and communication capabilities.

  2. If the issue persists, contact Cisco TAC.

Failed to commit FTD migration to Cloud-Delivered Firewall Management Center

Cause:

  • The 14-day evaluation period has expired.

  • Firewall Threat Defense devices have been reverted to or deleted from the On-Premises Firewall Management Center , preventing further actions.

Workaround:

  1. Try committing again to address any transient network or device issues.

  2. If the issue persists, contact Cisco TAC.

Failed to retain device on On-Premises Firewall Management Center for Analytics

Cause:

If your source manager is an On-Premises Firewall Management Center 1000/2500/4500, it cannot support retaining for Analytics because of the limited resources.

Workaround:

  1. Ensure that the Retain on On-Prem FMC for Analytics option is selected during the migration process.

  2. If the issue persists, contact Cisco TAC.

Failed to revert the device manager to On-Premises Firewall Management Center

Cause:

  • The device cannot be reverted if the 14-day evaluation period has expired.

  • Firewall Threat Defense devices have been reverted to or deleted from the On-Premises Firewall Management Center , preventing further actions.

Workaround:

  1. Perform these actions according to your requirements:

    • Try committing the changes again to address the temporary server or network issues.

    • If changes have occurred in the high availability configuration after migration, reset the devices to their original migration state before attempting to commit.

  2. If the issue persists, contact Cisco TAC.

Failed to configure Security Cloud Control as the configuration manager

Cause:

The device already has a configuration manager.

Workaround:

  1. If another configuration manager is present, remove it manually and retry the migration.

  2. If the issue persists, contact Cisco TAC.

Failed to commit migration; the device is ineligible

Cause:

  • The device has pending changes that have to be deployed.

  • The device to be migrated is part of FTD high availability (HA), but the current state is invalid, for example, it is in Active/Active state.

  • The device to be migrated is connected in Analytics-only mode.

  • Cluster migration is supported only for FTDs version 7.4 and above.

  • Migration for chassis and MI FTDs on models 3100/4200 is currently not supported.

Workaround:

  1. Perform these actions according to your requirements:

    • Verify that the device is up to date with On-Premises Firewall Management Center , then retry migration.

    • Ensure all pending changes on the devices are deployed.

    • Confirm that the Firewall Threat Defense device is in a valid state, such as Active/Standby. If the status isn't correctly reflected in On-Premises Firewall Management Center , use the Force refresh node status option on the device listing page to update the correct status on management center.

  2. If the issue persists, contact Cisco TAC.

Failed to import site-to-site VPN policies from On-Premises Firewall Management Center

Cause:

The failure may be due to various factors, such as VPN policy configuration or network connectivity issues.

Workaround:

  1. Perform these actions according to your requirements:

    • Verify your site-to-site VPN policies in On-Premises Firewall Management Center to ensure there are no configuration errors. If object overrides are used within network objects, manually add these overrides to Security Cloud Control after migration.

    • Ensure that both the On-Premises Firewall Management Center and the targeted device have stable and reliable network connections to Security Cloud Control .

    • If the authentication type is set as Pre-shared Automatic Key in On-Premises Firewall Management Center , Security Cloud Control generates a new pre-shared key for the VPN post-migration deployment without disrupting existing tunnels.

  2. Retry migration.

  3. If the issue persists, contact Cisco TAC.

Failed to migrate as all devices within the topology need to be migrated simultaneously

Cause:

Migrating multiple devices, particularly those within the same network topology, requires synchronizing their migrations to avoid inconsistencies and potential errors. All devices should be migrated within the same timeframe.

Workaround:

  1. Perform these actions according to your requirements:

    • Devices registered for Analytics -only with the On-Premises Firewall Management Center or those with pending changes are not eligible for migration.

    • When selecting a device associated with a site-to-site VPN topology, Security Cloud Control automatically selects peer devices from the same or different topology, as all devices in the topology must be migrated together for success. Extranet devices, if any, are not listed by the wizard.

    • The S2S VPN Topology column shows the number of site-to-site VPN topologies a device is part of. Click the topology link to view the topologies and devices migrating with the selected device. This field does not apply to devices outside the site-to-site VPN topology.

    • A high-availability pair is shown as a single node. Select this node to include both active and standby devices in the migration.

  2. If the issue persists, contact Cisco TAC.

HTTP status code 201 (created) found in On-Premises Firewall Management Center response

Cause:

The Secure Device Connector (SDC) version is not compatible.

Workaround:

  1. Ensure that the SDC is upgraded to version 202205191350 or later.

    • In the left pane, click Administration > Integrations > Secure Connectors Administration > Secure Connectors .

    • Click the SDC to view the existing version in the Details pane on the right.

    • Update your Secure Device Connector .