Onboard Devices and Services

You can onboard both live devices and model devices to Security Cloud Control. Model devices are uploaded configuration files that you can view and edit using Security Cloud Control.

Most live devices and services require an open HTTPS connection so that the Secure Device Connector can connect Security Cloud Control to the device or service.

This chapter covers the following sections:

Supported Devices, Software, and Hardware

Security Cloud Control is a cloud-based management solution enabling the management of security policies and device configurations across multiple security platforms. Security Cloud Control centrally manages policy and configuration across:

  • Cisco Secure Firewall ASA, both on-premises and virtual

  • Cisco Secure Firewall Threat Defense (FTD), both on-premises and virtual

  • Cisco Catalyst SD-WAN Manager

  • Cisco Secure Firewall Management Center, on-premises

  • Cisco Meraki MX

  • Cisco IOS devices

  • Cisco Umbrella

  • AWS Security Groups

The documentation describes devices, software, and hardware Security Cloud Control supports. It does not point out software and devices that Security Cloud Control does not support. If we do not explicitly claim support for a software version or a device type, then we do not support it.

Cisco Secure Firewall ASA

Cisco Adaptive Security Appliance (ASA) is a security device integrating firewall, VPN, and intrusion prevention capabilities. It protects networks from unauthorized access, cyber threats, and data breaches, offering robust security services in a single platform. Security Cloud Control supports the management of ASA devices, offering features to streamline configuration management and ensure regulatory compliance across the network infrastructure.

Cisco Secure Firewall Threat Defense

Firewall Threat Defense integrates traditional firewall features with advanced threat protection capabilities. It offers comprehensive security functions, including intrusion prevention, application control, URL filtering, advanced malware protection, and so on. An FTD can be deployed on ASA hardware appliances, and Cisco firewall hardware appliances, and in virtual environments. Managing threat defense devices is possible through various management interfaces, such as Cisco Firewall Management Center, Security Cloud Control, and Firewall Device Manager.

For more information on software and hardware compatibility, see the Cisco Secure Firewall Threat Defense Compatibility Guide.

Firewall Device Manager is a web-based management interface explicitly designed for threat defense device management. It provides a simplified approach for configuring and monitoring threat defense devices, making it ideal for smaller-scale deployments or organizations preferring an intuitive interface.

FDM offers basic configuration capabilities for network settings, access control policies, NAT rules, VPN configuration, monitoring, and basic troubleshooting. Typically accessed through a web browser, FDM is directly available on the FTD device, eliminating the need for additional management servers or appliances.

Cisco Catalyst SD-WAN Manager

Security Cloud Control offers centralized management for Catalyst SD-WAN and Branch WAN environments, allowing organizations to efficiently configure, monitor, and enforce security policies across their networks. This integration also facilitates advanced troubleshooting, rule optimization, and change management on the Catalyst SD-WAN Manager.

For more information on software and hardware compatibility, see Cisco Catalyst SD-WAN Device Compatibility.

Cisco Secure Firewall Management Center

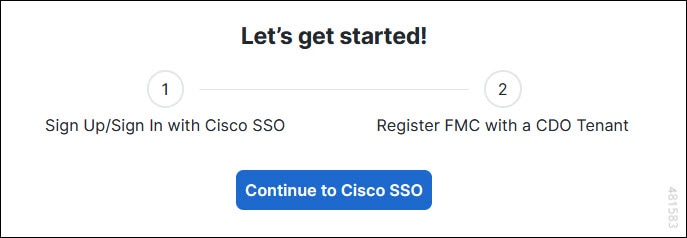
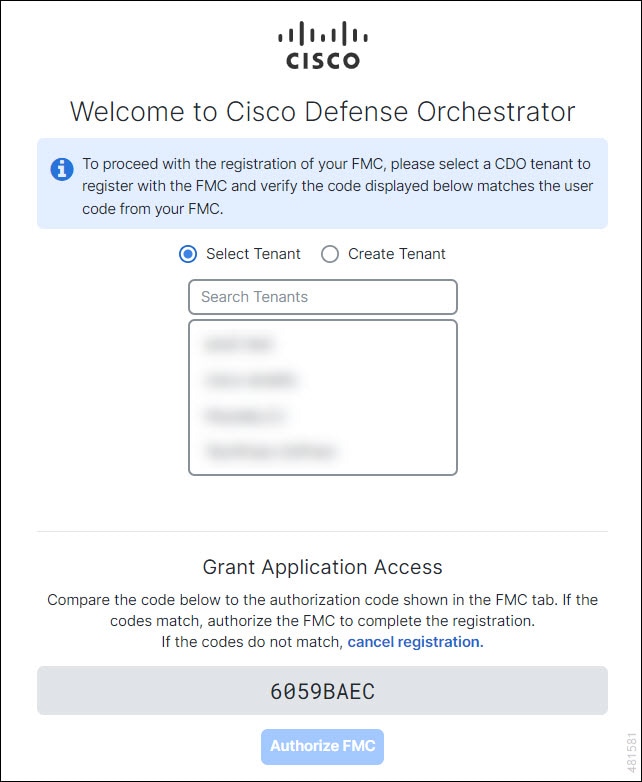
Security Cloud Control simplifies the management of on-premises Firewall Management Center by establishing a secure integration, discovering security devices, and enabling centralized policy management. Security policies such as firewall rules, VPN settings, and intrusion prevention policies can be efficiently managed and deployed across all devices under FMC.

Cisco Meraki MX

The Meraki MX appliance is an enterprise-grade security and SD-WAN next-generation firewall appliance, designed for decentralized deployments. Security Cloud Control supports managing layer 3 network rules on Meraki MX devices. When you onboard a Meraki device to Security Cloud Control, it communicates with the Meraki dashboard to manage that device. Security Cloud Control securely transfers configuration requests to the Meraki dashboard, which then applies the new configuration to the device. Key features of Security Cloud Control's support for Cisco Meraki MX include centralized policy management, backup and restore, monitoring and reporting, compliance checking, and automation capabilities.

Cisco IOS Devices

Cisco IOS can manage and control network functions, including routing, switching, and other networking protocols. It offers a set of features and commands to configure and maintain Cisco network devices, enabling efficient communication and management within networks of varying sizes and complexities.

Cisco Umbrella

Security Cloud Control manages Cisco Umbrella through integrations such as the Umbrella ASA Integration, which allows administrators to include their Cisco Adaptive Security Appliance (ASA) within their Umbrella configuration using per-interface policies. This integration enables the ASA to redirect DNS queries to Umbrella, enhancing network security by leveraging Umbrella's DNS security, web filtering, and threat intelligence capabilities.

AWS Security Groups

Security Cloud Control offers a simplified management interface for Amazon Web Services (AWS) Virtual Private Clouds (VPCs). Key features include monitoring AWS Site-to-Site VPN connections, tracking changes to AWS devices, and viewing AWS Site-to-Site VPN tunnels.

Onboard an On-Premises Firewall Management Center

Onboard an On-Premises Management Center to Security Cloud Control

Security Cloud Control provides the following methods to onboard on-premises management centers:

Review Connect Security Cloud Control to your Managed Devices for more information.


Note


Security Cloud Control complements FMC by allowing you to:


Limitations and Guidelines

These are the limitations applicable to onboarding an on-premises management center:

  • Onboarding an on-premises management center also onboards all of the devices registered to the on-premises management center. Be aware that if a managed device is disabled, or unreachable, Security Cloud Control may display the device in the Security Devices page, but cannot successfully send requests or view device information.

  • We recommend creating a new user on the on-premises management center specifically for Security Cloud Control communication that has administrator-level permissions. If you onboard an on-premises management center and then simultaneously log into that on-premises management center with the same login credentials, onboarding fails.

  • If you create a new user on the on-premises management center for Security Cloud Control communication, the Maximum Number of Failed Logins for the user configuration must be set to "0".

  • For On-Premises Management Centers running version 7.4 and older, if you experience a switchover and the FMC is no longer connected to the cloud, try disabling SecureX and then re-enabling it.

Auto-Onboard an On-Premises Management Center Integrated with Cisco Security Cloud

The auto-discovery and onboarding feature is enabled by default in Security Cloud Control, so you can expect all on-premises management centers that are running Version 7.2 or later and integrated with Cisco Security Cloud are automatically discovered and onboarded to Security Cloud Control. Additionally, the associated Firewall Threat Defense devices are onboarded to Security Cloud Control.

Security Cloud Control also onboards the on-premises management center high availability (HA) pair.

Before you begin
Ensure that the following prerequisites are met:
  • Allow outbound traffic from port 443 on the on-premises management center.

Procedure

Step 1

Integrate the on-premises management center you want to onboard with Cisco Security Cloud and register it with a Security Cloud Control tenant. See Integrate On-Premises Management Center With Cisco Security Cloud.

Step 2

Log in to the Security Cloud Control tenant that was registered with the on-premises management center.

Step 3

In the left pane, click Administration > Integrations > Firewall Management Center.

All on-premises management centers associated with your tenant is displayed in the FMC tab. See View Onboarded On-Premises Firewall Management Center.


Integrate On-Premises Management Center With Cisco Security Cloud

This procedure describes how to integrate the on-premises management center with Cisco Security Cloud. By enabling Cisco Security Cloud integration, your management center gets registered to the Cisco cloud tenancy.

Before you begin
  • Security Cloud Control uses Cisco security cloud sign on as its identity provider and Duo for multifactor authentication. Ensure that you have your Cisco security cloud sign on credentials and can sign in to the Cisco regional cloud where your account was created.

  • A Security Cloud Control tenant is required to integrate the on-premises management center with Cisco Security Cloud. If you do not already have a Security Cloud Control tenant, request one. See Create a Security Cloud Control Tenant for more information.

Procedure

Step 1

In your on-premises management center, perform the following:

  • For on-premises management center version between 7.2 and 7.4.x, go to Integration > SecureX.

  • For on-premises management center version 7.6 or later, go to Integration > Cisco Security Cloud.

Step 2

For on-premises management center version between 7.2 and 7.4.x, click Enable Secure X.

For on-premises management center version 7.6 or later, click Cisco Security Cloud.

A separate browser tab opens to log you in to your Security Cloud Control account. Make sure this page is not blocked by a pop-up blocker.

Step 3

Click Continue to Cisco SSO.

Figure 1. Cisco Security Cloud Welcome Page

Step 4

Log in to your Security Cloud Control account.

Figure 2. Cisco Security Cloud Sign On

If you do not have a security cloud sign on account to log in to Security Cloud Control and you want to create one, click Sign up now in the Security Cloud Sign On page. See Create a New Cisco Security Cloud Sign On Account.

Step 5

Choose a Security Cloud Control tenant that you want to use for this integration. The on-premises management center and the managed devices get onboarded to the Security Cloud Control tenant that you choose here.

Figure 3. Choose the Security Cloud Control Tenant

If you do not already have a Security Cloud Control tenant or if you want to use a new tenant for this integration, create a new tenant.

See Create a Security Cloud Control Tenant for more information.

Step 6

Verify that the code displayed in the Security Cloud Control login page matches the code provided by the on-premises management center.

Figure 4. Verification Code in the on-premises management center

Step 7

Click Authorize FMC.

Step 8

In the on-premises management center UI, click Save to save the configuration.

You can view the task progress under Notifications > Tasks.

The registration task can take up to 90 second to complete. If you must use on-premises management center while the registration task is in progress, open the on-premises management center in a new window.


Disable Auto-Onboarding of an On-Premises Management Center

Disabling the auto-onboarding of the on-premises management centers functionality prevents auto onboarding of new on-premises management centers from your Cisco Security Cloud to this Security Cloud Control tenant.

Only a Super Admin or Admin user on Security Cloud Control can enable or disable this functionality.

Procedure

Step 1

In the left pane, click Administration > General Settings

Step 2

In the General Settings screen, click the Auto onboard On-Prem FMCs with Cisco Security Cloud toggle button to disable the auto onboarding of on-premises management center functionality.

Step 3

Click Confirm.


Onboard an On-Premises Firewall Management Center to Security Cloud Control with Credentials

To onboard an on-premises management center to Security Cloud Control with credentials, follow this procedure:

Before you begin

The following prerequisites must be met:

  • For Cloud Secure Device Connector (SDC): Allow inbound traffic on port 443 of the on-premises management center.

    The SDC reaches the on-premises management center by allowing inbound traffic on port 443.

    Both the Security Cloud Control and the SDC are hosted in the cloud.

  • For On-Premises Secure Device Connector (SDC): Allow outbound connectivity on port 443 of the SDC.

    The SDC requires connectivity to the Security Cloud Control, making it imperative to permit outbound traffic from the SDC to the Security Cloud Control. No additonal port configuration required on the on-premises FMC.

Procedure

Step 1

In the left pane, click Administration > General Settings.

Step 2

Click to onboard an on-premises management center.

Step 3

Click Firewall Management Center.

Step 4

Select the Use Credentials card.

Step 5

Click the Secure Device Connector button and select an SDC installed in your network. If you would rather not use an SDC, Security Cloud Control can connect to your on-premises management center using the Cloud Connector. Your choice depends on how you connect Security Cloud Control to your managed devices.

Figure 5. Choose a Secure Device Connector

choose from list of secure device connectors

Step 6

Enter the device name and location. Click Next.

Step 7

Enter the Username and Password of the account credentials you want to use to access the on-premises management center. Click Next.

Step 8

The device is onboarded. From here you can opt to add labels to your on-premises management center, or click Go to Services to view the page of onboarded devices. If healthy, the FMC is displayed with a Synced status.

Note


Note that the devices managed by the on-premises management center are automatically named as "<fmcname>_<manageddevicename>."


Redirect Security Cloud Control to an On-Premises Firewall Management Center

After you have onboarded an On-Premises Management Center to Security Cloud Control, you must update the management interface's hostname in the On-Premises Management Center UI to contain the FQDN. If you do not, you cannot cross-launch from Security Cloud Control.

Use the following procedure to update the management interface hostname and redirect from Security Cloud Control to the On-Premises Management Center:

Procedure

Step 1

Log into the On-Premises Management Center UI.

Step 2

Navigate to System > Configuration.

Step 3

Select the Management Interfaces tab.

Step 4

Expand the Shared Settings header and click the edit icon.

Step 5

Locate the Hostname field and enter the FMC's FQDN.

Step 6

Save changes.

Note: You may have to log out of Security Cloud Control before you can click Manage Devices in Firepower Management Center and cross-launch to the On-Premises Management Center UI.


Remove an On-Premises Firewall Management Center from Security Cloud Control

If you choose to remove an on-premises management center from Security Cloud Control, all devices by that on-premises management center will also be removed.

Before you begin

Disable the auto-onboarding option to remove one or more on-premises management centers onboarded using auto-onboarding functionality.
  1. In the left pane, choose Settings > General Settings.

  2. In the Tenant Settings section, disable Auto onboard On-Prem FMCs integrated to Cisco Security Cloud.

Procedure


Step 1

In the left pane, click Administration > Integrations > Firewall Management Center.

Step 2

Ensure the FMC tab is selected and choose the on-premises management center you want to remove.

Step 3

In the Device Actions pane located to the right, click Remove On-Prem FMC and its managed devices.

Step 4

Click OK to confirm that you want to remove the on-premises management center and its managed devices from your tenant.

Step 5

Refresh your browser to see an updated list of available devices.